


第一章——Spring入门
核心
依赖注入(DI)
Maven坐标
Maven工程属性
Maven依赖
Maven插件
Maven坐标
<groupId>com.youkeda.course</groupId>
<artifactId>app</artifactId>
<packaging>jar</packaging>
<version>1.0-SNAPSHOT</version>
groupId
类似于一个文件夹
artifactId
类似于一个文件夹名
packaging
把整个工程打包成packagin指定的文件格式
version
对应着版本号
版本号规范
SNAPSHOT表示当前程序还处于不稳定的阶段,随时可以再修改
RELEASE代表的是稳定,一般正式发布的时候,就会把version改为 RELEASE
三位版本号
第一位代表的是主版本号
第二位代表的是新增功能(数字是几就代表有了几次新增功能的行为)
第三位代表的是bugfix的版本(代表修复bug的次数)
Maven属性配置
<properties>
<java.version>1.8</java.version><maven.compiler.source>${java.version}</maven.compiler.source>
<project.build.sourceEncoding>UTF-8</project.build.sourceEncoding>
<maven.compiler.target>${java.version}</maven.compiler.target>
</properties>
java.version
代表设置一个参数
maven.compiler.source
指定Maven编译时候源代码的JDK版本
project.build.sourceEncoding
指定的是工程代码源文件的文件编码格式,一般都设置为 UTF-8
maven.compiler.target
表示按这个值来进行编译源代码(上面的代表是版本,这个是具体的,例如:JDK1.8)
中间仓库
Maven存放所有的jar的地方
原网站部署在国外,在国内访问不到,用国内的镜像替代
阿里云的镜像服务器:https://developer.aliyun.com/mvn/search
间接依赖
如果一个remote工程依赖了okhttp库,而当前工程 locale依赖了 remote工程,这个时候 locale 工程也会自动依赖了okhttp
插件体系plugins
使得Maven这个工具变得高度可定制,可以无缝的支撑工程化能力
<build>
<plugins>
<plugin>
<groupId>org.apache.maven.plugins</groupId>
<artifactId>maven-compiler-plugin</artifactId>
<version>3.8.1</version>
</plugin>
</plugins>
</build>
这里声明了一个 maven-compiler-plugin插件用于执行maven compile。
Hello Spring
Spring强调的是面向接口编程
packagecom.youkeda;
importorg.springframework.context.ApplicationContext;
importorg.springframework.context.annotation.AnnotationConfigApplicationContext;
importorg.springframework.context.annotation.ComponentScan;
importcom.youkeda.service.MessageService;
/**
* Application
*/
@ComponentScan
publicclassApplication {
publicstaticvoidmain(String[] args) {
ApplicationContextcontext=newAnnotationConfigApplicationContext(Application.class);
MessageServicemsgService=context.getBean(MessageService.class);
System.out.println(msgService.getMessage());
}
}
上下对比一下即可看出,使用Spring不需要关心实现类、如何实例化实现类,直接获取接口就可以
第二章——Spring依赖注入
Java注解
注解能够再编译、运行阶段读取,注解(Annotation)本身也是一个类
Target
用于设定该注解得目标范围,比如说可以作用于类或者方法等。
ElementTyoe.TYPE
可以作用于类、接口类、枚举类上
@Service
publicclassMessageServiceImplimplementsMessageService{
publicStringgetMessage() {
return"Hello World!";
}
}
ElementType.FIELD
可以作用于类得属性上
publicclassMessageServiceImplimplementsMessageService{
@Autowired
privateWorkspaceServiceworkspaceService;
}
ElementType.METHOD
可以作用于类得方法上
publicclassMessageServiceImplimplementsMessageService{
@ResponseBody
publicStringgetMessage() {
return"Hello World!";
}
}
ElementType.PARAMETER
可以作用于类的参数
publicclassMessageServiceImplimplementsMessageService{
publicStringgetMessage(@RequestParam("msg")Stringmsg) {
return"Hello "+msg;
}
}
如果想同时作用于类和方法上:
@Target({ElementType.TYPE,ElementType.METHOD})
Retention
用于声明该注解的生命周期
SOURCE:纯注释作用
CLASS:在编译阶段是有效的
RUNTIME:在运行时有效
Documented
将注解中的元素包含到JavaDoc文档中,一般都会添加这个注解
@interface
声明当前的Java类型是Annotation
Annotation
String value() default "";
有点像类的属性一样,约定了属性的类型和属性名称(默认是value,在引用的时候可以省略),default代表的是默认值。
value是默认属性名称可以缩写
import org.springframework.stereotype.Service;
@Service(value="Demo")
public class Demo {
}
等同于
import org.springframework.stereotype.Service;
@Service("Demo")
public class Demo {
}
静态代码块
有时候,为了让系统能够自动执行一些代码,可以采用静态代码块的方式
public class Hello {
static {
Song song = new Song();
... ...
... ...
}
... ...
}
没有参数也没有返回值,当系统加载这个类的时候,会自动执行静态代码块中的代码,无论被new多少次,静态代码块都只执行一次。
Spring Bean(上)
Ioc(控制反转)容器是Spring框架最核心的组件
所有的Java对象都会通过IoC容器转变为Bean(Spring对象的一种称呼)
基本上所有的Bean都是由接口+实现类完成的,用户想要获取Bean的实例直接从IoC容器获取就可以了,不需要关心实现类
一种是基于XML、一种是基于Annotation方案,目前主流是Annotation
启动IoC容器的代码:
ApplicationContext context =
new AnnotationConfigApplicationContext("fm.douban");
会自动加载包fm.douban下的所有Bean
AnnotationConfigApplicationContext这个类的构造函数有两种
根据包名实例化(AnnotationConfigApplicationContext("fm.douban"))
根据自定义包扫描行为实例化
(AnnotationConfigApplicationContext(Class clazz))
官方声明的Spring Bean注解:
org.springframework.stereotype.Service(通用)
org.springframework.stereotype.Component(Service)
org.springframework.stereotype.Controller(Web)
org.springframework.stereotype.Repository(持久化)
Spring Bean(下)
前一步是容器启动,后一步就是依赖注入
@Autowired
private SongService songService;
@Service和 @Autowired是相辅相成的,如果没有加 @Service,就意味着没有标记成Spring Bean,那么即使加了 @Autowired也无法注入实例
Spring Resource(上)
用于Spring的读文件、写文件区域
Resource内的文件是无法通过正常的读文件读取的,因为在Maven执行package的时候,会把resources目录下的文件一起打包进jar包里
classpath
classpath指定的文件不能解析成File对象,但是可以解析成InputStream,我们可以借助Java IO就可以读出来了
classpath的根目录是从 /开始代表的是 src/main/java或者 src/main/resources目录
读文件依赖
<dependency>
<groupId>commons-io</groupId>
<artifactId>commons-io</artifactId>
<version>2.6</version>
</dependency>
public class Test {
public static void main(String[] args) {
// 读取 classpath 的内容
InputStream in = Test.class.getClassLoader().getResourceAsStream("data.json");
// 使用 commons-io 库读取文本
try {
String content = IOUtils.toString(in, "utf-8");
System.out.println(content);
} catch (IOException e) {
// IOUtils.toString 有可能会抛出异常,需要我们捕获一下
e.printStackTrace();
}
}
}
从Java运行的类加载器实例中查找文件,Test.class指的当前的Test.java编译后的Java class文件。是一种固定的写法
Spring Resource(下)
作用
在Spring种通过 org.springframework.core.io.ResourceLoader服务来提供任意文件的读写,你可以在任意的Spring Bean中引入 ResourceLoader
@Autowired
private ResourceLoader loader;
接口
public interface FileService {
String getContent(String name);
}
实现类
import fm.douban.service.FileService;
import org.apache.commons.io.IOUtils;
import org.springframework.beans.factory.annotation.Autowired;
import org.springframework.core.io.Resource;
import org.springframework.core.io.ResourceLoader;
import org.springframework.stereotype.Service;
import java.io.IOException;
import java.io.InputStream;
@Service
public class FileServiceImpl implements FileService {
@Autowired
private ResourceLoader loader;
@Override
public String getContent(String name) {
try {
InputStream in = loader.getResource(name).getInputStream();
return IOUtils.toString(in,"utf-8");
} catch (IOException e) {
return null;
}
}
}
服务调用
FileService fileService = context.getBean(FileService.class);
String content = fileService.getContent("classpath:data/urls.txt");
System.out.println(content);
再次利用该代码读取本地文件
String content2 = fileService.getContent("file:mywork/readme.md");
System.out.println(content2);
file:mywork/readme.md代表的就是读取工程目录下文件 mywork/readme.md
还可以读取远程文件
String content2 = fileService.getContent("https://www.zhihu.com/question/34786516/answer/822686390");
System.out.println(content2);
总结
把本地文件、classpath文件、远程文件都封装成Resource对象来统一加载。
Spring bean的生命周期(Lifecycle)
init方法,可以是任意名称,主要是注解,代表该方法在Spring Bean启动后自动执行
import javax.annotation.PostConstruct;
@Service
public class SubjectServiceImpl implements SubjectService {
@PostConstruct
public void init(){
System.out.println("启动啦");
}
}
Spring MVC
面向服务的框架Sping Boot
Spirng Controller
三个核心点:
Bean的配置:Controller注解运用
网络资源的加载:加载网页
网址路由的配置:RequestMapping注解运用
Controller注解
import org.springframework.stereotype.Controller;
@Controller
public class HelloControl {
}
加载网页
RequestMapping注解
对于Web服务器来说,必须要实现的一个能力就是解析URL,并提供资源内容给调用者。这个过程我们一般称为路由
import org.springframework.stereotype.Controller;
import org.springframework.web.bind.annotation.RequestMapping;
@Controller
public class HelloControl {
@RequestMapping("/hello")
public String say(){
return "html/hello.html";
}
}
Get Request(一)
平常我们浏览网站、看视频、看图片用的都是get协议
获取Http URL参数
@RequestMapping("/songlist")
public String index( @RequestParam("listId") String id){
return "html/songList.html";
}
https://域名/songlist?ListId=xxxx
注意不是写的id,看的是括号内的名称
Get Request(二)
@GetMapping
import org.springframework.web.bind.annotation.*;
@GetMapping("/songlist")
public String index(@RequestParam("id") String id,@RequestParam("pageNum") int pageNum){
return "html/songList.html";
}
多个参数之间用 &进行分割
非必须传递参数
@GetMapping("/songlist")
public String index(@RequestParam(name="pageNum",required = false) int pageNum,@RequestParam("id") String id){
return "html/songList.html";
}
输出JSON数据
@GetMapping("/api/foos")
@ResponseBody
public String getFoos(@RequestParam("id") String id) {
return "ID: " + id;
}
第四章——Spring Template
Thymeleaf入门
模板用法
Maven依赖
<dependency>
<groupId>org.springframework.boot</groupId>
<artifactId>spring-boot-starter-thymeleaf</artifactId>
</dependency>
数据传递
引入Model对象,就可以通过这个Model对象传递到页面中
@Controller
public class SongListControl {
@Autowired
private SongListService songListService;
@RequestMapping("/songlist")
public String index(@RequestParam("id")String id,Model model){
SongList songList = songListService.get(id);
//传递歌单对象到模板当中
//第一个 songList 是模板中使用的变量名
// 第二个 songList 是当前的对象实例
model.addAttribute("songList",songList);
return "songList";
}
}
系统会自动匹配,所以不加后缀html也没关系
最后的文件内容
<!DOCTYPE html>
<html lang="en" xmlns:th="http://www.thymeleaf.org">
<head>
<meta charset="UTF-8" />
<meta name="viewport" content="width=device-width, initial-scale=1.0" />
<meta http-equiv="X-UA-Compatible" content="ie=edge" />
<link rel="stylesheet" href="/css/songList.css" />
<title>豆瓣歌单</title>
</head>
<body>
<h1 th:text="${songList.name}"></h1>
</body>
</html>
虽然其后缀也是html,但它其实不是HTML文件,而是thymeleaf模板
xmlns:th=" http://www.thymeleaf.org"的作用是,在写代码时,让软件能够识别thymeleaf语法
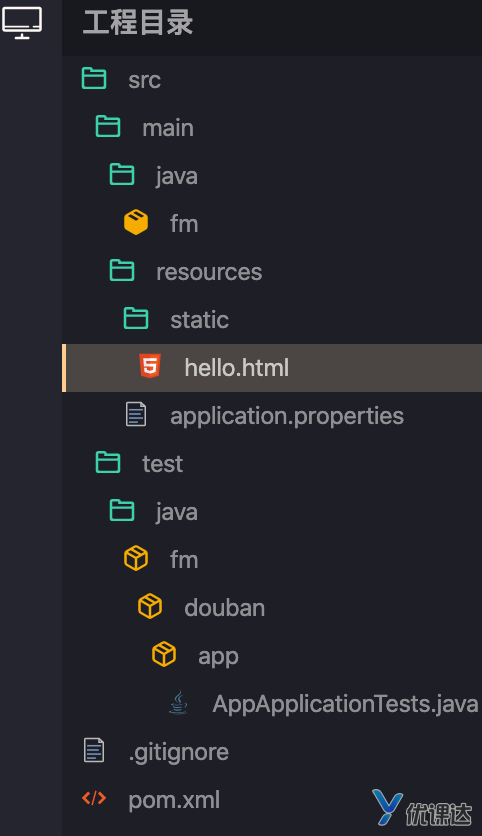
只有在工程的 src/main/resources/templates下面放置了文件,就表示需要使用Thymeleaf,这些文件是模板。放在 src/main/resources/static目录下的就不是模板,是静态文件
Thymeleaf变量
模板变量
th:text这个属性就是Thymeleaf自定义的HTML标签属性
会动态替换掉html标签的内部内容
对象变量
<!DOCTYPE html>
<html lang="en" xmlns:th="http://www.thymeleaf.org">
<head>
<meta charset="UTF-8" />
</head>
<body>
<span th:text="${sl.id}"></span>
<span th:text="${sl.name}"></span>
</body>
</html>
当传入是对象的时候,也可以通过 .来调用其属性
Thymeleaf循环语句
<ul th:each="song : ${songs}">
<li th:text="${song.name}">歌曲名称</li>
</ul>
打印列表的索引值
<ul th:each="song,it: ${songs}">
<li>
<span th:text="${it.count}"></span>
<span th:text="${song.name}"></span>
</li>
</ul>
it.index
返回对象的index,从0开始算
it.count
当前对象的index,从1开始算
it.size
获得列表长度
it.current
当前迭代变量
it.even/odd
布尔值,当前循环是偶数/奇数
it.first
布尔值,当前循环是否是第一个
it.last
布尔值,当前循环是否是最后一个
Thymeleaf表达式
<span th:text="'00:00/'+${totalTime}"></span>
利用 + 完成字符串拼接
字符串拼接优化
<span th:text="|00:00/${totalTime}|"></span>
数据转化
依赖
<dependency>
<groupId>org.thymeleaf.extras</groupId>
<artifactId>thymeleaf-extras-java8time</artifactId>
<version>3.0.4.RELEASE</version>
</dependency>
代码
<p th:text="${#dates.format(dateVar, 'yyyy-MM-dd')}"></p>
<p th:text="${#dates.format(dateVar, 'yyyy年MM月dd日')}"></p>
strings

内联表达式
将变量写在HTML中
<span>Hello [[${msg}]]</span>
th:text和 [[]]两种写法都可以,看个人习惯
Thymeleaf条件语句
<span th:if="${user.sex == 'male'}">男</span>
strings逻辑判断
isEmpty
${#strings.isEmpty(name)}
数组类
${#strings.arrayIsEmpty(name)}
集合类
${#strings.listIsEmpty(name)}
contains
${#strings.contains(name,'abc')}
第五章Spring Template进阶
Thymeleaf表单
@PostMapping的不同点在于只接收http method为post请求的数据
<!DOCTYPE html>
<html lang="en" xmlns:th="http://www.thymeleaf.org">
<head>
<meta charset="UTF-8" />
<meta name="viewport" content="width=device-width, initial-scale=1.0" />
<meta http-equiv="X-UA-Compatible" content="ie=edge" />
<title>添加书籍</title>
</head>
<body>
<h2>添加书籍</h2>
<form action="/book/save" method="POST">
<div>
<label>书的名称:</label>
<input type="text" name="name">
</div>
<div>
<label>书的作者:</label>
<input type="text" name="author">
</div>
<div>
<label>书的描述:</label>
<textarea name="desc"></textarea>
</div>
<div>
<label>书的编号:</label>
<input type="text" name="isbn">
</div>
<div>
<label>书的价格:</label>
<input type="text" name="price">
</div>
<div>
<label>书的封面:</label>
<input type="text" name="pictureUrl">
</div>
<div>
<button type="submit">注册</button>
</div>
</form>
</body>
</html>
除了form属性调整,还需要修改inpu的name属性,属性和Book类的属性名一致
Spring Validation(一)
JSR 380
JSR的意思是Java规范提案
Maven依赖
<dependency>
<groupId>jakarta.validation</groupId>
<artifactId>jakarta.validation-api</artifactId>
<version>2.0.1</version>
</dependency>
<dependency>
<groupId>org.springframework.boot</groupId>
<artifactId>spring-boot-starter-validation</artifactId>
</dependency>
Validation注解
@NotNull
不允许为null对象
@AssertTrue
是否为true
@Size
约定字符串的长度
@Min
字符串的最小长度
@Max
字符串的最大长度
@Email
是否是邮箱格式
@NotEmpty
不允许为null或者为空
@NotBlank
不允许为null和空格
package com.bookstore.model;
import javax.validation.constraints.*;
public class User {
@NotEmpty(message = "名称不能为 null")
private String name;
@Min(value = 18, message = "你的年龄必须大于等于18岁")
@Max(value = 150, message = "你的年龄必须小于等于150岁")
private int age;
@NotEmpty(message = "邮箱必须输入")
@Email(message = "邮箱不正确")
private String email;
// standard setters and getters
}
执行检验
package com.bookstore.control;
import com.bookstore.model.User;
import org.springframework.stereotype.Controller;
import org.springframework.validation.BindingResult;
import org.springframework.web.bind.annotation.GetMapping;
import org.springframework.web.bind.annotation.PostMapping;
import javax.validation.Valid;
@Controller
public class UserControl {
@GetMapping("/user/add.html")
public String addUser() {
return "user/addUser";
}
@PostMapping("/user/save")
public String saveUser(@Valid User user, BindingResult errors) {
if (errors.hasErrors()) {
// 如果校验不通过,返回用户编辑页面
return "user/addUser";
}
// 校验通过,返回成功页面
return "user/addUserSuccess";
}
}
第一个参数增加了注解@Valid,第二个参数是errors
Spring Validation(二)
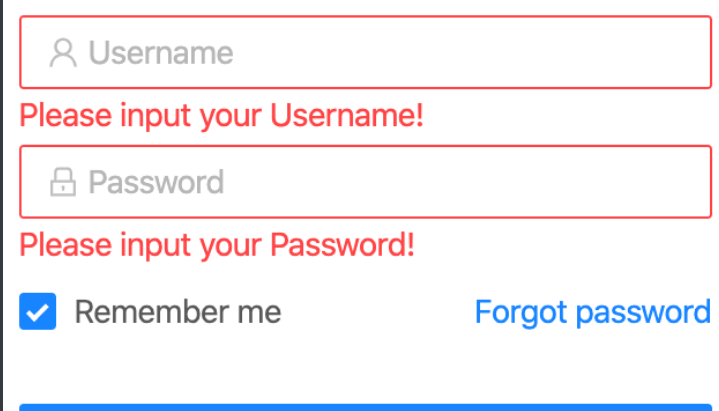
让错误的原因显现出来
th:object
可以用于替换对象,就不需要每次再次对象了,可以直接操作它的属性
<form action="/user/save" th:object="${user}" method="POST">
...
</form>
th:classappend
动态管理表单的样式
<div th:classappend="${#fields.hasErrors('name')} ? 'error' : ''">
</div>
如果错误信息里有name字段,上面的代码会生成
<div class="error">
</div>
th:errors
显示出错误信息,这个会自动取出错误信息来
<p th:if="${#fields.hasErrors('age')}" th:errors="*{age}"></p>
th:field
一般错误的时候,我们还希望显示上一次输入的内容
<div th:classappend="${#fields.hasErrors('age')} ? 'error' : ''">
<label>年龄:</label>
<input type="text" th:field="*{age}" />
<p th:if="${#fields.hasErrors('age')}" th:errors="*{age}"></p>
</div>
Thymeleaf布局(Layout)
解决模板复用的问题
使用 th:include + th:replace方案来完成布局的开发
<div class="container" th:include="::content">页面正文内容</div>
::content指的是选择器,指的就是加载当前页面的 th:fragment的值
th:replace="layout"
这个一旦声明后,也买你会被替换成layout的内容,这个“layout”指的是 templates/layout.html
th:fragment="content"
<div th:fragment="content">
</div>
<!DOCTYPE html>
<html lang="en" xmlns:th="http://www.thymeleaf.org"
th:replace="layout">
<div th:fragment="content">
<h2>用户列表</h2>
<div>
<a href="/user/add.html">添加用户</a>
</div>
<table>
<thead>
<tr>
<th>
用户名称
</th>
<th>
用户年龄
</th>
<th>
用户邮箱
</th>
</tr>
</thead>
<tbody>
<tr th:each="user : ${users}">
<td th:text="${user.name}"></td>
<td th:text="${user.age}"></td>
<td th:text="${user.email}"></td>
</tr>
</tbody>
</table>
</div>
</html>
第六章——Spring Boot入门
Spring Boot ComponentScan
fm.douban.service、fm.douban.service.impl不是 fm.douban.app的子包,所以不会自动扫描,也不会实例化 Bean
解决办法
@SpringBootApplication(scanBasePackages={"fm.douban.app", "fm.douban.service"})
public class AppApplication {
public static void main(String[] args) {
SpringApplication.run(AppApplication.class, args);
}
}
加一个参数,告知系统需要额外扫描的包
另一种写法
@ComponentScan({"fm.service", "fm.app"})
public class SpringConfiguration {
... ...
}
@RestController等同于使用 @Controller的类的方法上添加 @ResponseBody注解,效果是一样的。
Spring Boot Logger
日志系统的两大优势
可以轻松的控制日志是否输出
可以灵活的配置日志的细节,例如输出格式,自动附带输出日志发生的时间
1. 配置
在 src/main/resources/目录下,增加日志级别配置
logging.level.root=info
表示所有日志(root)都为 info级别
logging.level.fm.douban.app=info
表示 fm.douban.app包及其子包种的所有的类都输出 info级别的日志
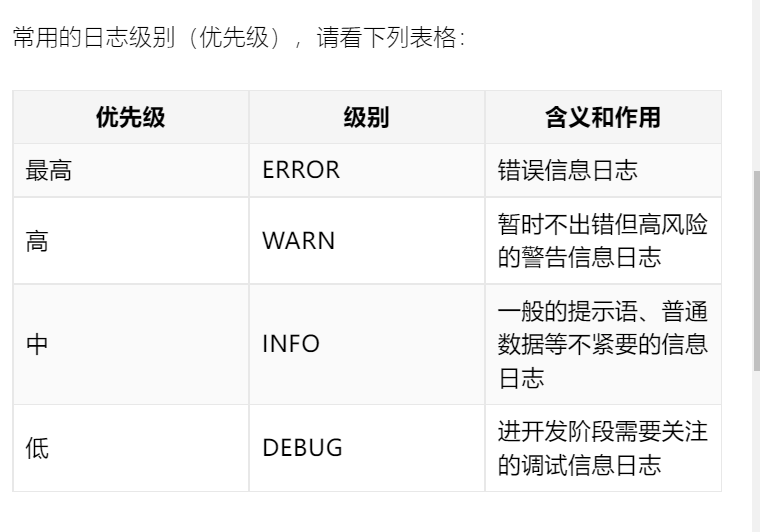
级别的作用
不会输出更低优先级的日志
2.编码
实例化对象
import org.slf4j.Logger;
import org.slf4j.LoggerFactory;
import org.springframework.web.bind.annotation.RestController;
import javax.annotation.PostConstruct;
@RestController
public class SongListControl {
private static final Logger LOG = LoggerFactory.getLogger(SongListControl.class);
@PostConstruct
public void init(){
LOG.info("SongListControl 启动啦");
}
}
写明当前的类,方便之后追踪日志是在哪里输出的
Spring Boot Properties
配置的主要作用,是把可变的内容从代码中剥离出来,在做到不修改代码的情况下,方便的修改这些可变的或常变得内容。这个过程称之为避免硬编码,做到解耦
自定义配置项
song.name=God is a girl
使用配置项
import org.springframework.beans.factory.annotation.Value;
public class SongListControl {
@Value("${song.name}")
private String songName;
}
只需要使用 @Value注解即可
第七章——Spring Session
Cookie
在客户端
读Cookie
import javax.servlet.http.Cookie;
import javax.servlet.http.HttpServletRequest;
@RequestMapping("/songlist")
public Map index(HttpServletRequest request) {
Map returnData = new HashMap();
returnData.put("result", "this is song list");
returnData.put("author", songAuthor);
Cookie[] cookies = request.getCookies();
returnData.put("cookies", cookies);
return returnData;
}
使用注解读取cookie
import org.springframework.web.bind.annotation.CookieValue;
@RequestMapping("/songlist")
public Map index(@CookieValue("JSESSIONID") String jSessionId) {
Map returnData = new HashMap();
returnData.put("result", "this is song list");
returnData.put("author", songAuthor);
returnData.put("JSESSIONID", jSessionId);
return returnData;
}
写Cookie
import javax.servlet.http.Cookie;
import javax.servlet.http.HttpServletResponse;
@RequestMapping("/songlist")
public Map index(HttpServletResponse response) {
Map returnData = new HashMap();
returnData.put("result", "this is song list");
returnData.put("name", songName);
Cookie cookie = new Cookie("sessionId","CookieTestInfo");
// 设置的是 cookie 的域名,就是会在哪个域名下生成 cookie 值
cookie.setDomain("youkeda.com");
// 是 cookie 的路径,一般就是写到 / ,不会写其他路径的
cookie.setPath("/");
// 设置cookie 的最大存活时间,-1 代表随浏览器的有效期,也就是浏览器关闭掉,这个 cookie 就失效了。
cookie.setMaxAge(-1);
// 设置是否只能服务器修改,浏览器端不能修改,安全有保障
cookie.setHttpOnly(false);
response.addCookie(cookie);
returnData.put("message", "add cookie successful");
return returnData;
}
Spring Session API
不存放在客户端,而是存放在服务端,名字为JSESSIONID的cookie是专门用来记录用户session的
读操作
request.getSession()
session.getAttribute("userLoginInfo")
登录信息类
必须实现序列化接口 Serializable
import java.io.Serializable;
public class UserLoginInfo implements Serializable {
private String userId;
private String userName;
}
读操作
import javax.servlet.http.HttpServletRequest;
import javax.servlet.http.HttpServletResponse;
import javax.servlet.http.HttpSession;
@RequestMapping("/songlist")
public Map index(HttpServletRequest request, HttpServletResponse response) {
Map returnData = new HashMap();
returnData.put("result", "this is song list");
// 取得 HttpSession 对象
HttpSession session = request.getSession();
// 读取登录信息
UserLoginInfo userLoginInfo = (UserLoginInfo)session.getAttribute("userLoginInfo");
if (userLoginInfo == null) {
// 未登录
returnData.put("loginInfo", "not login");
} else {
// 已登录
returnData.put("loginInfo", "already login");
}
return returnData;
}
写操作
import javax.servlet.http.HttpServletRequest;
import javax.servlet.http.HttpServletResponse;
import javax.servlet.http.HttpSession;
@RequestMapping("/loginmock")
public Map loginMock(HttpServletRequest request, HttpServletResponse response) {
Map returnData = new HashMap();
// 假设对比用户名和密码成功
// 仅演示的登录信息对象
UserLoginInfo userLoginInfo = new UserLoginInfo();
userLoginInfo.setUserId("12334445576788");
userLoginInfo.setUserName("ZhangSan");
// 取得 HttpSession 对象
HttpSession session = request.getSession();
// 写入登录信息
session.setAttribute("userLoginInfo", userLoginInfo);
returnData.put("message", "login successful");
return returnData;
}
知识点 Cookie放在客户端,一般不能超过 4kb,而 Session存放在服务器端,没有限制
Spring Session 配置
import org.springframework.context.annotation.Bean;
import org.springframework.context.annotation.Configuration;
@Configuration
public class SpringHttpSessionConfig {
@Bean
public TestBean testBean() {
return new TestBean();
}
}
@Configuration注解,表示这是一个配置类,系统会自动扫描并处理
在方法上添加 @Bean驻俄界,表示把此方法返回的对象实例注册成 Bean
Session配置
依赖
<!-- spring session 支持 -->
<dependency>
<groupId>org.springframework.session</groupId>
<artifactId>spring-session-core</artifactId>
</dependency>
配置类
在类上额外加一个注解 @EnableSpringHttpSession,开启 session。然后,注册两个 bean:
CookieSerializer:读写Cookies中的SessionId信息
MapSessionRepository:Session信息在服务器上的存储仓库
import org.springframework.session.MapSessionRepository;
import org.springframework.session.config.annotation.web.http.EnableSpringHttpSession;
import org.springframework.session.web.http.CookieSerializer;
import org.springframework.session.web.http.DefaultCookieSerializer;
import java.util.concurrent.ConcurrentHashMap;
@Configuration
@EnableSpringHttpSession
public class SpringHttpSessionConfig {
@Bean
public CookieSerializer cookieSerializer() {
DefaultCookieSerializer serializer = new DefaultCookieSerializer();
serializer.setCookieName("JSESSIONID");
// 用正则表达式配置匹配的域名,可以兼容 localhost、127.0.0.1 等各种场景
serializer.setDomainNamePattern("^.+?\\.(\\w+\\.[a-z]+)$");
serializer.setCookiePath("/");
serializer.setUseHttpOnlyCookie(false);
// 最大生命周期的单位是秒
serializer.setCookieMaxAge(24 * 60 * 60);
return serializer;
}
// 当前存在内存中
@Bean
public MapSessionRepository sessionRepository() {
return new MapSessionRepository(new ConcurrentHashMap<>());
}
}
Spring Request 拦截器
创建拦截器
必须实现 HandlerInterceptor接口
import javax.servlet.http.HttpServletRequest;
import javax.servlet.http.HttpServletResponse;
import org.springframework.web.servlet.HandlerInterceptor;
import org.springframework.web.servlet.ModelAndView;
public class InterceptorDemo implements HandlerInterceptor {
// Controller方法执行之前
@Override
public boolean preHandle(HttpServletRequest request, HttpServletResponse response, Object handler) throws Exception {
// 只有返回true才会继续向下执行,返回false取消当前请求
return true;
}
//Controller方法执行之后
@Override
public void postHandle(HttpServletRequest request, HttpServletResponse response, Object handler,
ModelAndView modelAndView) throws Exception {
}
// 整个请求完成后(包括Thymeleaf渲染完毕)
@Override
public void afterCompletion(HttpServletRequest request, HttpServletResponse response, Object handler, Exception ex) throws Exception {
}
}
preHandle() 方法的参数中有 HttpServletRequest和 HttpServletResponse,可以像 control一样使用 Session
实现WebMvcConfigurer
创建一个类实现 WebMvcConfigurer,并实现 addInterceptors()方法。用于管理拦截器
import org.springframework.context.annotation.Configuration;
import org.springframework.web.servlet.config.annotation.InterceptorRegistry;
import org.springframework.web.servlet.config.annotation.WebMvcConfigurer;
@Configuration
public class WebAppConfigurerDemo implements WebMvcConfigurer {
@Override
public void addInterceptors(InterceptorRegistry registry) {
// 多个拦截器组成一个拦截器链
// 仅演示,设置所有 url 都拦截
registry.addInterceptor(new UserInterceptor()).addPathPatterns("/**");
}
}
addPathPatterns("/**")表示拦截所有的URL,可以用 `excludePathPatterns() 方法排除某些 `URL
第八章——Spring Data入门
MongoDB配置
依赖
<dependency>
<groupId>org.springframework.boot</groupId>
<artifactId>spring-boot-starter-data-mongodb</artifactId>
</dependency>
配置
# 购买的云服务器的公网 IP
spring.data.mongodb.host=192.168.0.1
# MongoDB 服务的端口号
spring.data.mongodb.port=27017
# 创建的数据库及用户名和密码
spring.data.mongodb.database=practice
Spring Data CRUD
新增数据
import org.springframework.data.mongodb.core.MongoTemplate;
@Autowired
private MongoTemplate mongoTemplate;
public void test() {
Song song = new Song();
song.setSubjectId("s001");
song.setLyrics("...");
song.setName("成都");
mongoTemplate.insert(song);
}
查询数据
mongoTemplate.findById(songId, Song.class)
修改数据
// 修改 id=1 的数据
Query query = new Query(Criteria.where("id").is("1"));
// 把歌名修改为 “new name”
Update updateData = new Update();
updateData.set("name", "new name");
// 执行修改,修改返回结果的是一个对象
UpdateResult result = mongoTemplate.updateFirst(query, updateData, Song.class);
// 修改的记录数大于 0 ,表示修改成功
System.out.println("修改的数据记录数量:" + result.getModifiedCount());
删除数据
Song song = new Song();
song.setId(songId);
// 执行删除
DeleteResult result = mongoTemplate.remove(song);
// 删除的记录数大于 0 ,表示删除成功
System.out.println("删除的数据记录数量:" + result.getDeletedCount());
Spring Data Query
上面是主键查询,现在的是多条件查询
import org.springframework.data.mongodb.core.query.Query;
import org.springframework.data.mongodb.core.query.Criteria;
public List<Song> list(Song songParam) {
// 总条件
Criteria criteria = new Criteria();
// 可能有多个子条件
List<Criteria> subCris = new ArrayList();
if (StringUtils.hasText(songParam.getName())) {
subCris.add(Criteria.where("name").is(songParam.getName()));
}
if (StringUtils.hasText(songParam.getLyrics())) {
subCris.add(Criteria.where("lyrics").is(songParam.getLyrics()));
}
if (StringUtils.hasText(songParam.getSubjectId())) {
subCris.add(Criteria.where("subjectId").is(songParam.getSubjectId()));
}
// 必须至少有一个查询条件
if (subCris.isEmpty()) {
LOG.error("input song query param is not correct.");
return null;
}
// 三个子条件以 and 关键词连接成总条件对象,相当于 name='' and lyrics='' and subjectId=''
criteria.andOperator(subCris.toArray(new Criteria[]{}));
// 条件对象构建查询对象
Query query = new Query(criteria);
// 仅演示:由于很多同学都在运行演示程序,所以需要限定输出,以免查询数据量太大
query.limit(10);
List<Song> songs = mongoTemplate.find(query, Song.class);
return songs;
}
Spring Data分页
构建
构建分页条件对象
Pageable pageable = PageRequest.of(0 , 20);
query.with(pageable);
第一个参数是页码,第二个参数是每页的数量
还需要查询总数,才能进一步计算出总共多少页,实现完整的分页功能
调用count(query, XXX.class)查询总数,第一个是查询条件,第二个参数表示查询什么样的对象
根据结果、分页条件、总数三个数据,构建分页器对象
importorg.springframework.data.domain.Page;
importorg.springframework.data.repository.support.PageableExecutionUtils;
// 总数
longcount=mongoTemplate.count(query, Song.class);
// 构建分页器
Page<Song>pageResult=PageableExecutionUtils.getPage(songs, pageable, newLongSupplier() {
@Override
publiclonggetAsLong() {
returncount;
}
});
注意对应的返回值应该重构为 Page<Song>表示返回分页结果对象
使用
Page<Song>songResult=songService.list(queryParam);
List<Song>songs=songResult.getContent();


 167
167


 被折叠的 条评论
为什么被折叠?
被折叠的 条评论
为什么被折叠?
 到【灌水乐园】发言


