


手机屏幕是块长方形区域,较短的那条边叫作宽,较长的那条边叫作高。App控件通常也是长方形状, 控件宽度通过属性android:layout_width表达,控件高度通过属性android:layout_height表达,宽高的 取值主要有下列3种:
(1)match_parent:表示与上级视图保持一致。上级视图的尺寸有多大,当前视图的尺寸就有多大。
(2)wrap_content:表示与内容自适应。对于文本视图来说,内部文字需要多大的显示空间,当前视 图就要占据多大的尺寸。但最宽不能超过上级视图的宽度,一旦超过就要换行;最高不能超过上级视图 的高度,一旦超过就会隐藏。
(3)以dp为单位的具体尺寸,比如300dp,表示宽度或者高度就是这么大。 在XML文件中采用以上任一方式均可设置视图的宽高,但在Java代码中设置宽高就有点复杂了,首先确 保XML中的宽高属性值为wrap_content,这样才允许在代码中修改宽高。接着打开该页面对应的Java代码,依序执行以下3个步骤:
步骤一,调用控件对象的getLayoutParams方法,获取该控件的布局参数,参数类型为ViewGroup.LayoutParams。
步骤二,布局参数的width属性表示宽度,height属性表示高度,修改这两个属性值,即可调整控件的宽 高。
步骤三,调用控件对象的setLayoutParams方法,填入修改后的布局参数使之生效。 不过布局参数的width和height两个数值默认是px单位,需要将dp单位的数值转换为px单位的数值,然 后才能赋值给width属性和height属性。下面是把dp大小转为px大小的方法代码:
// 根据手机的分辨率从 dp 的单位 转成为 px(像素)

public static int dip2px(Context context, float dpValue) {
    // 获取当前手机的像素密度(1个dp对应几个px)

    float scale = context.getResources().getDisplayMetrics().density;
    return (int) (dpValue * scale + 0.5f); // 四舍五入取整

}
* 完整代码见下文
有了上面定义的公共方法dip2px,就能将某个dp数值转换成px数值,比如准备把文本视图的宽度改为300dp,那么调整宽度的Java代码示例如下:
// 获取名为tv_code的文本视图

TextView tv_code = findViewById(R.id.tv_code);

// 获取tv_code的布局参数(含宽度和高度)

ViewGroup.LayoutParams params = tv_code.getLayoutParams();

// 修改布局参数中的宽度数值,注意默认px单位,需要把dp数值转成px数值

params.width = Utils.dip2px(this, 300);

tv_code.setLayoutParams(params);  // 设置tv_code的布局参数
* 完整代码见下文
接下来通过演示页面并观察几种尺寸设置方式的界面效果,主要通过背景色区分当前视图的宽高范围, 详细的XML文件内容如下所示:
<LinearLayout xmlns:android="http://schemas.android.com/apk/res/android"

    android:layout_width="match_parent"

    android:layout_height="match_parent"

    android:orientation="vertical">

    <TextView

        android:layout_width="wrap_content"

        android:layout_height="wrap_content"

        android:layout_marginTop="5dp"

        android:background="#00ffff"

        android:text="视图宽度采用wrap_content定义"

        android:textColor="#000000"

        android:textSize="17sp" />

    <TextView

        android:layout_width="match_parent"

        android:layout_height="wrap_content"

        android:layout_marginTop="5dp"

        android:background="#00ffff"

        android:text="视图宽度采用match_parent定义"

        android:textColor="#000000"

        android:textSize="17sp" />

    <TextView

        android:layout_width="300dp"

        android:layout_height="wrap_content"

        android:layout_marginTop="5dp"

        android:background="#00ffff"

        android:text="视图宽度采用固定大小"

        android:textColor="#000000"

        android:textSize="17sp" />

    <TextView

        android:id="@+id/tv_code"

        android:layout_width="wrap_content"

        android:layout_height="wrap_content"

        android:layout_marginTop="5dp"

        android:background="#00ffff"

        android:text="通过代码指定视图宽度"

        android:textColor="#000000"

        android:textSize="17sp" />
</LinearLayout>
* 完整代码见下文
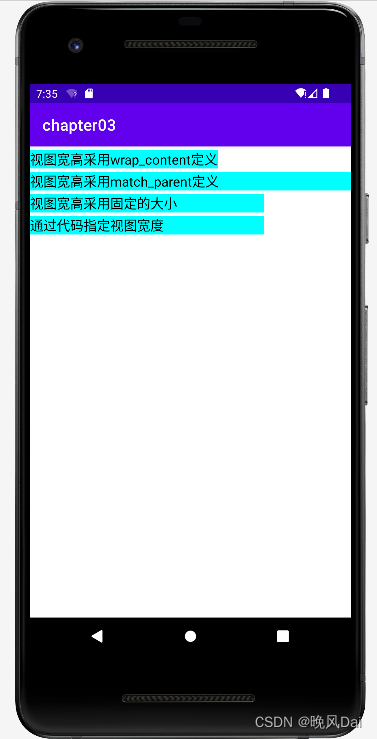
运行测试App,打开演示界面如下图所示,依据背景色判断文本视图的边界,可见wrap_content方式 刚好包住了文本内容,match_parent方式扩展到了与屏幕等宽,而300dp的宽度介于前两者之间(安卓 手机的屏幕宽度基本为360dp)。

=============================我是分割线================================
完整代码:
src\main\res\layout\activity_view_border.xml
<LinearLayout xmlns:android="http://schemas.android.com/apk/res/android"
    android:layout_width="match_parent"
    android:layout_height="match_parent"
    android:orientation="vertical">

    <TextView
        android:layout_width="wrap_content"
        android:layout_height="wrap_content"
        android:layout_marginTop="5dp"
        android:text="视图宽高采用wrap_content定义"
        android:textColor="#000000"
        android:background="#00ffff"
        android:textSize="17sp"/>
    <TextView
        android:layout_width="match_parent"
        android:layout_height="wrap_content"
        android:layout_marginTop="5dp"
        android:text="视图宽高采用match_parent定义"
        android:textColor="#000000"
        android:background="#00ffff"
        android:textSize="17sp"/>
    <TextView
        android:layout_width="300dp"
        android:layout_height="wrap_content"
        android:layout_marginTop="5dp"
        android:text="视图宽高采用固定的大小"
        android:textColor="#000000"
        android:background="#00ffff"
        android:textSize="17sp"/>
    <TextView
        android:id="@+id/tv_code"
        android:layout_width="wrap_content"
        android:layout_height="wrap_content"
        android:layout_marginTop="5dp"
        android:text="通过代码指定视图宽度"
        android:textColor="#000000"
        android:background="#00ffff"
        android:textSize="17sp"/>
</LinearLayout>
src\main\java\com\example\chapter03\ViewBorderActivity.java
package com.example.chapter03;

import androidx.appcompat.app.AppCompatActivity;

import android.os.Bundle;
import android.view.ViewGroup;
import android.widget.TextView;

import com.example.chapter03.util.Utils;

public class TextBorderActivity extends AppCompatActivity {

    @Override
    protected void onCreate(Bundle savedInstanceState) {
        super.onCreate(savedInstanceState);
        setContentView(R.layout.activity_text_border);
        TextView tv_code = findViewById(R.id.tv_code);
        // 获取tv_code的布局参数(含宽度和高度)
        ViewGroup.LayoutParams params = tv_code.getLayoutParams();
        // 修改布局参数中的宽度数值,注意默认px单位,需要把dp数值转成px数值
        params.width = Utils.dip2px(this,300);
        tv_code.setLayoutParams(params);
    }
}
src\main\java\com\example\chapter03\util\Utils.java
package com.example.chapter03.util;

import android.content.Context;

public class Utils {

    //根据手机的分辨率从dp的单位转成px(像素)
    public static int dip2px(Context context,float dpValue){
        //获取当前手机的像素密度(1个dp对应几个px)
        float scale = context.getResources().getDisplayMetrics().density;
        //四舍五入取整
        return (int) (dpValue * scale + 0.5f);
    }
}
下面我们看看运行效果
注意:清单文件记得修改(AndroidManifest.xml)
感谢观看!!!


 549
549


 被折叠的 条评论
为什么被折叠?
被折叠的 条评论
为什么被折叠?
 到【灌水乐园】发言


