


实验目标:
1.在第一次作业的基础上,为列表的每一项添加信息
2.实现点击列表中的内容进行跳转,并显示新的内容
3.计划完成一个简单的音乐播放器,点击歌名跳转到播放器并播放歌曲
技术说明:
1.RecyclerView技术:
该技术主要是为了实现界面的跳转功能
2.Service技术:
该技术主要是为了实现歌曲播放的功能
实现思路:
1.实现界面跳转并展示新的内容
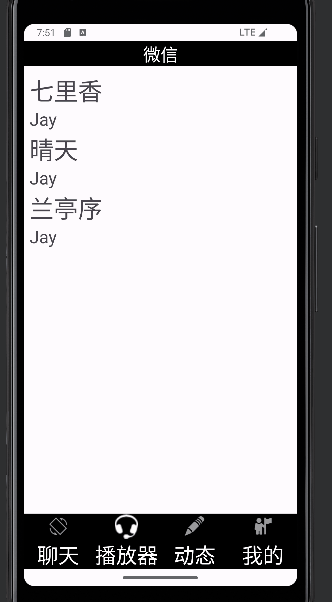
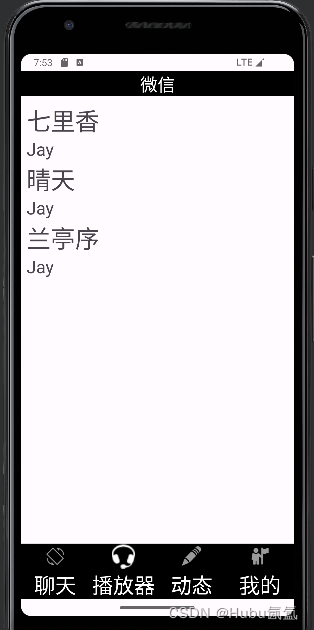
首先需要重新定义item.xml,为添加了recycrview控件的界面列表格式化列表项的展示,我这里是为了实现音乐播放器,所以每一项就用来歌名--歌手的形式
其次,需要重新编写Myadapter适配器,使其能够正确显示跳转后的内容
2.实现播放音乐
通过Myservice方法,实现音乐播放功能
新增和需要修改的文件(第一次作业的基础上):
java文件说明:
1.在第一次实验的基础上,需要修改的是tab2,其余可保持不动
2.新增了Activity2、MyService和SongAdapter文件,其中MyService是为了实现音乐的播放功能,SongAdapter是为了实现跳转功能
layout文件说明:
1.在第一次实验基础上,需要修改的是tab2.xml和item.xml,对item.xml我是新建了一个item_song.xml
2.新增了activity_2.xml,这个界面设置的音乐跳转播放器的展示效果
raw文件:
音乐mp3需要放在raw文件下,没有需要新建一个
实现过程:
1.item_song.xml
这个设计的比较简单,只显示歌曲名称和歌手名,所以使用两个textview控件并用LinearLaout布局
<?xml version="1.0" encoding="utf-8"?>
<LinearLayout xmlns:android="http://schemas.android.com/apk/res/android"
    android:layout_width="match_parent"
    android:layout_height="wrap_content"
    android:orientation="vertical">

    <TextView
        android:id="@+id/textView_songname"
        android:layout_width="match_parent"
        android:layout_height="wrap_content"
        android:layout_weight="1"
        android:text="TextView"
        android:textSize="35sp" />

    <TextView
        android:id="@+id/textView_songer"
        android:layout_width="match_parent"
        android:layout_height="wrap_content"
        android:text="TextView"
        android:textSize="25sp" />

</LinearLayout>
2.tab2.xml
仅仅是将里面的控件修改成了recyclerview控件
<?xml version="1.0" encoding="utf-8"?>
<androidx.constraintlayout.widget.ConstraintLayout xmlns:android="http://schemas.android.com/apk/res/android"
    xmlns:app="http://schemas.android.com/apk/res-auto"
    xmlns:tools="http://schemas.android.com/tools"
    android:id="@+id/frameLayout2"
    android:layout_width="match_parent"
    android:layout_height="match_parent"
    android:orientation="vertical"
    tools:context=".tab2">

    <androidx.recyclerview.widget.RecyclerView
        android:id="@+id/recyclerview2"
        android:layout_width="match_parent"
        android:layout_height="match_parent"
        android:layout_marginStart="8dp"
        android:layout_marginTop="8dp"
        android:layout_marginEnd="8dp"
        android:layout_marginBottom="8dp"
        app:layout_constraintBottom_toBottomOf="parent"
        app:layout_constraintEnd_toEndOf="parent"
        app:layout_constraintStart_toStartOf="parent"
        app:layout_constraintTop_toTopOf="parent" />
</androidx.constraintlayout.widget.ConstraintLayout>
3.activity_2.xml
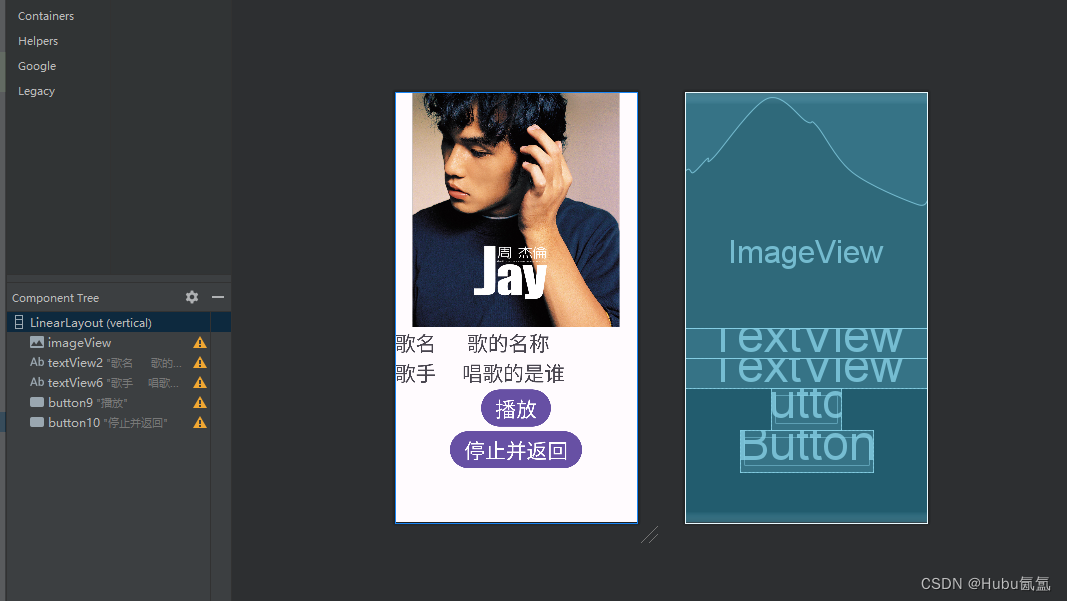
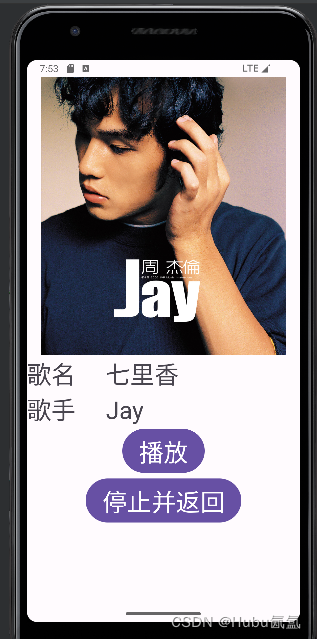
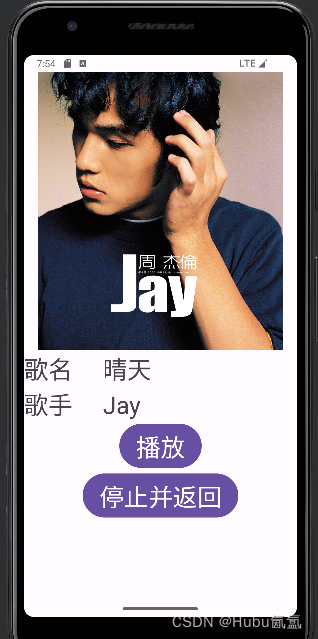
这里面是歌曲播放器的展示效果,使用了两个textview去显示歌曲名和歌手名,以及两个button控件实现歌曲的播放和停止功能,imageview里面放了一张我自己的图片,如果想自定义需要将图片放在drawable文件夹下
<?xml version="1.0" encoding="utf-8"?>
<LinearLayout xmlns:android="http://schemas.android.com/apk/res/android"
    xmlns:app="http://schemas.android.com/apk/res-auto"
    xmlns:tools="http://schemas.android.com/tools"
    android:layout_width="match_parent"
    android:layout_height="match_parent"
    android:orientation="vertical"
    tools:context=".Activity2">

  <ImageView
      android:id="@+id/imageView"
      android:layout_width="wrap_content"
      android:layout_height="400dp"

      android:src="@drawable/img" />

  <TextView
      android:id="@+id/textView2"
      android:layout_width="match_parent"
      android:layout_height="wrap_content"
      android:text="歌名      歌的名称"
      android:textSize="35sp" />

  <TextView
      android:id="@+id/textView6"
      android:layout_width="match_parent"
      android:layout_height="wrap_content"
      android:text="歌手     唱歌的是谁"
      android:textSize="35sp" />

  <Button
      android:id="@+id/button9"
      android:layout_width="wrap_content"
      android:layout_height="wrap_content"
      android:layout_gravity="center"
      android:text="播放"
      android:textSize="35sp" />

  <Button
      android:id="@+id/button10"
      android:layout_width="wrap_content"
      android:layout_height="wrap_content"
      android:layout_gravity="center"
      android:text="停止并返回"
      android:textSize="35sp" />
</LinearLayout>
效果展示:
4.tab2.java
在tab2中创建recyclerview实例,并创建和初始化适配器
import android.annotation.SuppressLint;
import android.content.Context;
import android.content.Intent;
import android.os.Bundle;

import androidx.fragment.app.Fragment;
import androidx.recyclerview.widget.LinearLayoutManager;
import androidx.recyclerview.widget.RecyclerView;

import android.view.LayoutInflater;
import android.view.View;
import android.view.ViewGroup;
import android.widget.Button;
import android.widget.ListView;

import java.util.ArrayList;
import java.util.List;

public class tab2 extends Fragment {
    Context context;
    RecyclerView recyclerView;
    List<String> songList;
    List<String> songerList;

    @SuppressLint("MissingInflatedId")
    @Override
    public View onCreateView(LayoutInflater inflater, ViewGroup container,
                             Bundle savedInstanceState) {

        View view = inflater.inflate(R.layout.tab2, container, false);

        recyclerView=view.findViewById(R.id.recyclerview2);

        // 创建一个歌单项的列表
        songList = new ArrayList<>();
        songList.add("七里香");
        songList.add("晴天");
        songList.add("兰亭序");

        songerList=new ArrayList<>();
        songerList.add("Jay");
        songerList.add("Jay");
        songerList.add("Jay");
        // ...

        // 创建自定义适配器
        SongAdapter adapter = new SongAdapter(getContext(), songList,songerList);
        // 设置适配器
        recyclerView.setLayoutManager(new LinearLayoutManager(getContext()));
        recyclerView.setAdapter(adapter);

       return view;
    }
}
5.songAdapter.java适配器
这里recycrview的点击功能,我是在Adapter里面直接对控件做点击事件,在onBindViewHolder中使用holder.控件.setOnClickListener()方法去实现点击控件执行事件
然后利用intent.putExtra()方法,将歌名和歌手传递到Activity2中
import android.content.Context;
import android.content.Intent;
import android.view.LayoutInflater;
import android.view.View;
import android.view.ViewGroup;
import android.widget.Button;
import android.widget.TextView;

import androidx.annotation.NonNull;
import androidx.recyclerview.widget.RecyclerView;

import java.util.List;

public class SongAdapter extends RecyclerView.Adapter<SongAdapter.SongViewHolder> {
    private List<String> songList;
    private List<String> songerList;

    public SongAdapter(Context context, List<String> songList,List<String> songerList) {
        this.songList = songList;
        this.songerList=songerList;
    }

    @NonNull
    @Override
    public SongViewHolder onCreateViewHolder(@NonNull ViewGroup parent, int viewType) {
        Context context = parent.getContext();
        LayoutInflater inflater = LayoutInflater.from(context);
        View view = inflater.inflate(R.layout.item_song, parent, false);
        return new SongViewHolder(view);
    }

    @Override
    public void onBindViewHolder(@NonNull SongViewHolder holder, int position) {
        String songName = songList.get(position);
        String songerName=songerList.get(position);
        holder.songTextView.setText(songName);
        holder.songerTextView.setText(songerName);

        holder.songTextView.setOnClickListener(new View.OnClickListener() {
            @Override
            public void onClick(View view) {
                Context context=view.getContext();
                Intent intent=new Intent(context, Activity2.class);
                intent.putExtra("songname",songName);
                intent.putExtra("songername",songerName);
                context.startActivity(intent);
            }
        });
    }

    @Override
    public int getItemCount() {
        return songList.size();
    }

    public static class SongViewHolder extends RecyclerView.ViewHolder {
        TextView songTextView;
        TextView songerTextView;

        public SongViewHolder(@NonNull View itemView) {
            super(itemView);
            songTextView = itemView.findViewById(R.id.textView_songname);
            songerTextView=itemView.findViewById(R.id.textView_songer);

        }
    }
}
6.Activity2.java
1.使用intent=new intent()方法,将参数设置成Activity.this和Myservice.class,实现在Activity2中启动Myservice服务,播放音乐
2.为了实现点击列表项播放相应的音乐功能,我目前没有什么更好的方法,是通过索引去播放相应的音乐,使用if-else语句,将点击得到的内容与music数组进行比较,匹配设置成相应的下标索引,这样就可以实现点击播放相应歌曲的功能
import androidx.appcompat.app.AppCompatActivity;

import android.content.Intent;
import android.os.Bundle;
import android.util.Log;
import android.view.View;
import android.widget.Button;
import android.widget.ImageView;
import android.widget.TextView;

import org.w3c.dom.Text;

public class Activity2 extends AppCompatActivity {


    @Override
    protected void onPause() {
        super.onPause();
        Log.d("sh","2:onPause...");
    }

    @Override
    protected void onPostResume() {
        super.onPostResume();
        Log.d("sh","2:onPostResume...");
    }

    @Override
    protected void onResume() {
        super.onResume();
        Log.d("sh","2:onResume...");
    }

    @Override
    protected void onDestroy() {
        super.onDestroy();
        Log.d("sh","2:onDestroy...");
    }

    @Override
    protected void onStop() {
        super.onStop();
        Log.d("sh","2:onStop...");
    }

    @Override
    protected void onStart() {
        super.onStart();
        Log.d("sh","2:onStart...");
    }

    ImageView imageView;
    Button button1,button2;
    TextView textView1,textView2;
    int songIndex=-1;

    @Override
    protected void onCreate(Bundle savedInstanceState) {
        super.onCreate(savedInstanceState);
        setContentView(R.layout.activity_2);

        Log.d("sh","2:onCreate...");

        imageView=findViewById(R.id.imageView);
        textView1=findViewById(R.id.textView2);
        textView2=findViewById(R.id.textView6);
        button1=findViewById(R.id.button9);
        button2=findViewById(R.id.button10);
        Intent intent=getIntent();
        Intent intent1=new Intent(Activity2.this,MyService.class);


        String songname=intent.getStringExtra("songname");
        String songername=intent.getStringExtra("songername");
        textView1.setText("歌名     "+songname);
        textView2.setText("歌手     "+songername);

        //将点击的歌曲名称设置对应的索引
        if (songname.equals("七里香"))
            songIndex=0;
        else if (songname.equals("晴天")) {
            songIndex=1;
        } else if (songname.equals("兰亭序")) {
            songIndex=2;
        }

        button1.setOnClickListener(new View.OnClickListener() {
            @Override
            public void onClick(View view) {
                intent1.putExtra("songIndex",songIndex);
                startService(intent1);
            }
        });
        button2.setOnClickListener(new View.OnClickListener() {
            @Override
            public void onClick(View view) {
                stopService(intent1);
                finish();
            }
        });

    }
}
7.Myservice.java音乐服务
1.要实现点击歌曲播放相应音乐的功能,需要Myservice中添加一个setSong()方法去设播放索引歌曲,setSong()中应包含stop()和release()方法,因为onCreate()中定义了默认播放的歌曲
2.在Myservice的onStartCommand()方法中获取传递的歌曲索引,并调用setSong()方法播放索引歌曲
import android.app.Service;
import android.content.Intent;
import android.media.MediaPlayer;
import android.os.IBinder;
import android.util.Log;

public class MyService extends Service {
    MediaPlayer player;
    int[] music={
            R.raw.serven,
            R.raw.tian,
            R.raw.lan,
            R.raw.hj,
            R.raw.music
    };
    public MyService() {

    }

    @Override
    public void onCreate() {
        super.onCreate();
        Log.d("sh","MyService:onCreate...");
        player=MediaPlayer.create(this,music[0]);  //设置默认播放的歌曲
    }

    @Override
    public int onStartCommand(Intent intent, int flags, int startId) {
        Log.d("sh","MyService:onStart...");
        //获取歌曲索引,默认是0
        int songIndex=intent.getIntExtra("songIndex",0);
        //设置要播放的歌曲索引
        setSong(songIndex);

        player.start();
        return super.onStartCommand(intent, flags, startId);
    }

    @Override
    public void onDestroy() {
        player.stop();
        player.release();
        super.onDestroy();
        Log.d("sh","MyService:onDestroy...");
    }

    @Override
    public IBinder onBind(Intent intent) {
        // TODO: Return the communication channel to the service.

        throw new UnsupportedOperationException("Not yet implemented");
    }

    public void setSong(int songIndex){
        //该方法用来实现点击歌曲播放相应歌曲
        if(songIndex>=0&&songIndex<= music.length){
            player.stop();
            player.release();
            player=MediaPlayer.create(this,music[songIndex]);
        }

    }
}
总结:
这次作业,实现了一个简单的音乐播放器功能,主要是应用到RecycrView和Myservice技术,一开始实验时,并没有理清自己的思路,并不知道从哪里开始下手,也不知道怎么做,后面我就决定先将大功能先实现,比如列表项样式,播放器样式,以及简单的界面跳转和音乐播放,完成这些后,再将它们联合起来,实现一个简陋的音乐播放,后面又继续对其优化,实现在歌单点歌播放相应的歌曲,并正确显示歌名和歌手。顺着这个步骤下来,我实验时头脑就比较清晰。关于代码部分,在歌曲索引匹配的问题上应该是有更加简单高效的方法,而不是使用if-else语句去逐个匹配,但是我目前并没有很好的解决办法。


 被折叠的 条评论
为什么被折叠?
被折叠的 条评论
为什么被折叠?
 到【灌水乐园】发言


