


一、配置小包 (默认 Git、CMake 已经可以使用)
1. Java
下载链接:Java Downloads | Oracle (点击下图选项)
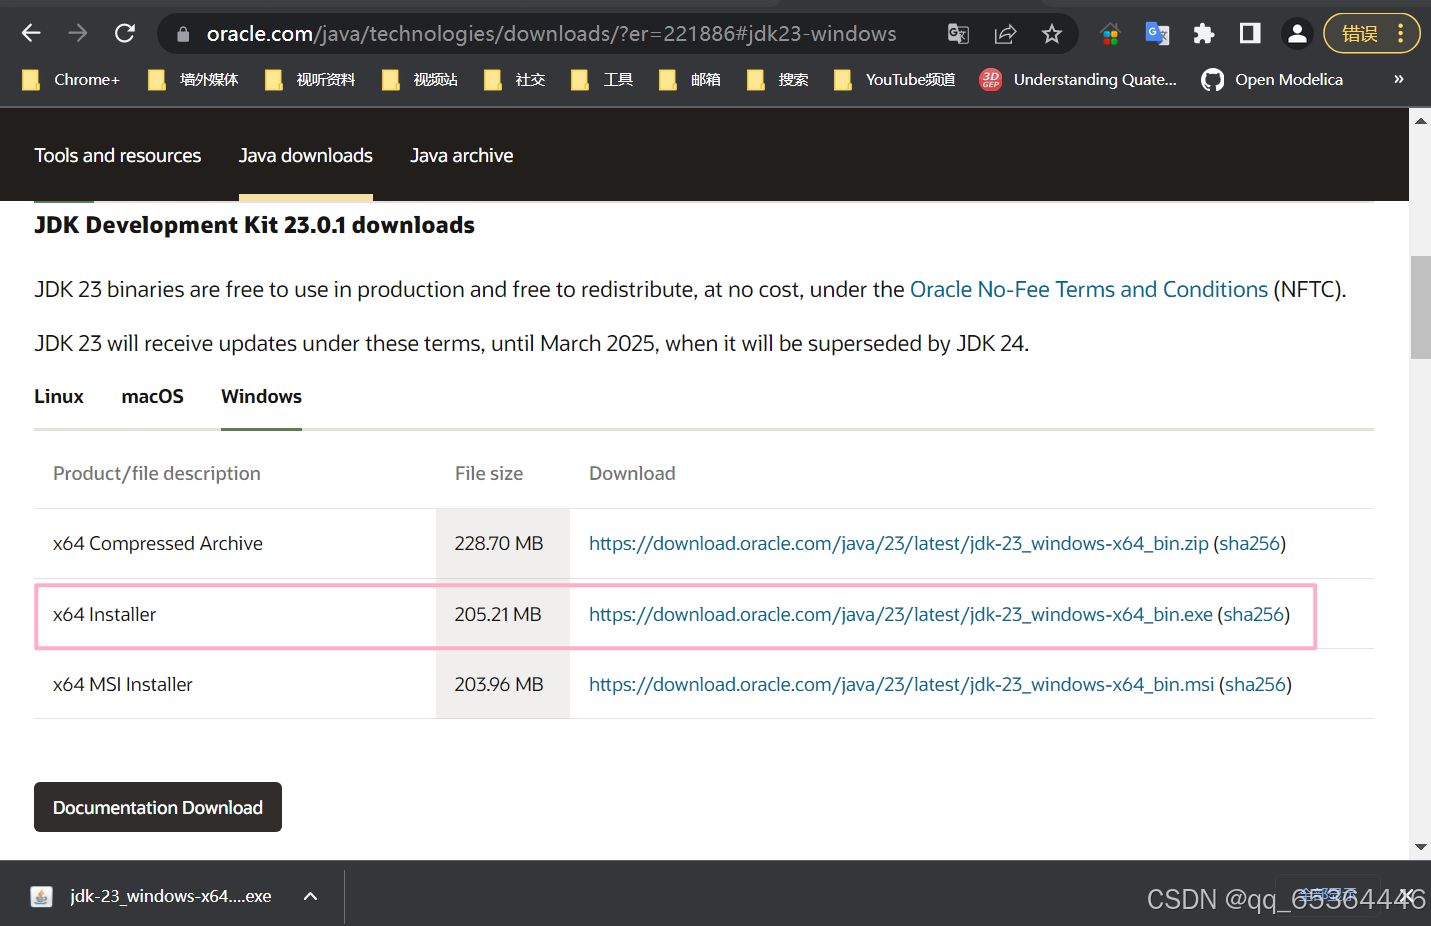
完全按照该下载指南走,不用做其他操作。
(补充:该 exe 完成后,会显示帮助使用的文档链接 JDK 23 Documentation - Home)
2. TortoiseSVN
完全按照该下载指南走,不用做其他操作。
(保留下载的入口以备新版本下载:https://sourceforge.net/projects/tortoisesvn/files/1.14.8/Application/TortoiseSVN-1.14.8.29723-x64-svn-1.14.4.msi/download)
本篇默认 Git、CMake 已经可以使用,就不做详细的教程了,
你要是没有下载,请参考以下两个链接:
Git 安装教程:Git 详细安装教程(详解 Git 安装过程的每一个步骤)_git安装-CSDN博客
CMake 安装教程:Febio Studio 编译_febio编译-CSDN博客 ( 要求版本号不小于 3.21 )
二、 安装 OMDev
1. 在 Git Bash 中输入命令
右键管理员权限打开 Git Bash,依次输入以下命令,每行输入结束后按 ENTER 键。
( 是的,只能手动敲入,或者 Shift+Insert 粘贴! o T A T o)
  git config --global core.eol lf
  git config --global core.autocrlf input
( 注意:均为小写英文,无大写英文 → l 是小写的 L )
解释: 将所有本地仓库的 core.eol 设置为 lf (即 Linux 下的换行符 \n);
并且当提交文件到仓库时,Git 会将所有文件的换行符 统一转换为 lf 形式。
git config : Git 要开始设置 配置项 啦;
--global : 表明是一个全局设置,设置的配置项在所有本地仓库都有效;
core.eol : 该配置项 用来指定文件末尾应该使用什么类型的换行符 \n;
core.autocrlf : 该配置项 用来指定 Git 如何在不同操作系统之间处理换行符 \n;
lf : 即 Line Feed,这是换行符的类型,表示使用 Linux 下的换行符 \n;
input : 当从工作目录检出文件时,Git 会根据操作系统默认的换行符类型
转换文件中的换行符 \n。
继续输入以下命令,每行输入结束后按 ENTER 键。
cd /c/
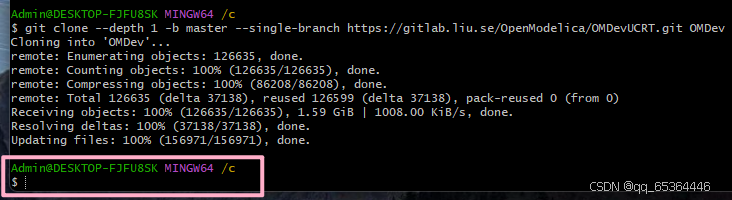
git clone --depth 1 -b master --single-branch https://gitlab.liu.se/OpenModelica/OMDevUCRT.git OMDev 解释:进入 C 盘;
直接在 C 盘下载 OMDev 的代码。
Tips
- 这个过程就是会很长哦,基本是只需注意 不要让电脑中断联网,因为这样会报错失败。
- 如果报错失败,也不用难受哦,只需要重新在 Git Bash 输入最后一句命令就可以了;
- 还是不行的话就是网不好,多试几次;重复输入该句命令不会影响安装。
- 不用特意建立文件夹 或 下载同一个 zip/tar/rar 包,最后一句命令会自己建立相应的文件夹。
成功完成就会再次出现 $,显示如下:
2. 配置 OMDev
在环境变量的用户变量中添加 OMDev,值为你设置的路径:C:\OMDev ;
之后按照原文档进行操作:INSTALL.md · master · OpenModelica / OMDevUCRT · GitLab
Tips :
在环境变量中,非 path 变量以 用户变量 为优先,path 以 系统变量 为优先。
在 .bashrc 末尾添加的代码:
export PATH=$PATH:/c/Program\ Files/Git/bin:/c/Program\ Files/TortoiseSVN/bin:/e/DownloadSoftWare/Java/jdk-23/bin:/c/Program\ Files/CMake/bin
export OPENMODELICAHOME="/c/OpenModelica/build"
export OPENMODELICALIBRARY="/c/Users/Admin/AppData/Roaming/.openmodelica/libraries"
export OMDEV="/c/OMDev"
三、对 OpenModelica 进行的操作
使用 Git Bash 下载 OpenModelica 源代码,命令如下:
git clone --recurse-submodules https://openmodelica.org/git-readonly/OpenModelica.git之后请做以下操作:
Step 1、安装并配置 MinGW
安装 MinGW,之后把 MinGW 的bin 的路径 添加到环境变量 path (系统)里。
继续给 MinGW 下载 Lapack库 和 Blas库 :
按照win10 安装 lapack + blas_windows10 安装blas-CSDN博客
使用 cmake gui 使得 generate 成功;
搜索 MinGW 的全部路径下的 blas 和 Lapack 压缩文件 + .sig文件 (共 2 X 2 个),
分别解压得到 3 X 2 个文件,分别粘贴至 MinGW 的 lib 目录下的
BLAS 和 LAPACK 文件夹,并且把解压后得到的他们自己的 mingw64 文件夹下的
lib路径 和 bin路径添加到环境变量 path (系统)里。
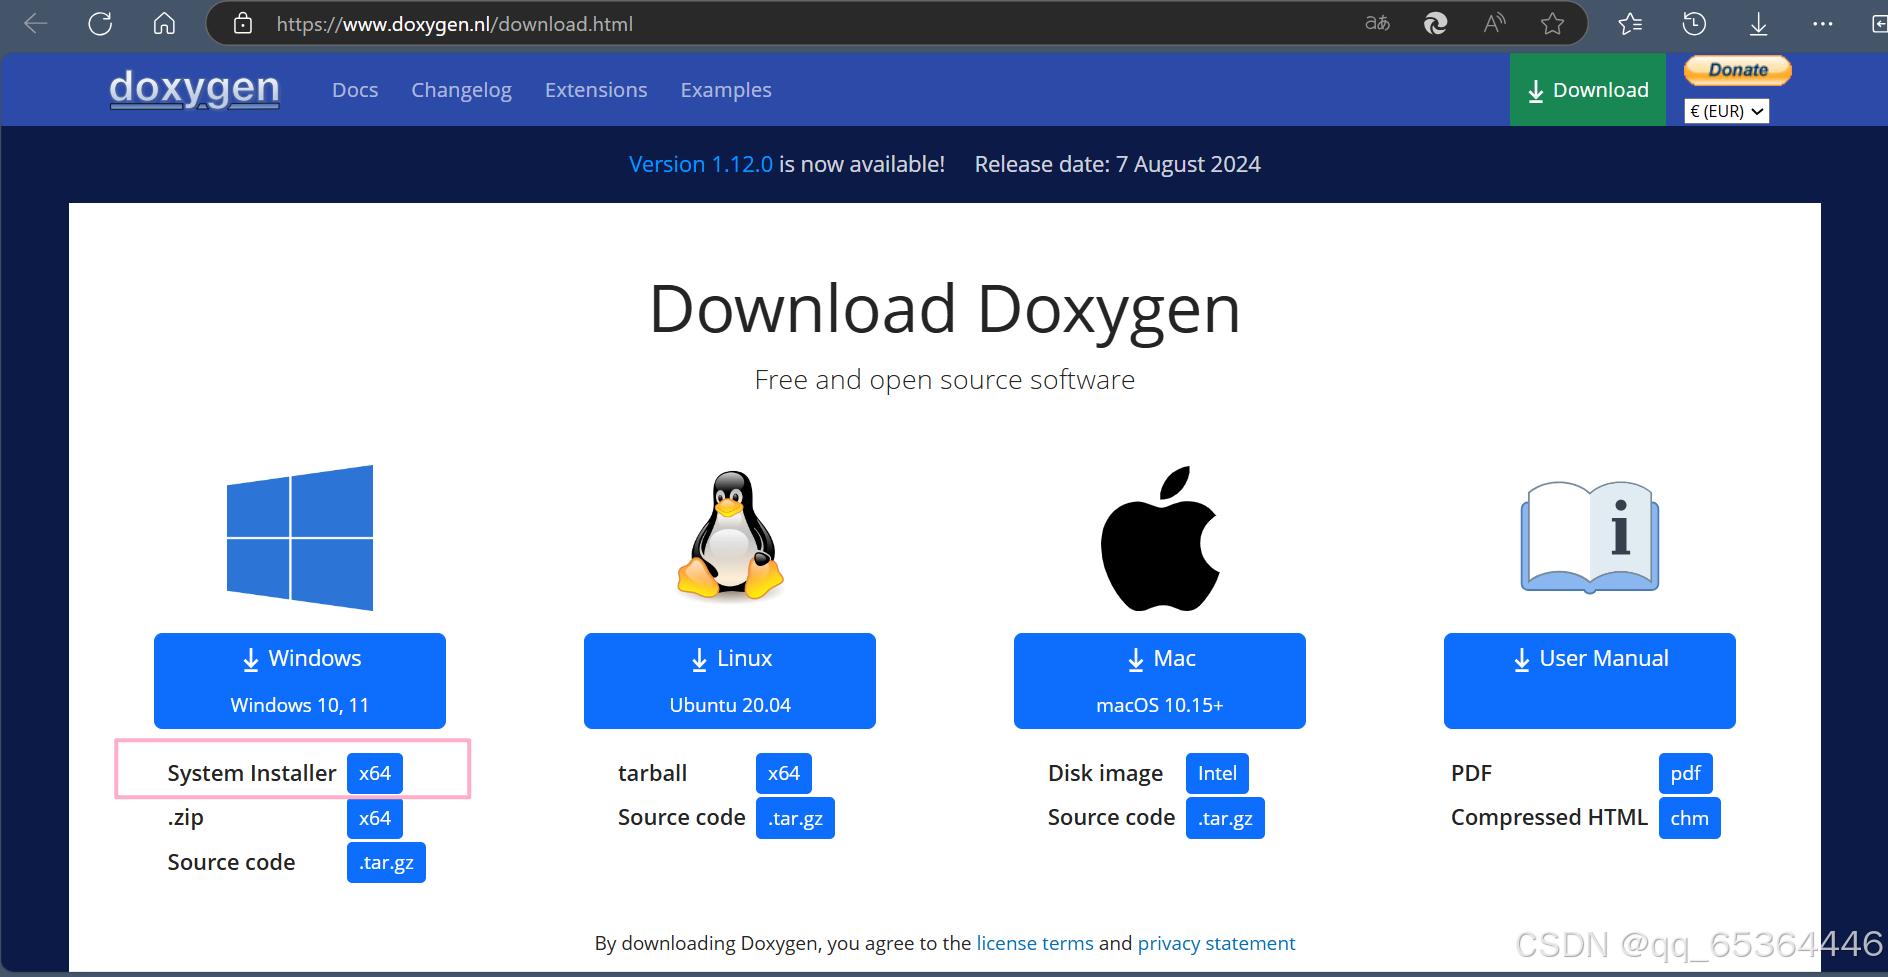
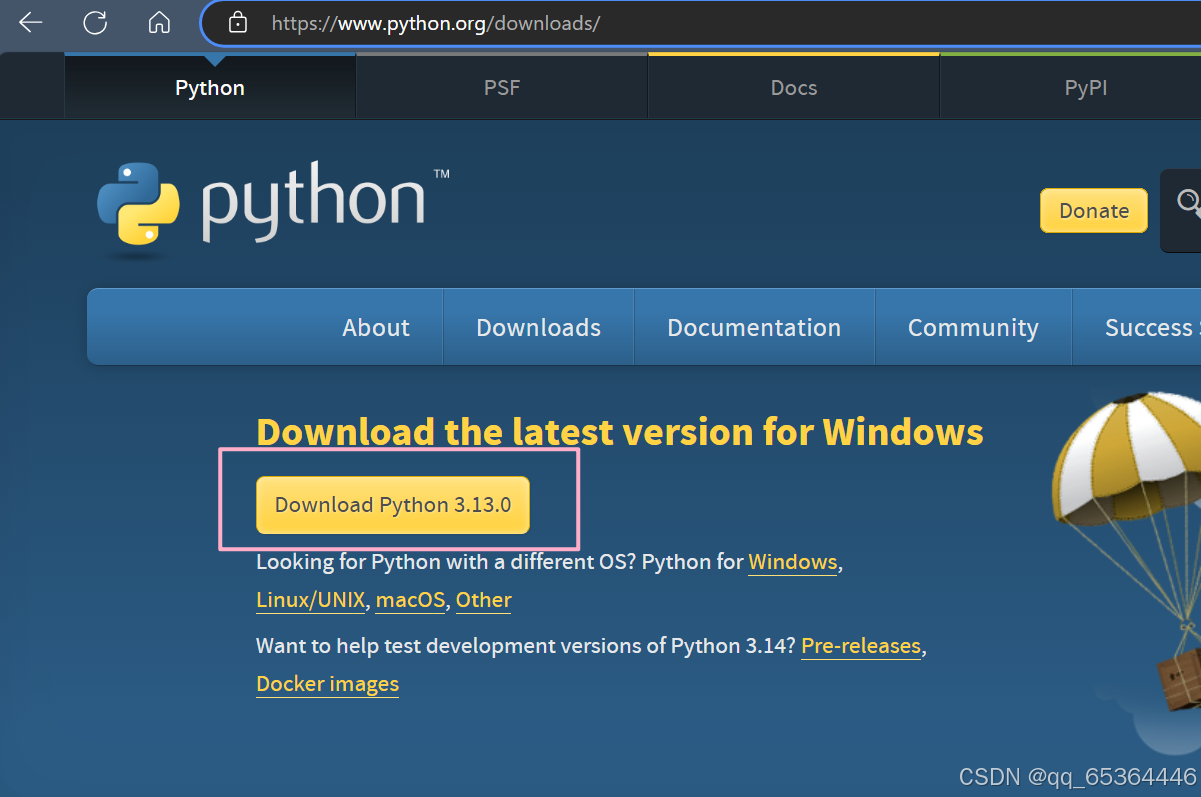
Step 2、安装 AsciiDoc、Doxygen、Sphinx
下载 AsciiDoc、Doxygen、Sphinx:
(D) 下载链接:Doxygen download
(S) 先下载 Python Package Index (PyPI), 下载链接:Download Python | Python.org
 (点击下载好的exe进行安装时,把下方两个小方格都打勾,然后点击最上方的大箭头进行安装)
下载完后,去环境变量 path (系统)里检查,如果没有 Python 的路径
就把 C:\Users\<你的用户名>\AppData\Local\Programs\Python\Python313 添加进去。
你再检查下这个数字对否,你下载了不同版本可能会轻微不同。
( 哼哼,如果没有选择最上方的大箭头安装,自己去找 python.exe 路径吧!)
验证 Python 安装:
在 cmd 输入
python --version 若成功安装,你就继续下一步。
退出后重新进入 cmd,输入
pip install -U sphinx验证 sphinx 安装:
sphinx-build --version(A) 右键管理员权限打开 cmd,输入命令:
pip3 install asciidoc验证 asciidoc 安装:
asciidoc --versionP.S.
各电脑配置不同,比如没有 zlib 的电脑还需要安装该库等。
如果安装完上述小包仍然报错,并且不知道怎么处理,
可以按照我写的 FS 编译,把列出的各个小包都下载了。
你已经把上述小包都安装完了哦?哼~ 那你继续下一步吧
打开 OMDev 的 shell 环境,依次输入以下命令:
cd /c/OpenModelica

# 安装 ccache:
pacman -S ccache

# 验证 ccache 的安装:
which ccache

make -f Makefile.omdev.mingw -j12
make -f Makefile.omdev.mingw -j12 omedit
make -f Makefile.omdev.mingw -j12 qtclients
( 我的是这样的。但是,"-j12" 中的 "12",要替换成你电脑的cpu核心数哦。 )
怎么查看 cpu核心数(cores) 呢?
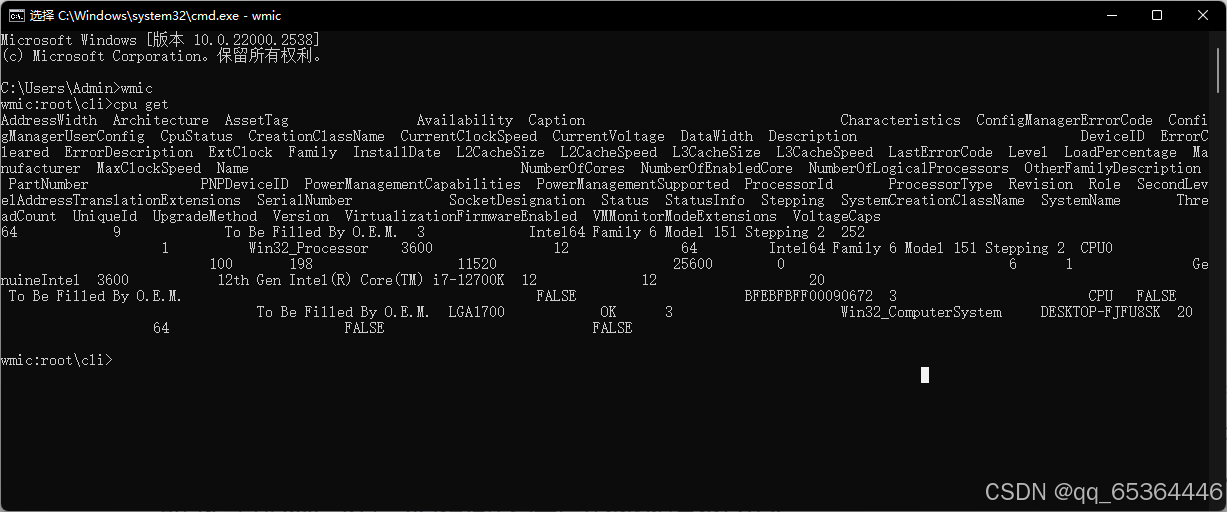
要在 cmd 中依次输入以下命令:
wmic
cpu get
会显示如下:
这样,NumberOfCores 为核数。( NumberOfLogicalProcessors 为线程数 )
安装完毕! >v<
以下内容乃记录用,请忽略。
查看 CC 、CXX 、CMAKE_AR 值,
设置成 gcc、g++、ar (记得先查看后几个的值是否存在);
导航到对应目录后,再输入命令来安装库:
# 安装 ccache:
pacman -S ccache

# 验证 ccache 的安装:
which ccache


# 安装 BLAS 和 LAPACK:
# (BLAS 库,这是 LAPACK 的依赖库,所以要一起装)
pacman -S mingw-w64-x86_64-openblas
pacman -S mingw-w64-x86_64-lapack

# 验证 BLAS 和 LAPACK 的安装:
which libopenblas.dll
which liblapack.dll
如何探索得到的解决方法 ?过程如下
在 2.1 MSYS 和 CMake 出错,尝试以下 3 种的解决方法:
方法1. 从 cmd (管理员权限) 使用 cd 命令进入对应路径下的 mingw64.exe \ ucrt64.exe,
然后 输入上述文档的命令。
报错同方法2。
方法2. 直接点击 mingw.exe \ ucrt64.exe,
然后 输入上述文档的命令。
报错,显示如下:
Admin@DESKTOP-FJFU8SK MINGW64 ~
# cd /e/DownloadSoftWare/OpenModelica
Admin@DESKTOP-FJFU8SK MINGW64 /e/DownloadSoftWare/OpenModelica
# cmake -S . -B build_cmake -Wno-dev -G "MSYS Makefiles"
-- The C compiler identification is unknown
-- The CXX compiler identification is unknown
CMake Error at CMakeLists.txt:10 (project):
No CMAKE_C_COMPILER could be found.Tell CMake where to find the compiler by setting either the environment
variable "CC" or the CMake cache entry CMAKE_C_COMPILER to the full path to
the compiler, or to the compiler name if it is in the PATH.
CMake Error at CMakeLists.txt:10 (project):
No CMAKE_CXX_COMPILER could be found.Tell CMake where to find the compiler by setting either the environment
variable "CXX" or the CMake cache entry CMAKE_CXX_COMPILER to the full path
to the compiler, or to the compiler name if it is in the PATH.
CMake Error: CMAKE_AR was not found, please set to archive program. CMAKE_AR-NOTFOUND
-- Configuring incomplete, errors occurred!
方法3. 直接使用 CMake 进行构建。
报错如下:
Selecting Windows SDK version 10.0.22621.0 to target Windows 10.0.22000.
The C compiler identification is MSVC 19.41.34123.0
The CXX compiler identification is MSVC 19.41.34123.0
Detecting C compiler ABI info
Detecting C compiler ABI info - done
Check for working C compiler: C:/Program Files (x86)/Microsoft Visual Studio/2022/BuildTools/VC/Tools/MSVC/14.41.34120/bin/Hostx64/x64/cl.exe - skipped
Detecting C compile features
Detecting C compile features - done
Detecting CXX compiler ABI info
Detecting CXX compiler ABI info - done
Check for working CXX compiler: C:/Program Files (x86)/Microsoft Visual Studio/2022/BuildTools/VC/Tools/MSVC/14.41.34120/bin/Hostx64/x64/cl.exe - skipped
Detecting CXX compile features
Detecting CXX compile features - done
OMC_TARGET_ARCH="x86_64"
Found Git: C:/Program Files/Git/cmd/git.exe (found version "2.45.1.windows.1")
SOURCE_REVISION="-cmake"
CMake Error at cmake/OMCPThreads.cmake:14 (find_package):
Could not find a package configuration file provided by "pthreads" with any
of the following names:
pthreadsConfig.cmake
pthreads-config.cmake
Add the installation prefix of "pthreads" to CMAKE_PREFIX_PATH or set
"pthreads_DIR" to a directory containing one of the above files. If
"pthreads" provides a separate development package or SDK, be sure it has
been installed.
Call Stack (most recent call first):
CMakeLists.txt:42 (include)
Configuring incomplete, errors occurred!
诊断中...
everything → 没有搜索到,其他文件没有顺道安装过。
搜索得知,可能隶属于 Liux;
尝试这个命令:
cmake -S . -B build_cmake -Wno-dev -G "MSYS Makefiles" -DCMAKE_C_COMPILER=gcc -DCMAKE_CXX_COMPILER=g++ -DCMAKE_AR=ar
OpenModelica/OMCompiler/README.Windows.md at master · OpenModelica/OpenModelica · GitHub
INSTALL.md · master · OpenModelica / OMDevUCRT · GitLab
要看的
图1.2 ---> 1.2 OpenModelica Compiler Translation Stages


 被折叠的 条评论
为什么被折叠?
被折叠的 条评论
为什么被折叠?
 到【灌水乐园】发言


