


在现代 Web 应用程序中,脚手架已被 yeoman 等工具流行起来。这些工具为您的项目生成一个标准原型,其中包含启动和运行所需的一切,包括目录结构、构建系统、项目依赖项等。
Spring Boot有自己的脚手架工具。有两种方法可以快速引导您的 Spring 启动应用程序 -
- 使用托管在 http://start.spring.io 的 Spring 初始值设定项 Web 应用程序
- 使用 Spring Boot CLI
Spring Initializer
Spring Initializer是一个Web工具,有助于快速引导spring启动项目。
该工具使用起来非常简单。只需输入项目详细信息和所需的依赖项。该工具将根据您输入的详细信息生成并下载一个包含标准 Spring 引导项目的 zip 文件。
 按照以下步骤使用 Spring 初始值设定项 Web 应用程序生成新项目 -
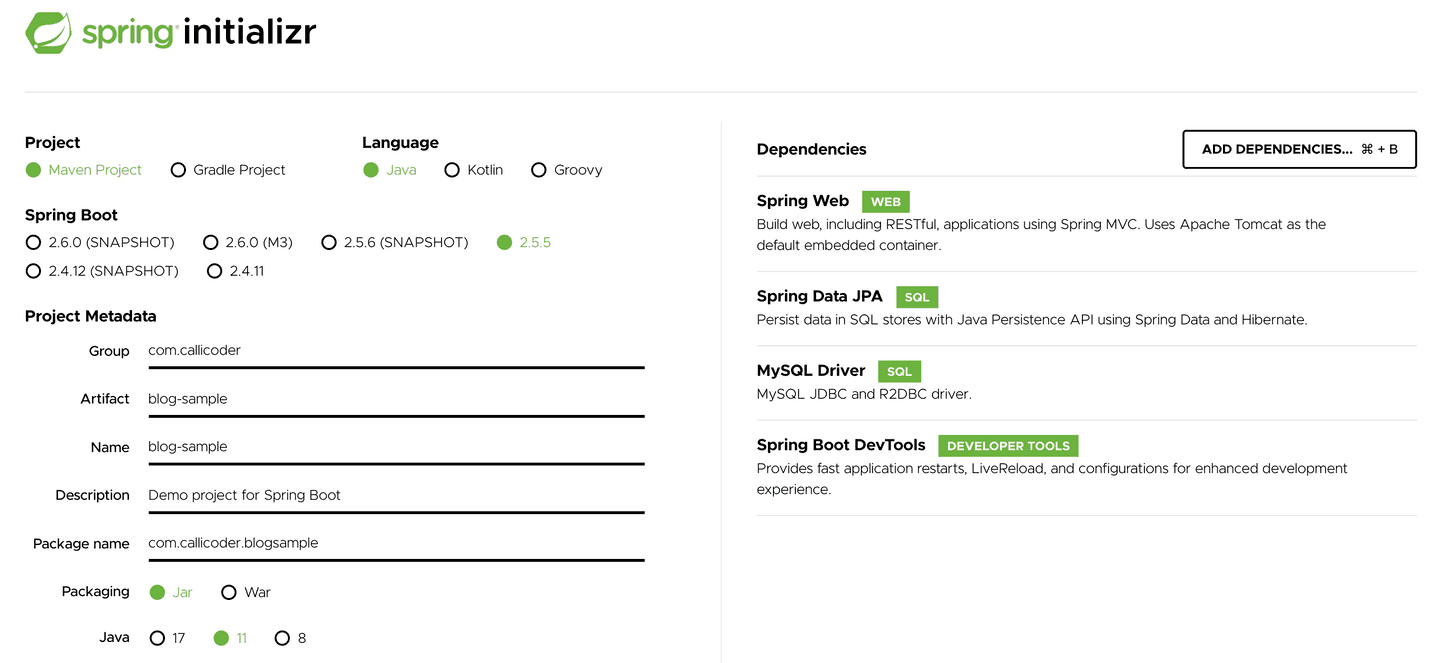
第 1 步。转到 http://start.spring.io。
第 2 步。在“项目”部分中选择“Maven 项目”或“Gradle 项目”。Maven 项目是默认的。
第 3 步。选择您选择的语言 Java、Kotlin 或 Groovy。Java 是默认的
第 4 步。选择 Spring 引导版本。当前稳定版本是默认版本。
第5步。在项目元数据中输入组、项目和名称。
第 6 步。在“依赖项”部分中搜索依赖项,然后按 Enter 将其添加到项目中。
步骤 7.选择所有依赖项并输入项目详细信息后,单击“生成”以生成项目。
该工具将生成并下载一个包含项目原型的 zip 文件。生成的原型将包含所有项目目录、主应用程序类和 pom.xml 或 build.gradle 文件以及您选择的所有依赖项。
只需解压缩文件并将其导入您选择的 IDE 即可开始工作。
我在写这篇文章时使用 Spring 初始化器创建了一个 maven 项目,这就是我得到的 -
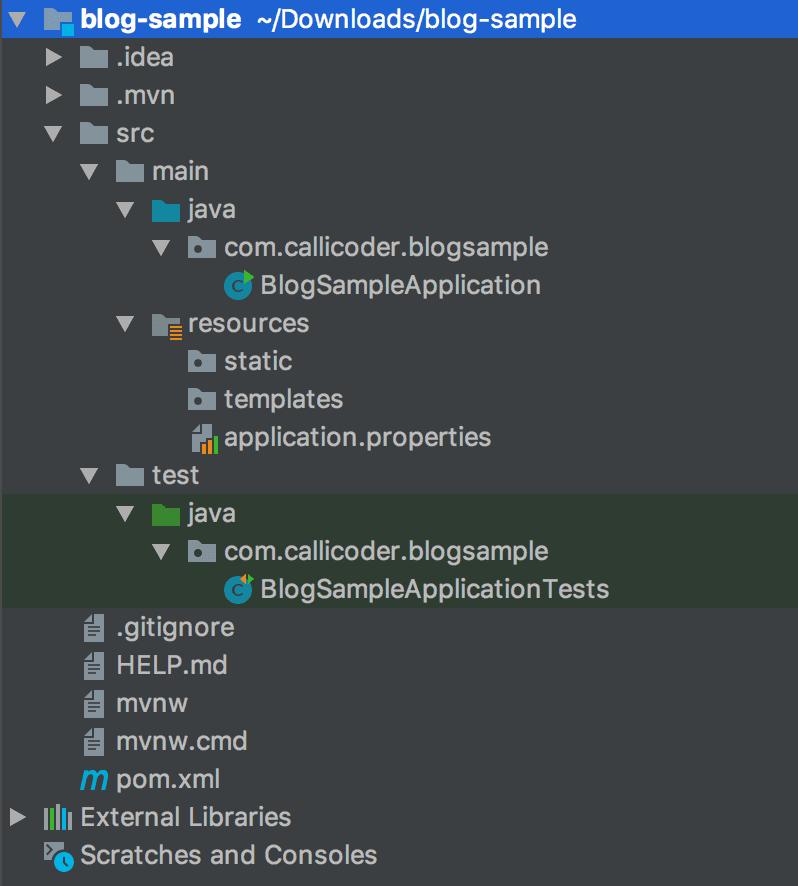 你看!我已经准备好了开始所需的一切。一个标准的 Spring 引导项目结构,其中包含所有必需的目录以及一个包含所有依赖项的文件。
pom.xml
$ mvn spring-boot:run
如果你已经生成了一个 gradle 项目,你可以使用以下命令 run
$ gradle bootRun
Spring Boot CLI
Spring Boot CLI 是一个命令行工具,有助于使用 Spring 快速进行原型设计。您也可以使用此工具运行Groovy脚本。
查看官方 Spring 引导文档,以获取有关如何为您的操作系统安装 Spring 引导 CLI 的说明。安装后,键入以下命令以查看可以使用 Spring Boot CLI 执行的操作 -
$ spring --help

usage: spring [--help] [--version]
       <command> [<args>]

Available commands are:

  run [options] <files> [--] [args]
    Run a spring groovy script

  grab
    Download a spring groovy scripts dependencies to ./repository

  jar [options] <jar-name> <files>
    Create a self-contained executable jar file from a Spring Groovy script

  war [options] <war-name> <files>
    Create a self-contained executable war file from a Spring Groovy script

  install [options] <coordinates>
    Install dependencies to the lib/ext directory

  uninstall [options] <coordinates>
    Uninstall dependencies from the lib/ext directory

  init [options] [location]
    Initialize a new project using Spring Initializr (start.spring.io)

  encodepassword [options] <password to encode>
    Encode a password for use with Spring Security

  shell
    Start a nested shell

Common options:

  --debug Verbose mode
    Print additional status information for the command you are running


See 'spring help <command>' for more information on a specific command.
在这之后,我们将看看生成新的 spring 引导项目的命令spring init。该命令在内部使用 Spring Initializr Web 应用程序来生成和下载项目。
打开您的终端并键入 spring help init以获取有关 init 命令的所有信息。
以下是如何使用该命令的几个示例 -
To list all the capabilities of the service:
    $ spring init --list

To creates a default project:
    $ spring init

To create a web my-app.zip:
    $ spring init -d=web my-app.zip

To create a web/data-jpa gradle project unpacked:
    $ spring init -d=web,jpa --build=gradle my-dir
让我们生成一个具有JPA,Mysql和Thymleaf依赖项的maven Web应用程序 -
$ spring init -n=blog-sample -d=web,data-jpa,mysql,devtools,thymeleaf -g=com.callicoder -a=blog-sample

Using service at https://start.spring.io
Content saved to 'blog-sample.zip'
此命令将创建一个具有所有指定设置的新 Spring 引导项目。
快速简单!不是吗?
结论
恭喜大家!我们探索了两种快速引导spring boot应用程序的方法。每当我必须使用新的 Spring 启动应用程序时,我总是使用这两种方法之一。它为我节省了很多时间。
我更喜欢使用 Spring-CLI,因为它允许我从命令行做所有事情。通过在下面的评论部分发表评论,让我知道您更喜欢哪种方法。


 5135
5135


 被折叠的 条评论
为什么被折叠?
被折叠的 条评论
为什么被折叠?
 到【灌水乐园】发言


