


一、快速安装Apache
1.1安装
[root@server ~]# yum install httpd
1.2预处理
[root@server ~]# setenforce 0
[root@server ~]# systemctl stop firewalld
[root@server ~]# systemctl start httpd
[root@server ~]# systemctl enable httpd
1.3 分析
| 内容 | 位置 |
| 服务目录 | /etc/httpd |
| 配置文件 | /etc/httpd/conf/httpd.conf |
| 网站数据目录 | /var/www/html |
| 访问日志 | /var/log/httpd/access_log |
| 错误日志 | /var/log/httpd/error_log |
1.3.1 主配置文件
[root@server ~]# vim /etc/httpd/conf/httpd.conf
34 ServerRoot "/etc/httpd" ---服务目录
46 #Listen 12.34.56.78:80 ----设置监听的IP地址及端口
47 Listen 80 ----默认开启监听端口为80
61 Include conf.modules.d/*.conf ----加载额外配置文件
71 User apache ----运行服务的用户
72 Group apache ----运行服务的工作组
91 ServerAdmin root@localhost ----管理者的邮箱
100 #ServerName www.example.com:80 ----设置域名及端口号,必须要域名解析
107 <Directory /> #<>表示起始标志 </>表示结束标志
108 AllowOverride none #不允许覆盖
109 Require all denied #禁止所有来源访问文件或目录
110 </Directory>
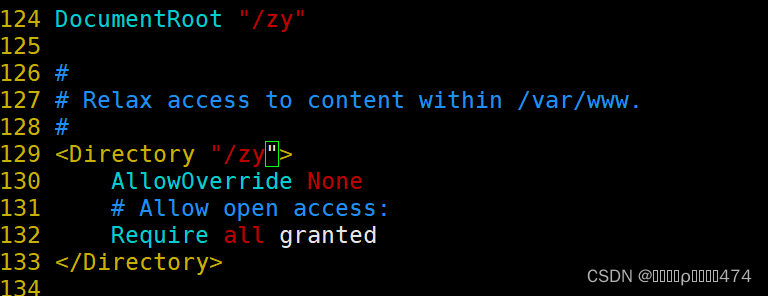
124 DocumentRoot "/var/www/html" #重点,网页存放的默认目录
129 <Directory "/var/www"> #设置网页目录的权限,与DocumentRoot搭配使用
130 AllowOverride None
131 # Allow open access:
132 Require all granted #允许所有来源访问
133 </Directory>
1.3.2 实验一 快速搭建静态网站
第一种方法 :自定义网站访问欢迎界面
[root@node1 ~]# echo helloworld > /var/www/html/index.html打开windows的浏览器输入IP地址进行测试

注意:因为没有修改之前的源文件 是 /var/www/html 
1.3.3 实验二 替换默认网页目录
测试结果第二种方法:使用xftp上传之前下载的网页源文件到/目录,此例使用/zy 网页

[root@node1 ~]# vim /etc/httpd/conf/httpd.conf1.将配置文件修改成如下图
2.重启配置文件
[root@node1 ~]# systemctl restart httpd
3.打开windows的浏览器输入IP地址进行测试

1.3.4 实验三 搭建一个个人用户主页功能网站,实现通过身份验证功能来访问数据
1.恢复快照
2.准备工作
[root@server ~]# setenforce 0
[root@server ~]# systemctl stop firewalld
[root@server ~]# yum install httpd -y
3.编辑用户httpd主配置文件,设置参数
[root@node1 ~]# cd /etc/httpd
[root@node1 httpd]# ls
conf  conf.d  conf.modules.d  logs  modules  run  state
[root@node1 httpd]# cd conf.d
[root@node1 conf.d]# ls
autoindex.conf  README  userdir.conf  welcome.conf  ---找到用户编辑主文件
[root@node1 conf.d]# vim userdir.conf

![]()
17     #UserDir disabled   --此行增加# 表示开启用户主页功能

24     UserDir public_html   ----去掉#表示网站数据保存在用户的家目录中
4.新增2个普通账户
[root@node1 conf.d]# cd ~
[root@node1 ~]# useradd t1    #新建t1账户
[root@node1 ~]# passwd t1     #设置t1账户密码
Changing password for user t1.
New password:
BAD PASSWORD: The password is shorter than 8 characters
Retype new password:
passwd: all authentication tokens updated successfully.
[root@node1 ~]# useradd t2
[root@node1 ~]# passwd t2
Changing password for user t2.
New password:
BAD PASSWORD: The password is shorter than 8 characters
Retype new password:
passwd: all authentication tokens updated successfully.
[root@node1 ~]#
5.切换到普通账户,进入家目录。新建用于存储网页数据的public_html目录,并设置权限
[root@node1 ~]# su t1    #切换账户
[t1@node1 root]$ cd /home/t1   #进入t1账户目录
[t1@node1 ~]$ ls
[t1@node1 ~]$ mkdir public_html    #新建用于存储网页数据目录public_html
[t1@node1 ~]$ ls
public_html
使用xftp将sxhkt目录内容所有网页文件上传到/home/t1/public_html目录中
注意:将sxhkt目录中的内容上传,不要sxhkt目录本身

[t1@node1 ~]$ chmod -Rf  755 /home/t1  #设置权限
[t1@node1 ~]$ ll  #查看权限
total 0
drwxr-xr-x 7 t1 t1 100 Jul  9 13:25 public_html
t2步骤与t1相同
[t1@node1 ~]$ su t2
Password:
[t2@node1 t1]$ cd /home/t2
[t2@node1 ~]$ mkdir public_html
[t2@node1 ~]$ ls
public_html

[t2@node1 ~]$ chmod -Rf 755 /home/t2
[t2@node1 ~]$ ll
total 0
drwxr-xr-x 6 t2 t2 70 Jul 9 13:34 public_html
6.重启服务
[t2@node1 ~]$ su root
Password:
[root@node1 t2]# cd ~
[root@node1 ~]# systemctl restart httpd
7.访问测试
#定位window的浏览器地址栏输入以下格式:
#IP地址/~账户名


#例子如下:192.168.145.127/~t1/
192.168.145.127/~t1/
8.增加密码访问控制
#给t1账户设置访问网站的密码
[root@node1 ~]# htpasswd -c /etc/httpd/passwd t1
New password:
Re-type new password:
Adding password for user t1

#htpasswd :生成密码数据库的命令
#-c  : 表示第一次生成,第二次以后的生成密码时不能使用
#etc/httpd/passwd :密码的数据库文件存储路径
#t1  : 需要密码验证密码的用户名称

[root@node1 ~]# htpasswd  /etc/httpd/passwd t2
New password:
Re-type new password:
Adding password for user t2
[root@node1 ~]#


#当给t2账户设置密码时,命令中不能使用-c参数,否则上述t1的密码文件会覆盖
9.编辑个人主页配置文件,设置使用密码访问
[root@node1 ~]# vim /etc/httpd/conf.d/userdir.conf #定位第31行,删除31-35行,增加如下内容:
<Directory "/home/t1/public_html"> #区域配置,设置用户网页验证目录
authuserfile "/etc/httpd/passwd" #设置刚刚生成的密码文件的存储路径
authname "My privately website" #用户登录网站的提示信息
authtype basic #加密模式
require user t1 #用户进行登录时需要验证密码的账户名
</Directory> #区域配置结束
<Directory "/home/t2/public_html">
authuserfile "/etc/httpd/passwd"
authname "My privately website"
authtype basic
require user t2
</Directory>
10.重启服务进行测试
[root@node1 ~]# systemctl restart httpd
#打开window端浏览器输入192.168.145.127/~t1 192.168.145.127/~t2
#有对话框弹出来
#输入用户名:t1 ,密码: ,t2同理


二、 虚拟主机功能
2.1基于多IP地址
2.2 原理
如果一台服务器有多个IP地址,而且每个IP地址与服务器上部署的每个网站——对应,当用户请求的IP地址不同,则会访问到不同网页,且每个网站都有一个独立的IP地址(常用)
注意:主机必须有多个IP地址
2.2.1 准备工作
[root@server ~]# setenforce 0
[root@server ~]# systemctl stop firewalld
[root@server ~]# yum install httpd -y
给网卡添加2个IP地址,重置激活网络
[root@server ~]# nmtui


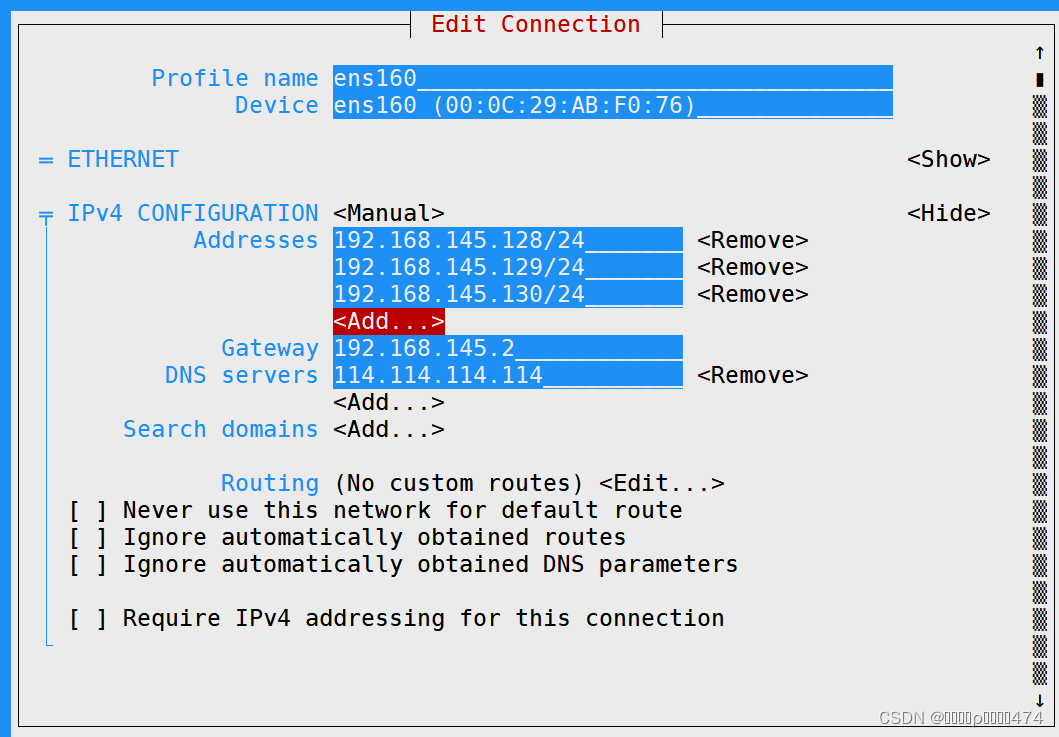

[root@server ~]# nmcli c up ens160
[root@server ~]# ip a

2.2.2 建立基于IP的虚拟主机
- 创建一个配置文件[root@server ~]# vim /etc/httpd/conf.d/xiao.conf (红色字体可以按需求起自己需要的名字)
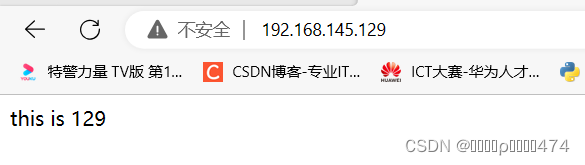
[root@server ~]# vim /etc/httpd/conf.d/xiao.conf


#配置文件内容
<VirtualHost   192.168.145.128:80>
        DocumentRoot  /www
        ServerName 192.168.145.128
</VirtualHost>

<VirtualHost   192.168.145.129:80>
        DocumentRoot  /www/129
        ServerName 192.168.145.129
</VirtualHost>
<VirtualHost   192.168.145.130:80>
        DocumentRoot  /www/130
        ServerName 192.168.145.130
</VirtualHost>

<Directory   /www>
        AllowOverride none
        Require all granted
</Directory>


[root@server ~]# mkdir /www/{129,130} -pv
mkdir: created directory '/www/129'
mkdir: created directory '/www/130'
[root@server ~]# echo this is 128 > /www/index.html
[root@server ~]# echo this is 129 > /www/129/index.html
[root@server ~]# echo this is 130 > /www/130/index.html
[root@server ~]# systemctl restart httpd
测试


2.2.3多端口搭建多网站
- 配置文件
[root@server ~]# vim /etc/httpd/conf.d/xiao.conf

#多端口监听配置
<VirtualHost   192.168.145.128:80>
        DocumentRoot  /www/130
        ServerName 192.168.145.128
</VirtualHost>
<VirtualHost   192.168.145.128:8909>
        DocumentRoot  /www/100
        ServerName 192.168.145.128
</VirtualHost>


[root@server ~]# mkdir /www/{100,130} -pv

[root@server ~]# echo this is 8909 > /www/100/index.html
[root@server ~]# echo this is 130  > /www/130/index.html
[root@server ~]# systemctl restart httpd
[root@server ~]# netstat -tuanlp | grep httpd
tcp6       0      0 :::8909                 :::*                    LISTEN      4333/httpd
tcp6       0      0 :::80                   :::*                    LISTEN      4333/httpd

- 判断服务是否运行的命令
[root@localhost ~]#systemctl status httpd
[root@localhost ~]#systemctl is-active httpd
[root@localhost ~]#lsof -i:8909
[root@localhost ~]#netstat -tunlp |grep httpd
[root@localhost ~]#ps -aux | grep httpd
5.[root@localhost ~]#systemctl status httpd 查看服务运行的日志信息
[root@localhost xixi]# journalctl -xeu httpd.server
[root@localhost xixi]# httpd -t
2.2.4多域名访问多网站 (编辑客户端主机hosts文件)
[root@server ~]# vim /etc/hosts

192.168.145.128 www.haha.com www.xixi.com

[root@server ~]# ping www.haha.com
[root@server ~]# vim /etc/httpd/conf.d/xiao.conf

#多域名配置
<VirtualHost   192.168.145.128:80>
        DocumentRoot  /www/haha
        ServerName www.haha.com
</VirtualHost>

<VirtualHost   192.168.145.128:80>
        DocumentRoot  /www/xixi
        ServerName www.xixi.com
</VirtualHost>


[root@server ~]# mkdir /www/{haha,xixi} -pv
mkdir: created directory '/www/haha'
mkdir: created directory '/www/xixi'
[root@server ~]# echo this is haha > /www/haha/index.html
[root@server ~]# echo this is xixi > /www/xixi/index.html
[root@server ~]# systemctl restart httpd
[root@server ~]# curl http://www.xixi.com
this is xixi
[root@server ~]# curl http://www.haha.com
this is haha
2.2.5虚拟目录----灵活管理资源界面文件
[root@server xixi]# echo this 3 page > /pub/3.html
[root@server xixi]# vim /etc/httpd/conf.d/xiao.conf

#多域名配置
<VirtualHost   192.168.145.128:80>
        DocumentRoot  /www/haha
        ServerName www.haha.com
</VirtualHost>

<VirtualHost   192.168.145.128:80>
        DocumentRoot  /www/xixi
        ServerName www.xixi.com
        alias /3  /pub/3.html
</VirtualHost>
<Directory   /pub>
        AllowOverride none
        Require all granted
</Directory>


[root@server xixi]# systemctl restart httpd
[root@server xixi]# curl http://www.xixi.com
this is xixi
[root@server xixi]# curl http://www.xixi.com/3
this 3 page
2.2.6目录访问控制
[root@server xixi]# vim /etc/httpd/conf.d/xiao.conf

<Directory   /pub>  -----用户控制
        AuthType  Basic
        AuthName "login......"
        AuthUserFile /etc/httpd/users
        Require  user zhangsan
</Directory>


[root@server xixi]# htpasswd -c /etc/httpd/users zhangsan
New password:
Re-type new password:
Adding password for user zhangsan
[root@server xixi]# htpasswd  /etc/httpd/users lisi
New password:
Re-type new password:
Adding password for user lisi
[root@server xixi]# systemctl restart httpd
[root@server xixi]# vim /etc/httpd/conf.d/xiao.conf


<Directory   /pub>

        <RequireAll>
        Require all granted
        Require not ip  192.168.145.128
        </REquireAll>
</Directory>


[root@server xixi]# systemctl restart httpd
[root@server xixi]# curl http://www.xixi.com
this is xixi
2.2.7配置https加密网站
###https 加密网站搭建
(1)安装mod_ssl
[root@localhost ~]# yum install mod_ssl -y- 找到密钥配置文件路径
[root@server ~]# cd /etc/httpd/conf.d/
[root@server conf.d]# ll
total 32
-rw-r--r-- 1 root root 2916 Apr 14 17:23 autoindex.conf
-rw-r--r-- 1 root root  400 Apr 14 17:24 README
-rw-r--r-- 1 root root 8720 Apr 14 17:22 ssl.conf
-rw-r--r-- 1 root root 1252 Apr 14 17:22 userdir.conf
-rw-r--r-- 1 root root  653 Apr 14 17:22 welcome.conf
-rw-r--r-- 1 root root 1394 Jul 10 17:09 xiao.conf
[root@server conf.d]# vim ssl.conf
[root@server conf.d]# vim /etc/httpd/conf.d/xiao.conf
- 网站文件创建
[root@server conf.d]# mkdir /www/private
[root@server conf.d]# echo this is https > /www/private/index.html
(2)虚拟主机标签开启加密验证,标记证书文件的位置和私钥文件的位置
- 创建私钥和证书
[root@server conf.d]# openssl req -newkey rsa:4096 -keyout /etc/pki/tls/private/openlab.key -x509 -days 365 -out /etc/pki/tls/certs/openlab.crt


(3)测试
第一种
[root@server conf.d]# curl -k https://192.168.145.130
this is https    #忽略加密,进行测试
第二种:在windows浏览器上输入 https://192.168.145.130


 1158
1158


 被折叠的 条评论
为什么被折叠?
被折叠的 条评论
为什么被折叠?
 到【灌水乐园】发言


