


文章目录
一、自定义组件是什么?
自定义组件是微信小程序提供的一种将界面和逻辑封装在一起的机制。通过自定义组件,开发者可以将复杂的 UI 结构和交互逻辑抽象成一个独立的单元,从而提高代码的复用性和可维护性。每个自定义组件都有自己的.wxml模板文件、.wxss样式文件、.js逻辑文件和.json配置文件,类似于一个小型的页面。
二、创建自定义组件
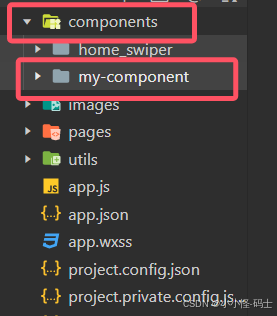
(一)目录结构
首先,在项目的根目录下创建一个components文件夹,用于存放所有的自定义组件。在components文件夹下,再创建一个新的文件夹,例如my - component,这个文件夹就是自定义组件的目录。
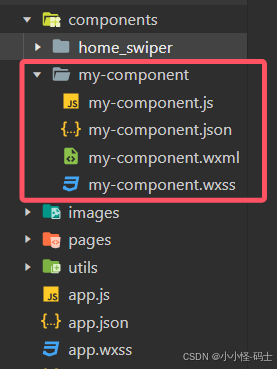
(二)文件创建
在my - component文件夹下,分别创建my - component.wxml、my - component.wxss、my - component.js和my - component.json这四个文件。
- my - component.json:在这个文件中,需要声明这是一个自定义组件。内容如下:
{
  "component": true
}
- my - component.wxml:编写组件的模板结构,例如:
<view class="my - component">
  <text>{{message}}</text>
  <button bindtap="handleClick">点击我</button>
</view>
- my - component.wxss:定义组件的样式,例如:
.my - component {
  padding: 20px;
  background - color: #f0f0f0;
  border - radius: 10px;
}
- my - component.js:编写组件的逻辑,例如:
Component({
  data: {
    message: '这是一个自定义组件'
  },
  methods: {
    handleClick() {
      this.setData({
        message: '你点击了按钮'
      });
    }
  }
});
三、使用自定义组件
(一)在页面中引入
在需要使用自定义组件的页面的.json文件中,引入自定义组件。例如,在pages/index/index.json中:
{
  "usingComponents": {
    "my - component": "/components/my - component/my - component"
  }
}
这里my - component是自定义组件的标签名,/components/my - component/my - component是自定义组件的路径。
(二)在页面中使用
在页面的.wxml文件中,使用自定义组件的标签名来引入组件,例如:
<view class="container">
  <my - component></my - component>
</view>
四、自定义组件的高级技巧—组件间通信
(一) 父子组件通信
- 父组件向子组件传递数据:通过在子组件标签上设置属性来传递数据。例如,在父组件的.wxml中:
<my - component message="{{parentMessage}}"></my - component>
- 在子组件的my - component.js中,通过properties接收数据:
Component({
  properties: {
    message: {
      type: String,
      value: ''
    }
  },
  data: {},
  methods: {}
});
- 子组件向父组件传递数据:通过this.triggerEvent方法触发一个事件,父组件监听这个事件来接收数据。例如,在子组件的my - component.js中:
methods: {
  handleClick() {
    this.triggerEvent('childEvent', { data: '子组件传递的数据' });
  }
}
- 在父组件的.wxml中监听事件:
<my - component bindchildEvent="handleChildEvent"></my - component>
- 在父组件的.js中处理事件:
Page({
  handleChildEvent(e) {
    console.log(e.detail.data);
  }
});
(二) 兄弟组件通信:
可以通过共同的父组件来实现兄弟组件之间的通信,或者使用全局事件总线等方式。


 被折叠的 条评论
为什么被折叠?
被折叠的 条评论
为什么被折叠?
 到【灌水乐园】发言


