


安卓开发——制作打卡签到功能
在我开发的校园公交项目中,司机端中使用到了签到的功能,我想实现的目标是类似于钉钉之类的软件,在每日工作时打卡,记录打卡时间来统计司机的上班情况。
-
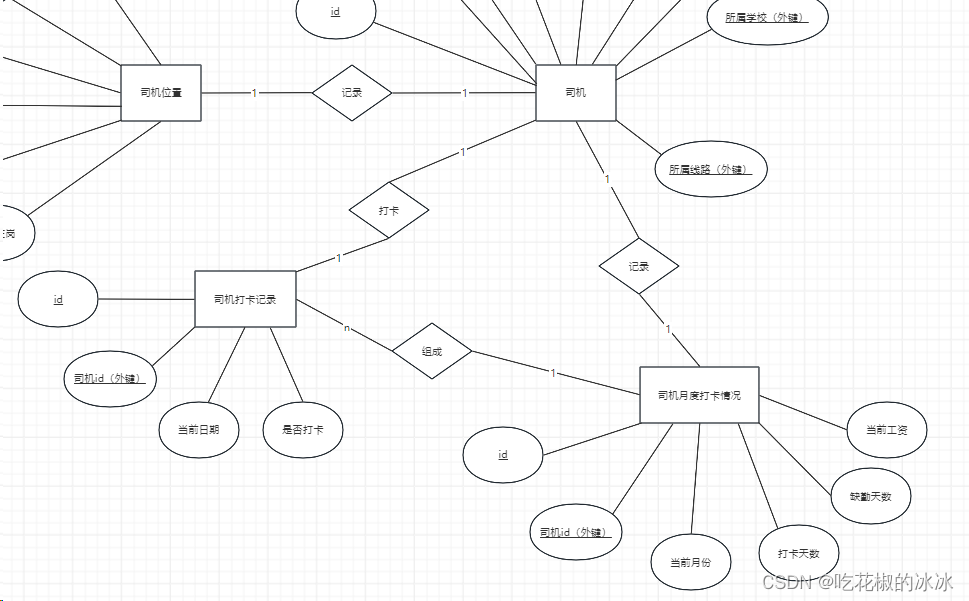
首先考虑数据库的设计。数据库需要用至少一个表来记录打卡人及打卡时间等信息。
-
然后考虑后端视图函数的设计。后端视图函数中要实现的功能应该至少包括获得签到信息并修改数据库,及访问数据库并反馈签到信息的功能。
-
然后是Android前端UI的设计及交互。前端需要用一个开源的日历组件来显示签到页面的各种日期信息。然后需要监听按钮来接收签到请求。
-
最后是Android主线程的设计,需要利用okhttp发送和接收request请求,然后处理相关数据最后呈现在UI界面。
下面我来一个一个讲解
1.数据库的搭建
-
要把每个司机的打卡信息存储起来,并且汇聚成有条理的月度的信息,应该怎么做呢?
我的做法是外键为司机,做一个如下ER图的司机打卡记录表,这样可以记录每个司机的打卡时间。在访问数据库时直接查询相关司机的打卡记录即可获取和整理相关数据。
下面为使用django中写的这两个表
class Driver_clockIn(models.Model):
    clock_in_id=models.AutoField(primary_key=True,verbose_name="id")
    clock_in_driver=models.ForeignKey(Driver,on_delete=models.CASCADE,verbose_name="司机")
    clock_in_date=models.DateField(auto_now=True,verbose_name="打卡时间")
    isclock=models.BooleanField(default=False,verbose_name="是否打卡")
    def __str__(self):
        return self.name
    class Meta:
        db_table='driver_clock_in'

class Driver_month_chockIn(models.Model):
    month_clockIn_id=models.AutoField(primary_key=True,verbose_name="id")
    month_clockIn_driver=models.ForeignKey(Driver,on_delete=models.CASCADE,verbose_name="司机")
    month_clockIn_date=models.DateField(auto_now=True,verbose_name="日期")
    month_clockIn_days=models.IntegerField(default=0,verbose_name="打卡天数")
    month_clockIn_lack_days=models.IntegerField(default=0,verbose_name="缺勤天数")
    month_clockIn_wage=models.IntegerField(default=0,verbose_name="当前工资")
    def __str__(self):
        return self.name
    class Meta:
        db_table='driver_month_clockIn'
在上面的代码中,我在后端只使用了每日打卡表,没有使用月度打卡表,因为我在安卓端打卡时需要获取的是具体的打卡日期,这样就没有月度打卡表的使用需求了,相关信息我也直接可以简单计算获取。这个在下方安卓代码会讲解。
2.视图函数的搭建
下面为django中获取司机打卡日期的及处理司机签到信息的函数
def driver_getSignedDays(request):  #获取该司机打卡过的日期
    if request.method=='POST':
        true_accountGet=request.POST.get('driver_account','')
        driver=Driver.objects.get(account=true_accountGet)
        clock_in_data=Driver_clockIn.objects.filter(clock_in_driver=driver)
        res=[
            {
                'year':clock.clock_in_date.year,
                'month':clock.clock_in_date.month,
                'day':clock.clock_in_date.day,
            }
            for clock in clock_in_data
        ]
        #print(res)
        return JsonResponse(res,safe=False)

def driver_send_clockIn_date(request): #司机发来签到
    if request.method=='POST':
        true_accountGet=request.POST.get('driver_account','')
        driver=Driver.objects.get(account=true_accountGet)
        Driver_clockIn.objects.create(clock_in_driver=driver,isclock=1)
        return HttpResponse('OK')
这里解读一下代码
-
首先是获取司机打卡日期。在进入司机页面时,签到fragment的onCreateView时期就应该调用并获取一次打卡日期,以便于显示在日历上(也就是看自哪天签到了哪天没签)。
-
所以这里先获取请求体中的账号信息,然后直接在签到表查找相关用户的签到信息,将相关信息打包后发送回去。
-
然后是司机签到功能,该账户发来签到信息后,只需要在签到表中新建项即可。
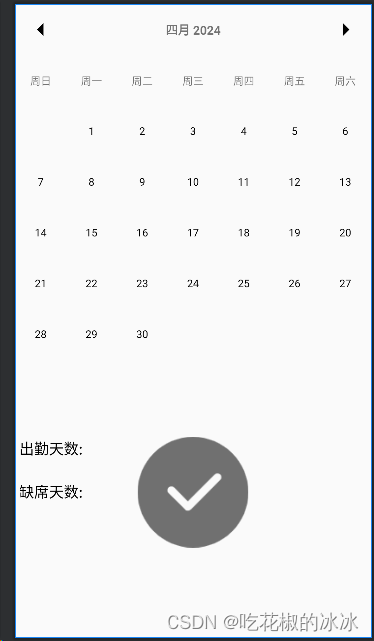
3.Android前端UI界面的设计
这里我的UI界面做的比较粗糙,目的是实现功能。
UI如下图,上方是MaterialCalendarView控件(这个控件自己在github上找),下方是签到按钮和两个TextView
xml文件代码为
<?xml version="1.0" encoding="utf-8"?>
<FrameLayout xmlns:android="http://schemas.android.com/apk/res/android"
    xmlns:app="http://schemas.android.com/apk/res-auto"
    xmlns:tools="http://schemas.android.com/tools"
    android:layout_width="match_parent"
    android:layout_height="match_parent"
    tools:context=".fragment.Checking_In_Fragment">

    <com.prolificinteractive.materialcalendarview.MaterialCalendarView
        android:id="@+id/calendarView"
        android:layout_width="match_parent"
        android:layout_height="wrap_content"
        app:mcv_selectionColor="@color/teal_200"
        app:mcv_showOtherDates="none" />

    <ImageButton
        android:id="@+id/clockIn_button"
        android:layout_width="wrap_content"
        android:layout_height="wrap_content"
        android:background="@drawable/clock_in_none"
        android:layout_marginTop="500dp"
        android:layout_gravity="center_horizontal"
        android:contentDescription="clock in"/>

    <TextView
        android:layout_width="wrap_content"
        android:layout_height="wrap_content"
        android:layout_marginStart="5dp"
        android:layout_marginTop="500dp"
        android:text="出勤天数:"
        android:textSize="17sp"
        android:textColor="@color/black"/>

    <TextView
        android:id="@+id/clockIn_days"
        android:layout_width="40dp"
        android:layout_height="29dp"
        android:layout_marginStart="80dp"
        android:layout_marginTop="500dp"
        android:textColor="@color/blue1"
        android:textSize="17sp"/>

    <TextView
        android:layout_width="wrap_content"
        android:layout_height="wrap_content"
        android:layout_marginStart="5dp"
        android:layout_marginTop="550dp"
        android:text="缺席天数:"
        android:textSize="17sp"
        android:textColor="@color/black"/>

    <TextView
        android:id="@+id/lack_days"
        android:layout_width="40dp"
        android:layout_height="29dp"
        android:layout_marginStart="80dp"
        android:layout_marginTop="550dp"
        android:textColor="@color/red"
        android:textSize="20sp"/>

</FrameLayout>
这个代码就不多解释了,已经配图了。
4.Android主线程的设计
package com.example.myapplication.fragment;

import android.annotation.SuppressLint;
import android.content.Context;
import android.content.SharedPreferences;
import android.graphics.Color;
import android.graphics.drawable.ColorDrawable;
import android.graphics.drawable.Drawable;
import android.os.Bundle;
import android.text.style.ForegroundColorSpan;
import android.util.Log;
import android.view.LayoutInflater;
import android.view.View;
import android.view.ViewGroup;
import android.widget.ImageButton;
import android.widget.TextView;
import android.widget.Toast;

import androidx.annotation.NonNull;
import androidx.core.content.ContextCompat;
import androidx.fragment.app.Fragment;

import com.android.volley.AuthFailureError;
import com.android.volley.NetworkResponse;
import com.android.volley.RequestQueue;
import com.android.volley.Response;
import com.android.volley.VolleyError;
import com.android.volley.toolbox.StringRequest;
import com.android.volley.toolbox.Volley;
import com.example.myapplication.R;
import com.example.myapplication.javabean.ServerSetting;
import com.example.myapplication.javabean.django_url;
import com.prolificinteractive.materialcalendarview.CalendarDay;
import com.prolificinteractive.materialcalendarview.DayViewDecorator;
import com.prolificinteractive.materialcalendarview.DayViewFacade;
import com.prolificinteractive.materialcalendarview.MaterialCalendarView;
import com.prolificinteractive.materialcalendarview.OnMonthChangedListener;

import org.json.JSONArray;
import org.json.JSONException;
import org.json.JSONObject;

import java.io.IOException;
import java.util.ArrayList;
import java.util.Calendar;
import java.util.HashMap;
import java.util.List;
import java.util.Map;

import okhttp3.Call;
import okhttp3.Callback;
import okhttp3.FormBody;
import okhttp3.OkHttpClient;
import okhttp3.Request;
import okhttp3.RequestBody;

/**
 * A simple {@link Fragment} subclass.
 * Use the {@link Checking_In_Fragment#newInstance} factory method to
 * create an instance of this fragment.
 */
public class Checking_In_Fragment extends Fragment {

    // TODO: Rename parameter arguments, choose names that match
    // the fragment initialization parameters, e.g. ARG_ITEM_NUMBER
    private static final String ARG_PARAM1 = "param1";
    private static final String ARG_PARAM2 = "param2";

    // TODO: Rename and change types of parameters
    private String mParam1;
    private String mParam2;
    private View rootView;
    private MaterialCalendarView mvc;
    private ImageButton clockIn_button;
    private List<CalendarDay> selectedDates_true = new ArrayList<>();

    private SharedPreferences sharedPreferences;

    private CalendarDay currentDate=CalendarDay.today();
    private TextView clockIn_days,lack_days;

    public Checking_In_Fragment() {
        // Required empty public constructor
    }

    /**
     * Use this factory method to create a new instance of
     * this fragment using the provided parameters.
     *
     * @param param1 Parameter 1.
     * @param param2 Parameter 2.
     * @return A new instance of fragment Checking_In_Fragment.
     */
    // TODO: Rename and change types and number of parameters
    public static Checking_In_Fragment newInstance(String param1, String param2) {
        Checking_In_Fragment fragment = new Checking_In_Fragment();
        Bundle args = new Bundle();
        args.putString(ARG_PARAM1, param1);
        args.putString(ARG_PARAM2, param2);
        fragment.setArguments(args);
        return fragment;
    }

    @Override
    public void onCreate(Bundle savedInstanceState) {
        super.onCreate(savedInstanceState);
        if (getArguments() != null) {
            mParam1 = getArguments().getString(ARG_PARAM1);
            mParam2 = getArguments().getString(ARG_PARAM2);
        }
    }

    @Override
    public View onCreateView(LayoutInflater inflater, ViewGroup container,
                             Bundle savedInstanceState) {
        // Inflate the layout for this fragment
        if(rootView==null)
        {
            rootView=inflater.inflate(R.layout.fragment_checking__in_, container, false);
        }
        mvc=rootView.findViewById(R.id.calendarView);
        clockIn_button=rootView.findViewById(R.id.clockIn_button);
        clockIn_days = rootView.findViewById(R.id.clockIn_days);
        lack_days=rootView.findViewById(R.id.lack_days);
        sharedPreferences= requireContext().getSharedPreferences("user", Context.MODE_PRIVATE);
        getSignedDays();  //从服务器获取已签到日期
        set_calender();  //设置日历
        return rootView;
    }
    public void getSignedDays() {
        String url = ServerSetting.ServerPublicIpAndPort+"driver_getSignedDays/";
        String driver_account=sharedPreferences.getString("driver_account","");
        OkHttpClient okHttpClient = new OkHttpClient();  //构建一个网络类型的实例
        RequestBody requestBody = new FormBody.Builder()
                .add("driver_account", driver_account)
                .build();
        Request request = new Request.Builder() //构建一个具体的网络请求对象,具体的请求url,请求头,请求体等
                .url(url)
                .post(requestBody)
                .build();
        Call call = okHttpClient.newCall(request); //将具体的网络请求与执行请求的实体进行绑定
        call.enqueue(new Callback() {
            @Override
            public void onFailure(@NonNull Call call, @NonNull IOException e) {
                requireActivity().runOnUiThread(new Runnable() {
                    @Override
                    public void run() {
                        Toast.makeText(requireActivity(), "请检查网络", Toast.LENGTH_SHORT).show();
                    }
                });
            }
            @Override
            public void onResponse(@NonNull Call call, @NonNull okhttp3.Response response) throws IOException {
                if (!response.isSuccessful()) {
                    // 请求不成功,处理错误响应
                    final String errorMessage = response.body().string();
                    // 切换到主线程更新 UI
                    requireActivity().runOnUiThread(new Runnable() {
                        @Override
                        public void run() {
                            Toast.makeText(requireActivity(), "签到失败:" + errorMessage, Toast.LENGTH_SHORT).show();
                        }
                    });
                }else{
                    int year,month,day;
                    List<CalendarDay> selectedDates = new ArrayList<>();
                    try {
                        String responseData = response.body().string();
                        JSONArray jsonArray =new JSONArray(responseData);   //将string类型的response转换为JSONObject类型的object

                        for(int i=0;i<jsonArray.length();i++)
                        {
                            JSONObject object = jsonArray.getJSONObject(i);
                            year=Integer.parseInt(object.getString("year"));
                            month=Integer.parseInt(object.getString("month"));
                            day=Integer.parseInt(object.getString("day"));

                            selectedDates.add(CalendarDay.from(year,month-1,day));
                        }
                        //Log.e("TAG?!?!?!?!", "run: "+selectedDates);
                        selectedDates_true=selectedDates;
                    } catch (JSONException e) {
                        throw new RuntimeException(e);
                    }
                    for (CalendarDay selectedDate : selectedDates) {
                        requireActivity().runOnUiThread(new Runnable() {
                            @Override
                            public void run() {
                                mvc.addDecorators(new SelectedDayDecorator(selectedDate, Color.parseColor("#ADD8E6")));
                            }
                        });
                        if(selectedDate.equals(currentDate)){
                            requireActivity().runOnUiThread(new Runnable() {
                                @Override
                                public void run() {
                                    clockIn_button.setImageResource(R.drawable.clock_in_ok);
                                }
                            });
                        }
                    }
                    //
                    int month_work_days=0;
                    int month_lack_days;
                    for (CalendarDay selectedDate : selectedDates) {
                        if(selectedDate.getMonth()+1==currentDate.getMonth()+1&&selectedDate.getYear()==currentDate.getYear())
                        {
                            month_work_days++;
                        }
                    }
                    month_lack_days=currentDate.getDay()-month_work_days;
                    int finalMonth_work_days = month_work_days;
                    requireActivity().runOnUiThread(new Runnable() {
                        @Override
                        public void run() {
                            lack_days.setText(String.valueOf(month_lack_days));
                            clockIn_days.setText(String.valueOf(finalMonth_work_days));
                        }
                    });
                }
            }
        });
    }
    private void set_calender() {
        mvc.setSelectionMode(MaterialCalendarView.SELECTION_MODE_NONE);
        Calendar minDate = Calendar.getInstance();
        minDate.add(Calendar.YEAR, -1);
        Calendar maxDate = Calendar.getInstance();
        maxDate.add(Calendar.YEAR, 1);
        mvc.state().edit()
                .setMinimumDate(minDate)
                .setMaximumDate(maxDate)
                .commit();

        //将今天变为选中状态
        mvc.setDateSelected(currentDate, true);

        // 将今天及以前的所有日期标记为红色
        CalendarDay startDay = currentDate;
        while (startDay.isAfter(CalendarDay.from(currentDate.getYear(), currentDate.getMonth(), 1))) {
            mvc.addDecorators(new DayDecorator(startDay, Color.RED));
            Calendar calendar = startDay.getCalendar();
            calendar.add(Calendar.DAY_OF_MONTH, -1);
            startDay = CalendarDay.from(calendar);
        }
    }

    @Override
    public void onResume() {
        super.onResume();
        clockIn_button.setOnClickListener(new View.OnClickListener() {
            @SuppressLint("UseCompatLoadingForDrawables")
            @Override
            public void onClick(View view) {
                Drawable background = clockIn_button.getDrawable();
                Drawable grayDrawable = ContextCompat.getDrawable(requireContext(), R.drawable.clock_in_none);
                if (background==null||background.getConstantState() == null || background.getConstantState().equals(grayDrawable.getConstantState())) {
                    // 若是空或为灰色则可执行签到

                    //Log.e("TAG?!?!?!?!", "run: ????");
                    send_clockIn();  // 向服务器发送签到数据
                }
            }
        });
        mvc.setOnMonthChangedListener(new OnMonthChangedListener() {  //翻页监听器
            @Override
            public void onMonthChanged(MaterialCalendarView widget, CalendarDay date) {
                int month = date.getMonth() + 1; // 月份是从0开始计数的,所以要加1
                int year = date.getYear();
                Calendar calendar=date.getCalendar();
                int total_days=calendar.getActualMaximum(Calendar.DAY_OF_MONTH);
                int month_work_days=0;
                int month_lack_days;
                for (CalendarDay selectedDate : selectedDates_true) {
                    if(selectedDate.getMonth()+1==month&&selectedDate.getYear()==year)
                    {
                        month_work_days++;
                    }
                }
                if(year==currentDate.getYear()&&month==currentDate.getMonth()+1)
                    month_lack_days=currentDate.getDay()-month_work_days;
                else
                    month_lack_days=total_days-month_work_days;
                lack_days.setText(String.valueOf(month_lack_days));
                clockIn_days.setText(String.valueOf(month_work_days));
            }
        });
    }

    public void send_clockIn() {
        String url = ServerSetting.ServerPublicIpAndPort+"driver_send_clockIn_date/";
        String driver_account=sharedPreferences.getString("driver_account","");
        OkHttpClient okHttpClient = new OkHttpClient();  //构建一个网络类型的实例
        RequestBody requestBody = new FormBody.Builder()
                .add("driver_account", driver_account)
                .build();
        Request request = new Request.Builder() //构建一个具体的网络请求对象,具体的请求url,请求头,请求体等
                .url(url)
                .post(requestBody)
                .build();
        Call call = okHttpClient.newCall(request); //将具体的网络请求与执行请求的实体进行绑定
        call.enqueue(new Callback() {
            @Override
            public void onFailure(@NonNull Call call, @NonNull IOException e) {
                requireActivity().runOnUiThread(new Runnable() {
                    @Override
                    public void run() {
                        Toast.makeText(requireActivity(), "签到失败:请检查网络", Toast.LENGTH_SHORT).show();
                    }
                });
            }
            @Override
            public void onResponse(@NonNull Call call, @NonNull okhttp3.Response response) throws IOException {
                if (!response.isSuccessful()) {
                    // 请求不成功,处理错误响应
                    final String errorMessage = response.body().string();
                    // 切换到主线程更新 UI
                    requireActivity().runOnUiThread(new Runnable() {
                        @Override
                        public void run() {
                            Toast.makeText(requireActivity(), "签到失败:" + errorMessage, Toast.LENGTH_SHORT).show();
                        }
                    });
                }else{
                    requireActivity().runOnUiThread(new Runnable() {
                        @Override
                        public void run() {
                            Toast.makeText(getContext(), "签到成功", Toast.LENGTH_SHORT).show();
                            getSignedDays(); //重新获取一次签到数据
                        }
                    });

                }

            }
        });
    }
}

// DayDecorator 类用于标记今天以前的日期为红色
class DayDecorator implements DayViewDecorator {
    private final CalendarDay date;
    private final int color;

    public DayDecorator(CalendarDay date, int color) {
        this.date = date;
        this.color = color;
    }

    @Override
    public boolean shouldDecorate(CalendarDay day) {  //判断是否应该装饰该日期
        return day.isBefore(date) || day.equals(date);
    }

    @Override
    public void decorate(DayViewFacade view) { //实际装饰操作
        view.addSpan(new ForegroundColorSpan(color));
    }
}
// SelectedDayDecorator 类用于给定日期添加浅蓝色圆圈
class SelectedDayDecorator implements DayViewDecorator {
    private final CalendarDay date;
    private final int color;

    public SelectedDayDecorator(CalendarDay date, int color) {
        this.date = date;
        this.color = color;
    }

    @Override
    public boolean shouldDecorate(CalendarDay day) {
        return day.equals(date);
    }

    @Override
    public void decorate(DayViewFacade view) {
        view.setSelectionDrawable(new ColorDrawable(color));
        view.addSpan(new ForegroundColorSpan(Color.WHITE));
    }
}-
上面的代码很清晰的写了整个运作流程。
-
在创建视图时绑定各种控件,然后用getSignedDays()从服务器获取签到信息,并依据今日是否签到来给按钮上色,未签到就是灰色,签到后就是蓝色。并将缺勤和出勤天数计算并显示(注意在子线程对UI操作时需要跳到主线程进行)。
-
在签到按钮的监听中,若按钮为灰色,则说明未签到,在触发后即可调用send_clockIn()来发送签到数据。签到后将重新调用一次获取签到数据的操作,这样可以保证页面出勤缺勤等信息是最新的。
至此所有相关操作就结束了。细节大家可以详细阅读我的代码,也有比较详细的注释。
有问题可以留言评论区,我会尽力解决


 被折叠的 条评论
为什么被折叠?
被折叠的 条评论
为什么被折叠?
 到【灌水乐园】发言


