


Vue学习
本篇文章的目标:学习Vue,并且会更新学习 js,Es6等。
视频来自于黑马:025-v-bind操作class_哔哩哔哩_bilibili
Node&包管理器
介绍:
Node.js是一个基于JavaScript的平台,它让JavaScript能够在服务端执行。
简介:
Node下载完后,会自带一个对应的npm(node环境下的包管理器,Node提供的一个npm服务器,开源的类似github这样。服务器可以供给我们开发人员可以从这服务器上去拉取代码包库,拉去到本地),都可以去查看版本。
当有时候拉去第三方的包,他所需的npm版本与下载的本地版本不一致,这时候可以卸载node,下载对应的node版本。
其他:
npm拉去包时,有一些国外的,或者网速慢,就会出现丢包,包下载 失败的情况。
解决办法:
1.使用镜像,例如淘宝镜像,把我们的地址,映射到淘宝镜像,从而快速拉取。
2.安装yarn(其实是在npm上去开发的一个包管理器)他更稳定,错误极端情况很少的,推荐使用
使用步骤:
npm install --global yarn 直接在cmd窗口运行即可。
查看版本:
yarn -v
node -v
npm -v
yarn使用:
yarn init 初始化创建工程
yarn add vue(@指定版本) 安装vue 安装node_modules包,适用于初始化工程后执行。
yarn upgrade vue(可以添加@x.x.x来指定版本同上) 升级vue版本
yarn remove vue 移除vue
yarn / yarn install / npm install 安装node_modules包,拉取别人写好的工程
执行yarn 命令出错:
提示yarn : 无法加载文件 C:\Users\Admin\AppData\Roaming\npm\yarn.ps1,因为在此系统
解决:
yarn : 无法加载文件 C:\Users\Administrator\AppData\Roaming\npm\yarn.ps1,因为在此系统上禁止运行脚本。-CSDN博客
搜索Windows PowerShell 管理员运行,set-ExecutionPolicy RemoteSigned , Y .
v-on
细节: v-on:可以简写为@
作用: 注册事件 = 添加监听 + 提供处理逻辑
案例1
代码:
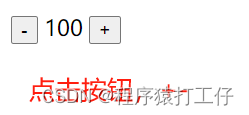
<div id="app">
    <!-- v-on绑定事件,mouseenter是鼠标划入事件 -->
    <!-- <button v-on:mouseenter="count--">-</button> -->
    <button v-on:click="count--">-</button>
    <span>{{count}}</span>
    <button v-on:click="count++">+</button>
  </div>
  <script src="./vue.js"></script>
  <script>
    const app = new Vue({
      el: '#app',
      data: {
        count : 100,
      }
    })
  </script>
实现效果:
案例2
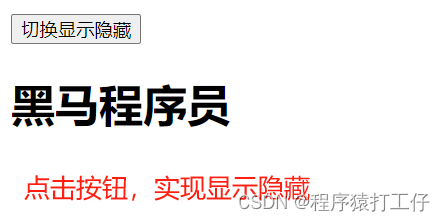
细节:频繁切换用v-show,this指向的就是vue对象
代码:
<div id="app">
    <button @click="fn">切换显示隐藏</button>
    <h1 v-show="isShow">黑马程序员</h1>
  </div>
  <script src="./vue.js"></script>
  <script>
    const app = new Vue({
      el: '#app',
      data: {//data中的数据,其实已经挂载到vue对象上了
        isShow : true ,
      },
      methods: {
        fn(){
          // console.log('isShow-->'+isShow); //isShow全局变量,找不到,会报错
          // vue让提供的所有的methods中的函数,this都指向当前实例,就是new出来的Vue,也就是 app
          console.log('isShow-->' + app.isShow);
          console.log('isShow-->' + this.isShow);
          this.isShow = !this.isShow   // ! 取反
        }
      }
    })
  </script>
实现效果:
案例3
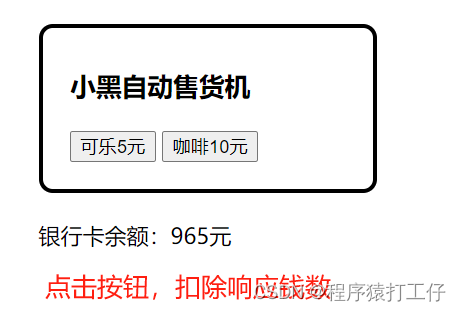
v-on调用传参
细节:以前""中写的是方法名,现在可以是 方法名(参数1,参数2...)。要记得money变量要用this哦
代码:
<div id="app">
    <div class="box">
      <h3>小黑自动售货机</h3>
      <button @click="fn(5)">可乐5元</button>
      <button @click="fn(10)">咖啡10元</button>
    </div>
    <p>银行卡余额:{{money}}元</p>
  </div>

  <script src="./vue.js"></script>
  <script>
    const app = new Vue({
      el: '#app',
      data: {
        money : 1000,
      },
      methods:{
        fn(consume){
          this.money = this.money - consume
        }
      }
    })
  </script>
实现效果:
v-for
作用:多次渲染元素 ->可以渲染 数组,对象,数组
语法:v-for="(item , index) in 数组" item遍历的每一项 index是遍历的下标
细节:(item , index) in 数组中,index可以省略,甚至括号也可以省略,只有item
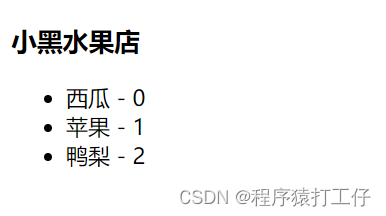
案例1:基础遍历
代码:
<div id="app">
    <h3>小黑水果店</h3>
    <ul>
      <li v-for="(item , index) in list">
        {{item}} - {{index}}
      </li>
    </ul>
  </div>

  <script src="./vue.js"></script>
  <script>
    const app = new Vue({
      el: '#app',
      data: {
        list: ['西瓜', '苹果', '鸭梨']
      }
    })
  </script>
实现效果:
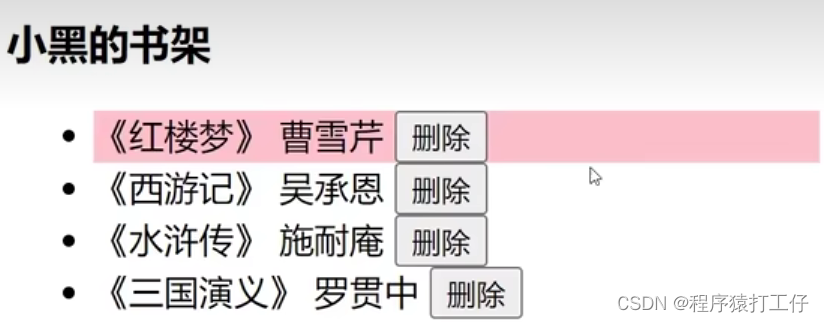
案例2:遍历数据,删除
本案例中,v-for后,没有添加:key="item.id" 也不影响效果,但是不是很完美,有些瑕疵,为什么加参考案例3说明
细节:数据中,有id,优先使用id(因为id是唯一标识,更加的稳定,相比于数组的索引下标)。
js中filter()方法不会改变原数组,保留满足条件的对应项,得到一个新数组
代码:
<div id="app">
<h3>小黑的书架</h3>
<ul>
<li v-for="(item , index) in booksList">
<span>{{item.name}}</span>
<span>{{item.author}}</span>
<!-- 注册点击事件 ->通过id删除数组中对应的数据 -->
<button @click="del(item.id)">删除</button>
</li>
</ul>
</div>
<script src="./vue.js"></script>
<script>
const app = new Vue({
el: '#app',
data: {
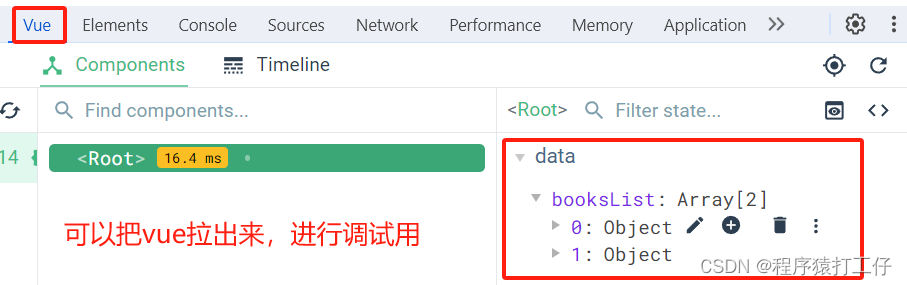
booksList: [
{ id: 1, name: '《红楼梦》', author: '曹雪芹' },
{ id: 2, name: '《西游记》', author: '吴承恩' },
{ id: 3, name: '《水浒传》', author: '施耐庵' },
{ id: 4, name: '《三国演义》', author: '罗贯中' }
]
},
methods: {
del(id) {
// filter方法不会改变原数组,会生成一个新数组
console.log(this.booksList.filter(item => item.id != id ));
this.booksList = this.booksList.filter(item => item.id != id )
}
}
})
</script>运行效果:

案例3:v-for的key
key的作用:给元素添加唯一标识,便于Vue进行列表项的正确排序复用
底层可能和diff算法有关
注意点:
1.key的值只能是 字符串 和 数字类型
2.key的值必须具有 唯一性
3.推荐使用 id 作为 key(唯一) ,不推荐使用 index 作为key (会变化,不对应)
案例:
加key的效果
粉色背景的li会被删掉,有key可以有效的找到每一项对应数据
不加key的效果

粉色样式还会存在,只是数据消失,依次向上移动(点击第一个删除时,他其实把最后一个li删掉了,但是第一条数据删除了,剩下的数据向上移动了)
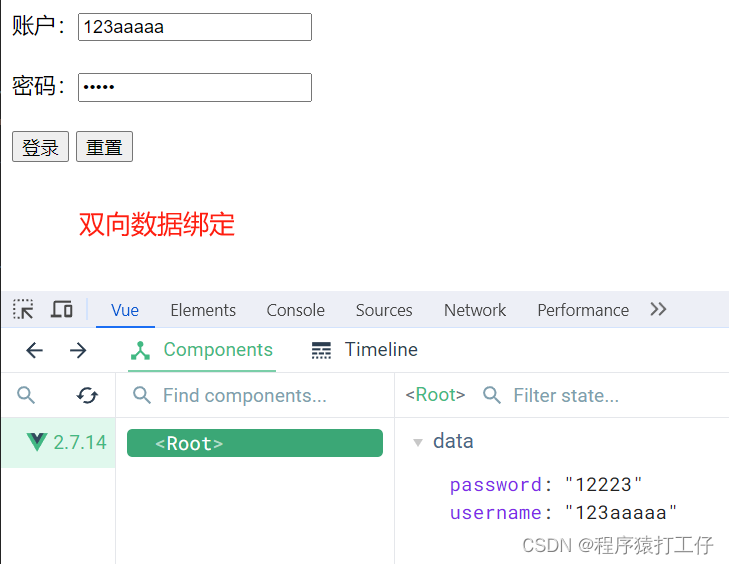
v-model
作用:给表单元素使用的,双向数据绑定 -> 可以快速获取 或 设置 表单元素内容
小提示:vue是数据驱动的,数据变化,视图更新
代码:
<div id="app">
    <!--
      v-model可以让视图和数据 实现 双向绑定
      1.数据改变,视图改变
      2.视图改变,数据改变
      可以快速[获取]或[设置]表单元素的内容
     -->
    账户:<input type="text" v-model="username"> <br><br>
    密码:<input type="password" v-model="password"> <br><br>
    <button @click="login">登录</button>
    <button @click="reset()">重置</button>
  </div>
  <script src="./vue.js"></script>
  <script>
    const app = new Vue({
      el: '#app',
      data: {
        username:'',
        password:''
      },
      methods: {
        login(){
          console.log(this.username,this.password);
        },
        reset(){
          this.username = '',
          this.password = ''
        }
      },
    })
  </script>
代码实现:
v-bind操作
作用:动态的设置html的标签属性--> src url title
语法:v-bind:属性名 = "表达式" 简写为 :属性名
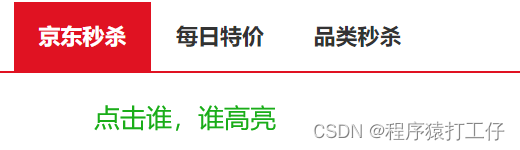
案例1:单机效果
细节:v-for时,要写 :key 有id用id
代码:
  <div id="app">
    <ul>
      <li v-for="(item, index) in list" :key="item.id" @click="activeIndex = index">
        <a :class="{active:activeIndex === index}" href="#">{{item.name}}</a>
      </li>
    </ul>
  </div>
  <script src="./vue.js"></script>
  <script>
    const app = new Vue({
      el: '#app',
      data: {
        activeIndex: 0,
        list: [
          { id: 1, name: '京东秒杀' },
          { id: 2, name: '每日特价' },
          { id: 3, name: '品类秒杀' }
        ]
      }
    })
  </script>
active是一个类 actice:true/false
实现效果:
案例2:进度条
v-bind对于样式控制的增强 - 操作style
细节::style="{这是一个js对象}" | 一定要符合js对象的规范(例如:400px,要加单引号) | background-color带横杠不行 | 命名规范
<div id="app">
    <!-- :style="{这是一个js对象}"  |  一定要符合js对象的规范 | background-color带横杠不行-->
    <!-- 1.要么加单引号'background-color'  2.改成小驼峰backgroundColor -->
    <div class="box" :style="{width:'400px',height:'200px', background-color : green}"></div>
  </div>
代码:
<div id="app">
    <!-- 外层盒子,就是底色 -->
    <div class="progress">
      <!-- 内部盒子,就是进度 -->
      <div class="inner" :style="{ width : parcent+'%'}">
        <span>{{parcent}}%</span>
      </div>
    </div>
    <button @click="parcent = 25">设置25%</button>
    <button @click="parcent = 50">设置50%</button>
    <button @click="parcent = 75">设置75%</button>
    <button @click="parcent = 100">设置100%</button>
  </div>
  <script src="./vue.js"></script>
  <script>
    const app = new Vue({
      el: '#app',
      data: {
        parcent: 0
      }
    })
  </script>
parcent+'%' ,因为在js对象中,是可以拼接的。
实现效果:

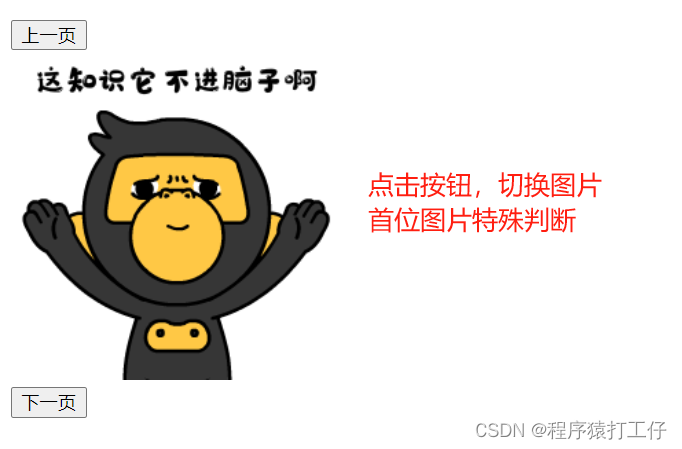
案例3:图片切换
代码:
<div id="app">
    <button v-show="index > 0" @click="index--">上一页</button>
    <div>
      <img :src="list[index]" alt="">
    </div>
    <button v-show="index < list.length - 1" @click="index++">下一页</button>
  </div>
  <script src="./vue.js"></script>
  <script>
    const app = new Vue({
      el: '#app',
      data: {
        index:0,
        list: [
          './imgs/11-00.gif',
          './imgs/11-01.gif',
          './imgs/11-02.gif',
          './imgs/11-03.gif',
          './imgs/11-04.png',
          './imgs/11-05.png',
        ]
      }
    })
  </script>
实现效果:
阶段案例:小黑记事本
对应视频P22
细节:没一条数据前的序号,不要用id,要用index,要不然删除后,序号不连续。
删除数据用filter()方法。 v-for时,要有key
添加事项时,id一般是后端传过来的,此处用一个时间搓代替,不会重复
频繁切换用v-show
代码:
<!-- 主体区域 -->
<section id="app">
  <!-- 输入框 -->
  <header class="header">
    <h1>小黑记事本</h1>
    <input placeholder="请输入任务" class="new-todo" v-model="todoName"/>
    <button class="add" @click="add">添加任务</button>
  </header>
  <!-- 列表区域 -->
  <section class="main">
    <ul class="todo-list">
      <li class="todo" v-for="(item,index) in list" :key="item.id">
        <div class="view">
          <span class="index">{{index + 1}}</span> <label>{{item.todo}}</label>
          <button class="destroy" @click="del(item.id)"></button>
        </div>
      </li>
    </ul>
  </section>
  <!-- 统计和清空 -->
  <!-- 当数组没有元素时,不显示。频繁切换用v-show -->
  <footer class="footer" v-show="list.length > 0">
    <!-- 统计 -->
    <span class="todo-count">合 计:<strong> {{list.length}} </strong></span>
    <!-- 清空 -->
    <button class="clear-completed" @click="clear">
      清空任务
    </button>
  </footer>
</section>

<!-- 底部 -->
<script src="https://cdn.jsdelivr.net/npm/vue/dist/vue.js"></script>
<script>
  //添加功能
  //1.通过 v-model 绑定 输入框 ->实时获取表单中元素的内容
  //2.点击按钮,进行新增,本质上是网数组最前面添加unshift
  const app = new Vue({
    el: '#app',
    data: {
      todoName:'',
      list:[
        {
          id : 1,
          todo : '早起'
        },
        {
          id: 2,
          todo: '晚睡'
        },
        {
          id: 3,
          todo: '锻炼身体'
        }
      ]
    },
    methods:{
      del(id){
        //删除用filter,不会改变原来的数组,会生成新的数组.保留所有不等于改id的项
        this.list = this.list.filter(item => item.id != id)
      },
      add(){
        if(this.todoName.trim() === ''){
          alert('添加事项不能为空!')
          return
        }
        this.list.unshift({
          id:+new Date,
          todo: this.todoName
        })
        this.todoName = ''  //添加完毕,置空输入框
      },
      clear(){
        this.list = []
      }
    }
  })

</script>
实现效果:

指令的修饰符

v-model应用于其他表单元素
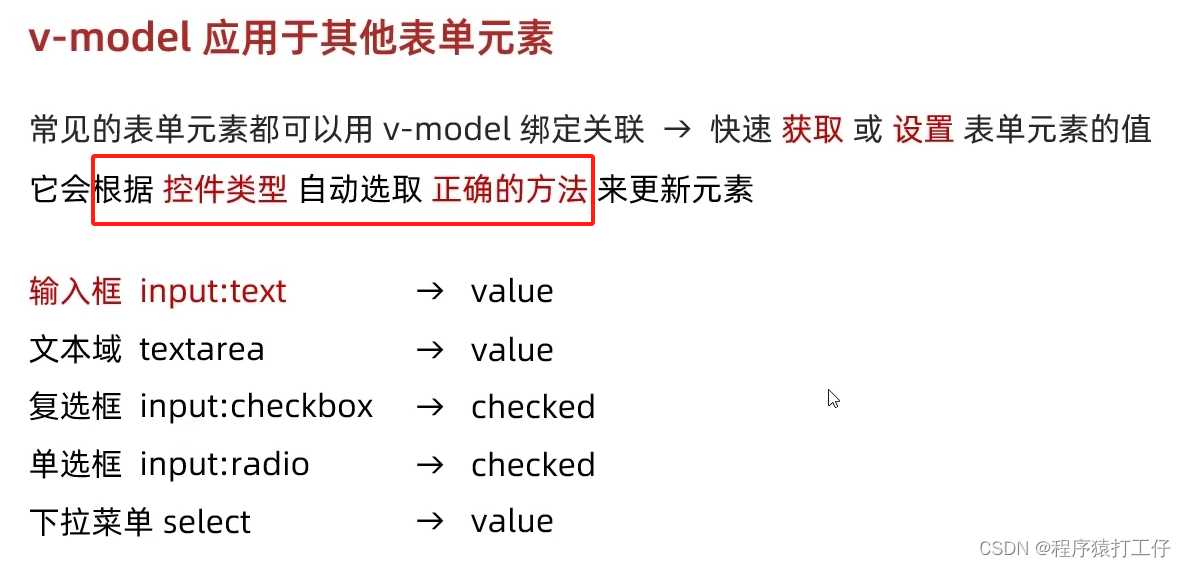
细节:真正用于提交的是value。 这些控件vue会自动选取属性,自动绑定value
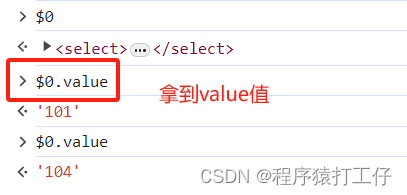
小技巧:
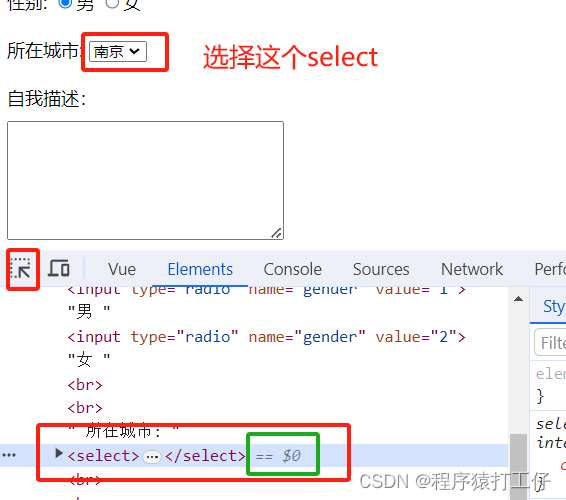
点击后,会有一个 ==$0,可以在控制台输出他,就可以拿到这个元素
代码:
<div id="app">
    <h3>小黑学习网</h3>

    姓名:
      <input type="text" v-model="username">
      <br><br>

    是否单身:
      <input type="checkbox" v-model="isSingle">
      <br><br>

    <!--
      前置理解:
        1. name:  给单选框加上 name 属性 可以分组 → 同一组互相会互斥
        2. value: 给单选框加上 value 属性,用于提交给后台的数据。真正用于提交的是value
      结合 Vue 使用 → v-model
    -->
    性别:
    <input type="radio" name="gender" value="1" v-model="gender">男
    <input type="radio" name="gender" value="2" v-model="gender">女
      <br><br>

    <!--
      前置理解:
        1. option 需要设置 value 值,提交给后台 . 真正用于提交的是value
        2. ***select 的 value 值,关联了选中的 option 的 value 值***
      结合 Vue 使用 → v-model
    -->
    所在城市:
      <select  v-model="city">
        <option value="101">北京</option>
        <option value="102">上海</option>
        <option value="103">成都</option>
        <option value="104">南京</option>
      </select>
      <br><br>

    自我描述:
      <textarea v-model="text"></textarea>

    <button>立即注册</button>
  </div>
  <script src="https://cdn.jsdelivr.net/npm/vue@2/dist/vue.js"></script>
  <script>
    const app = new Vue({
      el: '#app',
      data: {
        username:'',
        isSingle:true,
        gender:'1',
        city:'101',
        text:''
      }
    })
  </script>
实现效果:

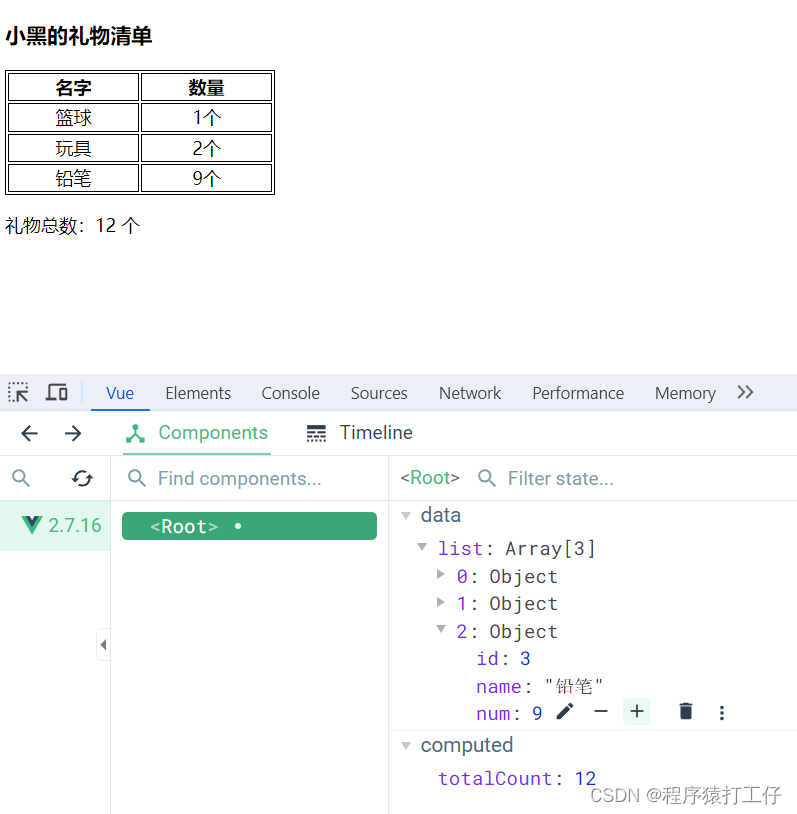
计算属性
细节:computed和data等级对应。一个计算属性对应一个函数。计算属性本质上一个属性。不要因为computed中写了函数,就加上(). 示例: {{totalCount}} 不要加()
数组指定元素求和,用reduce()方法
代码:
<div id="app">
    <h3>小黑的礼物清单</h3>
    <table>
      <tr>
        <th>名字</th>
        <th>数量</th>
      </tr>
      <tr v-for="(item, index) in list" :key="item.id">
        <td>{{ item.name }}</td>
        <td>{{ item.num }}个</td>
      </tr>
    </table>

    <!-- 目标:统计求和,求得礼物总数 -->
    <p>礼物总数:{{totalCount}} 个</p>
  </div>
  <script src="https://cdn.jsdelivr.net/npm/vue@2/dist/vue.js"></script>
  <script>
    const app = new Vue({
      el: '#app',
      data: {
        // 现有的数据
        list: [
          { id: 1, name: '篮球', num: 1 },
          { id: 2, name: '玩具', num: 2 },
          { id: 3, name: '铅笔', num: 5 },
        ]
      },
      computed:{
        totalCount(){
          // 对list中的num求和 -> reduce
          // 0是起始值给到sum, sum + item.num 累加逻辑在给到sum , 依次重复
          let total = this.list.reduce((sum,item) => sum+item.num , 0)
          return total
        }
      }
    })
  </script>
实现效果:
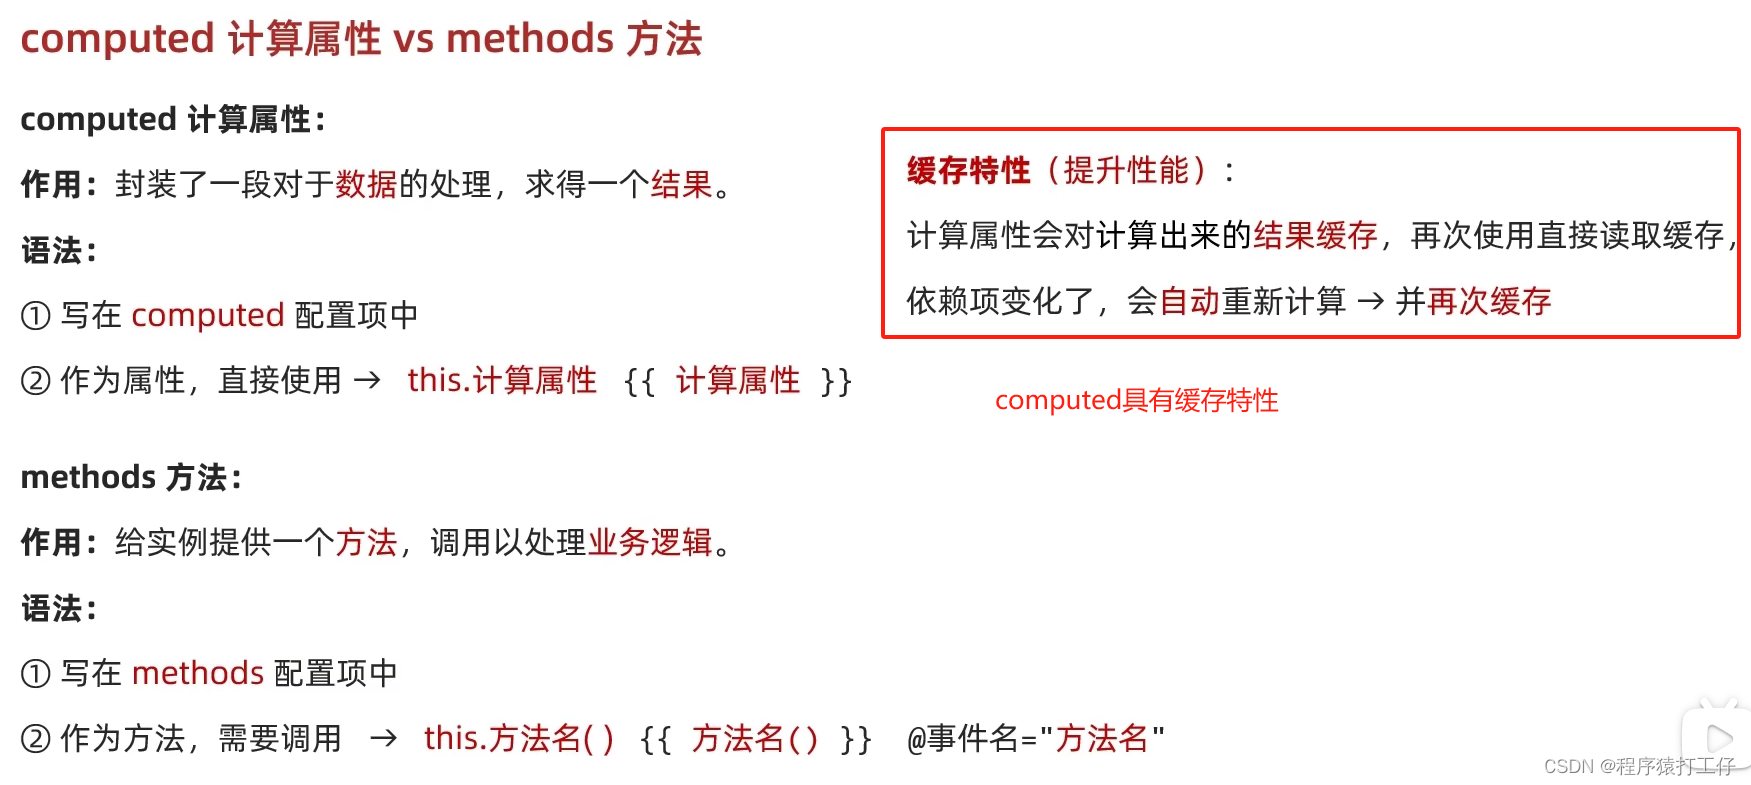
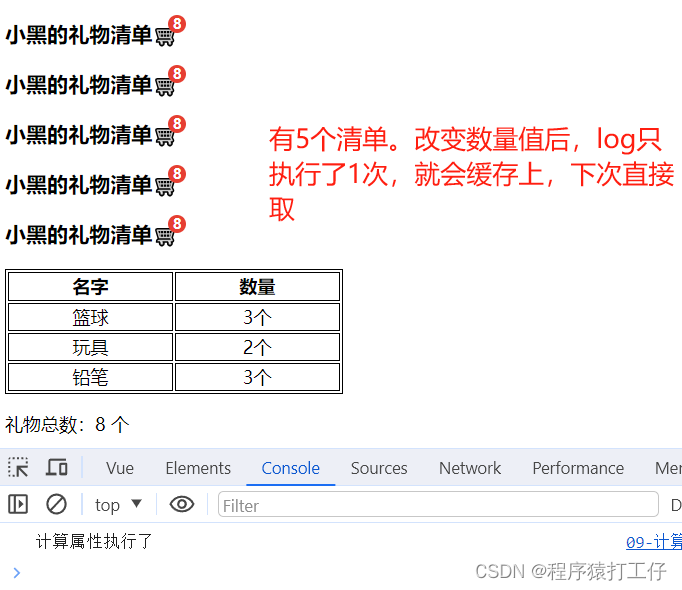
computed和method的区别
细节:方法个侧重于处理业务。computed侧重于数据处理
代码:
<div id="app">
    <h3>小黑的礼物清单🛒<span>{{totalCount()}}</span></h3>
    <h3>小黑的礼物清单🛒<span>{{totalCount()}}</span></h3>
    <h3>小黑的礼物清单🛒<span>{{totalCount()}}</span></h3>
    <h3>小黑的礼物清单🛒<span>{{totalCount()}}</span></h3>
    <h3>小黑的礼物清单🛒<span>{{totalCount()}}</span></h3>
    <table>
      <tr>
        <th>名字</th>
        <th>数量</th>
      </tr>
      <tr v-for="(item, index) in list" :key="item.id">
        <td>{{ item.name }}</td>
        <td>{{ item.num }}个</td>
      </tr>
    </table>

    <p>礼物总数:{{ totalCount }} 个</p>
  </div>
  <script src="https://cdn.jsdelivr.net/npm/vue@2/dist/vue.js"></script>
  <script>
    const app = new Vue({
      el: '#app',
      data: {
        // 现有的数据
        list: [
          { id: 1, name: '篮球', num: 3 },
          { id: 2, name: '玩具', num: 2 },
          { id: 3, name: '铅笔', num: 5 },
        ]
      },
      methods:{
        totalCount() {
          console.log("method执行了");
          let total = this.list.reduce((sum, item) => sum + item.num, 0)
          return total
        }
      },
      computed: {
        totalCount () {
          // 计算属性有缓存的,一旦计算出来结果,就会立刻缓存
          // 下一次读取 ->直接读缓存就行 -> 性能特别高
          // console.log("计算属性执行了");
          // let total = this.list.reduce((sum, item) => sum + item.num, 0)
          // return total
        }
      }
    })
  </script>
效果展示:
--------------------------------------------------computed-------------------------------------------------
--------------------------------------------------method-------------------------------------------------

计算属性的完整写法
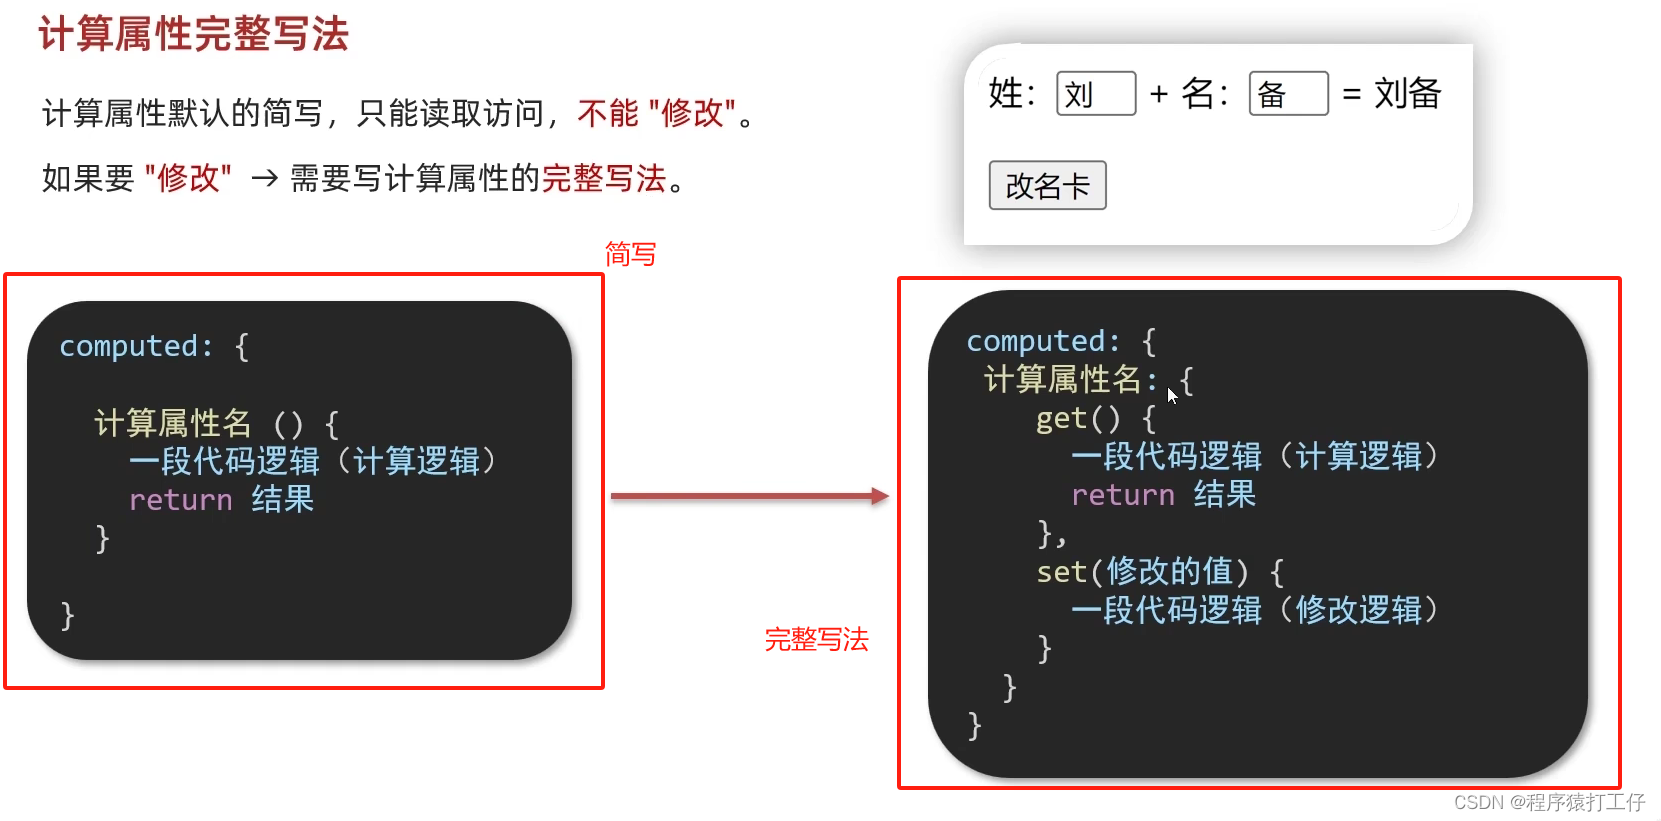
既要获取又要设置的情况并不多,大部分都是写简写。
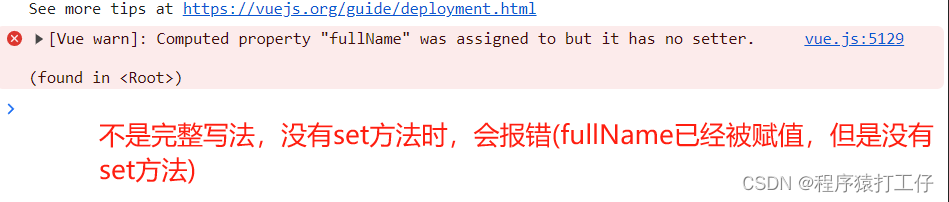
细节:给计算属性赋值时,如果没有set方法,会报错。只需获取时,就用简写就行。如果想要设置的,就得用get和set
截取字符串,用slice()方法
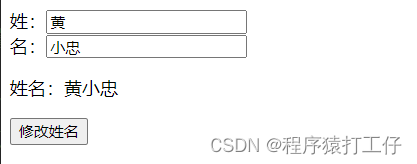
代码:
<div id="app">
    姓:<input type="text" v-model="firstName"><br>
    名:<input type="text" v-model="lastName"><br>
    <p>姓名:{{fullName}}</p>
    <button @click="changeName">修改姓名</button>
  </div>
  <script src="https://cdn.jsdelivr.net/npm/vue@2/dist/vue.js"></script>
  <script>
    const app = new Vue({
      el: '#app',
      data: {
        firstName:'',
        lastName:''
      },
      computed: {
        //简写 ->获取,没有配置设置的逻辑
        // fullName(){
        //   return this.firstName + this.lastName;
        // }

        //完整写法 -> 获取 + 设置
        fullName:{
          // 1.将fullName计算属性,被获取求值时,执行get,有缓存,优先读取缓存
          // 会将返回值作为求值的结果
          get(){
            return this.firstName + this.lastName;
          },
          //2.将fullName计算属性,被修改赋值时 ,会执行set
          // 修改的值,会作为形参,传递给set
          set(value){
            console.log(value.slice(0,1)); // 0,1 截取第一个字符
            console.log(value.slice(1));   //截取 1 包括1往后的字符
            this.firstName = value.slice(0, 1);
            this.lastName = value.slice(1)
          }
        }
      },
      methods: {
        changeName(){
          this.fullName = '黄小忠'   //给计算属性赋值
        }
      }
    })
  </script>
实现效果:
当没有set方法时
正常效果:
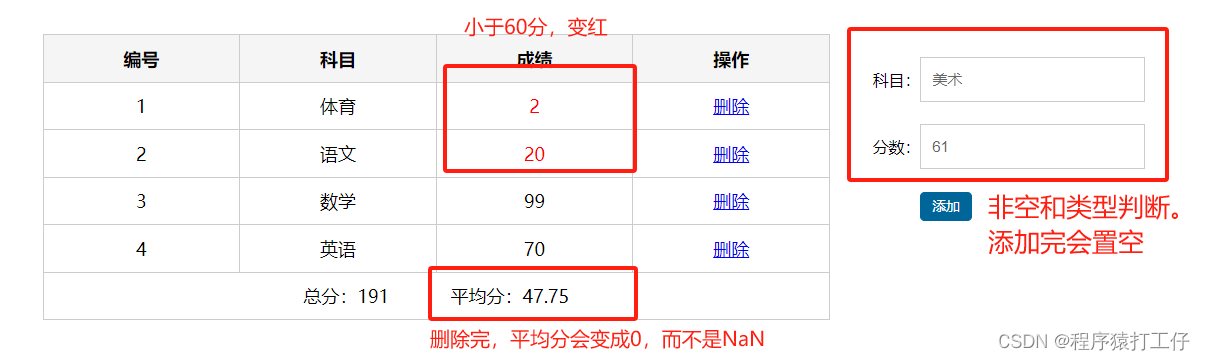
成绩案例(总结了上方学到的内容)
细节:v-bind动态控制样式(分数<60用红色 :class="{red:条件(boolean)}") 。 table中只能有一个tbody,从节点上进行销毁用v-if,直接销毁tbody,只能存在一个。v-show得写两遍(并且不会销毁元素)。 v-for时,渲染出来的编号,要用index,不要用id。输入的内容去空格用v-model.trim。输入的内容转数字用v-model.number。阻止事件行为发生@click.prevent
代码:
<body>
    <div id="app" class="score-case">
      <div class="table">
        <table>
          <thead>
            <tr>
              <th>编号</th>
              <th>科目</th>
              <th>成绩</th>
              <th>操作</th>
            </tr>
          </thead>
          <!-- 正常情况下,只能存在一个tbody,所以要销毁,从节点上进行销毁,用v-if -->
          <tbody v-if="list.length > 0">
            <!-- v-for时,要写key -->
            <tr v-for="(item , index) in list" :key="item.id">
              <td>{{ index + 1 }}</td>
              <td>{{item.subject}}</td>
              <td :class="{red : item.score < 60 }">{{item.score}}</td>
              <td><a @click.prevent="del(item.id)" href="#">删除</a></td>
            </tr>
          </tbody>
          <tbody v-else>
            <tr>
              <td colspan="5">
                <span class="none">暂无数据</span>
              </td>
            </tr>
          </tbody>

          <tfoot>
            <tr>
              <td colspan="5">
                <span>总分:{{sum}}</span>
                <span style="margin-left: 50px">平均分:{{avg}}</span>
              </td>
            </tr>
          </tfoot>
        </table>
      </div>
      <div class="form">
        <div class="form-item">
          <div class="label">科目:</div>
          <div class="input" >
            <input
              type="text"
              placeholder="请输入科目"
              v-model.trim="subject"
            />
          </div>
        </div>
        <div class="form-item">
          <div class="label">分数:</div>
          <div class="input">
            <input
              type="text"
              placeholder="请输入分数"
              v-model.number="score"
            />
          </div>
        </div>
        <div class="form-item">
          <div class="label"></div>
          <div class="input">
            <button class="submit" @click="add">添加</button>
          </div>
        </div>
      </div>
    </div>
    <script src="../vue.js"></script>

    <script>
      const app = new Vue({
        el: '#app',
        data: {
          list: [
            { id: 1, subject: '语文', score: 20 },
            { id: 7, subject: '数学', score: 99 },
            { id: 12, subject: '英语', score: 70 },
          ],
          subject: '',
          score: ''
        },
        methods:{
          add(){
            console.log(this.score);
            if (!this.subject) {//如果subject科目不存在
              alert('请输入科目')
              return
            }
            if (typeof this.score !== 'number') {//判断 已经转换的score 是否为 number类型
              alert('请输入正确成绩')
              return
            }
            this.list.unshift({
              id : +new Date,   //利用时间搓来代替id
              subject: this.subject,
              score: this.score
            })
            this.score = '',
            this.subject = ''
          },
          del(id){
            this.list = this.list.filter(item => item.id != id)
          }
        },
        computed:{
          sum(){
            return this.list.reduce((sum,item) => sum = sum + item.score,0)
          },
          avg(){//计算属性,avg中可以依赖sum中的值,直接用this.就行
            if(this.list.length === 0){//当sum=0,数组长度也为0时,avg就会NaN
              return 0
            }
            return (this.sum / this.list.length).toFixed(2) //保留2位的意思
          }
        }
      })
    </script>
  </body>
实现效果:
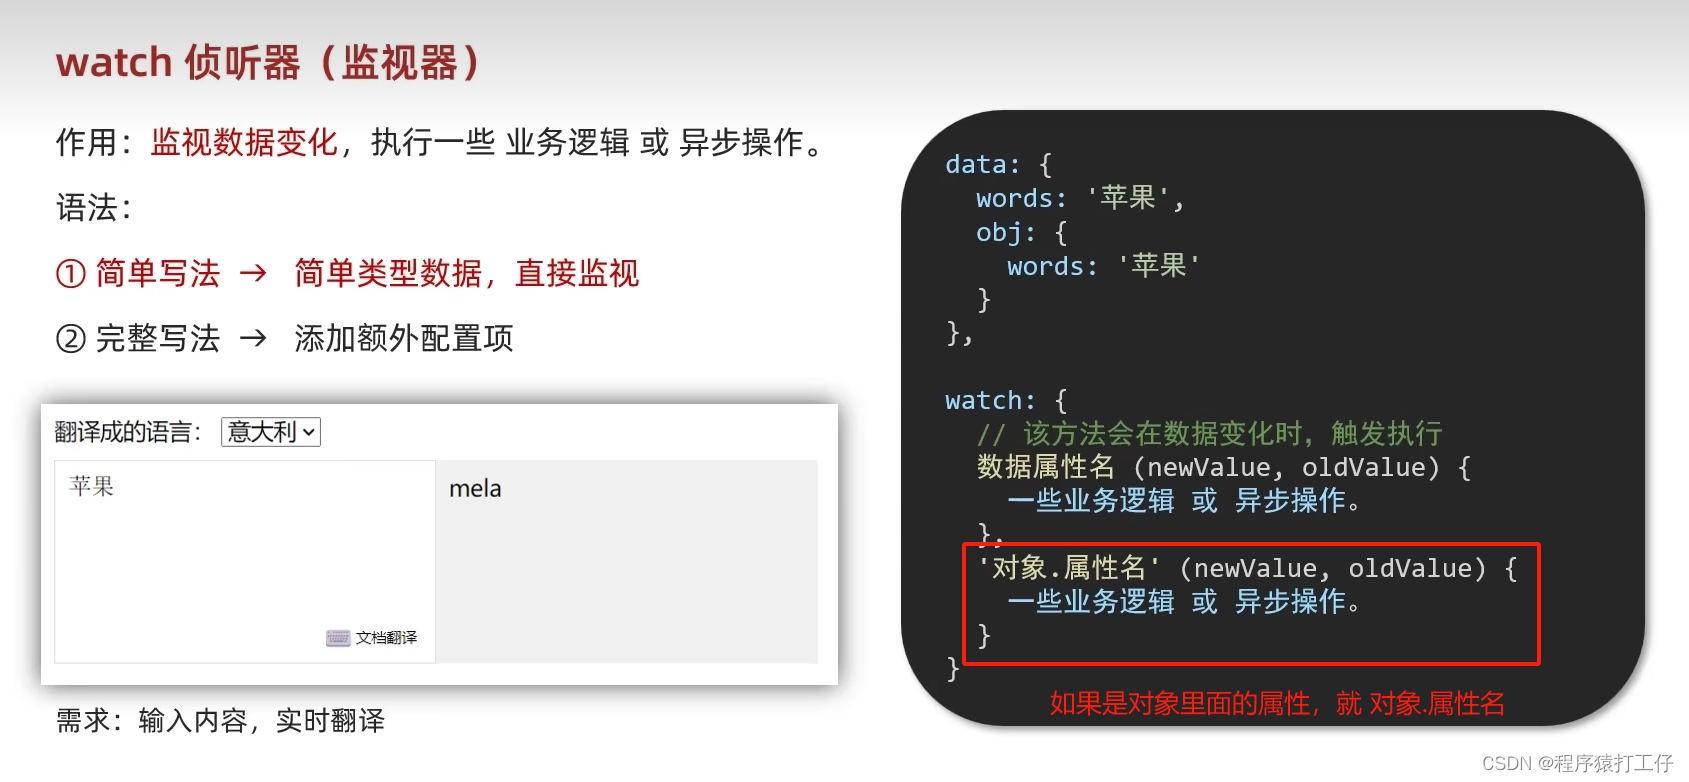
监听器(32没理解,找机会学会)
细节:监视谁,名字就和他一样。在js中,方法名是不允许出现特殊字符的。例如 obj.words,这个时候要加引号,'obj.words'。防抖的使用。
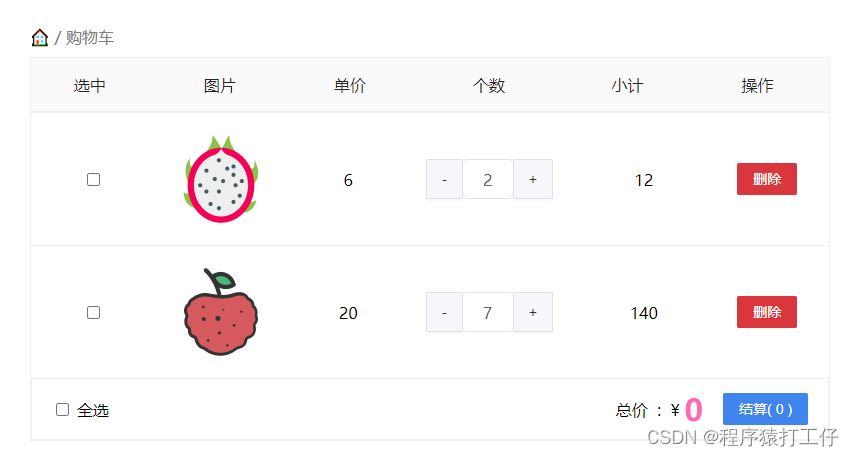
购物车(缺少6持久化到本地)
细节:互斥,只能出现一个,用v-if和v-else。表单元素绑定用v-model(这里的checked选中)。vue中全选反选基本都用计算属性来做。一般什么什么都满足,用every方法(必须所有的都满足条件才返回true)。计算属性的完整写法中的set方法,可以直接获取属性修改的值,set(value),因为有双向绑定。计算属性完整写法,会明白,全选反选要能联想到计算属性。find方法。filter方法。reduce方法。
代码:
<body>
<div class="app-container" id="app">
<!-- 顶部banner -->
<div class="banner-box"><img src="http://autumnfish.cn/static/fruit.jpg" alt="" /></div>
<!-- 面包屑 -->
<div class="breadcrumb">
<span>🏠</span>
/
<span>购物车</span>
</div>
<!-- 购物车主体 -->
<div class="main" v-if="fruitList.length > 0">
<div class="table">
<!-- 头部 -->
<div class="thead">
<div class="tr">
<div class="th">选中</div>
<div class="th th-pic">图片</div>
<div class="th">单价</div>
<div class="th num-th">个数</div>
<div class="th">小计</div>
<div class="th">操作</div>
</div>
</div>
<!-- 身体 -->
<div class="tbody">
<div v-for="(item, index) in fruitList" :key="item.id" class="tr" :class="{ active: item.isChecked }">
<div class="td"><input type="checkbox" v-model="item.isChecked" /></div>
<div class="td"><img :src="item.icon" alt="" /></div>
<div class="td">{{ item.price }}</div>
<div class="td">
<div class="my-input-number">
<button :disabled="item.num <= 1" class="decrease" @click="sub(item.id)"> - </button>
<span class="my-input__inner">{{ item.num }}</span>
<button class="increase" @click="add(item.id)"> + </button>
</div>
</div>
<div class="td">{{ item.num * item.price }}</div>
<div class="td"><button @click="del(item.id)">删除</button></div>
</div>
</div>
</div>
<!-- 底部 -->
<div class="bottom">
<!-- 全选 -->
<label class="check-all">
<input type="checkbox" v-model="isAll" />
全选
</label>
<div class="right-box">
<!-- 所有商品总价 -->
<span class="price-box">总价 : ¥ <span class="price">{{ totalPrice }}</span></span>
<!-- 结算按钮 -->
<button class="pay">结算( {{ totalCount }} )</button>
</div>
</div>
</div>
<!-- 空车 -->
<div class="empty" v-else>🛒空空如也</div>
</div>
<script src="../vue.js"></script>
<script>
const app = new Vue({
el: '#app',
data: {
// 水果列表
fruitList: [
{
id: 1,
icon: './img/火龙果.png',
isChecked: true,
num: 2,
price: 6,
},
{
id: 2,
icon: './img/荔枝.png',
isChecked: false,
num: 7,
price: 20,
},
{
id: 3,
icon: './img/榴莲.png',
isChecked: false,
num: 3,
price: 40,
},
{
id: 4,
icon: './img/鸭梨.png',
isChecked: true,
num: 10,
price: 3,
},
{
id: 5,
icon: './img/樱桃.png',
isChecked: false,
num: 20,
price: 34,
},
],
},
methods: {
del(id) {
this.fruitList = this.fruitList.filter(item => item.id !== id)
},
add(id) {
//找到对应的数据,在进行加减
const fruit = this.fruitList.find(item => item.id === id)
fruit.num++;
},
reduce(id) {
const fruit = this.fruitList.find(item => item.id === id)
fruit.num--;
}
},
computed: {
// 默认计算属性:只能获取不能设置,要设置需要写完整写法
// isAll () {
// // 必须所有的小选框都选中,全选按钮才选中 → every
// return this.fruitList.every(item => item.isChecked)
// }
// 完整写法 = get + set
isAll: {
get() {
//every都满足返回true
//因为是bool值 === true可以省略
return this.fruitList.every(item => item.isChecked === true)
},
set(value) {//因为双向绑定到了isAll,set方法可以直接获取改变的值
// 基于拿到的布尔值,要让所有的小选框 同步状态
this.fruitList.forEach(item => item.isChecked = value)
}
},
totalCount() {
return this.fruitList.reduce((sum, item) => {//item.isChecked是否被选中
return item.isChecked ? sum + item.num : sum
// if (item.isChecked) {//选中
// return sum + item.num
// } else {//没选中
// return sum
// }
}, 0)
},
totalPrice() {
return this.fruitList.reduce((sum, item) => {
if (item.isChecked) {//选中
return sum + item.num * item.price
} else {//没选中
return sum
}
}, 0)
}
}
}
)
</script>
</body>示例:
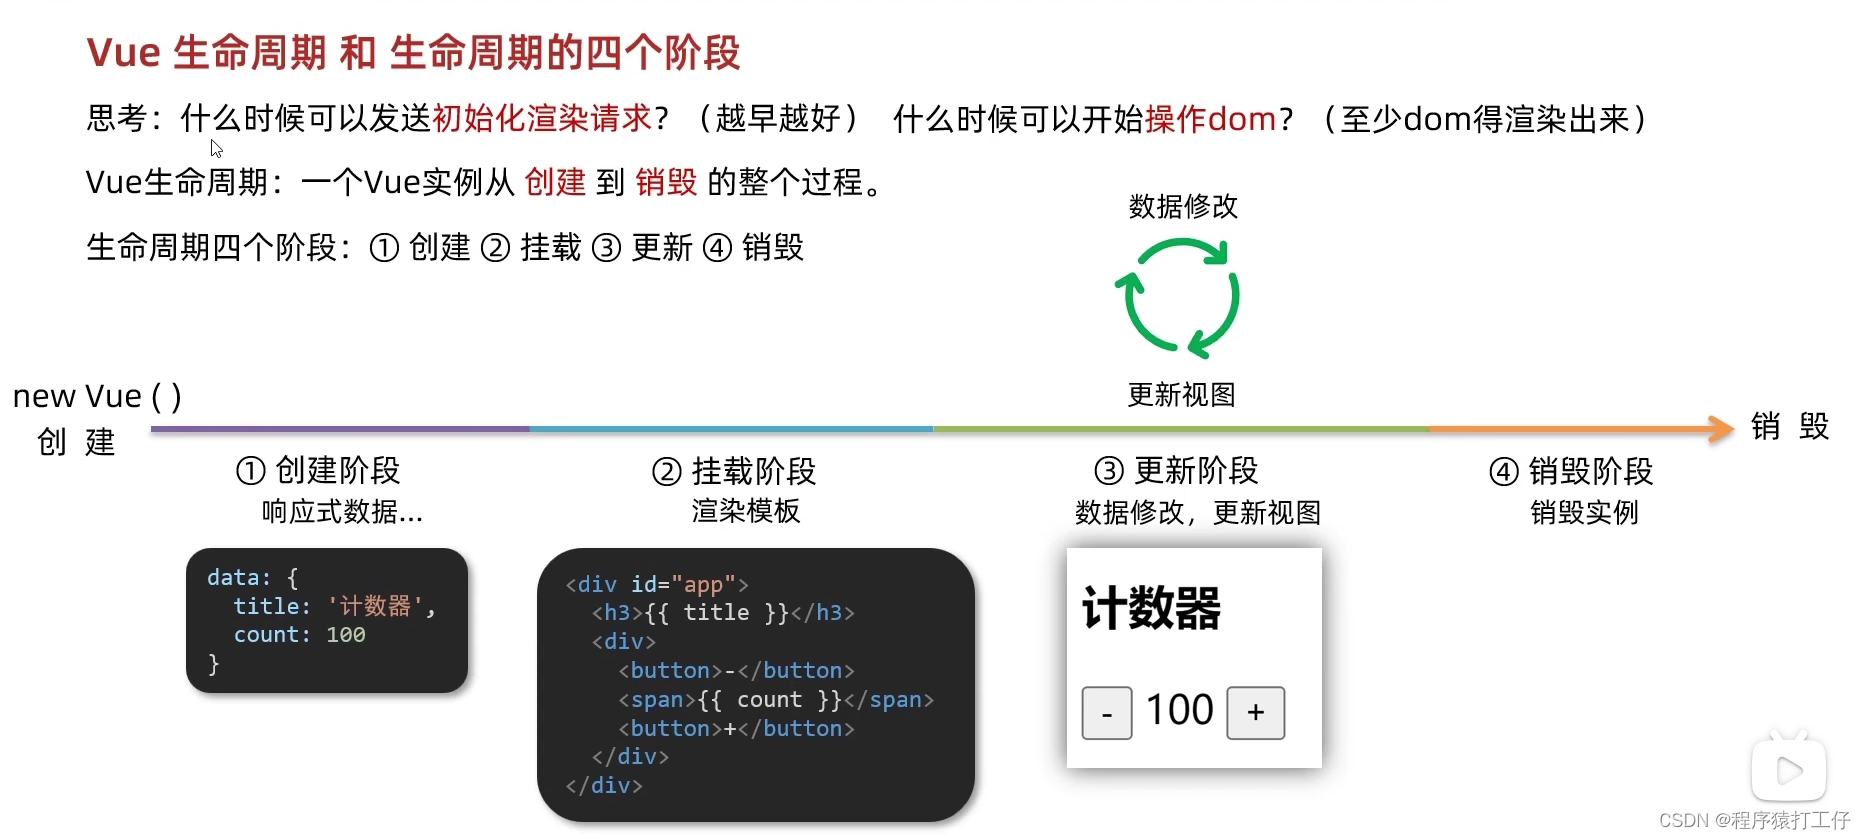
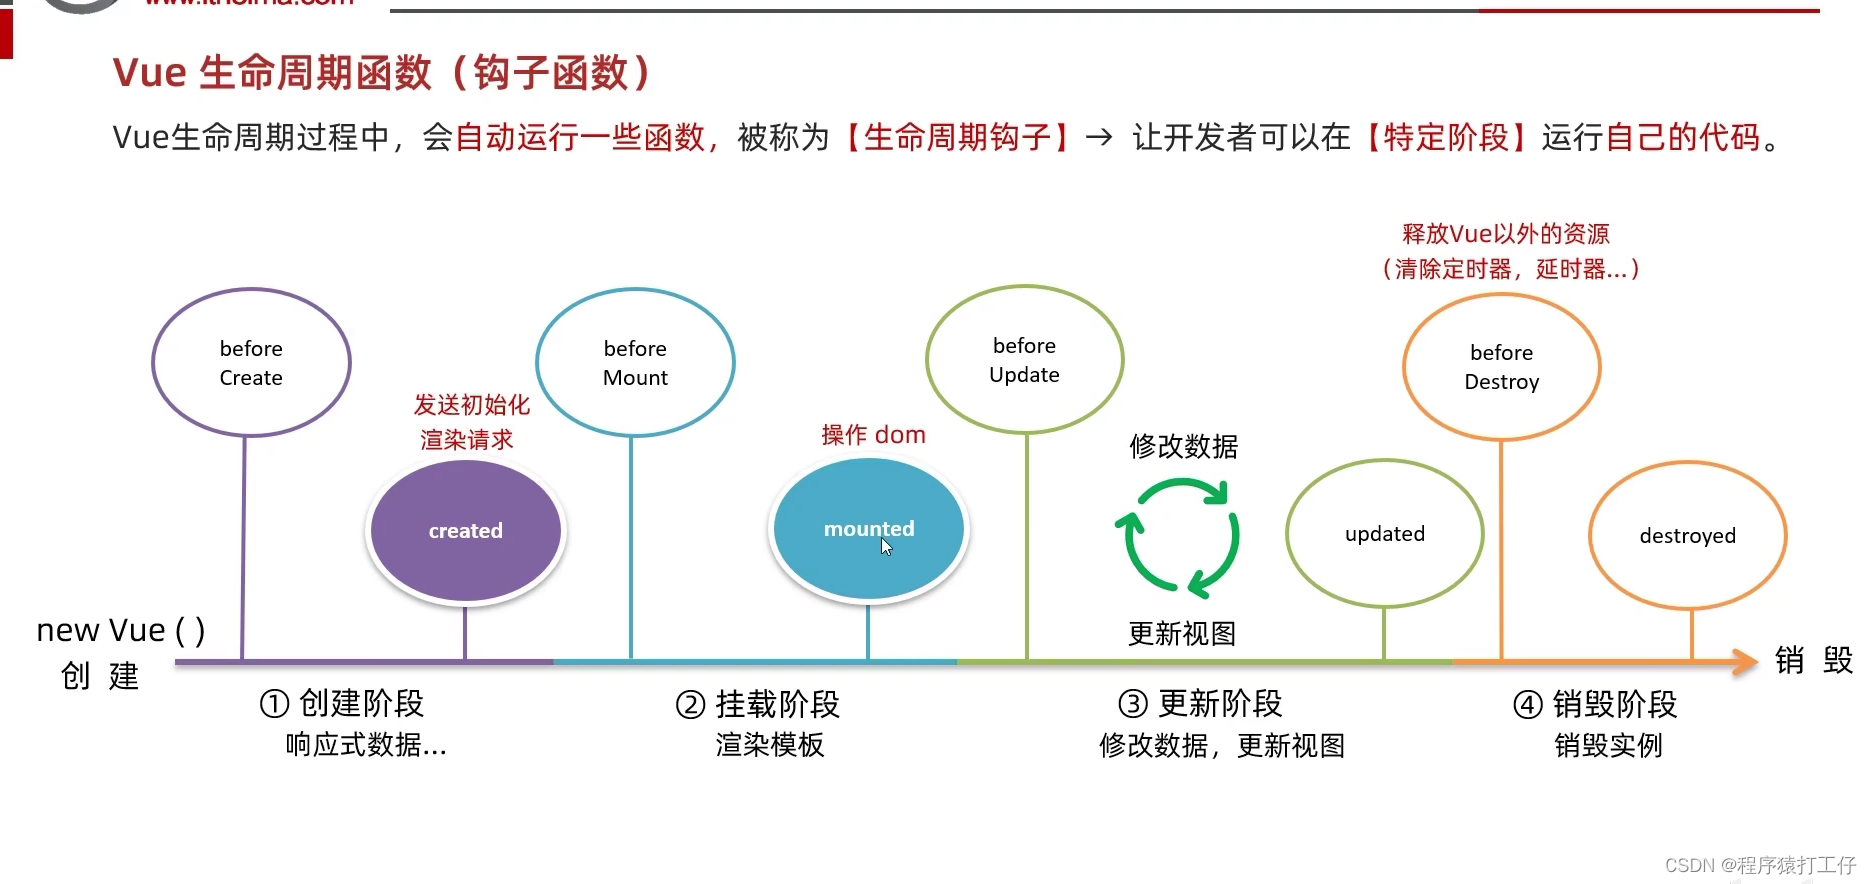
Vue的声明周期与4个阶段
代码:
<body>

  <div id="app">
    <h3>{{ title }}</h3>
    <div>
      <button @click="count--">-</button>
      <span>{{ count }}</span>
      <button @click="count++">+</button>
    </div>
  </div>
  <script src="./vue.js"></script>
  <script>
    const app = new Vue({
      el: '#app',
      data: {
        count: 100,
        title: '计数器'
      },
      //因为是钩子函数,所以是函数形式,要和data同级别。
      //1.创建阶段(准备数据)
      beforeCreate() {//this.count 为 undefined
        console.log('beforeCreate响应式数据准备好之前',this.count);
      },
      created() {//100
        console.log('created响应式数据准备好之后', this.count);
        //可以开始发送初始化渲染的请求
        //this.数据名 = 请求回来的数据
      },
      //2.挂载阶段(渲染模板)
      beforeMount() {//{{ title }}  这时还没渲染
        console.log('beforeMount模板渲染之前',document.querySelector('h3').innerHTML);
      },
      mounted() {// 计数器
        //要操作dom,mounted这时候就可以了
        console.log('mounted模板渲染之后', document.querySelector('h3').innerHTML);
      },
      //3.更新阶段   (修改数据->更新数据)修改数据时触发
      beforeUpdate() {//beforeUpdate数据修改了,视图还没更新 100
        console.log('beforeUpdate数据修改了,视图还没更新',document.querySelector('span').innerHTML);
      },
      //beforeUpdate,updated他俩区别不在于数据,而在于视图
      updated() {//updated数据修改了,视图已经更新 101
        console.log('updated数据修改了,视图已经更新', document.querySelector('span').innerHTML);
      },
      //4.卸载阶段
      //关闭网页后,也看不到控制台输出了,所有vue官方提供了一个卸载方式 app.$destroy()
      beforeDestroy() {
        console.log('beforeDestroy卸载前');
        //通常会清楚掉一些vue以外的资源占用,定时器延时器...
        //通常结合组件多一些
      },
      destroyed() {
        console.log('destroyed卸载后');
      },
    })
  </script>
</body>
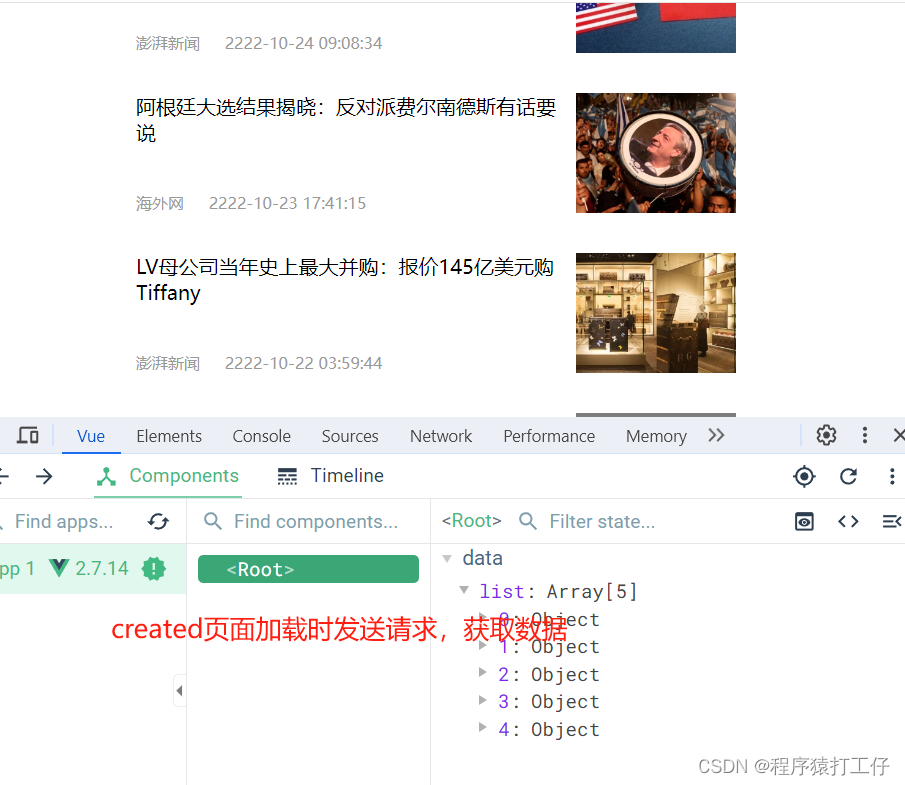
声明周期两个小例子:初始化渲染和获取焦点
8个钩子函数,最常用的3个:created,mounted,beforeDestroy
代码:
<div id="app">
    <ul>
      <li class="news" v-for="(item, index) in list" :key="item.id">
        <div class="left">
          <div class="title">{{item.title}}</div>
          <div class="info">
            <span>{{item.source}}</span>
            <span>{{item.time}}</span>
          </div>
        </div>
        <div class="right">
          <img :src="item.img" alt="">
        </div>
      </li>


    </ul>
  </div>
  <script src="./vue.js"></script>
  <script src="./axios.js"></script>
  <script>
    // 接口地址:http://hmajax.itheima.net/api/news
    // 请求方式:get
    const app = new Vue({
      el: '#app',
      data: {
        list:[]
      },
      async created() {//axios是异步,async与await同步等待
        const res = await axios.get('http://hmajax.itheima.net/api/news')
        console.log(res);
        this.list = res.data.data
      },
    })
  </script>
实现效果:
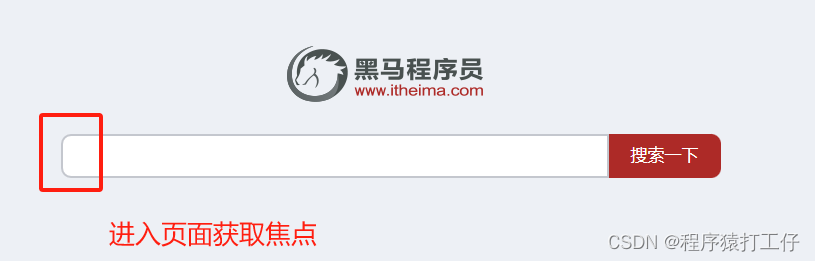
案例2:
细节:获取焦点,要操作dom,mounted模板渲染完后,可以开始操作dom。如果想操作dom,至少在mounted或之后。
需求:已进入页面,输入框获取焦点
代码:
<body>
<div class="container" id="app">
  <div class="search-container">
    <img src="https://www.itheima.com/images/logo.png" alt="">
    <div class="search-box">
      <input type="text" v-model="words" id="inp">
      <button>搜索一下</button>
    </div>
  </div>
</div>

<script src="./vue.js"></script>
<script>
  const app = new Vue({
    el: '#app',
    data: {
      words: ''
    },
    //核心思路:
    //1.等输入框渲染出来
    //2.让输入框获取焦点
    mounted() {//<input type="text" id="inp"> 已经被解析的
      // console.log(document.querySelector('#inp'));
      document.querySelector('#inp').focus()//如果想操作dom,至少在mounted或之后
    },
  })
</script>
实现效果:
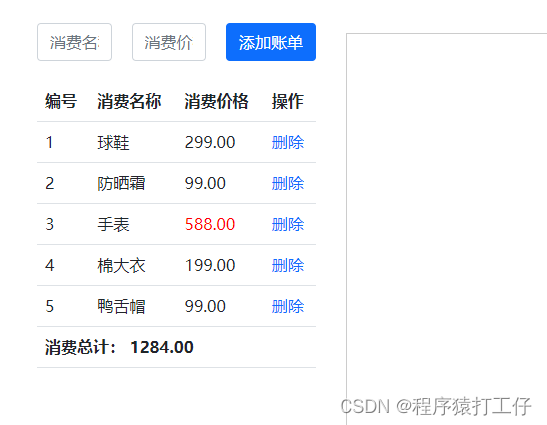
小黑记账清单案例
细节:保留两位小数{{item.price.toFixed(2)}}。大于500价格,高亮:class="{red:item.price > 500}"。
1基本渲染
代码:
<body>
    <div id="app">
      <div class="contain">
        <!-- 左侧列表 -->
        <div class="list-box">

          <!-- 添加资产 -->
          <form class="my-form">
            <input type="text" class="form-control" placeholder="消费名称" />
            <input type="text" class="form-control" placeholder="消费价格" />
            <button type="button" class="btn btn-primary">添加账单</button>
          </form>

          <table class="table table-hover">
            <thead>
              <tr>
                <th>编号</th>
                <th>消费名称</th>
                <th>消费价格</th>
                <th>操作</th>
              </tr>
            </thead>
            <tbody>
              <tr v-for="(item, index) in list" :key="item.id">
                <td>{{ index + 1 }}</td>
                <td>{{ item.name }}</td>
                <td :class="{ red: item.price > 500 }">{{ item.price.toFixed(2) }}</td>
                <td><a href="javascript:;">删除</a></td>
              </tr>
            </tbody>
            <tfoot>
              <tr>
                <td colspan="4">消费总计: {{ totalPrice.toFixed(2) }}</td>
              </tr>
            </tfoot>
          </table>
        </div>

        <!-- 右侧图表 -->
        <div class="echarts-box" id="main"></div>
      </div>
    </div>
    <script src="https://cdn.jsdelivr.net/npm/echarts@5.4.0/dist/echarts.min.js"></script>
    <script src="https://cdn.jsdelivr.net/npm/vue@2/dist/vue.js"></script>
    <script src="https://cdn.jsdelivr.net/npm/axios/dist/axios.min.js"></script>
    <script>
      /**
       * 接口文档地址:
       * https://www.apifox.cn/apidoc/shared-24459455-ebb1-4fdc-8df8-0aff8dc317a8/api-53371058
       *
       * 功能需求:
       * 1. 基本渲染
       *    (1) 立刻发送请求获取数据 created
       *    (2) 拿到数据,存到data的响应式数据中
       *    (3) 结合数据,进行渲染 v-for
       *    (4) 消费统计 => 计算属性
       * 2. 添加功能
       * 3. 删除功能
       * 4. 饼图渲染
       */
      const app = new Vue({
        el: '#app',
        data: {
          list: []
        },
        computed: {
          totalPrice () {
            return this.list.reduce((sum, item) => sum + item.price, 0)
          }
        },
        async created () {
          const res = await axios.get('https://applet-base-api-t.itheima.net/bill', {
            params: {
              creator: '小黑'
            }
          })
          this.list = res.data.data
        }
      })
    </script>
效果:
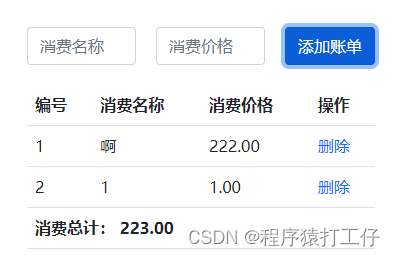
2.添加功能/删除功能
细节:去掉首位空格 v-model.trim="name"。数字类型:v-model.number="price"。只有get和delete请求,需要额外配置params。 写了await别忘了在函数前写async。发送请求后,(前端要响应显示)要重新渲染,就是重新调用下查询接口。typeof判断类型是否相等。删除接口,id拼在后面,不希望写死,要用``而不是'',${id}动态设置。
代码:
<body>
    <div id="app">
      <div class="contain">
        <!-- 左侧列表 -->
        <div class="list-box">

          <!-- 添加资产 -->
          <form class="my-form">
            <input v-model.trim="name" type="text" class="form-control" placeholder="消费名称" />
            <input v-model.number="price" type="text" class="form-control" placeholder="消费价格" />
            <button @click="add" type="button" class="btn btn-primary">添加账单</button>
          </form>

          <table class="table table-hover">
            <thead>
              <tr>
                <th>编号</th>
                <th>消费名称</th>
                <th>消费价格</th>
                <th>操作</th>
              </tr>
            </thead>
            <tbody>
              <tr v-for="(item, index) in list" :key="item.id">
                <td>{{ index + 1 }}</td>
                <td>{{ item.name }}</td>
                <td :class="{ red: item.price > 500 }">{{ item.price.toFixed(2) }}</td>
                <td><a @click="del(item.id)" href="javascript:;">删除</a></td>
              </tr>
            </tbody>
            <tfoot>
              <tr>
                <td colspan="4">消费总计: {{ totalPrice.toFixed(2) }}</td>
              </tr>
            </tfoot>
          </table>
        </div>

        <!-- 右侧图表 -->
        <div class="echarts-box" id="main"></div>
      </div>
    </div>
    <script src="https://cdn.jsdelivr.net/npm/echarts@5.4.0/dist/echarts.min.js"></script>
    <script src="https://cdn.jsdelivr.net/npm/vue@2/dist/vue.js"></script>
    <script src="https://cdn.jsdelivr.net/npm/axios/dist/axios.min.js"></script>
    <script>
      /**
       * 接口文档地址:
       * https://www.apifox.cn/apidoc/shared-24459455-ebb1-4fdc-8df8-0aff8dc317a8/api-53371058
       *
       * 功能需求:
       * 1. 基本渲染
       *    (1) 立刻发送请求获取数据 created
       *    (2) 拿到数据,存到data的响应式数据中
       *    (3) 结合数据,进行渲染 v-for
       *    (4) 消费统计 => 计算属性
       * 2. 添加功能
       *    (1) 收集表单数据 v-model
       *    (2) 给添加按钮注册点击事件,发送添加请求
       *    (3) 需要重新渲染
       * 3. 删除功能
       *    (1) 注册点击事件,传参传 id
       *    (2) 根据 id 发送删除请求
       *    (3) 需要重新渲染
       * 4. 饼图渲染
       */
      const app = new Vue({
        el: '#app',
        data: {
          list: [],
          name: '',
          price: ''
        },
        computed: {
          totalPrice () {
            return this.list.reduce((sum, item) => sum + item.price, 0)
          }
        },
        created () {
          // const res = await axios.get('https://applet-base-api-t.itheima.net/bill', {
          //   params: {
          //     creator: '小黑'
          //   }
          // })
          // this.list = res.data.data

          this.getList()
        },
        methods: {
          async getList () {
            const res = await axios.get('https://applet-base-api-t.itheima.net/bill', {
              params: {
                creator: '小黑'
              }
            })
            this.list = res.data.data
          },
          async add () {
            if (!this.name) {
              alert('请输入消费名称')
              return
            }
            if (typeof this.price !== 'number') {
              alert('请输入正确的消费价格')
              return
            }

            // 发送添加请求
            const res = await axios.post('https://applet-base-api-t.itheima.net/bill', {
              creator: '小黑',
              name: this.name,
              price: this.price
            })
            // 重新渲染一次
            this.getList()

            this.name = ''
            this.price = ''
          },
          async del (id) {
            // 根据 id 发送删除请求
            const res = await axios.delete(`https://applet-base-api-t.itheima.net/bill/${id}`)
            // 重新渲染
            this.getList()
          }
        }
      })
    </script>
  </body>
实现效果:
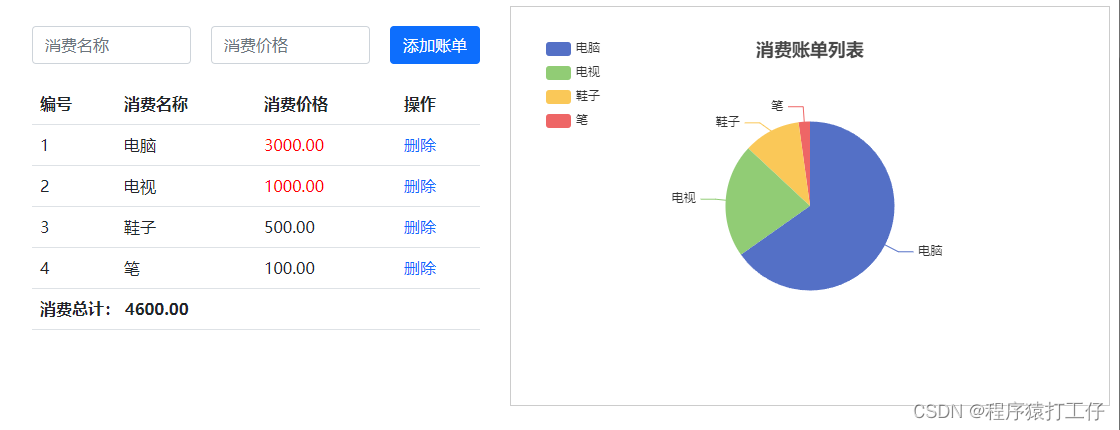
3.饼图渲染
ECharts:官网Apache ECharts
小提示:初始化echarts.init(这里是一个dom),所以需要在mounted中去实现。赋值数据实时更新this.myChart.setOption(要更新谁就写谁),这里面的层级结构不能乱。data所需value和name,这时查出来的数据就需要进行映射data: this.list.map(item => ({ value: item.price, name: item.name})),箭头函数返回值是一个对象{},要用()包裹起来(告诉它这是一个对象),如果不加括号,就会识别成代码段。
代码:
<body>
    <div id="app">
      <div class="contain">
        <!-- 左侧列表 -->
        <div class="list-box">

          <!-- 添加资产 -->
          <form class="my-form">
            <input v-model.trim="name" type="text" class="form-control" placeholder="消费名称" />
            <input v-model.number="price" type="text" class="form-control" placeholder="消费价格" />
            <button @click="add" type="button" class="btn btn-primary">添加账单</button>
          </form>

          <table class="table table-hover">
            <thead>
              <tr>
                <th>编号</th>
                <th>消费名称</th>
                <th>消费价格</th>
                <th>操作</th>
              </tr>
            </thead>
            <tbody>
              <tr v-for="(item, index) in list" :key="item.id">
                <td>{{ index + 1 }}</td>
                <td>{{ item.name }}</td>
                <td :class="{ red: item.price > 500 }">{{ item.price.toFixed(2) }}</td>
                <td><a @click="del(item.id)" href="javascript:;">删除</a></td>
              </tr>
            </tbody>
            <tfoot>
              <tr>
                <td colspan="4">消费总计: {{ totalPrice.toFixed(2) }}</td>
              </tr>
            </tfoot>
          </table>
        </div>

        <!-- 右侧图表 -->
        <div class="echarts-box" id="main"></div>
      </div>
    </div>
    <script src="https://cdn.jsdelivr.net/npm/echarts@5.4.0/dist/echarts.min.js"></script>
    <script src="https://cdn.jsdelivr.net/npm/vue@2/dist/vue.js"></script>
    <script src="https://cdn.jsdelivr.net/npm/axios/dist/axios.min.js"></script>
    <script>
      /**
       * 接口文档地址:
       * https://www.apifox.cn/apidoc/shared-24459455-ebb1-4fdc-8df8-0aff8dc317a8/api-53371058
       *
       * 功能需求:
       * 1. 基本渲染
       *    (1) 立刻发送请求获取数据 created
       *    (2) 拿到数据,存到data的响应式数据中
       *    (3) 结合数据,进行渲染 v-for
       *    (4) 消费统计 => 计算属性
       * 2. 添加功能
       *    (1) 收集表单数据 v-model
       *    (2) 给添加按钮注册点击事件,发送添加请求
       *    (3) 需要重新渲染
       * 3. 删除功能
       *    (1) 注册点击事件,传参传 id
       *    (2) 根据 id 发送删除请求
       *    (3) 需要重新渲染
       * 4. 饼图渲染
       *    (1) 初始化一个饼图 echarts.init(dom)  mounted钩子实现
       *    (2) 根据数据实时更新饼图 echarts.setOption({ ... })
       */
      const app = new Vue({
        el: '#app',
        data: {
          list: [],
          name: '',
          price: ''
        },
        computed: {
          totalPrice () {
            return this.list.reduce((sum, item) => sum + item.price, 0)
          }
        },
        created () {
          // const res = await axios.get('https://applet-base-api-t.itheima.net/bill', {
          //   params: {
          //     creator: '小黑'
          //   }
          // })
          // this.list = res.data.data

          this.getList()
        },
        mounted () {
          this.myChart = echarts.init(document.querySelector('#main'))
          this.myChart.setOption({
            // 大标题
            title: {
              text: '消费账单列表',
              left: 'center'
            },
            // 提示框
            tooltip: {
              trigger: 'item'
            },
            // 图例
            legend: {
              orient: 'vertical',
              left: 'left'
            },
            // 数据项
            series: [
              {
                name: '消费账单',
                type: 'pie',
                radius: '50%', // 半径
                data: [
                  // { value: 1048, name: '球鞋' },
                  // { value: 735, name: '防晒霜' }
                ],
                emphasis: {
                  itemStyle: {
                    shadowBlur: 10,
                    shadowOffsetX: 0,
                    shadowColor: 'rgba(0, 0, 0, 0.5)'
                  }
                }
              }
            ]
          })
        },

        methods: {
          async getList () {
            const res = await axios.get('https://applet-base-api-t.itheima.net/bill', {
              params: {
                creator: '小黑'
              }
            })
            this.list = res.data.data

            // 更新图表
            this.myChart.setOption({
              // 数据项
              series: [
                {
                  // data: [
                  //   { value: 1048, name: '球鞋' },
                  //   { value: 735, name: '防晒霜' }
                  // ]
                  data: this.list.map(item => ({ value: item.price, name: item.name}))
                }
              ]
            })
          },
          async add () {
            if (!this.name) {
              alert('请输入消费名称')
              return
            }
            if (typeof this.price !== 'number') {
              alert('请输入正确的消费价格')
              return
            }

            // 发送添加请求
            const res = await axios.post('https://applet-base-api-t.itheima.net/bill', {
              creator: '小黑',
              name: this.name,
              price: this.price
            })
            // 重新渲染一次
            this.getList()

            this.name = ''
            this.price = ''
          },
          async del (id) {
            // 根据 id 发送删除请求
            const res = await axios.delete(`https://applet-base-api-t.itheima.net/bill/${id}`)
            // 重新渲染
            this.getList()
          }
        }
      })
    </script>
  </body>
实现效果:
工程化开发和脚手架
前端需要管理员
yarn global......不是内部命令 ,npm i yarn -g ,执行这个可以先安装yarn环境。
shift按住+鼠标右键,可以打开powershell窗口(命令行)
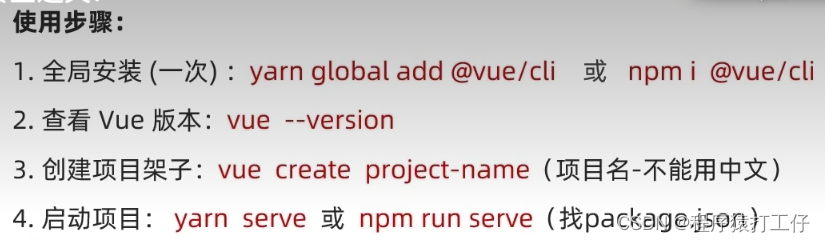
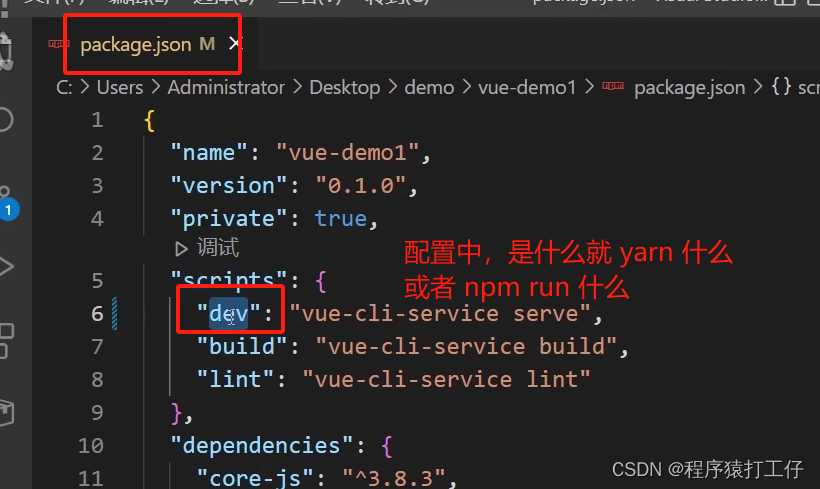
npm run dev || yarn dev
上面第一步只需要安装一次,输入vue --version 就可以查看版本 ,这个安装的是脚手架的版本,不同的系统支持的版本不一样,但是都没关系。
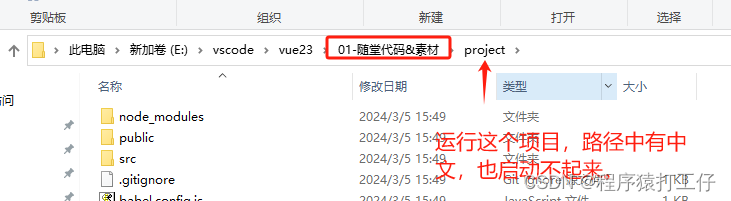
有中文会出现这个错误执行不是内部或外部命令,也不是可运行的程序 或批处理文件。 node:internal/modules/cjs/loader:1080 throw err; ^ Error: Cannot find module
创建的项目名,不能有中文
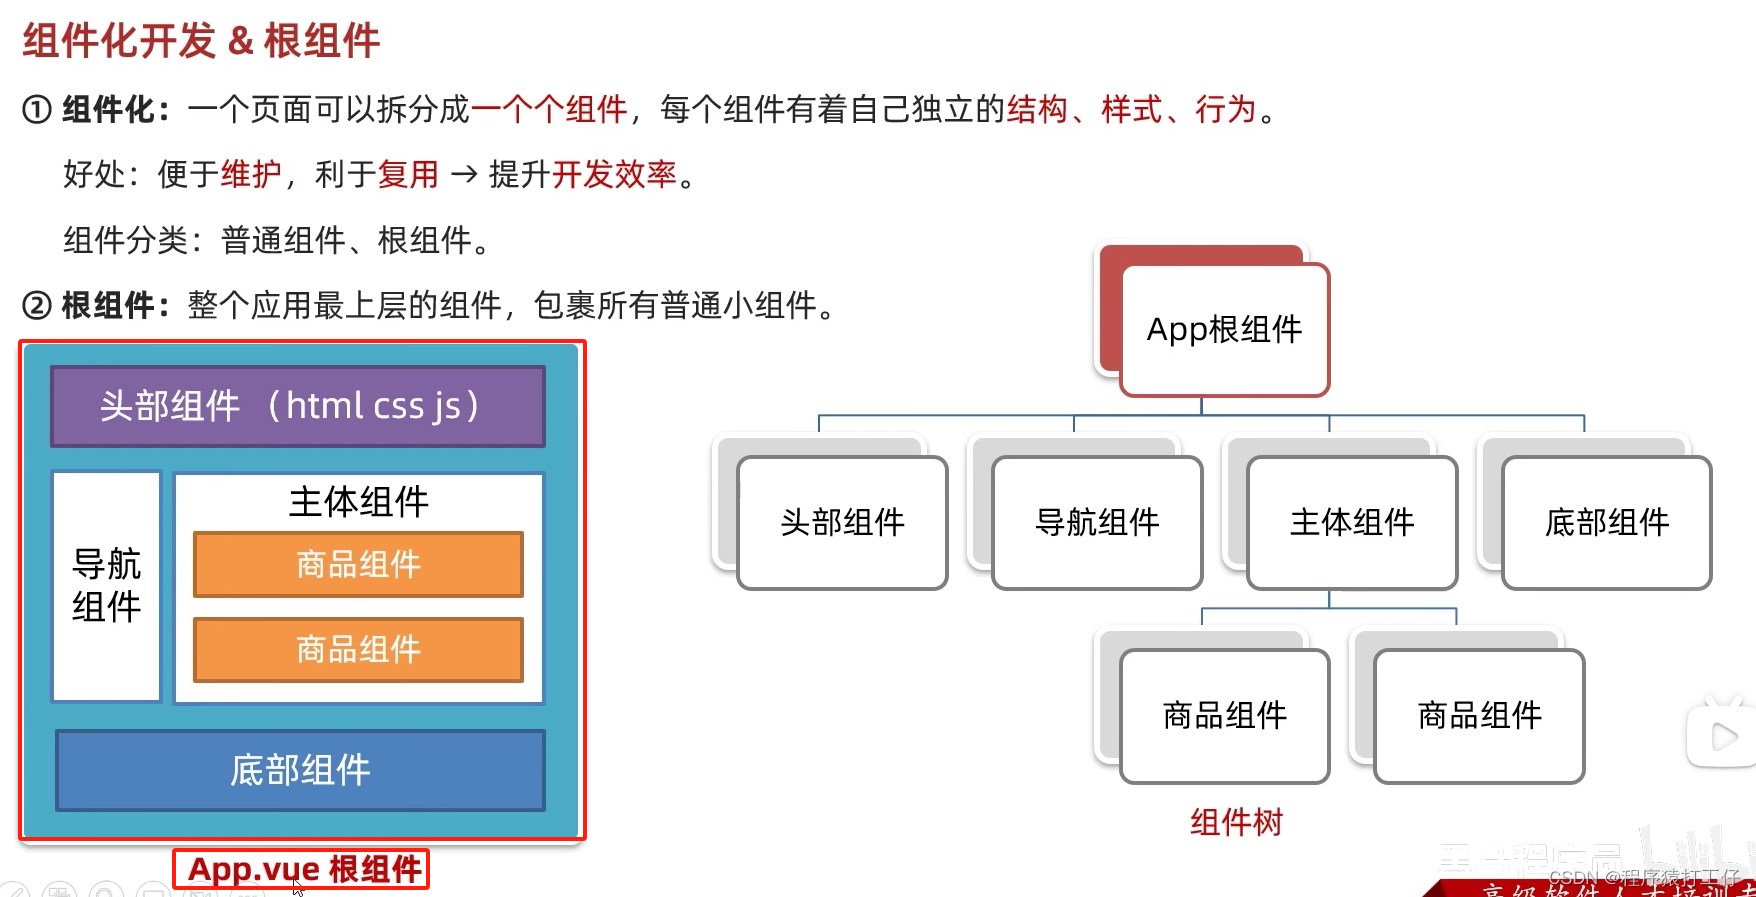
组件化开发&根组件
安装插件:Vetur(高亮样式)
App.vue文件的三个组成部分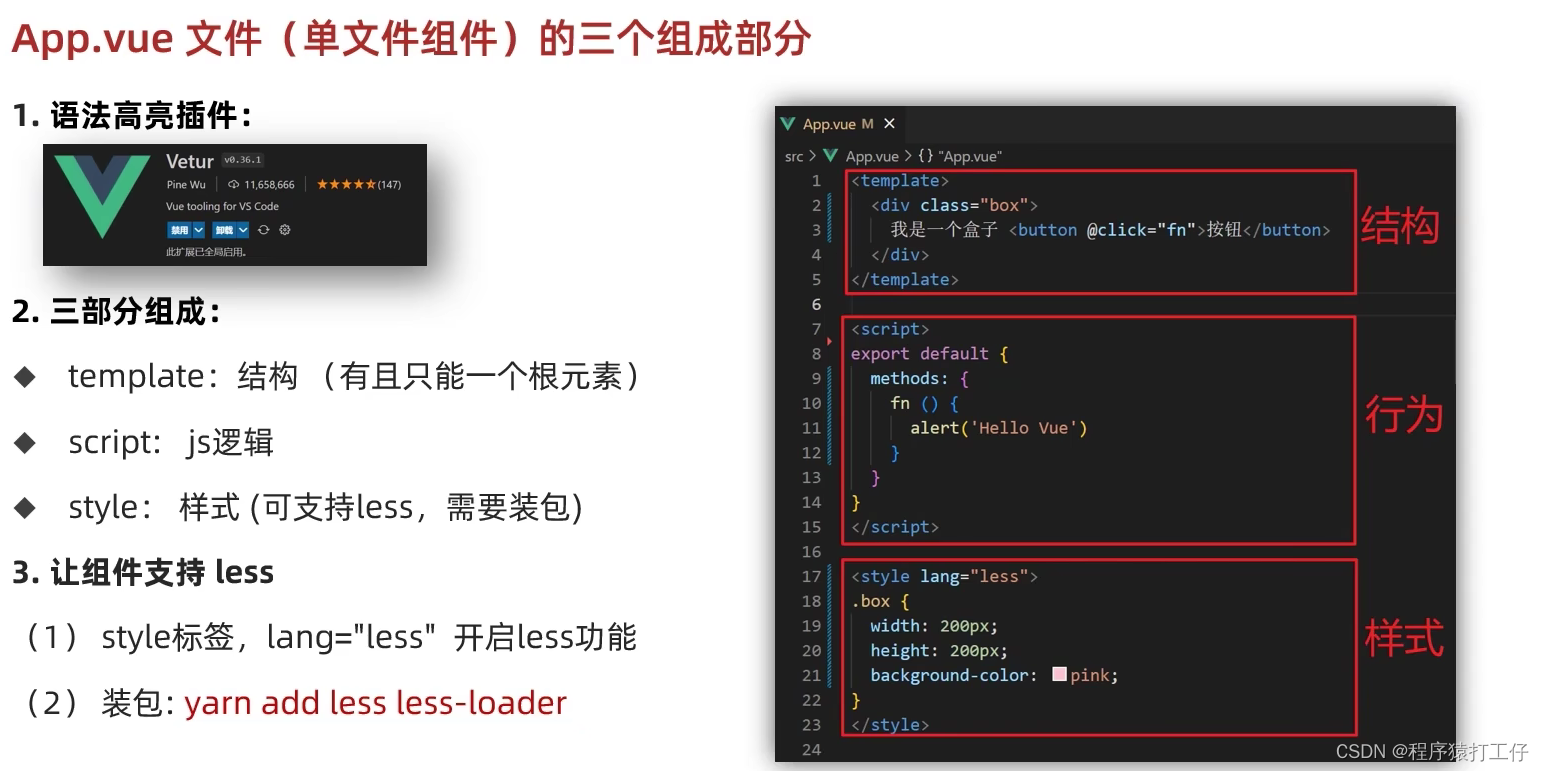
了解:<template>是用来保存结构的。<style>用来样式。<script>用来js逻辑。
yarn add less less-loader -D (开发依赖)安装失败,可以npm install less -g
代码:
<template>
  <div class="App">
    <div class="box" @click="fn"></div>
  </div>
</template>

<script>
// 导出的是当前组件的配置项
// 里面可以提供 data(特殊) methods computed watch 生命周期八大钩子
export default {
  created () {
    console.log('我是created')
  },
  methods: {
    fn () {
      alert('你好')
    }
  }
}
</script>

<style lang="less">
/* 让style支持less
   1. 给style加上 lang="less"
   2. 安装依赖包 less less-loader
      yarn add less less-loader -D (开发依赖)
*/
.App {
  width: 400px;
  height: 400px;
  background-color: pink;
  .box {
    width: 100px;
    height: 100px;
    background-color: skyblue;
  }
}
</style>
普通组件的注册使用-局部注册
在哪里导入,哪里才可以使用,局部注册。
细节:如果 HmFooter + tab 出不来 → 需要配置 vscode,设置中搜索 trigger on tab → 勾上。
导入组件后,要挂载到components,才可以使用。组件名和组件名称一样,可以省略
代码:
<template>
  <div class="App">
    <!-- 头部组件 -->
    <HmHeader></HmHeader>
    <!-- 主体组件 -->
    <HmMain></HmMain>
    <!-- 底部组件 -->
    <HmFooter></HmFooter>

    <!-- 如果 HmFooter + tab 出不来 → 需要配置 vscode
         设置中搜索 trigger on tab → 勾上
    -->
  </div>
</template>

<script>
import HmHeader from './components/HmHeader.vue'
import HmMain from './components/HmMain.vue'
import HmFooter from './components/HmFooter.vue'
export default {
  components: {
    // '组件名': 组件对象
    HmHeader: HmHeader,
    HmMain,
    HmFooter
  }
}
</script>

<style>
.App {
  width: 600px;
  height: 700px;
  background-color: #87ceeb;
  margin: 0 auto;
  padding: 20px;
}
</style>
普通组件的注册使用-全局注册
与局部注册,作用范围是不一样的。
细节:导入的时候,加不加.vue尾缀,在脚手架环境都不影响。
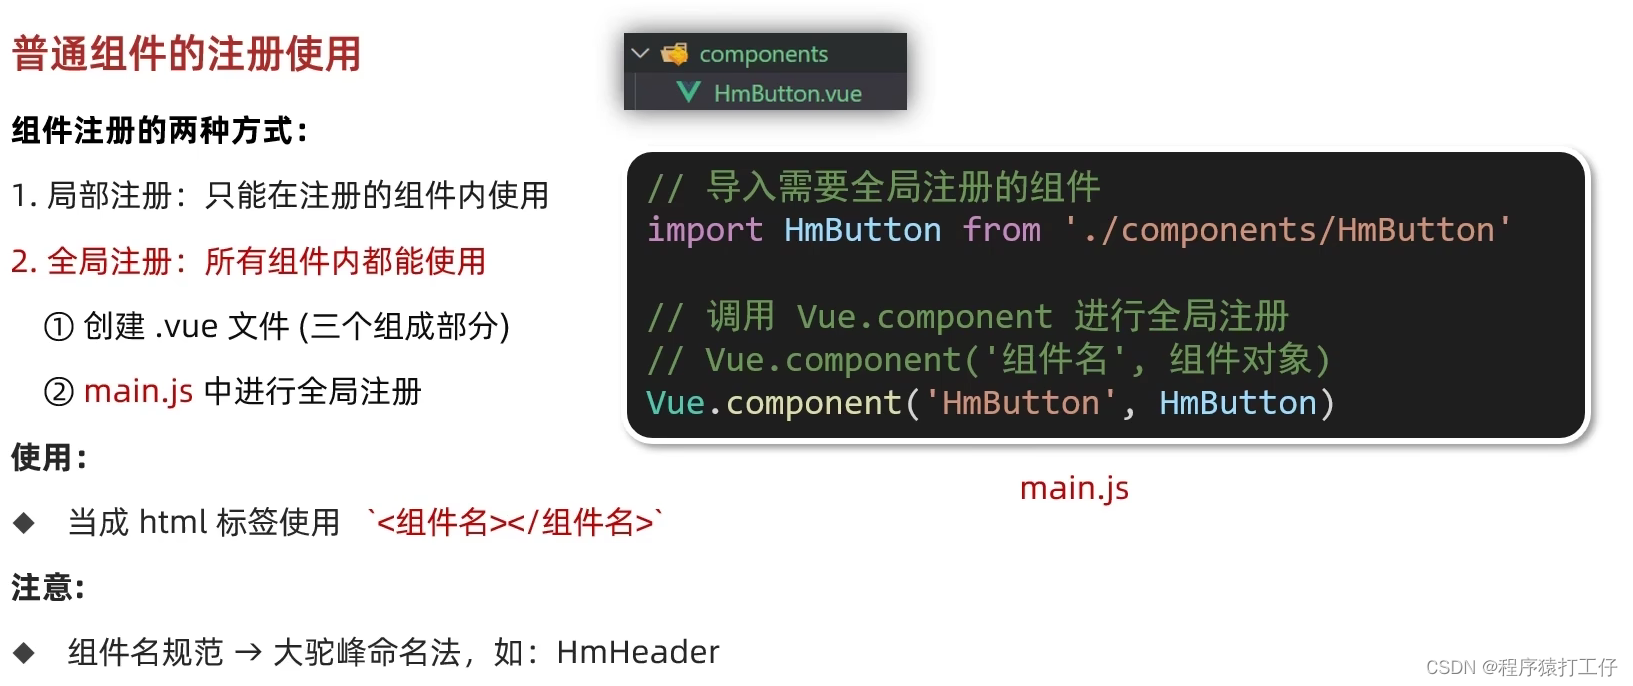
在main.js中, 导入后,要进行全局注册。这样就可以在别的组件vue中,直接<组件名>使用了,无需导入
代码:
// 文件核心作用:导入App.vue,基于App.vue创建结构渲染index.html
import Vue from 'vue'
import App from './App.vue'
// 编写导入的代码,往代码的顶部编写(规范)
import HmButton from './components/HmButton'
Vue.config.productionTip = false

// 进行全局注册 → 在所有的组件范围内都能直接使用
// Vue.component(组件名,组件对象)
Vue.component('HmButton', HmButton)


// Vue实例化,提供render方法 → 基于App.vue创建结构渲染index.html
new Vue({
  // render: h => h(App),
  render: (createElement) => {
    // 基于App创建元素结构
    return createElement(App)
  }
}).$mount('#app')
当这个组件,在多个组件中都要用到,这时就可以注册为全局组件了。
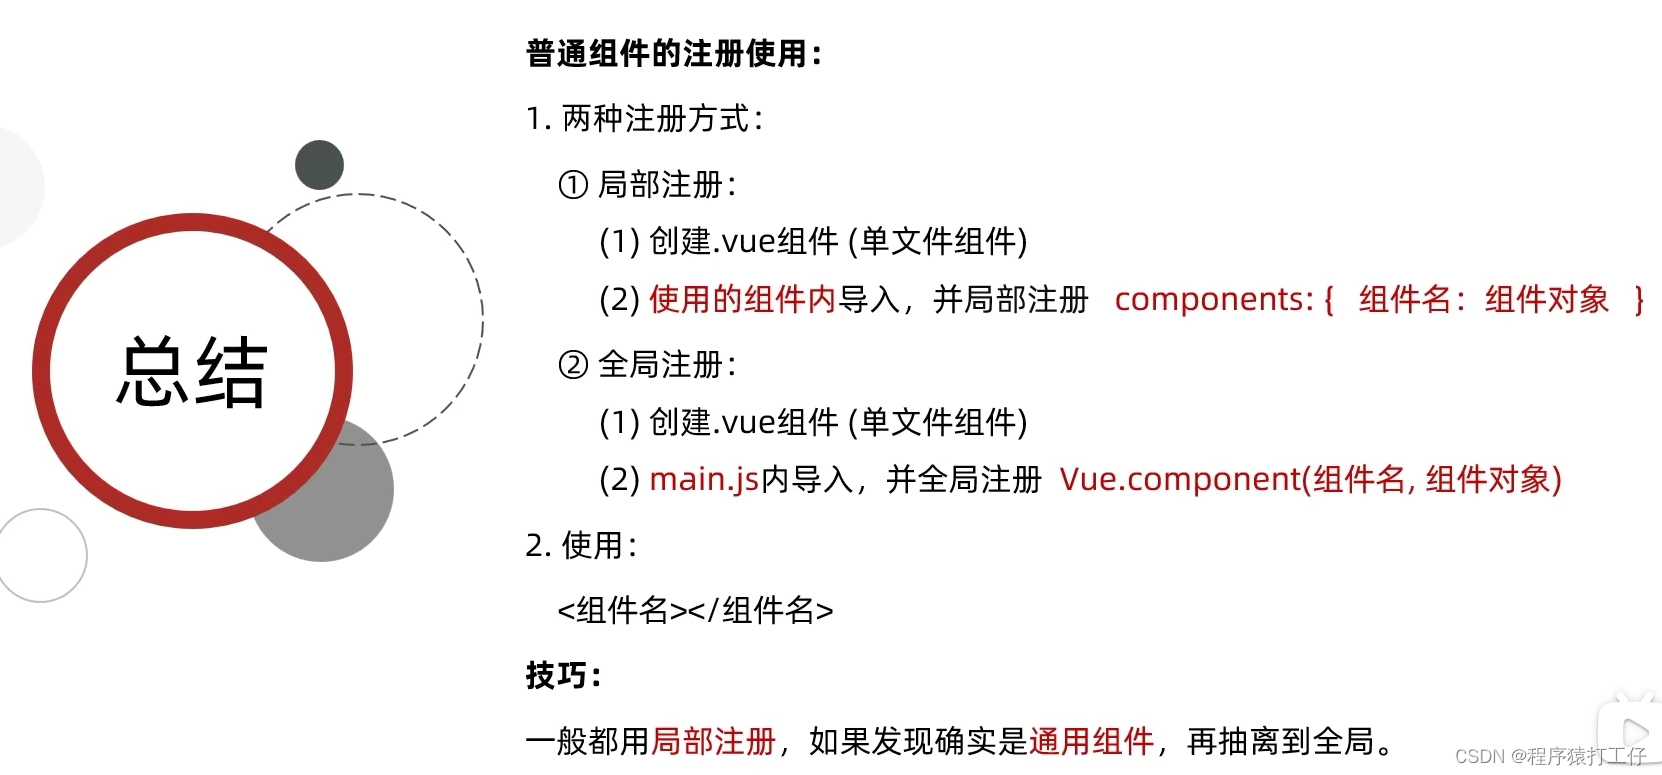
总结:
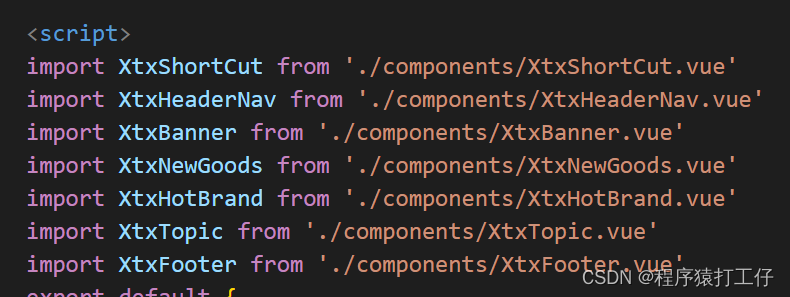
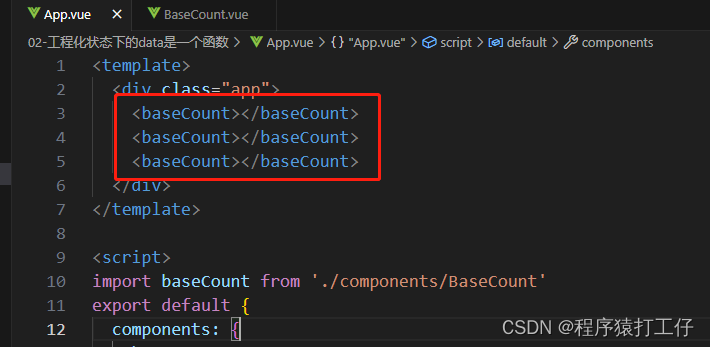
小兔鲜
import导入,然后注册到components。ctrl+k,ctrl+0,执行后,可以折叠样式。ctrl+k,ctrl+J,展开。

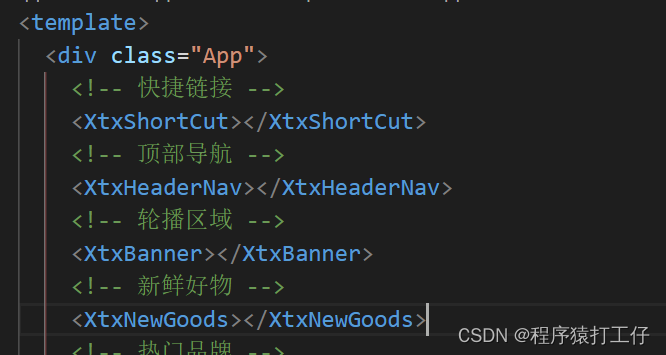
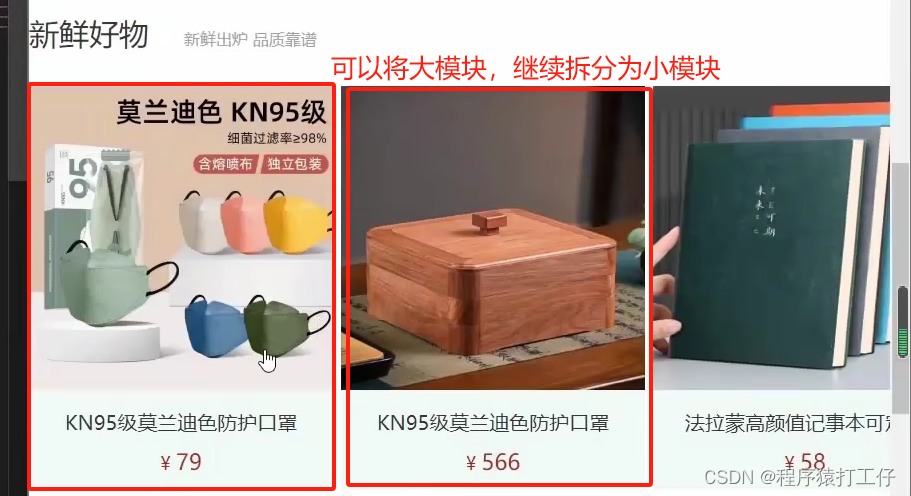
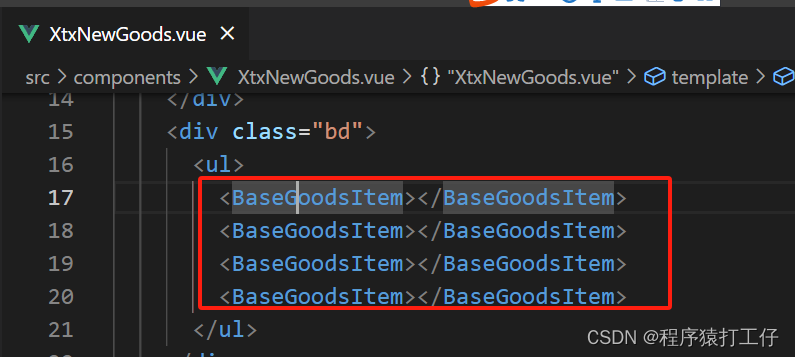
继续拆分,然后去多次渲染组件。
全局注册
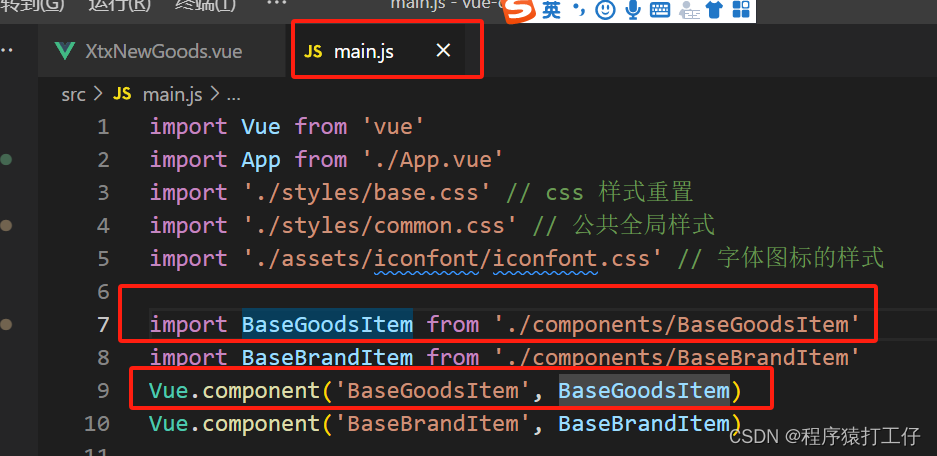
也可以进行v-for,脚手架环境,不加key会报错。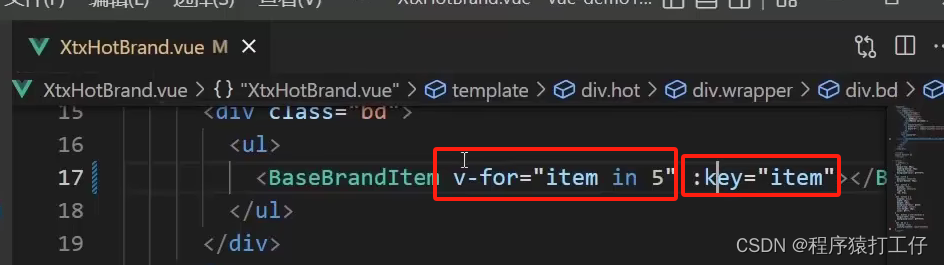
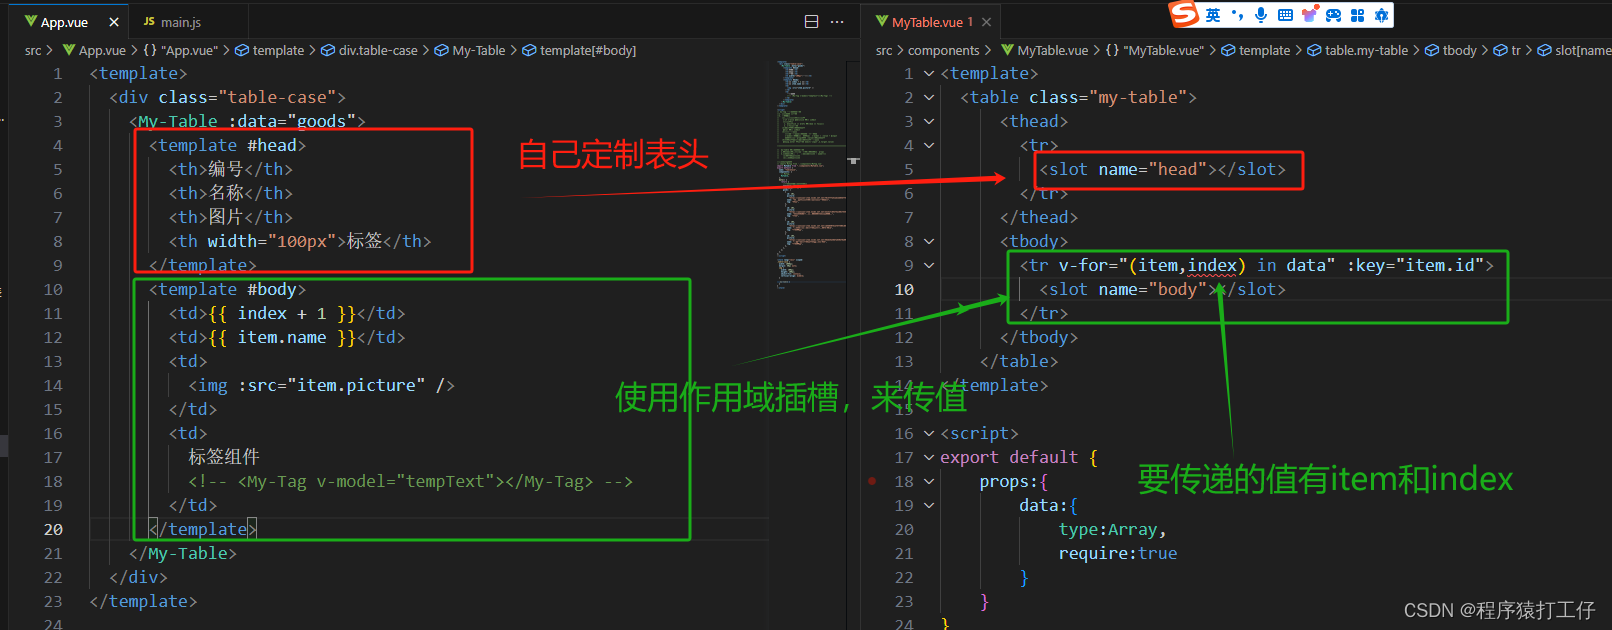
作用域插槽

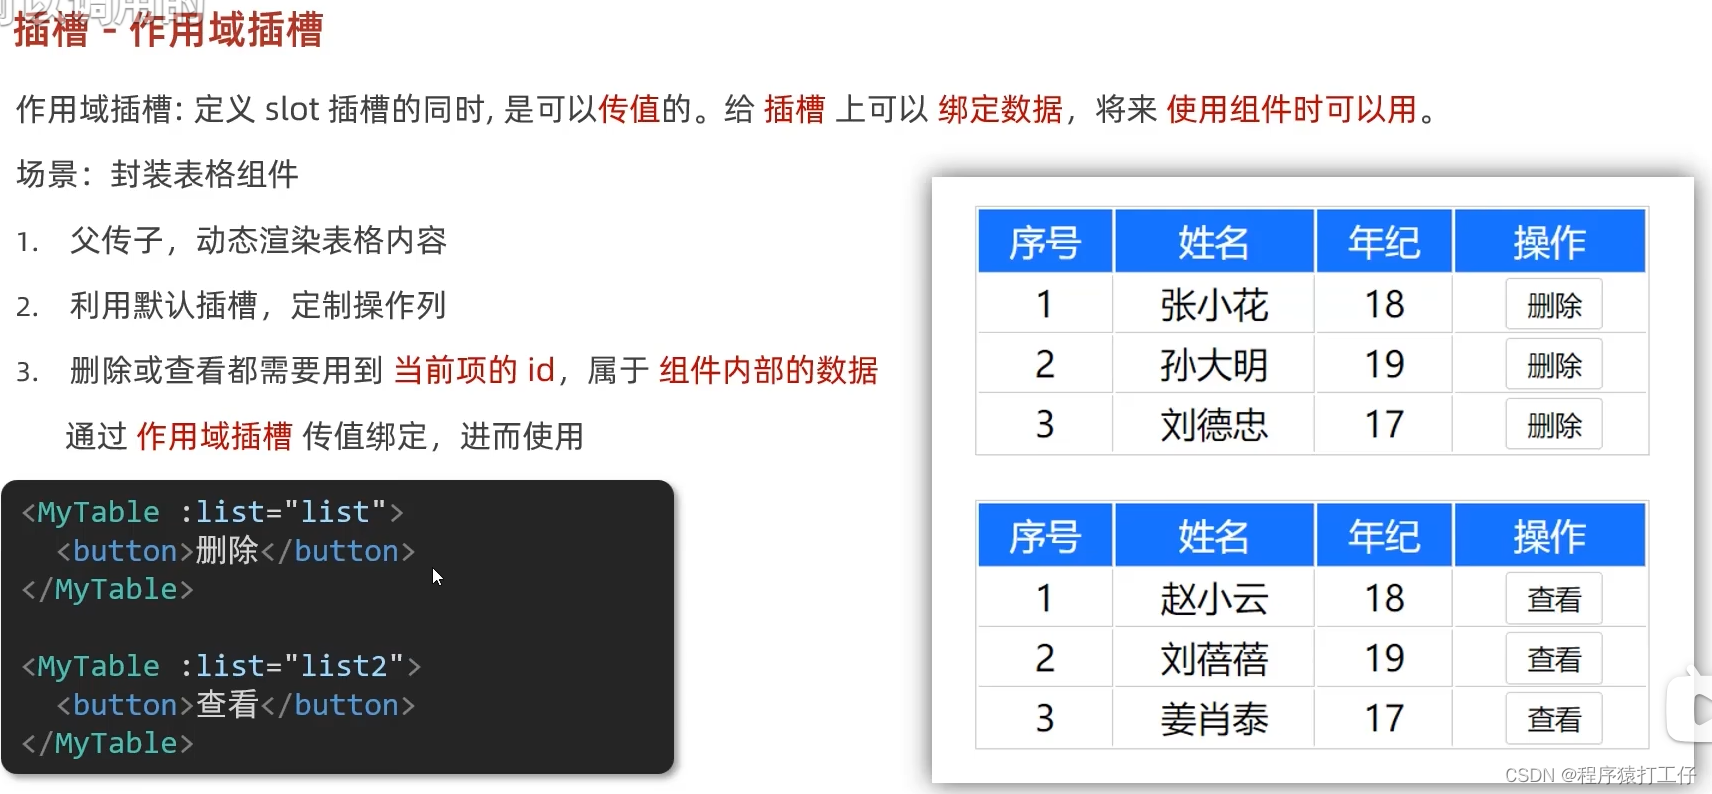

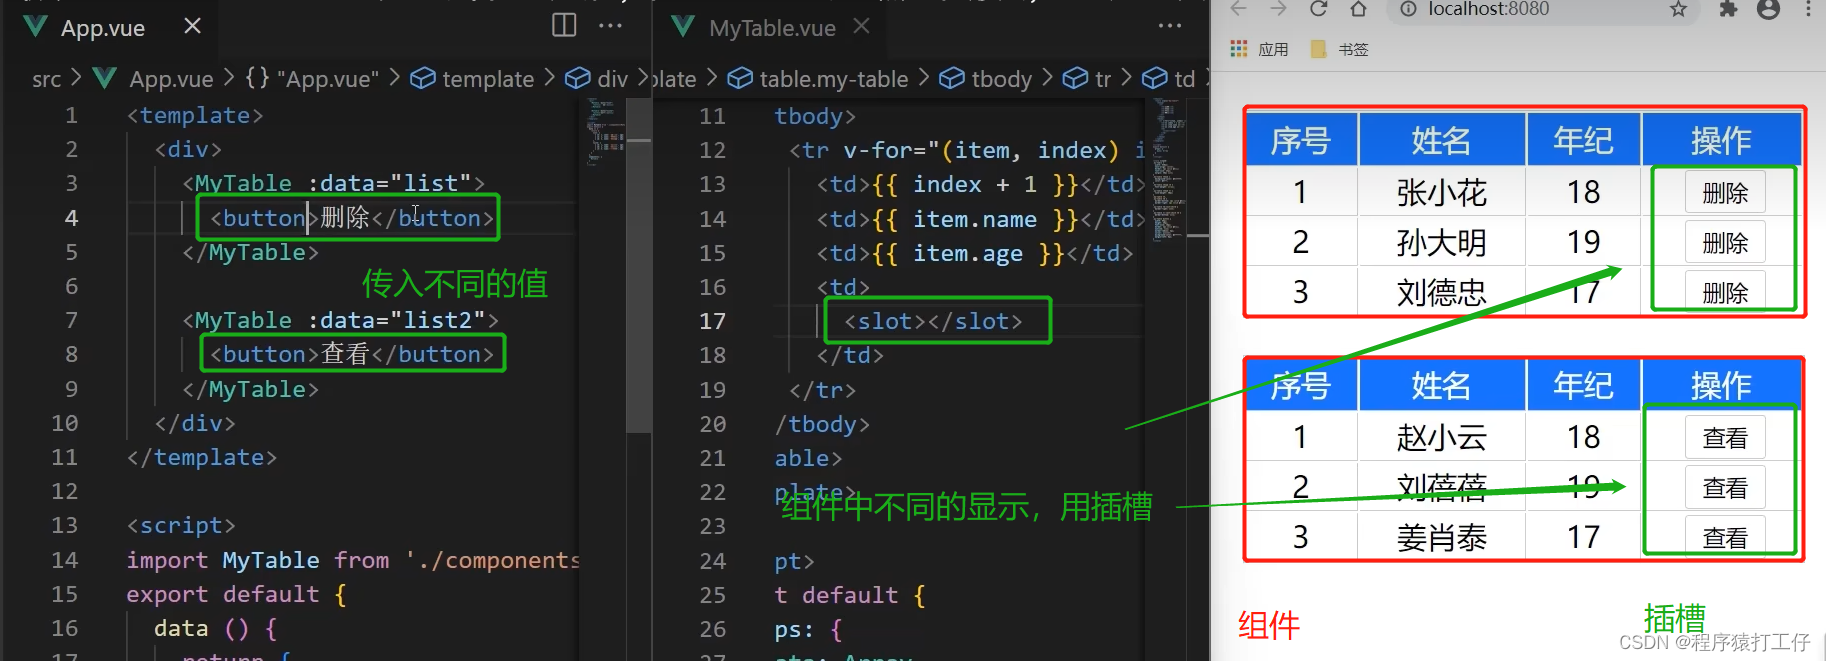

父组件中,是无法拿到子组件中的值的。
正确方式:
1.给slot标签,添加属性的方式传值。
2.将所有的属性,添加到一个对象中
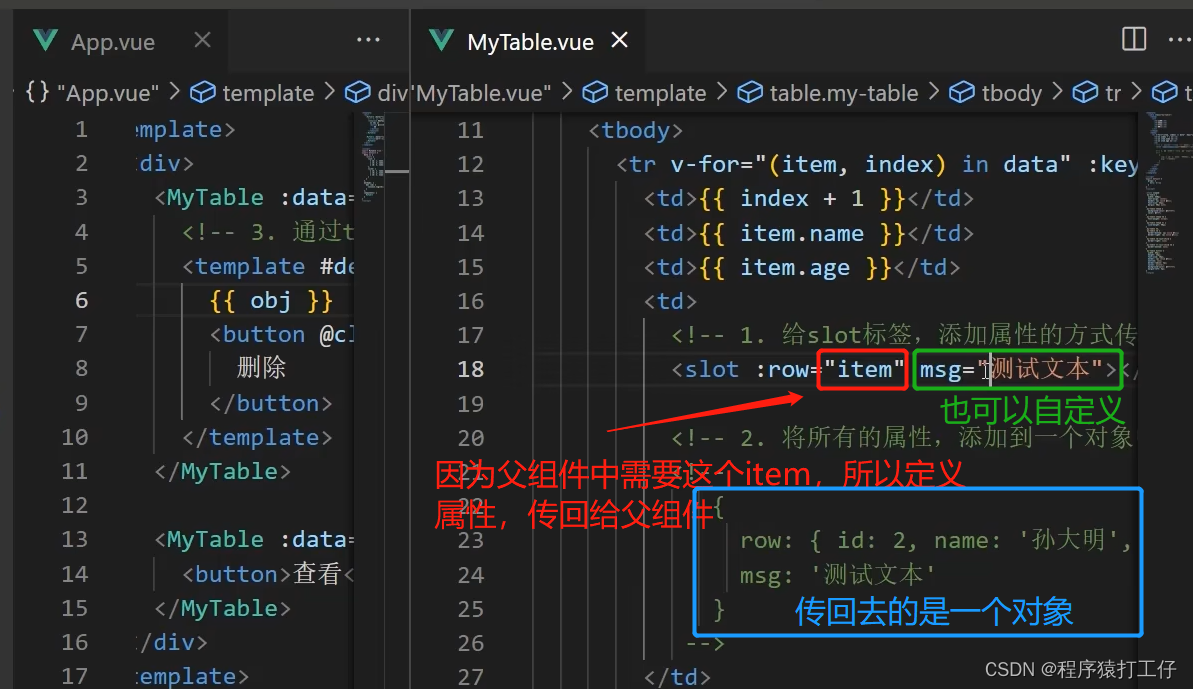
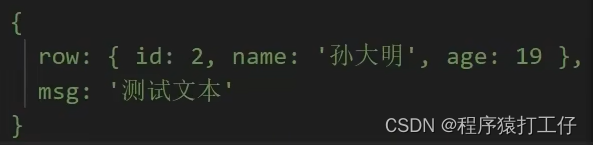
3.通过template进行包裹 #插槽名=“变量名” 进行接收
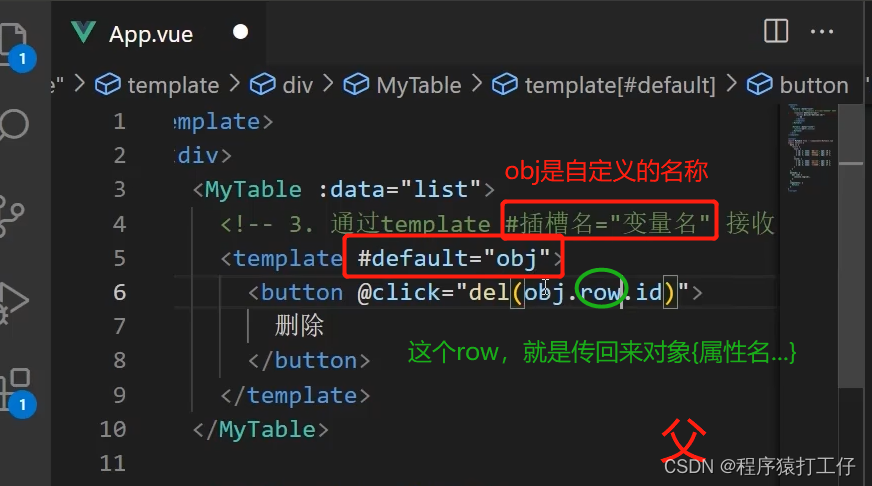
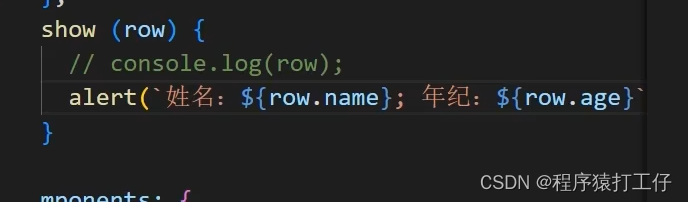
``模版字符串 ES6,${}可以直接进行拼接
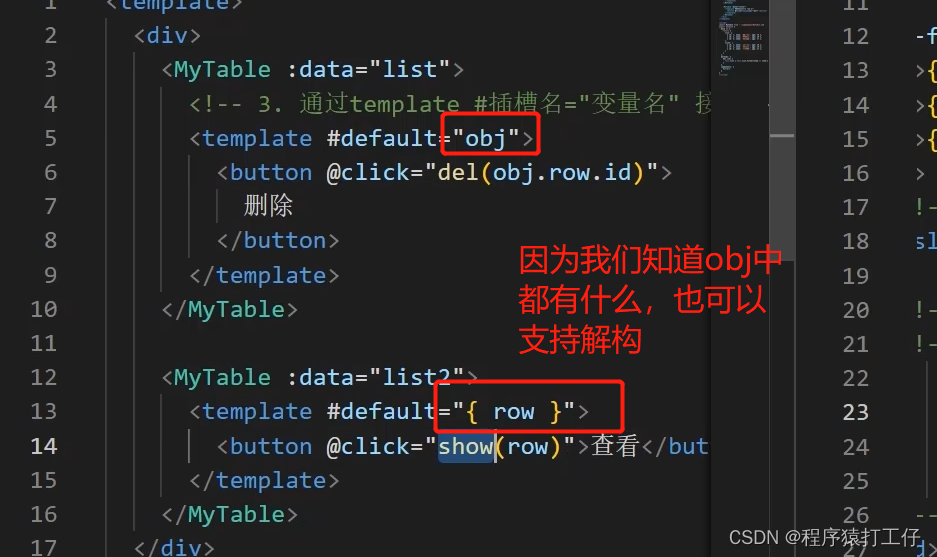
总结:插槽本质,就是通过添加属性进行传值(这个过程返回给父组件的时候是一个对象),然后父组件进行接收使用(父组件自定义名称进行接收,什么名都行),同时接受解构。父组件要用template包裹起来。

在 2.6.0 中,为具名插槽和作用域插槽引入了一个新的统一的语法 (即 v-slot 指令)。它取代了 slot 和 slot-scope 这两个目前已被废弃但未被移除且仍在文档中的 attribute。新语法的由来可查阅这份 RFC。注意slot版本变化,vue2中仍可以使用slot与slot-scope,但是vue3只能使用v-slot了,切记,避免踩坑。
data是一个函数
在组件中,让每一个组件之间,数据独立。每个组件有自己的数据,不会影响到别的组件。
三个组件,data就会被实例化三次。data函数可以保证每个组件维护独立的数据对象
### 1、data为什么要写成函数
一个组件的 **data** 选项必须**是一个函数**。目的是为了:保证每个组件实例,维护**独立**的一份**数据**对象。
每次创建新的组件实例,都会新**执行一次data 函数**,得到一个新对象。
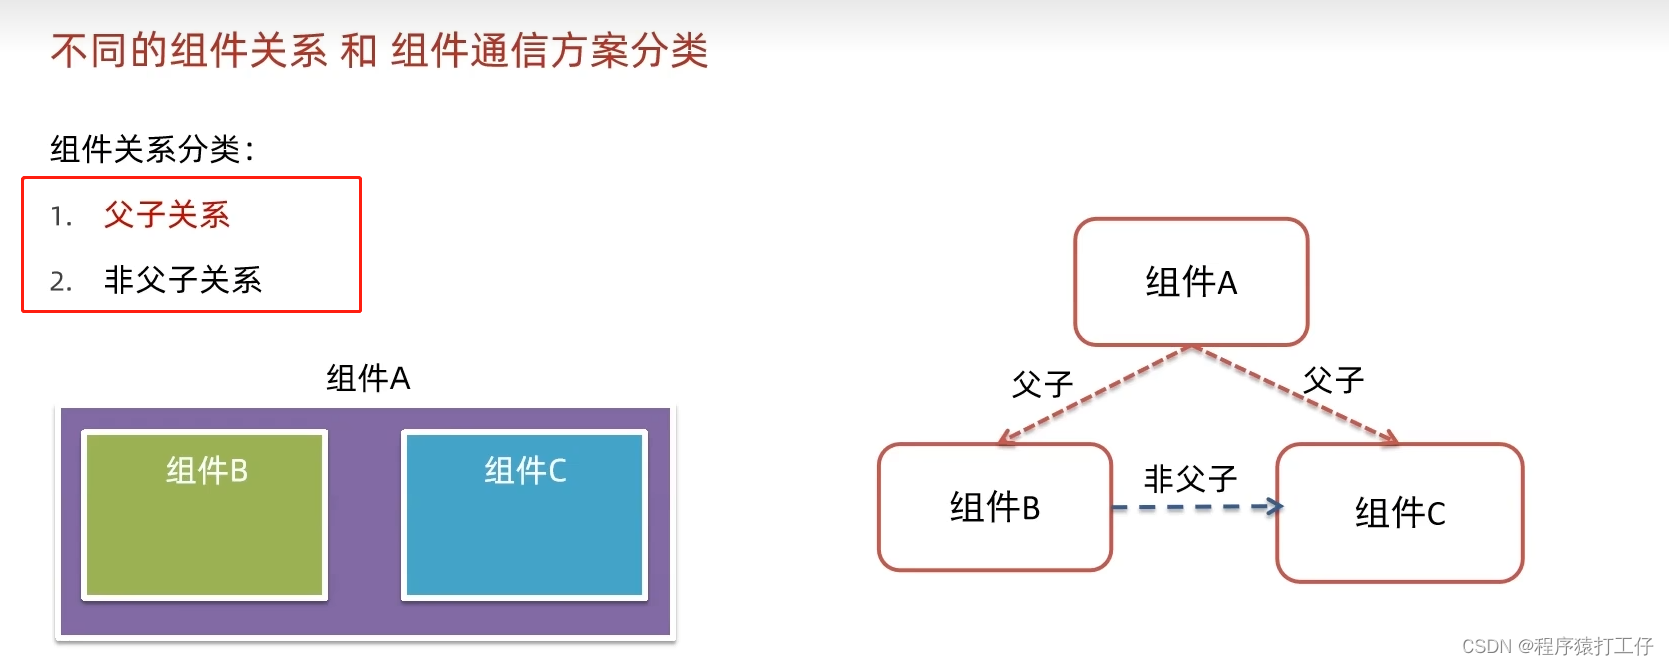
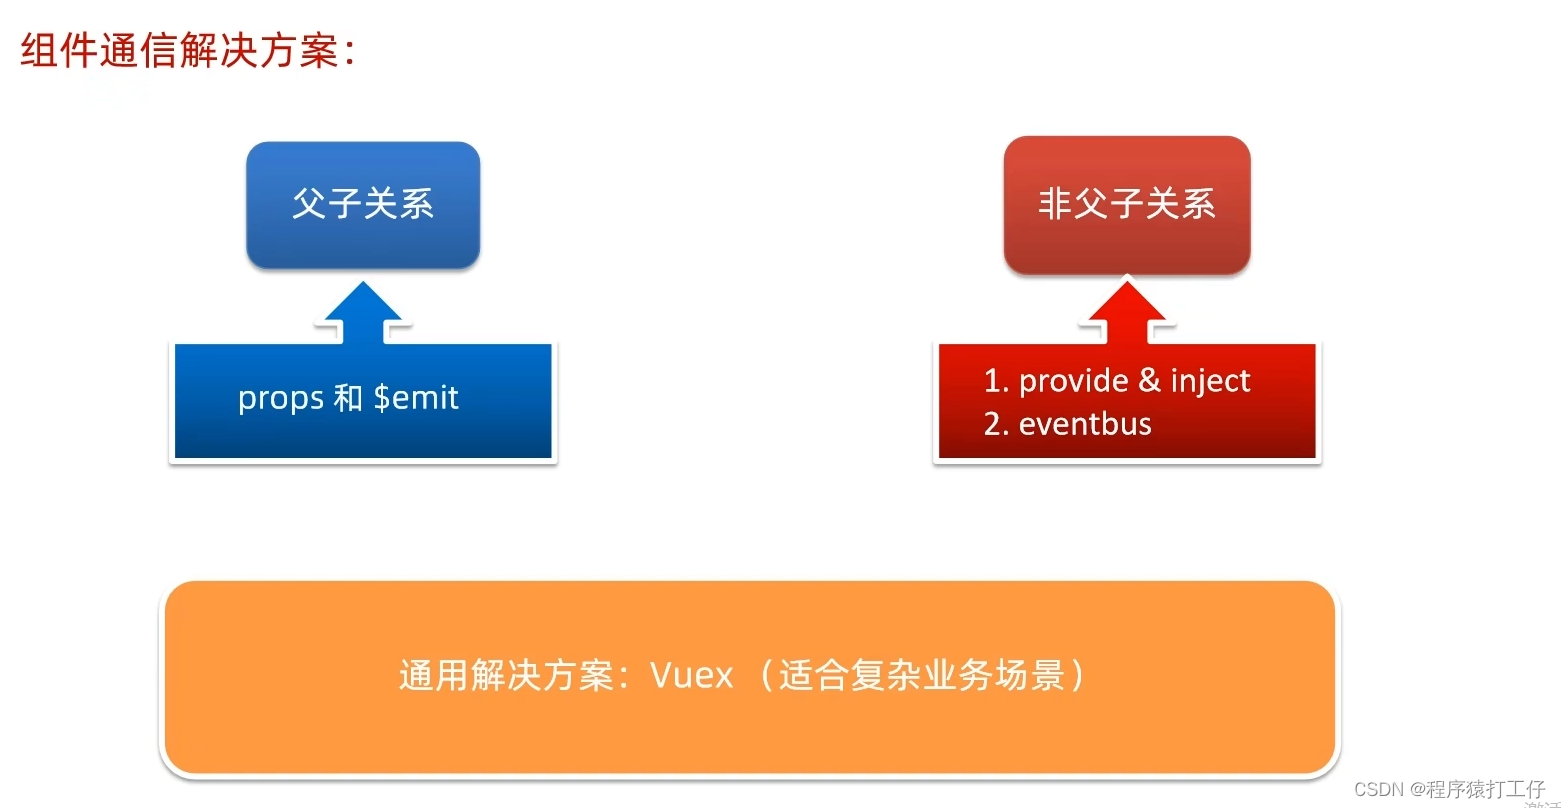
组件通信
- 组件的数据是独立的,无法直接访问其他组件的数据。
- 想使用其他组件的数据,就需要组件通信
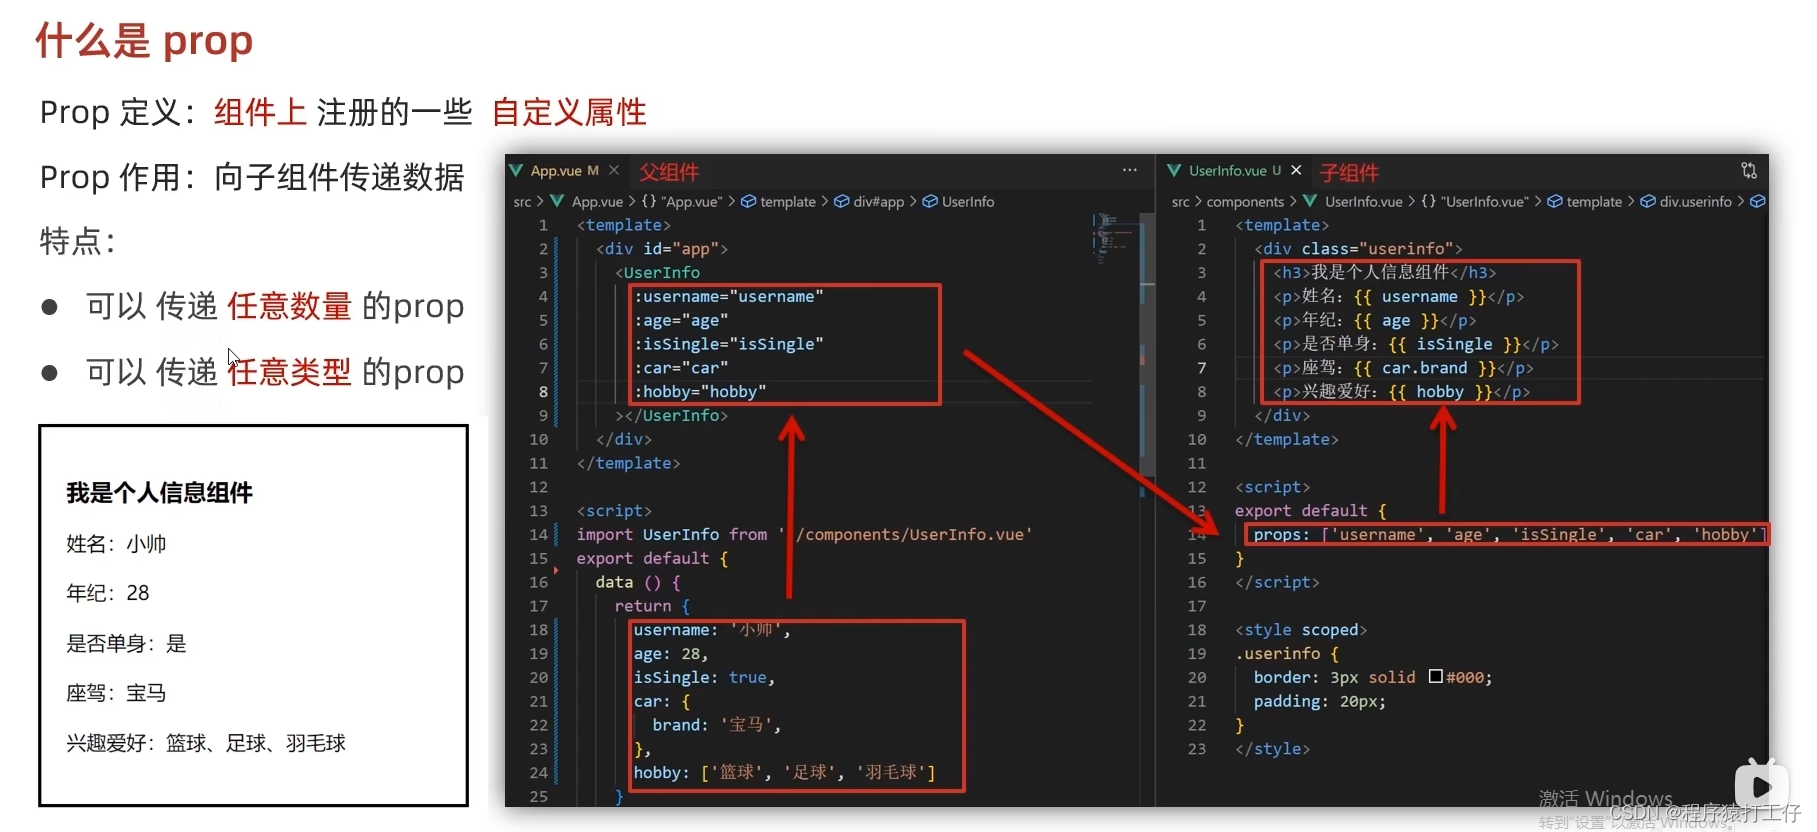
 父--->子
props其实就是在父组件身上,添加属性,就是添加数据。(添加属性的方式传值)
1.给组件标签,添加属性方式 赋值
2.通过props来接受
3.直接使用props的值
 父组件:
父组件:
title="myTitle"属于写死了属性 :title="myTitle"动态数据
子组件:
props:[ ] 是个数组,表示可以传多个值。数组中'name'必须和传过来的名字一样,这里是title
子---->父
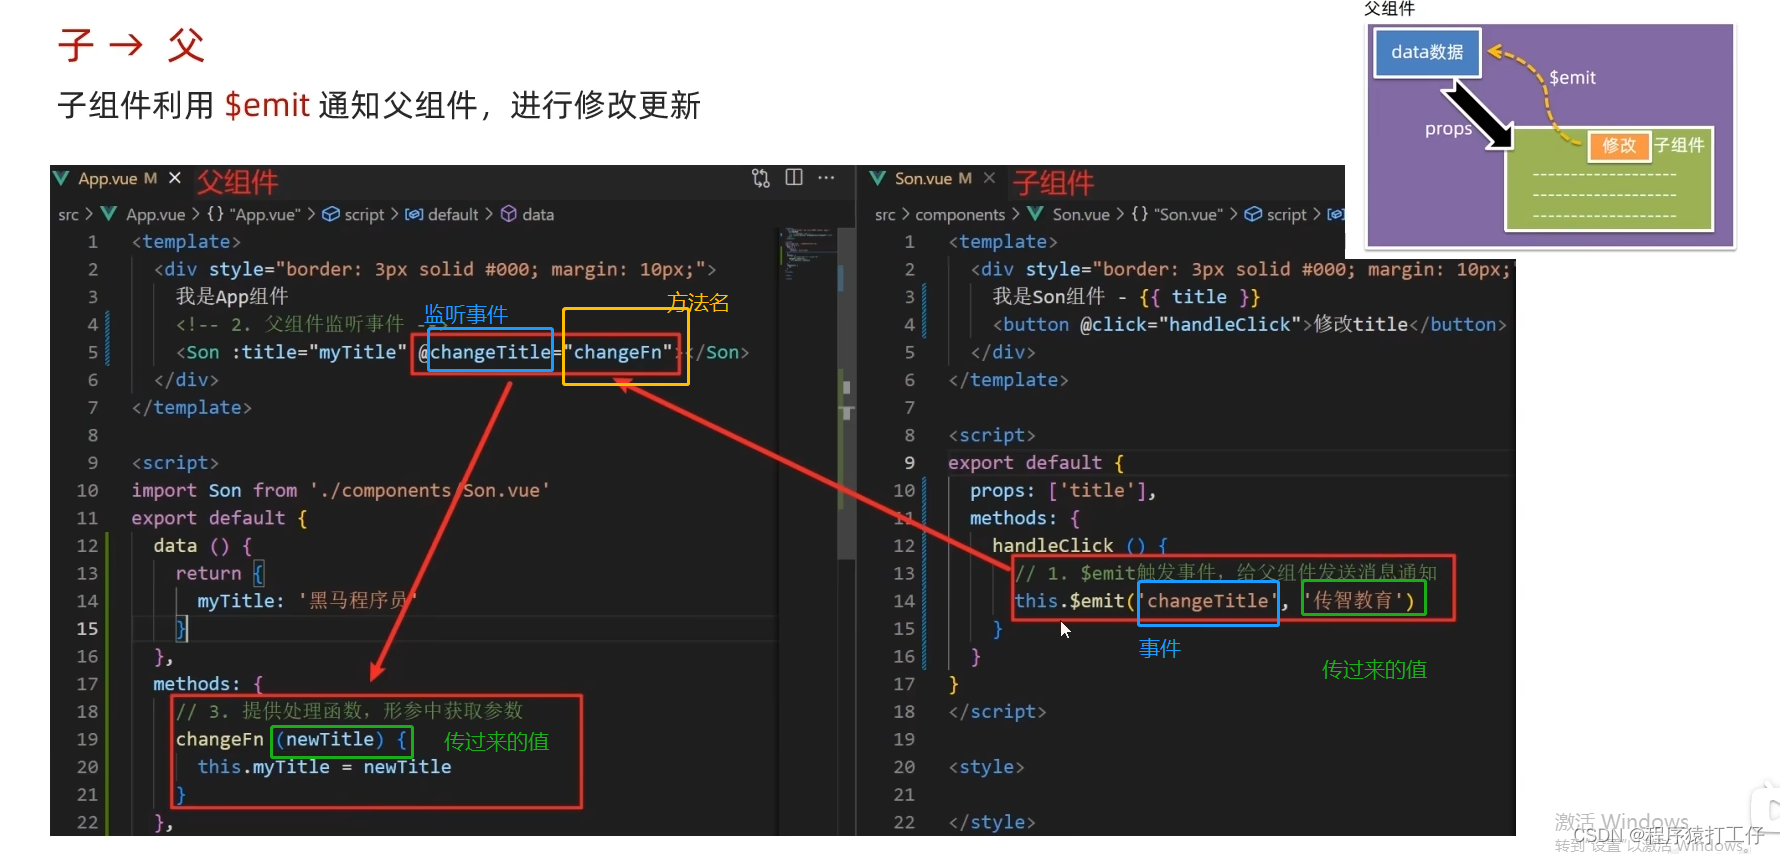
子组件是不能直接修改父组件传过来的数据的。要想修改必须emit触发事件,给父组件发送消息通知(就是this.$emit)。父组件需要对发送过来的事件,进行监听(这里是changeTitle事件)。传智教育就是传过来的值。
父组件监听事件,接受处理修改的值后,父组件就会影响子组件的值,子组件中就会修改。
props详解
练习
细节:
<div>兴趣爱好:{{hobby.join('、')}}</div>

代码:
App.vue
<template>
  <div class="app">
    <UserInfo
      :username="username"
      :age="age"
      :isSingle="isSingle"
      :car="car"
      :hobby="hobby"
    ></UserInfo>
  </div>
</template>

<script>
import UserInfo from './components/UserInfo.vue'
export default {
  data() {
    return {
      username: '小帅',
      age: 28,
      isSingle: true,
      car: {
        brand: '宝马',
      },
      hobby: ['篮球', '足球', '羽毛球'],
    }
  },
  components: {
    UserInfo,
  },
}
</script>

<style>
</style>
UserInfo.vue
<template>
  <div class="userinfo">
    <h3>我是个人信息组件</h3>
    <div>姓名:{{username}}</div>
    <div>年龄:{{age}}</div>
    <div>是否单身:{{isSingle}}</div>
    <div>座驾:{{car.brand}}</div>
    <div>兴趣爱好:{{hobby.join('、')}}</div>
  </div>
</template>

<script>
export default {
  props:['username','age','isSingle','car','hobby']
}
</script>

<style>
.userinfo {
  width: 300px;
  border: 3px solid #000;
  padding: 20px;
}
.userinfo > div {
  margin: 20px 10px;
}
</style>
prop校验
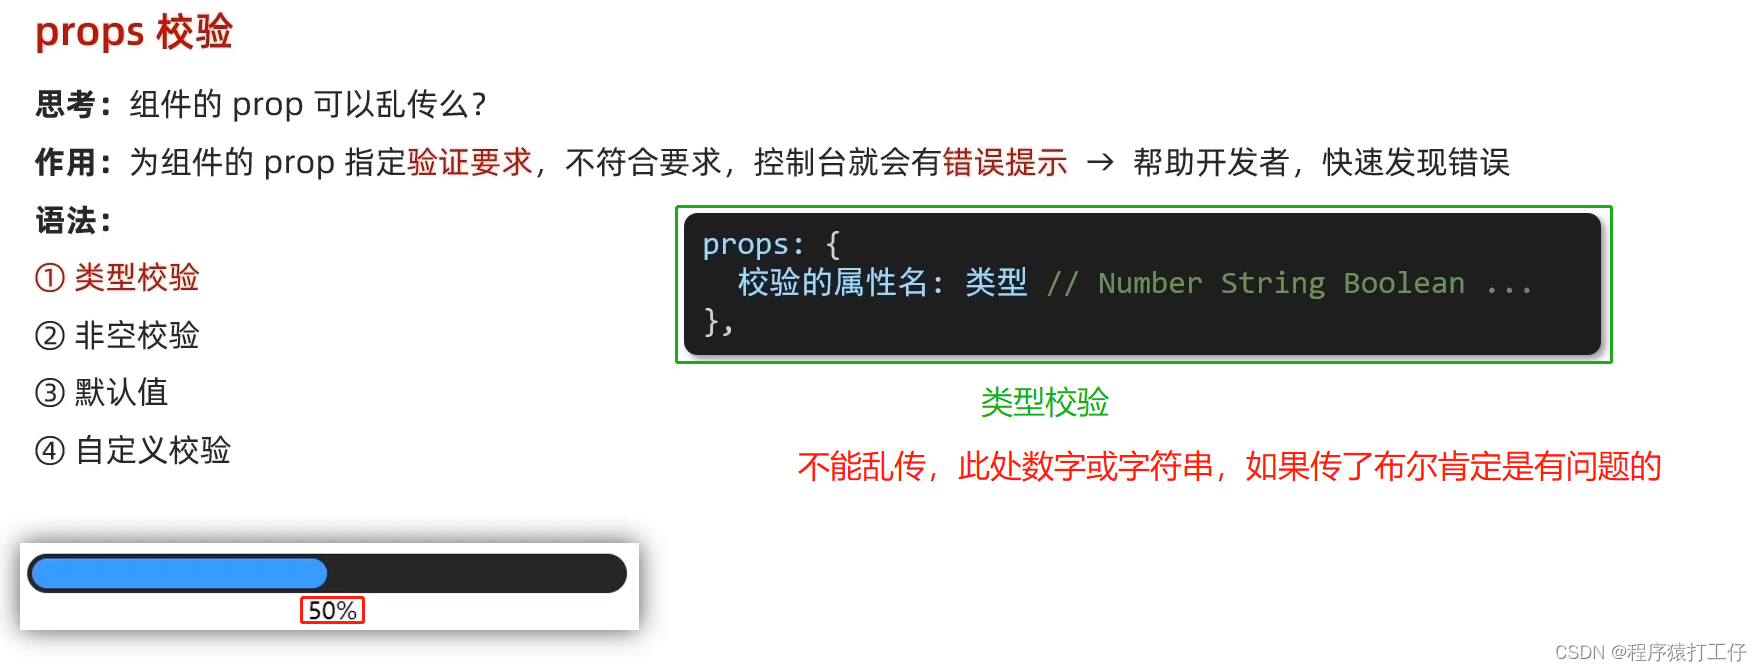
类型校验: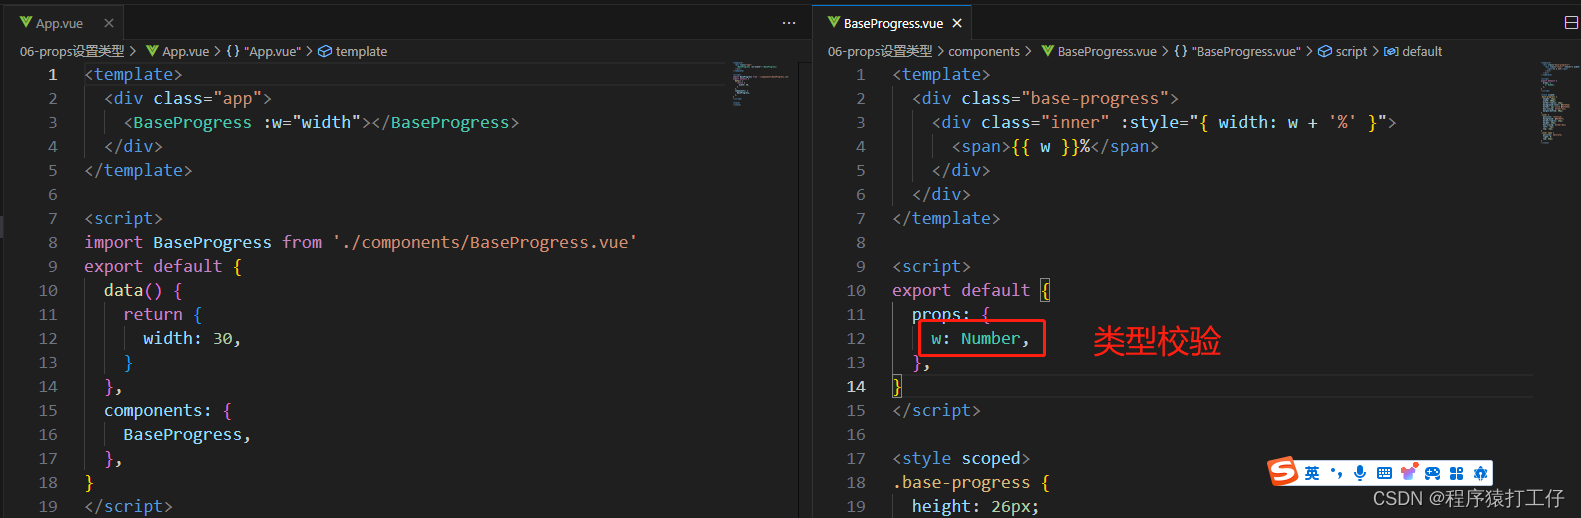
 细节:console.error('传入的prop w,必须是0-100') 可以提示一个error的信息。
代码:
<script>
export default {
// 0.最初写法
// props: ["w"],
// 1.基础写法(类型校验)
// props:{
// w:Number
// }
// 2.完整写法(类型、是否必填、默认值、自定义校验)
props: {
w: {
type: Number,
required: true,
default:0,
validator(value){//方法形参value,可以直接拿到传过来的数据
//true和flase 校验是否成功
if(value >=0 && value <=100){
return true;
}else{
console.error('传入的prop w,必须是0-100')
return false;
}
}
},
},
};
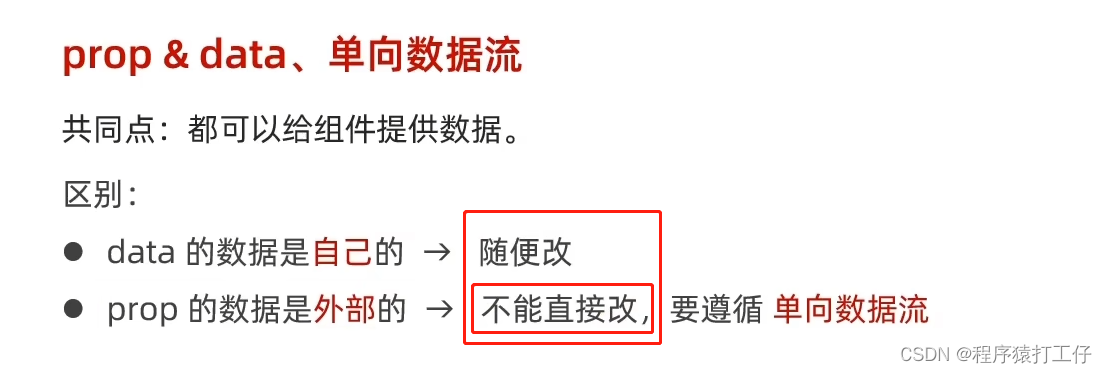
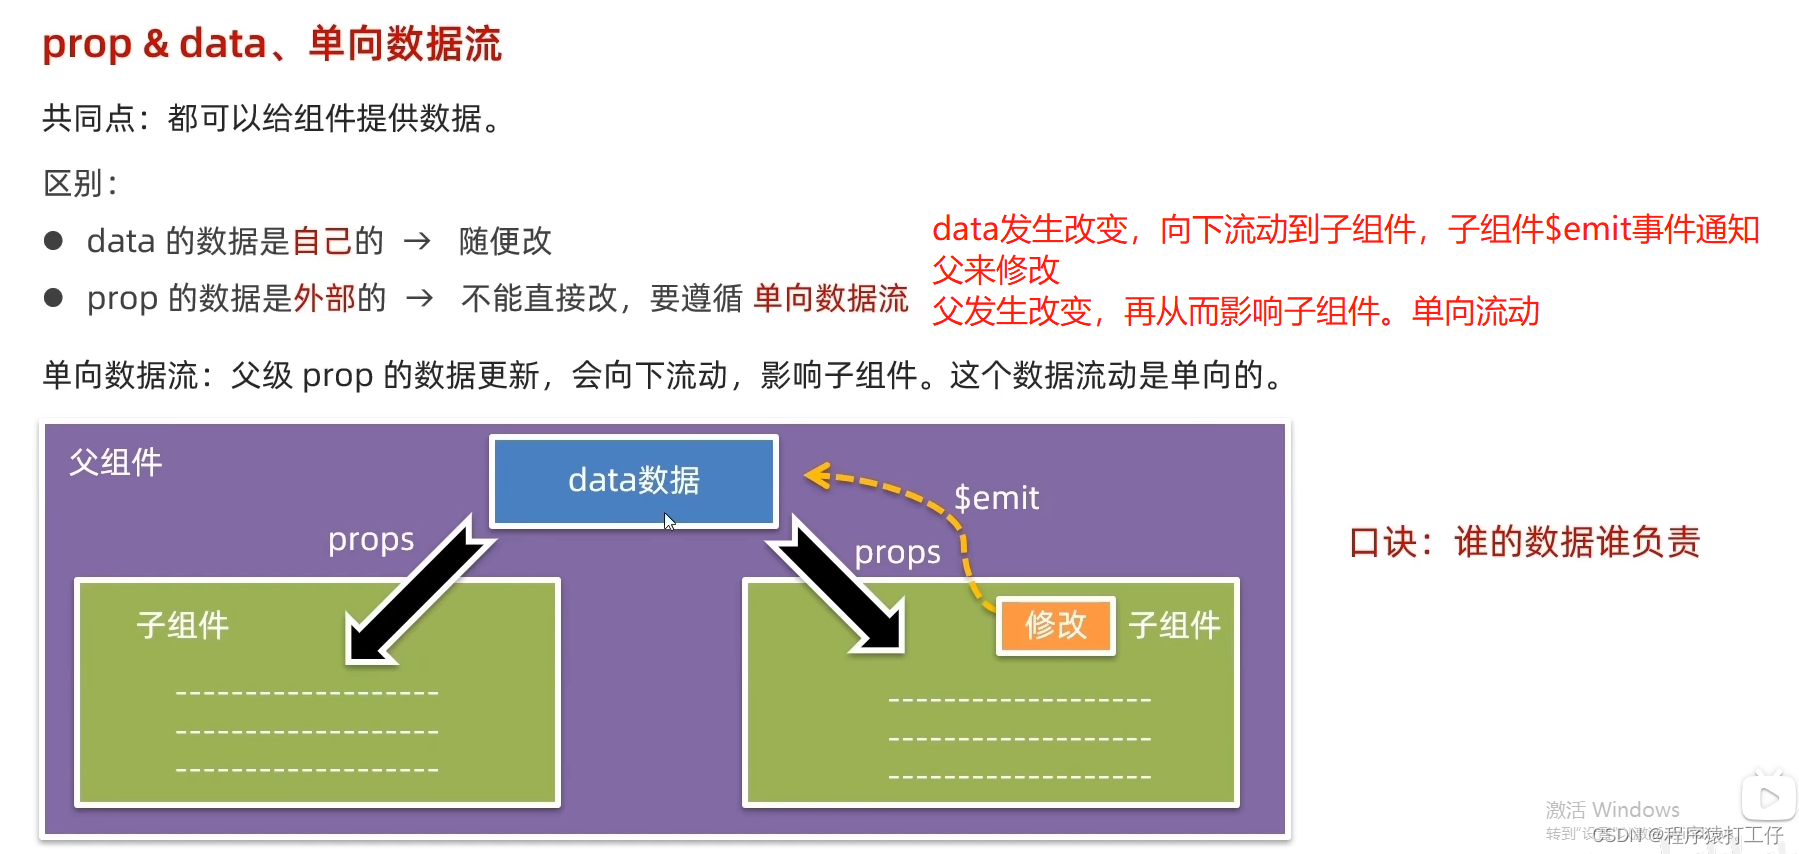
</script>prop和data 单向数据流(详看代码)
一句话:谁的数据谁负责(重要)
单向数据流(专业名词):父组件的prop更新,会单向向下流动,影响到子组件。
代码:
App.vue
<template>
  <div class="app">
    <BaseCount :count="count" @changeCount="handleChange"></BaseCount>
  </div>
</template>

<script>
import BaseCount from "./components/BaseCount.vue";
export default {
  components: {
    BaseCount,
  },
  data() {
    return {
      count: 100,
    };
  },
  methods: {
    handleChange(value) {
      //老爹这的数据变化了,就会影响:count="count",从而子组件数据改变,页面发生改变
      this.count = value;
    },
  },
};
</script>
<style>
</style>
BaseCount.vue
<template>
  <div class="base-count">
    <!--click不能写count-- 本质上count是父的数据(属于外部传过来的数据 不能随便修改) -->
    <!-- 所以要用事件发送通知(this.$emit),让父来进行修改 -->
    <button @click="handleSub">-</button>
    <span>{{ count }}</span>
    <button @click="handleAdd">+</button>
  </div>
</template>

<script>
//** 一句话:谁的数据谁负责  **
export default {
  // 1.自己的数据随便修改  (谁的数据 谁负责)
  // data () {
  //   return {
  //     count: 100,
  //   }
  // },

  // 2.外部传过来的数据 不能随便修改

  //单向数据流(专业名词):父组件的prop更新,会单向向下流动,影响到子组件。
  props: {
    count: Number,
  },
  methods: {
    handleAdd() {
      //子传父 this.$emit(事件名,参数)
      //不能是this.count++。++属于赋值了(因为不能随意修改)
      this.$emit("changeCount", this.count + 1);
    },
    handleSub() {
      this.$emit("changeCount", this.count - 1);
    },
  },
};
</script>

<style>
.base-count {
  margin: 20px;
}
</style>
总结:
非父子通信-事件总线
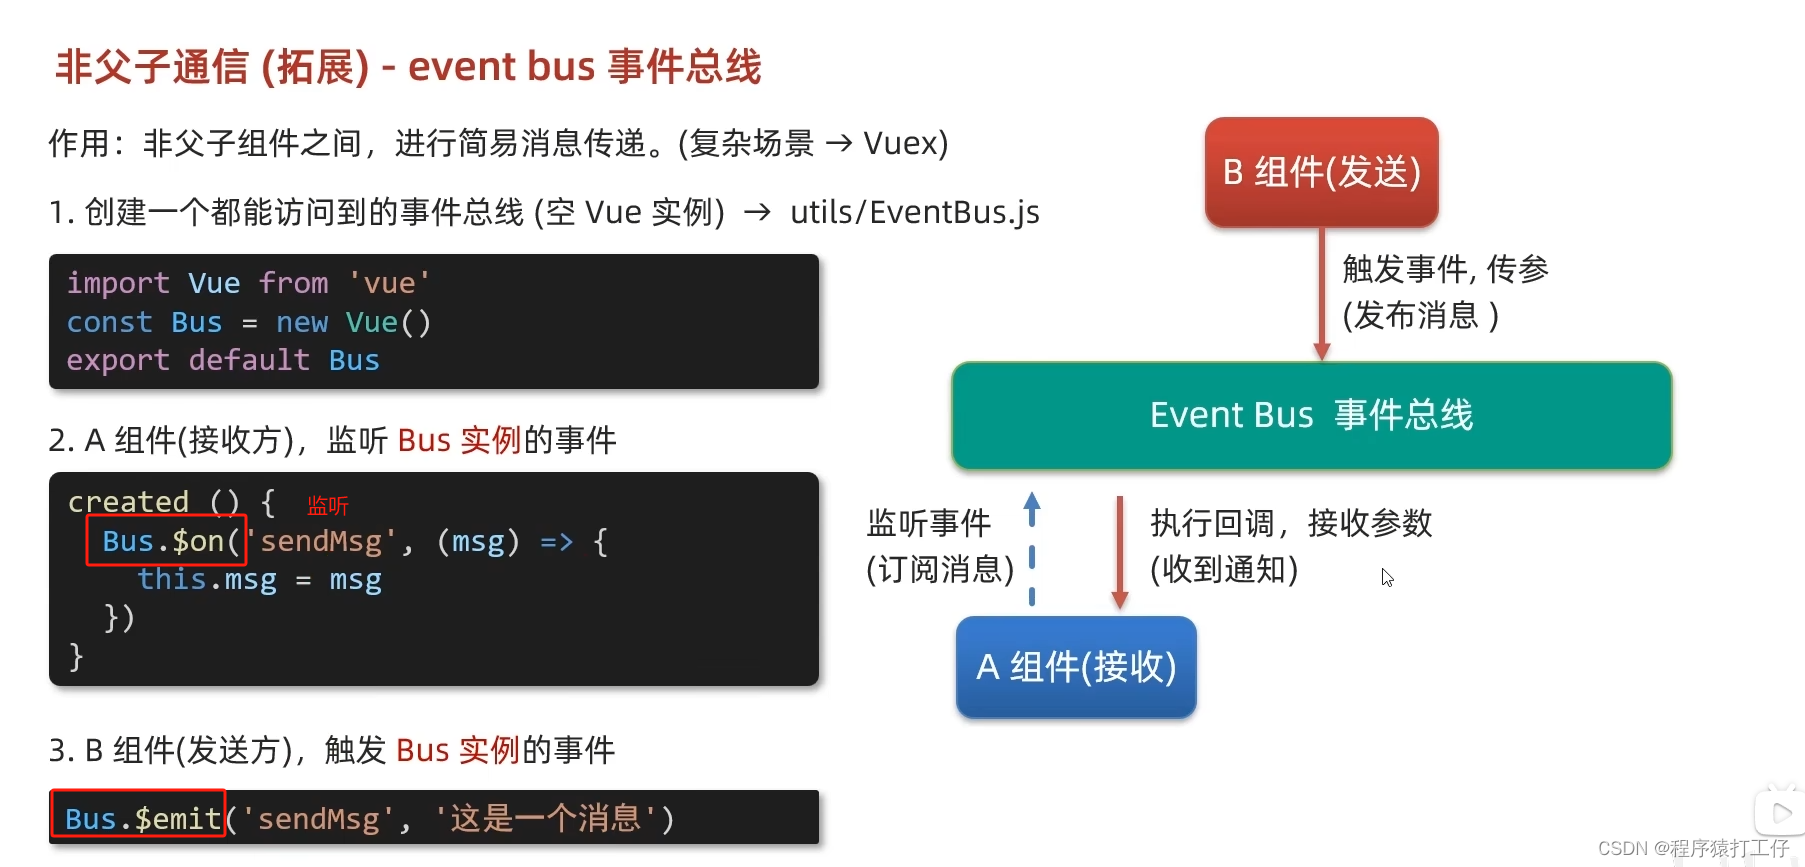
底层就是利用事件机制,进行传递。简易消息传递可以用Bus总线。复杂场景建议用Vuex
操作:

1.先创建一个都能访问的 事件总线Bus
2.导入Bus,发送方,写在方法中触发。接收方,在创建时,就进行监听。
触发用$emit,监听用$on

代码:
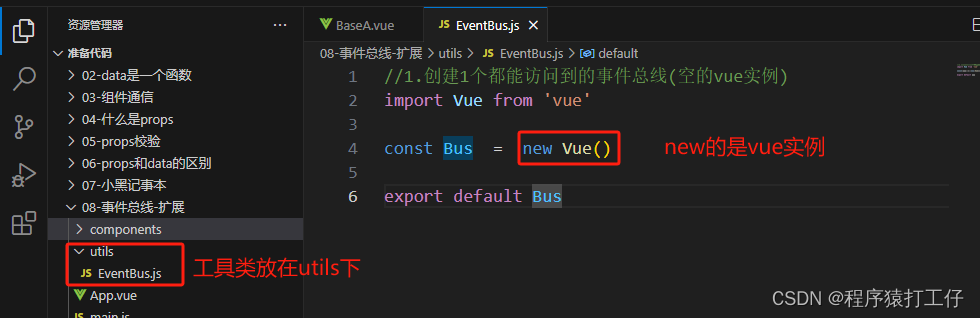
EventBus.js
//1.创建1个都能访问到的事件总线(空的vue实例)
import Vue from 'vue'

const Bus  =  new Vue()

export default Bus
BaseA.vue(接收方)
<template>
  <div class="base-a">
    我是A组件(接受方)
    <p>{{msg}}</p>
  </div>
</template>

<script>
//导入bus
import Bus from '../utils/EventBus'
export default {
  data() {//提供data,用于渲染传过来的数据
    return {
      msg: '',
    }
  },
  created() {//在创建时,进行监听Bus事件(订阅消息)   监听叫做on
  //监听名sendMsg,()=>{} 这是一个回调
    Bus.$on('sendMsg', (msg) => {
      // console.log(msg)
      this.msg = msg
    })
  },
}
</script>

<style scoped>
.base-a {
  width: 200px;
  height: 200px;
  border: 3px solid #000;
  border-radius: 3px;
  margin: 10px;
}
</style>
BaseB.vue发布方
<template>
  <div class="base-b">
    <div>我是B组件(发布方)</div>
    <!-- 点按钮发送通知 -->
    <button @click="sendMsgFn">发送消息</button>
  </div>
</template>

<script>
//先导入
import Bus from '../utils/EventBus'
export default {
  methods: {
    sendMsgFn() {
      //B组件是发送方,需要用触发事件的方式传递参数(发布消息)。   触发事件$emit
      //sendMsg名称要统一 。Bus.$emit('消息名称', '传递的内容')
      Bus.$emit('sendMsg', '今天天气不错,适合旅游')
    },
  },
}
</script>

<style scoped>
.base-b {
  width: 200px;
  height: 200px;
  border: 3px solid #000;
  border-radius: 3px;
  margin: 10px;
}
</style>
非父子通信-provide & inject

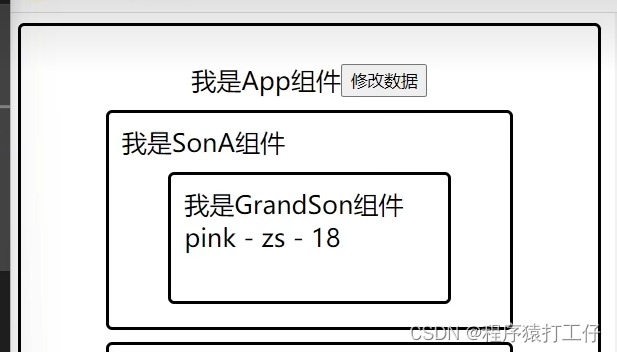
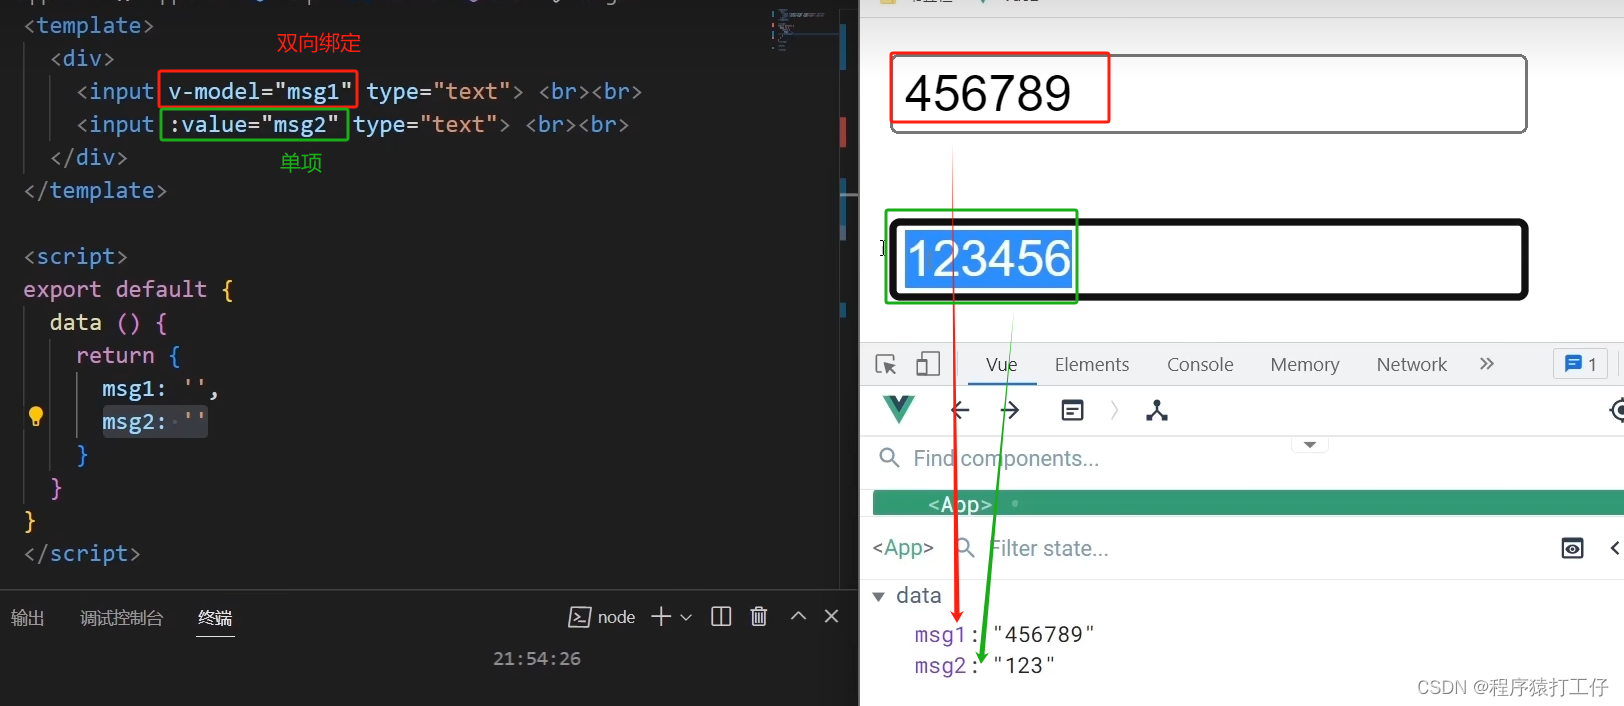
父用provide提供,子孙后代用inject接收 。provide是一个函数。简单类型是非相应式,复杂类型是相应式。方便理解(这有点像深拷贝和浅拷贝)。响应式就是,在传递过程中,是否发生二次改变。
视图:
代码:
父 App.vue
<template>
  <div class="app">
    我是APP组件
    <button @click="change">修改数据</button>
    <SonA></SonA>
    <SonB></SonB>
  </div>
</template>

<script>
import SonA from './components/SonA.vue'
import SonB from './components/SonB.vue'
export default {
  provide() {//provide写成一个函数,共享数据
    return {
      // 简单类型 是非响应式的
      color: this.color,
      // 复杂类型 是响应式的 - 推荐
      userInfo: this.userInfo,
    }
  },
  data() {
    return {
      color: 'pink',//简单类型
      userInfo: {//复杂类型
        name: 'zs',
        age: 18,
      },
    }
  },
  methods: {
    change() {
      this.color = 'red' //简单类型,数据改变,传递后,不会发生改变
      this.userInfo.name = 'ls' //复杂类型,传递过去后,会随着改变而发生改变
    },
  },
  components: {
    SonA,
    SonB,
  },
}
</script>

<style>
.app {
  border: 3px solid #000;
  border-radius: 6px;
  margin: 10px;
}
</style>
孙GrandSon.vue
<template>
<div class="grandSon">
我是GrandSon
{{ color }} -{{ userInfo.name }} -{{ userInfo.age }}
</div>
</template>
<script>
export default {
inject: ['color', 'userInfo'],
}
</script>
<style>
.grandSon {
border: 3px solid #000;
border-radius: 6px;
margin: 10px;
height: 100px;
}
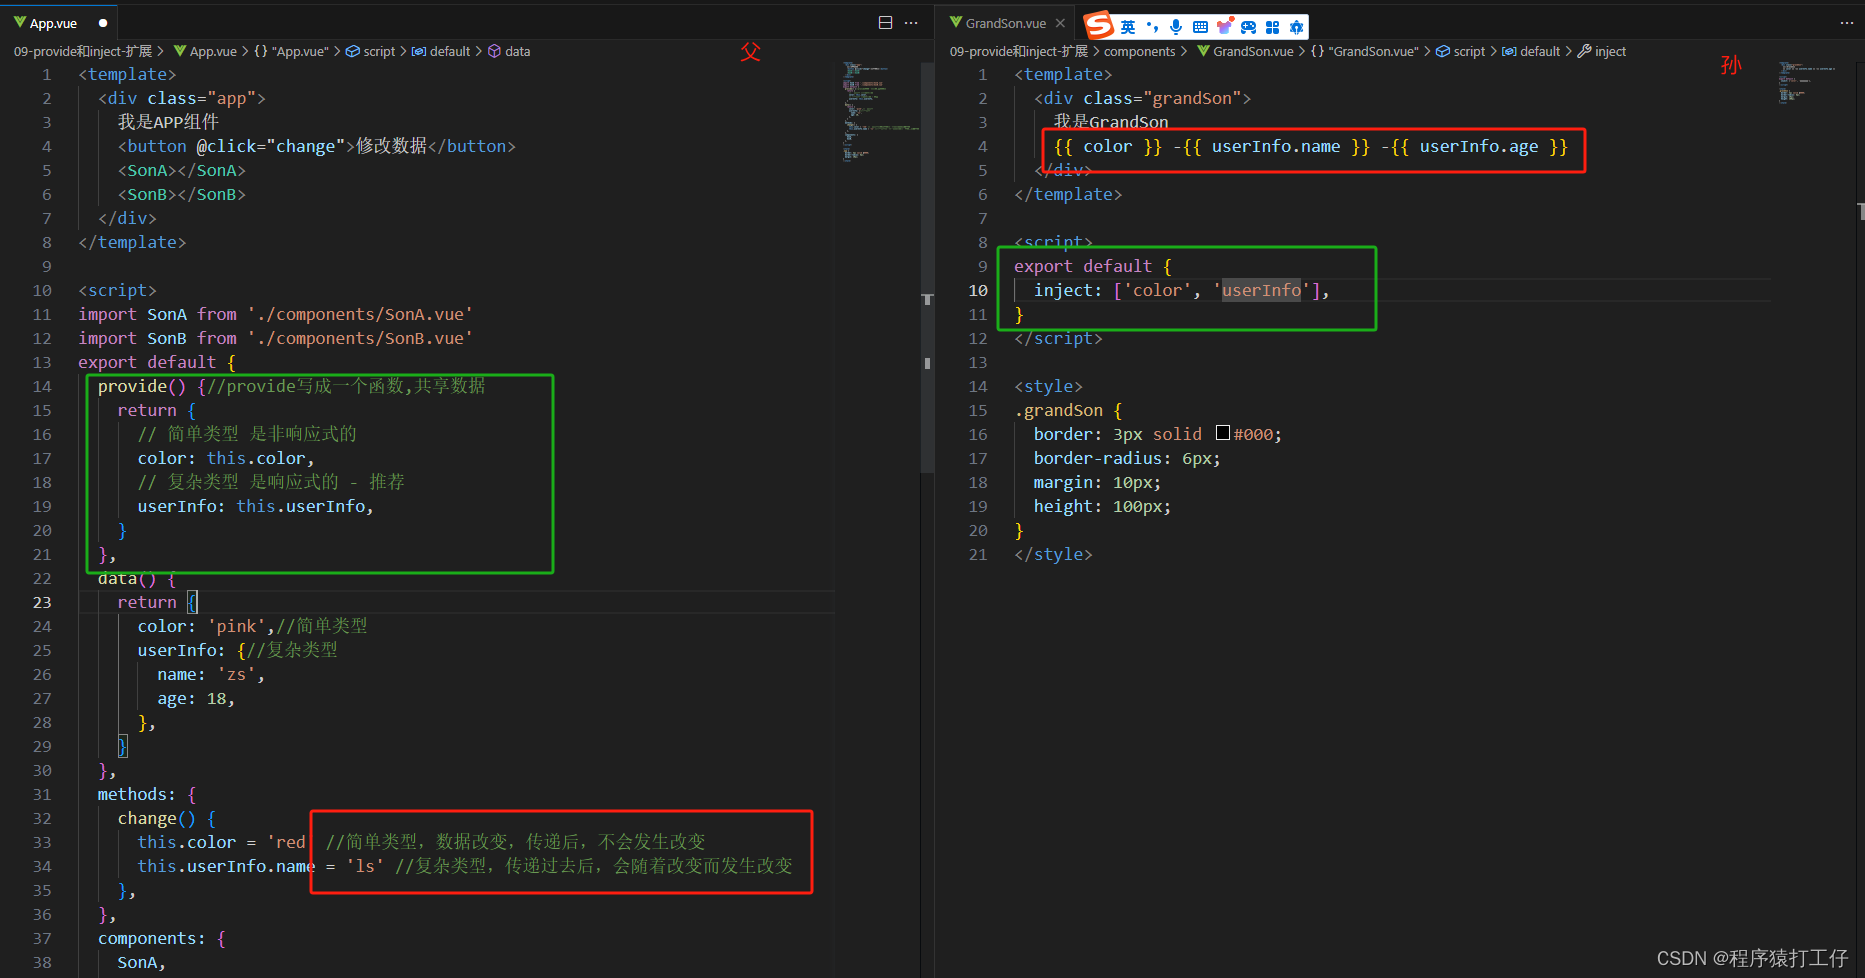
</style>v-model的原理
v-model不仅可以用于表单上,也可以用于组件上完成组件通信的。
注意:应用在输入框上,是 value 和 input 的结合。(应用在不同表单元素上,对应属性也不一样)对应的底层属性稍有不同。但是大体原理是相同的。
例如:应用在复选框上,就是checked和change的结合。
案例:
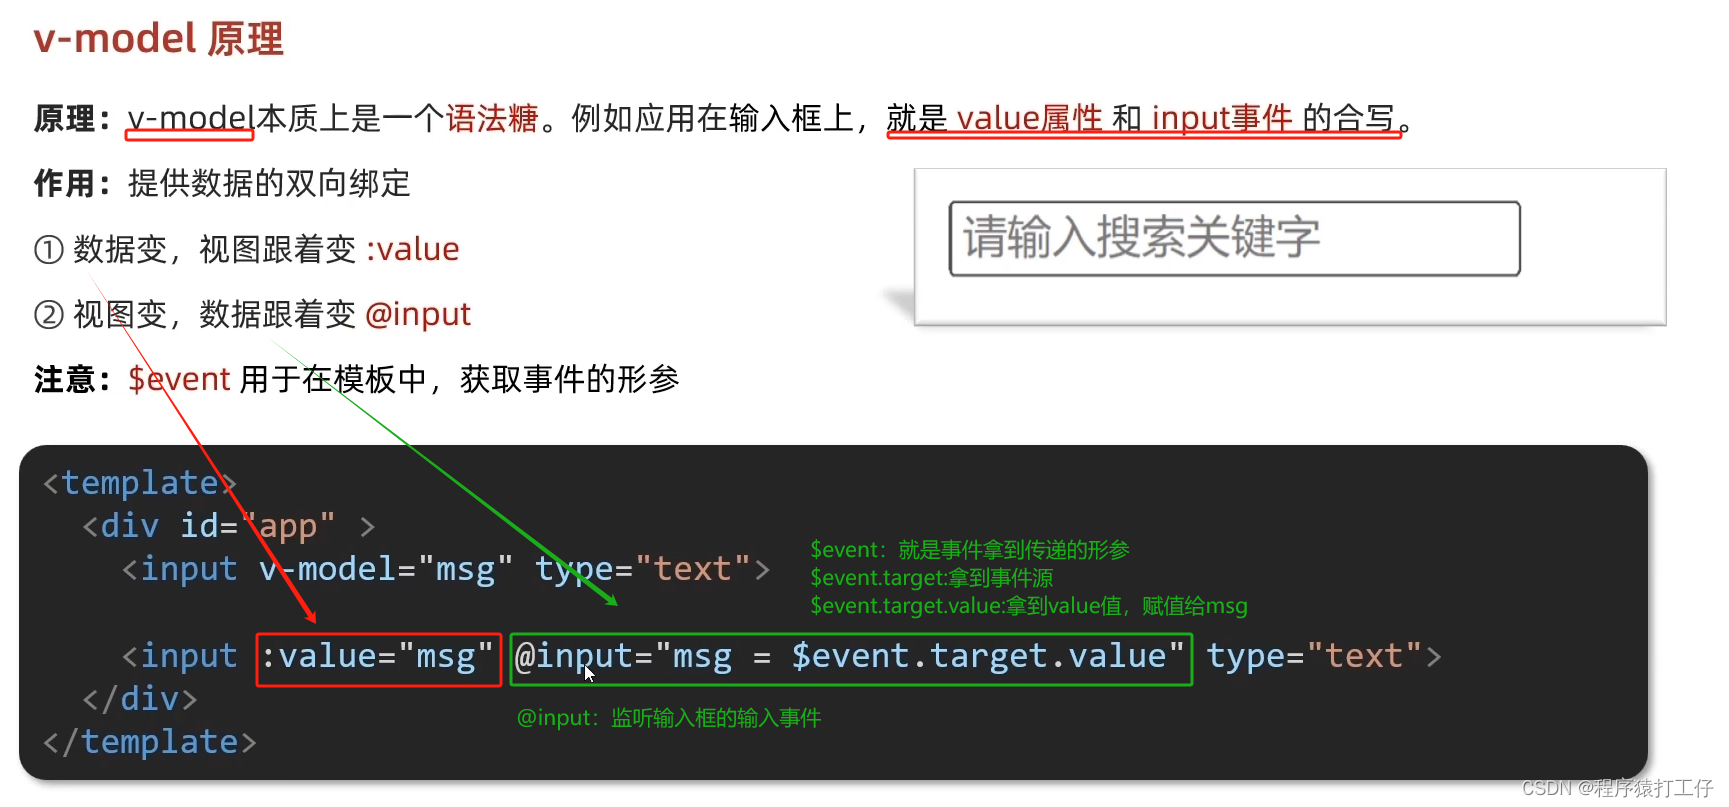
msg1:数据和视图改变,都会改变
msg2:视图改变后,数据没有发生改变。视图改变并没有同步给msg2.
那该怎么办???
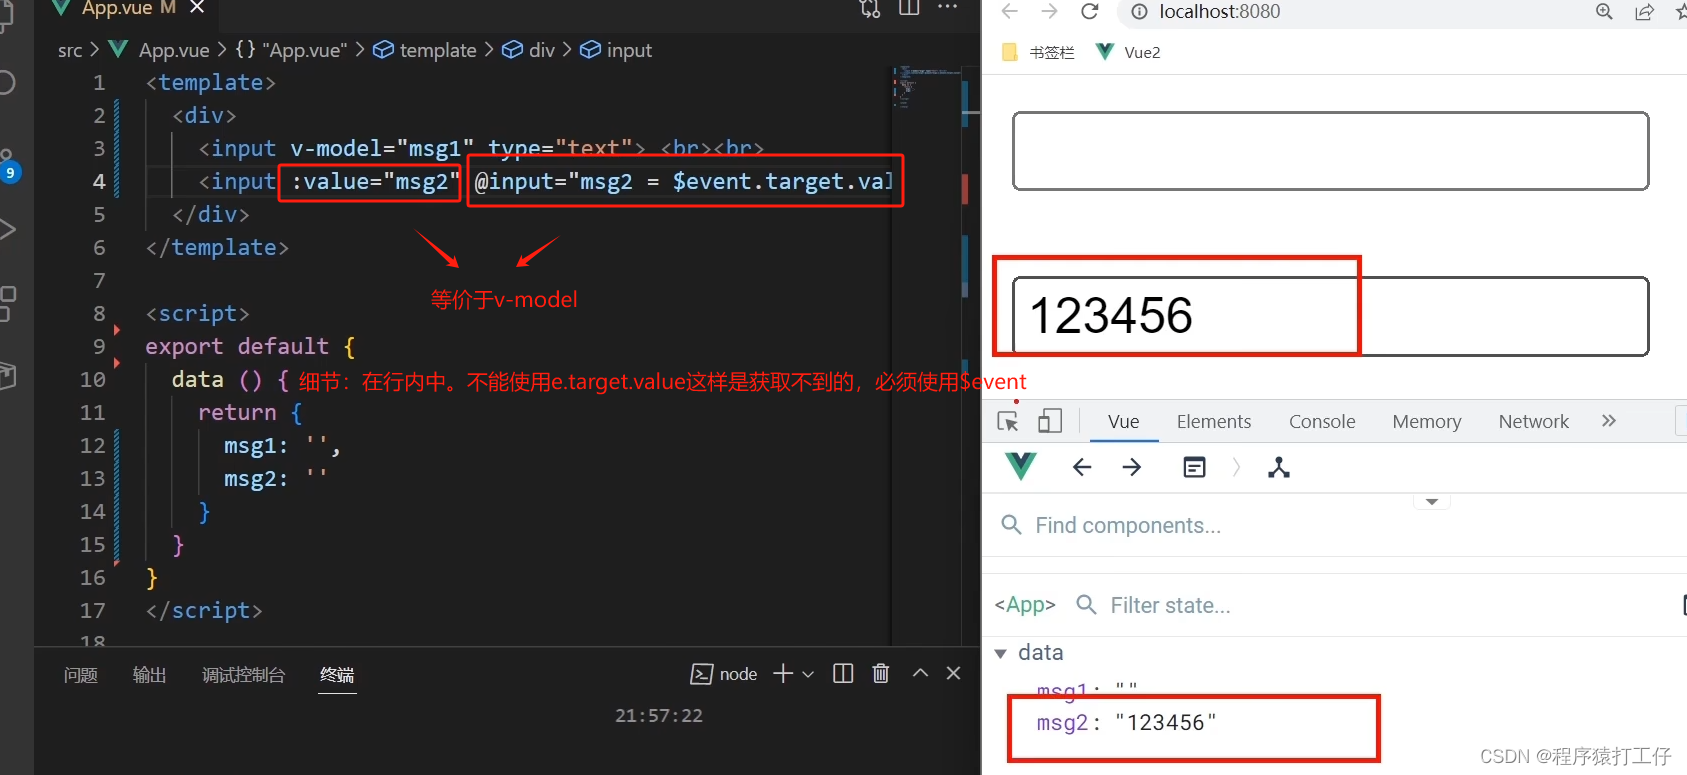
添加@input="msg = $event.target.value"
细节:模版中要想获取传递的形参,要用$event
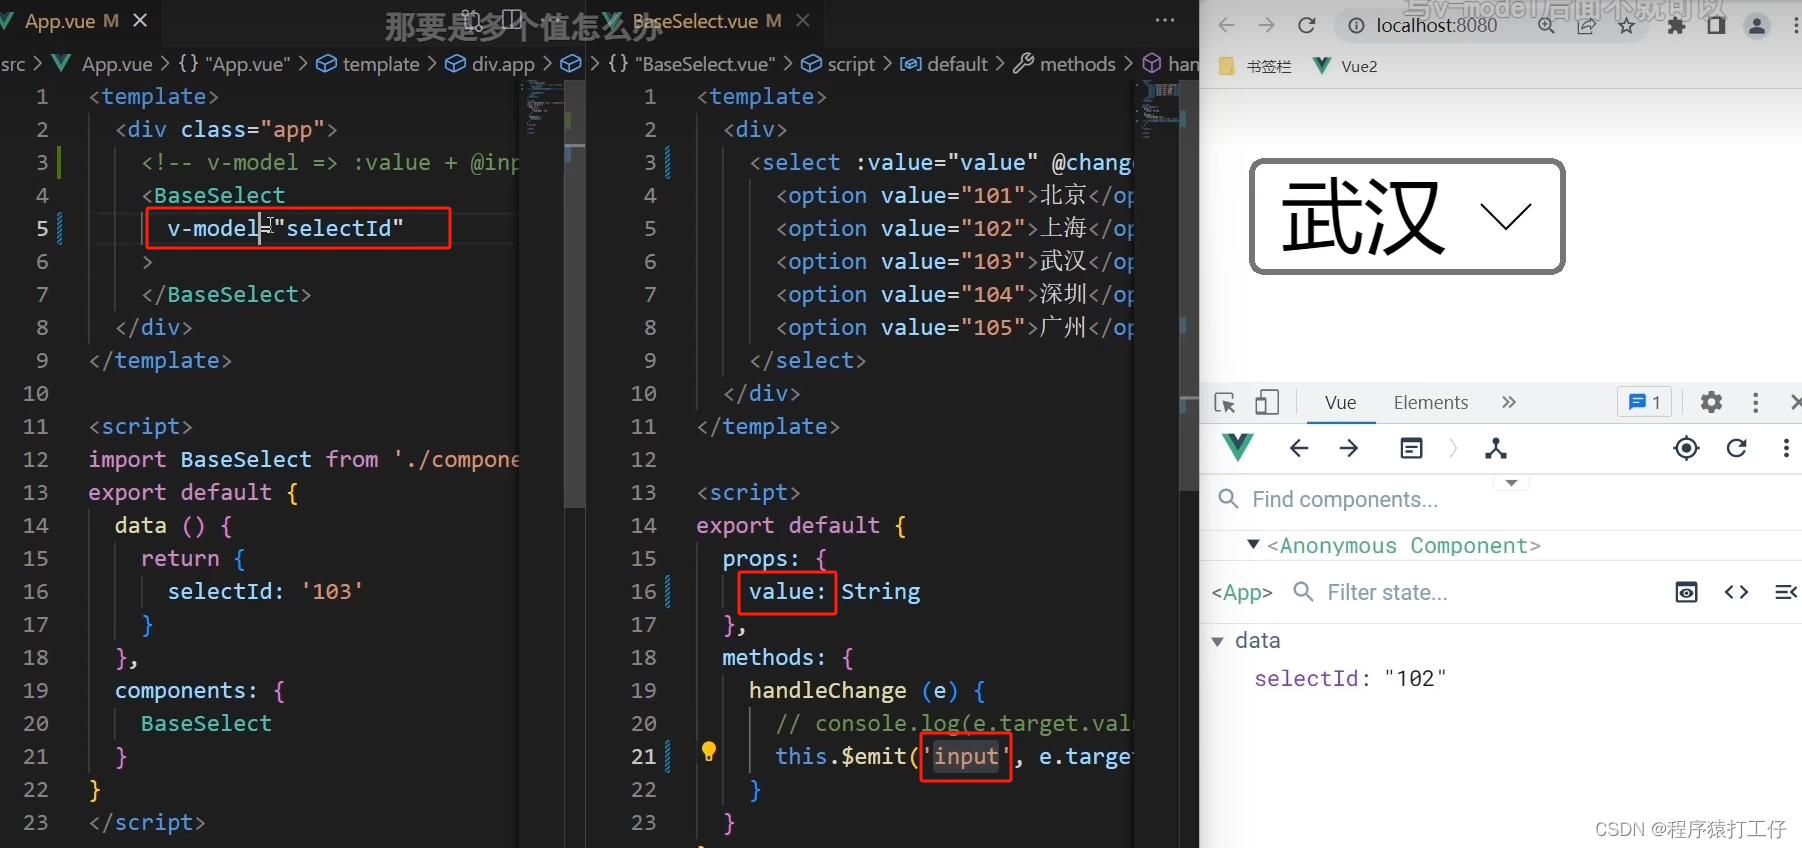
表单类组件的封装 & v-model简化代码
注重理解 悟了悟了!!!
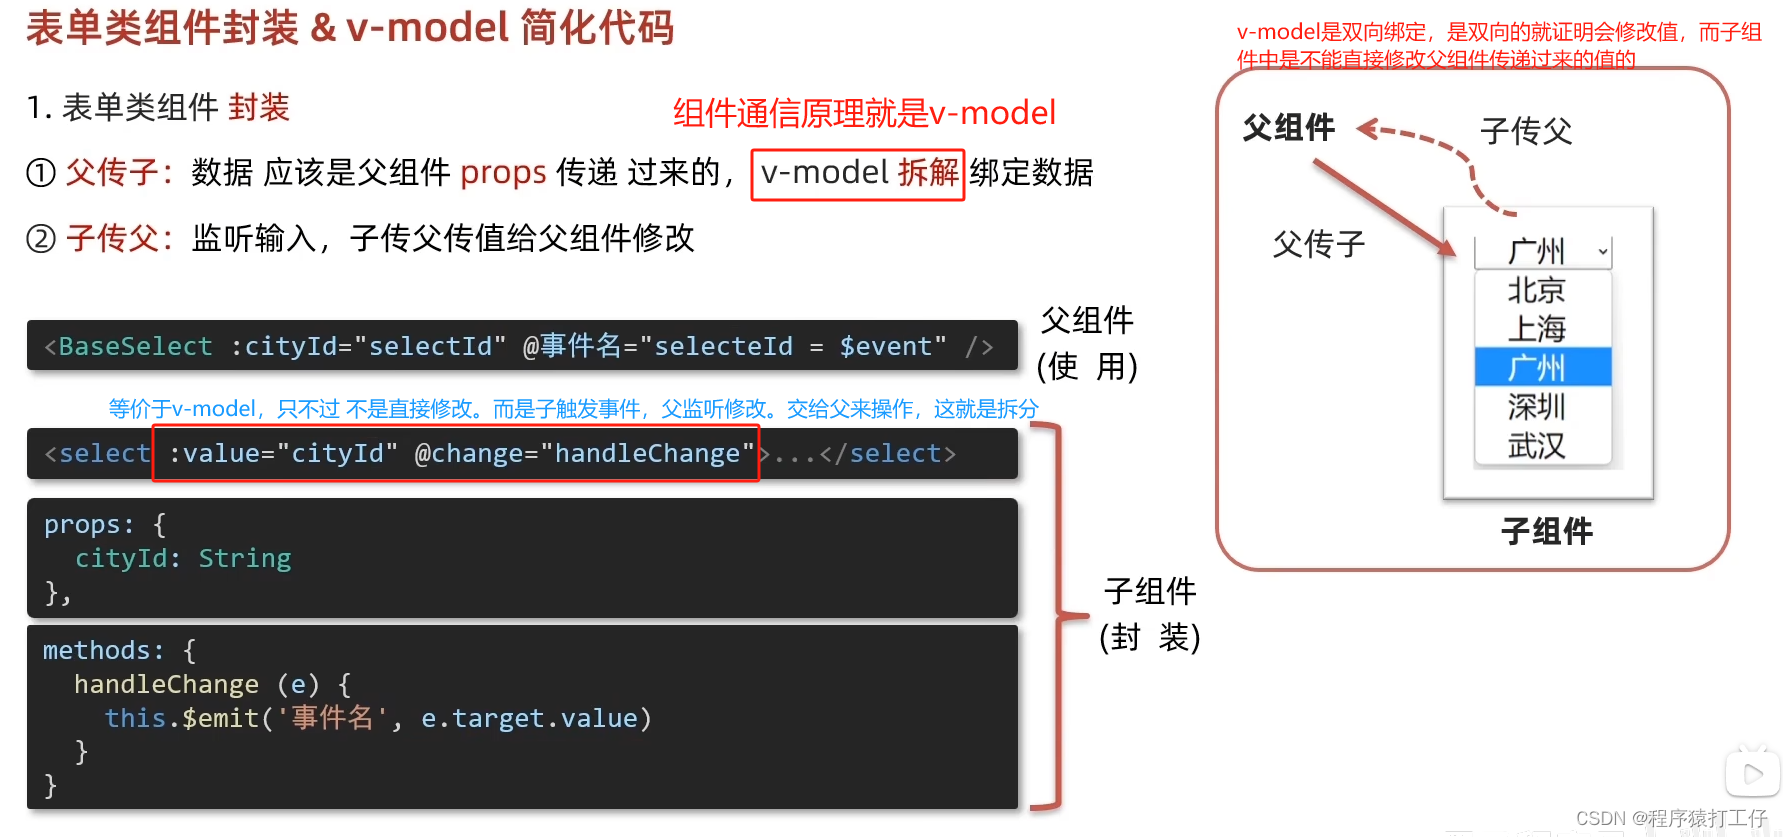
案例:
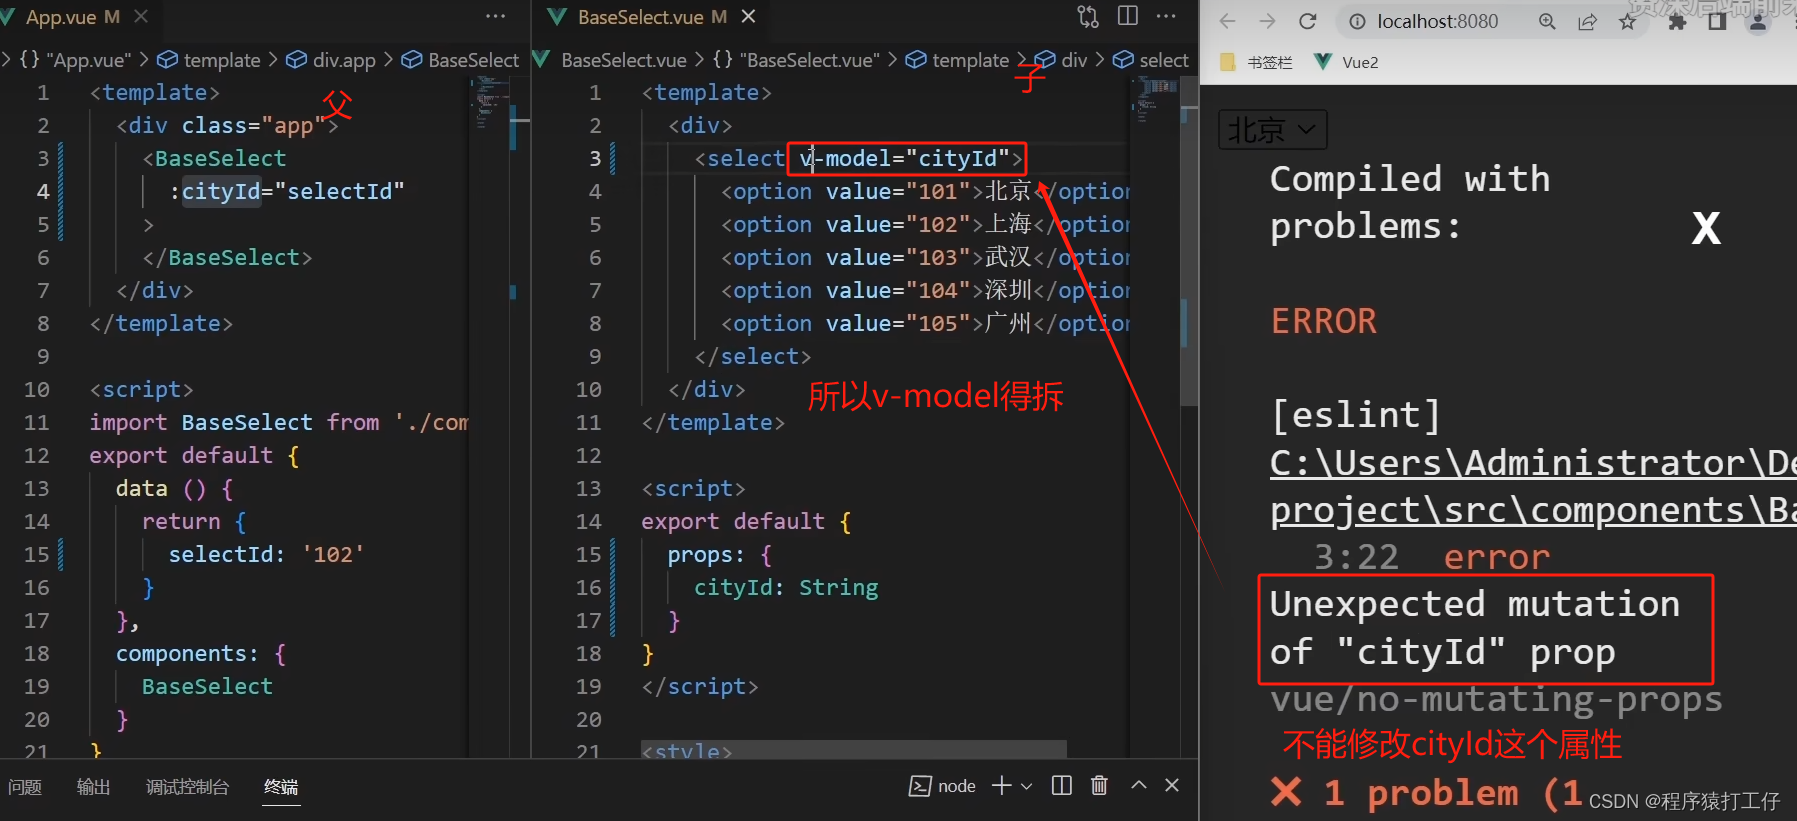
使用v-model,报错。怎么办??得拆 成 :value="cityId" 和 change
封装的整个流程,其实就是完成了 子组件和父组件 数据的双向绑定。
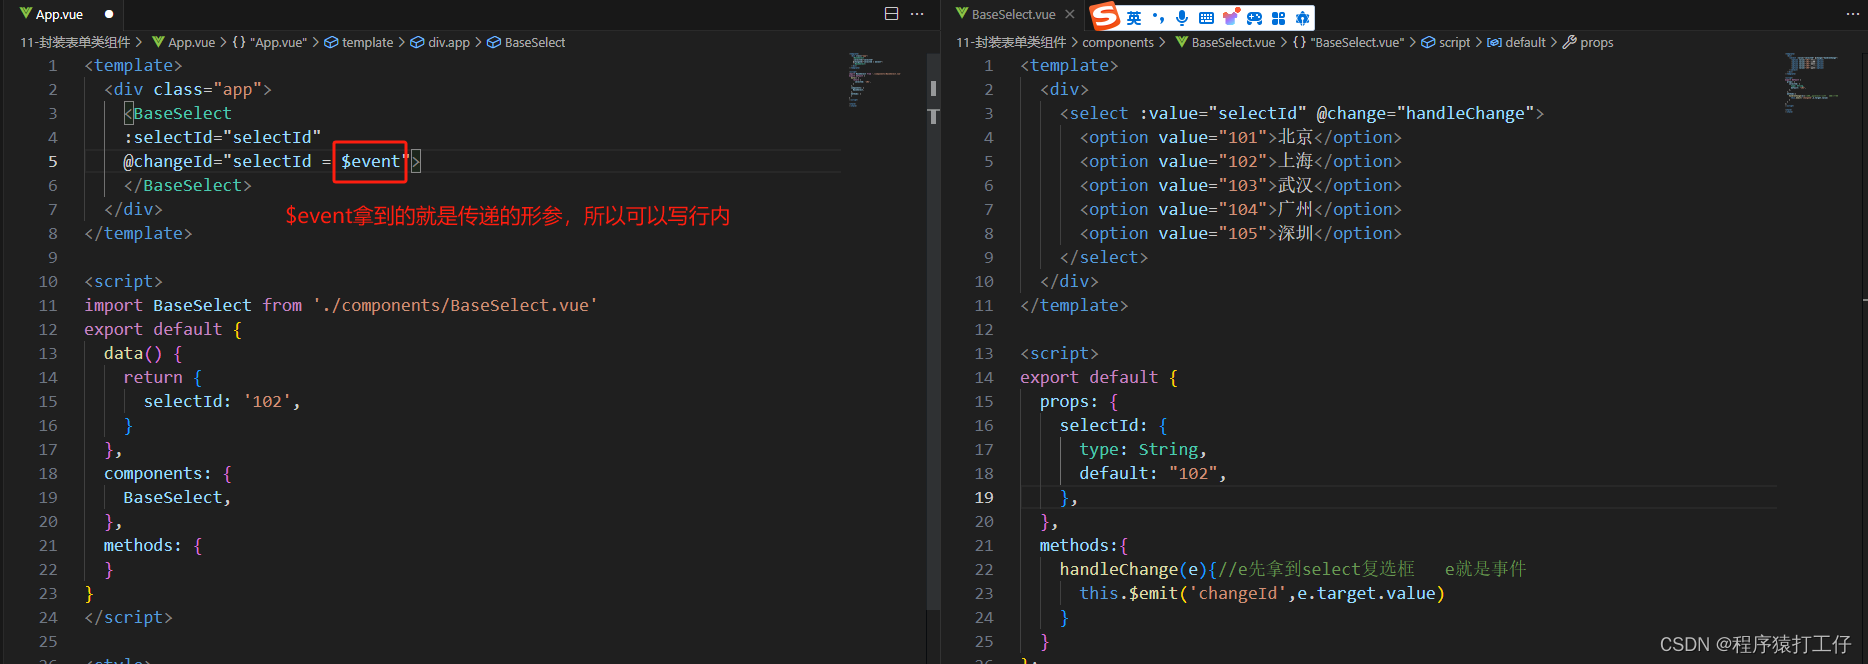
代码:
App.vue
<template>
  <div class="app">
    <BaseSelect
    :selectId="selectId"
    @changeId="selectId = $event">
    </BaseSelect>
  </div>
</template>

<script>
import BaseSelect from './components/BaseSelect.vue'
export default {
  data() {
    return {
      selectId: '102',
    }
  },
  components: {
    BaseSelect,
  },
  methods: {
  }
}
</script>

<style>
</style>
BaseSelect.vue
<template>
  <div>
    <select :value="selectId" @change="handleChange">
      <option value="101">北京</option>
      <option value="102">上海</option>
      <option value="103">武汉</option>
      <option value="104">广州</option>
      <option value="105">深圳</option>
    </select>
  </div>
</template>

<script>
export default {
  props: {
    selectId: {
      type: String,
      default: "102",
    },
  },
  methods:{
    handleChange(e){//e先拿到select复选框   e就是事件
      this.$emit('changeId',e.target.value)
    }
  }
};
</script>

<style>
</style>
父组件使用v-model来简化代码
 因为v-model语法糖,本质就是 value + input
父组件v-model="selectId"能直接绑的前提是,子组件已经按要求配合好了(接收值时用value,change事件中,传递的事件名要是input。$emit('input','数据') )
代码:
App.vue
<template>
  <div class="app">
    <!-- v-model本质就是 value属性和input事件 -->

    <!-- <BaseSelect
    :selectId="selectId"
    @changeId="selectId = $event">
    </BaseSelect> -->

    <BaseSelect
    v-model="selectId">
    </BaseSelect>
  </div>
</template>

<script>
import BaseSelect from './components/BaseSelect.vue'
export default {
  data() {
    return {
      selectId: '102',
    }
  },
  components: {
    BaseSelect,
  },
  methods: {
  }
}
</script>

<style>
</style>
BaseSelect.vue
<template>
  <div>
    <select :value="selectId" @change="handleChange">
      <option value="101">北京</option>
      <option value="102">上海</option>
      <option value="103">武汉</option>
      <option value="104">广州</option>
      <option value="105">深圳</option>
    </select>
  </div>
</template>

<script>
export default {
  props: {
    // selectId: {
    //   type: String,
    //   default: "102",
    // },
     value: {
      type: String,
      default: "102",
    },
  },
  methods:{
    handleChange(e){//e先拿到select复选框   e就是事件
      // this.$emit('changeId',e.target.value)
      this.$emit('input',e.target.value)
    }
  }
};
</script>

<style>
</style>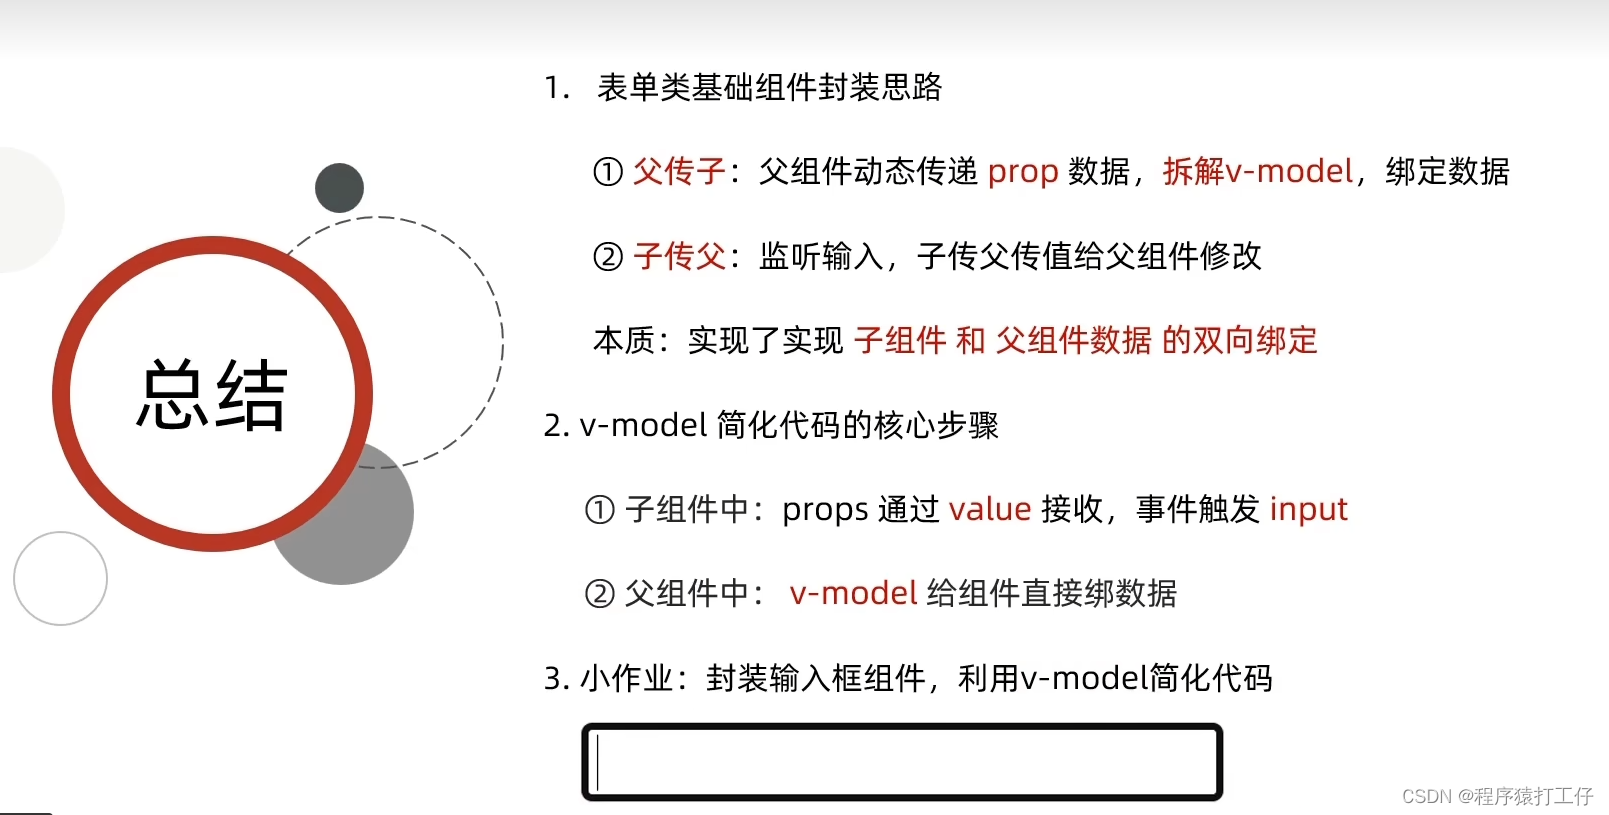
.sync修饰符
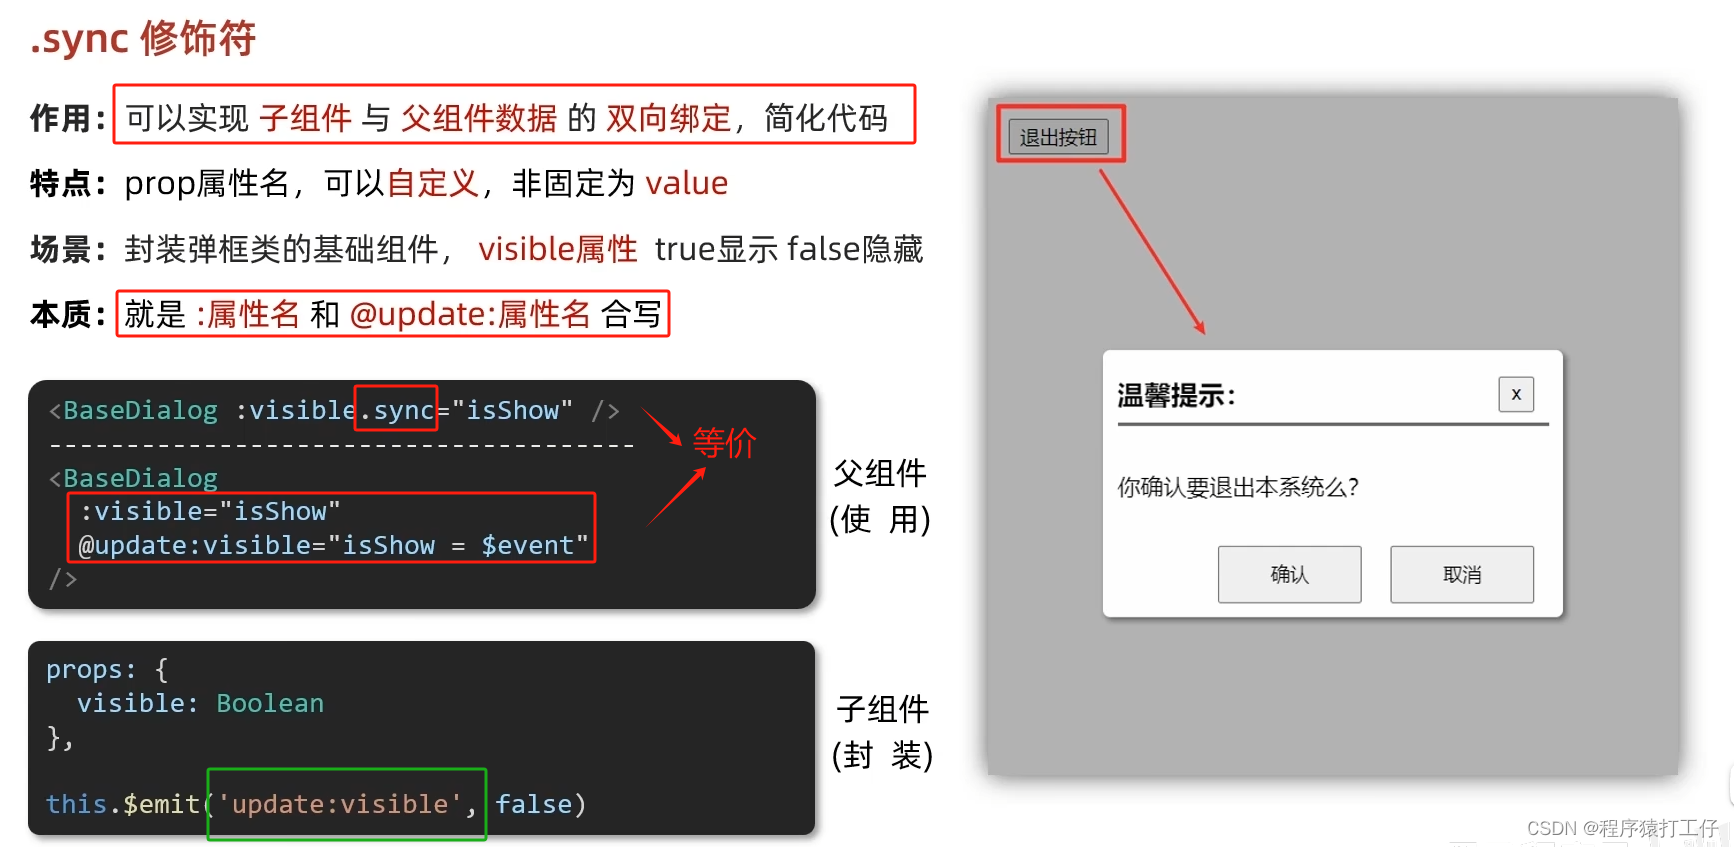
使用 .sync , 传递子组件 的 属性名 可以 不是固定的value。使用v-model必须是value名字。
.sync => :visible 和 update:
一旦用.sync,触发事件时,子组件回调就得固定写法 update:属性名
效果:
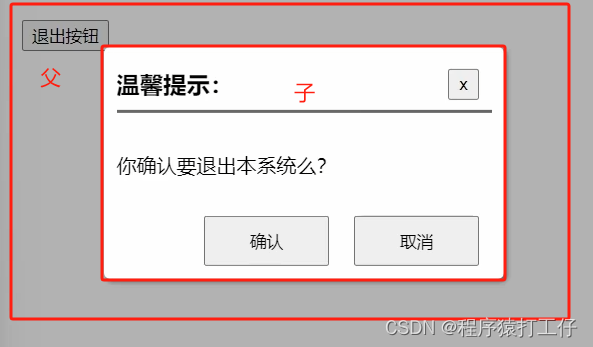
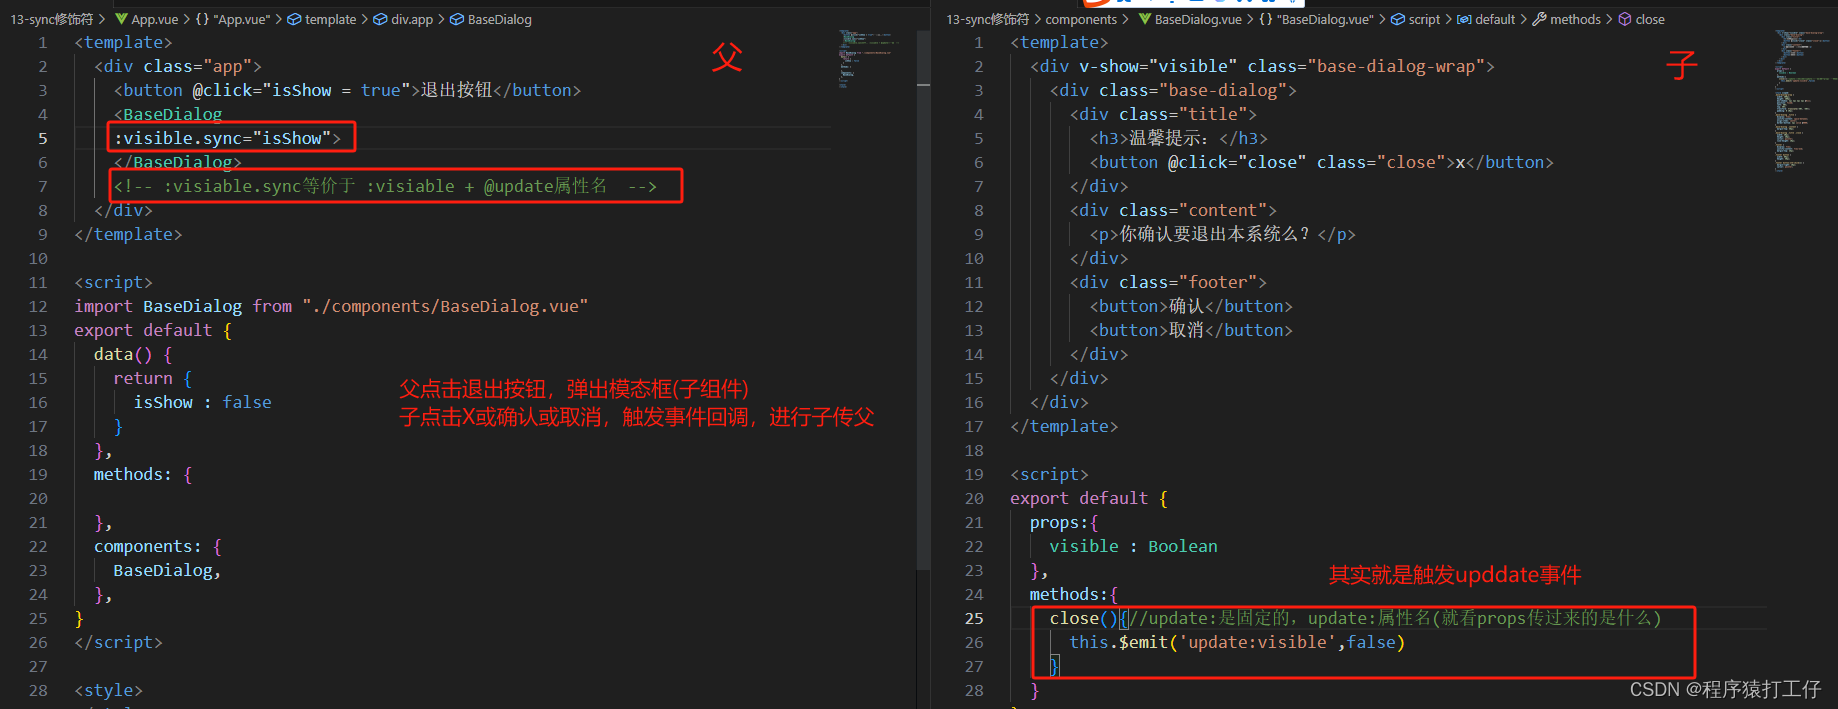
代码:
App.vue
<template>
  <div class="app">
    <button @click="isShow = true">退出按钮</button>
    <BaseDialog
    :visible.sync="isShow">
    </BaseDialog>
    <!-- :visiable.sync等价于 :visiable + @update属性名  -->
  </div>
</template>

<script>
import BaseDialog from "./components/BaseDialog.vue"
export default {
  data() {
    return {
      isShow : false
    }
  },
  methods: {

  },
  components: {
    BaseDialog,
  },
}
</script>

<style>
</style>
BaseDialog.vue
<template>
  <div v-show="visible" class="base-dialog-wrap">
    <div class="base-dialog">
      <div class="title">
        <h3>温馨提示:</h3>
        <button @click="close" class="close">x</button>
      </div>
      <div class="content">
        <p>你确认要退出本系统么?</p>
      </div>
      <div class="footer">
        <button>确认</button>
        <button>取消</button>
      </div>
    </div>
  </div>
</template>

<script>
export default {
  props:{
    visible : Boolean
  },
  methods:{
    close(){//update:是固定的,update:属性名(就看props传过来的是什么)
      this.$emit('update:visible',false)
    }
  }
}
</script>

<style scoped>
.base-dialog-wrap {
  width: 300px;
  height: 200px;
  box-shadow: 2px 2px 2px 2px #ccc;
  position: fixed;
  left: 50%;
  top: 50%;
  transform: translate(-50%, -50%);
  padding: 0 10px;
}
.base-dialog .title {
  display: flex;
  justify-content: space-between;
  align-items: center;
  border-bottom: 2px solid #000;
}
.base-dialog .content {
  margin-top: 38px;
}
.base-dialog .title .close {
  width: 20px;
  height: 20px;
  cursor: pointer;
  line-height: 10px;
}
.footer {
  display: flex;
  justify-content: flex-end;
  margin-top: 26px;
}
.footer button {
  width: 80px;
  height: 40px;
}
.footer button:nth-child(1) {
  margin-right: 10px;
  cursor: pointer;
}
</style>
ref 和 $refs
获取dom元素

ref会更加精确。
ref查找范围 是 当前组件内。document.querySelector 范围是 整个页面。
效果:
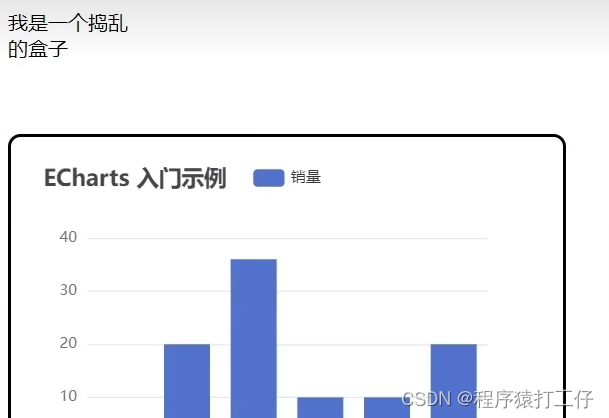
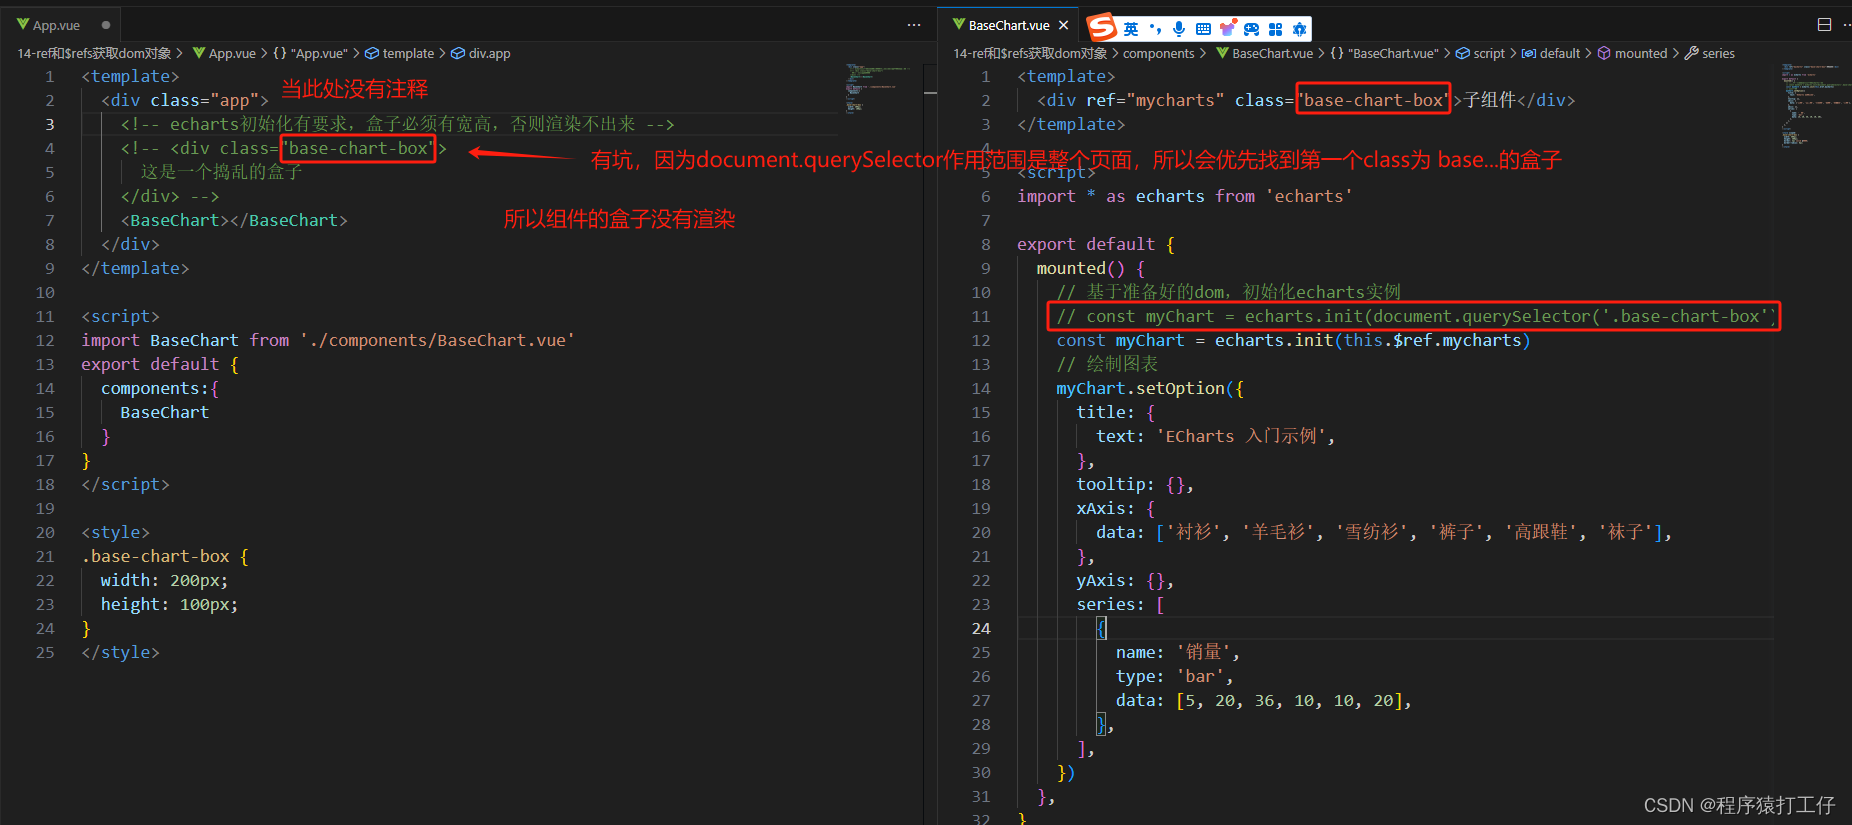
echarts渲染有条件,必须要有宽高,否则渲染不出来。
作用范围:document.Selector是整个页面,ref是当前组件。
代码:
App.vue
<template>
  <div class="app">
    <!-- echarts初始化有要求,盒子必须有宽高,否则渲染不出来 -->
    <!-- <div class="base-chart-box">
      这是一个捣乱的盒子
    </div> -->
    <BaseChart></BaseChart>
  </div>
</template>

<script>
import BaseChart from './components/BaseChart.vue'
export default {
  components:{
    BaseChart
  }
}
</script>

<style>
.base-chart-box {
  width: 200px;
  height: 100px;
}
</style>
BaseChart.vue
<template>
<div ref="mycharts" class="base-chart-box">子组件</div>
</template>
<script>
import * as echarts from 'echarts'
export default {
mounted() {
// 基于准备好的dom,初始化echarts实例
// const myChart = echarts.init(document.querySelector('.base-chart-box'))
const myChart = echarts.init(this.$ref.mycharts)
// 绘制图表
myChart.setOption({
title: {
text: 'ECharts 入门示例',
},
tooltip: {},
xAxis: {
data: ['衬衫', '羊毛衫', '雪纺衫', '裤子', '高跟鞋', '袜子'],
},
yAxis: {},
series: [
{
name: '销量',
type: 'bar',
data: [5, 20, 36, 10, 10, 20],
},
],
})
},
}
</script>
<style scoped>
.base-chart-box {
width: 400px;
height: 300px;
border: 3px solid #000;
border-radius: 6px;
}
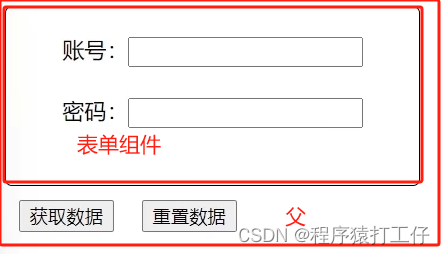
</style>组件实例
很重要,组件封装很常用。
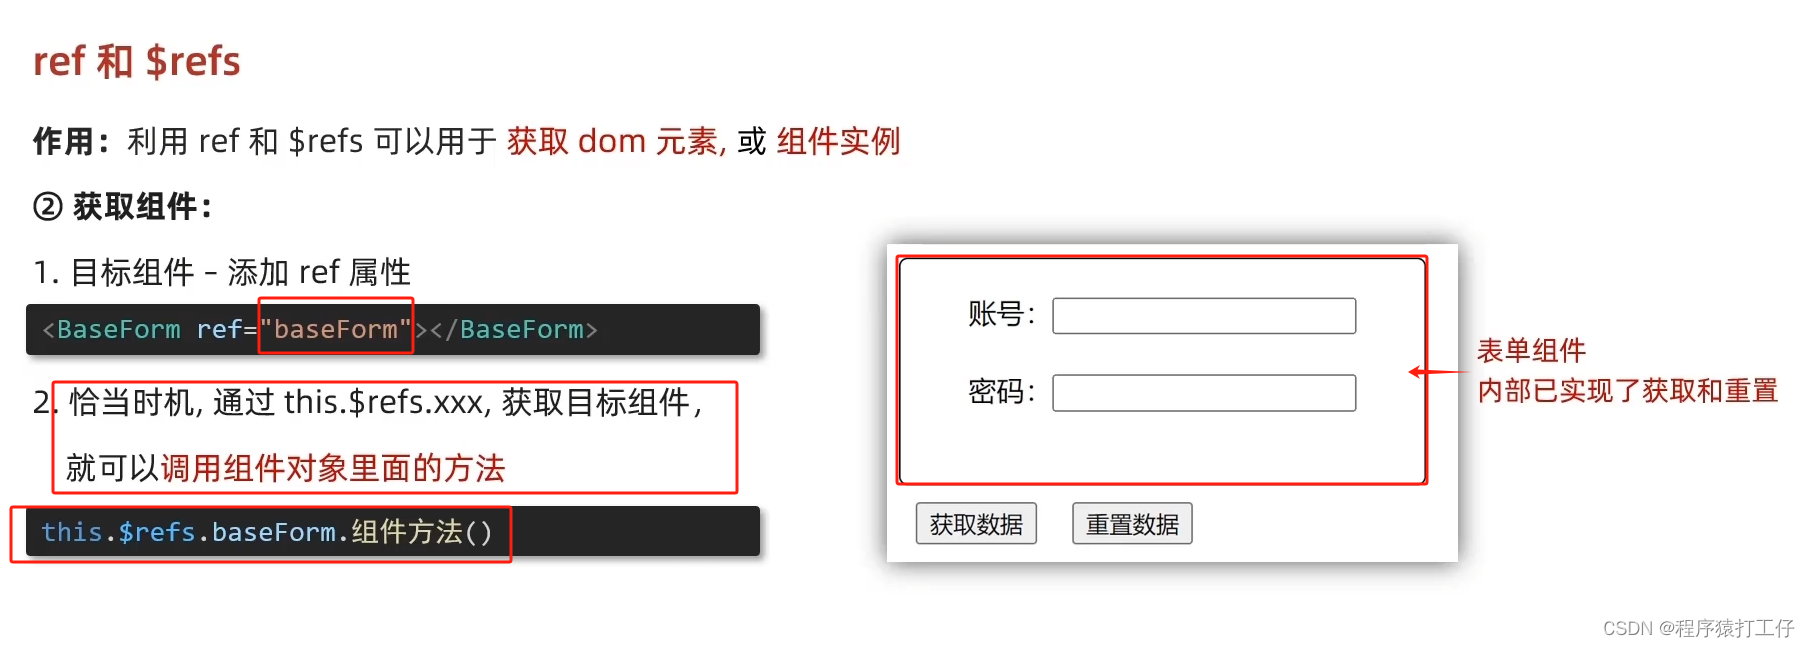
通过this.$refs.属性名.方法 ,可以拿到子组件的自己方法。
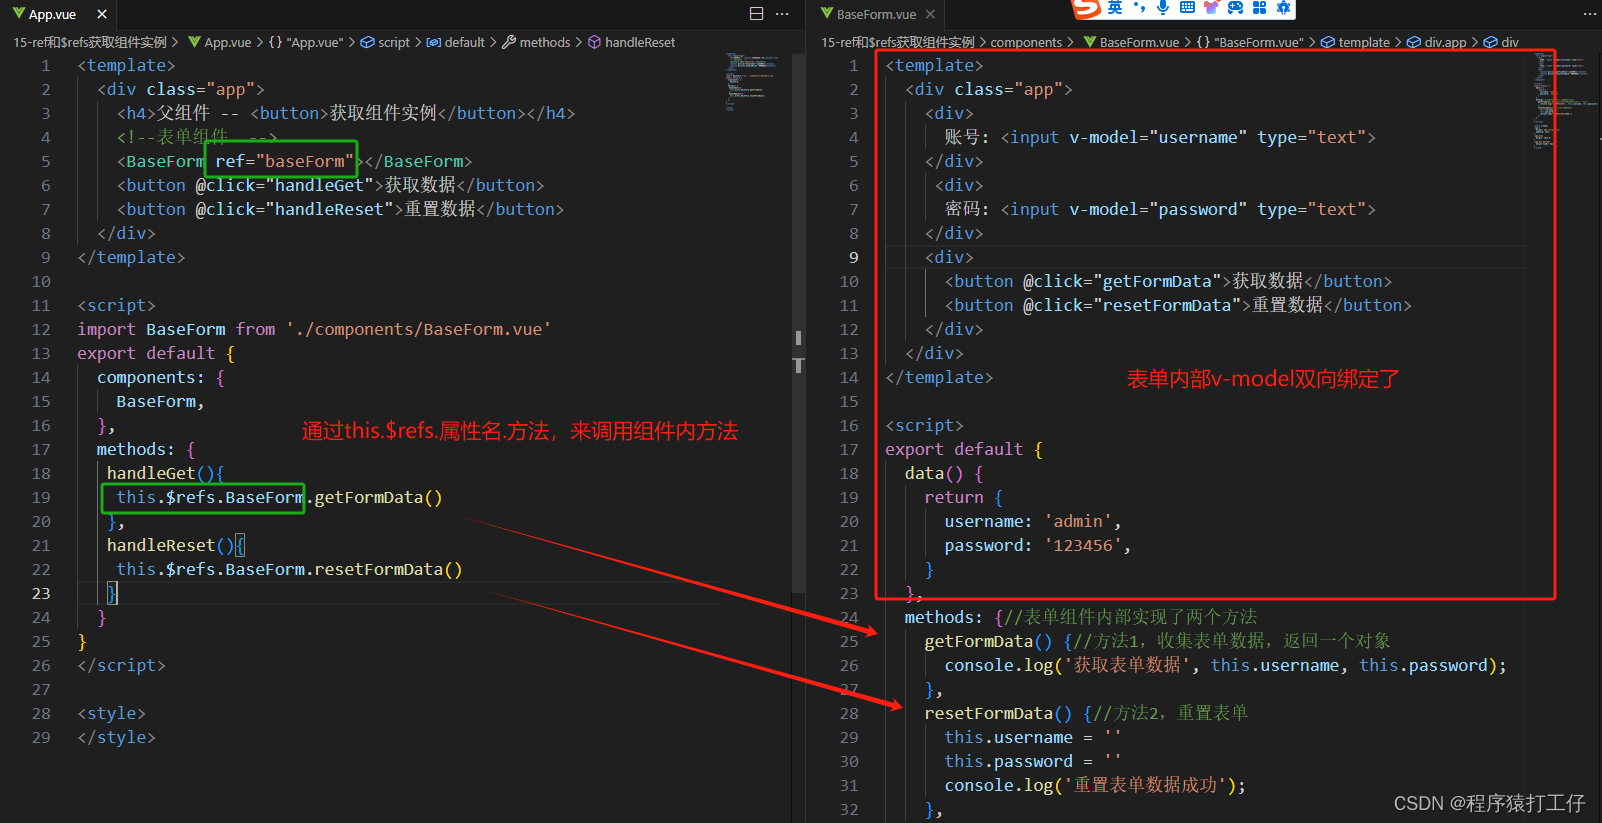
App.vue
<template>
  <div class="app">
    <h4>父组件 -- <button>获取组件实例</button></h4>
    <!--表单组件  -->
    <BaseForm ref="baseForm"></BaseForm>
    <button @click="handleGet">获取数据</button>
    <button @click="handleReset">重置数据</button>
  </div>
</template>

<script>
import BaseForm from './components/BaseForm.vue'
export default {
  components: {
    BaseForm,
  },
  methods: {
   handleGet(){
    this.$refs.BaseForm.getFormData()
   },
   handleReset(){
    this.$refs.BaseForm.resetFormData()
   }
  }
}
</script>

<style>
</style>
BaseForm.vue
<template>
  <div class="app">
    <div>
      账号: <input v-model="username" type="text">
    </div>
     <div>
      密码: <input v-model="password" type="text">
    </div>
    <div>
      <button @click="getFormData">获取数据</button>
      <button @click="resetFormData">重置数据</button>
    </div>
  </div>
</template>

<script>
export default {
  data() {
    return {
      username: 'admin',
      password: '123456',
    }
  },
  methods: {//表单组件内部实现了两个方法
    getFormData() {//方法1,收集表单数据,返回一个对象
      console.log('获取表单数据', this.username, this.password);
    },
    resetFormData() {//方法2,重置表单
      this.username = ''
      this.password = ''
      console.log('重置表单数据成功');
    },
  }
}
</script>

<style scoped>
.app {
  border: 2px solid #ccc;
  padding: 10px;
}
.app div{
  margin: 10px 0;
}
.app div button{
  margin-right: 8px;
}
</style>
Vue异步更新,$nextTick
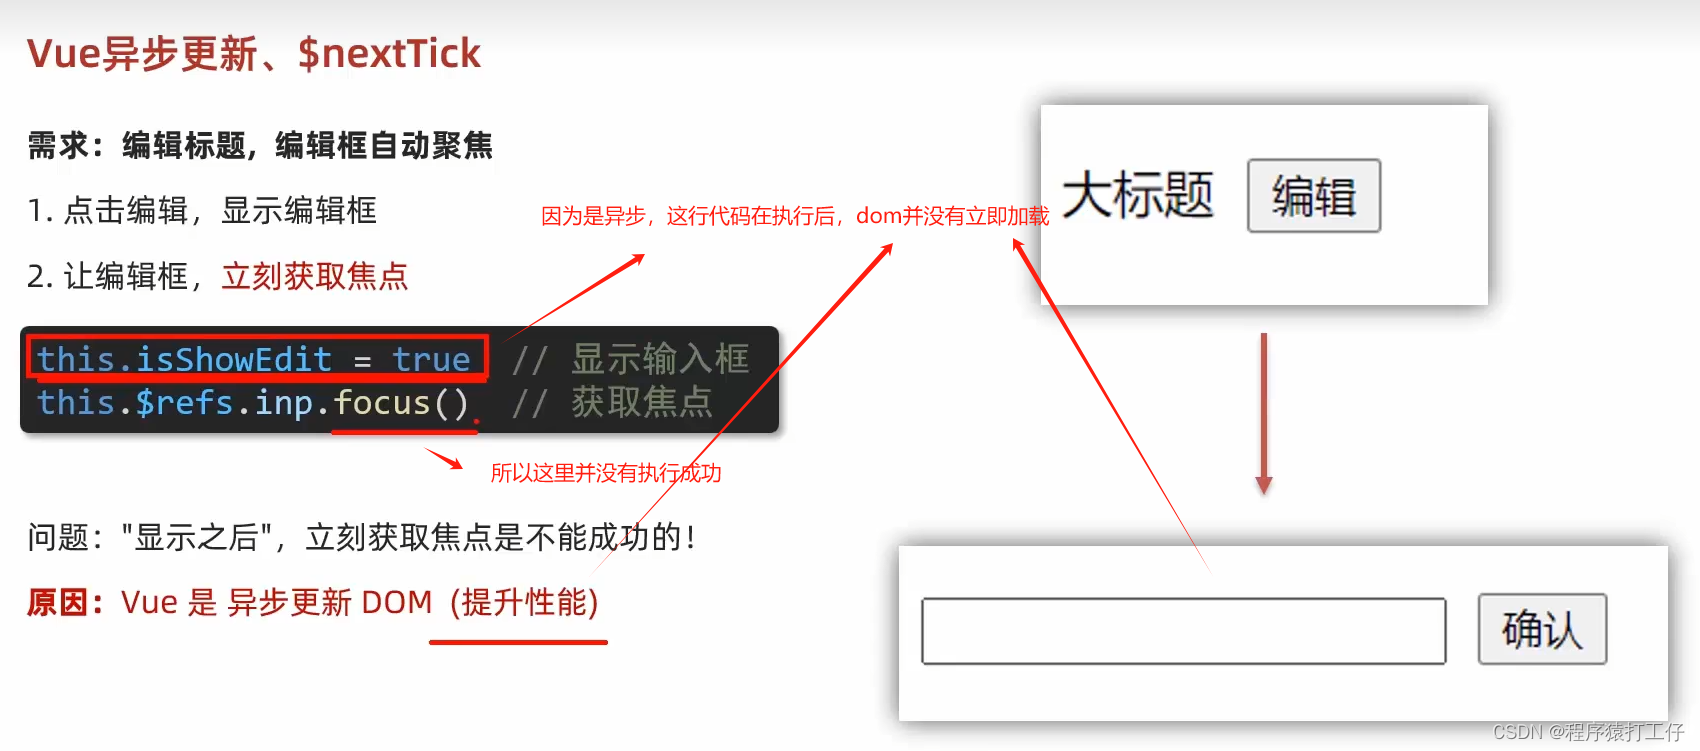
实例:点击编辑后,输入框出现并获取焦点,大标题消失
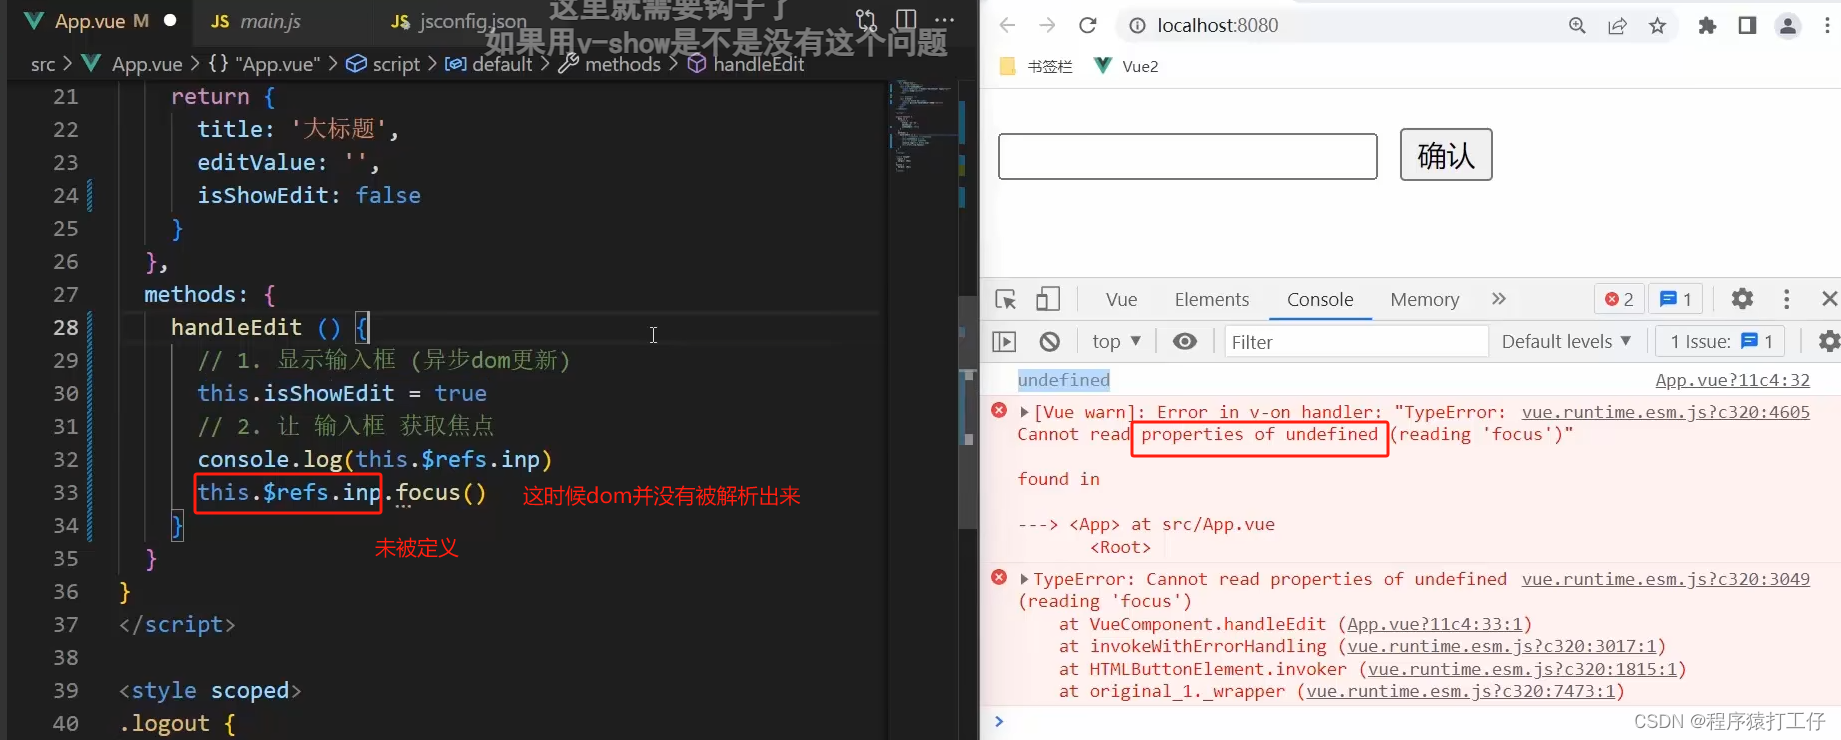
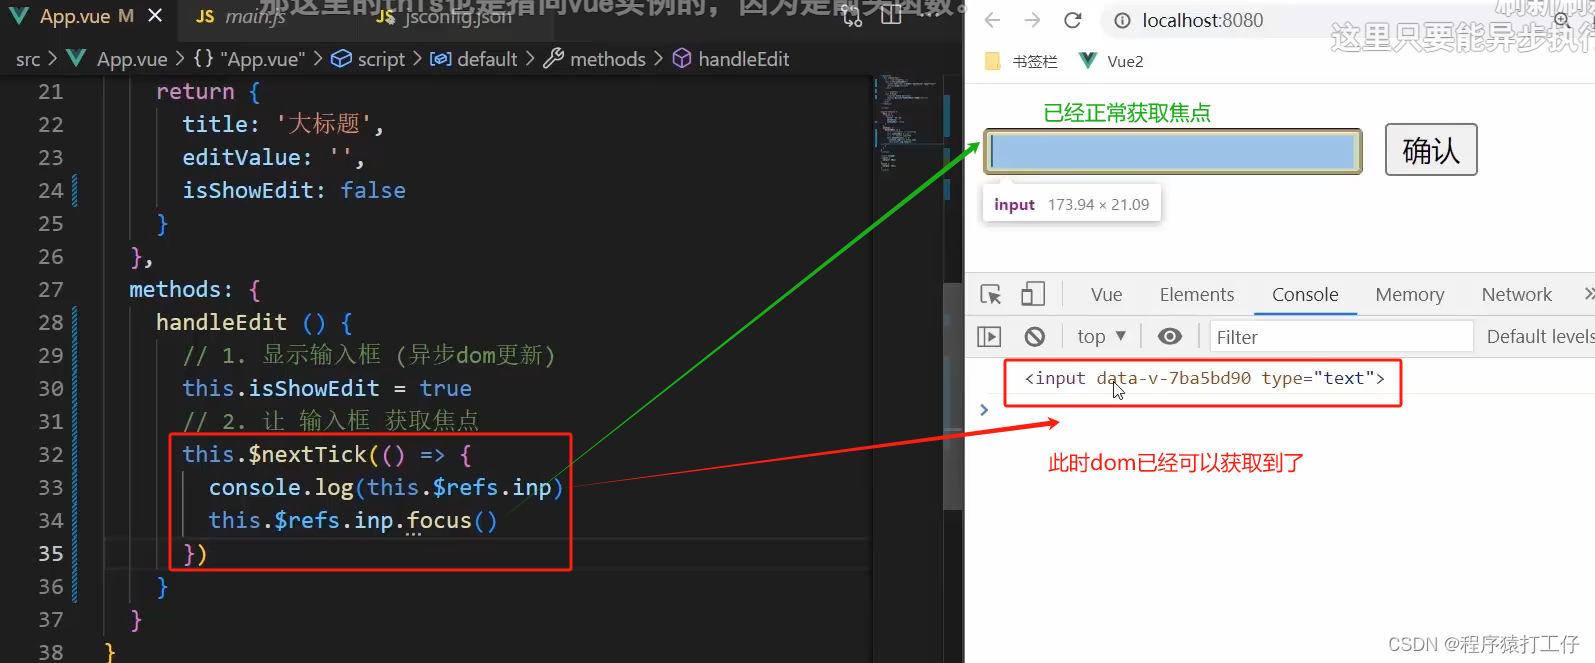
获取dom,用ref。此时dom并没有加载出来,所以this.$refs.inp会找不到,那怎么办呢?
解决:等待 this.isShowEdit = true 执行完毕,dom加载出来后,就可以获取到dom了
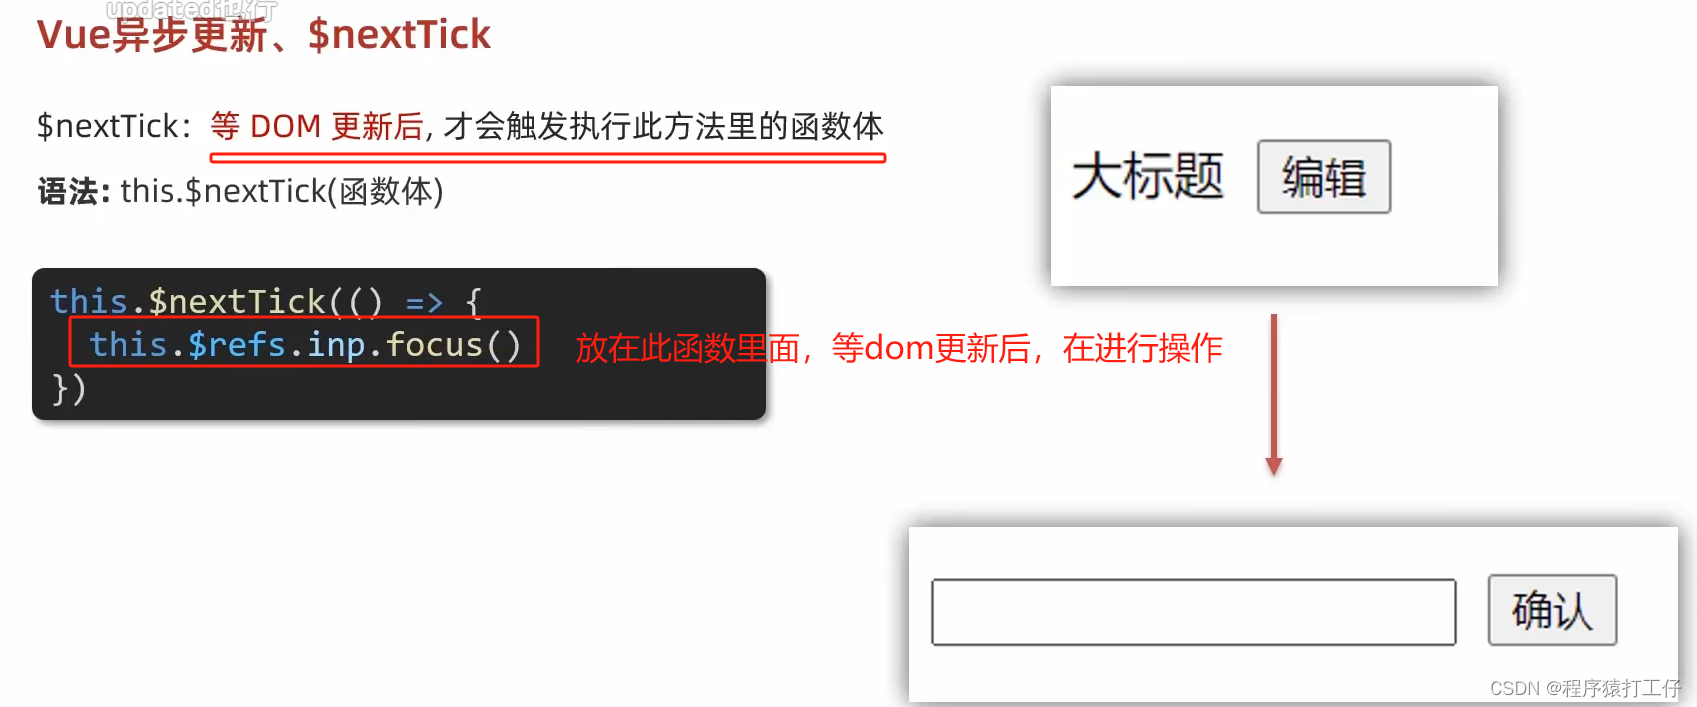
运用$nextTick
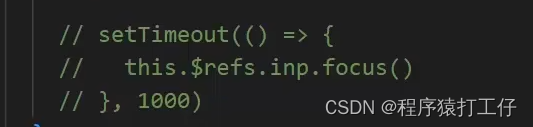
用延时器setTimeout()函数也可以,但是时间不精准,不确定设置多长时间才正合适。作用:等待时间 ,来确保dom已经加载完成
代码:
<template>
  <div class="app">
    <div v-if="isShowEdit">
      <input type="text" v-model="editValue" ref="inp" />
      <button>确认</button>
    </div>
    <div v-else>
      <span>{{ title }}</span>
      <button @click="handleEdit">编辑</button>
    </div>
  </div>
</template>

<script>
export default {
  data() {
    return {
      title: "大标题",
      isShowEdit: false,
      editValue: "",
    };
  },
  methods: {
    handleEdit() {
      //显示输入框(dom异步更新)
      this.isShowEdit = true;
      //2.获取dom输入框获取焦点,($nextTick等dom加载完,立刻执行方法体)
      $nextTick(() => {
        this.$refs.inp.focus();
      });
      // setTimeout(() => {
      //   this.$refs.inp.focus();
      // }, 1000);
    },
  },
};
</script>

<style>
</style>
评论区说:updated也行
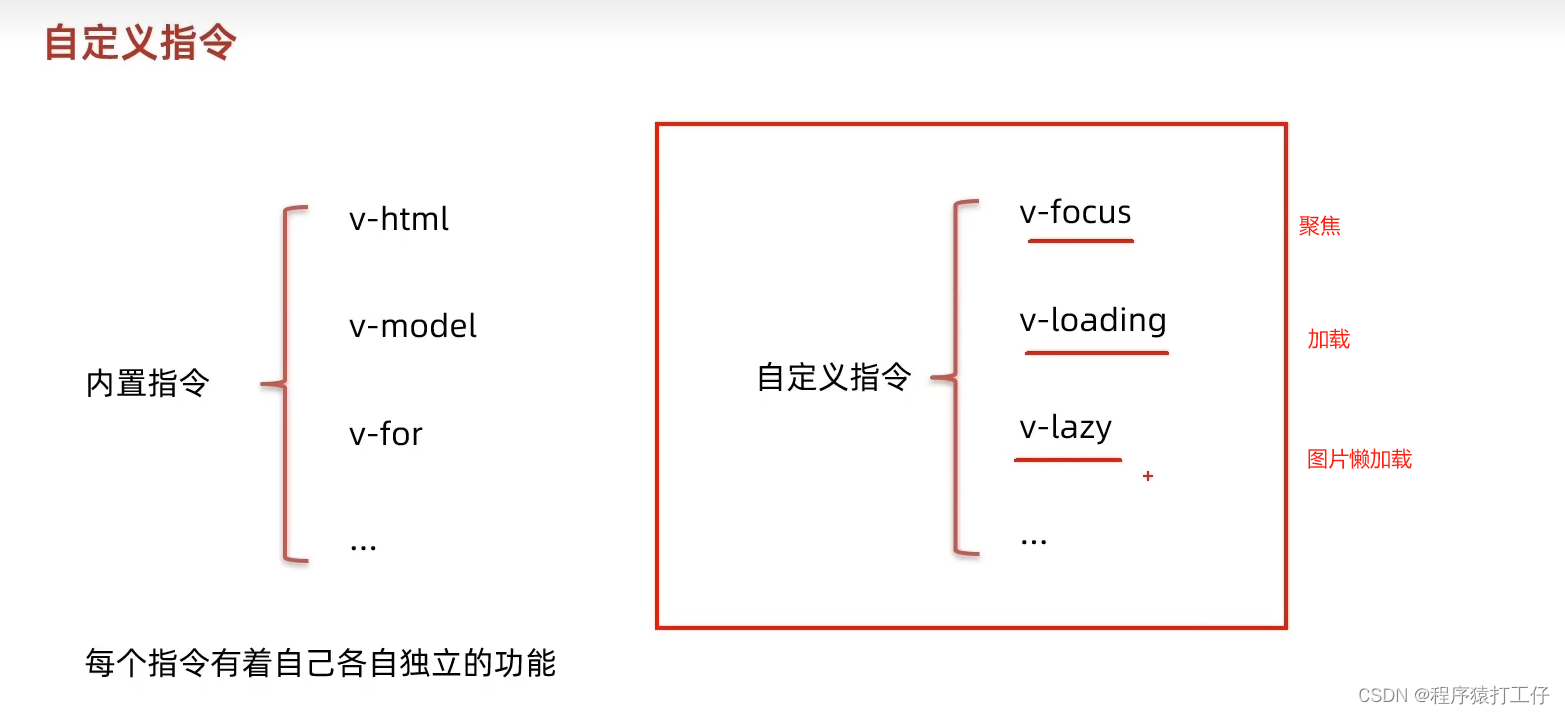
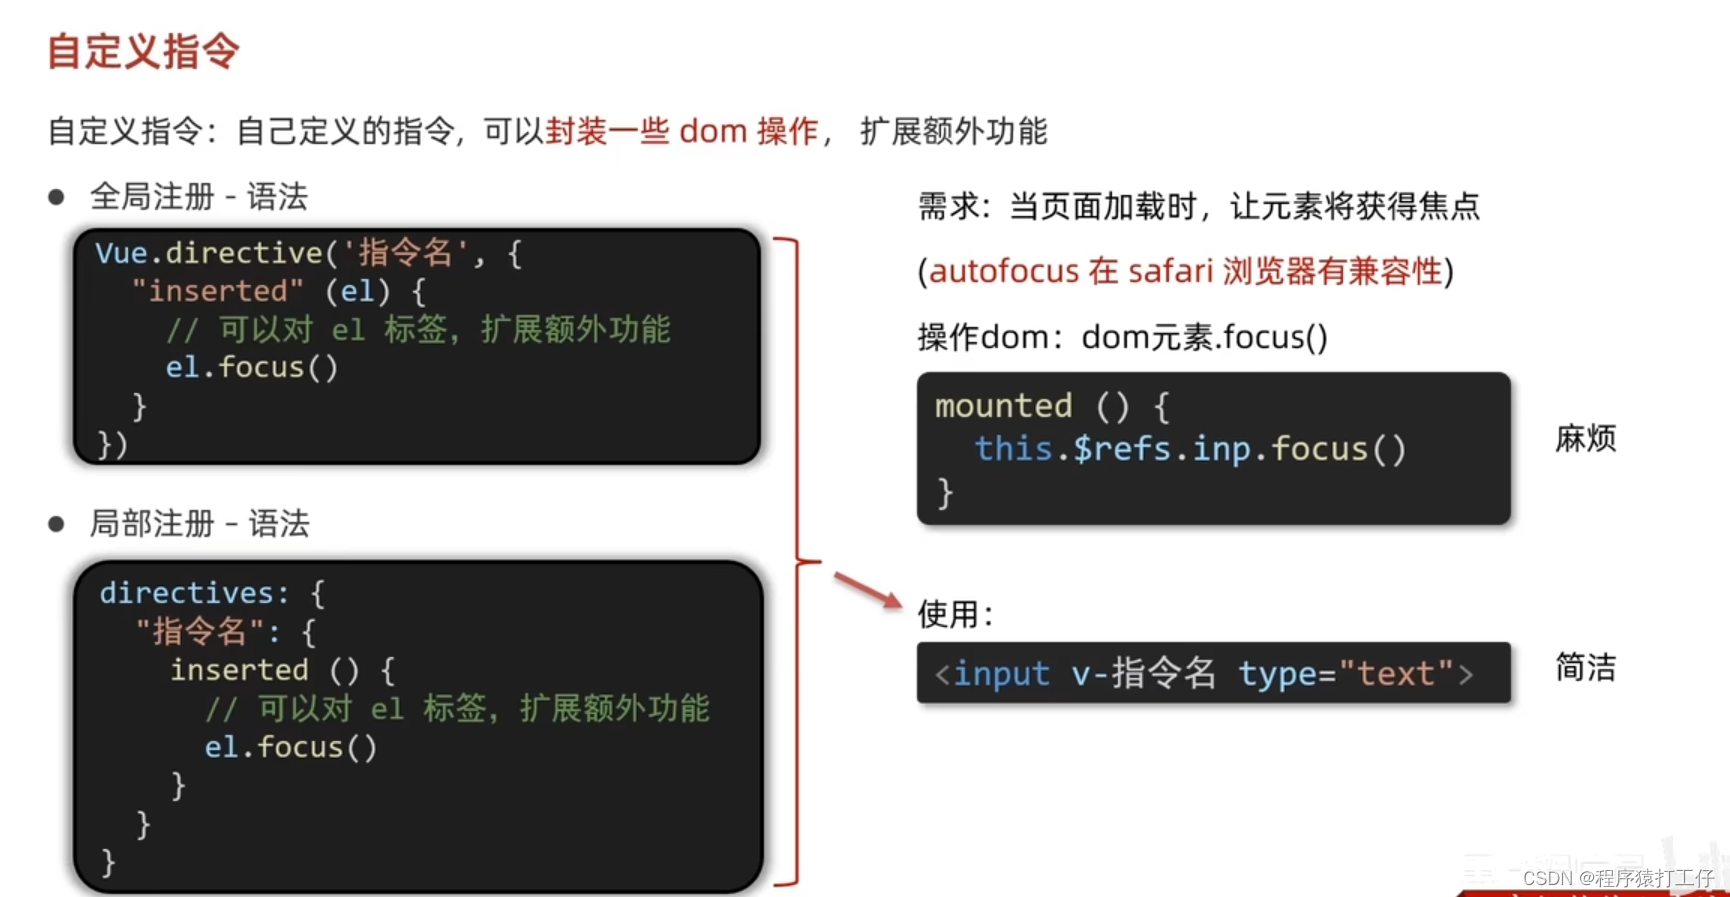
自定义指令-基础语法
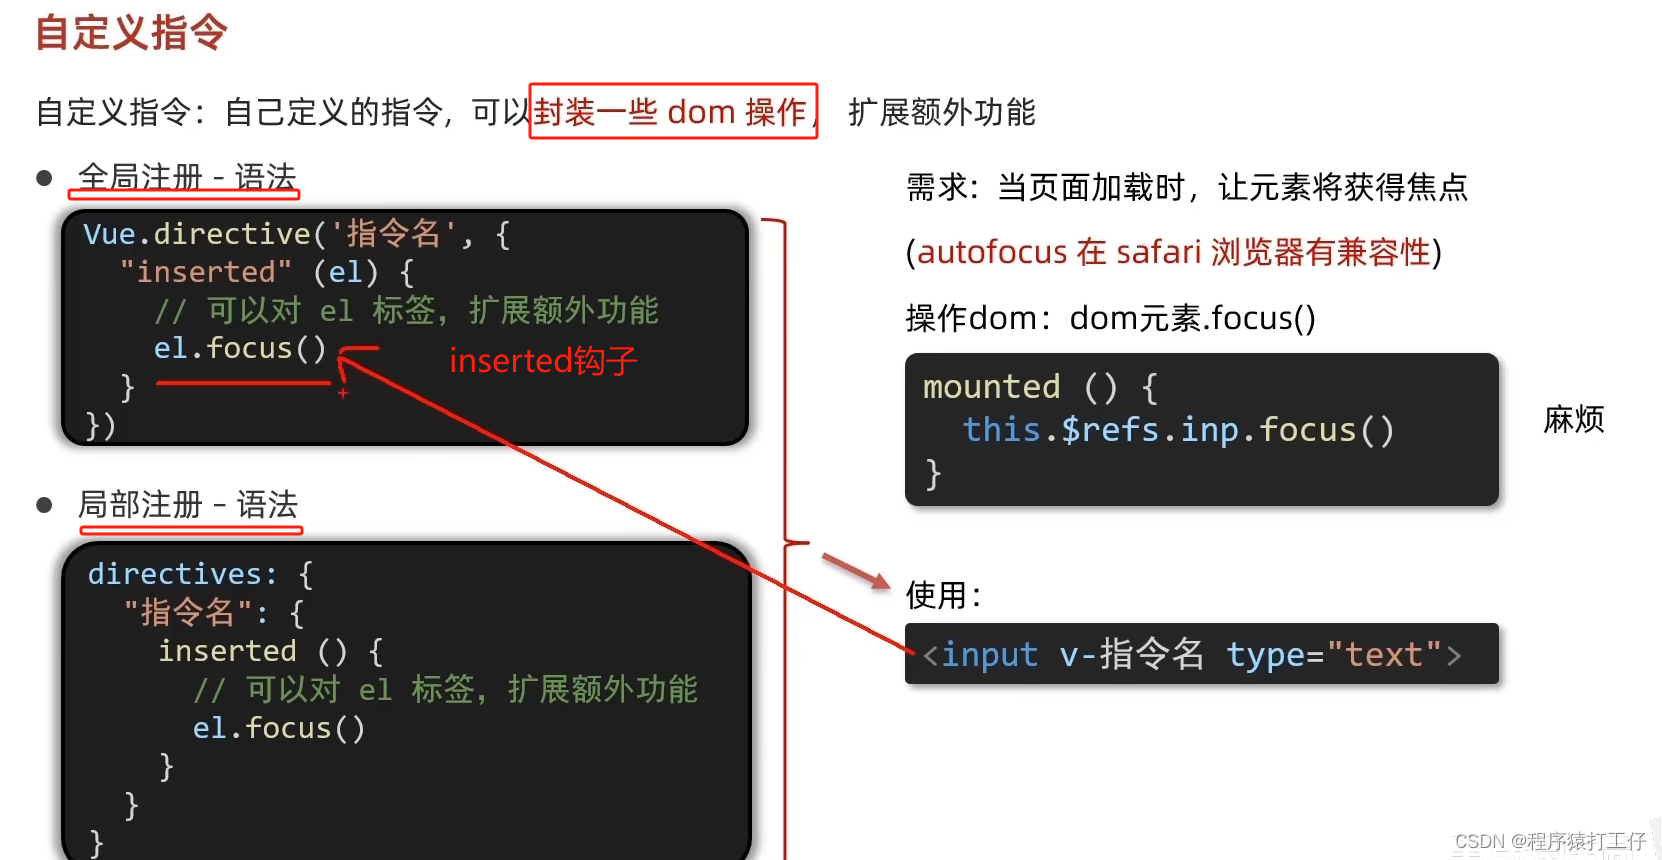
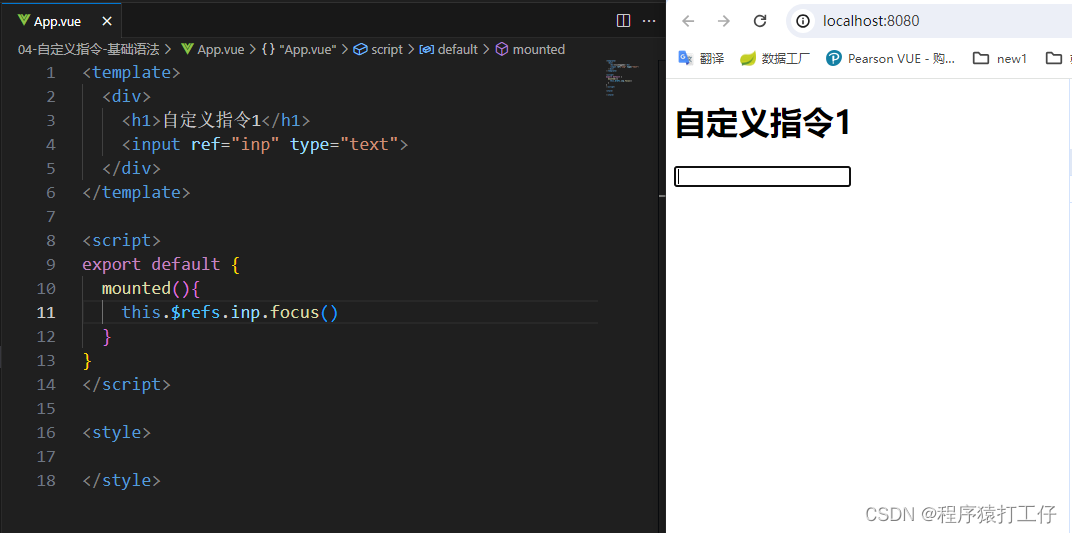
案例:自动获取焦点
使用ref来设置进入页面自动获取焦点
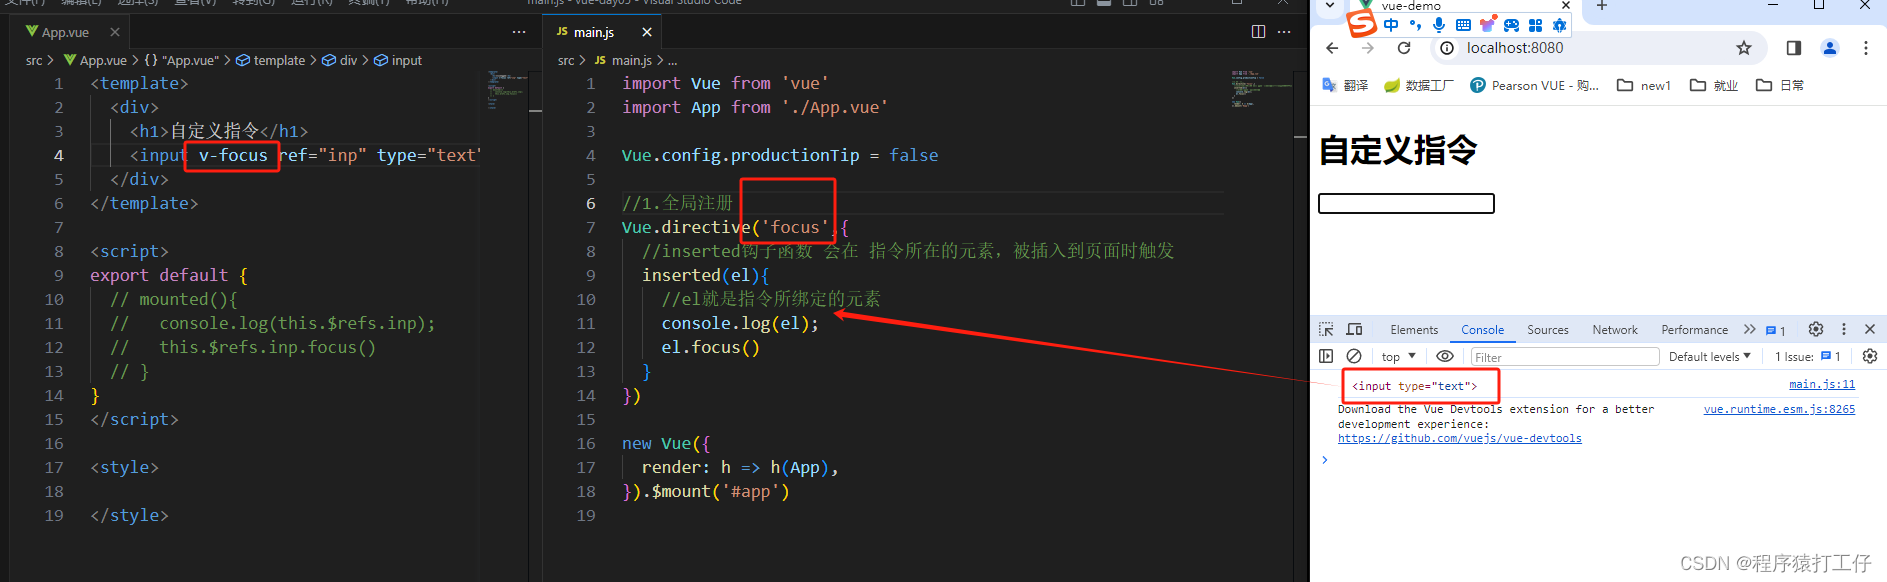
下面使用全局注册
下面使用局部注册
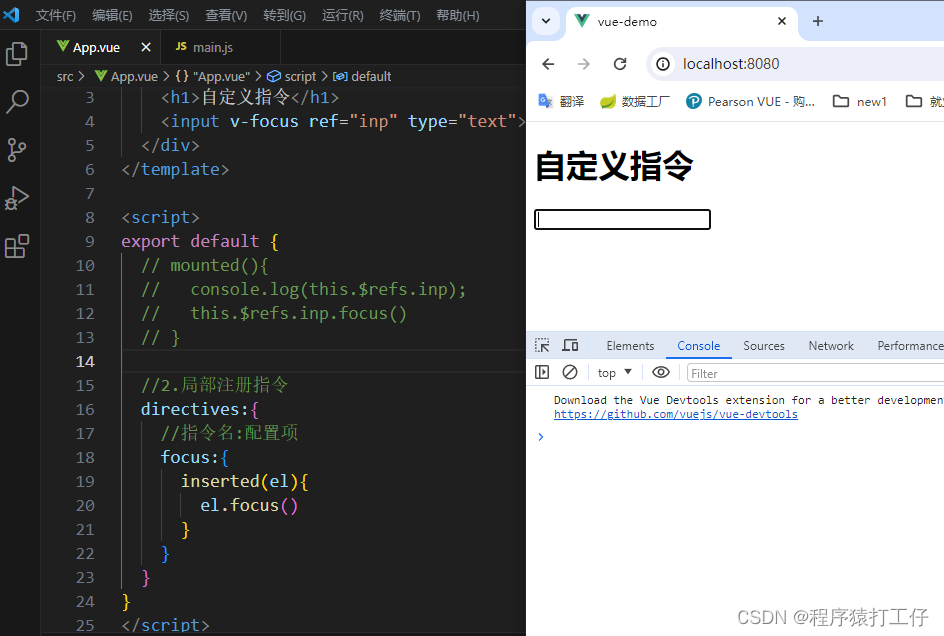
指令名:配置项。inserted()生命周期钩子。
总结:
代码:
App.vue
<template>
  <div>
    <h1>自定义指令</h1>
    <input v-focus ref="inp" type="text">
  </div>
</template>

<script>
export default {
  // mounted(){
  //   console.log(this.$refs.inp);
  //   this.$refs.inp.focus()
  // }

  //2.局部注册指令
  directives:{
    //指令名:配置项
    focus:{
      inserted(el){
        el.focus()
      }
    }
  }
}
</script>

<style>

</style>
main.js
import Vue from 'vue'
import App from './App.vue'

Vue.config.productionTip = false

// //1.全局注册
// Vue.directive('focus',{
//   //inserted钩子函数 会在 指令所在的元素,被插入到页面时触发
//   inserted(el){
//     //el就是指令所绑定的元素
//     console.log(el);
//     el.focus()
//   }
// })

new Vue({
  render: h => h(App),
}).$mount('#app')
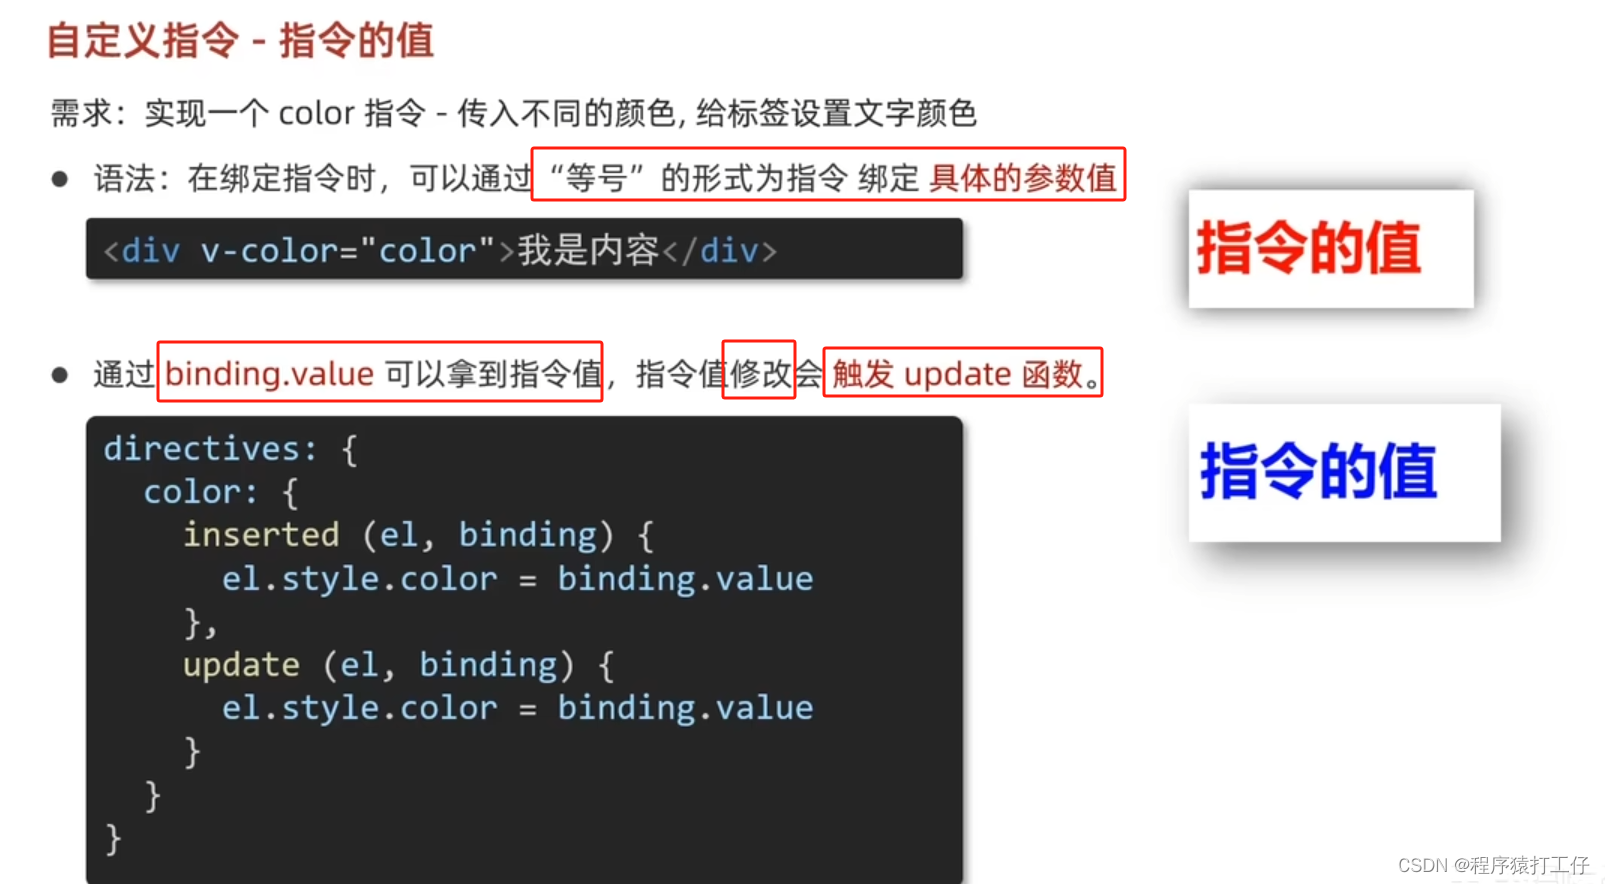
自定义指令-指令的值
案例:

binding.value就是指令的值
el就是dom标签,获取的元素
vue是响应式的,但是此时在网页的vue中去修改值,颜色并不会发生变化。
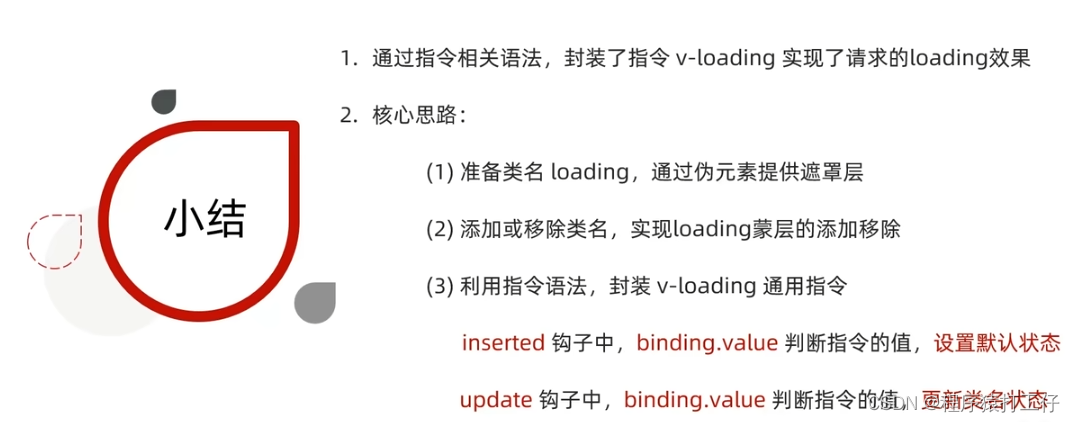
1.inserted 提供的是元素被添加到页面中时的逻辑(可以理解,元素被添加到页面中时触发)
2. 另外一个钩子 update 指令的值修改的时候触发,提供值变化后,dom更新的逻辑。
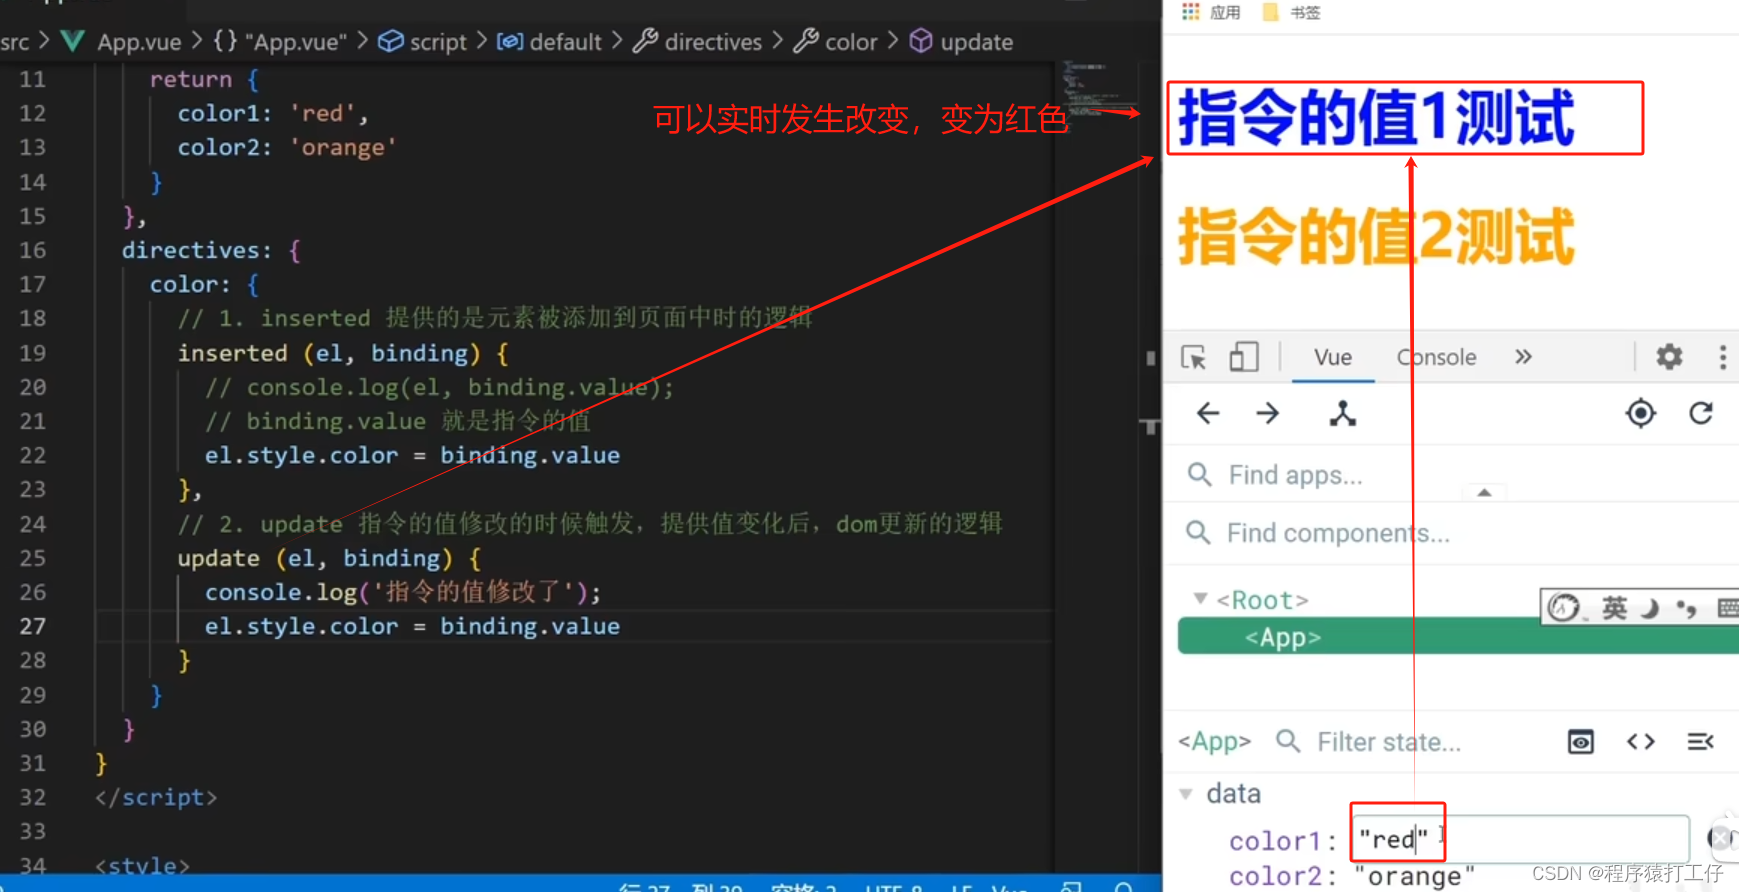
当值发生改变时,要有update钩子函数,用来发生值的改变。
总结:
 代码:
代码:
<template>
<div>
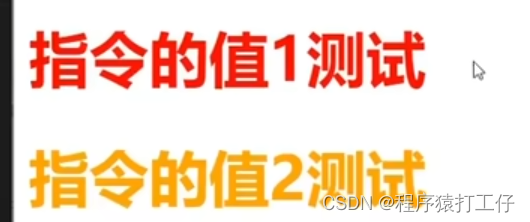
<h1 v-color="color1">指令的值1测试</h1>
<h1 v-color="color2">指令的值2测试</h1>
</div>
</template>
<script>
export default {
data () {
return {
color1 : 'red',
color2: 'green'
}
},
directives:{
color:{
//1.inserted 提供的是元素被添加到页面中时的逻辑(可以理解,元素被添加到页面中时触发)
inserted(el,binding){
//binding.value就是指令的值
//el就是dom标签,获取的元素
console.log(el,binding.value);
el.style.color = binding.value
},
//2.另外一个钩子 update 指令的值修改的时候触发,提供值变化后,dom更新的逻辑。
update(el,binding){
console.log('指令的值修改了');
el.style.color = binding.value
}
}
}
}
</script>
<style>
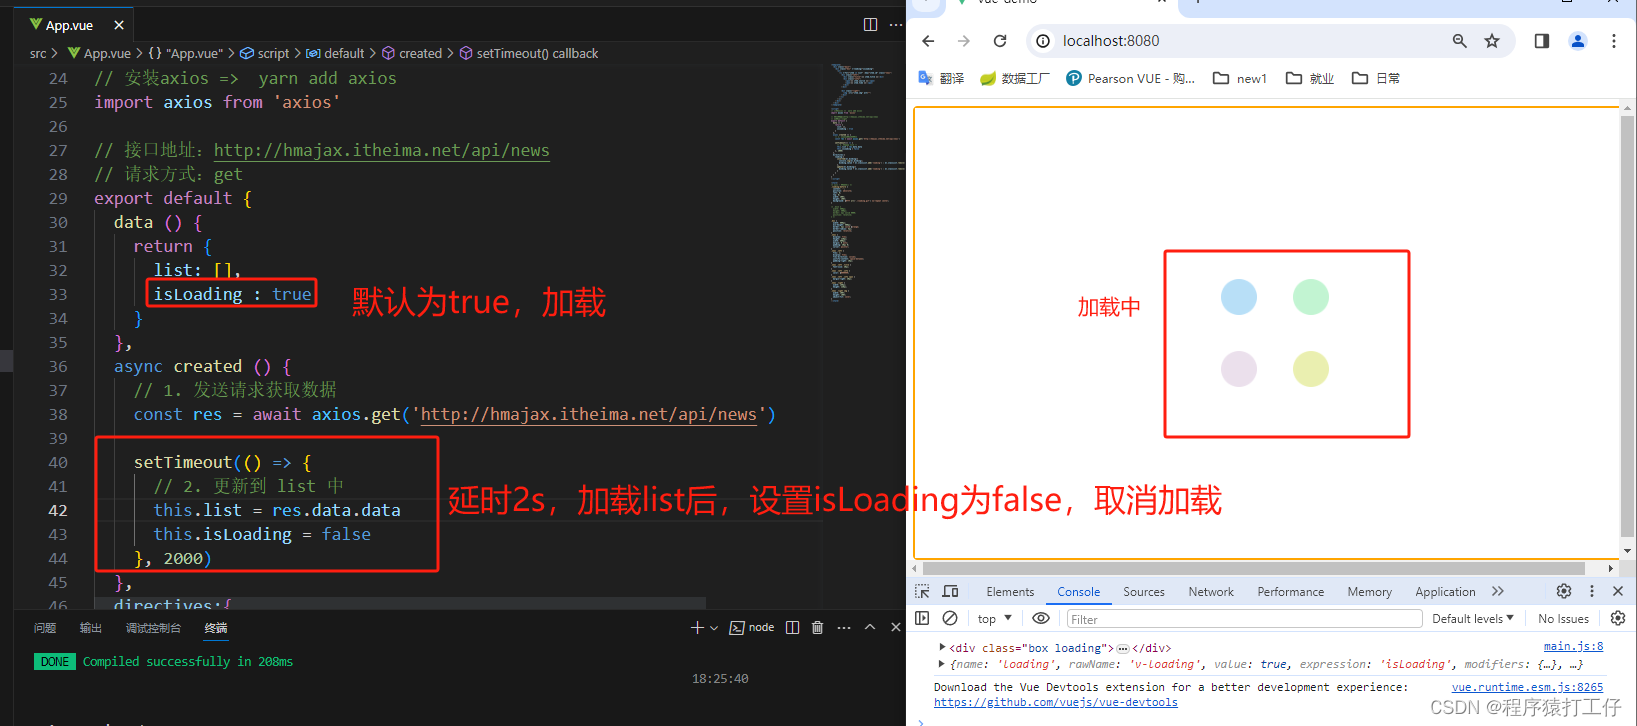
</style>自定义指令- v-loading

代码:
<template>
<div class="main">
<div class="box" v-loading="isLoading">
<ul>
<li v-for="item in list" :key="item.id" class="news">
<div class="left">
<div class="title">{{ item.title }}</div>
<div class="info">
<span>{{ item.source }}</span>
<span>{{ item.time }}</span>
</div>
</div>
<div class="right">
<img :src="item.img" alt="">
</div>
</li>
</ul>
</div>
</div>
</template>
<script>
// 安装axios => yarn add axios
import axios from 'axios'
// 接口地址:http://hmajax.itheima.net/api/news
// 请求方式:get
export default {
data () {
return {
list: [],
isLoading : true
}
},
async created () {
// 1. 发送请求获取数据
const res = await axios.get('http://hmajax.itheima.net/api/news')
setTimeout(() => {
// 2. 更新到 list 中
this.list = res.data.data
this.isLoading = false
}, 2000)
},
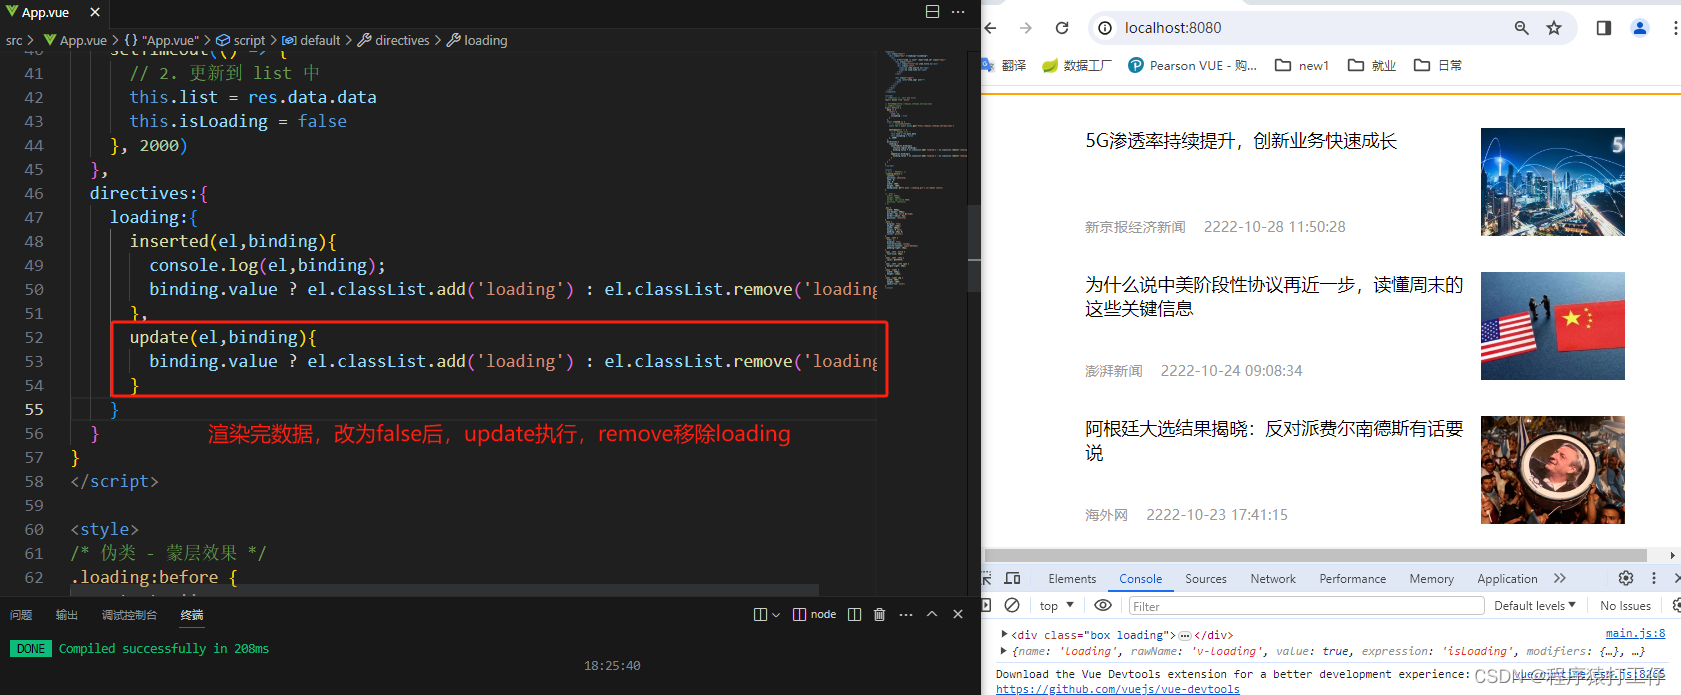
directives:{
loading:{
inserted(el,binding){
console.log(el,binding);
binding.value ? el.classList.add('loading') : el.classList.remove('loading')
},
update(el,binding){
binding.value ? el.classList.add('loading') : el.classList.remove('loading')
}
}
}
}
</script>
<style>
/* 伪类 - 蒙层效果 */
.loading:before {
content: '';
position: absolute;
left: 0;
top: 0;
width: 100%;
height: 100%;
background: #fff url('./loading.gif') no-repeat center;
}
/* .box2 {
width: 400px;
height: 400px;
border: 2px solid #000;
position: relative;
} */
.box {
width: 800px;
min-height: 500px;
border: 3px solid orange;
border-radius: 5px;
position: relative;
}
.news {
display: flex;
height: 120px;
width: 600px;
margin: 0 auto;
padding: 20px 0;
cursor: pointer;
}
.news .left {
flex: 1;
display: flex;
flex-direction: column;
justify-content: space-between;
padding-right: 10px;
}
.news .left .title {
font-size: 20px;
}
.news .left .info {
color: #999999;
}
.news .left .info span {
margin-right: 20px;
}
.news .right {
width: 160px;
height: 120px;
}
.news .right img {
width: 100%;
height: 100%;
object-fit: cover;
}
</style>el是获取的元素dom,binding是修改的数据,发生变化的数据。
商品列表 my-tag组件封装1-创建组件
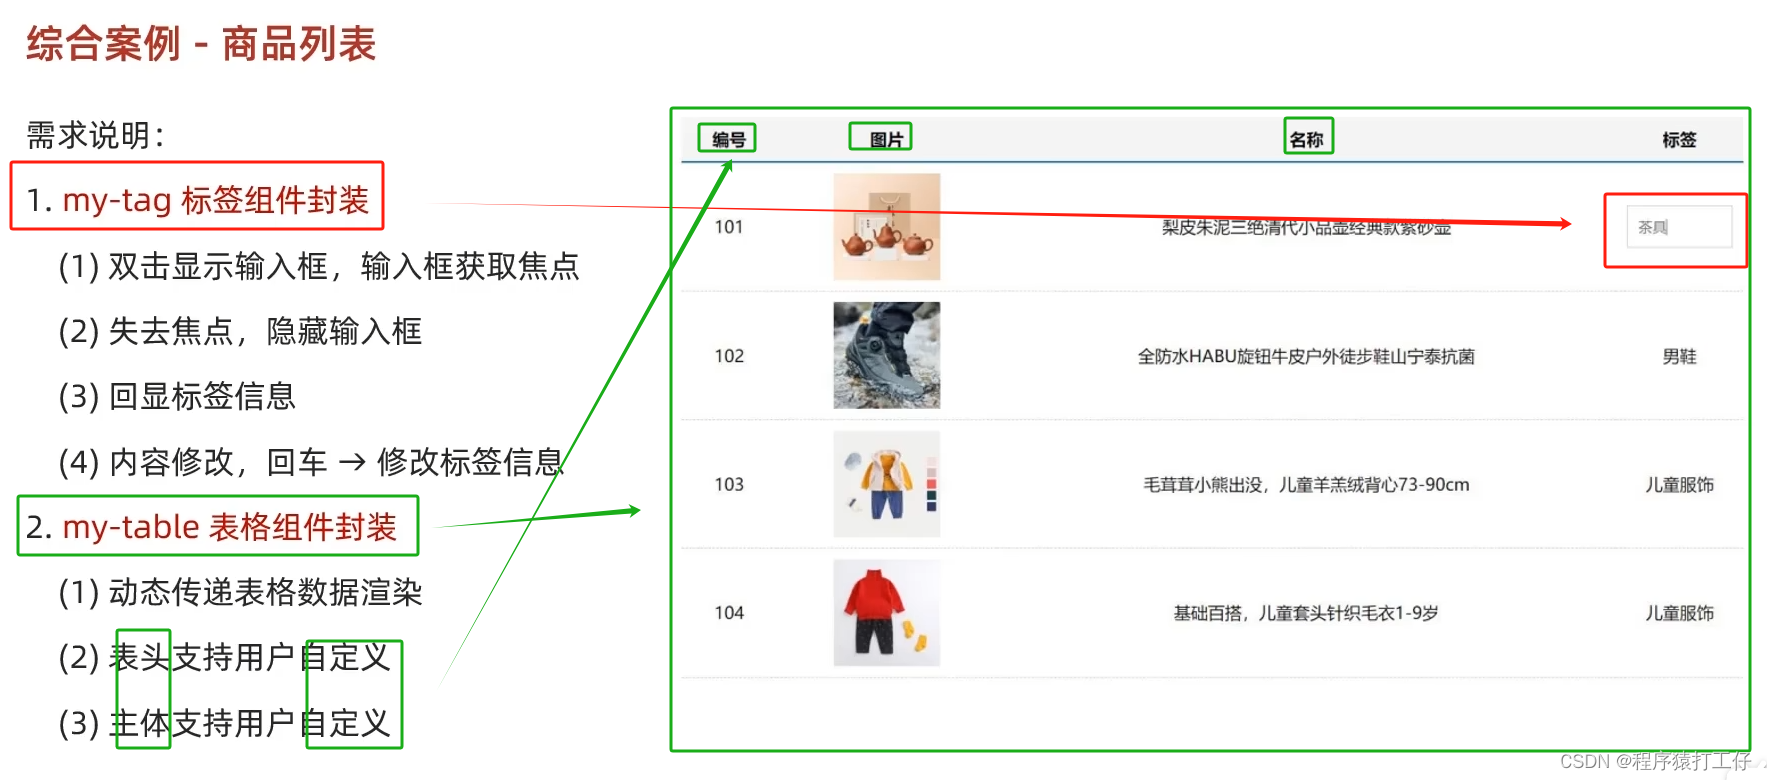
用插槽,表头支持自定义 。双击变成输入框,并且可以回显封成组件。
操作步骤:
1.将<div class="my-tag">复制到新建的MyTag.vue,template标签内。
2.将.my-tag css样式同样复制到MyTag.vue的 style中,并添加lang="less" scoped
3.导入使用
代码:
MyTag.vue
<template>
  <div class="my-tag">
    <!-- <input
        class="input"
        type="text"
        placeholder="输入标签"
        /> -->
    <div class="text">茶具</div>
  </div>
</template>

<script>
export default {};
</script>

<style lang="less" scoped>
.my-tag {
    cursor: pointer;
    .input {
      appearance: none;
      outline: none;
      border: 1px solid #ccc;
      width: 100px;
      height: 40px;
      box-sizing: border-box;
      padding: 10px;
      color: #666;
      &::placeholder {
        color: #666;
      }
    }
  }
</style>
App.vue
<template>
<div class="table-case">
<table class="my-table">
<thead>
<tr>
<th>编号</th>
<th>名称</th>
<th>图片</th>
<th width="100px">标签</th>
</tr>
</thead>
<tbody>
<tr>
<td>1</td>
<td>梨皮朱泥三绝清代小品壶经典款紫砂壶</td>
<td>
<img src="https://yanxuan-item.nosdn.127.net/f8c37ffa41ab1eb84bff499e1f6acfc7.jpg" />
</td>
<td>
<!-- 标签组件 -->
<My-Tag></My-Tag>
</td>
</tr>
<tr>
<td>1</td>
<td>梨皮朱泥三绝清代小品壶经典款紫砂壶</td>
<td>
<img src="https://yanxuan-item.nosdn.127.net/221317c85274a188174352474b859d7b.jpg" />
</td>
<td>
<!-- 标签组件 -->
</td>
</tr>
</tbody>
</table>
</div>
</template>
<script>
// my-tag 标签组件的封装
//1. 创建组件 初始化
//2. 实现功能
// (1)双击显示,并自动聚焦
// (2)失去焦点,隐藏输入框
// (3)回显标签信息
// (4)内容修改了,回车,可以修改标签信息
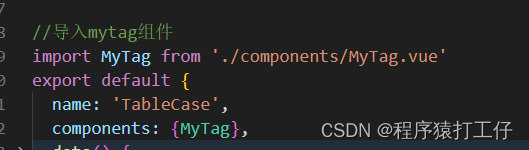
//导入mytag组件
import MyTag from './components/MyTag.vue'
export default {
name: 'TableCase',
components: {MyTag},
data() {
return {
goods: [
{
id: 101,
picture:
'https://yanxuan-item.nosdn.127.net/f8c37ffa41ab1eb84bff499e1f6acfc7.jpg',
name: '梨皮朱泥三绝清代小品壶经典款紫砂壶',
tag: '茶具',
},
{
id: 102,
picture:
'https://yanxuan-item.nosdn.127.net/221317c85274a188174352474b859d7b.jpg',
name: '全防水HABU旋钮牛皮户外徒步鞋山宁泰抗菌',
tag: '男鞋',
},
{
id: 103,
picture:
'https://yanxuan-item.nosdn.127.net/cd4b840751ef4f7505c85004f0bebcb5.png',
name: '毛茸茸小熊出没,儿童羊羔绒背心73-90cm',
tag: '儿童服饰',
},
{
id: 104,
picture:
'https://yanxuan-item.nosdn.127.net/56eb25a38d7a630e76a608a9360eec6b.jpg',
name: '基础百搭,儿童套头针织毛衣1-9岁',
tag: '儿童服饰',
},
],
}
},
}
</script>
<style lang="less" scoped>
.table-case {
width: 1000px;
margin: 50px auto;
img {
width: 100px;
height: 100px;
object-fit: contain;
vertical-align: middle;
}
.my-table {
width: 100%;
border-spacing: 0;
img {
width: 100px;
height: 100px;
object-fit: contain;
vertical-align: middle;
}
th {
background: #f5f5f5;
border-bottom: 2px solid #069;
}
td {
border-bottom: 1px dashed #ccc;
}
td,
th {
text-align: center;
padding: 10px;
transition: all 0.5s;
&.red {
color: red;
}
}
.none {
height: 100px;
line-height: 100px;
color: #999;
}
}
}
</style>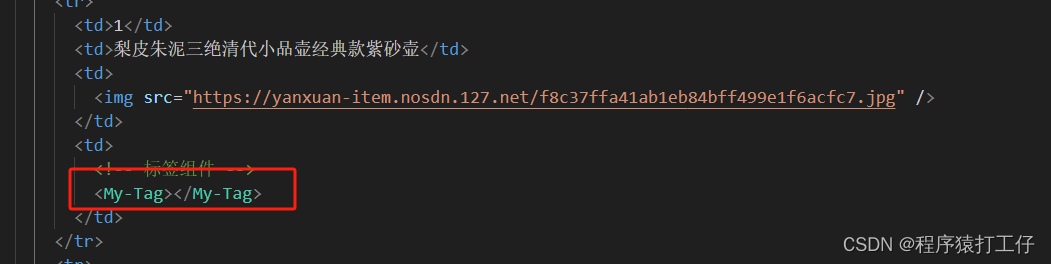
商品列表 my-tag组件封装2-控制显示隐藏
this.isEdit = true //双击后切换为显示状态
//此时不能直接使用this.$refs.inp.focus() **vue是异步dom更新**
应使用
this.$nextTick(()=>{
this.$refs.inp.focus()
})
因每次都要写这3行代码,所以可以把它封装为指令。用v-focus代替,可节省代码
再main.js中进行以下操作
//封装focus全局指令
Vue.directive('focus' ,{
//指令所在的dom元素,被插入到页面中时触发
inserted(el){
el.focus()
}
})
@blur失去焦点事件 @dblclick双击事件
代码:
main.js 全局封装v-focus
import Vue from 'vue'
import App from '../src/App.vue'

Vue.config.productionTip = false

//封装focus全局指令
Vue.directive('focus' ,{
  //指令所在的dom元素,被插入到页面中时触发
  inserted(el){
    el.focus()
  }
})

new Vue({
  render: h => h(App),
}).$mount('#app')
MyTag.vue
<template>
  <div class="my-tag">
    <!-- @blur失去焦点事件 -->
    <input v-if="isEdit" v-focus ref="inp" @blur="isEdit = false" class="input" type="text" placeholder="输入标签" />
    <!-- @dblclick双击事件 -->
    <div v-else @dblclick="handleClick" class="text">茶具</div>
  </div>
</template>

<script>
export default {
  data() {
    return {
      isEdit: false,
    }
  },
  methods:{
    handleClick(){
        this.isEdit = true //双击后切换为显示状态
        //此时不能直接使用this.$refs.inp.focus() **vue是异步dom更新**

        // this.$nextTick(()=>{//等dom加载完毕,再获取焦点
        //     //立刻获得焦点
        //     this.$refs.inp.focus()
        // })

    }
  }
};
</script>

<style lang="less" scoped>
.my-tag {
  cursor: pointer;
  .input {
    appearance: none;
    outline: none;
    border: 1px solid #ccc;
    width: 100px;
    height: 40px;
    box-sizing: border-box;
    padding: 10px;
    color: #666;
    &::placeholder {
      color: #666;
    }
  }
}
</style>
封装2主要实现:
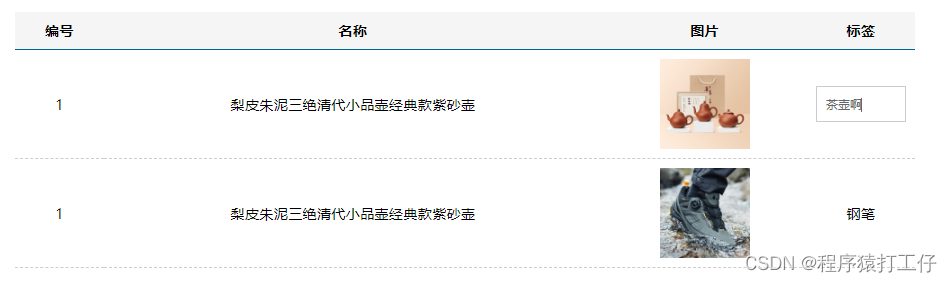
商品列表 my-tag组件封装3- v-model处理
e.target 就是事件源 -->![]()
App.vue
<template>
<div class="table-case">
<table class="my-table">
<thead>
<tr>
<th>编号</th>
<th>名称</th>
<th>图片</th>
<th width="100px">标签</th>
</tr>
</thead>
<tbody>
<tr>
<td>1</td>
<td>梨皮朱泥三绝清代小品壶经典款紫砂壶</td>
<td>
<img src="https://yanxuan-item.nosdn.127.net/f8c37ffa41ab1eb84bff499e1f6acfc7.jpg" />
</td>
<td>
<!-- 标签组件 -->
<My-Tag v-model="tempText"></My-Tag>
</td>
</tr>
<tr>
<td>1</td>
<td>梨皮朱泥三绝清代小品壶经典款紫砂壶</td>
<td>
<img src="https://yanxuan-item.nosdn.127.net/221317c85274a188174352474b859d7b.jpg" />
</td>
<td>
<!-- 标签组件 -->
<My-Tag v-model="tempText2"></My-Tag>
</td>
</tr>
</tbody>
</table>
</div>
</template>
<script>
// my-tag 标签组件的封装
//1. 创建组件 初始化
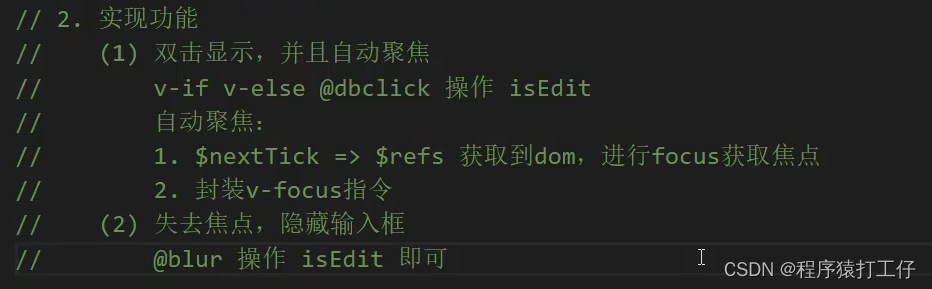
//2. 实现功能
// (1)双击显示,并自动聚焦
// v-if v-else @dblclick 操作 isEdit
// 自动聚焦:
// 1. $nextTick => $refs 操作dom , focus()
// 2. v-focus封装
// (2)失去焦点,隐藏输入框
// @blur 操作 isEdit
// (3)回显标签信息
// 回显的标签信息是父组件传递过来的
// v-model实现功能(简化代码) v-model = :value + @input
// 组件内部通过props接收 :value设置给输入框
// (4)内容修改了,回车,可以修改标签信息
// @keyup.enter 触发事件 $emit('input',e.target.value)
//导入mytag组件
import MyTag from './components/MyTag.vue'
export default {
name: 'TableCase',
components: {MyTag},
data() {
return {
//测试组件功能的临时数据
tempText:'茶壶',
tempText2:'钢笔',
goods: [
{
id: 101,
picture:
'https://yanxuan-item.nosdn.127.net/f8c37ffa41ab1eb84bff499e1f6acfc7.jpg',
name: '梨皮朱泥三绝清代小品壶经典款紫砂壶',
tag: '茶具',
},
{
id: 102,
picture:
'https://yanxuan-item.nosdn.127.net/221317c85274a188174352474b859d7b.jpg',
name: '全防水HABU旋钮牛皮户外徒步鞋山宁泰抗菌',
tag: '男鞋',
},
{
id: 103,
picture:
'https://yanxuan-item.nosdn.127.net/cd4b840751ef4f7505c85004f0bebcb5.png',
name: '毛茸茸小熊出没,儿童羊羔绒背心73-90cm',
tag: '儿童服饰',
},
{
id: 104,
picture:
'https://yanxuan-item.nosdn.127.net/56eb25a38d7a630e76a608a9360eec6b.jpg',
name: '基础百搭,儿童套头针织毛衣1-9岁',
tag: '儿童服饰',
},
],
}
},
}
</script>
<style lang="less" scoped>
.table-case {
width: 1000px;
margin: 50px auto;
img {
width: 100px;
height: 100px;
object-fit: contain;
vertical-align: middle;
}
.my-table {
width: 100%;
border-spacing: 0;
img {
width: 100px;
height: 100px;
object-fit: contain;
vertical-align: middle;
}
th {
background: #f5f5f5;
border-bottom: 2px solid #069;
}
td {
border-bottom: 1px dashed #ccc;
}
td,
th {
text-align: center;
padding: 10px;
transition: all 0.5s;
&.red {
color: red;
}
}
.none {
height: 100px;
line-height: 100px;
color: #999;
}
}
}
</style>MyTag.vue
<template>
  <div class="my-tag">
    <!-- @blur失去焦点事件 -->
    <input v-if="isEdit" v-focus ref="inp" @blur="isEdit = false"
     :value="value" @keyup.enter="handleEnter"
     class="input" type="text" placeholder="输入标签" />
    <!-- @dblclick双击事件 -->
    <div v-else @dblclick="handleClick" class="text">{{value}}</div>
  </div>
</template>

<script>
export default {
    props:{
        value:String
    },
  data() {
    return {
      isEdit: false,
    }
  },
  methods:{
    handleClick(){
        this.isEdit = true //双击后切换为显示状态
        //此时不能直接使用this.$refs.inp.focus() **vue是异步dom更新**

        // this.$nextTick(()=>{//等dom加载完毕,再获取焦点
        //     //立刻获得焦点
        //     this.$refs.inp.focus()
        // })

    },
    handleEnter(e){
        if(e.target.value.trim() === ''){
            return alert('标签内容不能为空!!!')
        }

        //子传父 , 将输入框输入的内容,提交给父组件进行更新
        //由于父组件是 v-model,所以此处触发事件要是input事件
        // console.log(e.target);  就是事件源 input dom对象
        this.$emit('input',e.target.value)
        //提交完成,隐藏掉输入框
        this.isEdit = false

    }
  }
};
</script>

<style lang="less" scoped>
.my-tag {
  cursor: pointer;
  .input {
    appearance: none;
    outline: none;
    border: 1px solid #ccc;
    width: 100px;
    height: 40px;
    box-sizing: border-box;
    padding: 10px;
    color: #666;
    &::placeholder {
      color: #666;
    }
  }
}
</style>
main.js
import Vue from 'vue'
import App from '../src/App.vue'

Vue.config.productionTip = false

//封装focus全局指令
Vue.directive('focus' ,{
  //指令所在的dom元素,被插入到页面中时触发
  inserted(el){
    el.focus()
  }
})

new Vue({
  render: h => h(App),
}).$mount('#app')
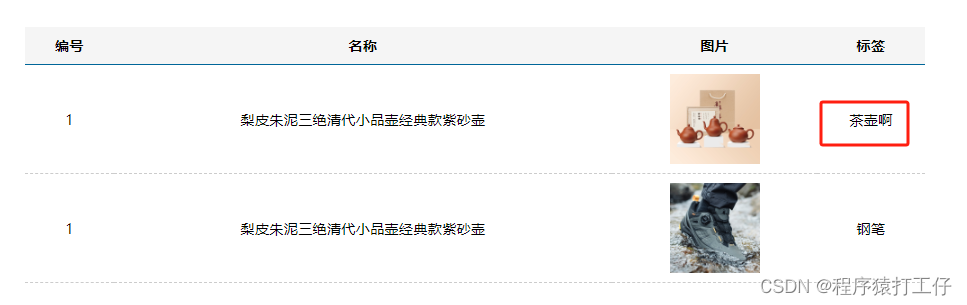
效果:
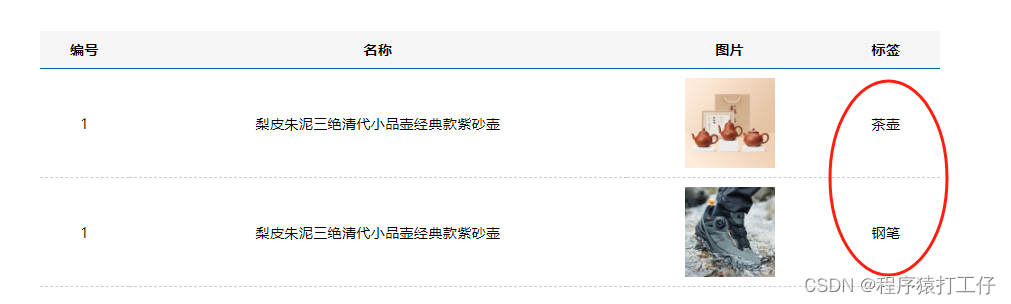
双击获取焦点,并回显数据
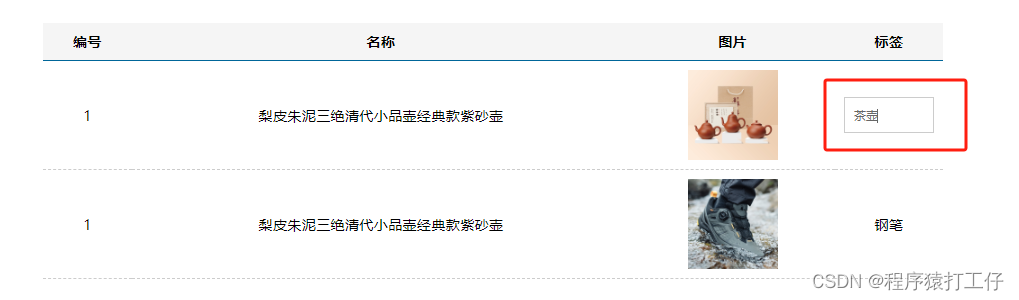
回车进行保存
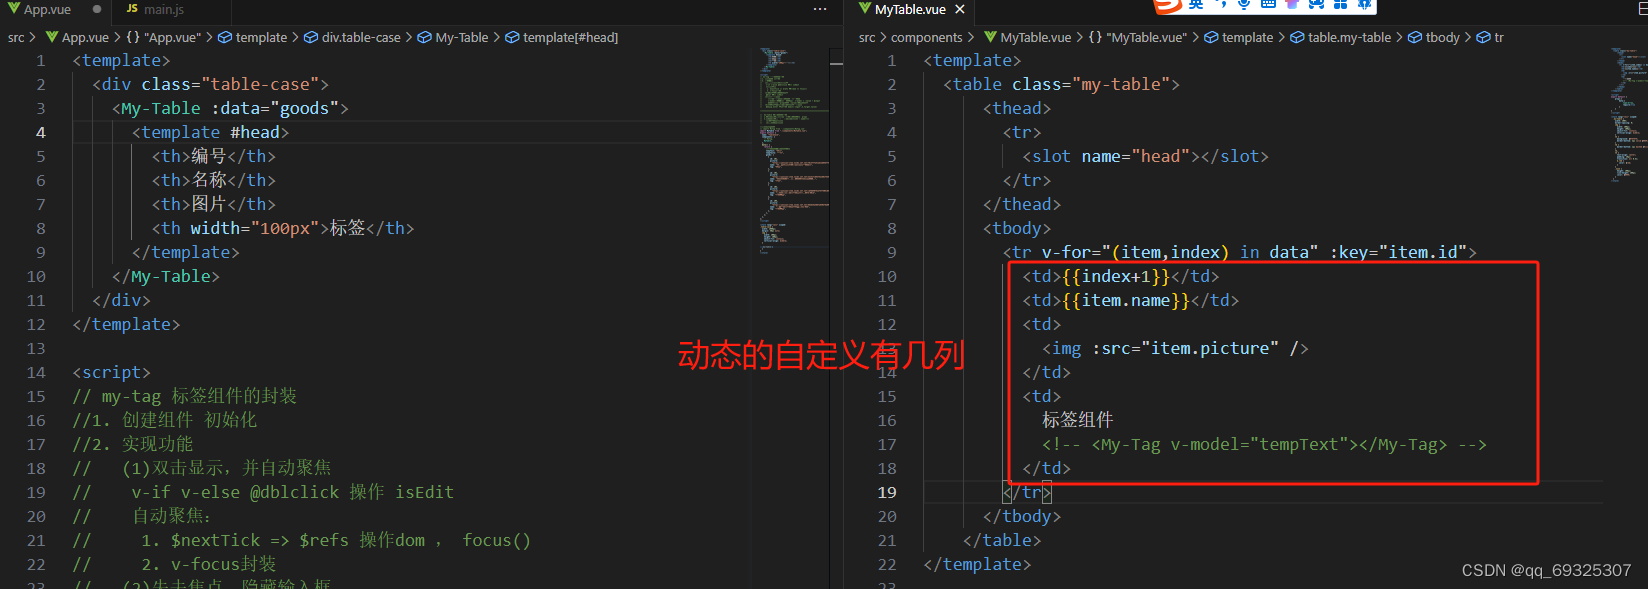
商品列表my-table组件封装
结构自定义(要联想到插槽)
操作步骤
1.新建MyTable.vue,复制table过来,复制css样式过来,添加lang="less" scoped
2.在App.vue中 导入并加载到components中。
3.父 :data="数据" 传入 , 子 props接收并渲染。
代码:
App.vue
<template>
  <div class="table-case">
    <My-Table :data="goods"></My-Table>
  </div>
</template>

<script>
// my-tag 标签组件的封装
//1. 创建组件 初始化
//2. 实现功能
//   (1)双击显示,并自动聚焦
//    v-if v-else @dblclick 操作 isEdit
//    自动聚焦:
//     1. $nextTick => $refs 操作dom , focus()
//     2. v-focus封装
//   (2)失去焦点,隐藏输入框
//    @blur 操作 isEdit
//   (3)回显标签信息
//      回显的标签信息是父组件传递过来的
//      v-model实现功能(简化代码)  v-model = :value + @input
//      组件内部通过props接收 :value设置给输入框
//   (4)内容修改了,回车,可以修改标签信息
//    @keyup.enter 触发事件 $emit('input',e.target.value)

//=====================================================================

//  my-table 表格组件的封装
//  1.数据不能写死,动态传递表格渲染数据  props
//  2.结构不能写死  -   多处结构自定义 - 具名插槽
//    (1)表头支持自定义
//    (2)主体支持自定义

//导入mytag组件
// import MyTag from './components/MyTag.vue'
import MyTable from './components/MyTable.vue'
export default {
  name: 'TableCase',
  components:
  {
    // MyTag,
    MyTable
  },
  data() {
    return {
      //测试组件功能的临时数据
      tempText:'茶壶',
      tempText2:'钢笔',
      goods: [
        {
          id: 101,
          picture:
            'https://yanxuan-item.nosdn.127.net/f8c37ffa41ab1eb84bff499e1f6acfc7.jpg',
          name: '梨皮朱泥三绝清代小品壶经典款紫砂壶',
          tag: '茶具',
        },
        {
          id: 102,
          picture:
            'https://yanxuan-item.nosdn.127.net/221317c85274a188174352474b859d7b.jpg',
          name: '全防水HABU旋钮牛皮户外徒步鞋山宁泰抗菌',
          tag: '男鞋',
        },
        {
          id: 103,
          picture:
            'https://yanxuan-item.nosdn.127.net/cd4b840751ef4f7505c85004f0bebcb5.png',
          name: '毛茸茸小熊出没,儿童羊羔绒背心73-90cm',
          tag: '儿童服饰',
        },
        {
          id: 104,
          picture:
            'https://yanxuan-item.nosdn.127.net/56eb25a38d7a630e76a608a9360eec6b.jpg',
          name: '基础百搭,儿童套头针织毛衣1-9岁',
          tag: '儿童服饰',
        },
      ],
    }
  },
}
</script>

<style lang="less" scoped>
.table-case {
  width: 1000px;
  margin: 50px auto;
  img {
    width: 100px;
    height: 100px;
    object-fit: contain;
    vertical-align: middle;
  }

  .my-table {
    width: 100%;
    border-spacing: 0;
    img {
      width: 100px;
      height: 100px;
      object-fit: contain;
      vertical-align: middle;
    }
    th {
      background: #f5f5f5;
      border-bottom: 2px solid #069;
    }
    td {
      border-bottom: 1px dashed #ccc;
    }
    td,
    th {
      text-align: center;
      padding: 10px;
      transition: all 0.5s;
      &.red {
        color: red;
      }
    }
    .none {
      height: 100px;
      line-height: 100px;
      color: #999;
    }
  }

}
</style>
MyTable.vue
<template>
  <table class="my-table">
      <thead>
        <tr>
          <th>编号</th>
          <th>名称</th>
          <th>图片</th>
          <th width="100px">标签</th>
        </tr>
      </thead>
      <tbody>
        <tr v-for="(item,index) in data" :key="item.id">
          <td>{{index+1}}</td>
          <td>{{item.name}}</td>
          <td>
            <img :src="item.picture" />
          </td>
          <td>
            标签组件
            <!-- <My-Tag v-model="tempText"></My-Tag> -->
          </td>
        </tr>
      </tbody>
    </table>
</template>

<script>
export default {
    props:{
        data:{
            type:Array,
            require:true
        }
    }
}
</script>

<style lang="less" scoped>
  .my-table {
    width: 100%;
    border-spacing: 0;
    img {
      width: 100px;
      height: 100px;
      object-fit: contain;
      vertical-align: middle;
    }
    th {
      background: #f5f5f5;
      border-bottom: 2px solid #069;
    }
    td {
      border-bottom: 1px dashed #ccc;
    }
    td,
    th {
      text-align: center;
      padding: 10px;
      transition: all 0.5s;
      &.red {
        color: red;
      }
    }
    .none {
      height: 100px;
      line-height: 100px;
      color: #999;
    }
  }
</style>
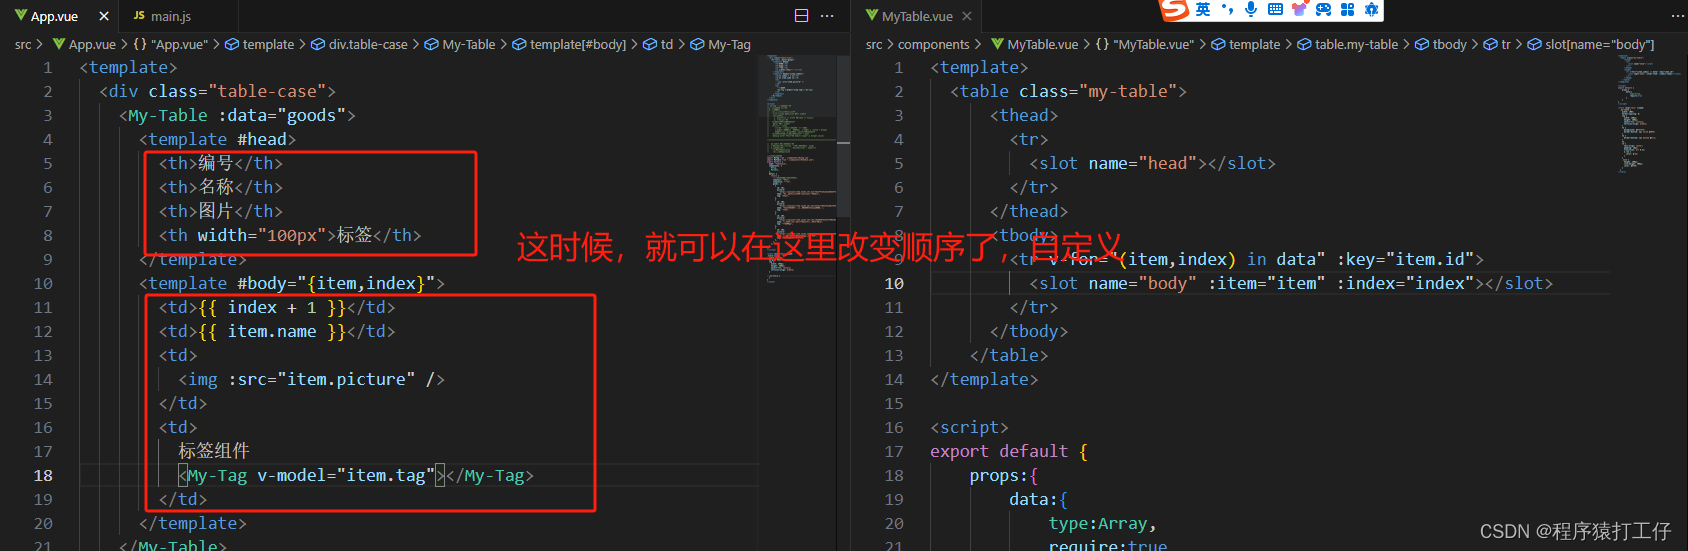
4. 表头不能写死,哪个位置不能写死,哪块就用slot占位。因为多个位置不能写死,所以得用具名插槽。
 obj也可以直接结构为#body="{item,index}"
5.这时候可以把Tag组件注释解开,并修改v-model为正确的值,item.tag
代码:
App.vue
<template>
  <div class="table-case">
    <My-Table :data="goods">
      <template #head>
        <th>编号</th>
        <th>名称</th>
        <th>图片</th>
        <th width="100px">标签</th>
      </template>
      <template #body="{item,index}">
        <td>{{ index + 1 }}</td>
        <td>{{ item.name }}</td>
        <td>
          <img :src="item.picture" />
        </td>
        <td>
          标签组件
          <My-Tag v-model="item.tag"></My-Tag>
        </td>
      </template>
    </My-Table>
  </div>
</template>

<script>
// my-tag 标签组件的封装
//1. 创建组件 初始化
//2. 实现功能
//   (1)双击显示,并自动聚焦
//    v-if v-else @dblclick 操作 isEdit
//    自动聚焦:
//     1. $nextTick => $refs 操作dom , focus()
//     2. v-focus封装
//   (2)失去焦点,隐藏输入框
//    @blur 操作 isEdit
//   (3)回显标签信息
//      回显的标签信息是父组件传递过来的
//      v-model实现功能(简化代码)  v-model = :value + @input
//      组件内部通过props接收 :value设置给输入框
//   (4)内容修改了,回车,可以修改标签信息
//    @keyup.enter 触发事件 $emit('input',e.target.value)

//=====================================================================

//  my-table 表格组件的封装
//  1.数据不能写死,动态传递表格渲染数据  props
//  2.结构不能写死  -   多处结构自定义 - 具名插槽
//    (1)表头支持自定义
//    (2)主体支持自定义

//导入mytag组件
import MyTag from './components/MyTag.vue'
import MyTable from "./components/MyTable.vue";
export default {
  name: "TableCase",
  components: {
    MyTag,
    MyTable,
  },
  data() {
    return {
      //测试组件功能的临时数据
      tempText: "茶壶",
      tempText2: "钢笔",
      goods: [
        {
          id: 101,
          picture:
            "https://yanxuan-item.nosdn.127.net/f8c37ffa41ab1eb84bff499e1f6acfc7.jpg",
          name: "梨皮朱泥三绝清代小品壶经典款紫砂壶",
          tag: "茶具",
        },
        {
          id: 102,
          picture:
            "https://yanxuan-item.nosdn.127.net/221317c85274a188174352474b859d7b.jpg",
          name: "全防水HABU旋钮牛皮户外徒步鞋山宁泰抗菌",
          tag: "男鞋",
        },
        {
          id: 103,
          picture:
            "https://yanxuan-item.nosdn.127.net/cd4b840751ef4f7505c85004f0bebcb5.png",
          name: "毛茸茸小熊出没,儿童羊羔绒背心73-90cm",
          tag: "儿童服饰",
        },
        {
          id: 104,
          picture:
            "https://yanxuan-item.nosdn.127.net/56eb25a38d7a630e76a608a9360eec6b.jpg",
          name: "基础百搭,儿童套头针织毛衣1-9岁",
          tag: "儿童服饰",
        },
      ],
    };
  },
};
</script>

<style lang="less" scoped>
.table-case {
  width: 1000px;
  margin: 50px auto;
  img {
    width: 100px;
    height: 100px;
    object-fit: contain;
    vertical-align: middle;
  }

  .my-table {
    width: 100%;
    border-spacing: 0;
    img {
      width: 100px;
      height: 100px;
      object-fit: contain;
      vertical-align: middle;
    }
    th {
      background: #f5f5f5;
      border-bottom: 2px solid #069;
    }
    td {
      border-bottom: 1px dashed #ccc;
    }
    td,
    th {
      text-align: center;
      padding: 10px;
      transition: all 0.5s;
      &.red {
        color: red;
      }
    }
    .none {
      height: 100px;
      line-height: 100px;
      color: #999;
    }
  }
}
</style>
MyTable.vue
<template>
  <table class="my-table">
      <thead>
        <tr>
          <slot name="head"></slot>
        </tr>
      </thead>
      <tbody>
        <tr v-for="(item,index) in data" :key="item.id">
          <slot name="body" :item="item" :index="index"></slot>
        </tr>
      </tbody>
    </table>
</template>

<script>
export default {
    props:{
        data:{
            type:Array,
            require:true
        }
    }
}
</script>

<style lang="less" scoped>
  .my-table {
    width: 100%;
    border-spacing: 0;
    img {
      width: 100px;
      height: 100px;
      object-fit: contain;
      vertical-align: middle;
    }
    th {
      background: #f5f5f5;
      border-bottom: 2px solid #069;
    }
    td {
      border-bottom: 1px dashed #ccc;
    }
    td,
    th {
      text-align: center;
      padding: 10px;
      transition: all 0.5s;
      &.red {
        color: red;
      }
    }
    .none {
      height: 100px;
      line-height: 100px;
      color: #999;
    }
  }
</style>
单页应用程序&路由介绍

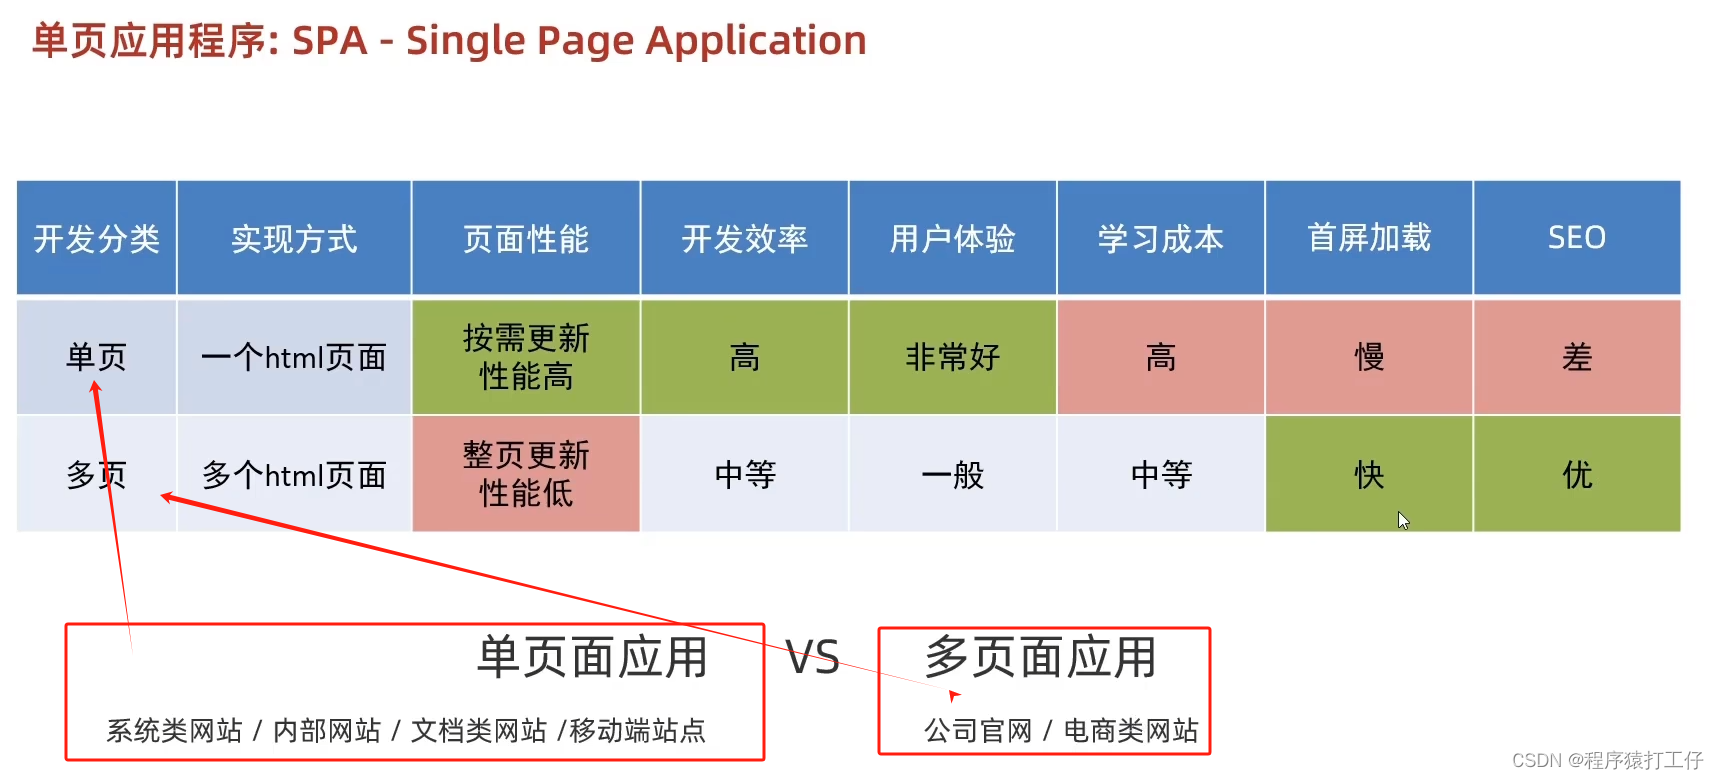
系统类要求性能高,用单页应用。官网电商 需要搜索的对SEO要求高。
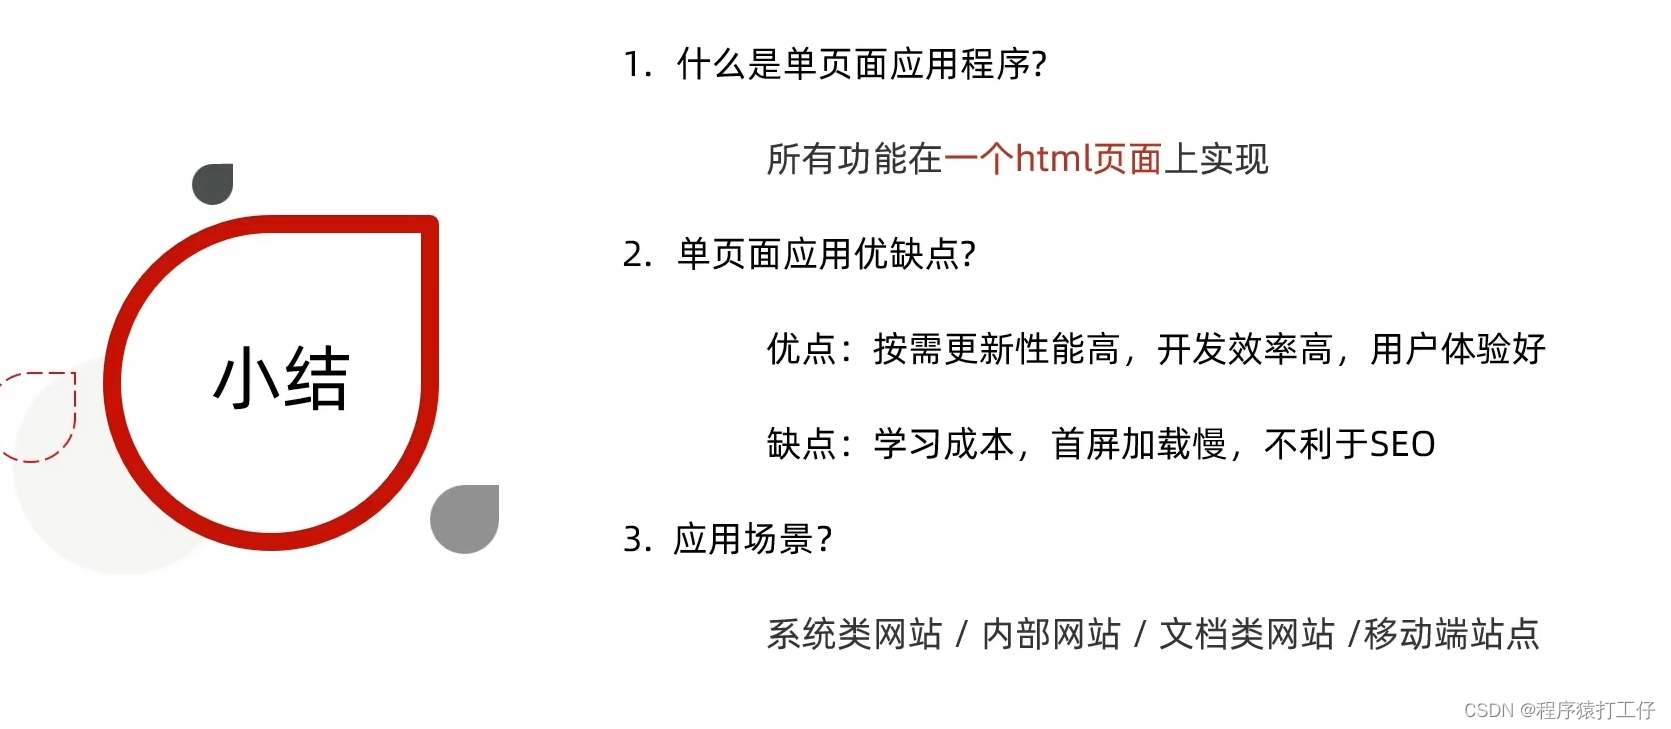
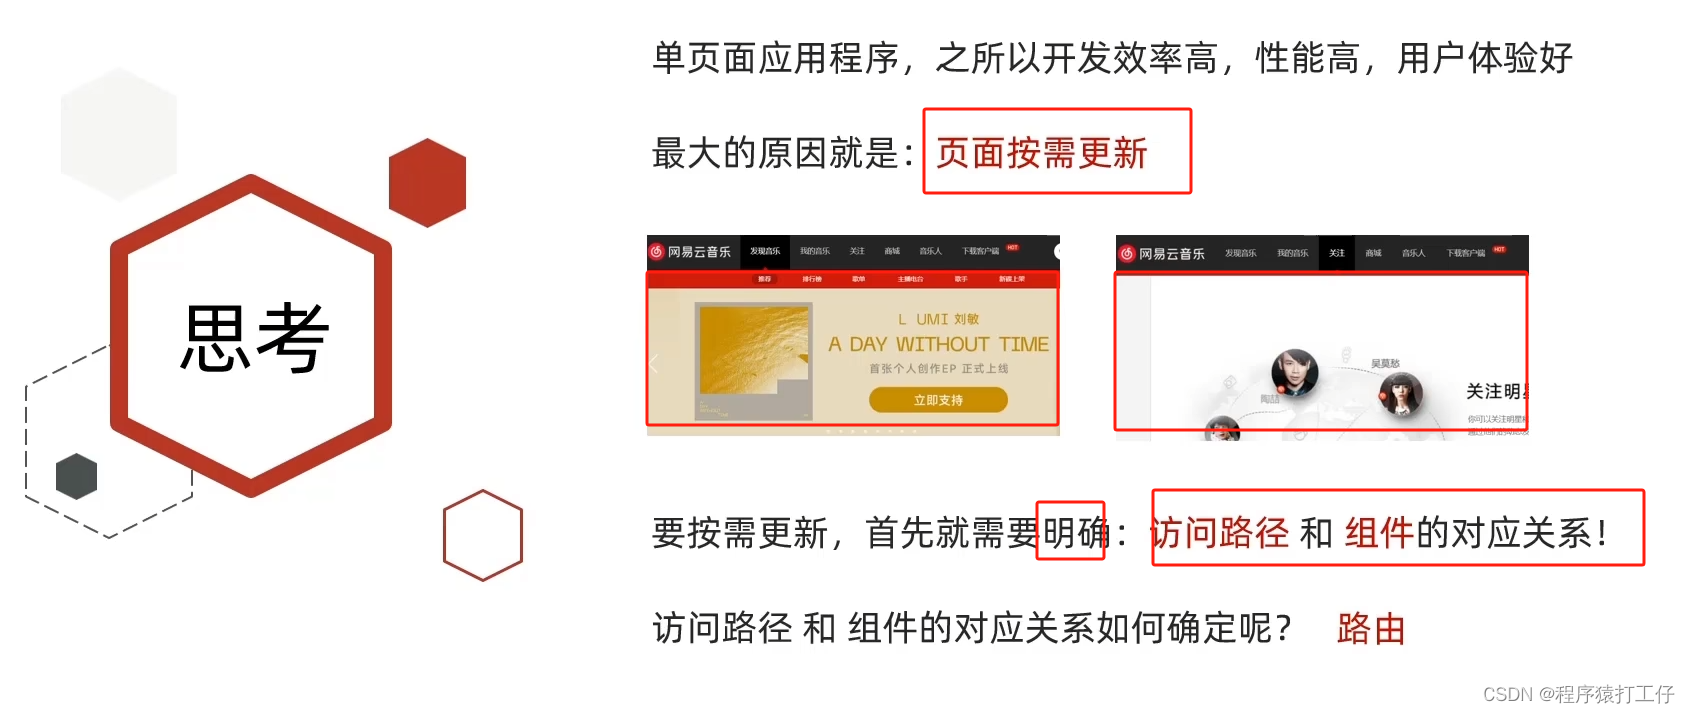
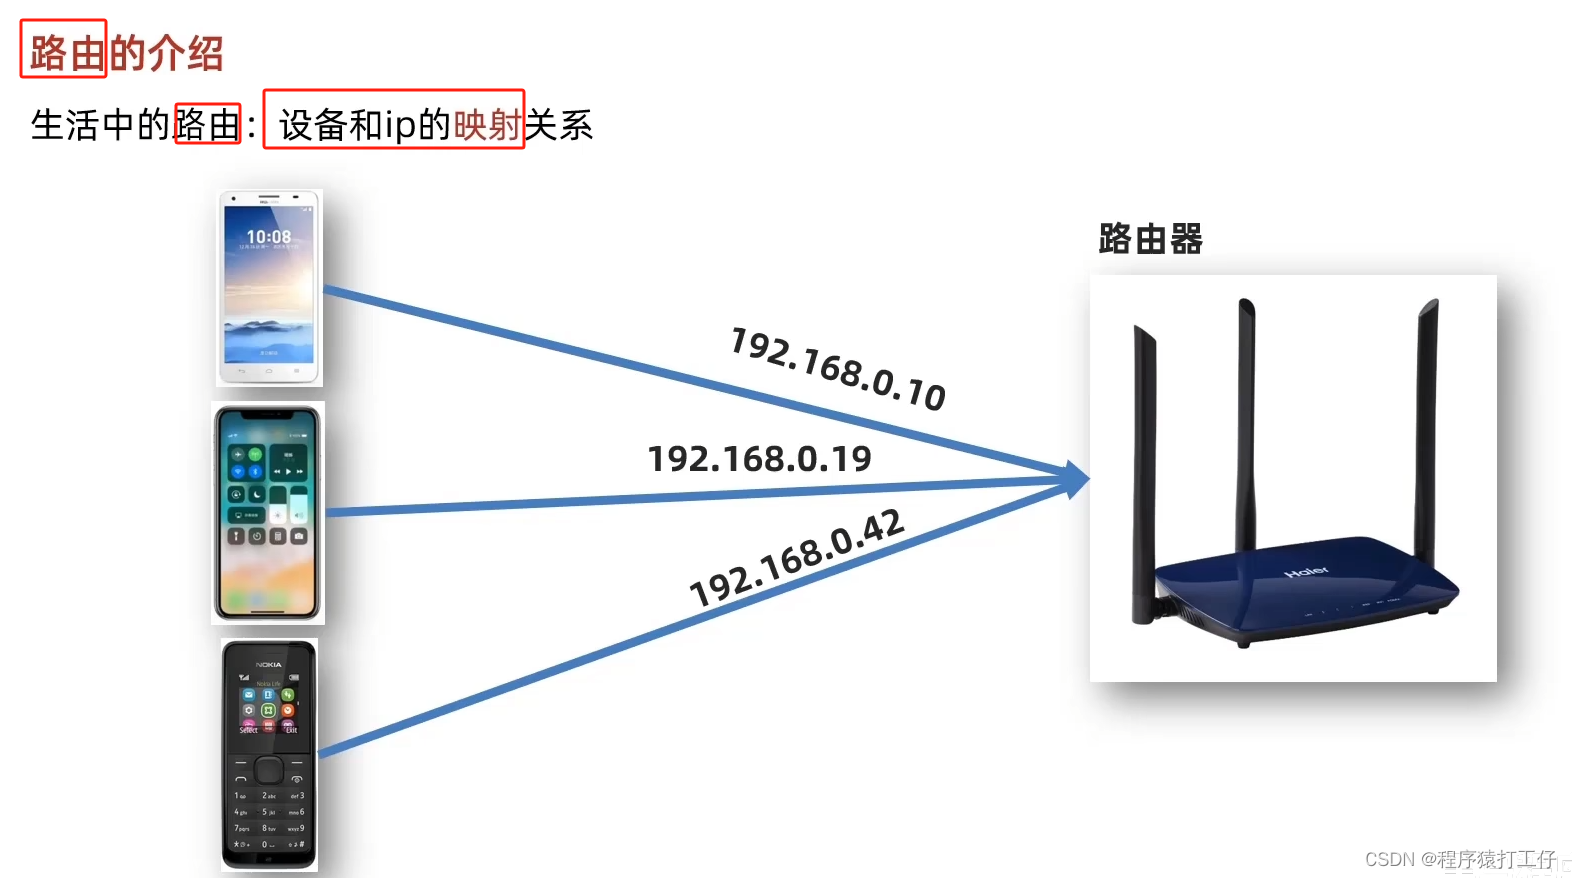
组成了1个局域网
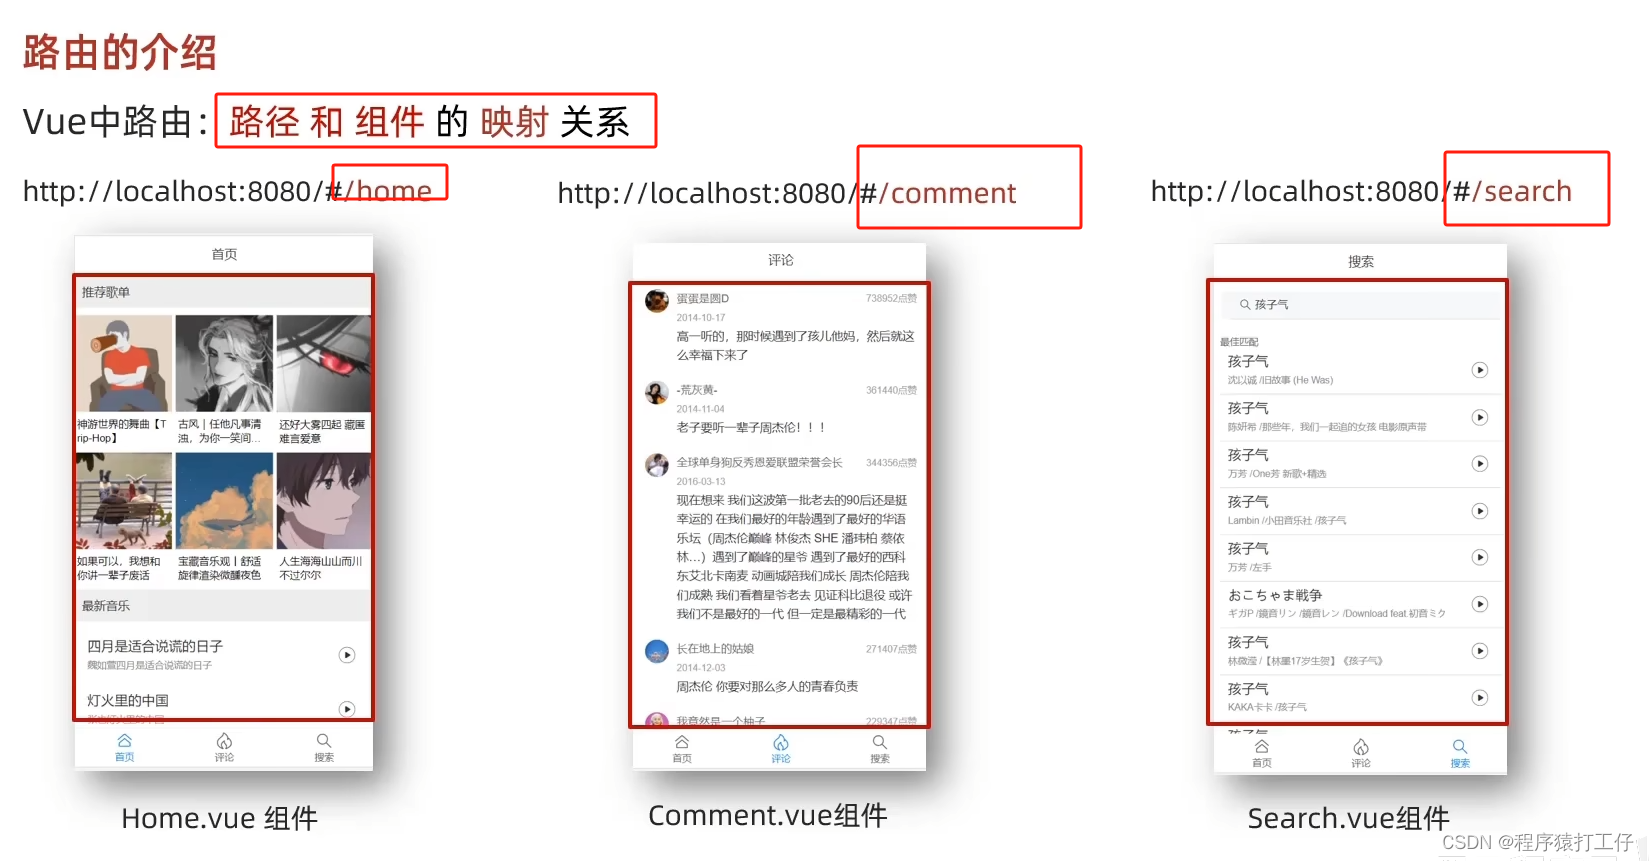

路由的基本使用
要记住:5个基础步骤,2个核心步骤。熟记
**--------------重要,版本要对应-------------**
Vue2 VueRouter3.x Vuex3.x
Vue3 VueRouter4.x Vuex4.x
---------------------------------------
使用步骤:
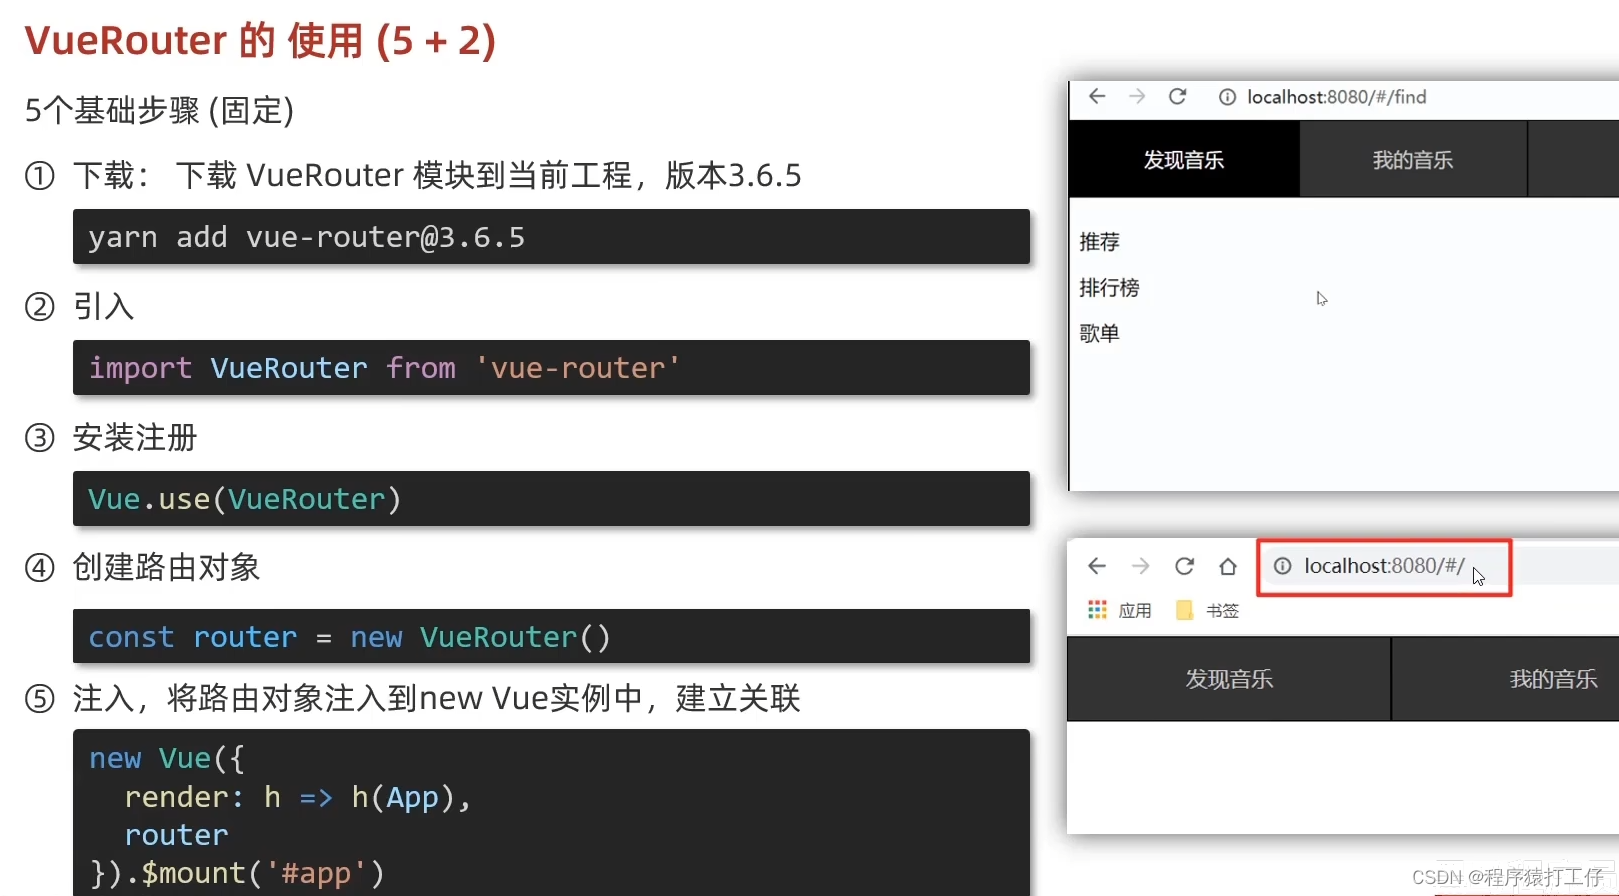
5步完成后,就可以看到地址栏会出现#/
操作细节 :

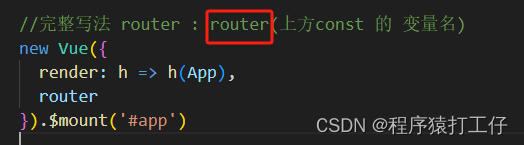
5+2的2: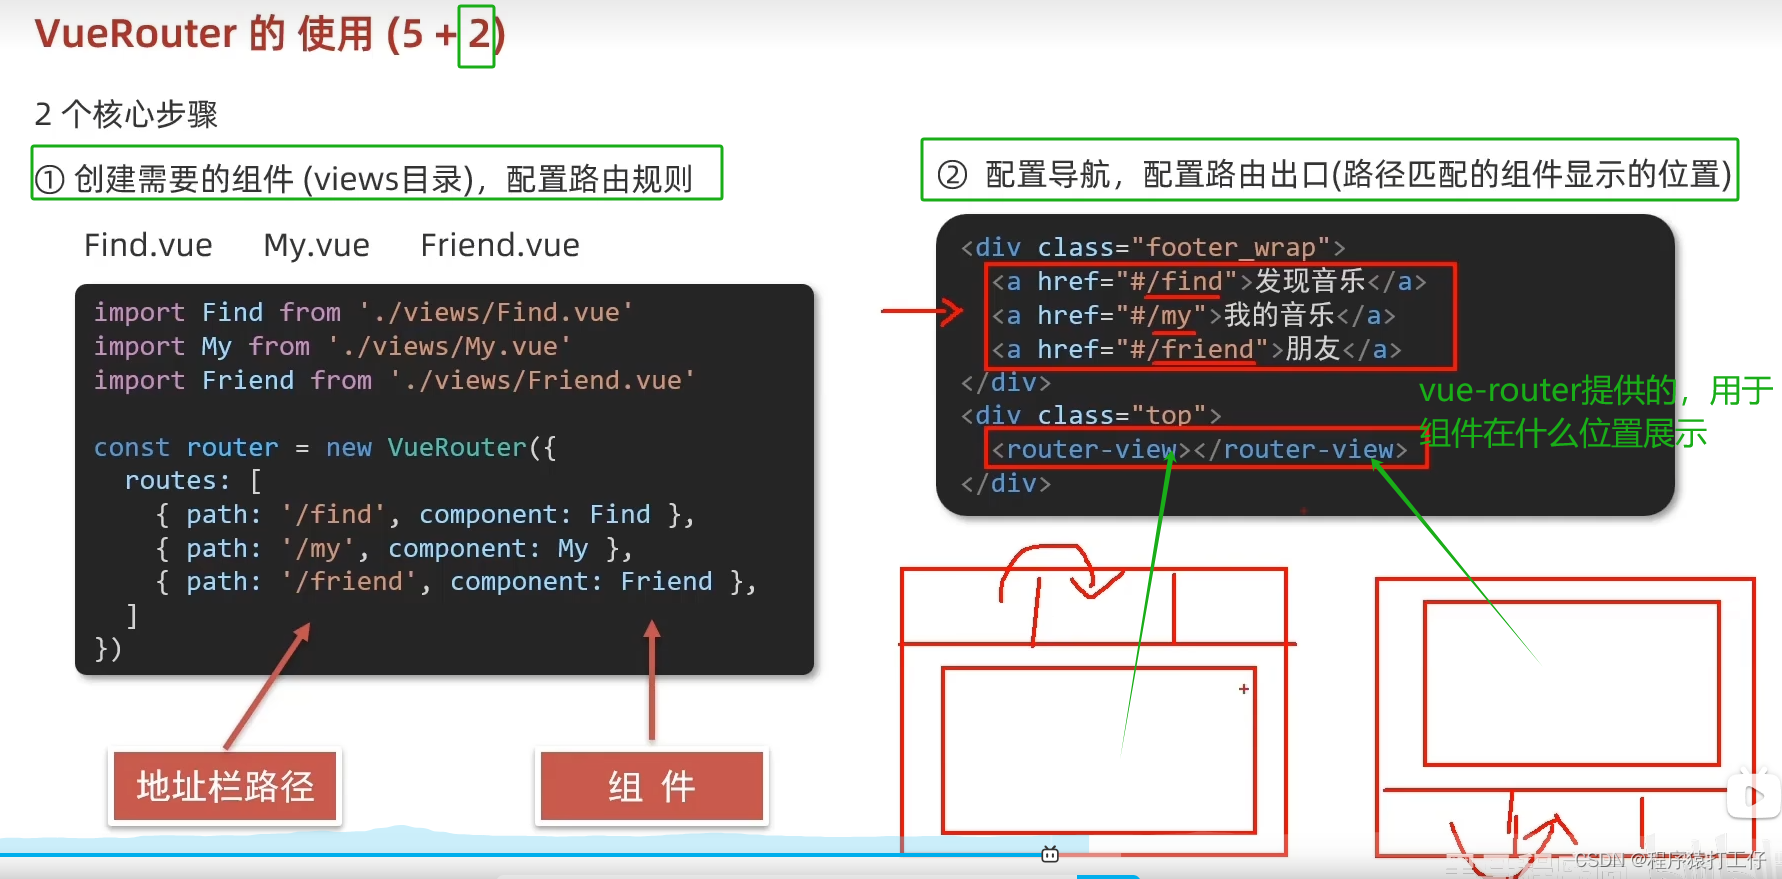
<router-view></router-view>路由出口 → 匹配的组件所展示的位置
细节: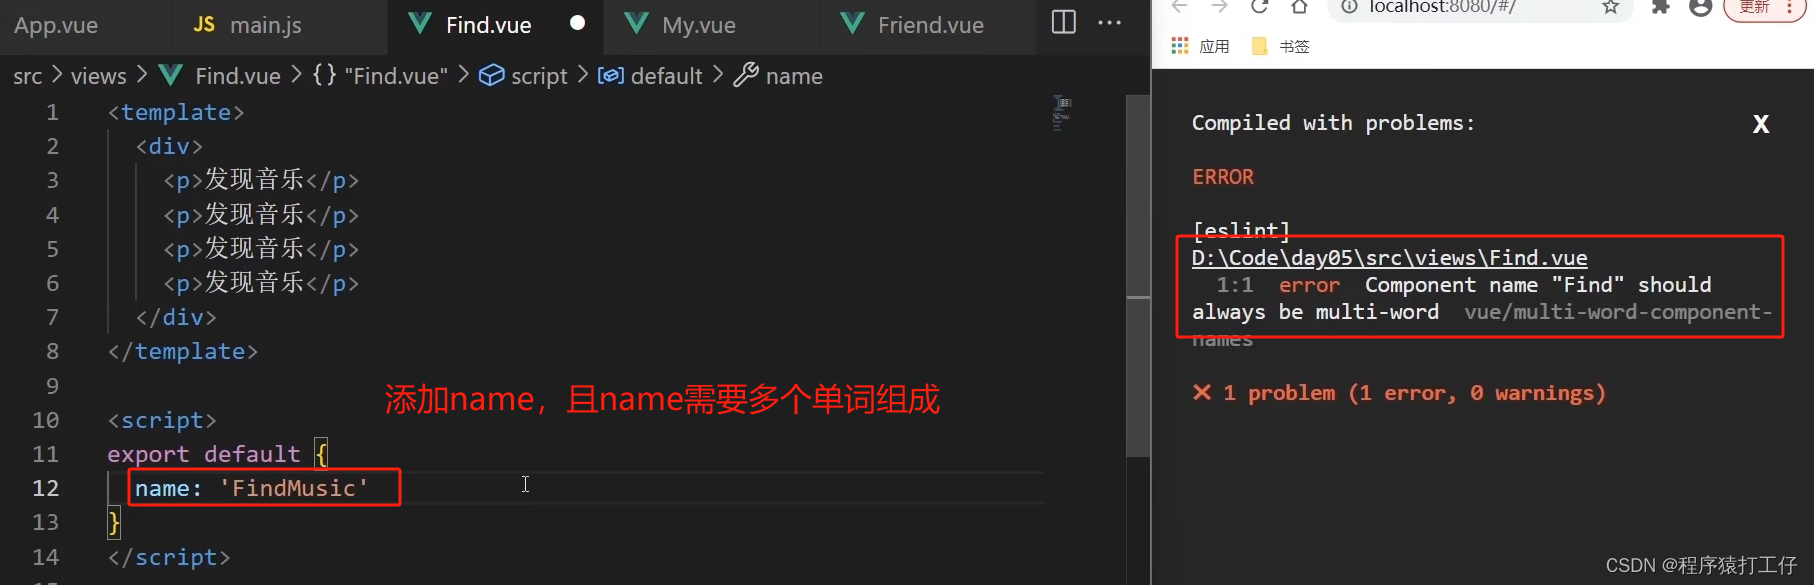
总结;
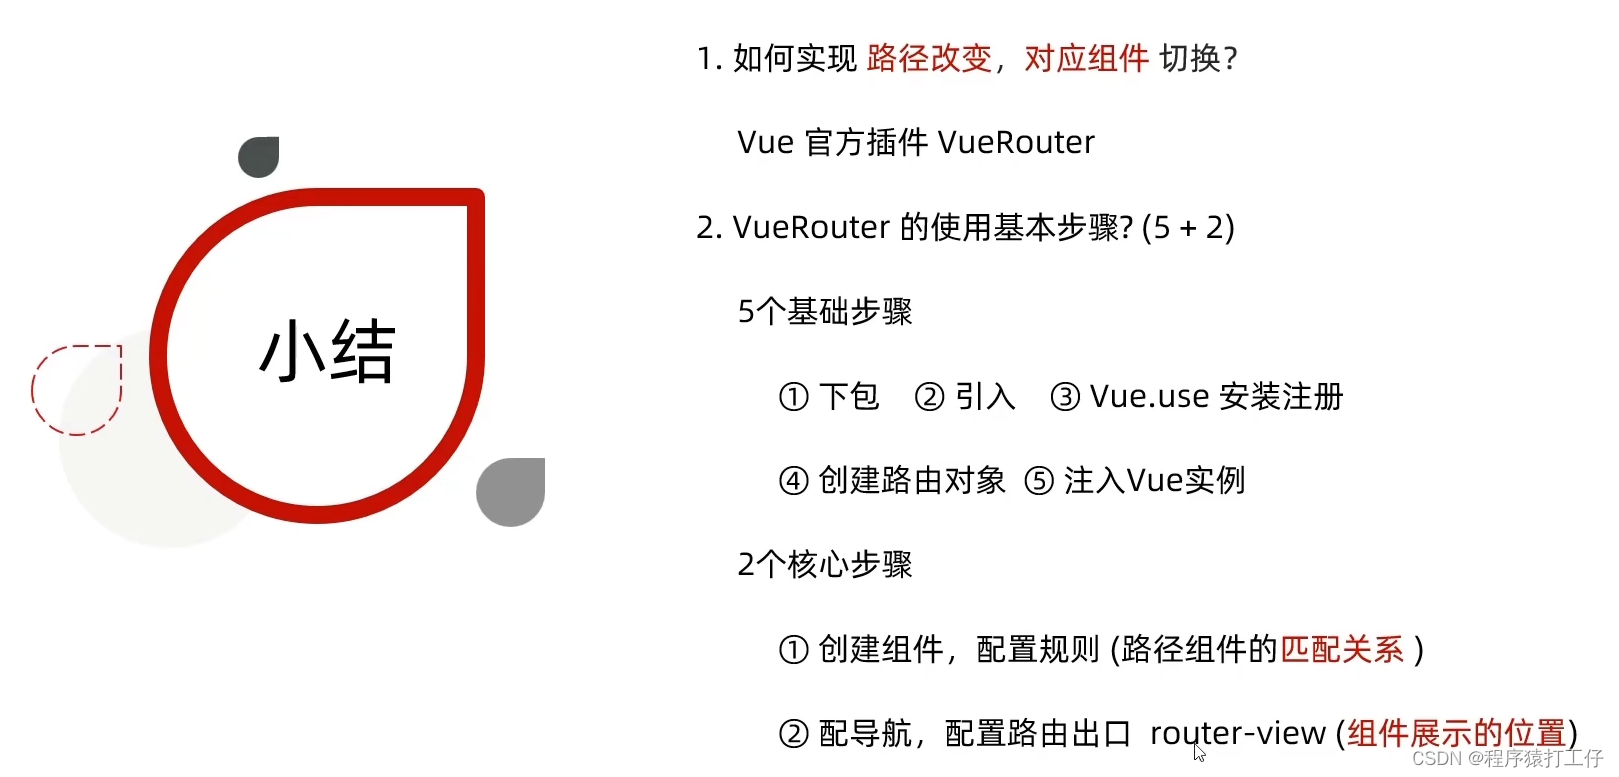
代码:(注重注释意思)
App.vue
<template>
  <div>
    <div class="footer_wrap">
      <a href="#/find">发现音乐</a>
      <a href="#/my">我的音乐</a>
      <a href="#/friend">朋友</a>
    </div>
    <div class="top">
      <!-- 路由出口 → 匹配的组件所展示的位置 -->
      <router-view></router-view>
    </div>
  </div>
</template>

<script>
export default {};
</script>

<style>
body {
  margin: 0;
  padding: 0;
}
.footer_wrap {
  position: relative;
  left: 0;
  top: 0;
  display: flex;
  width: 100%;
  text-align: center;
  background-color: #333;
  color: #ccc;
}
.footer_wrap a {
  flex: 1;
  text-decoration: none;
  padding: 20px 0;
  line-height: 20px;
  background-color: #333;
  color: #ccc;
  border: 1px solid black;
}
.footer_wrap a:hover {
  background-color: #555;
}
</style>
main.js
import Vue from 'vue'
import App from './App.vue'

// 路由的使用步骤 5 + 2
// 5个基础步骤
// 1. 下载 v3.6.5
// 2. 引入
// 3. 安装注册 Vue.use(Vue插件)
// 4. 创建路由对象
// 5. 注入到new Vue中,建立关联

// 2个核心步骤
// 1. 建组件(views目录),配规则
// 2. 准备导航链接,配置路由出口(匹配的组件展示的位置)
import Find from './views/Find'
import My from './views/My'
import Friend from './views/Friend'
import VueRouter from 'vue-router'
Vue.use(VueRouter) // VueRouter插件初始化

// const router 这个名字不能随便写,只有写成router,下面才能简写
const router = new VueRouter({
  //routes路由规则们 数组包对象
  //route就是一条路由规则{path:路径,component:组件}
  routes:[
    {
      path:'/find',
      component:Find
    },
    {
      path:'/my',
      component:My
    },
    {
      path:'/friend',
      component:Friend
    }
  ]
})

Vue.config.productionTip = false

//完整写法 router : router(上方const 的 变量名)
new Vue({
  render: h => h(App),
  router
}).$mount('#app')
Find.vue 其他几个组件一样
<template>
  <div>
    <p>发现音乐</p>
    <p>发现音乐</p>
    <p>发现音乐</p>
    <p>发现音乐</p>
  </div>
</template>

<script>
export default {
  name: 'FindMusic'
}
</script>

<style>

</style>
组件目录存放问题(组件分类)
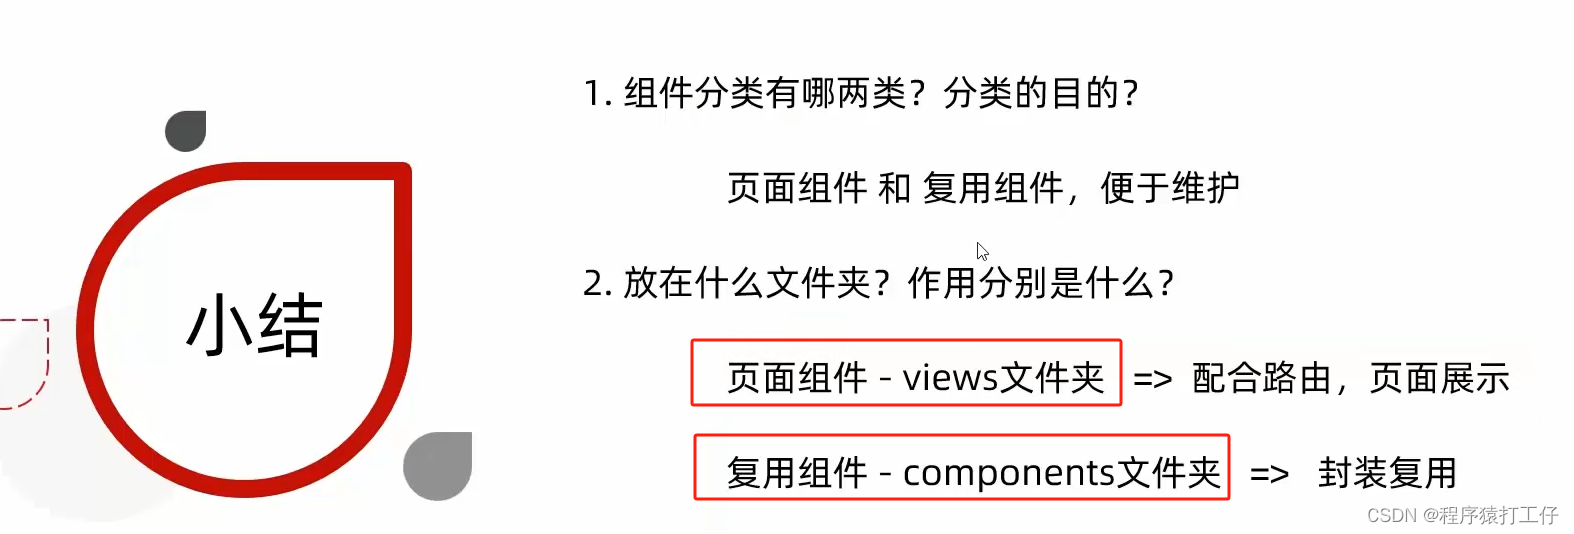
页面组件->views
复用组件->components
75.正式开始路由 - 进阶
开始...
路由模块封装
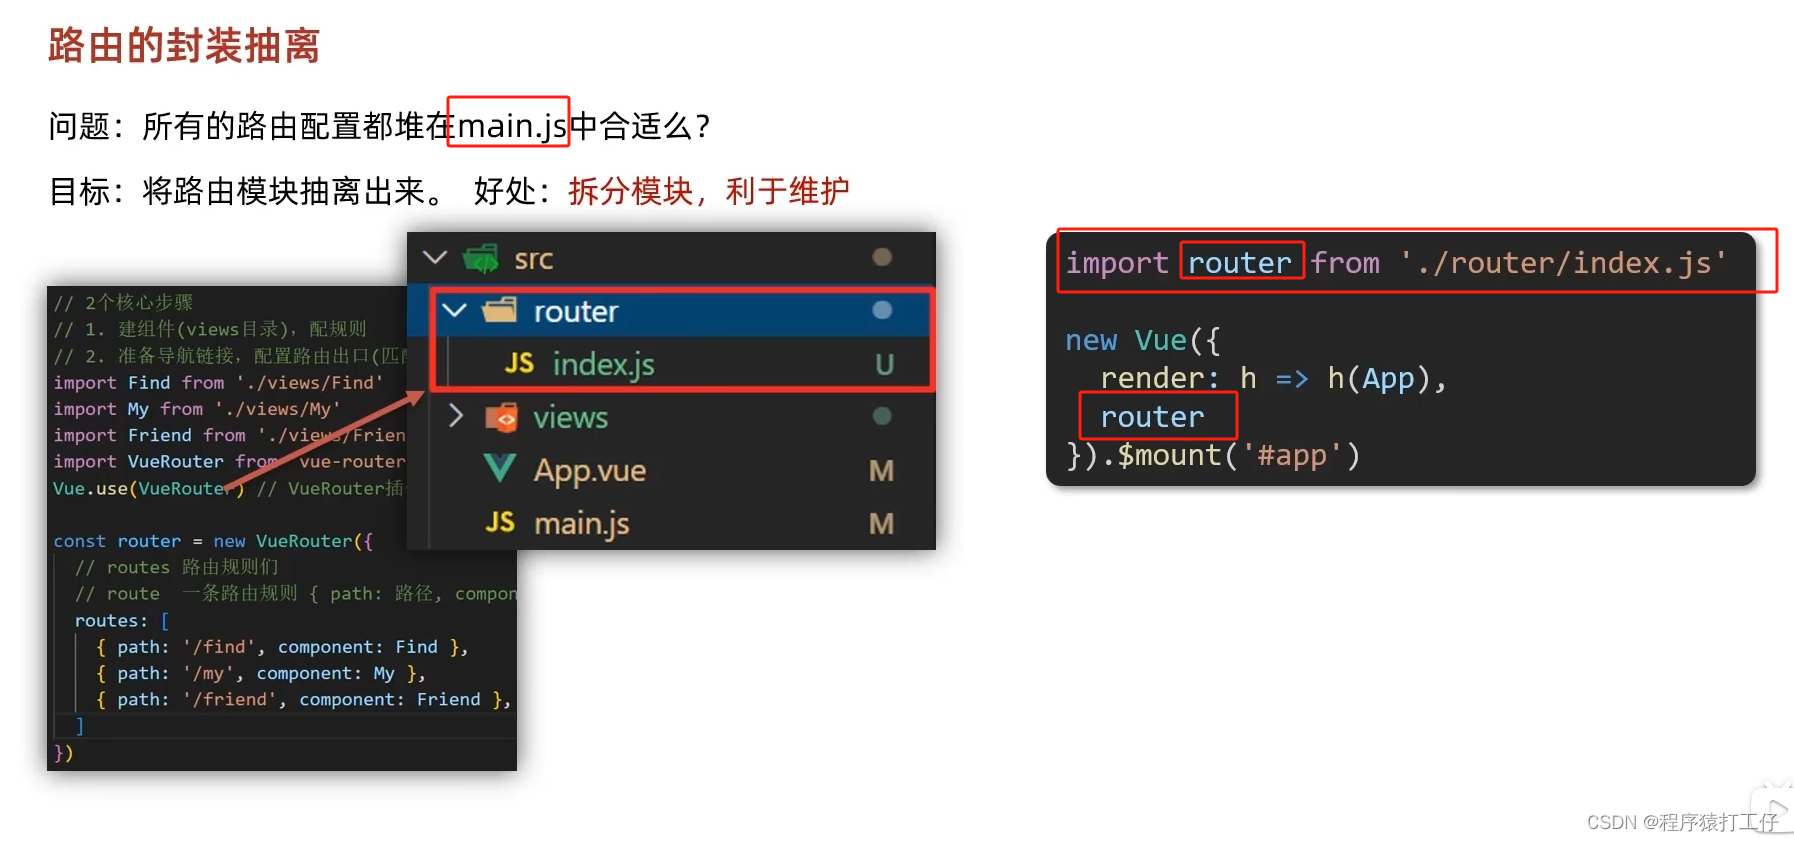
以前是写在main.js中的。封装后,在router文件夹下,为index.js
代码:(看代码注释)
1.在src下创建router文件夹,并创建index.js文件
2.将原来main.js中,路由相关代码,复制到index.js中
3.在index.js中,导入Vue,改绝对路径用@,切记要导出router
4.在main.js中,要导入router
index.js
//封装后,路径使用@代替src,使用绝对路径
import Find from '@/views/Find'
import My from '@/views/My'
import Friend from '@/views/Friend'
import VueRouter from 'vue-router'
//封装后,要先导入Vue
import Vue from 'vue'
Vue.use(VueRouter)
const router = new VueRouter({
  routes:[
    {
      path:'/find',
      component:Find
    },
    {
      path:'/my',
      component:My
    },
    {
      path:'/friend',
      component:Friend
    }
  ]
})

Vue.config.productionTip = false
//封装后,要导出,才能用
export default router
main.js
import Vue from 'vue'
import App from './App.vue'
//封装后,导入router
import router from '@/router/index'

new Vue({
  render: h => h(App),
  router
}).$mount('#app')
总结:
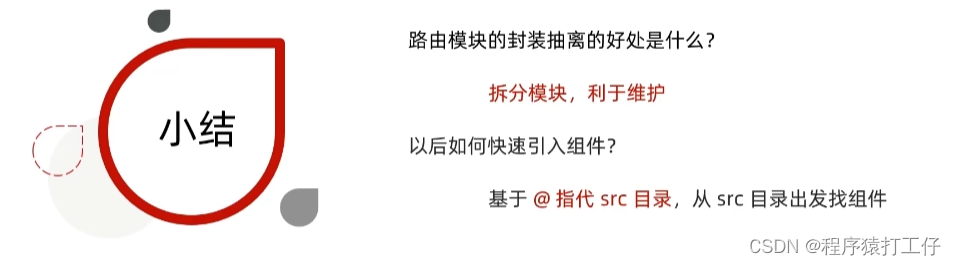
使用router-link代替a标签,实现高亮
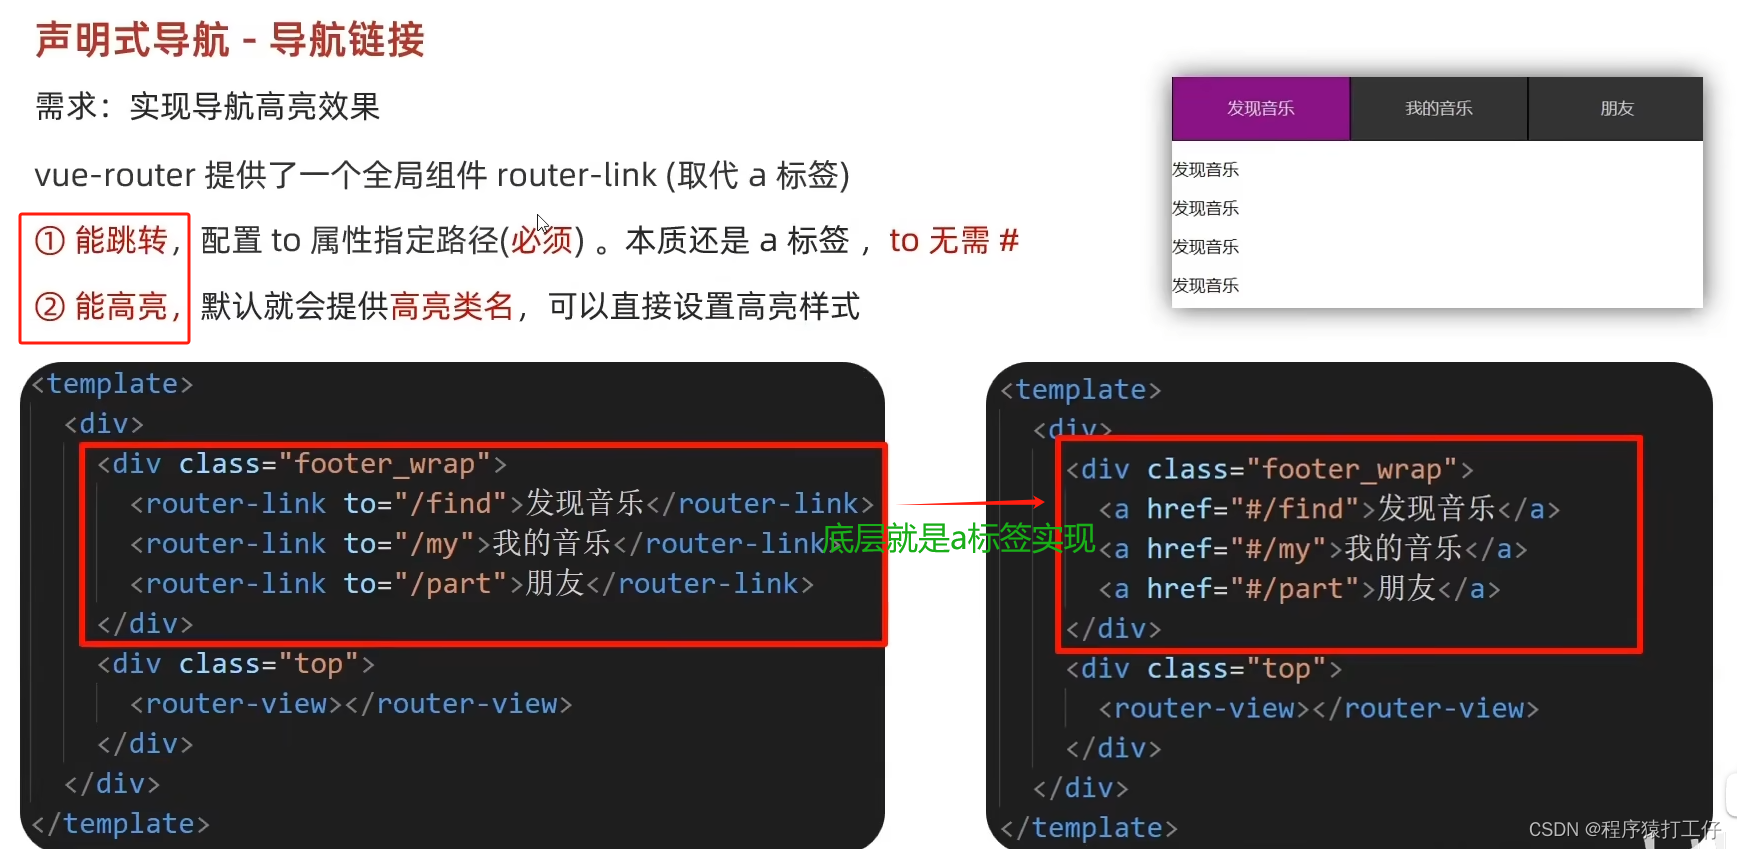
vue提供,就是用来替换a标签的。
底层就是a标签。
替换过程:
将a改为router-link,修改属性href为to,#不用写(注意)
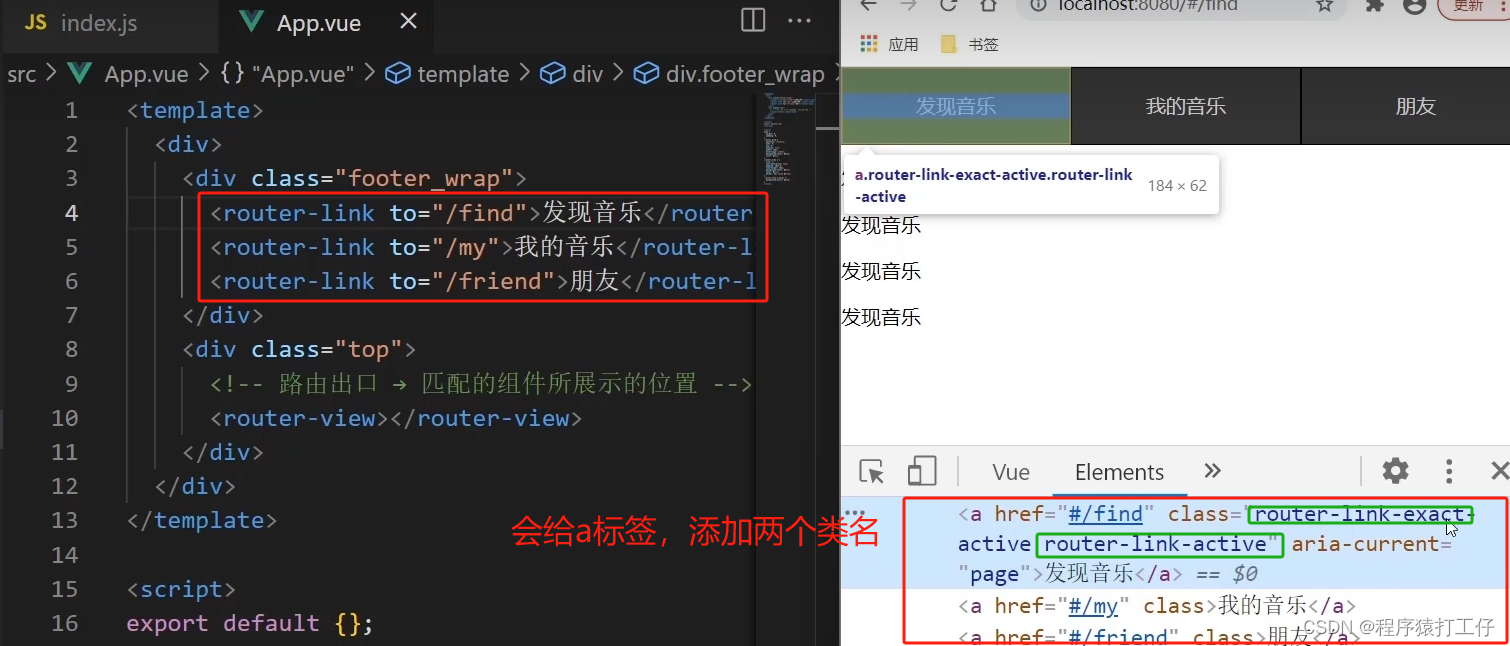
要实现高亮,找到多出来的这两个类名,给他添加高亮就可以了。
class="router-link-exact-active router-link-active"
添加样式:
.footer_wrap a.router-link-active{
background-color:blue
}
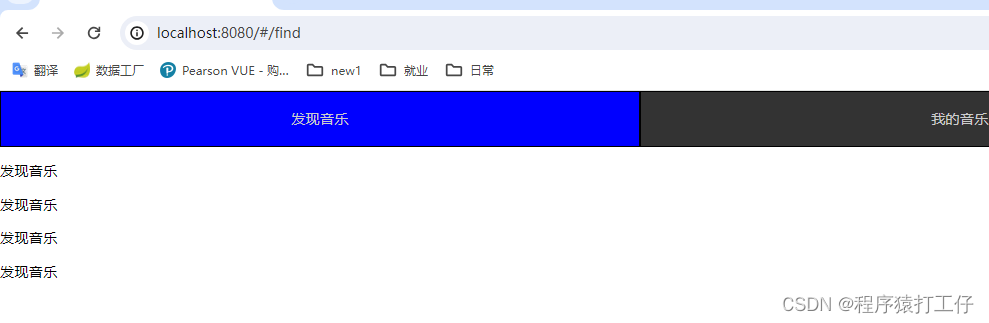
代码:
App.vue
<template>
  <div>
    <div class="footer_wrap">
      <router-link to="/find">发现音乐</router-link>
      <router-link to="/my">我的音乐</router-link>
      <router-link to="/friend">朋友</router-link>
    </div>
    <div class="top">
      <!-- 路由出口 → 匹配的组件所展示的位置 -->
      <router-view></router-view>
    </div>
  </div>
</template>

<script>
export default {};
</script>

<style>
body {
  margin: 0;
  padding: 0;
}
.footer_wrap {
  position: relative;
  left: 0;
  top: 0;
  display: flex;
  width: 100%;
  text-align: center;
  background-color: #333;
  color: #ccc;
}
.footer_wrap a {
  flex: 1;
  text-decoration: none;
  padding: 20px 0;
  line-height: 20px;
  background-color: #333;
  color: #ccc;
  border: 1px solid black;
}
.footer_wrap a.router-link-active{
  background-color:blue
}
.footer_wrap a:hover {
  background-color: #555;
}
</style>
router-link 声明式导航也叫导航链接
两个类名
 尽量使用模糊匹配,这样子模块也会匹配到,从而进行高亮
自定义匹配的类名
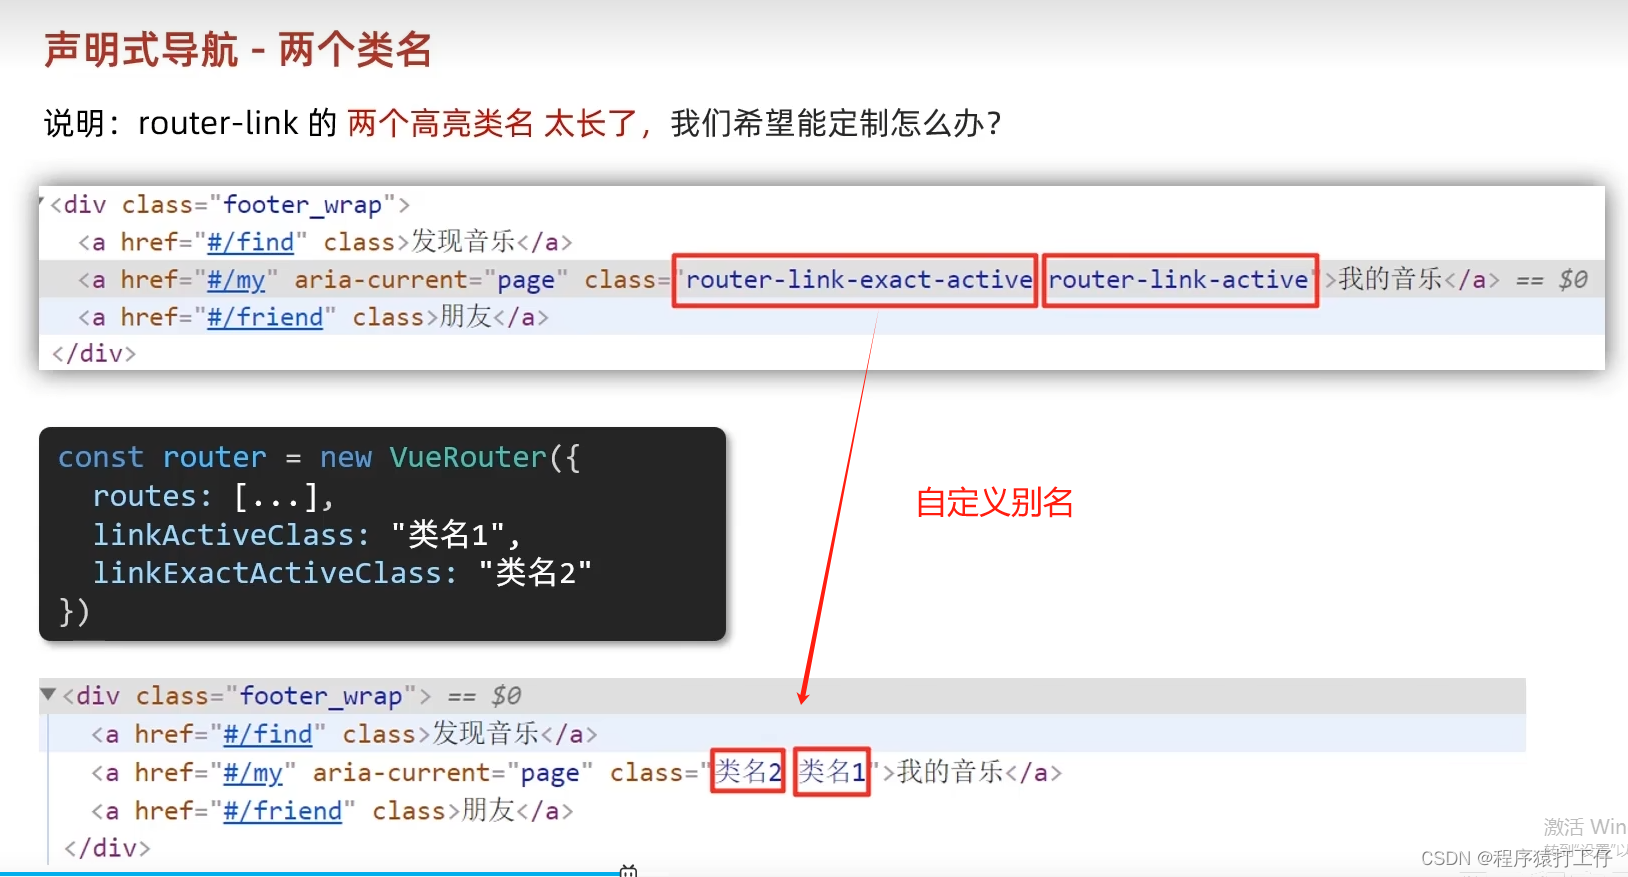
在index.js的router中,添加
linkActiveClass:'active', //模糊
linkExactActiveClass:'exact-active' //精确
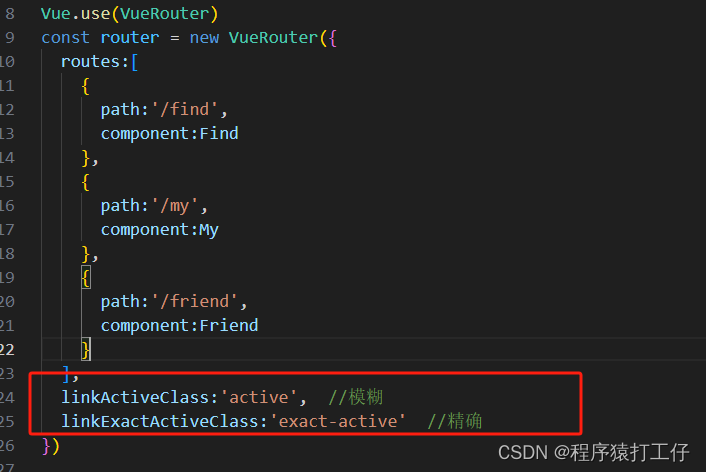
直接敲link就会有提示。
然后修改App.vue的css
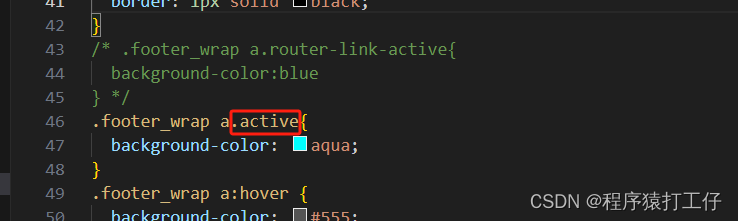
配置之前
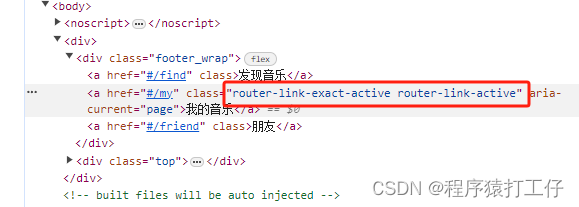
配置后:
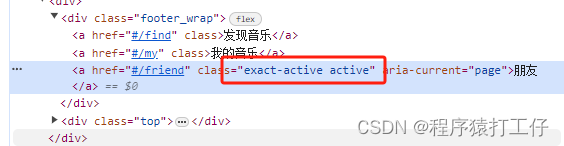
代码:
index.js
//封装后,路径使用@代替src,使用绝对路径
import Find from '@/views/Find'
import My from '@/views/My'
import Friend from '@/views/Friend'
import VueRouter from 'vue-router'
//封装后,要先导入Vue
import Vue from 'vue'
Vue.use(VueRouter)
const router = new VueRouter({
  routes:[
    {
      path:'/find',
      component:Find
    },
    {
      path:'/my',
      component:My
    },
    {
      path:'/friend',
      component:Friend
    }
  ],
  //link自定义高亮类名
  linkActiveClass:'active',  //模糊
  linkExactActiveClass:'exact-active'  //精确
})

Vue.config.productionTip = false
//封装后,要导出,才能用
export default router
App.vue
<template>
  <div>
    <div class="footer_wrap">
      <router-link to="/find">发现音乐</router-link>
      <router-link to="/my">我的音乐</router-link>
      <router-link to="/friend">朋友</router-link>
    </div>
    <div class="top">
      <!-- 路由出口 → 匹配的组件所展示的位置 -->
      <router-view></router-view>
    </div>
  </div>
</template>

<script>
export default {};
</script>

<style>
body {
  margin: 0;
  padding: 0;
}
.footer_wrap {
  position: relative;
  left: 0;
  top: 0;
  display: flex;
  width: 100%;
  text-align: center;
  background-color: #333;
  color: #ccc;
}
.footer_wrap a {
  flex: 1;
  text-decoration: none;
  padding: 20px 0;
  line-height: 20px;
  background-color: #333;
  color: #ccc;
  border: 1px solid black;
}
/* .footer_wrap a.router-link-active{
  background-color:blue
} */
.footer_wrap a.active{
  background-color: aqua;
}
.footer_wrap a:hover {
  background-color: #555;
}
</style>
声明式导航-跳转传参
声明式导航就是router-link
1.第一种方式传参
 热门搜索,点击不同的标签,传递不同的参数
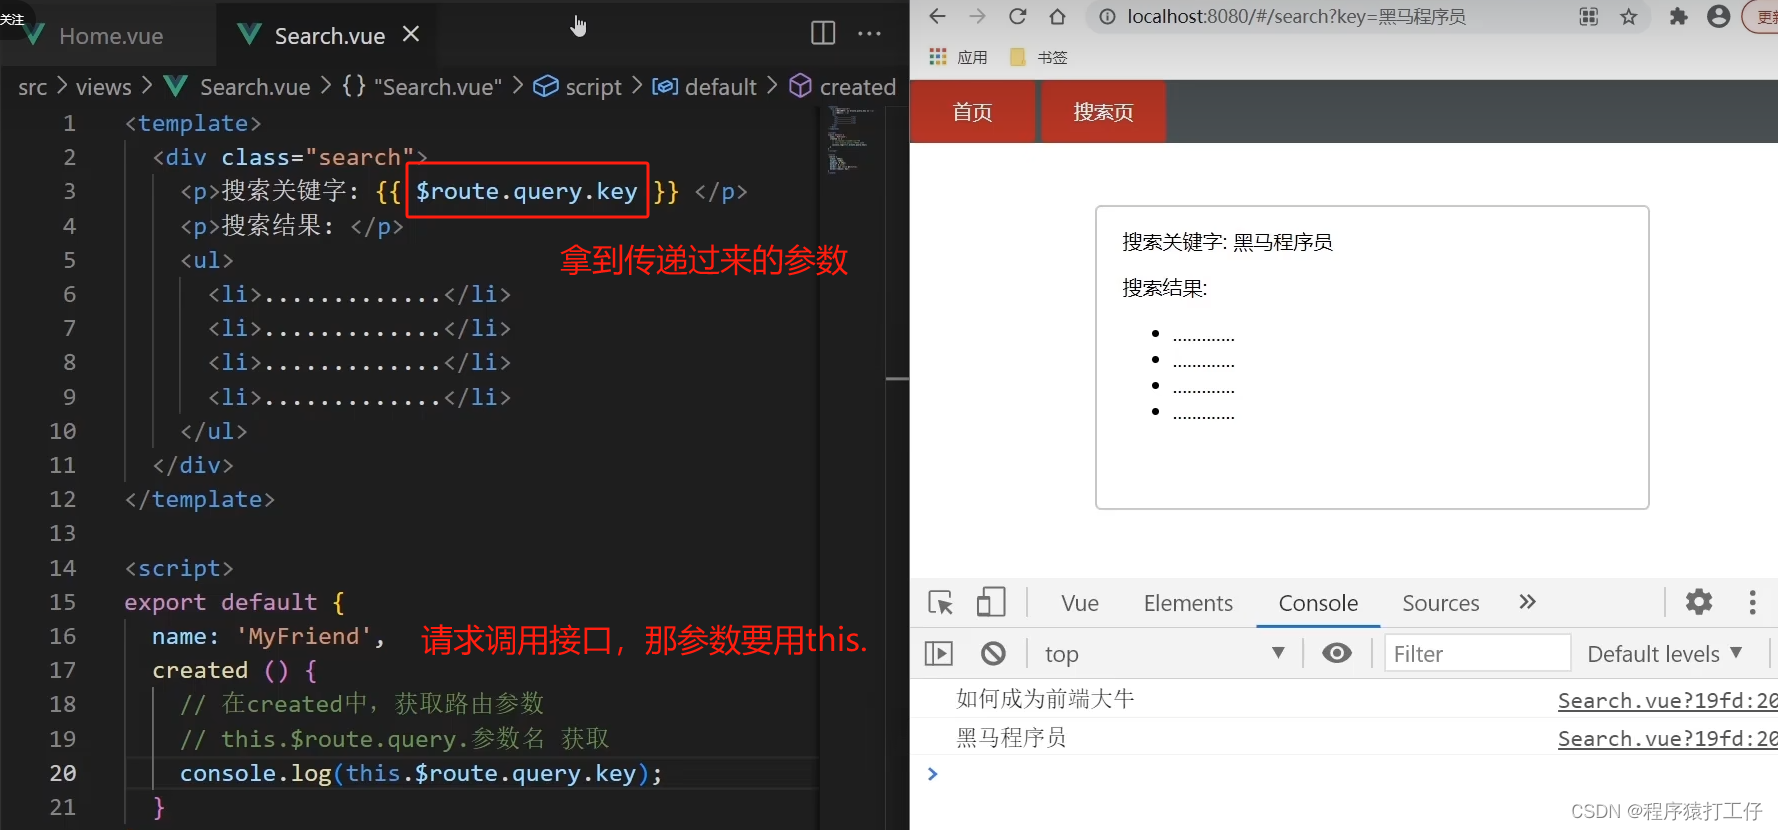
2.第二种方式传参
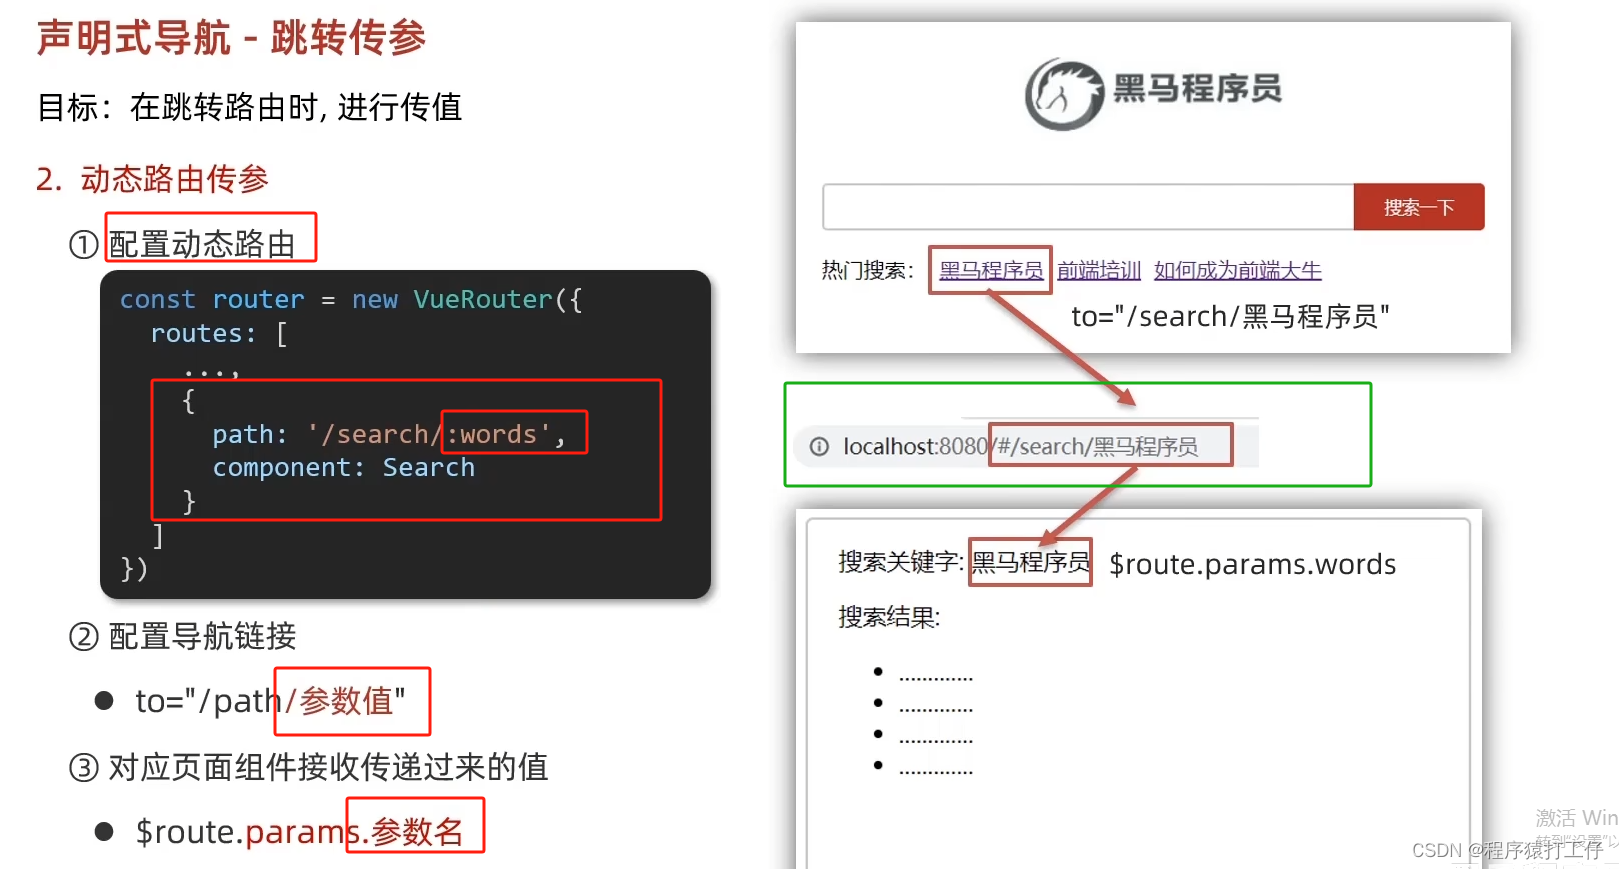
:不能省略(注意)。上面words起什么名字,接下来获取的时候就得是什么名字 ($route.params.words) 。这种动态路由传参,用的params。
步骤:
1.配置路由规则
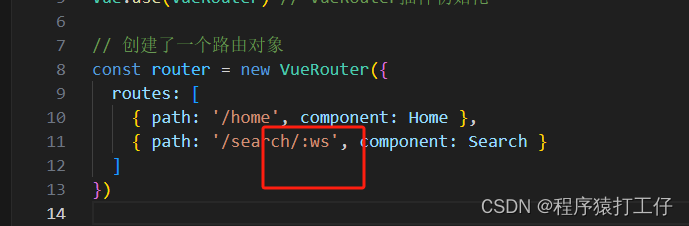
2.修改导航链接
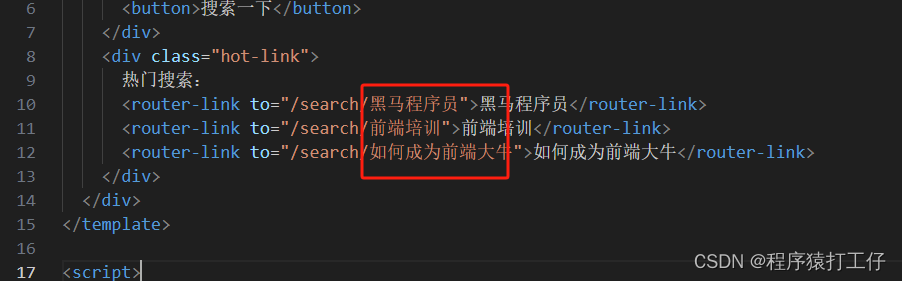
3.获取参数
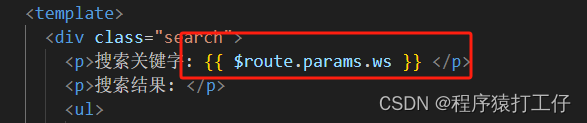
两种传参的区别:
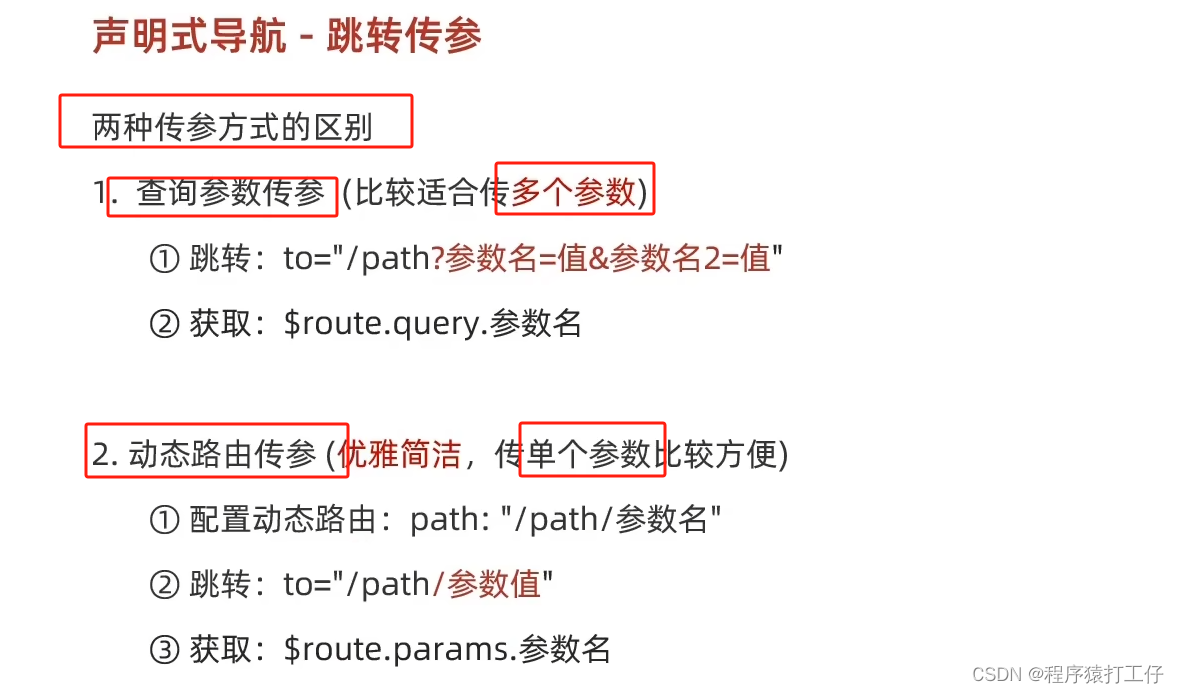
代码:
index.js
// 创建了一个路由对象
const router = new VueRouter({
  routes: [
    { path: '/home', component: Home },
    { path: '/search/:ws', component: Search }
  ]
})
Home.vue
<div class="home">
    <div class="logo-box"></div>
    <div class="search-box">
      <input type="text">
      <button>搜索一下</button>
    </div>
    <div class="hot-link">
      热门搜索:
      <router-link to="/search/黑马程序员">黑马程序员</router-link>
      <router-link to="/search/前端培训">前端培训</router-link>
      <router-link to="/search/如何成为前端大牛">如何成为前端大牛</router-link>
    </div>
  </div>
Search.vue
<div class="search">
    <p>搜索关键字: {{ $route.params.ws }} </p>
    <p>搜索结果: </p>
    <ul>
      <li>.............</li>
      <li>.............</li>
      <li>.............</li>
      <li>.............</li>
    </ul>
  </div>
</template>

<script>
export default {
  name: 'MyFriend',
  created () {
    // 在created中,获取路由参数
    // this.$route.query.参数名 获取    -查询参数传参
    // this.$route.params.ws        -动态路由传参
    console.log(this.$route.params.ws);
  }
}
</script>
但是有个问题??
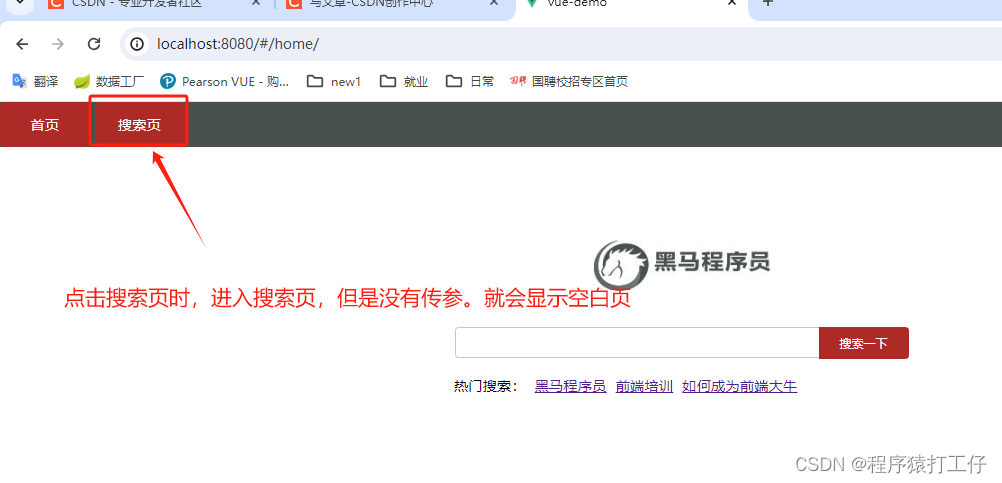
就会是这样,
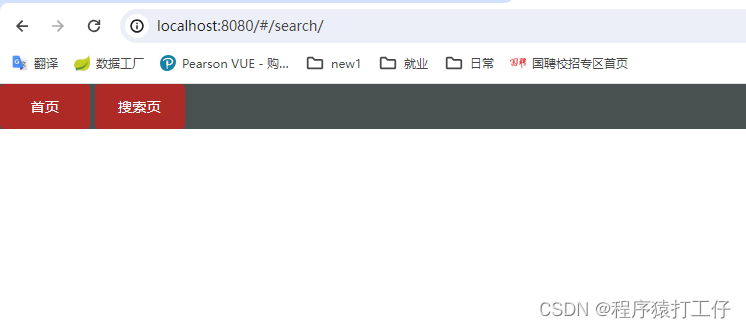
下面进行解决---->
动态路由参数可选符
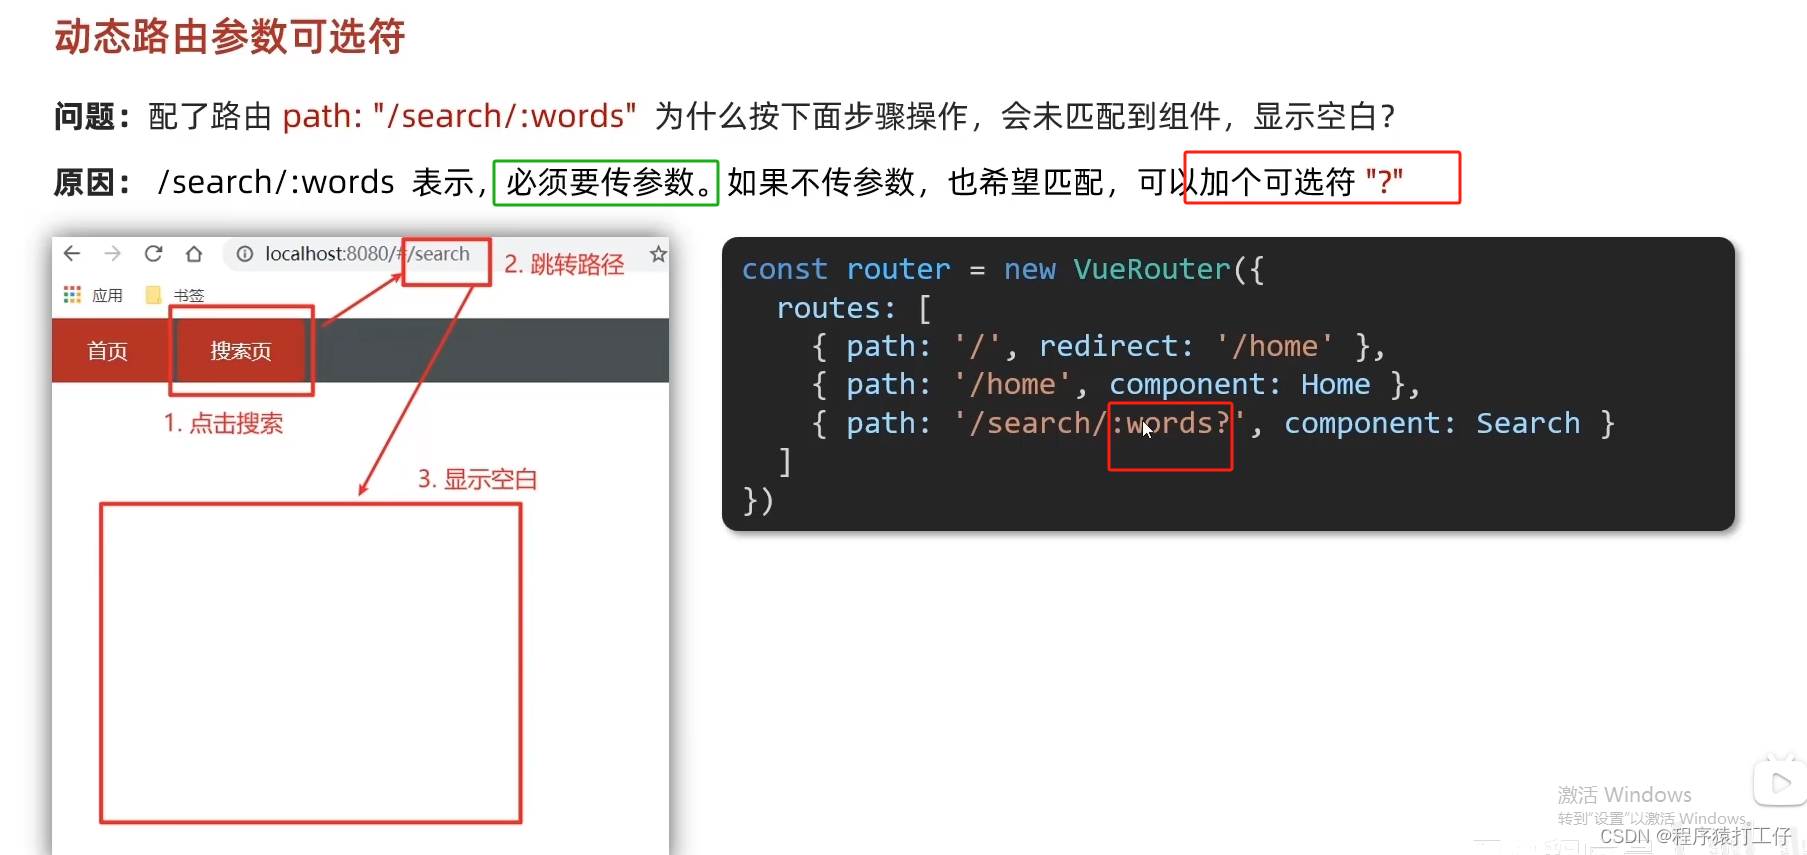
配置路由规则,在:名称后 加?
代码:
import Home from '@/views/Home'
import Search from '@/views/Search'
import Vue from 'vue'
import VueRouter from 'vue-router'
Vue.use(VueRouter) // VueRouter插件初始化

// 创建了一个路由对象
const router = new VueRouter({
  routes: [
    { path: '/home', component: Home },
    { path: '/search/:ws?', component: Search }
  ]
})

export default router
显示效果正常了
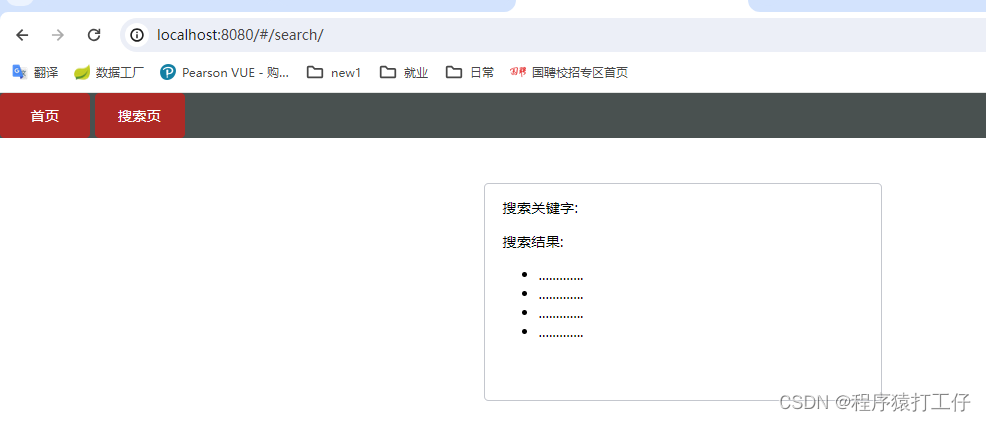
路由重定向
一 、主页面不显示问题,跳转主页
 路径 / 为 空白页 , 使用重定向跳转到主页
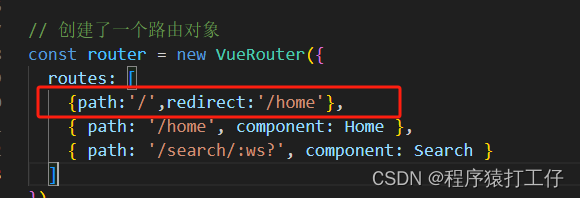
二、无匹配导航,跳转404页面
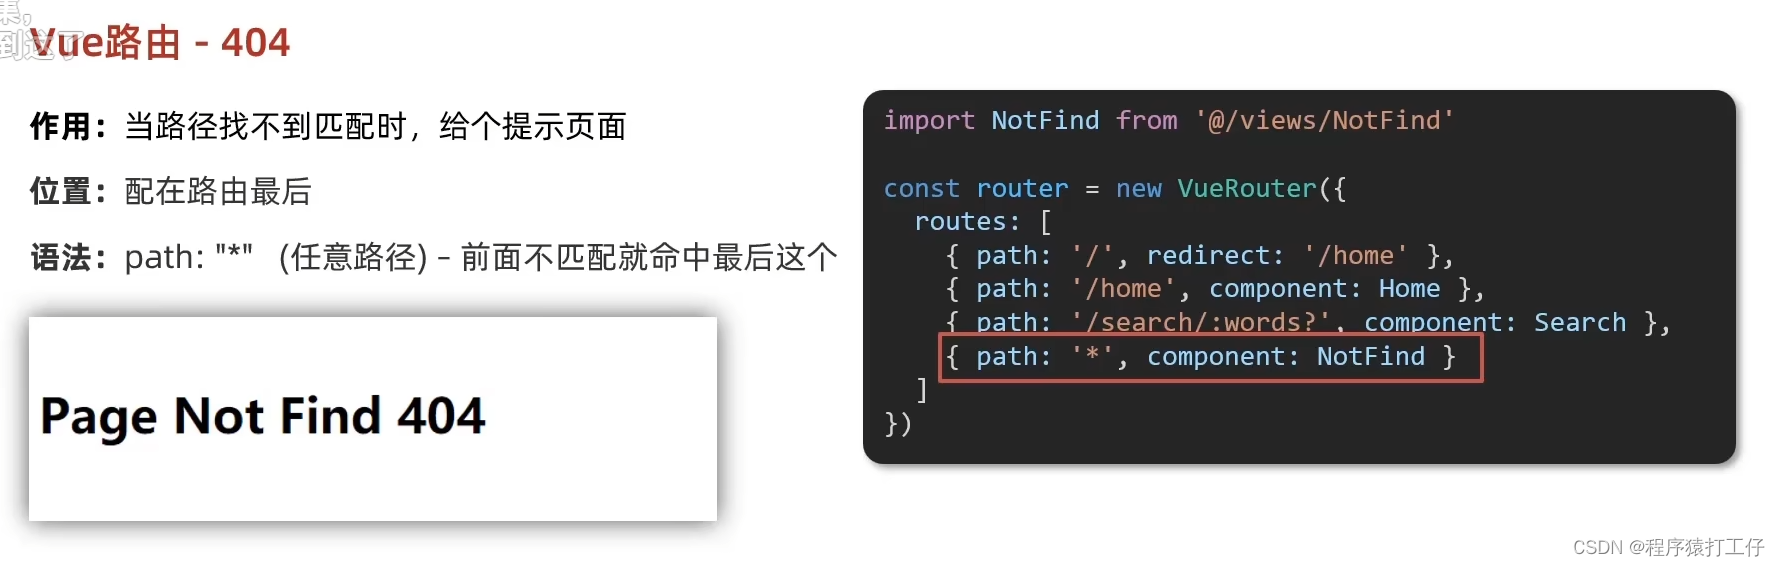
当路由前面的路径都没有匹配的时候,就会加载‘*’的组件
操作步骤:
1.写一个Not Found 组件
2.在路由中配置路由{ path: '*', component: NotFound }
一个没有的路径,就会跳转到404页面
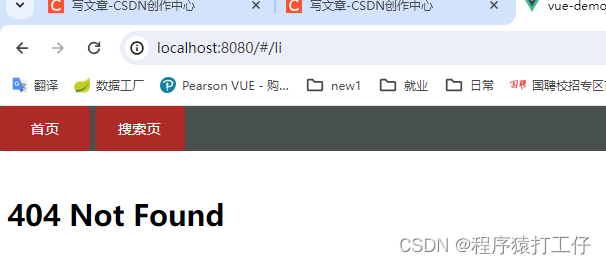
三、路由模式,消除路径#号
配置模式为history后,地址栏的#就会消失。(注意:要告诉后台配置访问规则)
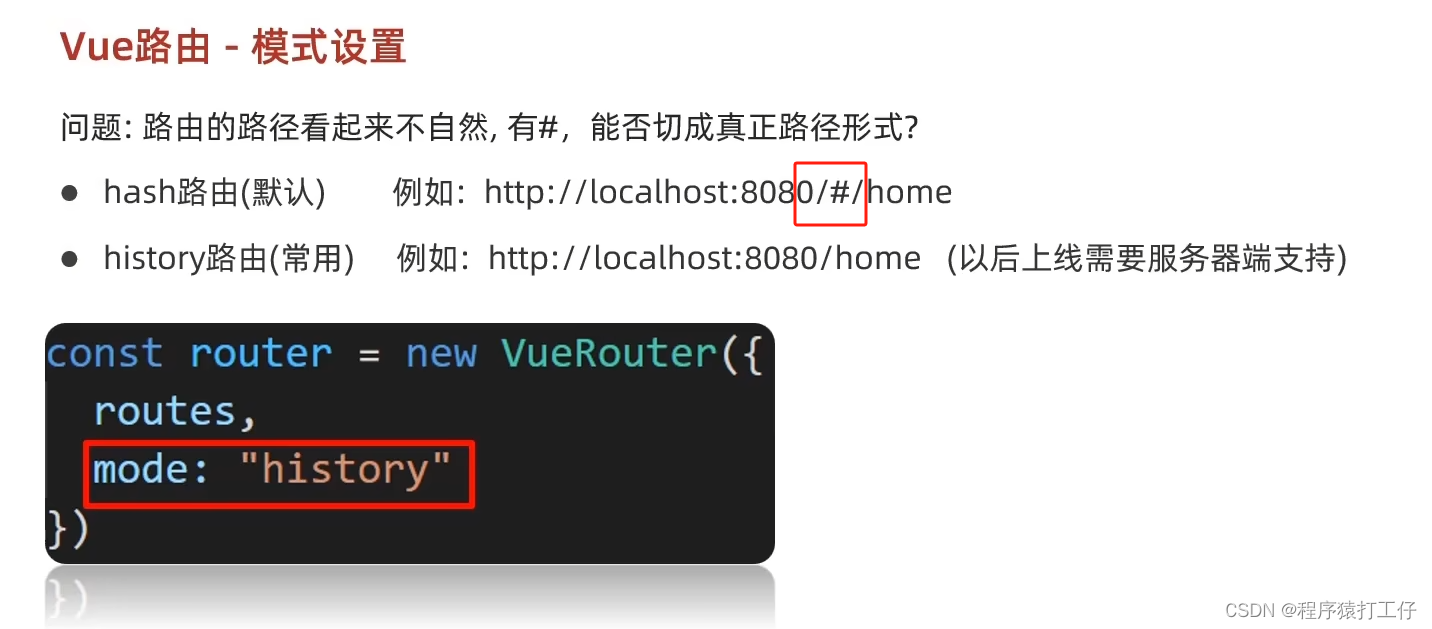
默认是hash模式
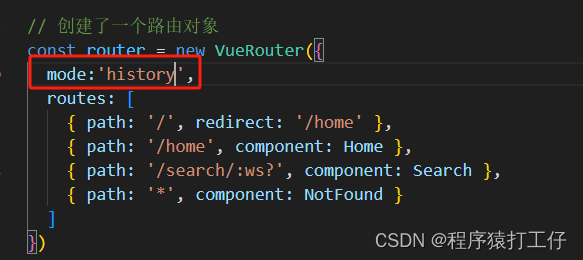
mode:'history',
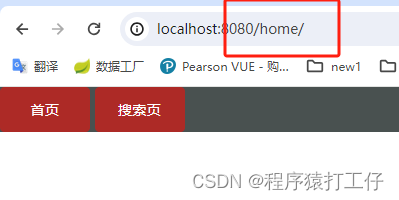
无#号了。
代码:
index.js
import Home from '@/views/Home'
import Search from '@/views/Search'
import Vue from 'vue'
import VueRouter from 'vue-router'
import NotFound from '@/views/NotFound'
Vue.use(VueRouter) // VueRouter插件初始化

// 创建了一个路由对象
const router = new VueRouter({
  //配置模式为history后,地址栏的#就会消失。(注意:要告诉后台配置访问规则)
  mode:'history',
  routes: [
    { path: '/', redirect: '/home' },
    { path: '/home', component: Home },
    { path: '/search/:ws?', component: Search },
    { path: '*', component: NotFound }
  ]
})

export default router
编程式导航-两种路由跳转方式
跳转方式
编程式导航:用js代码来进行跳转
一、第一种方式-path路径跳转
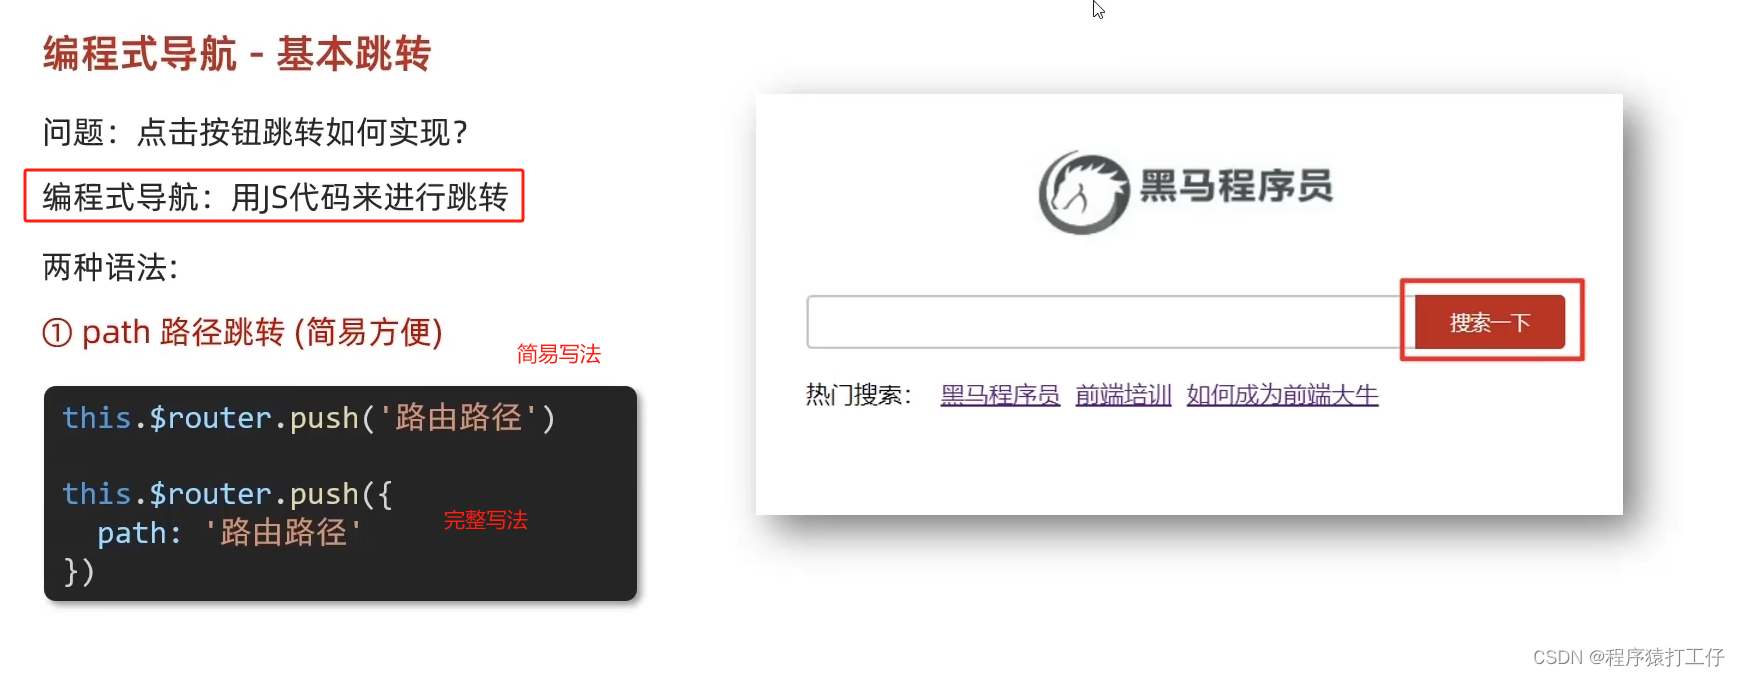
注意:这里用的是router,这是一个大的路由对象。
代码:
Home.vue
<template>
  <div class="home">
    <div class="logo-box"></div>
    <div class="search-box">
      <input type="text">
      <button @click="goSearch">搜索一下</button>
    </div>
    <div class="hot-link">
      热门搜索:
      <router-link to="/search/黑马程序员">黑马程序员</router-link>
      <router-link to="/search/前端培训">前端培训</router-link>
      <router-link to="/search/如何成为前端大牛">如何成为前端大牛</router-link>
    </div>
  </div>
</template>

<script>
export default {
  name: 'FindMusic',
  methods:{
    goSearch(){
      // 1.通过路径的方式跳转
      // (1) this.$router.push('路由路径') [简写]
      // this.$router.push('/search')

      // (2) this.$router.push({
      //        path:'路由路径'
      //     })
      this.$router.push({
        path:'/search'
      })
    }
  }
}
</script>

<style>
.logo-box {
  height: 150px;
  background: url('@/assets/logo.jpeg') no-repeat center;
}
.search-box {
  display: flex;
  justify-content: center;
}
.search-box input {
  width: 400px;
  height: 30px;
  line-height: 30px;
  border: 2px solid #c4c7ce;
  border-radius: 4px 0 0 4px;
  outline: none;
}
.search-box input:focus {
  border: 2px solid #ad2a26;
}
.search-box button {
  width: 100px;
  height: 36px;
  border: none;
  background-color: #ad2a26;
  color: #fff;
  position: relative;
  left: -2px;
  border-radius: 0 4px 4px 0;
}
.hot-link {
  width: 508px;
  height: 60px;
  line-height: 60px;
  margin: 0 auto;
}
.hot-link a {
  margin: 0 5px;
}
</style>
二、第二种方式-name命名路由跳转
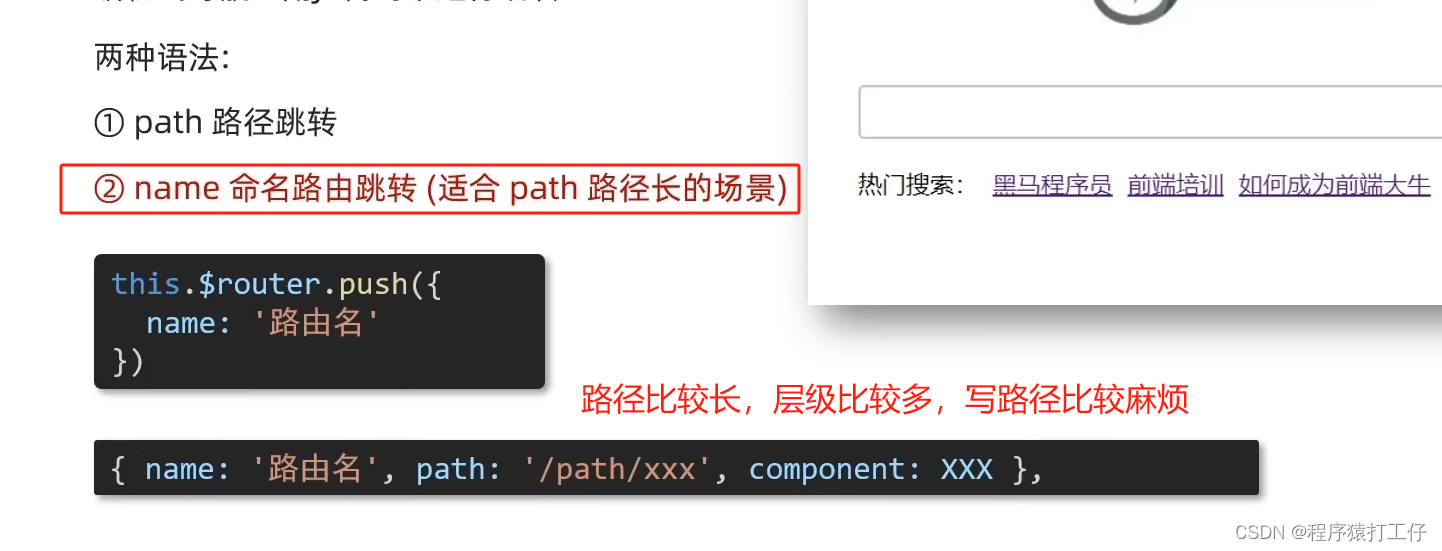
需要给路由起名字,配置name,通过name来跳转。
1.先配置name
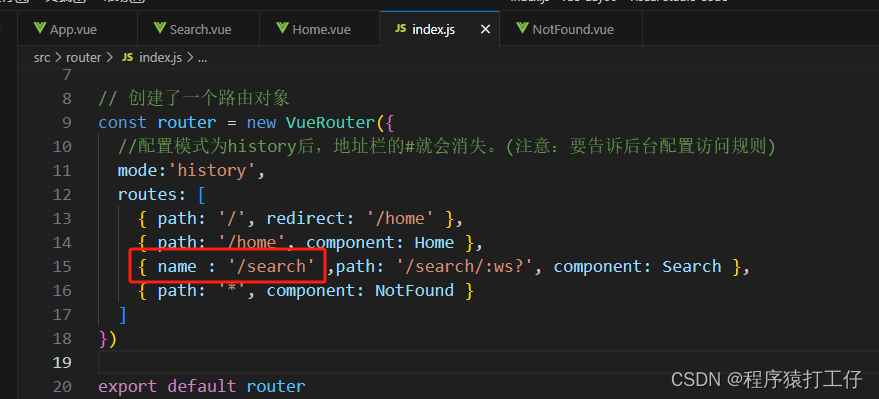
2.使用name来跳转
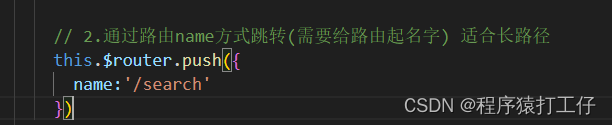
总结
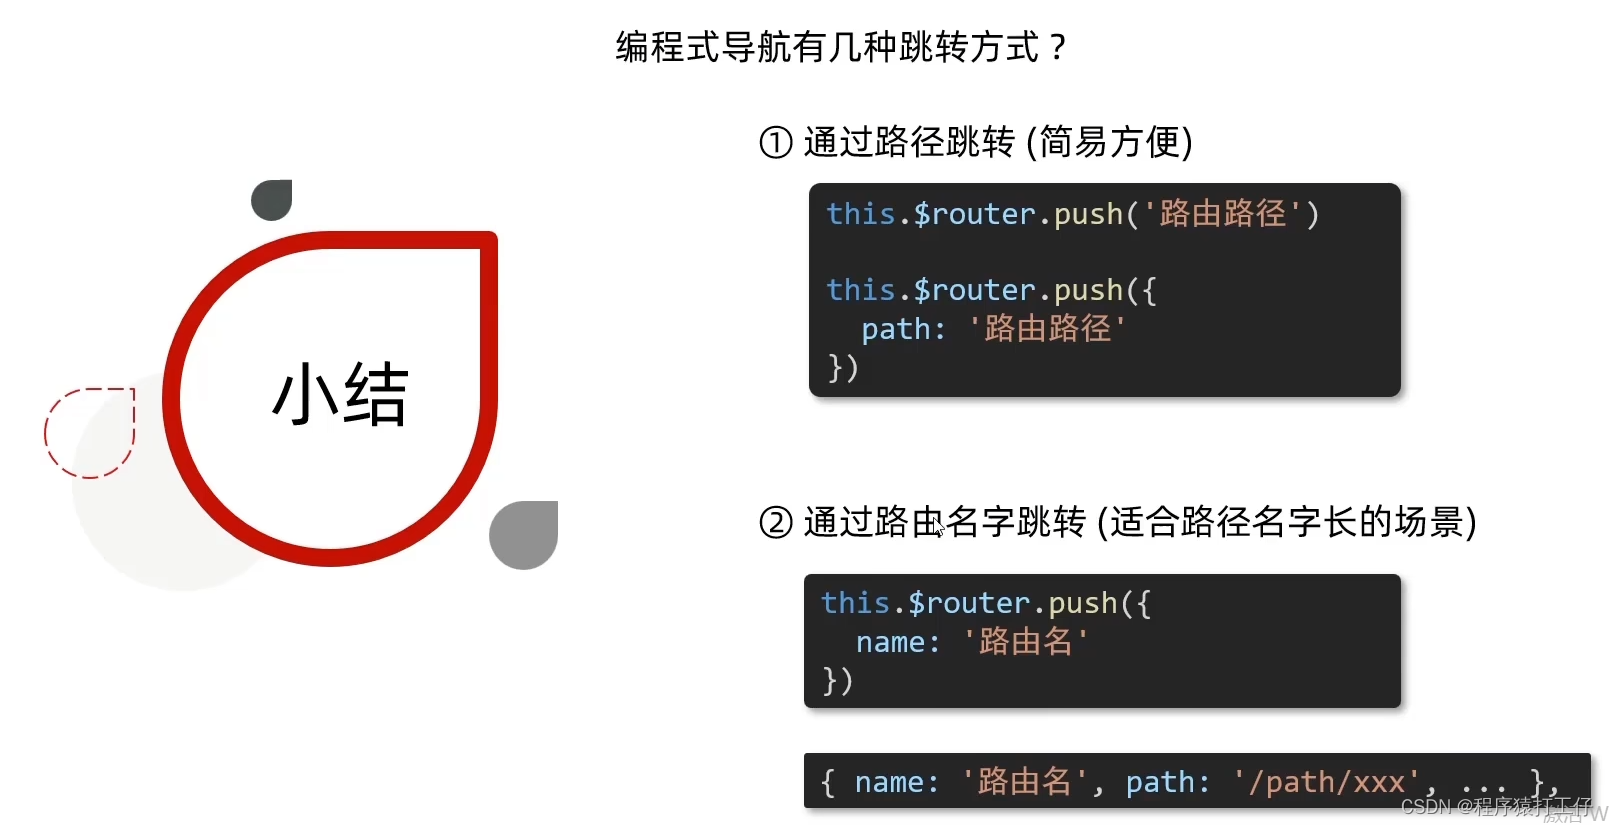
上面说完了跳转,接下来进行跳转传参。
跳转传参
path传参
对应两种传参方式-查询参数和动态路由传参,都可以
先来了解①path跳转传参----->
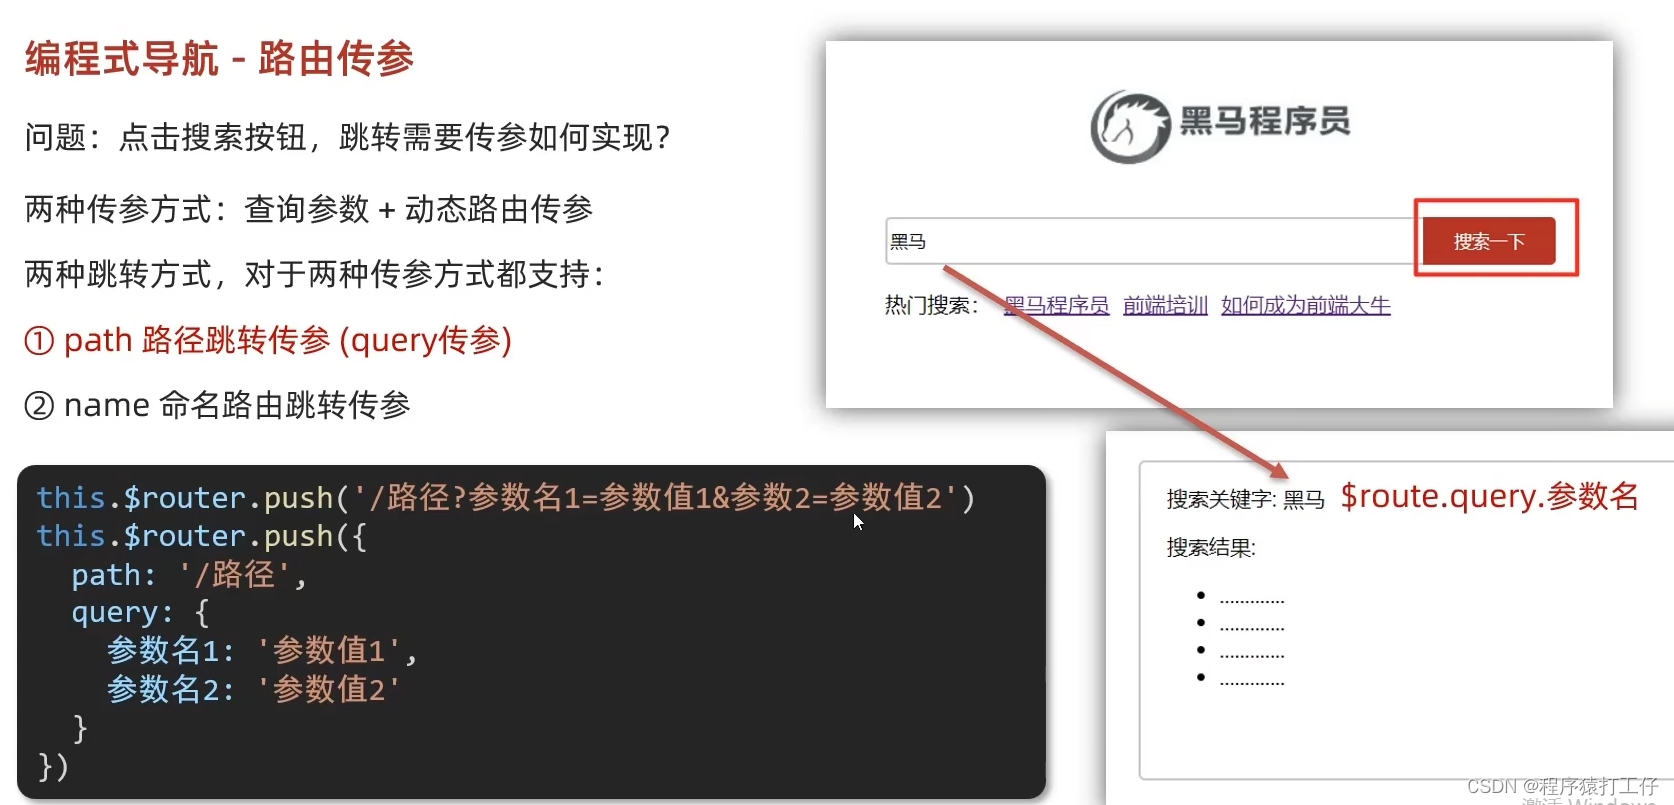
1.上面这种是查询参数传参。使用$route.query.参数名获取参数。这种方式,参数写在query{}中。
操作步骤:
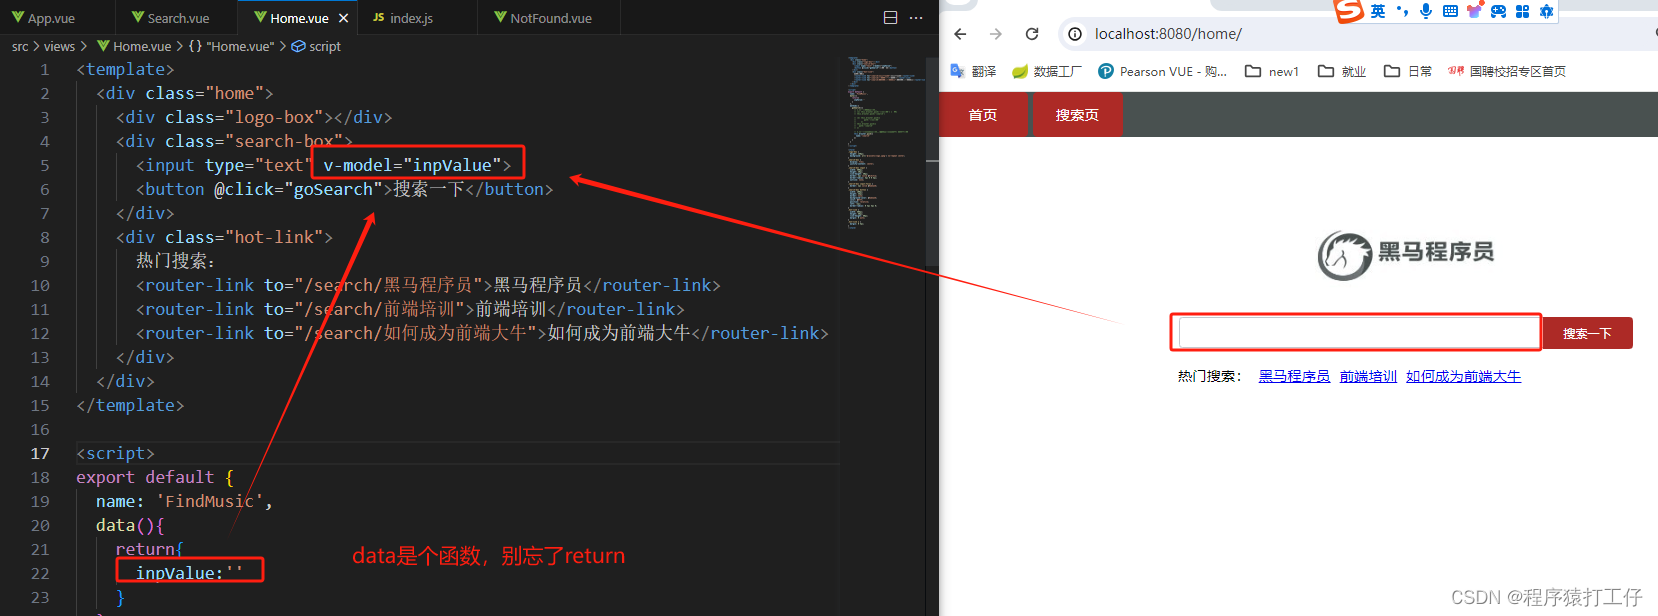
(1)将输入框进行双向绑定

 简写与完整写法
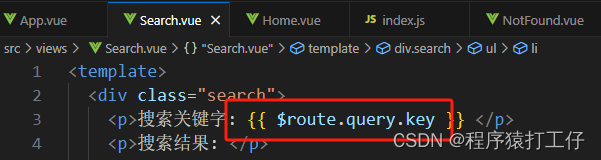
(2)使用``模版字符串在路径后方拼接参数 key=参数名。搜索页通过query.参数名接收参数。
代码:
Home.vue
<template>
  <div class="home">
    <div class="logo-box"></div>
    <div class="search-box">
      <input type="text" v-model="inpValue">
      <button @click="goSearch">搜索一下</button>
    </div>
    <div class="hot-link">
      热门搜索:
      <router-link to="/search/黑马程序员">黑马程序员</router-link>
      <router-link to="/search/前端培训">前端培训</router-link>
      <router-link to="/search/如何成为前端大牛">如何成为前端大牛</router-link>
    </div>
  </div>
</template>

<script>
export default {
  name: 'FindMusic',
  data(){
    return{
      inpValue:''
    }
  },
  methods:{
    goSearch(){
      // 1.通过路径的方式跳转
      // (1) this.$router.push('路由路径') [简写]
      // this.$router.push('/search')
      this.$router.push(`/search?key=${this.inpValue}`)

      // (2) this.$router.push({  [完整写法]
      //        path:'路由路径'
      //     })
      this.$router.push({
        path:'/search',
        query:{
          key:this.inpValue
        }
      })

      // 2.通过路由name方式跳转(需要给路由起名字) 适合长路径
      // this.$router.push({
      //   name:'/search'
      // })
    }
  }
}
</script>
Search.vue
<template>
  <div class="search">
    <p>搜索关键字: {{ $route.query.key }} </p>
    <p>搜索结果: </p>
    <ul>
      <li>.............</li>
      <li>.............</li>
      <li>.............</li>
      <li>.............</li>
    </ul>
  </div>
</template>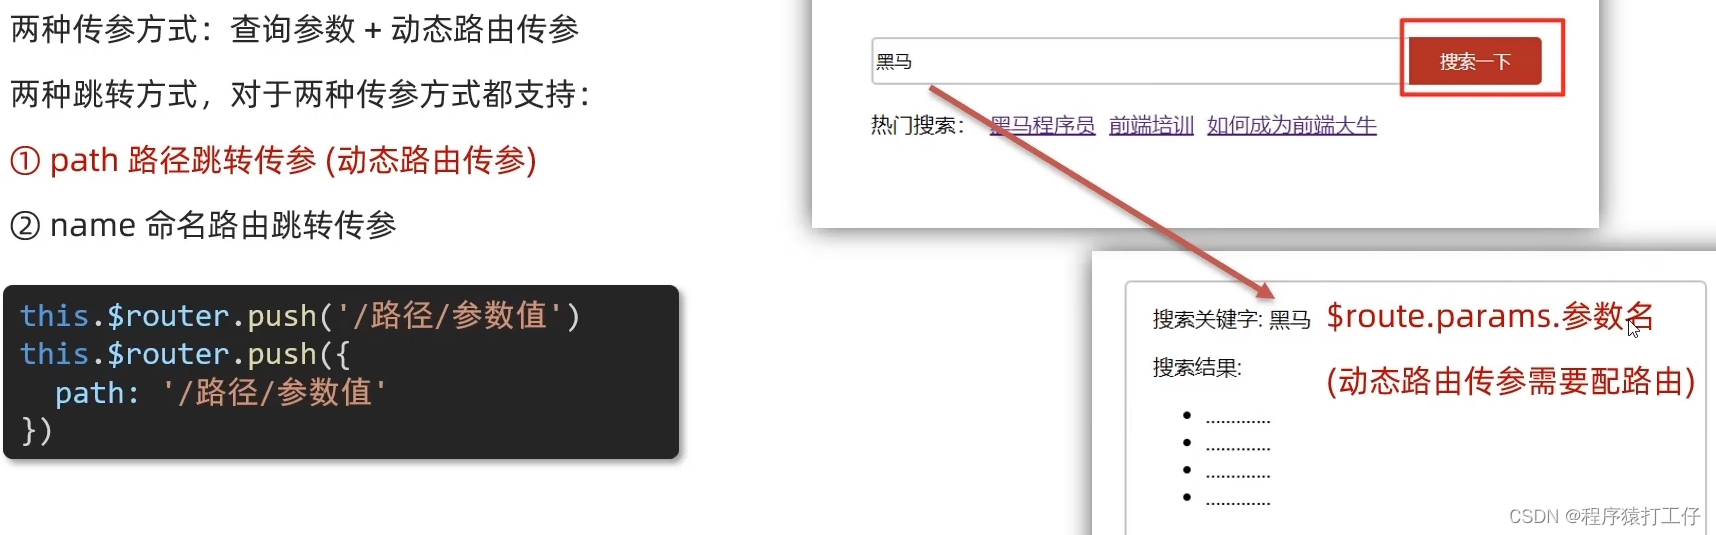
2.上面这种是利用动态路由传参。使用$route.params.参数名获取参数 。这种方式,参数直接写在路径后方
操作步骤:
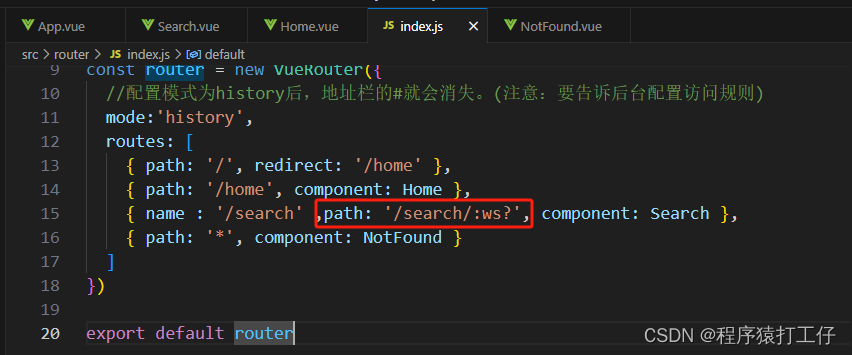
(1) 配置路由参数 :ws?
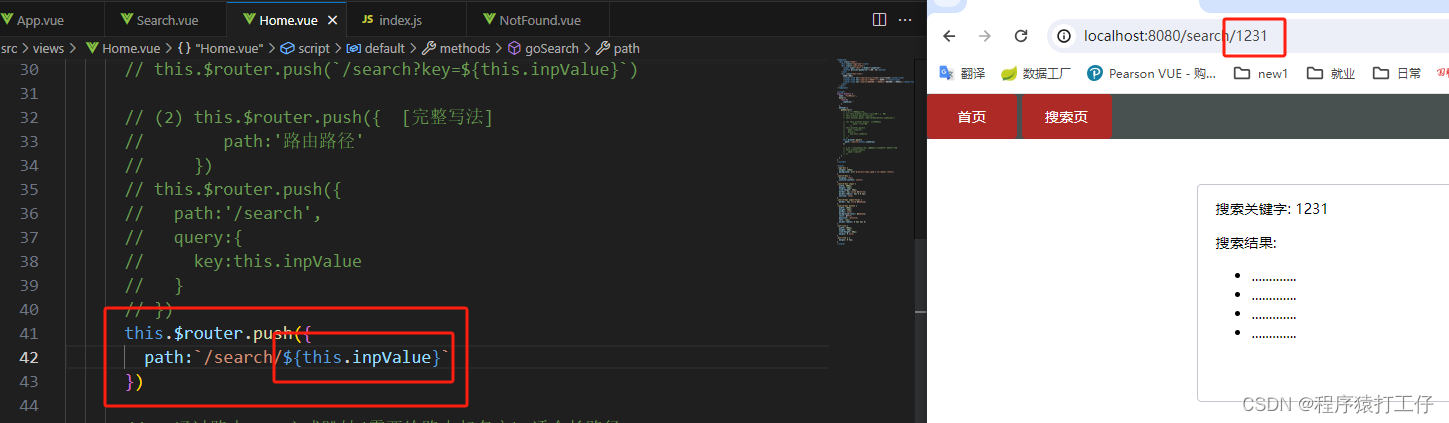
(2)使用模版字符串,在/后方添加参数
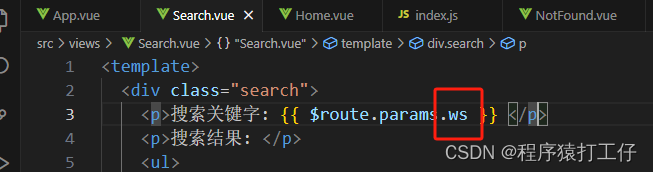
(3)修改搜索页的参数名(配置的名称要一致)
代码:
index.js 路由配置页面
import Home from '@/views/Home'
import Search from '@/views/Search'
import Vue from 'vue'
import VueRouter from 'vue-router'
import NotFound from '@/views/NotFound'
Vue.use(VueRouter) // VueRouter插件初始化

// 创建了一个路由对象
const router = new VueRouter({
  //配置模式为history后,地址栏的#就会消失。(注意:要告诉后台配置访问规则)
  mode:'history',
  routes: [
    { path: '/', redirect: '/home' },
    { path: '/home', component: Home },
    { name : '/search' ,path: '/search/:ws?', component: Search },
    { path: '*', component: NotFound }
  ]
})

export default router
Home.vue
this.$router.push({
        path:`/search/${this.inpValue}`
      })
Search.vue
<template>
  <div class="search">
    <p>搜索关键字: {{ $route.params.ws }} </p>
    <p>搜索结果: </p>
    <ul>
      <li>.............</li>
      <li>.............</li>
      <li>.............</li>
      <li>.............</li>
    </ul>
  </div>
</template>
name传参
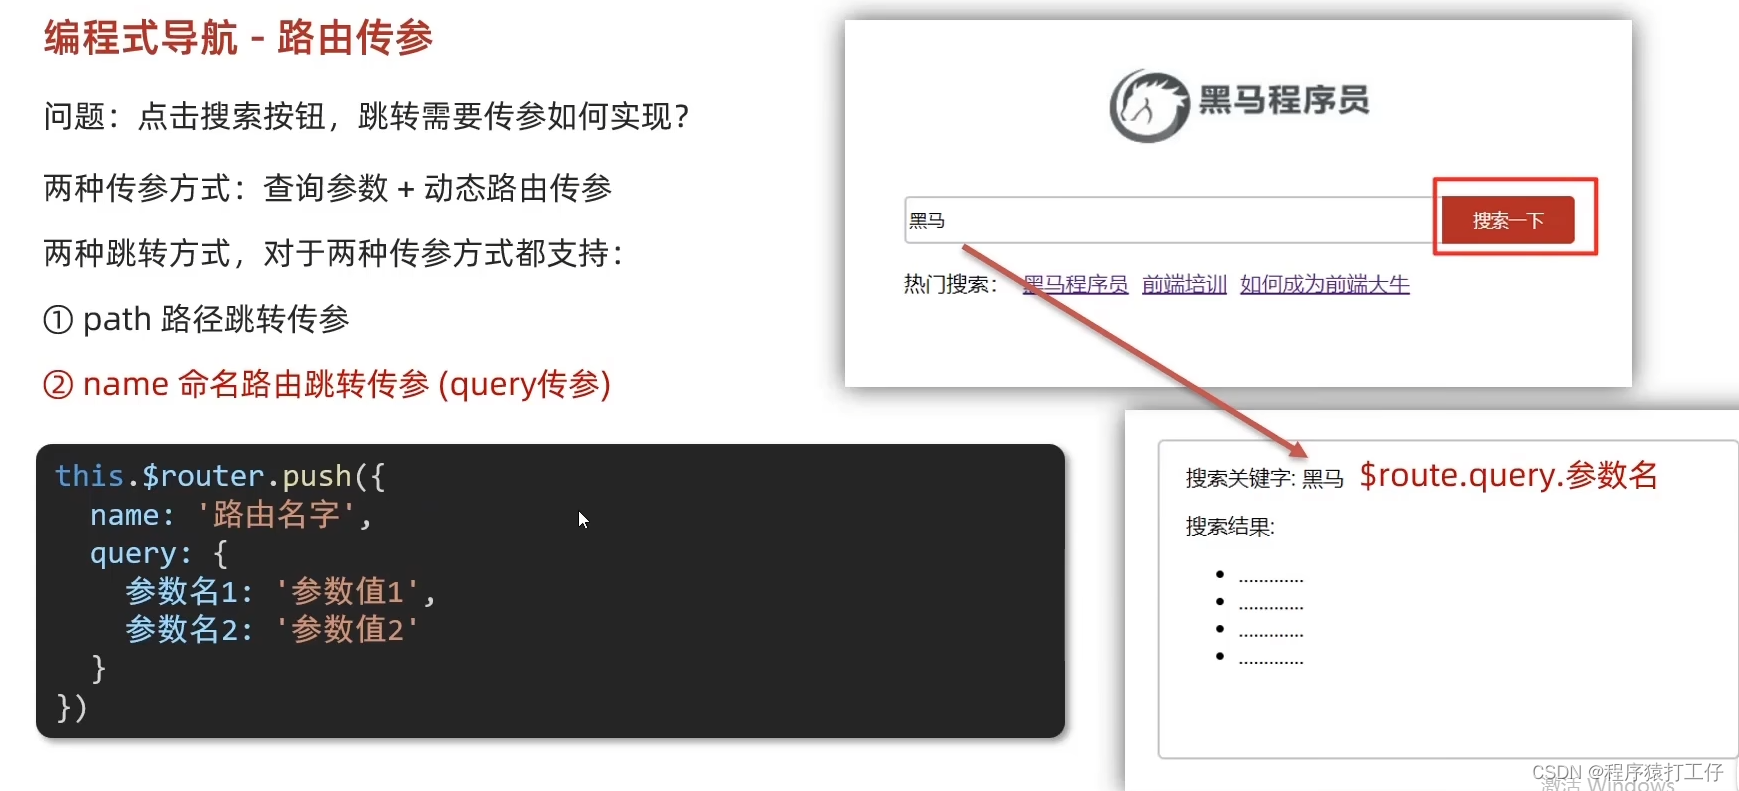
查询参数用query{}
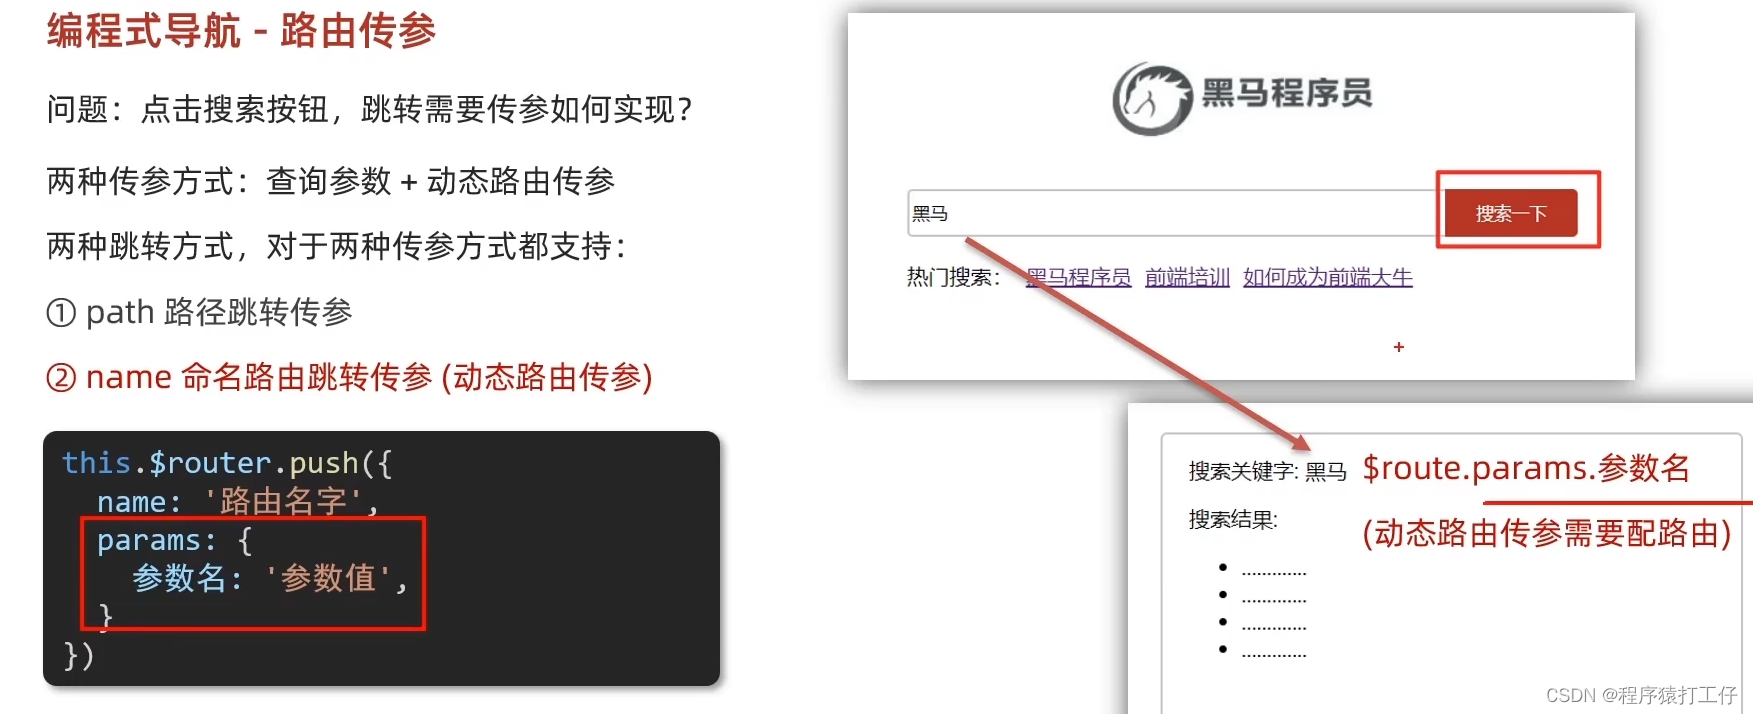
动态路由传参,用params。一一对应,接收的时候,用的就是$route.params.参数名
注意:动态路由传参的参数名要和配置的路由名称一样 ws(这里是)
name传参的两种传参方式区别:
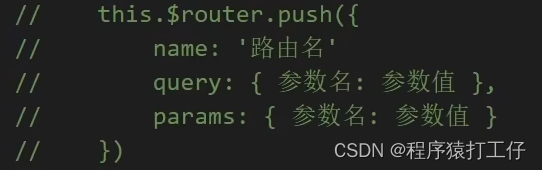
总结
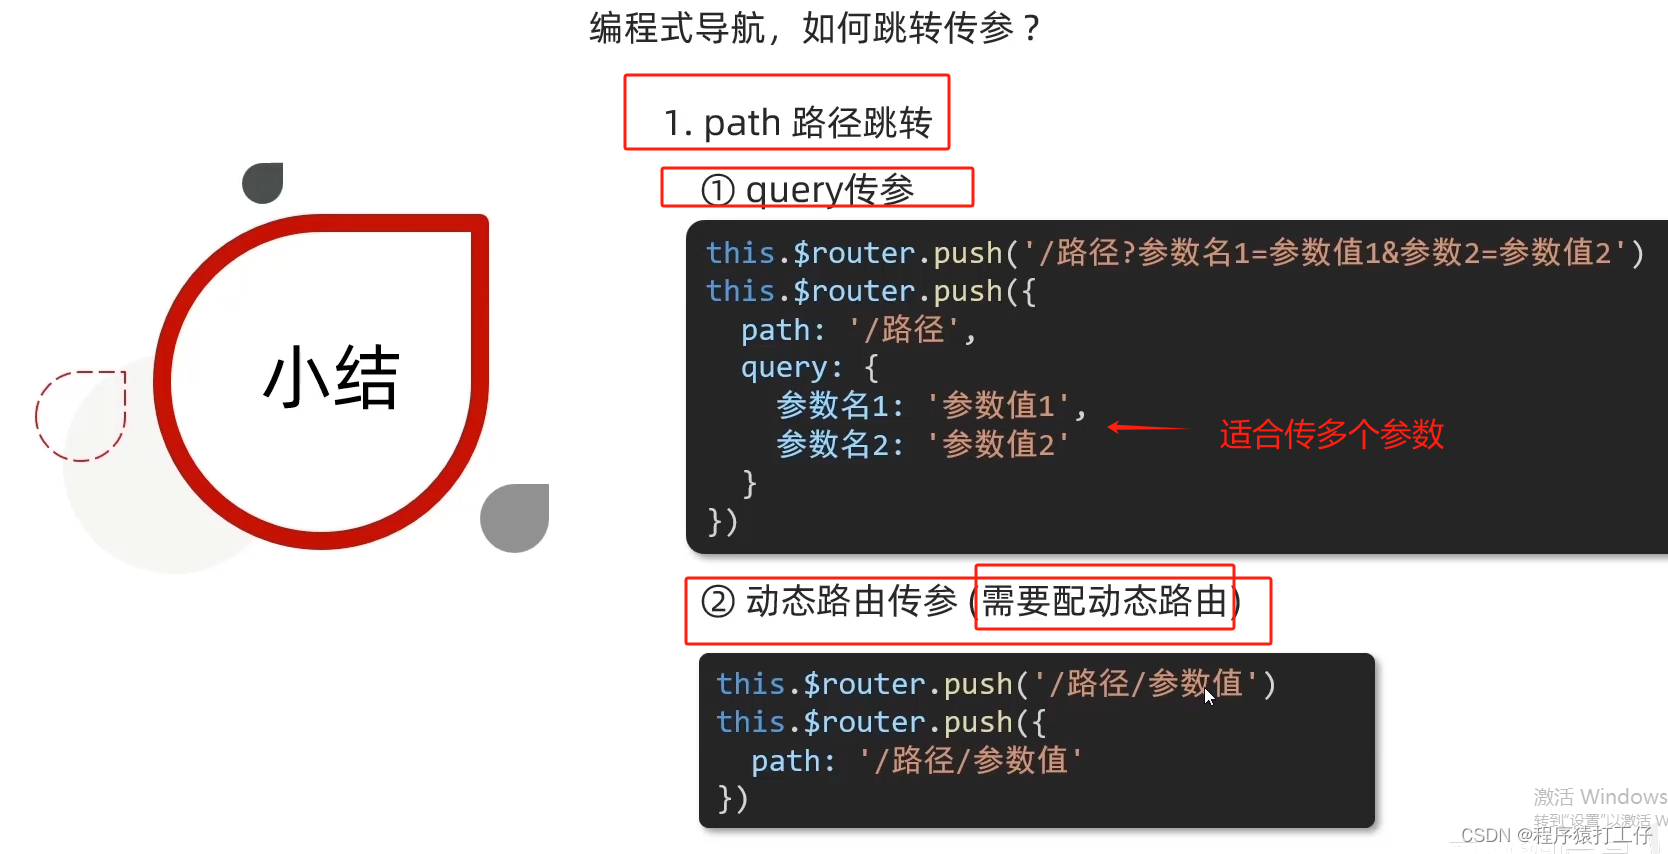
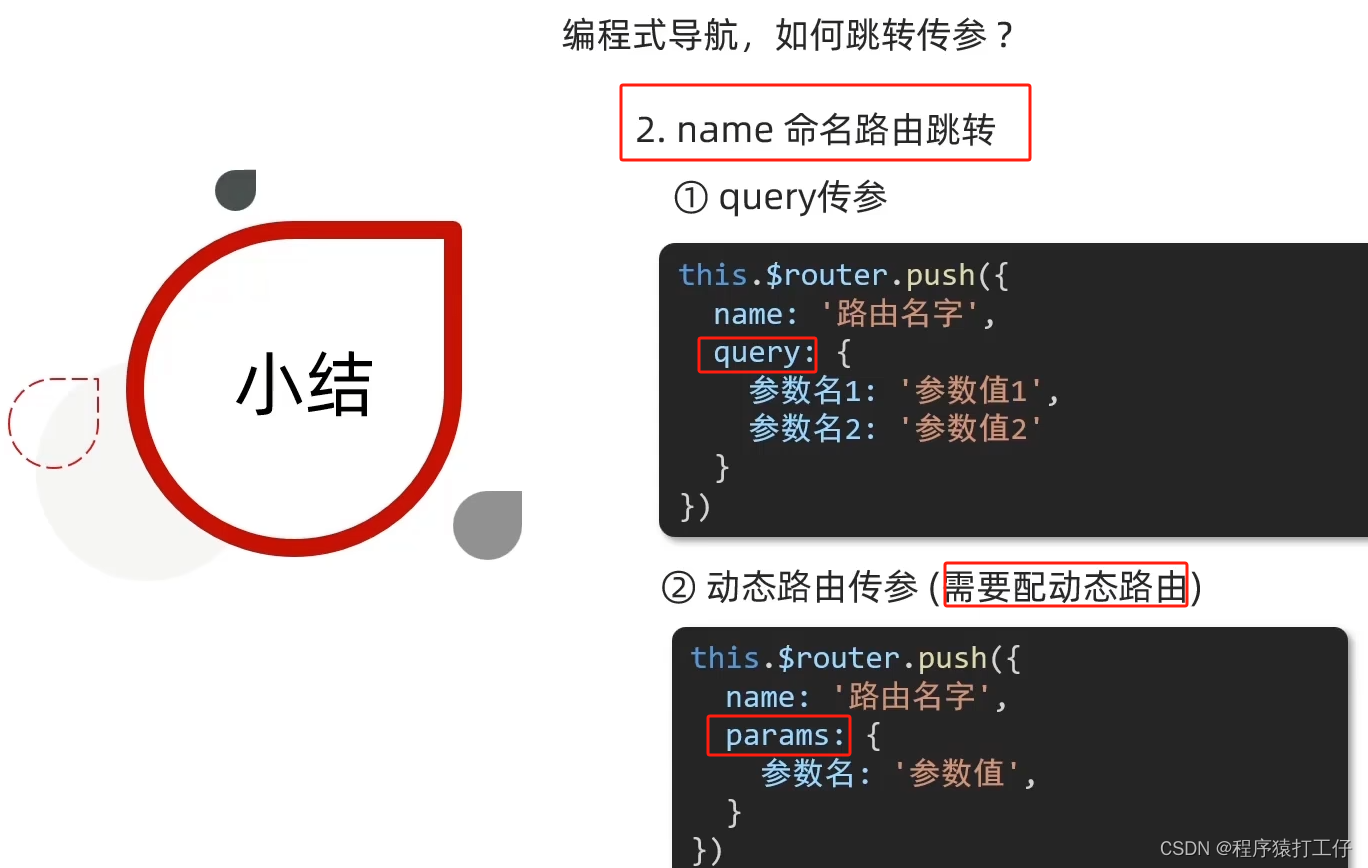
路径长用name,例如 /test/abc/po/.... 跳转方式
参数多,就用query传参。 传参方式


 1754
1754


 被折叠的 条评论
为什么被折叠?
被折叠的 条评论
为什么被折叠?
 到【灌水乐园】发言


