


@ContextConfiguration这个注解通常与@RunWith(SpringJUnit4ClassRunner.class)联合使用用来测试
当一个类添加了注解@Component,那么他就自动变成了一个bean,就不需要再Spring配置文件中显示的配置了。把这些bean收集起来通常有两种方式,Java的方式和XML的方式。当这些bean收集起来之后,当我们想要在某个测试类使用@Autowired注解来引入这些收集起来的bean时,只需要给这个测试类添加@ContextConfiguration注解来标注我们想要导入这个测试类的某些bean。
XML
我们先看看老年人使用的XML方式:
复制代码
<?xml version="1.0" encoding="UTF-8"?>
<beans xmlns=“http://www.springframework.org/schema/beans”
xmlns:xsi=“http://www.w3.org/2001/XMLSchema-instance” xmlns:p=“http://www.springframework.org/schema/p”
xmlns:context=“http://www.springframework.org/schema/context”
xsi:schemaLocation="http://www.springframework.org/schema/beans
http://www.springframework.org/schema/beans/spring-beans-3.1.xsd
http://www.springframework.org/schema/context
http://www.springframework.org/schema/context/spring-context-3.1.xsd >
复制代码
这个XML文件通过<context:component-scan base-package=“com” />标签将com包下的bean全都自动扫描进来。
下面我们就可以测试了。
一般这么写:
@RunWith(SpringJUnit4ClassRunner.class)
@ContextConfiguration(locations = {“classpath*😕*.xml”})
public class CDPlayerTest {
}
@ContextConfiguration括号里的locations = {“classpath*😕*.xml”}就表示将class路径里的所有.xml文件都包括进来,那么刚刚创建的那么XML文件就会包括进来,那么里面自动扫描的bean就都可以拿到了,此时就可以在测试类中使用@Autowired注解来获取之前自动扫描包下的所有bean
classpath和classpath*区别: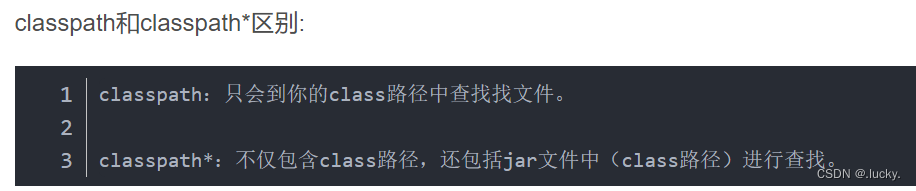


 3万+
3万+


 被折叠的 条评论
为什么被折叠?
被折叠的 条评论
为什么被折叠?
 到【灌水乐园】发言


