


文章目录
本篇是基于搭建好的Beast库实现的,主要是进行一些注册模块业务逻辑实现
基本页面设计
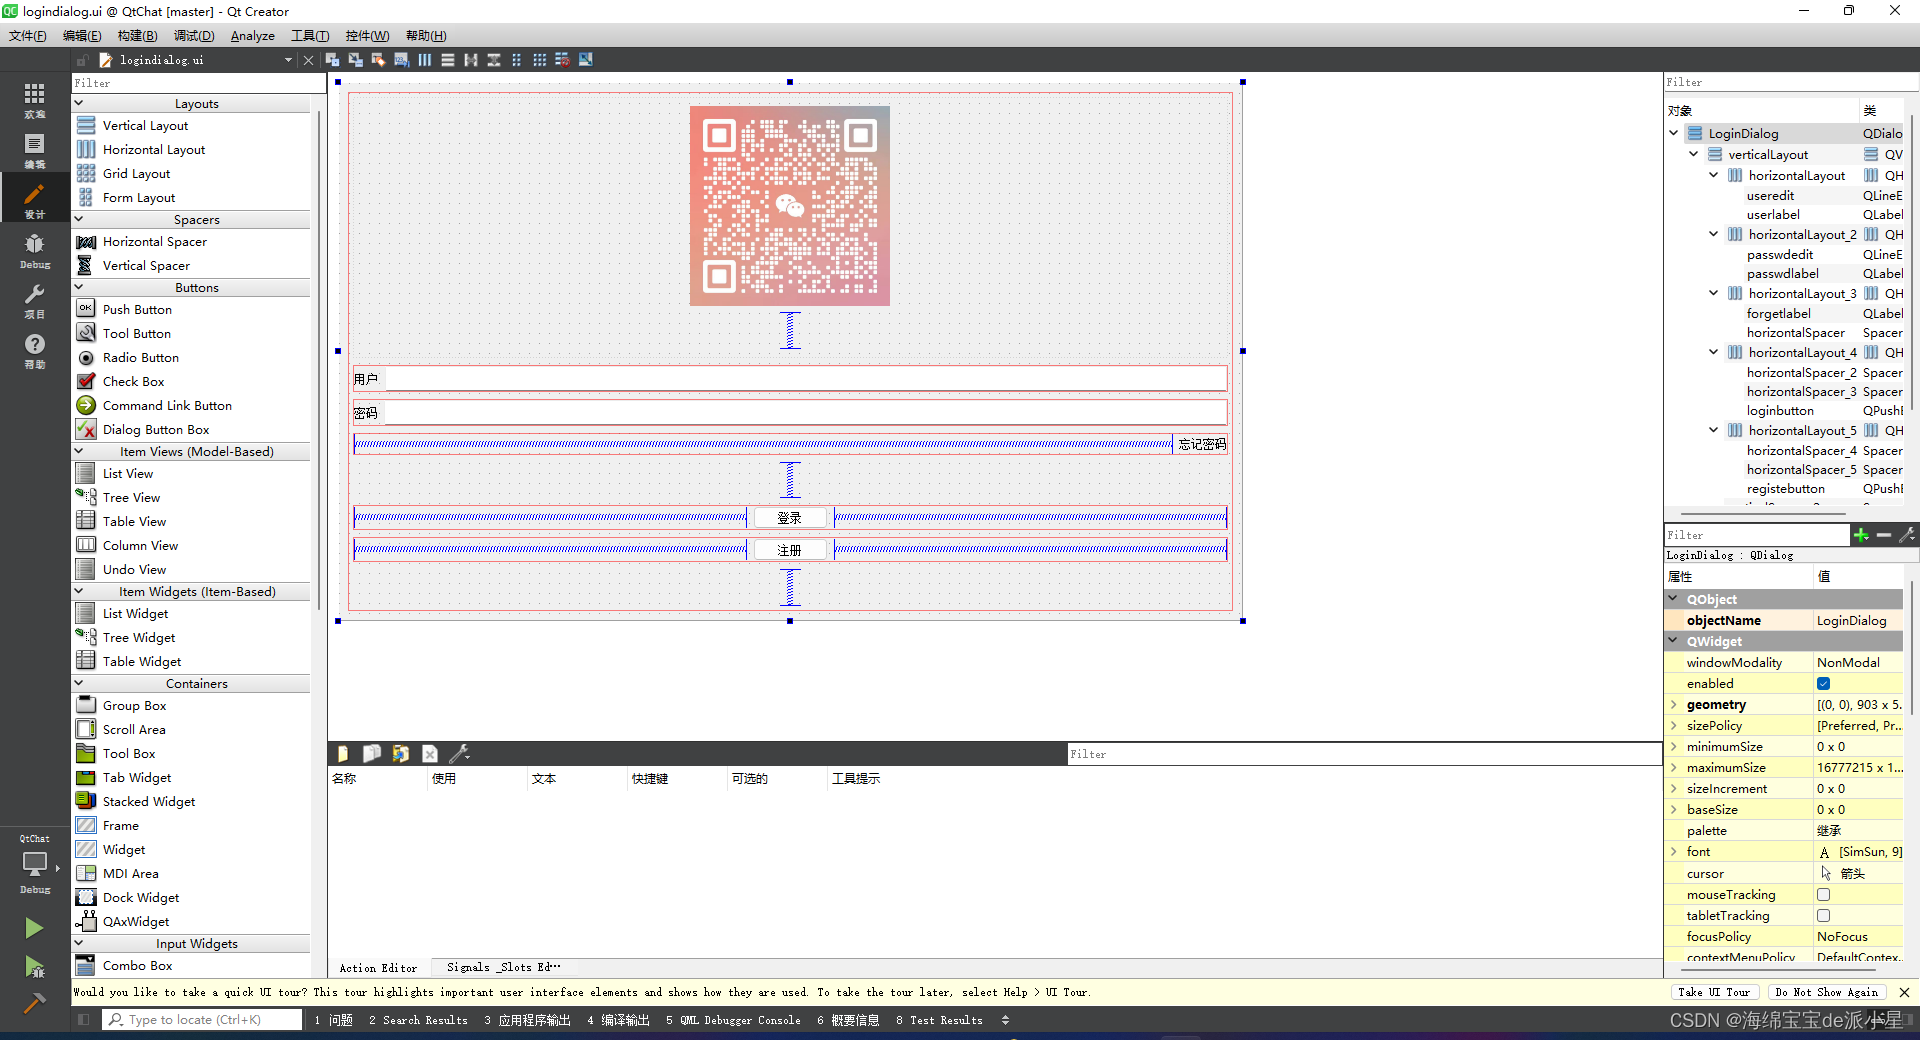
创建登录界面
右键项目,选择创建,点击设计师界面类
创建的名字就叫做LoginDialog。
将LoginDialog.ui修改为如下布局
在mainwindow.h中添加LoginDialog指针成员,然后在构造函数将LoginDialog设置为中心部件
MainWindow::MainWindow(QWidget *parent) :
    QMainWindow(parent),
    ui(new Ui::MainWindow)
{
    ui->setupUi(this);
    //创建一个CentralWidget, 并将其设置为MainWindow的中心部件
    _login_dlg = new LoginDialog();
    setCentralWidget(_login_dlg);
    _login_dlg->show();
}
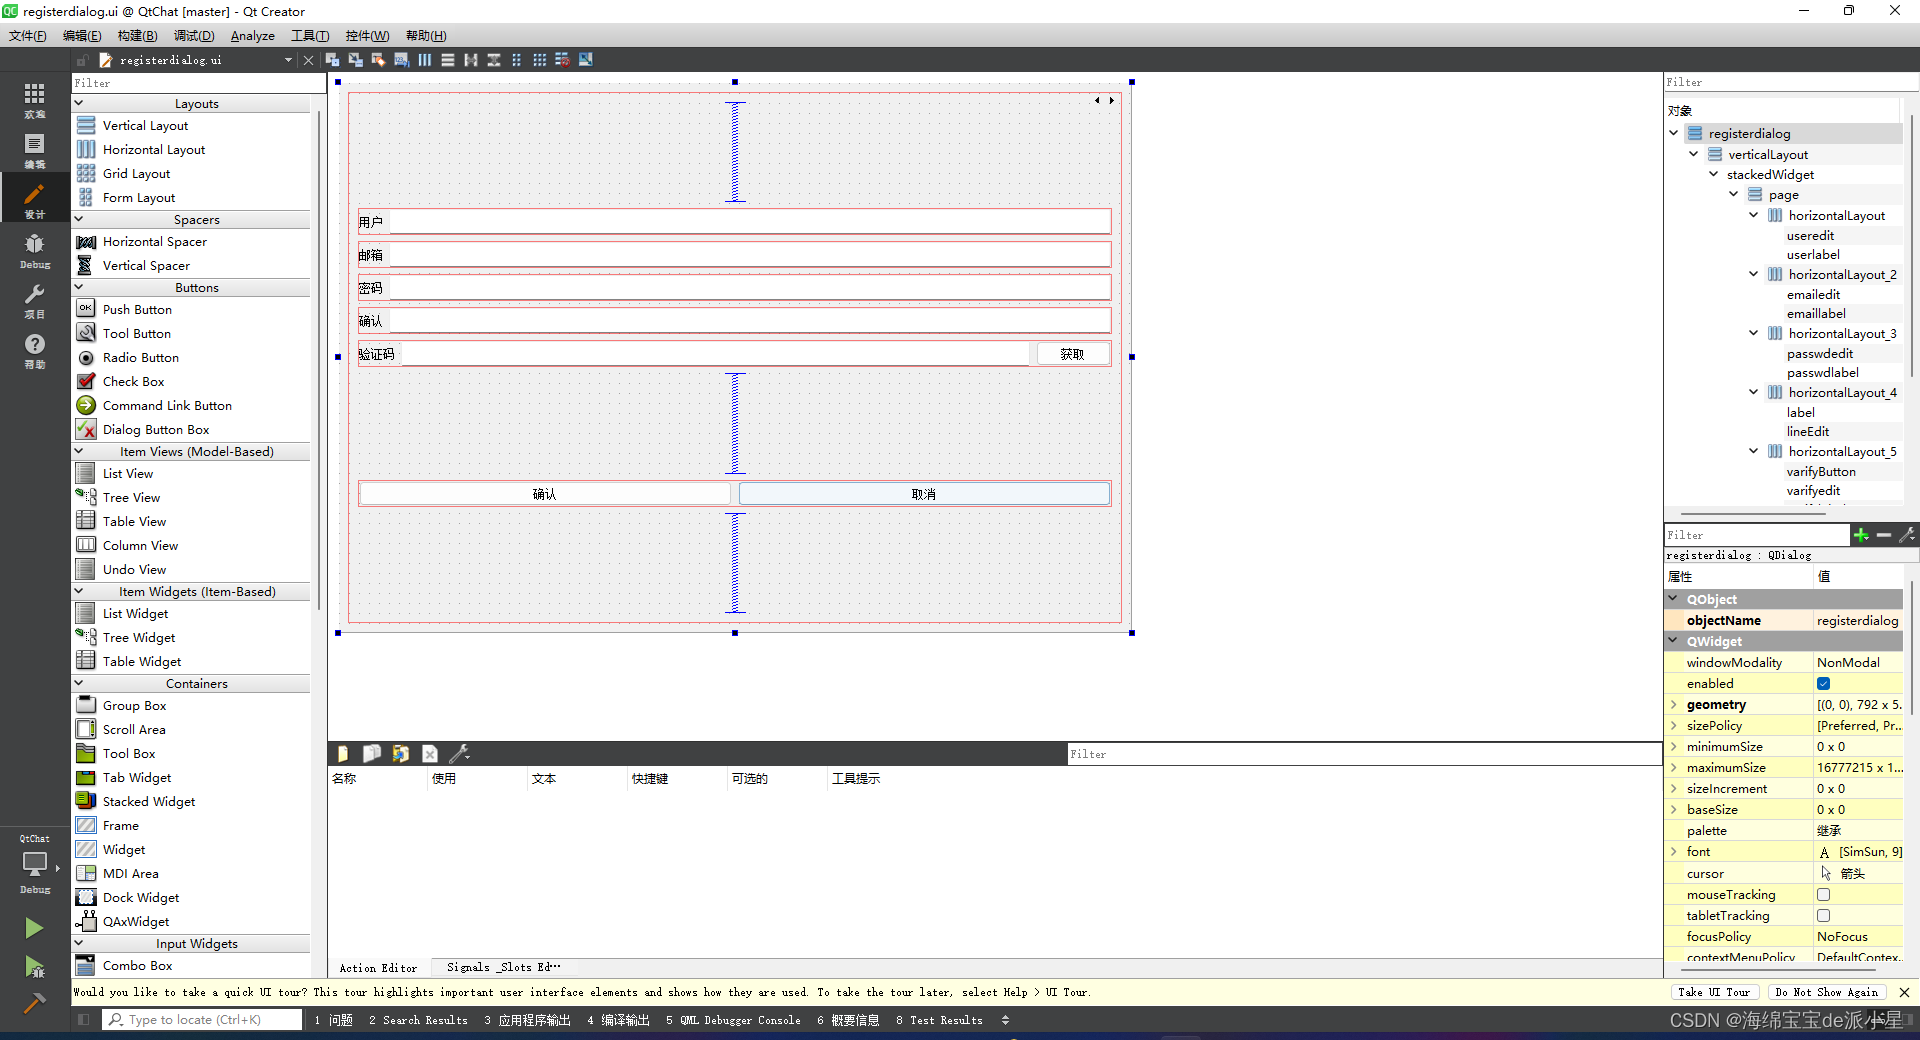
创建注册界面
注册界面创建方式和登录界面类似,我们创建的界面如下:
创建好界面后接下来在LoginDialog类声明里添加信号切换注册界面
signals:
    void switchRegister();
在LoginDialog的构造函数里连接按钮点击事件
connect(ui->reg_btn, &QPushButton::clicked, this, &LoginDialog::switchRegister);
按钮点击后LoginDialog发出switchRegister信号,该信号发送给MainWindow用来切换界面。
我们在MainWindow里声明注册类变量
private:
    RegisterDialog* _reg_dlg;
在其构造函数中添加注册类对象的初始化以及连接switchRegister信号
    //创建和注册消息的链接
    connect(_login_dlg, &LoginDialog::switchRegister,
            this, &MainWindow::SlotSwitchReg);
    _reg_dlg = new RegisterDialog();
接下来实现槽函数SlotSwitchReg
void MainWindow::SlotSwitchReg(){
    setCentralWidget(_reg_dlg);
    _login_dlg->hide();
    _reg_dlg->show();
}
这样启动程序主界面优先显示登录界面,点击注册后跳转到注册界面
优化样式
我们在项目根目录下创建style文件夹,在文件夹里创建stylesheet.qss文件,然后在qt项目中的rc.qrc右键添加现有文件,选择stylesheet.qss,这样qss就被导入到项目中了
在主程序启动后加载qss
int main(int argc, char *argv[])
{
    QApplication a(argc, argv);

    QFile qss(":/style/stylesheet.qss");

    if( qss.open(QFile::ReadOnly))
    {
        qDebug("open success");
        QString style = QLatin1String(qss.readAll());
        a.setStyleSheet(style);
        qss.close();
    }else{
         qDebug("Open failed");
     }

    MainWindow w;
    w.show();

    return a.exec();
}
然后我们写qss样式美化界面
QDialog#LoginDialog{
background-color:rgb(255,255,255)
}
完善注册类界面
先在注册类构造函数里添加lineEdit的模式为密码模式
ui->lineEdit_Passwd->setEchoMode(QLineEdit::Password);
ui->lineEdit_Confirm->setEchoMode(QLineEdit::Password);
在注册界面的ui里添加一个widget,widget内部包含一个tip居中显示,用来提示错误。设置label的显示为文字居中。
在qss里添加err_tip样式,根据不同的状态做字体显示
#err_tip[state='normal']{
   color: green;
}

#err_tip[state='err']{
   color: red;
}
接下来项目中添加global.h和global.cpp文件,global.h声明repolish函数,global.cpp用来定义这个函数。
.h中的声明
#ifndef GLOBAL_H
#define GLOBAL_H
#include <QWidget>
#include <functional>
#include "QStyle"
extern std::function<void(QWidget*)> repolish;

#endif // GLOBAL_H
.cpp中的定义
#include "global.h"

std::function<void(QWidget*)> repolish =[](QWidget *w){
    w->style()->unpolish(w);
    w->style()->polish(w);
};
在Register的构造函数中添加样式设置。
ui->err_tip->setProperty("state","normal");
repolish(ui->err_tip);
接下来实现获取验证码的逻辑,ui里关联get_code按钮的槽事件,并实现槽函数
void RegisterDialog::on_get_code_clicked()
{
    //验证邮箱的地址正则表达式
    auto email = ui->email_edit->text();
    // 邮箱地址的正则表达式
    QRegularExpression regex(R"((\w+)(\.|_)?(\w*)@(\w+)(\.(\w+))+)");
    bool match = regex.match(email).hasMatch(); // 执行正则表达式匹配
    if(match){
        //发送http请求获取验证码
    }else{
        //提示邮箱不正确
        showTip(tr("邮箱地址不正确"));
    }
}
在RegisterDialog中添加showTip函数
void RegisterDialog::showTip(QString str)
{
    ui->err_tip->setText(str);
    ui->err_tip->setProperty("state","err");
    repolish(ui->err_tip);
}
客户端逻辑完善
客户端增加post逻辑
之前在客户端实现了httpmgr的post请求,在点击获取验证码的槽函数里添加发送http的post请求即可
void RegisterDialog::on_get_code_clicked()
{
    //验证邮箱的地址正则表达式
    auto email = ui->email_edit->text();
    // 邮箱地址的正则表达式
    QRegularExpression regex(R"((\w+)(\.|_)?(\w*)@(\w+)(\.(\w+))+)");
    bool match = regex.match(email).hasMatch(); // 执行正则表达式匹配
    if(match){
        //发送http请求获取验证码
        QJsonObject json_obj;
        json_obj["email"] = email;
        HttpMgr::GetInstance()->PostHttpReq(QUrl("http://localhost:8080/get_varifycode"),
                     json_obj, ReqId::ID_GET_VARIFY_CODE,Modules::REGISTERMOD);

    }else{
        //提示邮箱不正确
        showTip(tr("邮箱地址不正确"),false);
    }
}
当服务器不启动,客户端输入邮箱,点击获取验证码,客户端会收到网络连接失败的提示
启动服务器后,再次获取验证码,就显示正确提示了
客户端配置管理
我们发现客户端代码中很多参数都是写死的,最好通过配置文件管理,我们在代码所在目录中新建一个config.ini文件, 内部添加配置
[GateServer]
host=localhost
port=8080
接着右键项目添加现有文件config.ini即可加入项目中
global.h中添加声明
extern QString gate_url_prefix;
在cpp中添加定义
QString gate_url_prefix = "";
在main函数中添加解析配置的逻辑
// 获取当前应用程序的路径
QString app_path = QCoreApplication::applicationDirPath();
// 拼接文件名
QString fileName = "config.ini";
QString config_path = QDir::toNativeSeparators(app_path +
                        QDir::separator() + fileName);

QSettings settings(config_path, QSettings::IniFormat);
QString gate_host = settings.value("GateServer/host").toString();
QString gate_port = settings.value("GateServer/port").toString();
gate_url_prefix = "http://"+gate_host+":"+gate_port;
将RegisterDialog发送post请求修改为
 HttpMgr::GetInstance()->PostHttpReq(QUrl(gate_url_prefix+"/get_varifycode"),
                     json_obj, ReqId::ID_GET_VARIFY_CODE,Modules::REGISTERMOD);
再次测试仍旧可以收到服务器回馈的http包
这么做的好处就是客户端增加了配置,而且以后修改参数也方便
邮箱注册服务
认证服务
认证服务要给邮箱发送验证码,所以用nodejs较为合适,nodejs是一门IO效率很高而且生态完善的语言,用到发送邮件的库也方便。
新建VarifyServer文件夹,在文件夹内部初始化server要用到的nodejs库的配置文件
npm init
根据提示同意会创建一个package.json文件
接着安装proto-loader用来动态解析proto文件
npm install @grpc/proto-loader
再安装email处理的库
npm install nodemailer
将proto文件放入VarifyServer文件夹,并且新建一个proto.js用来解析proto文件
const path = require('path')
const grpc = require('@grpc/grpc-js')
const protoLoader = require('@grpc/proto-loader')

const PROTO_PATH = path.join(__dirname, 'message.proto')
const packageDefinition = protoLoader.loadSync(PROTO_PATH, { keepCase: true, longs: String, enums: String, defaults: true, oneofs: true })
const protoDescriptor = grpc.loadPackageDefinition(packageDefinition)

const message_proto = protoDescriptor.message

module.exports = message_proto
keepCase: 如果为 true,则保留字段名的原始大小写。如果为 false,则将所有字段名转换为驼峰命名法。
longs: 控制如何表示 Protocol Buffers 中的 long 类型。如果设置为 String,则长整数会被转换为字符串,以避免 JavaScript 中的整数溢出问题。
enums: 控制如何表示 Protocol Buffers 中的枚举类型。如果设置为 String,则枚举值会被转换为字符串。
defaults: 如果为 true,则为未明确设置的字段提供默认值。
oneofs: 如果为 true,则支持 Protocol Buffers 中的 oneof 特性。
在写代码发送邮件之前,我们先去邮箱开启smtp服务。我用的163邮箱,在邮箱设置中查找smtp服务器地址,需要开启smtp服务。这个是固定的,不需要修改。
网易163邮箱的 SMTP 服务器地址为: smtp.163.com
发送邮件,建议使用授权码(有的邮箱叫 独立密码),确保邮箱密码的安全性。授权码在邮箱设置中进行设置。如果开启了授权码,发送邮件的时候,必须使用授权码
读取配置
因为我们要实现参数可配置,所以要读取配置,先在文件夹内创建一个config.json文件
{
    "email": {
      "user": "xxxxxxx@163.com",
      "pass": ""
    },
}
user是我们得邮箱地址,pass是邮箱得授权码,只有有了授权码才能用代码发邮件。大家记得把授权码改为你们自己的,否则用我的无法发送成功。
另外我们也要用到一些常量和全局得变量,所以定义一个const.js
let code_prefix = "code_";

const Errors = {
    Success : 0,
    RedisErr : 1,
    Exception : 2,
};


module.exports = {code_prefix,Errors}
新建config.js用来读取配置
const fs = require('fs');

let config = JSON.parse(fs.readFileSync('config.json', 'utf8'));
let email_user = config.email.user;
let email_pass = config.email.pass;
let mysql_host = config.mysql.host;
let mysql_port = config.mysql.port;
let redis_host = config.redis.host;
let redis_port = config.redis.port;
let redis_passwd = config.redis.passwd;
let code_prefix = "code_";


module.exports = {email_pass, email_user, mysql_host, mysql_port,redis_host, redis_port, redis_passwd, code_prefix}
接下来封装发邮件的模块,新建一个email.js文件
const nodemailer = require('nodemailer');
const config_module = require("./config")

/**
 * 创建发送邮件的代理
 */
let transport = nodemailer.createTransport({
    host: 'smtp.163.com',
    port: 465,
    secure: true,
    auth: {
        user: config_module.email_user, // 发送方邮箱地址
        pass: config_module.email_pass // 邮箱授权码或者密码
    }
});
接下来实现发邮件函数
/**
 * 发送邮件的函数
 * @param {*} mailOptions_ 发送邮件的参数
 * @returns
 */
function SendMail(mailOptions_){
    return new Promise(function(resolve, reject){
        transport.sendMail(mailOptions_, function(error, info){
            if (error) {
                console.log(error);
                reject(error);
            } else {
                console.log('邮件已成功发送:' + info.response);
                resolve(info.response)
            }
        });
    })

}

module.exports.SendMail = SendMail
因为transport.SendMail相当于一个异步函数,调用该函数后发送的结果是通过回调函数通知的,所以我们没办法同步使用,需要用Promise封装这个调用,抛出Promise给外部,那么外部就可以通过await或者then catch的方式处理了
新建server.js,用来启动grpc server
async function GetVarifyCode(call, callback) {
    console.log("email is ", call.request.email)
    try{
        uniqueId = uuidv4();
        console.log("uniqueId is ", uniqueId)
        let text_str =  '您的验证码为'+ uniqueId +'请三分钟内完成注册'
        //发送邮件
        let mailOptions = {
            from: 'secondtonone1@163.com',
            to: call.request.email,
            subject: '验证码',
            text: text_str,
        };

        let send_res = await emailModule.SendMail(mailOptions);
        console.log("send res is ", send_res)

        callback(null, { email:  call.request.email,
            error:const_module.Errors.Success
        });


    }catch(error){
        console.log("catch error is ", error)

        callback(null, { email:  call.request.email,
            error:const_module.Errors.Exception
        });
    }

}

function main() {
    var server = new grpc.Server()
    server.addService(message_proto.VarifyService.service, { GetVarifyCode: GetVarifyCode })
    server.bindAsync('0.0.0.0:50051', grpc.ServerCredentials.createInsecure(), () => {
        server.start()
        console.log('grpc server started')
    })
}

main()
GetVarifyCode声明为async是为了能在内部调用await
邮箱验证服务联调
启动GateServer和VarifyServer
GateServer收到Client发送的请求后,会调用grpc 服务 访问VarifyServer,VarifyServer会随机生成验证码,并且调用邮箱模块发送邮件给指定邮箱。而且把发送的结果给GateServer,GateServer再将消息回传给客户端
设置验证码过期
我们的验证码是要设置过期的,可以用redis管理过期的验证码自动删除,key为邮箱,value为验证码,过期时间为3min
封装redis操作类
因为hredis提供的操作太别扭了,所以需要手动封装redis操作类,简化调用流程
class RedisMgr: public Singleton<RedisMgr>,
	public std::enable_shared_from_this<RedisMgr>
{
	friend class Singleton<RedisMgr>;
public:
	~RedisMgr();
	bool Connect(const std::string& host, int port);
	bool Get(const std::string &key, std::string& value);
	bool Set(const std::string &key, const std::string &value);
	bool Auth(const std::string &password);
	bool LPush(const std::string &key, const std::string &value);
	bool LPop(const std::string &key, std::string& value);
	bool RPush(const std::string& key, const std::string& value);
	bool RPop(const std::string& key, std::string& value);
	bool HSet(const std::string &key, const std::string  &hkey, const std::string &value);
	bool HSet(const char* key, const char* hkey, const char* hvalue, size_t hvaluelen);
	std::string HGet(const std::string &key, const std::string &hkey);
	bool Del(const std::string &key);
	bool ExistsKey(const std::string &key);
	void Close();
private:
	RedisMgr();

	redisContext* _connect;
	redisReply* _reply;
};
封装redis连接池
class RedisConPool {
public:
	RedisConPool(size_t poolSize, const char* host, int port, const char* pwd)
		: poolSize_(poolSize), host_(host), port_(port), b_stop_(false){
		for (size_t i = 0; i < poolSize_; ++i) {
			auto* context = redisConnect(host, port);
			if (context == nullptr || context->err != 0) {
				if (context != nullptr) {
					redisFree(context);
				}
				continue;
			}

			auto reply = (redisReply*)redisCommand(context, "AUTH %s", pwd);
			if (reply->type == REDIS_REPLY_ERROR) {
				std::cout << "认证失败" << std::endl;
				//执行成功 释放redisCommand执行后返回的redisReply所占用的内存
				freeReplyObject(reply);
				continue;
			}

			//执行成功 释放redisCommand执行后返回的redisReply所占用的内存
			freeReplyObject(reply);
			std::cout << "认证成功" << std::endl;
			connections_.push(context);
		}

	}

	~RedisConPool() {
		std::lock_guard<std::mutex> lock(mutex_);
		while (!connections_.empty()) {
			connections_.pop();
		}
	}

	redisContext* getConnection() {
		std::unique_lock<std::mutex> lock(mutex_);
		cond_.wait(lock, [this] {
			if (b_stop_) {
				return true;
			}
			return !connections_.empty();
			});
		//如果停止则直接返回空指针
		if (b_stop_) {
			return  nullptr;
		}
		auto* context = connections_.front();
		connections_.pop();
		return context;
	}

	void returnConnection(redisContext* context) {
		std::lock_guard<std::mutex> lock(mutex_);
		if (b_stop_) {
			return;
		}
		connections_.push(context);
		cond_.notify_one();
	}

	void Close() {
		b_stop_ = true;
		cond_.notify_all();
	}

private:
	atomic<bool> b_stop_;
	size_t poolSize_;
	const char* host_;
	int port_;
	std::queue<redisContext*> connections_;
	std::mutex mutex_;
	std::condition_variable cond_;
};
RedisMgr构造函数中初始化pool连接池
RedisMgr::RedisMgr() {
	auto& gCfgMgr = ConfigMgr::Inst();
	auto host = gCfgMgr["Redis"]["Host"];
	auto port = gCfgMgr["Redis"]["Port"];
	auto pwd = gCfgMgr["Redis"]["Passwd"];
	_con_pool.reset(new RedisConPool(5, host.c_str(), atoi(port.c_str()), pwd.c_str()));
}
在析构函数中回收资源
RedisMgr::~RedisMgr() {
	Close();
}

void RedisMgr::Close() {
	_con_pool->Close();
}
在使用的时候改为从Pool中获取链接
bool RedisMgr::Get(const std::string& key, std::string& value)
{
	auto connect = _con_pool->getConnection();
	if (connect == nullptr) {
		return false;
	}
	 auto reply = (redisReply*)redisCommand(connect, "GET %s", key.c_str());
	 if (reply == NULL) {
		 std::cout << "[ GET  " << key << " ] failed" << std::endl;
		 freeReplyObject(reply);
		 _con_pool->returnConnection(connect);
		  return false;
	}

	 if (reply->type != REDIS_REPLY_STRING) {
		 std::cout << "[ GET  " << key << " ] failed" << std::endl;
		 freeReplyObject(reply);
		 _con_pool->returnConnection(connect);
		 return false;
	}

	 value = reply->str;
	 freeReplyObject(reply);

	 std::cout << "Succeed to execute command [ GET " << key << "  ]" << std::endl;
	 _con_pool->returnConnection(connect);
	 return true;
}
注册功能
实现注册功能,先实现客户端发送post请求, 将注册ui中确定按钮改为sure_btn,并为其添加click槽函数
void RegisterDialog::on_sure_btn_clicked()
{
    if(ui->user_edit->text() == ""){
        showTip(tr("用户名不能为空"), false);
        return;
    }

    if(ui->email_edit->text() == ""){
        showTip(tr("邮箱不能为空"), false);
        return;
    }

    if(ui->pass_edit->text() == ""){
        showTip(tr("密码不能为空"), false);
        return;
    }

    if(ui->confirm_edit->text() == ""){
        showTip(tr("确认密码不能为空"), false);
        return;
    }

    if(ui->confirm_edit->text() != ui->pass_edit->text()){
        showTip(tr("密码和确认密码不匹配"), false);
        return;
    }

    if(ui->varify_edit->text() == ""){
        showTip(tr("验证码不能为空"), false);
        return;
    }

    QJsonObject json_obj;
    json_obj["user"] = ui->user_edit->text();
    json_obj["email"] = ui->email_edit->text();
    json_obj["passwd"] = ui->pass_edit->text();
    json_obj["confirm"] = ui->confirm_edit->text();
    json_obj["varifycode"] = ui->varify_edit->text();
    HttpMgr::GetInstance()->PostHttpReq(QUrl(gate_url_prefix+"/user_register"),
                 json_obj, ReqId::ID_REG_USER,Modules::REGISTERMOD);
}
再添加http请求回复后收到处理流程
void RegisterDialog::initHttpHandlers()
{
    //...省略
    //注册注册用户回包逻辑
    _handlers.insert(ReqId::ID_REG_USER, [this](QJsonObject jsonObj){
        int error = jsonObj["error"].toInt();
        if(error != ErrorCodes::SUCCESS){
            showTip(tr("参数错误"),false);
            return;
        }
        auto email = jsonObj["email"].toString();
        showTip(tr("用户注册成功"), true);
        qDebug()<< "email is " << email ;
    });
}
Server端接受注册请求
Server注册user_register逻辑
RegPost("/user_register", [](std::shared_ptr<HttpConnection> connection) {
    auto body_str = boost::beast::buffers_to_string(connection->_request.body().data());
    std::cout << "receive body is " << body_str << std::endl;
    connection->_response.set(http::field::content_type, "text/json");
    Json::Value root;
    Json::Reader reader;
    Json::Value src_root;
    bool parse_success = reader.parse(body_str, src_root);
    if (!parse_success) {
        std::cout << "Failed to parse JSON data!" << std::endl;
        root["error"] = ErrorCodes::Error_Json;
        std::string jsonstr = root.toStyledString();
        beast::ostream(connection->_response.body()) << jsonstr;
        return true;
    }
    //先查找redis中email对应的验证码是否合理
    std::string  varify_code;
    bool b_get_varify = RedisMgr::GetInstance()->Get(src_root["email"].asString(), varify_code);
    if (!b_get_varify) {
        std::cout << " get varify code expired" << std::endl;
        root["error"] = ErrorCodes::VarifyExpired;
        std::string jsonstr = root.toStyledString();
        beast::ostream(connection->_response.body()) << jsonstr;
        return true;
    }

    if (varify_code != src_root["varifycode"].asString()) {
        std::cout << " varify code error" << std::endl;
        root["error"] = ErrorCodes::VarifyCodeErr;
        std::string jsonstr = root.toStyledString();
        beast::ostream(connection->_response.body()) << jsonstr;
        return true;
    }

    //访问redis查找
    bool b_usr_exist = RedisMgr::GetInstance()->ExistsKey(src_root["user"].asString());
    if (b_usr_exist) {
        std::cout << " user exist" << std::endl;
        root["error"] = ErrorCodes::UserExist;
        std::string jsonstr = root.toStyledString();
        beast::ostream(connection->_response.body()) << jsonstr;
        return true;
    }

    //查找数据库判断用户是否存在

    root["error"] = 0;
    root["email"] = src_root["email"];
    root ["user"]= src_root["user"].asString();
    root["passwd"] = src_root["passwd"].asString();
    root["confirm"] = src_root["confirm"].asString();
    root["varifycode"] = src_root["varifycode"].asString();
    std::string jsonstr = root.toStyledString();
    beast::ostream(connection->_response.body()) << jsonstr;
    return true;
    });
封装mysql连接池
Mysql Connector C++
尽管Mysql提供了访问数据库的接口,但是都是基于C风格的,为了便于面向对象设计,我们使用Mysql Connector C++ 这个库来访问mysql
class MySqlPool {
public:
	MySqlPool(const std::string& url, const std::string& user, const std::string& pass, const std::string& schema, int poolSize)
		: url_(url), user_(user), pass_(pass), schema_(schema), poolSize_(poolSize), b_stop_(false){
		try {
			for (int i = 0; i < poolSize_; ++i) {
				sql::mysql::MySQL_Driver* driver = sql::mysql::get_mysql_driver_instance();
				std::unique_ptr<sql::Connection> con(driver->connect(url_, user_, pass_));
				con->setSchema(schema_);
				pool_.push(std::move(con));
			}
		}
		catch (sql::SQLException& e) {
			// 处理异常
			std::cout << "mysql pool init failed" << std::endl;
		}
	}

	std::unique_ptr<sql::Connection> getConnection() {
		std::unique_lock<std::mutex> lock(mutex_);
		cond_.wait(lock, [this] {
			if (b_stop_) {
				return true;
			}
			return !pool_.empty(); });
		if (b_stop_) {
			return nullptr;
		}
		std::unique_ptr<sql::Connection> con(std::move(pool_.front()));
		pool_.pop();
		return con;
	}

	void returnConnection(std::unique_ptr<sql::Connection> con) {
		std::unique_lock<std::mutex> lock(mutex_);
		if (b_stop_) {
			return;
		}
		pool_.push(std::move(con));
		cond_.notify_one();
	}

	void Close() {
		b_stop_ = true;
		cond_.notify_all();
	}

	~MySqlPool() {
		std::unique_lock<std::mutex> lock(mutex_);
		while (!pool_.empty()) {
			pool_.pop();
		}
	}

private:
	std::string url_;
	std::string user_;
	std::string pass_;
	std::string schema_;
	int poolSize_;
	std::queue<std::unique_ptr<sql::Connection>> pool_;
	std::mutex mutex_;
	std::condition_variable cond_;
	std::atomic<bool> b_stop_;
};
封装DAO操作层
类的声明
class MysqlDao
{
public:
	MysqlDao();
	~MysqlDao();
	int RegUser(const std::string& name, const std::string& email, const std::string& pwd);
private:
	std::unique_ptr<MySqlPool> pool_;
};
实现
MysqlDao::MysqlDao()
{
	auto & cfg = ConfigMgr::Inst();
	const auto& host = cfg["Mysql"]["Host"];
	const auto& port = cfg["Mysql"]["Port"];
	const auto& pwd = cfg["Mysql"]["Passwd"];
	const auto& schema = cfg["Mysql"]["Schema"];
	const auto& user = cfg["Mysql"]["User"];
	pool_.reset(new MySqlPool(host+":"+port, user, pwd,schema, 5));
}

MysqlDao::~MysqlDao(){
	pool_->Close();
}

int MysqlDao::RegUser(const std::string& name, const std::string& email, const std::string& pwd)
{
	auto con = pool_->getConnection();
	try {
		if (con == nullptr) {
			pool_->returnConnection(std::move(con));
			return false;
		}
		// 准备调用存储过程
		unique_ptr < sql::PreparedStatement > stmt(con->prepareStatement("CALL reg_user(?,?,?,@result)"));
		// 设置输入参数
		stmt->setString(1, name);
		stmt->setString(2, email);
		stmt->setString(3, pwd);

		// 由于PreparedStatement不直接支持注册输出参数,我们需要使用会话变量或其他方法来获取输出参数的值

		  // 执行存储过程
		stmt->execute();
		// 如果存储过程设置了会话变量或有其他方式获取输出参数的值,你可以在这里执行SELECT查询来获取它们
	   // 例如,如果存储过程设置了一个会话变量@result来存储输出结果,可以这样获取:
	   unique_ptr<sql::Statement> stmtResult(con->createStatement());
	  unique_ptr<sql::ResultSet> res(stmtResult->executeQuery("SELECT @result AS result"));
	  if (res->next()) {
	       int result = res->getInt("result");
	      cout << "Result: " << result << endl;
		  pool_->returnConnection(std::move(con));
		  return result;
	  }
	  pool_->returnConnection(std::move(con));
		return -1;
	}
	catch (sql::SQLException& e) {
		pool_->returnConnection(std::move(con));
		std::cerr << "SQLException: " << e.what();
		std::cerr << " (MySQL error code: " << e.getErrorCode();
		std::cerr << ", SQLState: " << e.getSQLState() << " )" << std::endl;
		return -1;
	}
}
数据库管理者
我们需要建立一个数据库管理者用来实现服务层,对接逻辑层的调用
#include "const.h"
#include "MysqlDao.h"
class MysqlMgr: public Singleton<MysqlMgr>
{
	friend class Singleton<MysqlMgr>;
public:
	~MysqlMgr();
	int RegUser(const std::string& name, const std::string& email,  const std::string& pwd);
private:
	MysqlMgr();
	MysqlDao  _dao;
};
实现
#include "MysqlMgr.h"


MysqlMgr::~MysqlMgr() {

}

int MysqlMgr::RegUser(const std::string& name, const std::string& email, const std::string& pwd)
{
	return _dao.RegUser(name, email, pwd);
}

MysqlMgr::MysqlMgr() {
}
逻辑层调用
在逻辑层注册消息处理。
RegPost("/user_register", [](std::shared_ptr<HttpConnection> connection) {
    auto body_str = boost::beast::buffers_to_string(connection->_request.body().data());
    std::cout << "receive body is " << body_str << std::endl;
    connection->_response.set(http::field::content_type, "text/json");
    Json::Value root;
    Json::Reader reader;
    Json::Value src_root;
    bool parse_success = reader.parse(body_str, src_root);
    if (!parse_success) {
        std::cout << "Failed to parse JSON data!" << std::endl;
        root["error"] = ErrorCodes::Error_Json;
        std::string jsonstr = root.toStyledString();
        beast::ostream(connection->_response.body()) << jsonstr;
        return true;
    }

    auto email = src_root["email"].asString();
    auto name = src_root["user"].asString();
    auto pwd = src_root["passwd"].asString();
    auto confirm = src_root["confirm"].asString();

    if (pwd != confirm) {
        std::cout << "password err " << std::endl;
        root["error"] = ErrorCodes::PasswdErr;
        std::string jsonstr = root.toStyledString();
        beast::ostream(connection->_response.body()) << jsonstr;
        return true;
    }

    //先查找redis中email对应的验证码是否合理
    std::string  varify_code;
    bool b_get_varify = RedisMgr::GetInstance()->Get(CODEPREFIX+src_root["email"].asString(), varify_code);
    if (!b_get_varify) {
        std::cout << " get varify code expired" << std::endl;
        root["error"] = ErrorCodes::VarifyExpired;
        std::string jsonstr = root.toStyledString();
        beast::ostream(connection->_response.body()) << jsonstr;
        return true;
    }

    if (varify_code != src_root["varifycode"].asString()) {
        std::cout << " varify code error" << std::endl;
        root["error"] = ErrorCodes::VarifyCodeErr;
        std::string jsonstr = root.toStyledString();
        beast::ostream(connection->_response.body()) << jsonstr;
        return true;
    }

    //查找数据库判断用户是否存在
    int uid = MysqlMgr::GetInstance()->RegUser(name, email, pwd);
    if (uid == 0 || uid == -1) {
        std::cout << " user or email exist" << std::endl;
        root["error"] = ErrorCodes::UserExist;
        std::string jsonstr = root.toStyledString();
        beast::ostream(connection->_response.body()) << jsonstr;
        return true;
    }
    root["error"] = 0;
    root["uid"] = uid;
    root["email"] = email;
    root ["user"]= name;
    root["passwd"] = pwd;
    root["confirm"] = confirm;
    root["varifycode"] = src_root["varifycode"].asString();
    std::string jsonstr = root.toStyledString();
    beast::ostream(connection->_response.body()) << jsonstr;
    return true;
    });
再次启动客户端测试,可以注册成功


 950
950

 被折叠的 条评论
为什么被折叠?
被折叠的 条评论
为什么被折叠?
 到【灌水乐园】发言


