


Spring的JDBC
1.JdbcTemplate
Spring的JdbcTemplate是Spring框架中用于简化数据库编程的模块之一。它提供了一种简洁而强大的方式来执行SQL查询、更新和存储过程,并处理结果集。使用JdbcTemplate可以避免繁琐的JDBC代码,同时提供了更好的错误处理和资源管理。
JdbcTemplate的主要特点包括:
-
简化的API:JdbcTemplate提供了一组简单易用的方法来执行常见的数据库操作,例如查询、更新和存储过程调用。
-
异常处理:JdbcTemplate自动处理SQL异常并将它们转换为Spring的DataAccessException,简化了错误处理逻辑。
-
资源管理:JdbcTemplate自动管理数据库连接的获取和释放,避免了资源泄漏的问题。
-
参数绑定:JdbcTemplate支持参数化查询,可以安全地将用户输入绑定到SQL查询中,避免了SQL注入攻击。
-
结果集处理:JdbcTemplate提供了多种方法来处理查询结果集,包括将结果映射到Java对象、将结果集转换为列表或映射为Map等操作。
使用JdbcTemplate可以极大地简化数据库编程的工作量,并提高代码的可读性和可维护性。在Spring应用程序中,通常会通过配置一个JdbcTemplate bean来使用它,然后在需要访问数据库的地方注入该bean并调用相应的方法。
总的来说,jdbc就是基于对数据库的编辑和使用的模板类,可以完美的实现数据的增、删、改、查,帮助开发人员更轻松地与数据库交互,提高开发效率和代码质量。
2.JdbcAccessor
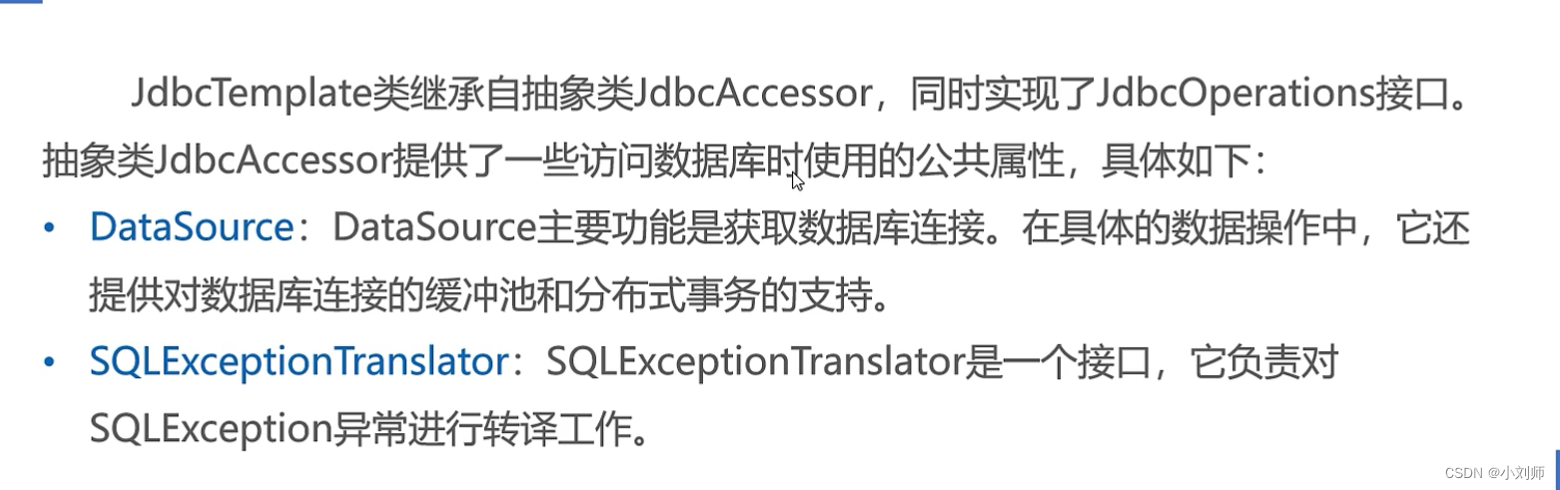
Spring Jdbc 的配置
1.Jdbc的四个配置包
- core(核心包):包含了jdbc的核心功能,包括JdbcTemplate类、SimpleJdbcIsert类、SimpleJdbcCall类以及NamedparamterJdbcTemplate类
- dataSource(数据源包):数据源包用于配置数据库连接池的相关功能。数据库连接池可以提高应用程序对数据库的访问性能,减少连接的创建和销毁次数,从而提高数据库操作的效率。
- object(对象包):以面向对象的方式访问数据库,将返回结果封装为对象,并且在数据表的列和业务对象的属性之间映射查询结果。
- support(支持包):包含core和object包的支持类
2.配置操作
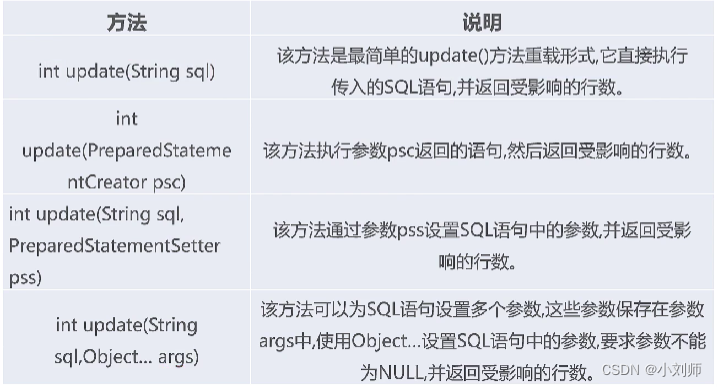
注意:下面代码完整的实现了excute、updata、query方法
1.execute方法:execute方法通常用于执行SQL语句或数据库操作。在MySQL中,可以使用execute方法来执行各种SQL语句,如create(创建表)、drop(删除表)、alter(修改表结构)、truncate(清空表数据)、rename(重命名表)等操作。
2.update方法:update方法通常用于更新数据库表中的数据。通过使用update语句,可以指定要更新的表名、要更新的字段和对应的数值,以及更新的条件。例如,使用以下语句可以将表中age字段为25的记录的name字段更新为"John":
UPDATE table_name SET name = 'John' WHERE age = 25;3.query方法:query方法通常用于查询数据库表中的数据。通过使用select语句,可以指定要查询的字段、要查询的表名,以及查询的条件。例如,使用以下语句可以查询表中所有记录的name和age字段:
SELECT name, age FROM table_name;
前提:
以下代码是建立在数据源sring目录下的,在开始我们得先实现spring数据源的创建
1.引入依赖:org、mysql、jdbc
注意:若是没有相关配置,需要mavn刷新(右上角蓝色的m)
 <!--        ioc相关-->
        <dependency>
            <groupId>org.springframework</groupId>
            <artifactId>spring-core</artifactId>
            <version>5.2.8.RELEASE</version>
        </dependency>
<!--        jdbc相关-->
        <dependency>
            <groupId>org.springframework</groupId>
            <artifactId>spring-jdbc</artifactId>
            <version>5.2.0.RELEASE</version>
        </dependency>
<!--        驱动包-->
        <dependency>
            <groupId>mysql</groupId>
            <artifactId>mysql-connector-java</artifactId>
            <version>8.0.11</version>
        </dependency>
<!--        spring的相关事务相关-->
        <dependency>
            <groupId>org.springframework</groupId>
            <artifactId>spring-tx</artifactId>
            <version>5.2.0.RELEASE</version>
        </dependency>

        <dependency>
            <groupId>org.springframework</groupId>
            <artifactId>spring-context</artifactId>
            <version>5.2.8.RELEASE</version>
        </dependency>
2.创建applicationContext.xml配置文件
<?xml version="1.0" encoding="UTF-8"?>
<beans xmlns="http://www.springframework.org/schema/beans"
xmlns:xsi="http://www.w3.org/2001/XMLSchema-instance"
xsi:schemaLocation="http://www.springframework.org/schema/beans
http://www.springframework.org/schema/beans/spring-beans-4.3.xsd">
<!--定义数据源-->
<bean id="dataSource"
class="org.springframework.jdbc.datasource.DriverManagerDataSource">
<!-- 1.1.数据库驱动 -->
<property name="driverClassName"
value="com.mysql.jdbc.Driver"></property>
<!-- 1.2.连接数据库的url -->
<property name="url"
value="jdbc:mysql://localhost:3306/spring?characterEncoding=utf8&useSSL=false&serverTimezone=UTC&rewriteBatchedStatements=true"></property>
<!-- 1.3.连接数据库的用户名 -->
<property name="username" value="root"></property>
<!-- 1.4.连接数据库的密码 -->
<property name="password" value="123456"></property>
</bean>
<!-- 2配置JDBC模板 -->
<bean id="jdbcTemplate"
class="org.springframework.jdbc.core.JdbcTemplate">
<!-- 默认必须使用数据源 -->
<property name="dataSource" ref="dataSource"></property>
</bean>
<!-- 3普通类-->
<!-- 定义id为accountDao的Bean -->
<bean id="accountDao" class="com.Springjdbc.demo.pojo.AccountDaoImpl">
<!-- 将jdbcTemplate注入到accountDao实例中 -->
<property name="jdbcTemplate" ref="jdbcTemplate"></property>
</bean>
</beans>注意!:这里要配置号自己的数据库,要使用自己的数据库密码
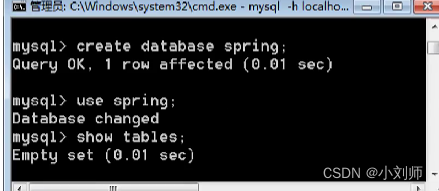
3.执行excute建表测试
在java目录下创建com.Springjdbc.demo.text包,创建JdbcTemplateTest类
package com.Springjdbc.demo.test;
import com.Springjdbc.demo.pojo.Account;
import com.Springjdbc.demo.pojo.AccountDao;
import org.springframework.context.ApplicationContext;
import org.springframework.context.support.ClassPathXmlApplicationContext;
import org.springframework.jdbc.core.JdbcTemplate;
public class JdbcTemplateTest {
public static void main(String[] args) {
mainTest();
}
public void mainTest() {
//加载配置文件
ApplicationContext applicationContext =new ClassPathXmlApplicationContext("applicationContext.xml");
//获取jdbcTemplate实例
JdbcTemplate jdbcTemplate=(JdbcTemplate) applicationContext.getBean("jdbcTemplate");
//使用execute()方法执行SQL语句,创建用户账户管理表account
jdbcTemplate.execute("create table account("+
"id int primary key auto_increment,"+
"username varchar(50),"+
"balance double)");
System.out.println("账户表创建成功!");
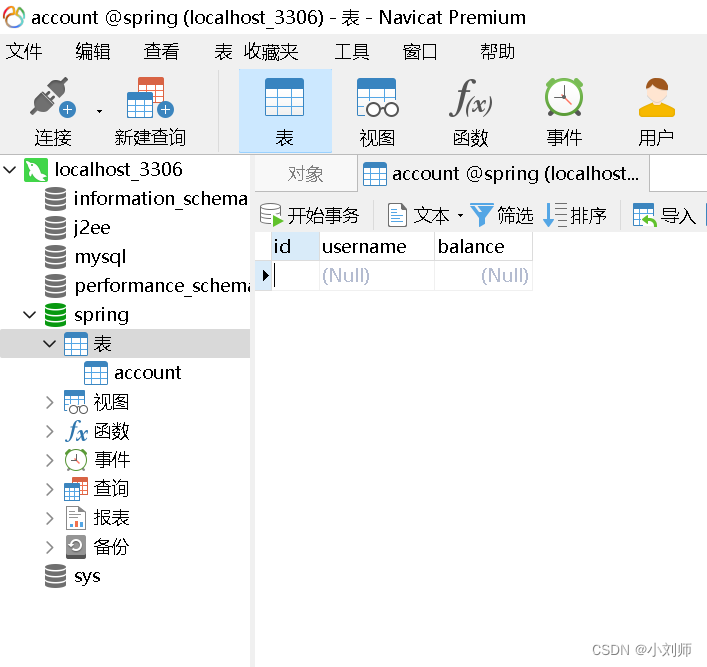
}若代码运行成功,则会在控制台输出“账户表创建成功!” 打开navicat或者相关sqllyog会发现在spring数据源中多出一个account表,如下图所示:
接下来我们要实现对数据库表中数据更删改(updata)的操作
(updata)一览:
4.创建Account实体类
在java目录下创建com.Springjdbc.demo.pojo包,并在pojo包内创建Account实体类作为对象的映射,代码如下:
package com.Springjdbc.demo.pojo;
public class Account {
    private Integer id;// 账户id;
    private String username;// 用户名
    private Double balance;// 账户余额

    public Integer getId() {
        return id;
    }

    public void setId(Integer id) {
        this.id = id;
    }

    public String getUsername() {
        return username;
    }

    public void setUsername(String username) {
        this.username = username;
    }

    public Double getBalance() {
        return balance;
    }

    public void setBalance(Double balance) {
        this.balance = balance;
    }

    @Override
    public String toString() {
        return "Account [id=" + id + ", username=" + username + ", balance=" + balance + "]";
    }

}
5.创建AccountDao接口
AccountDao接口是为了定义对Account对象的数据库操作方法,包括增删改等操作。通过创建接口,可以将数据库操作与业务逻辑分离,提高代码的可维护性和可测试性。
package com.Springjdbc.demo.pojo;


public interface AccountDao {
    //添加
    public int addAccount(Account account);
    //更新
    public int  updateAccount(Account account);
    //删除
    public int  deleteAccount(int id);
}
6.实现接口AccountDaoImpl
package com.Springjdbc.demo.pojo;

import com.Springjdbc.demo.pojo.Account;
import com.Springjdbc.demo.pojo.AccountDao;
import org.springframework.jdbc.core.JdbcTemplate;

public class AccountDaoImpl implements AccountDao {
    private JdbcTemplate jdbcTemplate;

    public void setJdbcTemplate(JdbcTemplate jdbcTemplate) {
        this.jdbcTemplate = jdbcTemplate;
    }

    @Override
    public int addAccount(Account account) {
        // 定义SQL
        String sql = "insert into account(username,balance) value(?,?)";
        //这里?指的是占位符
        // 定义数组来存放SQL语句中的参数
        Object[] obj = new Object[] { account.getUsername(), account.getBalance() };
        // 执行添加操作,返回受SQL语句影响的条数
        int num = this.jdbcTemplate.update(sql, obj);
        return num;
    }

    @Override
    public int updateAccount(Account account) {
        String sql = "update account set username=? , balance=? where id=?";
        Object[] obj = new Object[] { account.getUsername(), account.getBalance(), account.getId() };
        int num = this.jdbcTemplate.update(sql, obj);
        return num;
    }

    @Override
    public int deleteAccount(int id) {
        String sql = "delete from account where id=?";
        int num = this.jdbcTemplate.update(sql, id);
        return num;
    }
}
7.updata的测试实现
package com.Springjdbc.demo.test;
import com.Springjdbc.demo.pojo.Account;
import com.Springjdbc.demo.pojo.AccountDao;
import org.springframework.context.ApplicationContext;
import org.springframework.context.support.ClassPathXmlApplicationContext;
import org.springframework.jdbc.core.JdbcTemplate;
public class JdbcTemplateTest {
//这里实现方法的一一测试,并在navicat查看运行结果
public static void main(String[] args) {
addAccountTest();
}
public static void mainTest() {
//加载配置文件
ApplicationContext applicationContext =new ClassPathXmlApplicationContext("applicationContext.xml");
//获取jdbcTemplate实例
JdbcTemplate jdbcTemplate=(JdbcTemplate) applicationContext.getBean("jdbcTemplate");
//使用execute()方法执行SQL语句,创建用户账户管理表account
jdbcTemplate.execute("create table account("+
"id int primary key auto_increment,"+
"username varchar(50),"+
"balance double)");
System.out.println("账户表创建成功!");
}
public static void addAccountTest() {
//加载配置文件
ApplicationContext applicationContext=new ClassPathXmlApplicationContext("applicationContext.xml");
//获取AccountDao实例
AccountDao accountDao=(AccountDao) applicationContext.getBean("accountDao");
//创建Account对象,并向Account对象中添加数据
Account account=new Account();
account.setUsername("tom");
account.setBalance(4000.00);
//执行addAccount()方法,并获取返回结果
int num=accountDao.addAccount(account);
if(num>0) {
System.out.println("成功插入"+num+"条数据!");
}else {
System.out.println("插入操作执行失败");
}
}
public static void updateAccountTest() {
//加载配置文件
ApplicationContext applicationContext=new ClassPathXmlApplicationContext("applicationContext.xml");
//获取AccountDao实例
AccountDao accountDao=(AccountDao) applicationContext.getBean("accountDao");
//创建Account对象,并向Account对象中添加数据
Account account=new Account();
account.setId(1);
account.setUsername("tom");
account.setBalance(3000.00);
//执行updateAccount()方法,并获取返回结果
int num=accountDao.updateAccount(account);
if(num>0) {
System.out.println("成功修改"+num+"条数据!");
}else {
System.out.println("插入操作执行失败");
}
}
public static void deleteAccountTest() {
//加载配置文件
ApplicationContext applicationContext=new ClassPathXmlApplicationContext("applicationContext.xml");
//获取AccountDao实例
AccountDao accountDao=(AccountDao) applicationContext.getBean("accountDao");
//创建Account对象,并向Account对象中添加数据
Account account=new Account();
int num=accountDao.deleteAccount(2);
if(num>0) {
System.out.println("成功删除"+num+"条数据!");
}else {
System.out.println("插入操作执行失败");
}
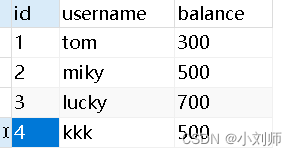
}试着添加几条数据到account表中:如下图所示:
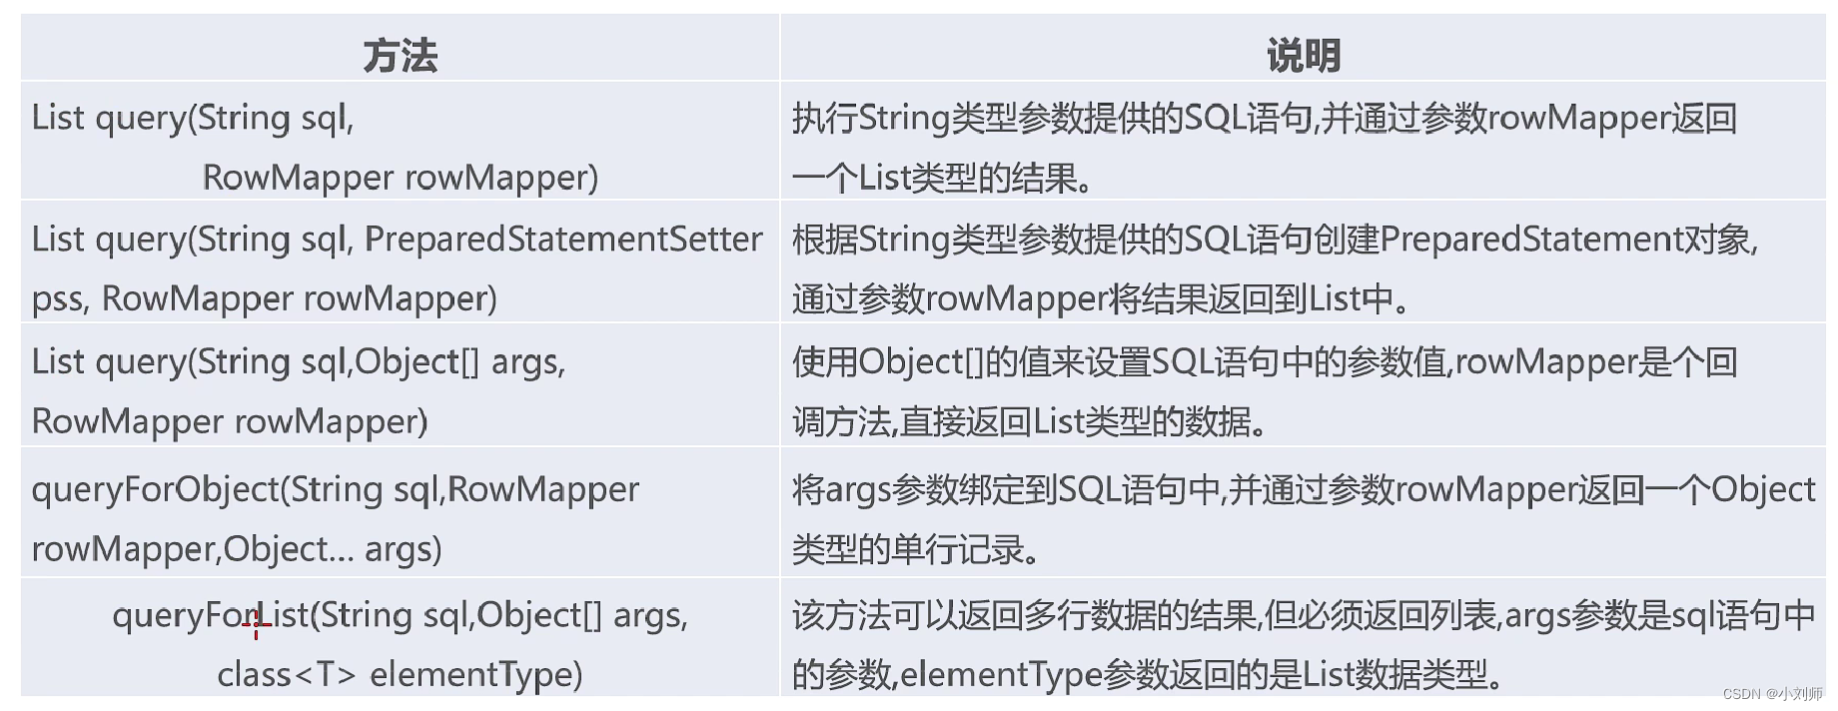
8.query方法的实现
下图是关于query方法的使用说明:
同样的需要配置接口方法:
 public Account findAccountById(int id);
    //查询所有账户
    public List<Account> findAllAccount();
配置实现类:
 @Override
    public Account findAccountById(int id) {
        String sql="select * from account where id=?";
        //创建新的powmapper对象
        BeanPropertyRowMapper<Account> rowmapper = new BeanPropertyRowMapper<>(Account.class);
        return this.jdbcTemplate.queryForObject(sql,rowmapper,id);

    }

    @Override
    //查询账户的所有信息
    public List<Account> findAllAccount() {
        String sql="select * from account";
        BeanPropertyRowMapper<Account> rowmapper = new BeanPropertyRowMapper<>(Account.class);
        return this.jdbcTemplate.query(sql,rowmapper);
    }
测试:
  public static void selectone(){
            ApplicationContext applicationcontext = new ClassPathXmlApplicationContext("applicationContext.xml");
            AccountDao accountdao =(AccountDao) applicationcontext.getBean("accountDao");
            Account account = accountdao.findAccountById(1);
            System.out.println(account);
        }

        public static void selectall(){
            ApplicationContext applicationcontext = new ClassPathXmlApplicationContext("applicationContext.xml");
            AccountDao accountdao =(AccountDao) applicationcontext.getBean("accountDao");
            List<Account> account = accountdao.findAllAccount();
            System.out.println(account);
    }
测试结果:
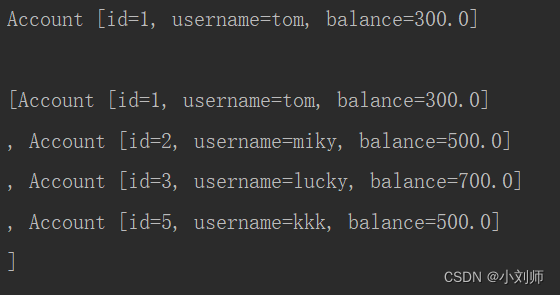


 2266
2266


 被折叠的 条评论
为什么被折叠?
被折叠的 条评论
为什么被折叠?
 到【灌水乐园】发言


