


1 首先可以自定义view所使用到的属性,例如:
<?xml version="1.0" encoding="utf-8"?>
<resources>
    <attr name="titleText" format="string" />
    <attr name="titleTextColor" format="color" />
    <attr name="titleTextSize" format="dimension" />

    <declare-styleable name="TitleView">
        <attr name="titleText" />
        <attr name="titleTextColor" />
        <attr name="titleTextSize" />
    </declare-styleable>

</resources>
2 在布局文件中加入自定义view,view的布局属性中使用到了自定义的styleable值,注意,需要加入命名空间声明:
xmlns:local=”http://schemas.android.com/apk/res/包名”
例如:
<?xml version="1.0" encoding="utf-8"?>
<RelativeLayout xmlns:android="http://schemas.android.com/apk/res/android"
xmlns:local="http://schemas.android.com/apk/res/com.android.test"
android:layout_width="fill_parent"
android:layout_height="fill_parent" >
<com.android.test.view.TitleView
android:layout_width="200dp"
android:layout_height="100dp"
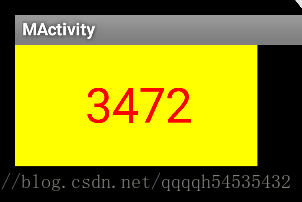
local:titleText="3472"
local:titleTextColor="#ff0000"
local:titleTextSize="40sp"
/>
</RelativeLayout>3 自定义view,注意,需要在构造函数中加入行:
this.setWillNotDraw(false);
防止父类ViewGroup设置了此标志位为true(父类可能没有做任何的绘制操作);然后,需要在构造函数中获取属性值,并据此重写onMeasure(), onDraw()进行绘图,例如:
package com.android.test.view;

import com.android.test.R;

import android.content.Context;
import android.content.res.TypedArray;
import android.graphics.Canvas;
import android.graphics.Color;
import android.graphics.Paint;
import android.graphics.Rect;
import android.util.AttributeSet;
import android.util.Log;
import android.widget.RelativeLayout;

public class TitleView extends RelativeLayout {

    private int mTitleTextColor;
    private String mTitleText;
    private int mTitleTextSize;

    private Paint mPaint;
    private Rect mBound;

    public TitleView(Context context, AttributeSet attrs){
        this(context, attrs, 0);
    }

    public TitleView(Context context ){
        this(context, null);
    }

    public TitleView(Context context, AttributeSet attrs, int defStyple){
        super(context, attrs, defStyple);

        this.setWillNotDraw(false);

        TypedArray ta = context.getTheme().obtainStyledAttributes(attrs, R.styleable.TitleView, defStyple, 0);

        try{
            mTitleTextColor = ta.getColor(R.styleable.TitleView_titleTextColor, 0xff0000);
            mTitleText = ta.getString(R.styleable.TitleView_titleText);
            mTitleTextSize = ta.getDimensionPixelSize(R.styleable.TitleView_titleTextSize, 40);
        }finally{
            ta.recycle();
        }

        mPaint = new Paint();
        mPaint.setTextSize(mTitleTextSize);
        mPaint.setColor(mTitleTextColor);
        mBound = new Rect();
        mPaint.getTextBounds(mTitleText, 0, mTitleText.length(), mBound);
    }

    @Override
    protected void onMeasure(int widthMeasureSpec, int heightMeasureSpec)
    {
        super.onMeasure(widthMeasureSpec, heightMeasureSpec);
    }

    @Override
    protected void onDraw(Canvas canvas)
    {
        super.onDraw(canvas);

        mPaint.setColor(Color.YELLOW);
        canvas.drawRect(0, 0, getMeasuredWidth(), getMeasuredHeight(), mPaint);

        mPaint.setColor(mTitleTextColor);
        canvas.drawText(mTitleText, getWidth() / 2 - mBound.width() / 2, getHeight() / 2 + mBound.height() / 2, mPaint);

    }
}
4 最后,在Activity中加入自定义view, 以下为最简单的示例:
package com.android.test;

import android.app.Activity;

public class MActivity extends Activity
{
    /** Called when the activity is first created. */
    @Override
    public void onCreate(Bundle savedInstanceState)
    {
        super.onCreate(savedInstanceState);
        setContentView(R.layout.main);
    }
}
5 最后附上AndroidManifest.xml文件:
<?xml version="1.0" encoding="utf-8"?>
<manifest xmlns:android="http://schemas.android.com/apk/res/android"
      package="com.android.test"
      android:versionCode="1"
      android:versionName="1.0">
      <application android:label="@string/app_name"
          android:icon="@drawable/ic_launcher">
          <activity android:name="MActivity"
              android:label="@string/app_name">
              <intent-filter>
                  <action android:name="android.intent.action.MAIN" />
                  <category android:name="android.intent.category.LAUNCHER" />
            </intent-filter>
        </activity>
    </application>
</manifest>
6 效果如图:


 3153
3153

 被折叠的 条评论
为什么被折叠?
被折叠的 条评论
为什么被折叠?
 到【灌水乐园】发言


