


所谓好记性不如烂笔头,本博客是基于《Angular权威教程》上的内容学习的记录笔记,这里也推荐大家去看此书,写得挺不错的。同时若有侵权问题,请留言联系,会及时删除相关博客信息。
一、ngIf命令
如果你希望根据一个条件来选择显示或隐藏或渲染一个元素,可以使用ngIf命令。如果表达式的返回结果是一个假值(false),那么元素就会被移除。
下面是一些简单的例子:
HTML页面如下:
<div>
	<h1>测试 *ngIF 命令</h1>
    <!-- isShow 和name 属于数据绑定-->
	<h2 *ngIf = "isShow"> {{name}}</h2>
	<h2 *ngIf = 'true'> {{title}} {{name}}</h2>
	<h2 *ngIf = "name == 'Jackson'">{{title}}</h2>
	<h2 *ngIf = "myFunc()">{{title}}</h2>
</div>
相关的.ts文件代码如下:
import { Component } from '@angular/core';

@Component({
  selector: 'app-root',
  templateUrl: './app.component.html',
  styleUrls: ['./app.component.css']
})
export class AppComponent {
  title = 'angular2-first';

  name = "Jackson";
  isShow = false;
  myFunc(): boolean {
  	return true;
  }


}
二、ngSwitch和ngSwitchCase命令
如果你需要根据一个给定的条件来渲染不同的元素,你出来可以使用ngIf命令嵌套使用之外,推荐使用ngSwitch命令,它和switch语句相似。其思想:对表达式进行一次求值,然后根据其结果来决定如何显示指令内的嵌套元素。
下面是一组例子:
<div>
	<h1>测试 *ngSwitch and *ngSwitchCase 命令</h1>
	<div [ngSwitch] = "ops">
		<div *ngSwitchCase = "'a'">value is A</div>
		<div *ngSwitchCase = "'b'">value is B</div>
		<div *ngSwitchCase = "'c'">value is C</div>
		<div *ngSwitchCase = "'a'">value is A again</div>
		<div *ngSwitchDefault>value is unknown</div>
	</div>
</div>
对应的.ts文件信息:
import { Component } from '@angular/core';

@Component({
  selector: 'app-root',
  templateUrl: './app.component.html',
  styleUrls: ['./app.component.css']
})
export class AppComponent {
  title = 'angular2-first';
  ops = 'a';
}
在switch语句中case条件不允许重复,而在*ngSwitch命令中,*ngSwitchCase可以声明重复的值,这样就可以多次匹配一个值。如上的例子中,若ops = ‘a’,那么相应的两个div的内容都会显示。
三、ngStyle命令
使用ngStyle命令,可以通过Angular表达式给指定的DOM元素设定CSS属性。该指令最简单的用法就是[ style.<cssproperty> = "value" ]的形式。
下面是一个简单的例子:
<div>
	<h1>测试 ngStyle 命令</h1>
	<div [style.background-color]= "'green'">
		Uses fixed green background
	</div>
</div>
另一种设置固定值的方式是使用ngStyle的属性,使用键值对来设置每个属性。注意单引号和双引号一定要匹配。例如
<div>
	<h1>测试 ngStyle 键值对设置属性</h1>
	<div [ngStyle] = "{'color' : 'white', 'background-color' : 'blue'}">
		Uses fixed white text on blue background
	</div>
</div>
但是ngStyle指令的真正能力在于使用动态值。例如
<div>
	<h1>测试 ngStyle 的动态赋值</h1>
	<div>
		<input type="text" name="color" value="{{color}}" #colorinput>
	</div>
	<div>
		<input type="text" name="fontSize" value="{{fontSize}}" #fontinput>
	</div>

	<button (click) = "apply(colorinput.value, fontinput.value)">Apply Setting</button>

	<div>
		<span [style.color] = "color" [style.font-size.px] = "fontSize">
			test text
		</span>
	</div>

</div>
对应的.ts文件信息如下:
import { Component } from '@angular/core';

@Component({
  selector: 'app-root',
  templateUrl: './app.component.html',
  styleUrls: ['./app.component.css']
})
export class AppComponent {

  color: string;
  fontSize: number;

  apply(color: string, fontSize: number) {
  	this.color = color;
  	this.fontSize = fontSize;
  }


}
测试结果:

注意,在某些情况下必须指定单位。例如把font-size设置成30不是合法的CSS,必须指定一个单位,比如30px或者3em。Angular提供了一个便捷用法来指定单位:这里用的格式是[style.font-size.px] = “fontSize”。后缀.px表明我们设置font-size属性值以像素为单位。也可以使用[style.font-size.em],表示以相对长度单位来表示字体大小;还可以使用[style.font-size.%],表示以百分比为单位。
四、ngClass命令
ngClass指令在HTML模版中用ngClass属性来表示,让你可以动态设置和改变一个给定DOM元素的CSS样式。
使用ngClass指令的第一种方式是传入一个对象。该对象希望以类名作为键,而值应该是一个用来表明是否该用该类的真(true)/假(false)值。如下示例:
1、在css文件中定义一个.bordered
.bordered {
	border: 1px dashed black;
	background: #eee;

}
2、在HTML页面中使用ngClass命令
<div>
	<h3>测试 ngClss 命令</h3>
	<div [ngClass] = "{bordered : false}">this is never bordered</div>
	<div [ngClass] = "{bordered : true}">this is always bordered</div>
</div>
五、ngFor命令
ngFor指令的任务是重复一个给定的DOM元素(或一组DOM元素),每次重复都会从数组中取一个不同的值。它的语法是:*ngFor = “let item of items”。
1⃣️let item语法指定一个用来接收items数组中的每一个元素的(模版)变量
2⃣️items是来自组件控制器的一组项的集合
如下示例:
1、在.ts文件中定义一个数组
import { Component } from '@angular/core';

@Component({
  selector: 'app-root',
  templateUrl: './app.component.html',
  styleUrls: ['./app.component.css']
})
export class AppComponent {
  citys: string [] = ['BeiJing', 'ShangHai', 'GuangZhou', 'ShenZhen'];
}
2、在HTML页面中如下使用:
div>
	<h4>测试 *ngFor 命令</h4>
	<ul>
		<li *ngFor = "let city of citys">{{city}}</li>
	</ul>
</div>
使用*ngFor命令还可以迭代一个对象数组。如下:
1、.ts文件
import { Component } from '@angular/core';

@Component({
  selector: 'app-root',
  templateUrl: './app.component.html',
  styleUrls: ['./app.component.css']
})
export class AppComponent {

  peoples = [
  	{"name" : "Jackson", "age" : "23", "city" : "Sao Paulo"},
  	{"name" : "John", "age" : "18", "city" : "Miami"},
  	{"name" : "Peter", "age" : "22", "city" : "New York"}
  ];

}
2、HTML页面:
<div>
	<table>
		<thead>测试 *ngFor 遍历对象</thead>
	</table>
	<tbody>
		<tr>
			<td>姓名</td>
			<td>年龄</td>
			<td>所在城市</td>
		</tr>
		<tr *ngFor = "let people of peoples">
			<td>{{people.name}}</td>
			<td>{{people.age}}</td>
			<td>{{people.city}}</td>
		</tr>
	</tbody>
</div>
注意,在数组迭代的过程中,我们可以获取每一项的索引。可以在ngFor语法中插入语法let idx = index,并用分号(;)隔开。如下:
*ngFor = "let item of items; let idx = index"
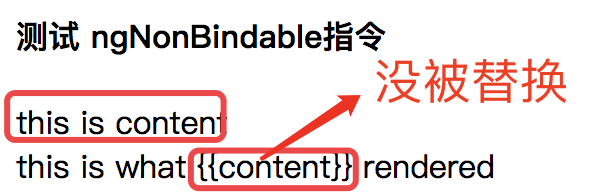
六、ngNonBindable命令
当我们想告述Angular不要编译或者绑定页面中的某个特殊部分时,要使用ngNonBingable指令。例如,假设我们在模版中渲染纯文本{{content}},通常情况下,这段文本会被绑定到变量content的值,因为我们使用了{{ }}模版语法。
如下例子:
1、.ts文件
import { Component } from '@angular/core';

@Component({
  selector: 'app-root',
  templateUrl: './app.component.html',
  styleUrls: ['./app.component.css']
})
export class AppComponent {

  content = 'this is content';

}
2、HTML页面
<div>
	<h4>测试 ngNonBindable指令</h4>
	<div>{{content}}</div>
	<div ngNonBindable>this is what {{content}} rendered</div>
</div>
3、结果


 288
288


 被折叠的 条评论
为什么被折叠?
被折叠的 条评论
为什么被折叠?
 到【灌水乐园】发言


