


安装初始化mysql后,默认建了几个数据库。本章主要介绍下每个库的情况。
mysql> show databases;
+--------------------+
| Database           |
+--------------------+
| information_schema |
| mysql              |
| performance_schema |
| sys                |
+--------------------+
4 rows in set (0.01 sec)
mysql>
1 information_schema
information_schema数据库是MySQL自带的,它提供了访问数据库元数据的方式。什么是元数据呢?元数据是关于数据的数据,如数据库名或表名,列的数据类型,或访问权限等。有些时候用于表述该信息的其他术语包括“数据词典”和“系统目录”。
在MySQL中,把 information_schema 看作是一个数据库,确切说是信息数据库。其中保存着关于MySQL服务器所维护的所有其他数据库的信息。如数据库名,数据库的表,表栏的数据类型与访问权 限等。在INFORMATION_SCHEMA中,有数个只读表。它们实际上是视图,而不是基本表,因此,你将无法看到与之相关的任何文件。
mysql> use information_schema;
Reading table information for completion of table and column names
You can turn off this feature to get a quicker startup with -A

Database changed
mysql> show tables;
+---------------------------------------+
| Tables_in_information_schema          |
+---------------------------------------+
| ADMINISTRABLE_ROLE_AUTHORIZATIONS     |
......
| VIEW_ROUTINE_USAGE                    |
| VIEW_TABLE_USAGE                      |
+---------------------------------------+
79 rows in set (0.00 sec)
mysql>
1.1 表说明
| 表名 | 中文名称 | 说明 |
|---|---|---|
| SCHEMATA | 提供了当前mysql实例中所有数据库的信息。是show databases的结果取之此表。 | |
| TABLES | 提供了关于数据库中的表的信息(包括视图)。详细表述了某个表属于哪个schema,表类型,表引擎,创建时间等信息。是show tables from schemaname的结果取之此表。 | |
| COLUMNS | 提供了表中的列信息。详细表述了某张表的所有列以及每个列的信息。是show columns from schemaname.tablename的结果取之此表。 | |
| STATISTICS | 提供了关于表索引的信息。是show index from schemaname.tablename的结果取之此表。 | |
| USER_PRIVILEGES | 用户权限表 | 给出了关于全程权限的信息。该信息源自mysql.user授权表。是非标准表。 |
| SCHEMA_PRIVILEGES | 方案权限表 | 给出了关于方案(数据库)权限的信息。该信息来自mysql.db授权表。是非标准表。 |
| TABLE_PRIVILEGES | 表权限表 | 给出了关于表权限的信息。该信息源自mysql.tables_priv授权表。是非标准表。 |
| COLUMN_PRIVILEGES | 列权限表 | 给出了关于列权限的信息。该信息源自mysql.columns_priv授权表。是非标准表。 |
| CHARACTER_SETS | 字符集表 | 提供了mysql实例可用字符集的信息。是SHOW CHARACTER SET结果集取之此表。 |
| COLLATIONS | 提供了关于各字符集的对照信息。 | |
| COLLATION_CHARACTER_SET_APPLICABILITY | 指明了可用于校对的字符集。这些列等效于SHOW COLLATION的前两个显示字段。 | |
| TABLE_CONSTRAINTS | 描述了存在约束的表,以及表的约束类型。 | |
| KEY_COLUMN_USAGE | 描述了具有约束的键列。 | |
| ROUTINES | 提供了关于存储子程序(存储程序和函数)的信息。此时,ROUTINES表不包含自定义函数(UDF)。名为“mysql.proc name”的列指明了对应于INFORMATION_SCHEMA.ROUTINES表的mysql.proc表列。 | |
| VIEWS | 给出了关于数据库中的视图的信息。需要有show views权限,否则无法查看视图信息。 | |
| TRIGGERS | 提供了关于触发程序的信息。必须有super权限才能查看该表 |
2 mysql
mysql库是mysql的核心数据库,类似于sql server中的master表,主要负责存储数据库的用户、权限设置、关键字等mysql自己需要使用的控制和管理信息。不可以删除,如果对mysql不是很了解,也不要轻易修改这个数据库里面的表信息。
| 表 | 中文名称 | 说明 |
|---|---|---|
| columns_priv | ||
| component | ||
| db | ||
| default_roles | ||
| engine_cost | ||
| func | ||
| general_log | ||
| global_grants | ||
| gtid_executed | ||
| help_category | ||
| help_keyword | ||
| help_relation | ||
| help_topic | ||
| innodb_index_stats | ||
| innodb_table_stats | ||
| password_history | ||
| plugin | ||
| procs_priv | ||
| proxies_priv | ||
| replication_asynchronous_connection_failover | ||
| replication_asynchronous_connection_failover_managed | ||
| role_edges | ||
| server_cost | ||
| servers | ||
| slave_master_info | ||
| slave_relay_log_info | ||
| slave_worker_info | ||
| slow_log | ||
| tables_priv | ||
| time_zone | ||
| time_zone_leap_second | ||
| time_zone_name | ||
| time_zone_transition | ||
| time_zone_transition_type | ||
| user |
3 performance_schema
mysql5.5版本新增了一个性能优化的引擎: PERFORMANCE_SCHEMA这个功能默认是关闭的:需要设置参数:performance_schema 才可以启动该功能,这个参数是静态参数,只能写在my.cnf 中 不能动态修改。
| 表 | 中文名称 | 说明 |
|---|---|---|
| accounts | ||
| binary_log_transaction_compression_stats | ||
| cond_instances | ||
| data_lock_waits | ||
| data_locks | ||
| error_log | ||
| events_errors_summary_by_account_by_error | ||
| events_errors_summary_by_host_by_error | ||
| events_errors_summary_by_thread_by_error | ||
| events_errors_summary_by_user_by_error | ||
| events_errors_summary_global_by_error | ||
| events_stages_current | ||
| events_stages_history | ||
| events_stages_history_long | ||
| events_stages_summary_by_account_by_event_name | ||
| events_stages_summary_by_host_by_event_name | ||
| events_stages_summary_by_thread_by_event_name | ||
| events_stages_summary_by_user_by_event_name | ||
| events_stages_summary_global_by_event_name | ||
| events_statements_current | ||
| events_statements_histogram_by_digest | ||
| events_statements_histogram_global | ||
| events_statements_history | ||
| events_statements_history_long | ||
| events_statements_summary_by_account_by_event_name | ||
| events_statements_summary_by_digest | ||
| events_statements_summary_by_host_by_event_name | ||
| events_statements_summary_by_program | ||
| events_statements_summary_by_thread_by_event_name | ||
| events_statements_summary_by_user_by_event_name | ||
| events_statements_summary_global_by_event_name | ||
| events_transactions_current | ||
| events_transactions_history | ||
| events_transactions_history_long | ||
| events_transactions_summary_by_account_by_event_name | ||
| events_transactions_summary_by_host_by_event_name | ||
| events_transactions_summary_by_thread_by_event_name | ||
| events_transactions_summary_by_user_by_event_name | ||
| events_transactions_summary_global_by_event_name | ||
| events_waits_current | ||
| events_waits_history | ||
| events_waits_history_long | ||
| events_waits_summary_by_account_by_event_name | ||
| events_waits_summary_by_host_by_event_name | ||
| events_waits_summary_by_instance | ||
| events_waits_summary_by_thread_by_event_name | ||
| events_waits_summary_by_user_by_event_name | ||
| events_waits_summary_global_by_event_name | ||
| file_instances | ||
| file_summary_by_event_name | ||
| file_summary_by_instance | ||
| global_status | ||
| global_variables | ||
| host_cache | ||
| hosts | ||
| keyring_keys | ||
| log_status | ||
| memory_summary_by_account_by_event_name | ||
| memory_summary_by_host_by_event_name | ||
| memory_summary_by_thread_by_event_name | ||
| memory_summary_by_user_by_event_name | ||
| memory_summary_global_by_event_name | ||
| metadata_locks | ||
| mutex_instances | ||
| objects_summary_global_by_type | ||
| performance_timers | ||
| persisted_variables | ||
| prepared_statements_instances | ||
| processlist | ||
| replication_applier_configuration | ||
| replication_applier_filters | ||
| replication_applier_global_filters | ||
| replication_applier_status | ||
| replication_applier_status_by_coordinator | ||
| replication_applier_status_by_worker | ||
| replication_asynchronous_connection_failover | ||
| replication_asynchronous_connection_failover_managed | ||
| replication_connection_configuration | ||
| replication_connection_status | ||
| replication_group_member_stats | ||
| replication_group_members | ||
| rwlock_instances | ||
| session_account_connect_attrs | ||
| session_connect_attrs | ||
| session_status | ||
| session_variables | ||
| setup_actors | ||
| setup_consumers | ||
| setup_instruments | ||
| setup_objects | ||
| setup_threads | ||
| socket_instances | ||
| socket_summary_by_event_name | ||
| socket_summary_by_instance | ||
| status_by_account | ||
| status_by_host | ||
| status_by_thread | ||
| status_by_user | ||
| table_handles | ||
| table_io_waits_summary_by_index_usage | ||
| table_io_waits_summary_by_table | ||
| table_lock_waits_summary_by_table | ||
| threads | ||
| tls_channel_status | ||
| user_defined_functions | ||
| user_variables_by_thread | ||
| users | ||
| variables_by_thread | ||
| variables_info |
这里的数据表分为几类:
- setup table : 设置表,配置监控选项。
- current events table : 记录当前那些thread 正在发生什么事情。
- history table 发生的各种事件的历史记录表
- summary table 对各种事件的统计表
- 杂项表,乱七八糟表。
4 sys
MySQL 5.7中引入了一个新的sys schema,sys是一个MySQL自带的系统库,在安装MySQL 5.7以后的版本,使用mysqld进行初始化时,会自动创建sys库。sys库可以帮助你轻松了解数据库的运行情况,原本需要查找performance_schema中多个表才能获得的数据,现在查询一个视图即可满足。
4.1 sys综述
sys schema里包含1个表,100个视图,存储过程及函数共48个,如下图所示:
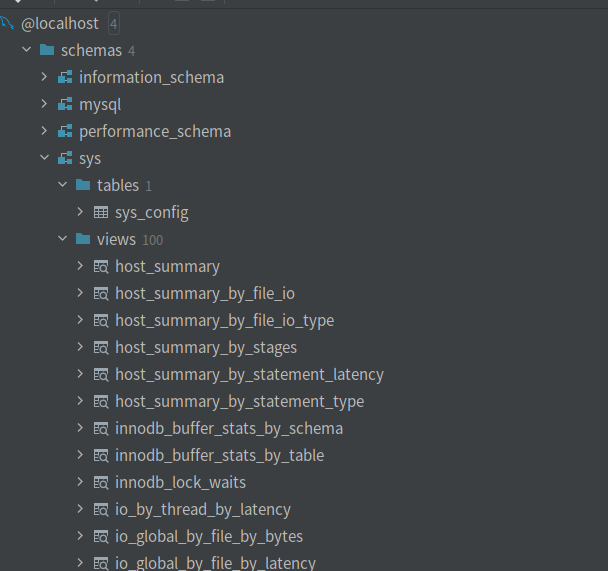
ys schema里的视图主要分为两类,一类是正常以字母开头的,共52个,一类是以 x$ 开头的,共48个。字母开头的视图显示的是格式化数据,更易读,而 x$ 开头的视图适合工具采集数据,显示的是原始未处理过的数据。
- host_summary:这个是服务器层面的,以IP分组,比如里面的视图host_summary_by_file_io;
- user_summary:这个是用户层级的,以用户分组,比如里面的视图user_summary_by_file_io;
- innodb:这个是InnoDB层面的,比如视图innodb_buffer_stats_by_schema;
- io:这个是I/O层的统计,比如视图io_global_by_file_by_bytes;
- memory:关于内存的使用情况,比如视图memory_by_host_by_current_bytes;
- schema:关于schema级别的统计信息,比如schema_table_lock_waits;
- session:关于会话级别的,这类视图少一些,只有session和session_ssl_status;
- statement:关于语句级别的,比如statements_with_errors_or_warnings;
- wait:关于等待的,比如视图waits_by_host_by_latency。
4.2 常用查询
- 查看每个客户端IP过来的连接消耗了多少资源。
mysql> select * from host_summary;
- 查看某个数据文件上发生了多少IO请求。
mysql> select * from io_global_by_file_by_bytes;
- 查看每个用户消耗了多少资源。
mysql> select * from user_summary;
- 查看总共分配了多少内存。
mysql> select * from memory_global_total;
- 查看当前连接情况。
mysql> select host, current_connections, statements from host_summary;
- 查看当前正在执行的SQL和执行show full processlist的效果相当。
mysql> select conn_id, user, current_statement, last_statement from session;
- 查询TOP 10最热SQL。
mysql> select db,exec_count,query from statement_analysis order by exec_count desc limit 10;
- 查看哪个文件产生了最多的IO,读多,还是写的多。
mysql> select * from io_global_by_file_by_bytes limit 10;
- 查看哪个表上的IO请求最多
mysql> select * from io_global_by_file_by_bytes where file like ‘%ibd’ order by total desc limit 10;
- 查看哪个表被访问的最多?先访问statement_analysis,根据热门SQL排序找到相应的数据表。
mysql> select * from statement_analysis order by avg_latency desc limit 10;
- 查看哪些SQL执行了全表扫描或执行了排序操作?
mysql> select * from statements_with_sorting;
mysql> select * from statements_with_full_table_scans;
- 查看哪些SQL语句使用了临时表,又有哪些用到了磁盘临时表?查看statement_analysis中哪个SQL的tmp_tables 、tmp_disk_tables值大于0即可。
mysql> select db, query, tmp_tables, tmp_disk_tables from statement_analysis where tmp_tables>0 or tmp_disk_tables >0 order by (tmp_tables+tmp_disk_tables) desc limit 20;
- 查看哪个表占用了最多的buffer pool?
mysql> select * from innodb_buffer_stats_by_table order by allocated desc limit 10;
- 查看每个库(database)占用多少buffer pool?
mysql> select * from innodb_buffer_stats_by_schema order by allocated desc limit 10;
- 查询每个连接分配多少内存?利用session表和memory_by_thread_by_current_bytes分配表进行关联查询。
mysql> select b.user, current_count_used, current_allocated, current_avg_alloc, current_max_alloc, total_allocated,current_statement from memory_by_thread_by_current_bytes a, session b where a.thread_id = b.thd_id;
- 查询MySQL自增长字段的最大值和当前已经使用到的值?
mysql> select * from schema_auto_increment_columns;
- 查询MySQL有哪些冗余索引和无用索引?
mysql> select * from schema_redundant_indexes;
mysql> select * from schema_unused_indexes;
- 查看事务等待情况
mysql> select * from innodb_lock_waits;


 5504
5504


 被折叠的 条评论
为什么被折叠?
被折叠的 条评论
为什么被折叠?
 到【灌水乐园】发言


