


SSM整合——个人笔记
一、 介绍SSM
SSM指的是Spring+SpringMVC+MyBatis集成的一个Web应用程序开源框架。Spring是一个控制反转(IOC)和面向切面(AOP)的容器管理框架。SpringMVC是Spring的后续产品,是一个开源的Web应用程序MVC框架,简单易使用。MyBatis由apache的一个开源项目iBatis而来,是一个基于Java的持久层框架。提供的持久层框架包括SQL Maps和Data Access Objects(DAO)MyBatis 消除了几乎所有的JDBC代码和参数手工设置以及结果集的检索。MyBatis 使用简单的 XML或注解用于配置和原始映射,将接口和 Java 的POJOs(PlainOld Java Objects,普通的 Java对象)映射成数据库中的记录。
二、SSM整合配置文件介绍
整合的配置文件分为四个,依次是:db.properties,保存数据库连接信息;spring.xml,加载配置文件,配置扫描;spring-mybatis.xml,用于配置数据源和SqlSessionFactory等MyBatis相关设置;spring-mvc.xml,配置Controller扫描和mvc视图解析器以及文件上传等。因为Controller属于MVC架构,所以这里我把Controller单独扫描。
三、导入jar包
用eclipse新建一个动态web项目SSM

在WEB_INF目录下的lib中添加jar包:

注:jackson开头的三个jar包是用来处理跟JSON数据有关操作的,如果不适用JSON可以不要
四、整合Spring+MyBatis
(一)、配置数据库连接db.properties
在src新建config目录,在config中创建db.properties,进行如下配置:
#数据库驱动
jdbc.driver=com.mysql.jdbc.Driver
#数据库地址
jdbc.url=jdbc:mysql://localhost:3306/db_ssm
#用户名
jdbc.username=root
#密码
jdbc.password=root
#定义初始连接数
jdbc.initialSize=0
#定义最大连接数
jdbc.maxActive=20
#定义最大空闲
jdbc.maxIdle=20
#定义最小空闲
jdbc.minIdle=1
#定义最长等待时间
jdbc.maxWait=60000
(二)、配置spring.xml文件
在config中创建spring.xml文件,进行如下配置:
<beans xmlns="http://www.springframework.org/schema/beans"
xmlns:xsi="http://www.w3.org/2001/XMLSchema-instance"
xmlns:context="http://www.springframework.org/schema/context"
xmlns:tx="http://www.springframework.org/schema/tx"
xsi:schemaLocation="
http://www.springframework.org/schema/beans
http://www.springframework.org/schema/beans/spring-beans-4.3.xsd
http://www.springframework.org/schema/context
http://www.springframework.org/schema/context/spring-context-4.3.xsd
http://www.springframework.org/schema/tx
http://www.springframework.org/schema/tx/spring-tx-4.2.xsd">
<!-- 引入jdbc配置文件 -->
<context:property-placeholderlocation="classpath:config/db.properties"/>
<!-- 扫描除Controller外的所有注解 -->
<context:component-scanbase-package="com.web">
<context:exclude-filtertype="annotation"
expression="org.springframework.stereotype.Controller"/>
</context:component-scan>
</beans>
注:spring.xml中扫描的是除了Controller外的所有类型,不扫描Controller使用的是<context:exclude-filter/>将Controller不包括在内。

(三)、配置spring-mybatis.xml
在config中创建spring-mybatis.xml文件,进行如下配置:
<beans xmlns="http://www.springframework.org/schema/beans"
xmlns:xsi="http://www.w3.org/2001/XMLSchema-instance"
xmlns:tx="http://www.springframework.org/schema/tx"
xsi:schemaLocation="
http://www.springframework.org/schema/beans
http://www.springframework.org/schema/beans/spring-beans-4.3.xsd
http://www.springframework.org/schema/tx
http://www.springframework.org/schema/tx/spring-tx-4.2.xsd">
<!-- 配置数据源 -->
<bean id="dataSource" class="org.apache.commons.dbcp.BasicDataSource"
destroy-method="close">
<property name="driverClassName" value="${jdbc.driver}"/>
<property name="url" value="${jdbc.url}"/>
<property name="username" value="${jdbc.username}"/>
<property name="password" value="${jdbc.password}"/>
<!-- 初始化连接大小 -->
<property name="initialSize" value="${jdbc.initialSize}"/>
<!-- 连接池最大数量 -->
<property name="maxActive" value="${jdbc.maxActive}"/>
<!-- 连接池最大空闲 -->
<property name="maxIdle" value="${jdbc.maxIdle}"/>
<!-- 连接池最小空闲 -->
<property name="minIdle" value="${jdbc.minIdle}"/>
<!-- 获取连接最大等待时间 -->
<property name="maxWait" value="${jdbc.maxWait}"/>
</bean>
<!-- 配置sqlSessionFactory -->
<bean id="sqlSessionFactory" class="org.mybatis.spring.SqlSessionFactoryBean">
<property name="dataSource" ref="dataSource"/>
<!-- 自动扫描mapper文件 -->
<property name="mapperLocations" value="classpath:com/web/mapper/*.xml"/>
</bean>
<!-- 扫描dao中的mapper接口装配到SQLSessionFactory中与mapper文件进行绑定并初始化bean,此项必须配置,不然无法初始化dao的bean,且basePackage的value必须是dao接口(mapper接口)所在的具体的包名,文件如果在com.web.dao中,value值就必须是com.web.dao-->
<bean class="org.mybatis.spring.mapper.MapperScannerConfigurer">
<property name="basePackage" value="org.web.ssm.dao"/>
<property name="sqlSessionFactoryBeanName" value="sqlSessionFactory"/>
</bean>
<!-- 声明事务管理 -->
<bean id="txManager"
class="org.springframework.jdbc.datasource.DataSourceTransactionManager">
<property name="dataSource" ref="dataSource"/>
</bean>
<!-- 开启事务注解 -->
<tx:annotation-driven transaction-manager="txManager"/>
</beans>


(四)、在mysql中创建db_ssm_test数据库,创建tb_uer表
DROP TABLE IF EXISTS `tb_user`;
CREATE TABLE `tb_user` (
`id` int(11) NOT NULL AUTO_INCREMENT COMMENT '主键id',
`username` varchar(255) DEFAULT NULL COMMENT '用户名',
`password` varchar(255) DEFAULT NULL COMMENT '密码',
`birth` date DEFAULT NULL COMMENT '生日',
`age` int(11) DEFAULT NULL COMMENT '年龄',
PRIMARY KEY (`id`)
) ENGINE=InnoDB AUTO_INCREMENT=1 DEFAULTCHARSET=utf8;
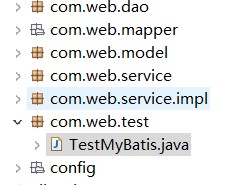
(五)、建立model、dao、service、serviceImpl进行测试
1、结构:

2、Model:
public class User{
privateint id;
private String username;
private String password;
private Date birth;
private int age;
public User(){
}
public int getId(){
return id;
}
public void setId(int id){
this.id=id;
}
public String getUsername(){
return username;
}
public void setUsername(String username){
this.username=username;
}
public String getPassword(){
return password;
}
public void setPassword(String password){
this.password=password;
}
public Date getBirth(){
return birth;
}
public void setBirth(Date birth){
this.birth=birth;
}
public int getAge(){
return age;
}
public void setAge(int age){
this.age=age;
}
@Override
public String toString(){
return" User [id=" + id + ",username=" + username + ",password=" + password + ",birth=" + birth + ",age=" + age + "]";
}
}
3、Dao:
public interface UserDao {
//查找所有信息
public List<User> findAll();
//根据id查找
public User findById(int id);
//添加一条数据
public int add(User u);
//修改一条数据
public int update(User u);
//根据id删除数据
public void deleteById(int id);
}
4、Service:
public interface UserService {
//查找所有信息
public List<User> findAll();
//根据id查找
public User findById(int id);
//添加一条数据
public int add(User u);
//修改一条数据
public int update(User u);
//根据id删除数据
public void deleteById(int id);
}
5、ServiceImpl:
@Service("userService")
public class UserServiceImpl implementsUserService {
private UserDao dao;
public UserDao getDao() {
returndao;
}
@Autowired
public void setDao(UserDao dao) {
this.dao= dao;
}
@Override
public List<User> findAll() {
return dao.findAll();
}
@Override
public User findById(int id) {
return dao.findById(id);
}
@Override
public int add(User u) {
return dao.add(u);
}
@Override
public int update(User u) {
return dao.update(u);
}
@Override
public void deleteById(int id) {
dao.deleteById(id);
}
}
6、UserMapper.xml:
<!DOCTYPE mapper PUBLIC"-//mybatis.org//DTD Mapper 3.0//EN"
"htpp://mybatis.org/dtd/mybatis-3-mapper.dtd">
<mapper namespace="com.web.dao.UserDao">
<!--ResultMap应用 -->
<resultMap id="UserMap" type="com.web.model.User">
<result property="id" column="id" />
<result property="username" column="username" />
<result property="password" column="password" />
<result property="birth" column="birth" />
<result property="age" column="age" />
</resultMap>
<!--查找所有数据 -->
<select id ="findAll" resultMap="UserMap">
select* from tb_user
</select>
<!--根据id查找数据 -->
<select id="findById" parameterType="int" resultMap="UserMap">
select * from tb_user where id=#{id}
</select>
<!--添加一条数据 -->
<insert id="add" parameterType="com.web.model.User">
insert into tb_user(id,username,password,birth,age)
values(#{id},#{username},#{password},#{birth},#{age})
</insert>
<!--修改一条数据 -->
<update id="update" parameterType="com.web.model.User">
update tb_user set username=#{username},password=#{password},
birth=#{birth},age=#{age} where id=#{id}
</update>
<!--删除一条数据 -->
<delete id="deleteById" parameterType="int">
delete from tb_user where id=#{id}
</delete>
</mapper>
(六)、测试
新建com.web.test包,新建TestMyBatis类:
package com.web.test;
import java.util.Date;
import java.util.List;
import org.junit.Before;
import org.junit.Test;
import org.springframework.context.ApplicationContext;
import org.springframework.context.support.ClassPathXmlApplicationContext;
import com.web.model.User;
import com.web.service.UserService;
public class TestMyBatis {
private ApplicationContext ac;
private UserService userService;
@Before
public void before(){
String[] s= newString[]{"config/spring.xml","config/spring-mybatis.xml"};
ac= new ClassPathXmlApplicationContext(s);
userService= (UserService)ac.getBean("userService");
}
@Test
public void testAdd(){
User u = new User();
u.setId(1);
u.setUsername("aaa");
u.setPassword("111");
int i = userService.add(u);
if(i==1)
System.out.println("添加数据成功!");
}
@Test
public void testFind(){
System.out.println("根据id查询:");
User u = userService.findById(1);
System.out.println(u);
System.out.println("全查询:");
List<User> list = userService.findAll();
for(Useruser:list)
System.out.println(user);
}
@Test
public void testUpdate(){
System.out.println("修改前:");
User u = userService.findById(1);
System.out.println(u);
System.out.println("修改后:");
u.setBirth(newDate());
userService.update(u);
User user = userService.findById(1);
System.out.println(user);
}
@Test
public void testDelete(){
userService.deleteById(1);
User u = userService.findById(1);
System.out.println(u);
}
}
测试完成后可发现全部配置正确,到此Spring+MyBatis整合成功。
五、整合SpringMVC
(一)、配置spring-mvc.xml文件
<beans xmlns="http://www.springframework.org/schema/beans"
xmlns:xsi="http://www.w3.org/2001/XMLSchema-instance"
xmlns:context="http://www.springframework.org/schema/context"
xmlns:mvc="http://www.springframework.org/schema/mvc"
xsi:schemaLocation="
http://www.springframework.org/schema/beans
http://www.springframework.org/schema/beans/spring-beans-4.3.xsd
http://www.springframework.org/schema/context
http://www.springframework.org/schema/context/spring-context-4.3.xsd
http://www.springframework.org/schema/mvc
http://www.springframework.org/schema/mvc/spring-mvc-4.3.xsd">
<!-- 扫描@Controller注解 -->
<context:component-scan base-package="com.web" use-default-filters="false">
<!-- 只对Controller注解的类初始化bean,user-default-filters必须关闭 -->
<context:include-filter type="annotation"
expression="org.springframework.stereotype.Controller"/>
</context:component-scan>
<!-- 注解驱动 -->
<mvc:annotation-driven/>
<!-- 配置文件上传 -->
<bean id="multipartResolver"
class="org.springframework.web.multipart.commons.CommonsMultipartResolver">
<!-- 默认编码 -->
<property name="defaultEncoding" value="utf-8"/>
<!-- 文件大小最大值 -->
<property name="maxUploadSize" value="302001200"/>
<!-- 内存中的最大值 -->
<property name="maxInMemorySize" value="40960"/>
<!-- 推迟文件解析,以便捕获文件大小异常 -->
<property name="resolveLazily" value="true"/>
</bean>
<!-- 视图解析器 -->
<bean id="viewResolver"
class="org.springframework.web.servlet.view.InternalResourceViewResolver">
<property name="prefix" value="/admin/"></property>
<property name="suffix" value=".jsp"></property>
</bean>
</beans>
(二)、Web.xml文件配置
<web-app xmlns:xsi="http://www.w3.org/2001/XMLSchema-instance"
xmlns="http://xmlns.jcp.org/xml/ns/javaee"
xsi:schemaLocation="http://xmlns.jcp.org/xml/ns/javaeehttp://xmlns.jcp.org/xml/ns/javaee/web-app_3_1.xsd"
id="WebApp_ID"version="3.1">
<display-name>SSM</display-name>
<welcome-file-list>
<welcome-file>admin/login.jsp</welcome-file>
</welcome-file-list>
<!--
加载spring配置文件
param-value的值可配置为classpath:config/spring*.xml,不过这样会连spring-mvc.xml文件一起加载,所以未使用
-->
<context-param>
<param-name>contextConfigLocation</param-name>
<param-value>classpath:config/spring.xml,classpath:config/spring-mybatis.xml</param-value>
</context-param>
<listener>
<description>spring监听器</description>
<listener-class>org.springframework.web.context.ContextLoaderListener</listener-class>
</listener>
<!-- 防止spring内存溢出监听器 -->
<listener>
<listener-class>org.springframework.web.util.IntrospectorCleanupListener</listener-class>
</listener>
<filter>
<description>字符集过滤器</description>
<filter-name>characterEncodingFilter</filter-name>
<filter-class>org.springframework.web.filter.CharacterEncodingFilter</filter-class>
<init-param>
<description>字符集编码</description>
<param-name>encoding</param-name>
<param-value>UTF-8</param-value>
</init-param>
<init-param>
<param-name>forceEncoding</param-name>
<param-value>true</param-value>
</init-param>
</filter>
<filter-mapping>
<filter-name>characterEncodingFilter</filter-name>
<url-pattern>/*</url-pattern>
</filter-mapping>
<servlet>
<servlet-name>springMVC</servlet-name>
<servlet-class>org.springframework.web.servlet.DispatcherServlet</servlet-class>
<init-param>
<description>springmvc配置文件</description>
<param-name>contextConfigLocation</param-name>
<param-value>classpath:config/spring-mvc.xml</param-value>
</init-param>
<load-on-startup>1</load-on-startup>
<async-supported>true</async-supported>
</servlet>
<servlet-mapping>
<servlet-name>springMVC</servlet-name>
<url-pattern>*.do</url-pattern>
</servlet-mapping>
</web-app>
(三)、测试
在src中新建com.web.controller包,在包中新建UserController.java类,在WebContent文件夹中新建admin文件夹,在admin中新建login.jsp和user.jsp。
1、UserController.java
@Controller
public class UserController {
@Resource(name="userService")
private UserService userService;
@RequestMapping("/login")
public String login(User user,HttpServletRequest request){
List<User> list = userService.findAll();
for(User u:list){
if(u.getUsername().equals(user.getUsername())&&
u.getPassword().equals(user.getPassword())){
request.getSession().setAttribute("user",user.getUsername());
return "user";
}
}
return "login";
}
}
2、login.jsp
<%@ page language="java"contentType="text/html; charset=UTF-8"
pageEncoding="UTF-8"%>
<!DOCTYPE html>
<html>
<head>
<meta http-equiv="Content-Type"content="text/html; charset=UTF-8">
<title>登录页面</title>
</head>
<body>
<form action="login.do"method="post">
用户名:<inputtype="text"name="username"><br/>
密码:<inputtype="password"name="password"><br>
<input type="reset"value="重置">
<input type="submit"value="登录">
</form>
</body>
</html>
3、user.jsp
<%@ page language="java"contentType="text/html; charset=UTF-8"
pageEncoding="UTF-8"%>
<!DOCTYPE html>
<html>
<head>
<meta http-equiv="Content-Type"content="text/html; charset=UTF-8">
<title>登录成功</title>
</head>
<body>
<%
String username=(String)session.getAttribute("user");
%>
欢迎<%=username%>,您已登录成功!
</body>
</html>
项目源码:http://download.csdn.net/download/quite64/9991864


 1279
1279

 被折叠的 条评论
为什么被折叠?
被折叠的 条评论
为什么被折叠?
 到【灌水乐园】发言


