


接着 Tomcat 源码解析一容器加载-大寂灭指(上),我们继续分析 。
再来看fixDocBase()方法的另外一种情况。
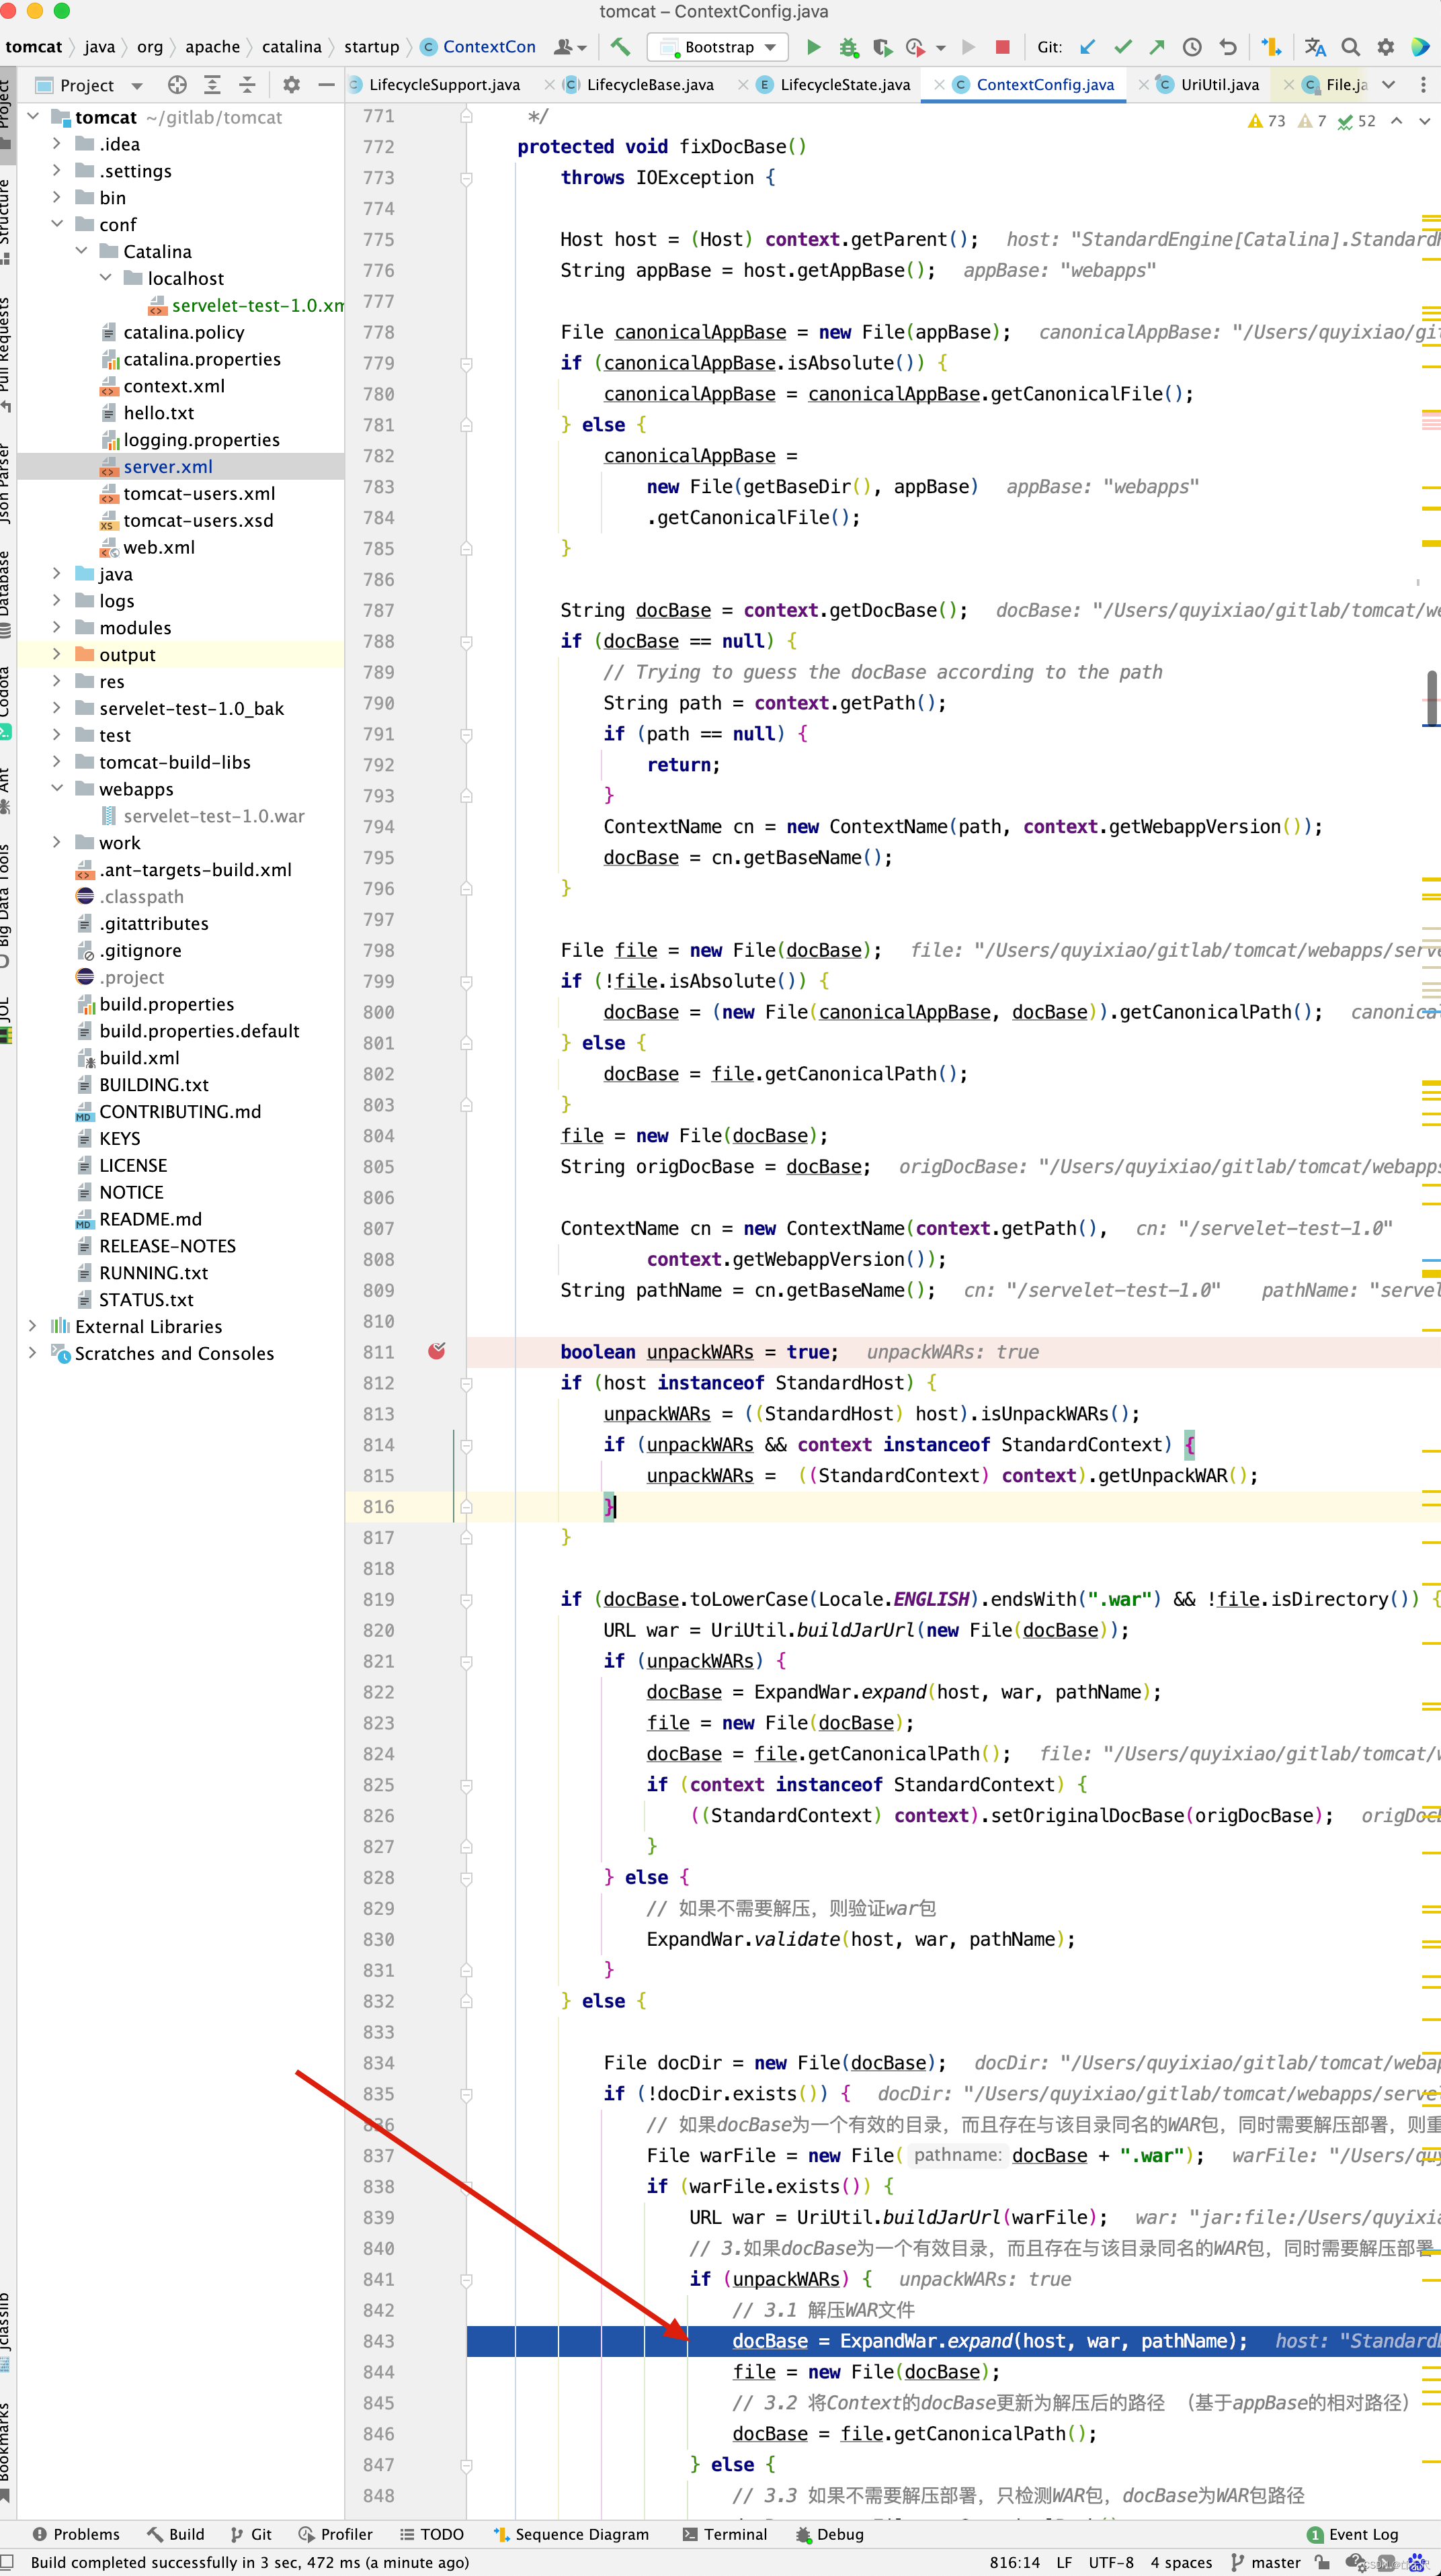
那什么时候会进入上图中箭头指向的代码呢?

我相信此时再来理解,就方便了。但是看到这里,大家有没有发现一个小问题,假如就按上图的配置,HelloServlet的doGet()方法中打印张三。
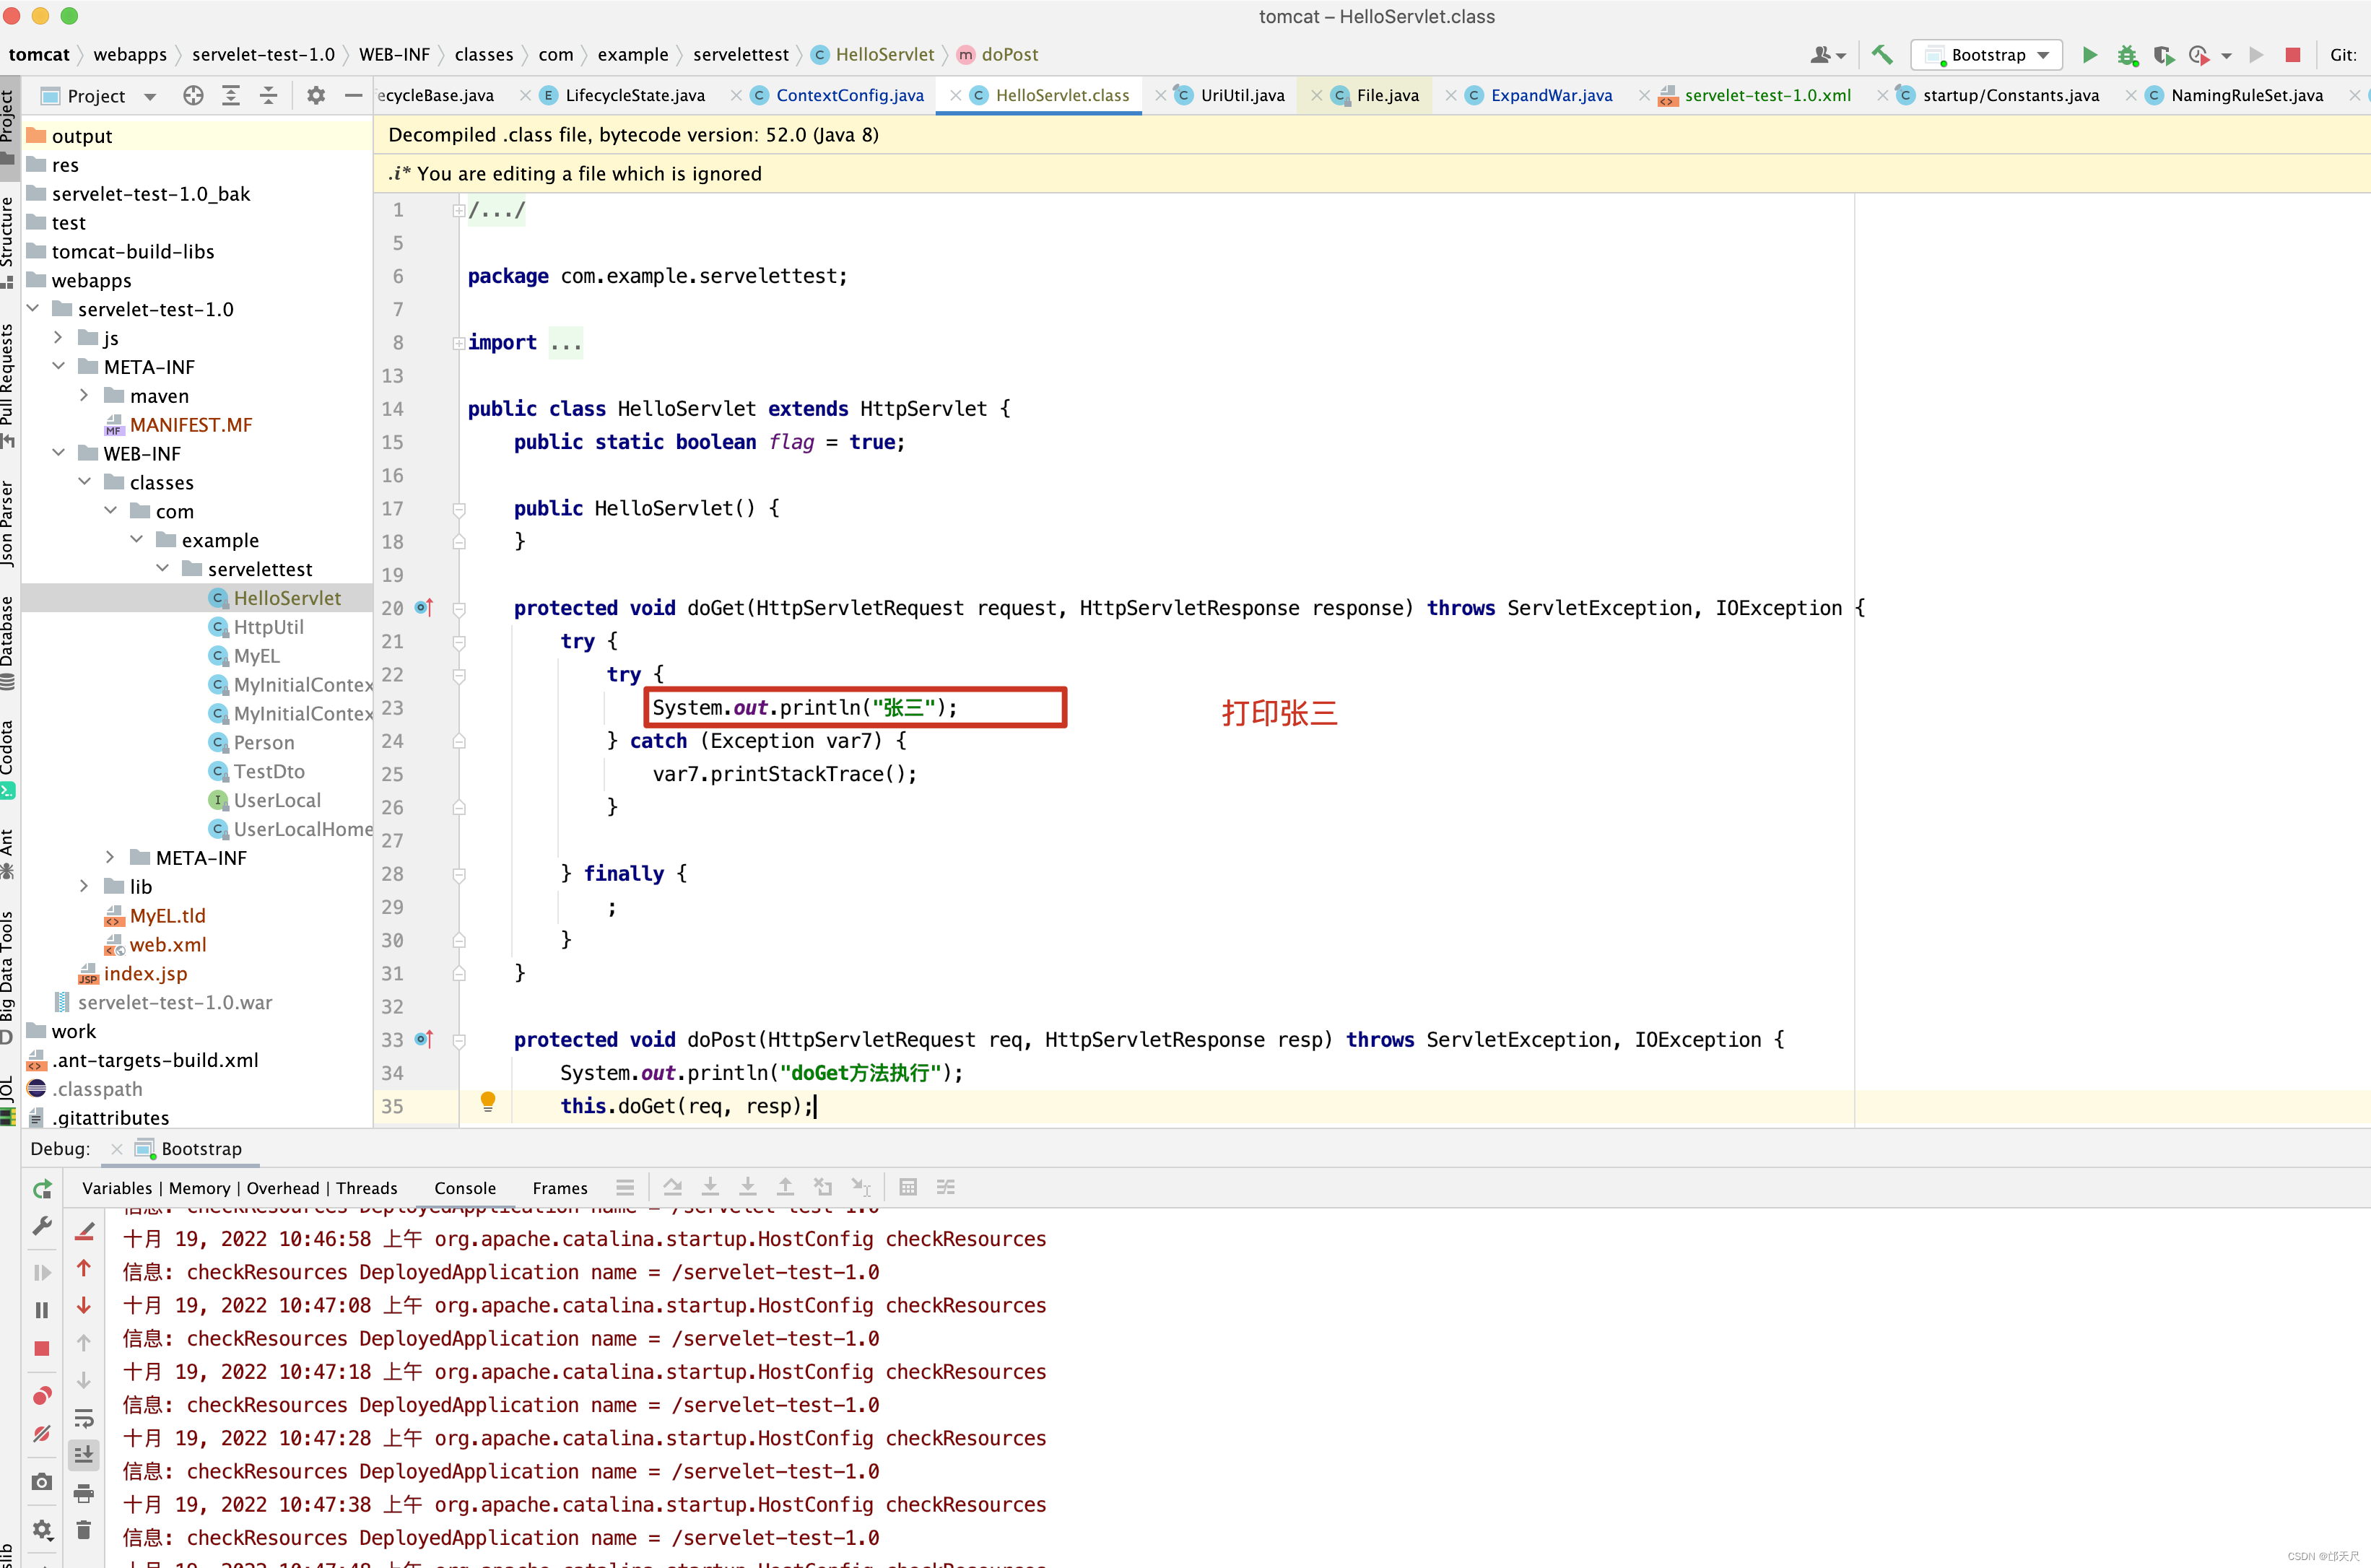
此时在代码中将张三改成李四。
停止tomcat,再将catalina.base/webapps/下的war给替换掉,再启动tomcat。
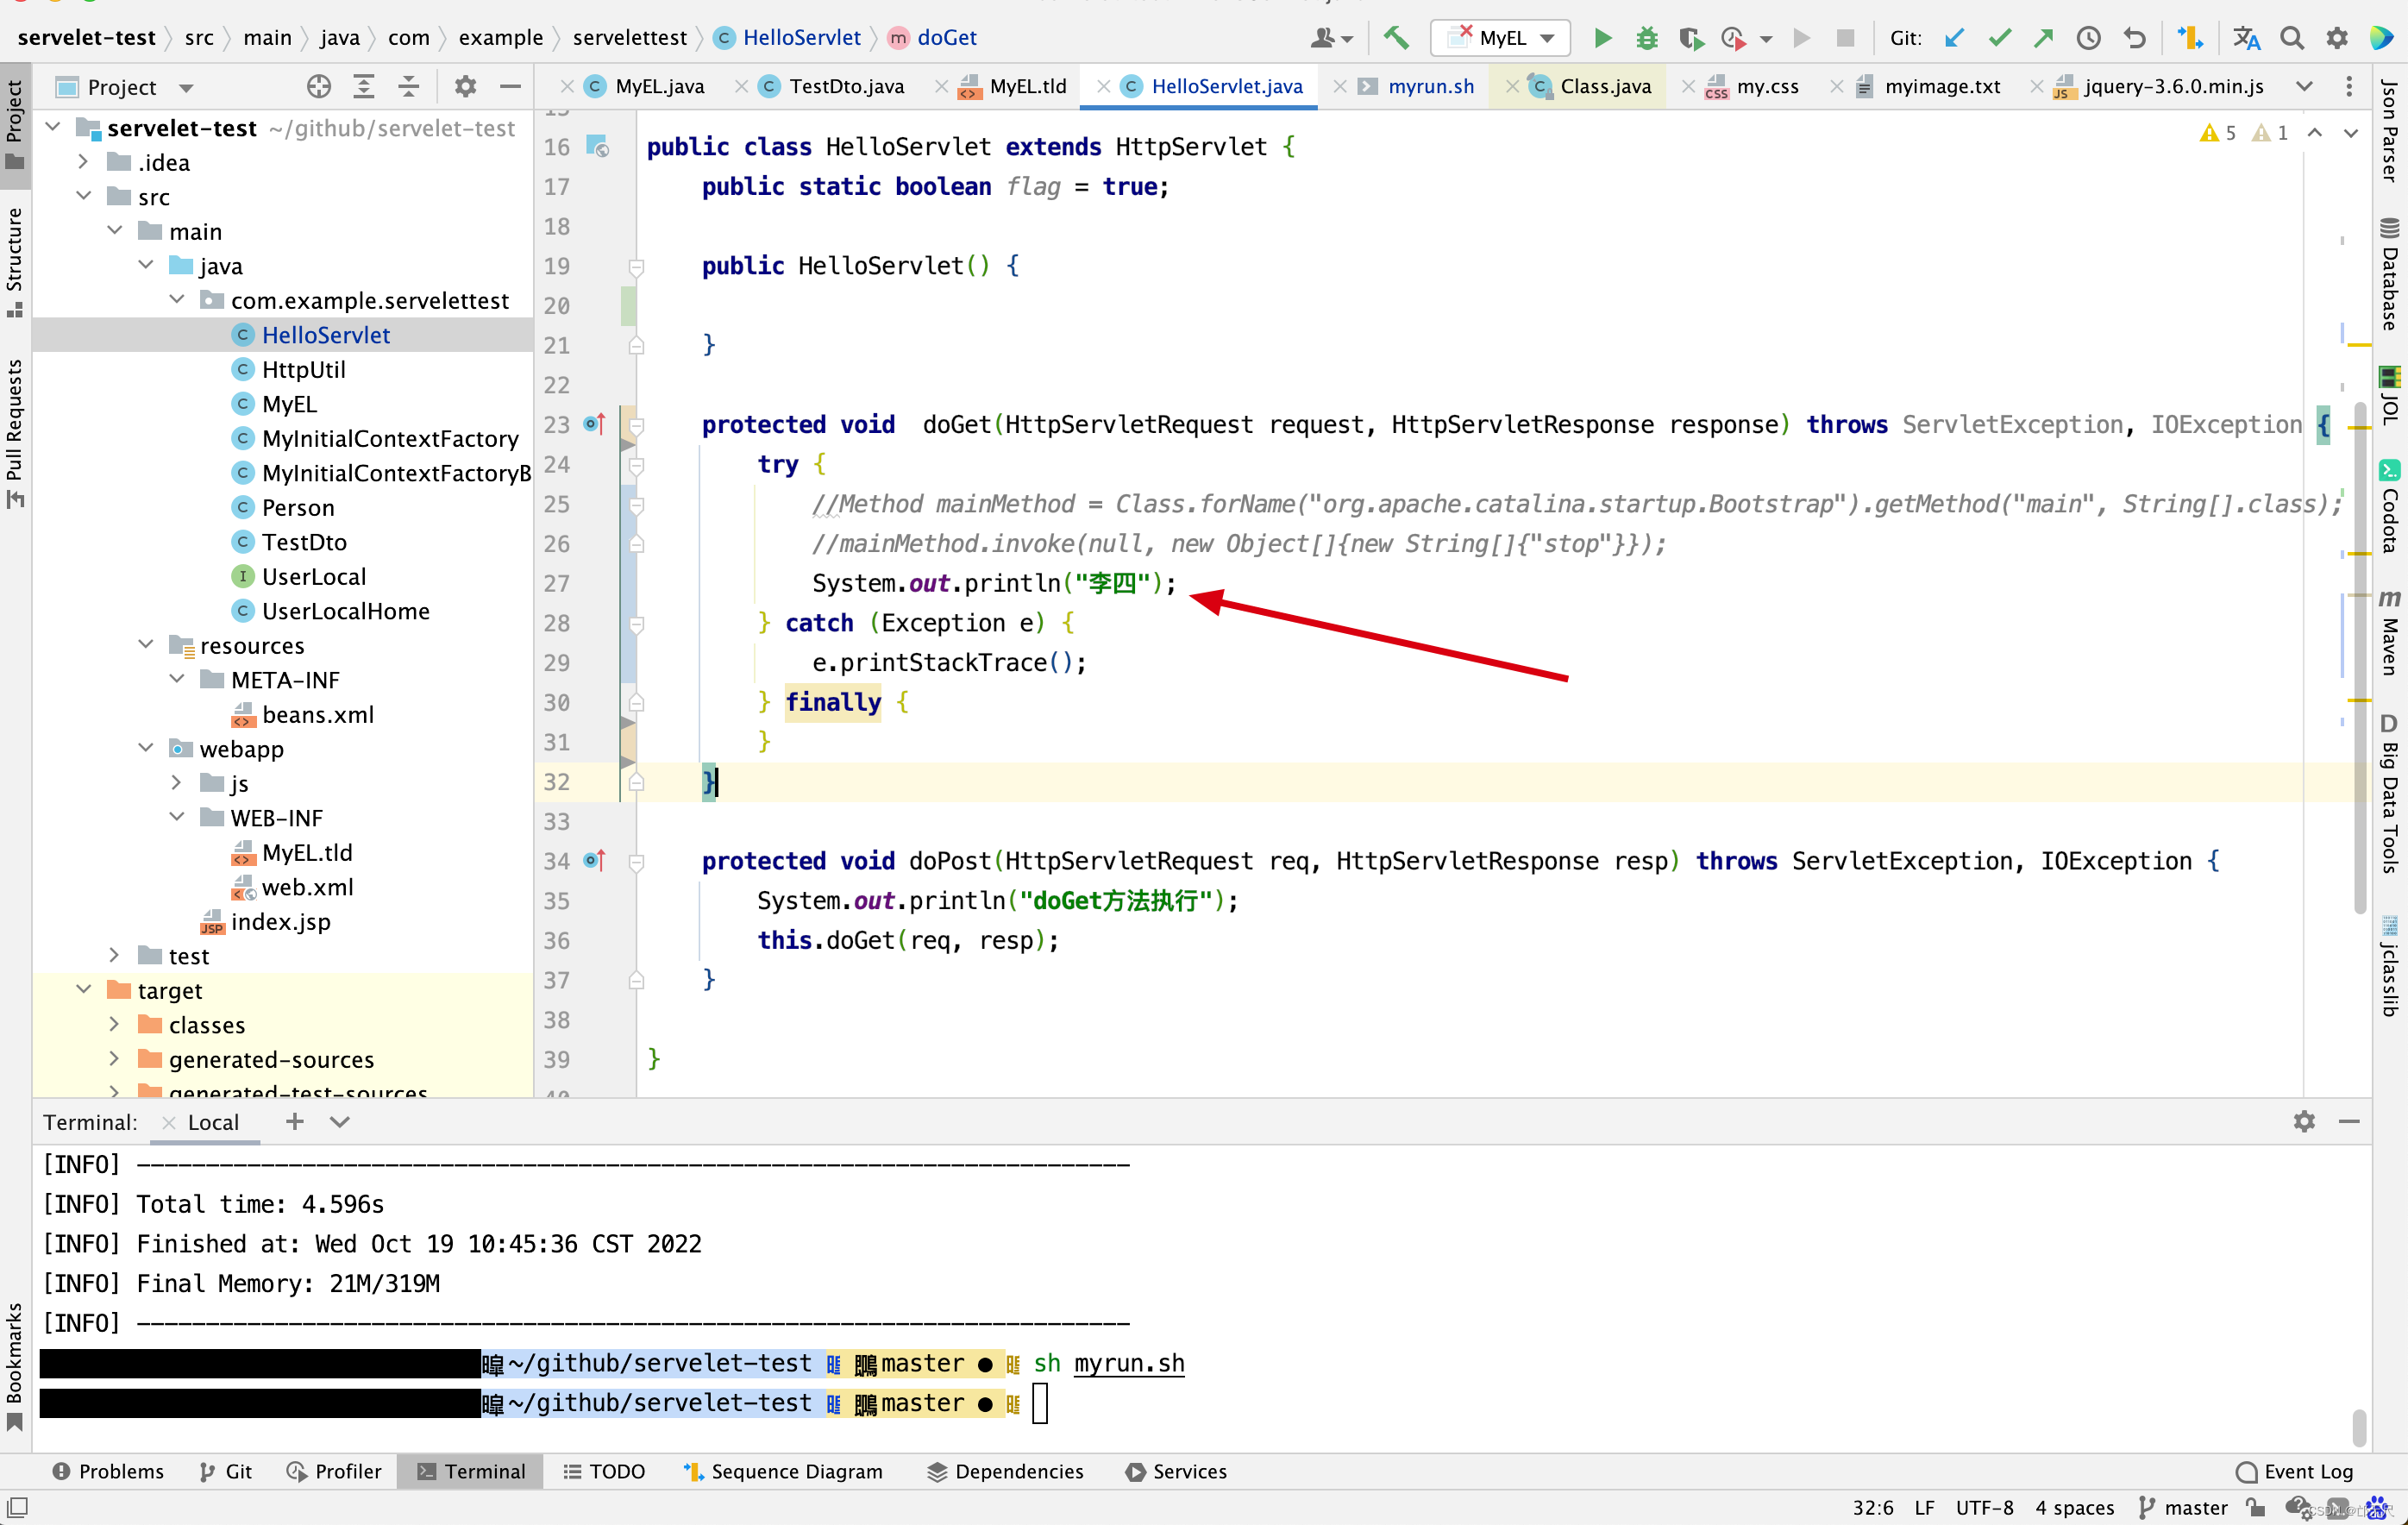
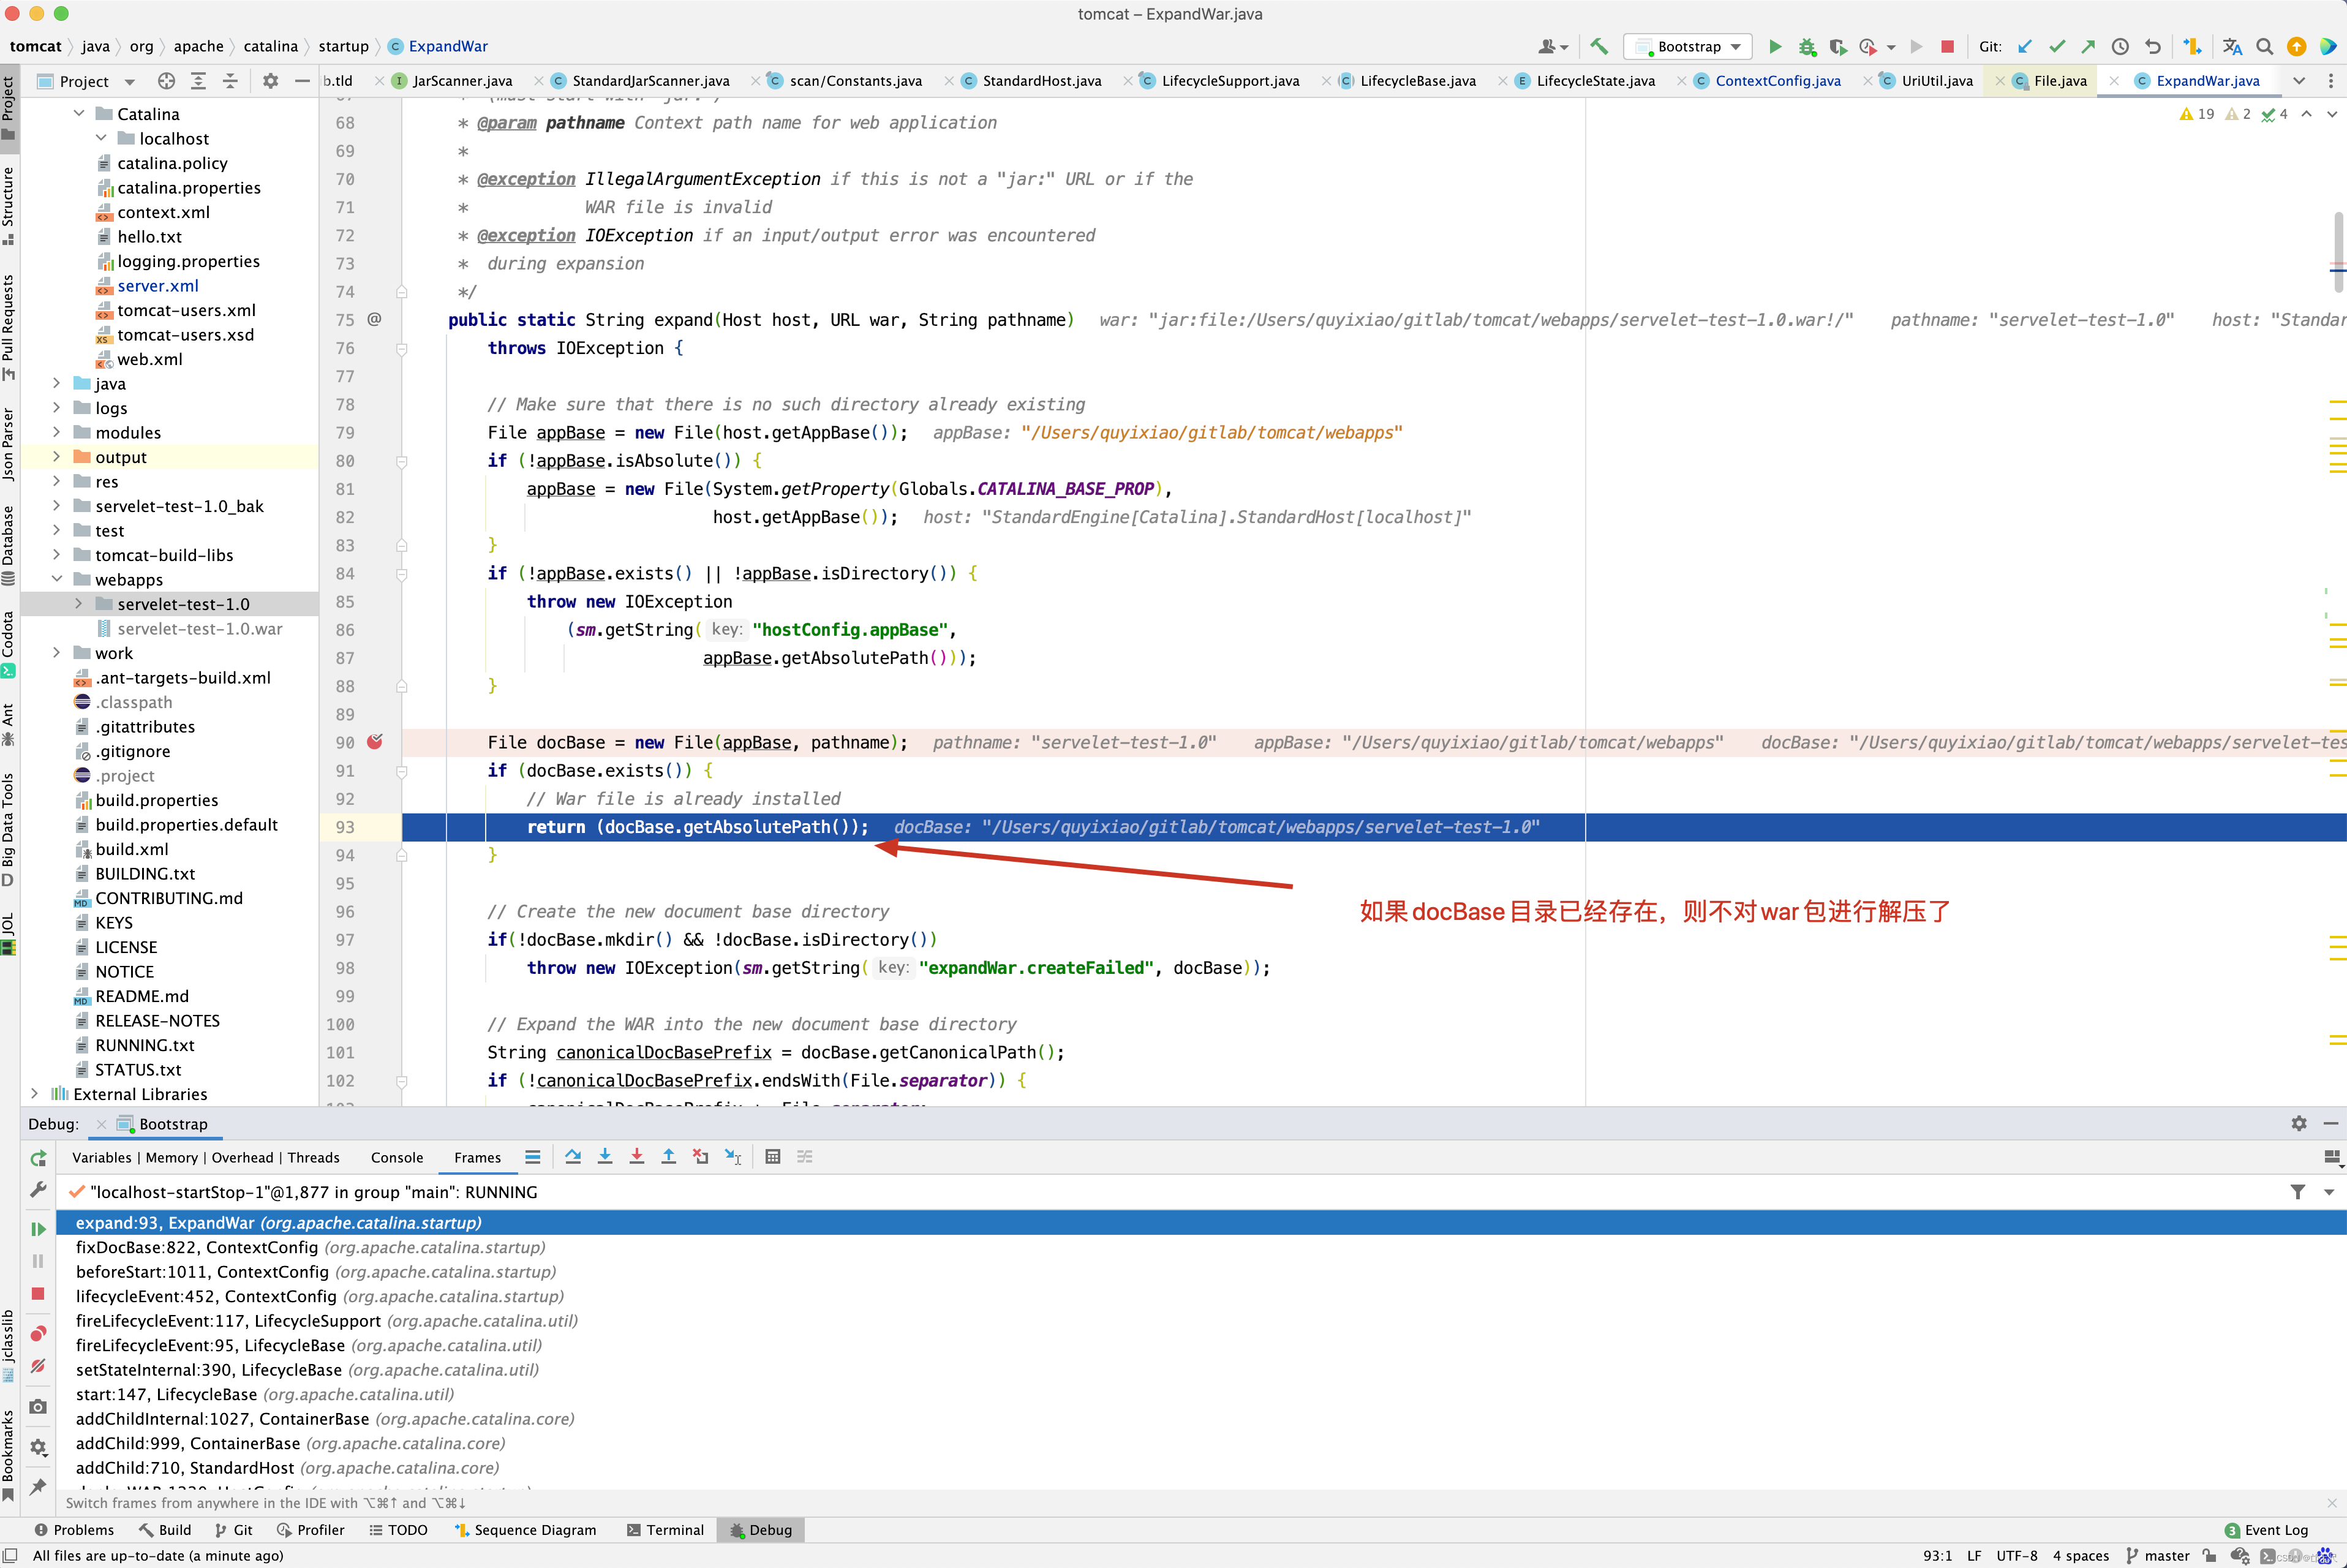
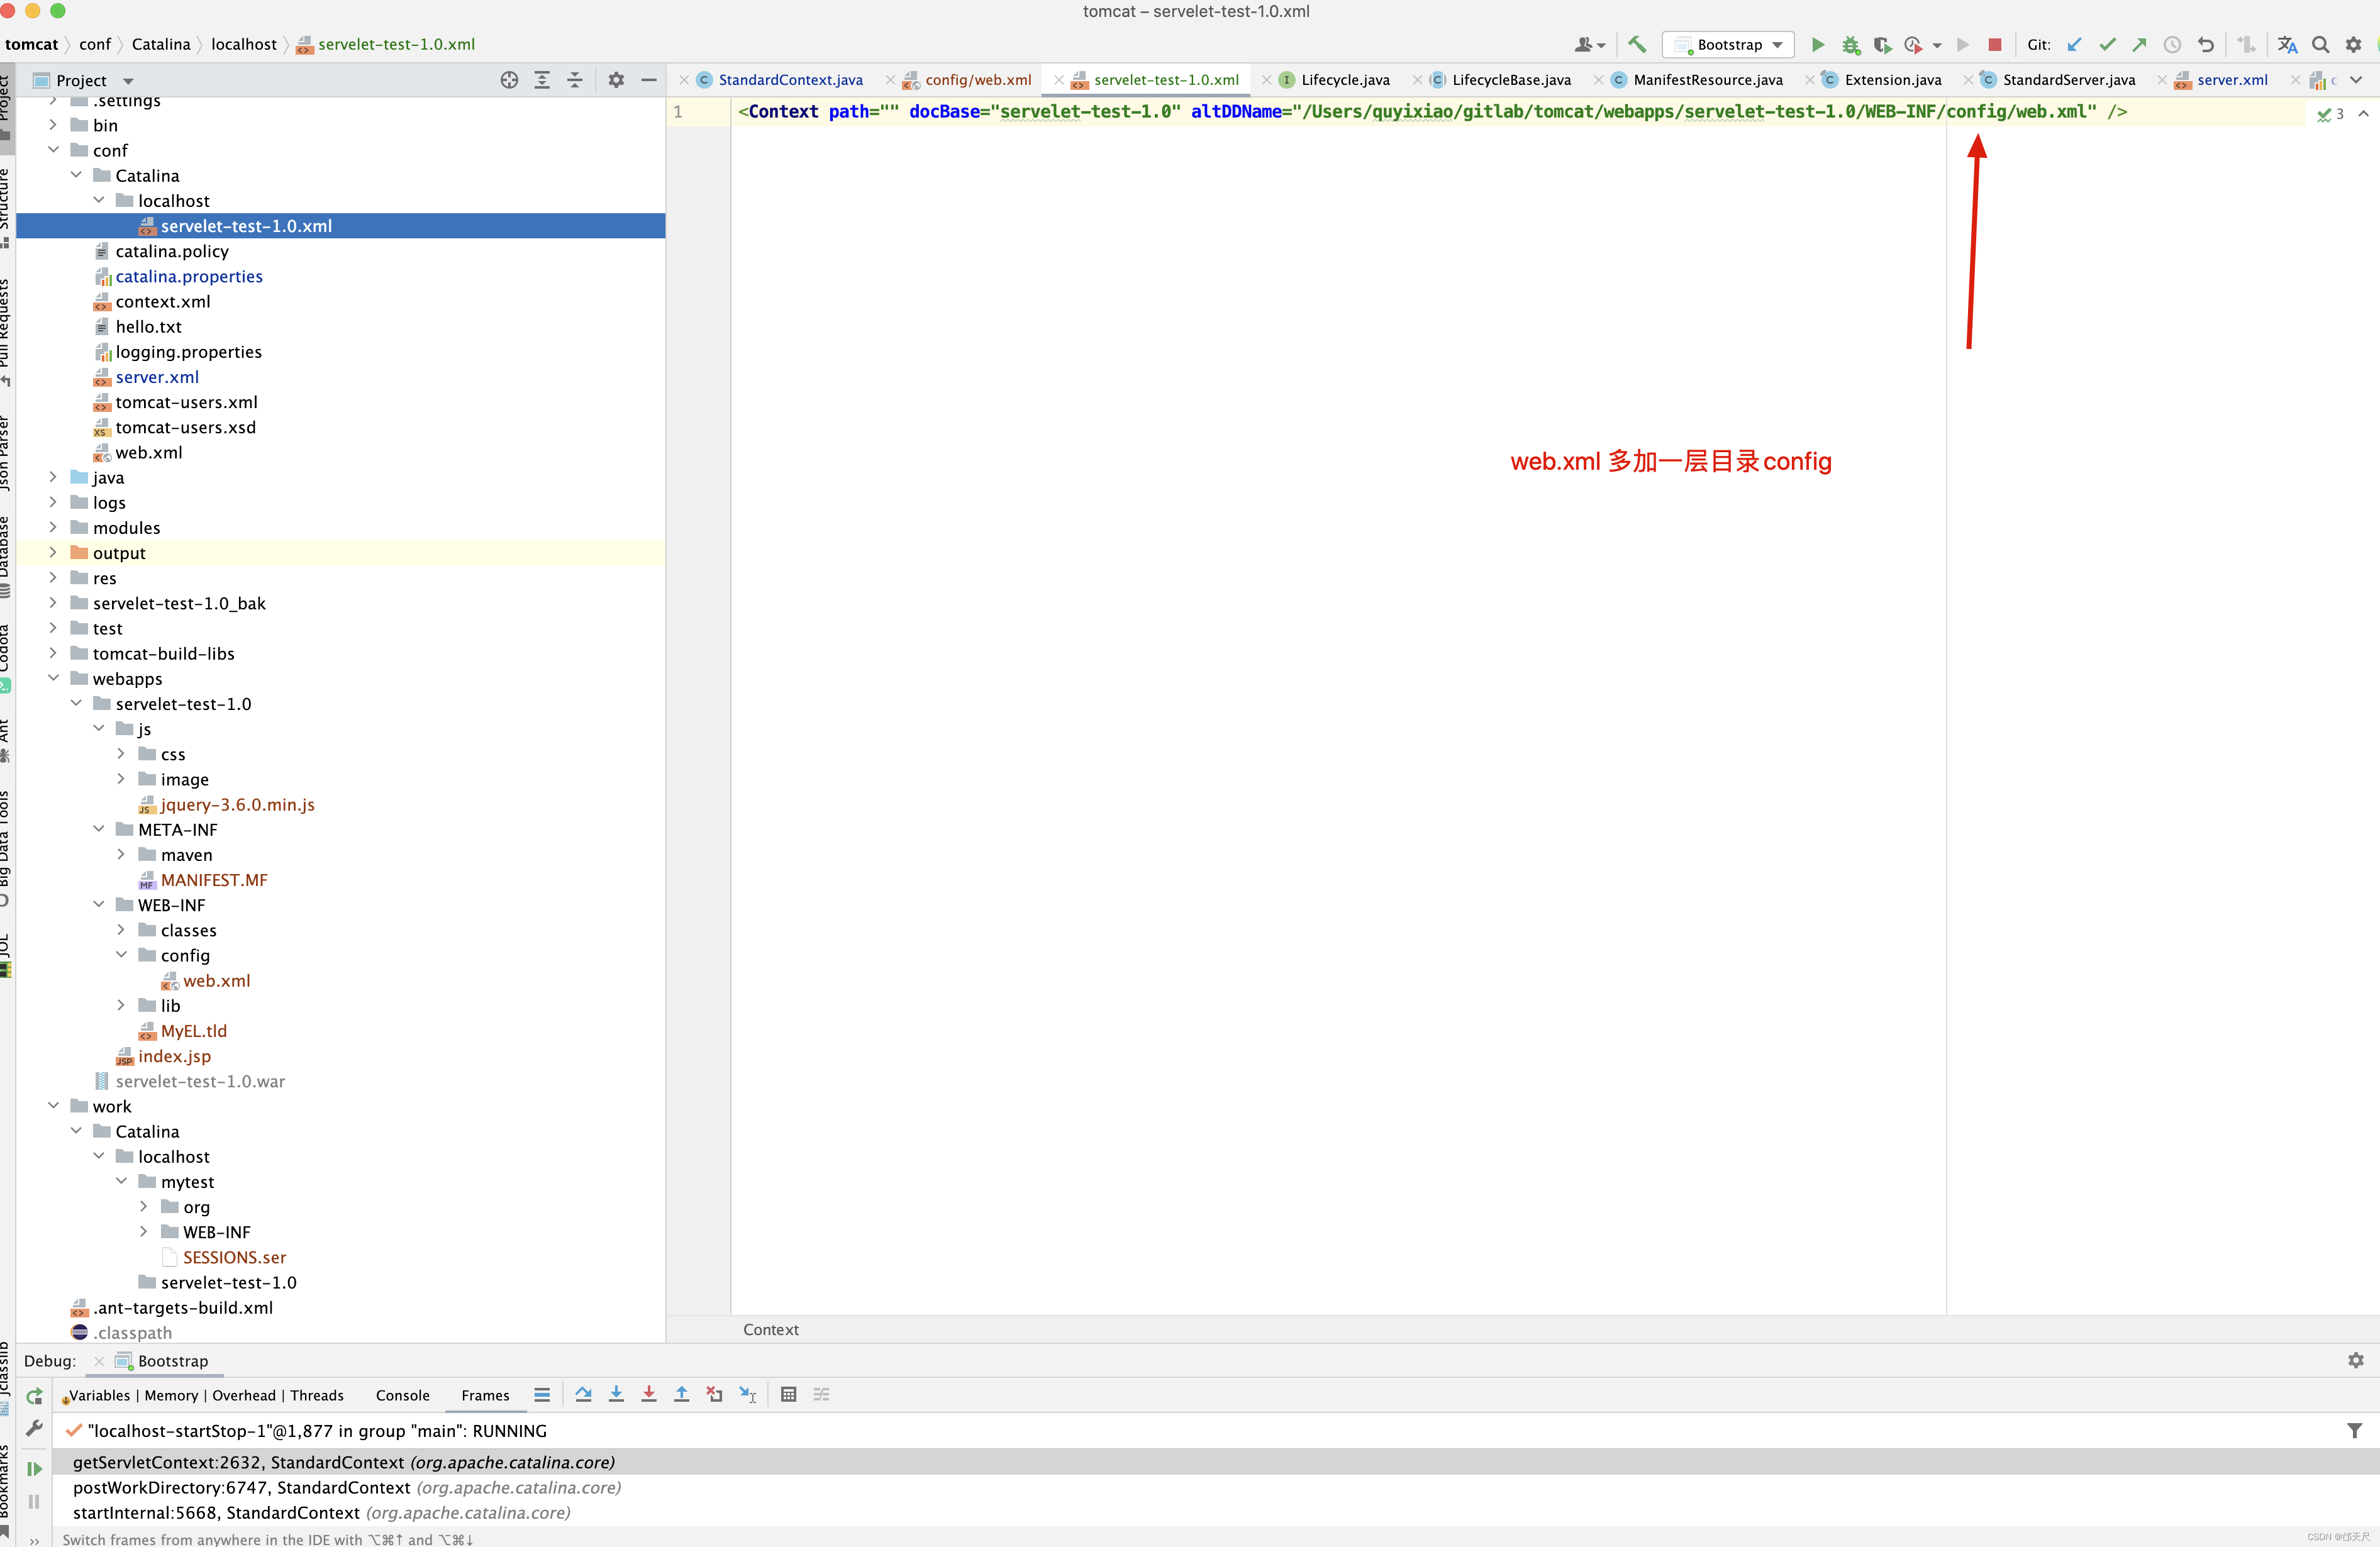
打印的还是张三,发现原因没有,就是fixDocBase()方法中的else逻辑判断,如果catalina.base/conf/[EngineName]/[HostName]/[ContextName].xml指向的<Context/> 标签指向的是一个目录,而非war包,此时如果目录存在,则不会再去解压war包了,因此在布署项目时,尽量将war包对应的目录给删除掉,再替换掉原来的war包。 当然有小伙伴可能也会发现奇怪的现象,比如先将war包给替换掉,过一会再停掉tomcat,再启动tomcat,发现新的war包生效,这是为什么呢?原因在于tomcat热布署,当tomcat检测到war包的最后修改时间不是系统之前存储的时候,证明war被修改了,此时,后台会删除掉原来的目录,再重新布署war包,因此你会发现,有个时候,不删除war包对应的目录,新代码依然生效。建议尽量不要这么做,如果热布署代码每隔10秒就运行一次,但是还没有等到热布署代码运行,此时你就将tomcat给停掉了,新代码依然不会生效。
有人会想,如果指向的是一个war包,而不是一个目录时,会不会就自动解压了呢?遗憾的告诉你,也不行,tomcat为了提升性能,当检测到目录已经存在,则不进行解压操作。
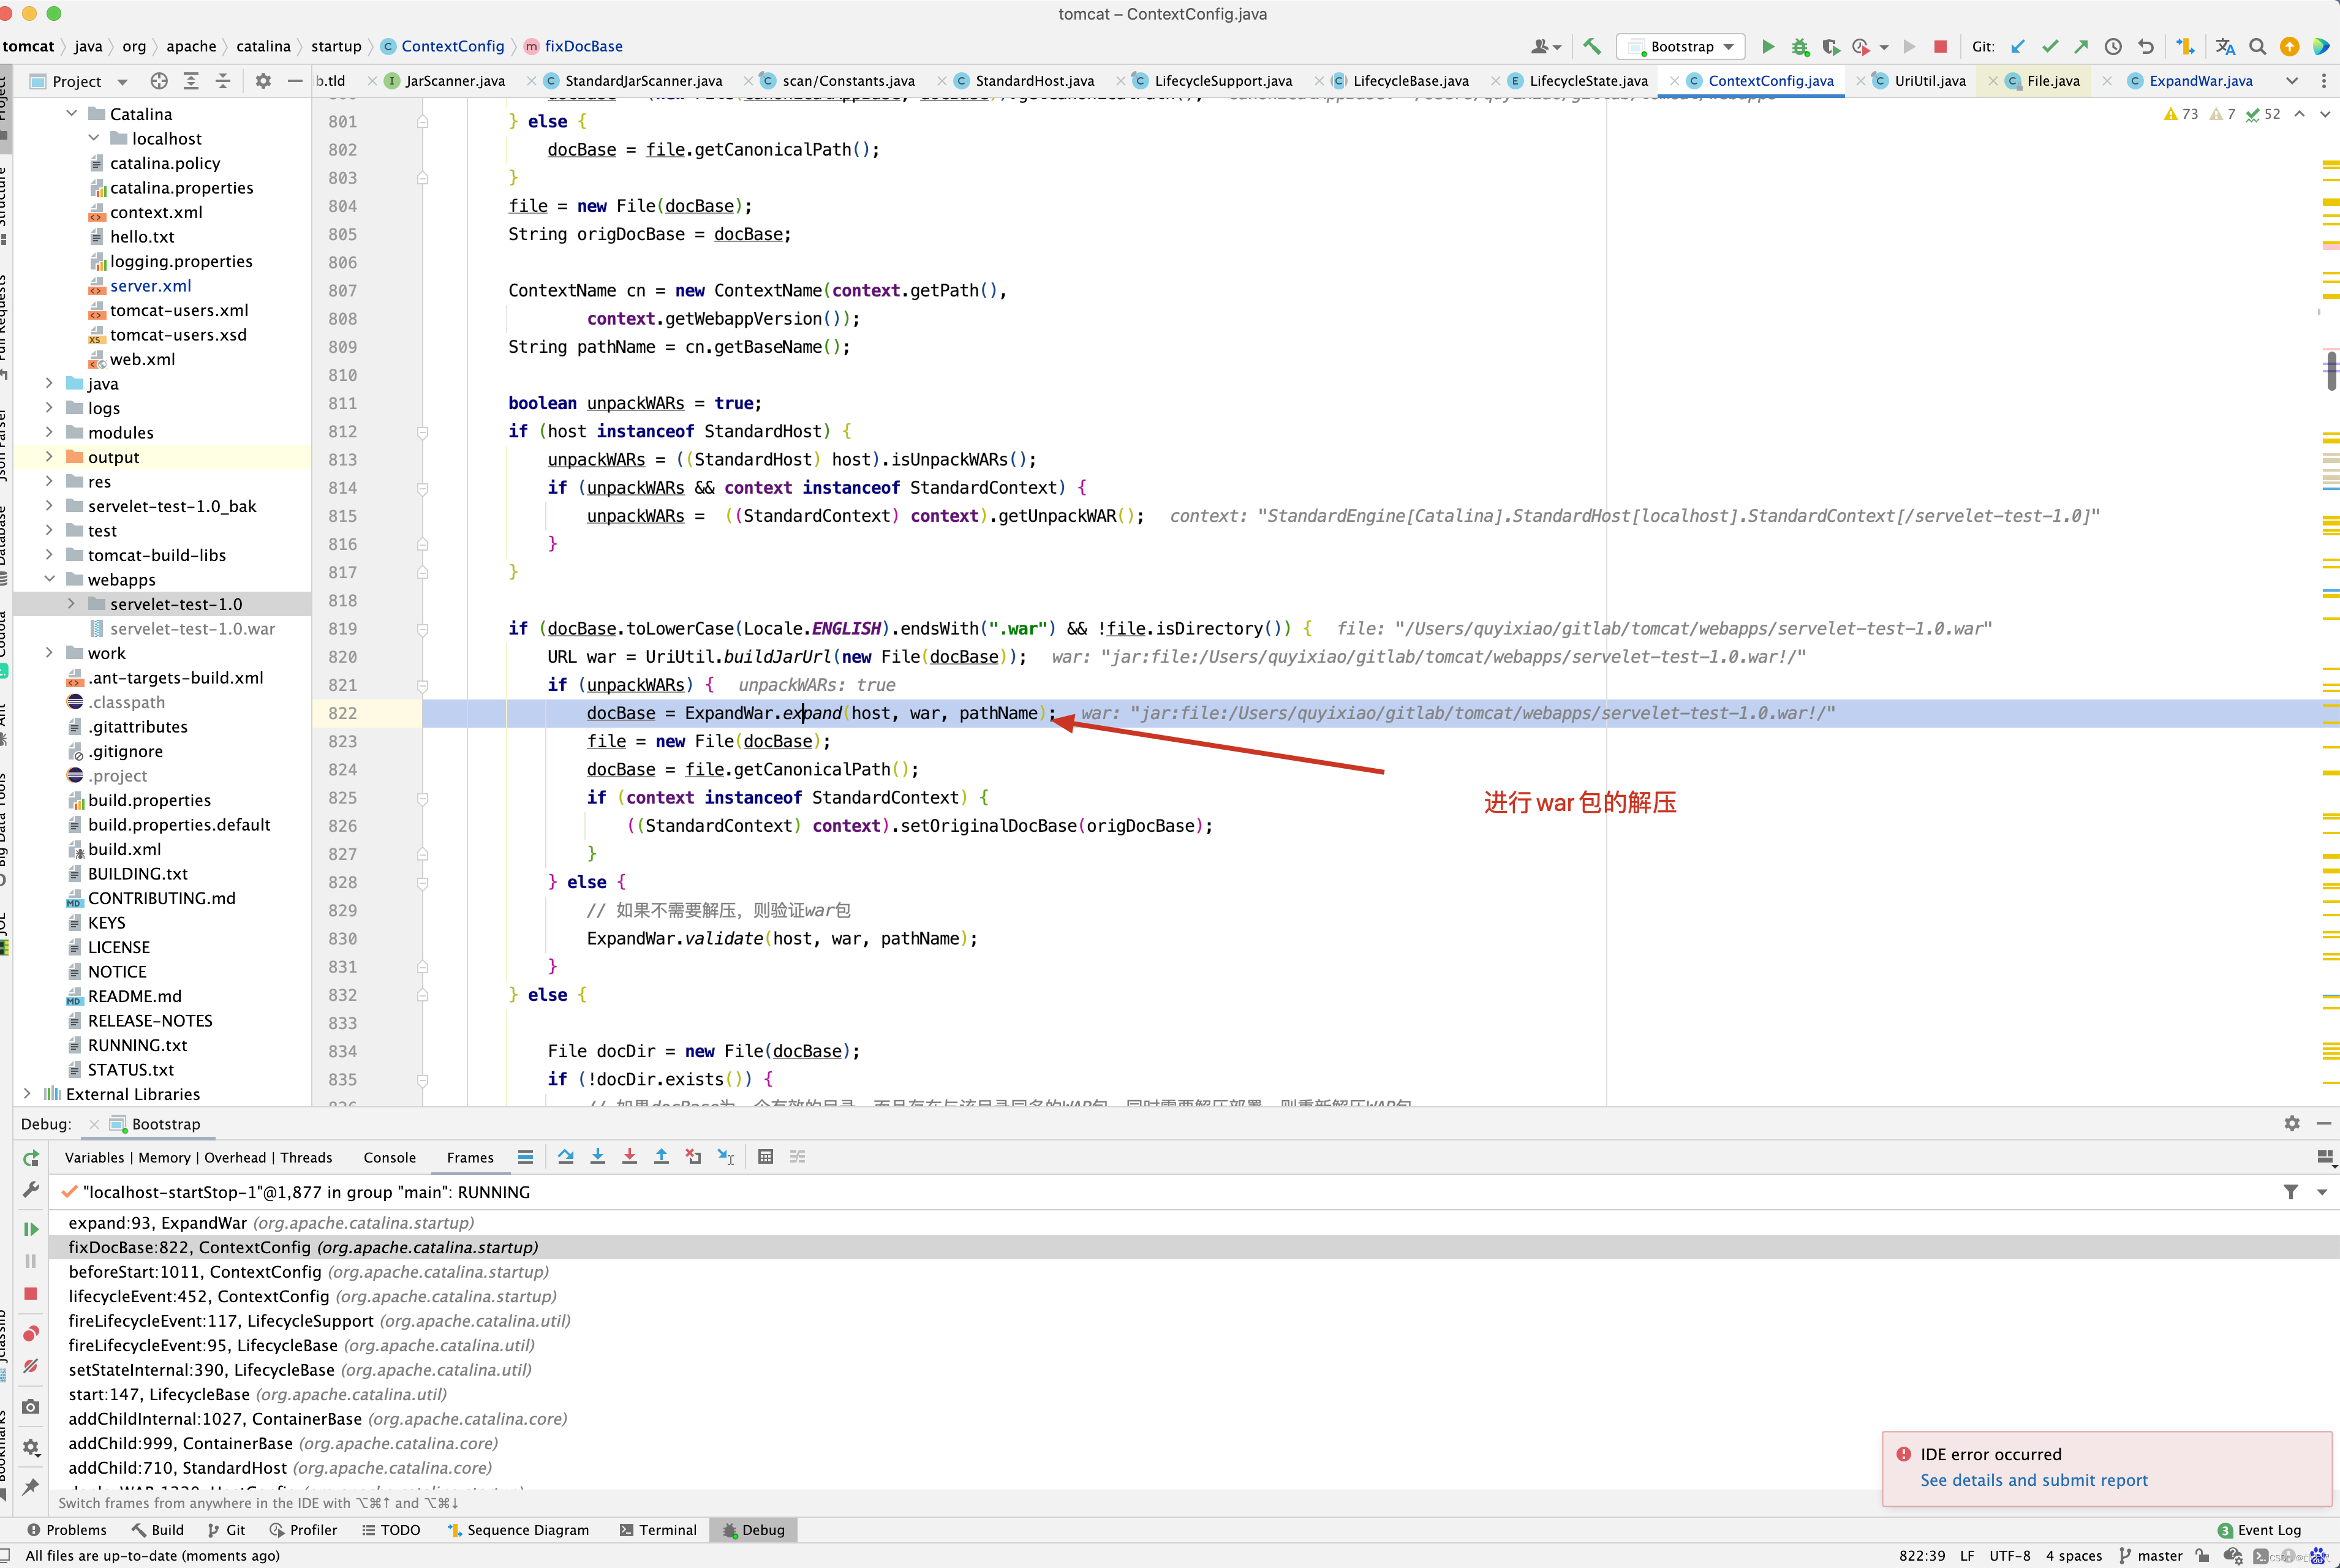
所以建议在进行WAR包重新布署时,将WAR包对应的目录删除掉吧。
接下来看antiLocking()方法的实现。
【背景】Tomcat应用更新时,把新的WAR包放到webapps目录下,Tomcat就会自动把原来的同名webapp删除,并把WAR包解压,运行新的 webapps。
但是,有时候Tomcat并不能把旧的webapp完全删除,通常会留下WEB-INF/lib下的某个jar包,必须关闭Tomcat才能删除,这就导致自动部署失败。将Web应用项目根据部署次数重命名并复制到%CATALIN_HOME%/temp临时目录下(例如第一次部署就是1-myTomcat.war),并把Context对象的docBase 指向临时目录下的Web项目,这样每次重新热部署都有一个新的应用名, 就算原来应用的某些Jar包被锁定也不会导致部署失败。具体解决方法是在元素中增加一个属性antiResourceLocking=“true” antiJARLocking=“true”,默认是"false"。这样就可以热部署了。
protected void antiLocking() {
    if ((context instanceof StandardContext)
        // 当Context的antiResourceLocking属性为true时,Tomcat会将当前的Web应用目录复制到临时文件夹下,以避免对原目录资源加锁。
        && ((StandardContext) context).getAntiResourceLocking()) {
        // 1 根据Host的appBase以及Context 的docBase计算docBase的绝对路径
        Host host = (Host) context.getParent();
        String appBase = host.getAppBase();
        String docBase = context.getDocBase();
        if (docBase == null)
            return;
        originalDocBase = docBase;

        File docBaseFile = new File(docBase);
        if (!docBaseFile.isAbsolute()) {
            File file = new File(appBase);
            if (!file.isAbsolute()) {
                file = new File(getBaseDir(), appBase);
            }
            docBaseFile = new File(file, docBase);
        }

        String path = context.getPath();
        if (path == null) {
            return;
        }
        ContextName cn = new ContextName(path, context.getWebappVersion());
        docBase = cn.getBaseName();
        // 2. 计算临时文件夹的Web应用根目录或WAR包名
        // 2.1 Web目录:${Context生命周期内的部署次数}-${目录名}
        // 2.2 WAR包:${Context生命周期内部署次数}-${WAR包名}
        if (originalDocBase.toLowerCase(Locale.ENGLISH).endsWith(".war")) {
            antiLockingDocBase = new File(
                    System.getProperty("java.io.tmpdir"),
                    deploymentCount++ + "-" + docBase + ".war");
        } else {
            antiLockingDocBase = new File(
                    System.getProperty("java.io.tmpdir"),
                    deploymentCount++ + "-" + docBase);
        }
        antiLockingDocBase = antiLockingDocBase.getAbsoluteFile();

        if (log.isDebugEnabled())
            log.debug("Anti locking context[" + context.getName()
                    + "] setting docBase to " +
                    antiLockingDocBase.getPath());

        // Cleanup just in case an old deployment is lying around
        ExpandWar.delete(antiLockingDocBase);
        // 3. 复制Web目录或者WAR包到临时目录
        if (ExpandWar.copy(docBaseFile, antiLockingDocBase)) {
            // 4. 将Context 的docBase更新为临时目录下的Web应用目录或者WAR包路径
            context.setDocBase(antiLockingDocBase.getPath());
        }
        // 通过上面的讲解我们知道,无论是AFTER_INIT_EVNT还是BEFORE_START_EVENT处理,仍然属于启动前准备工作,以确保Context
        // 相关属性的准确性,而真正创建Wrapper的则是CONFIGURE_START_EVENT事件
    }
}
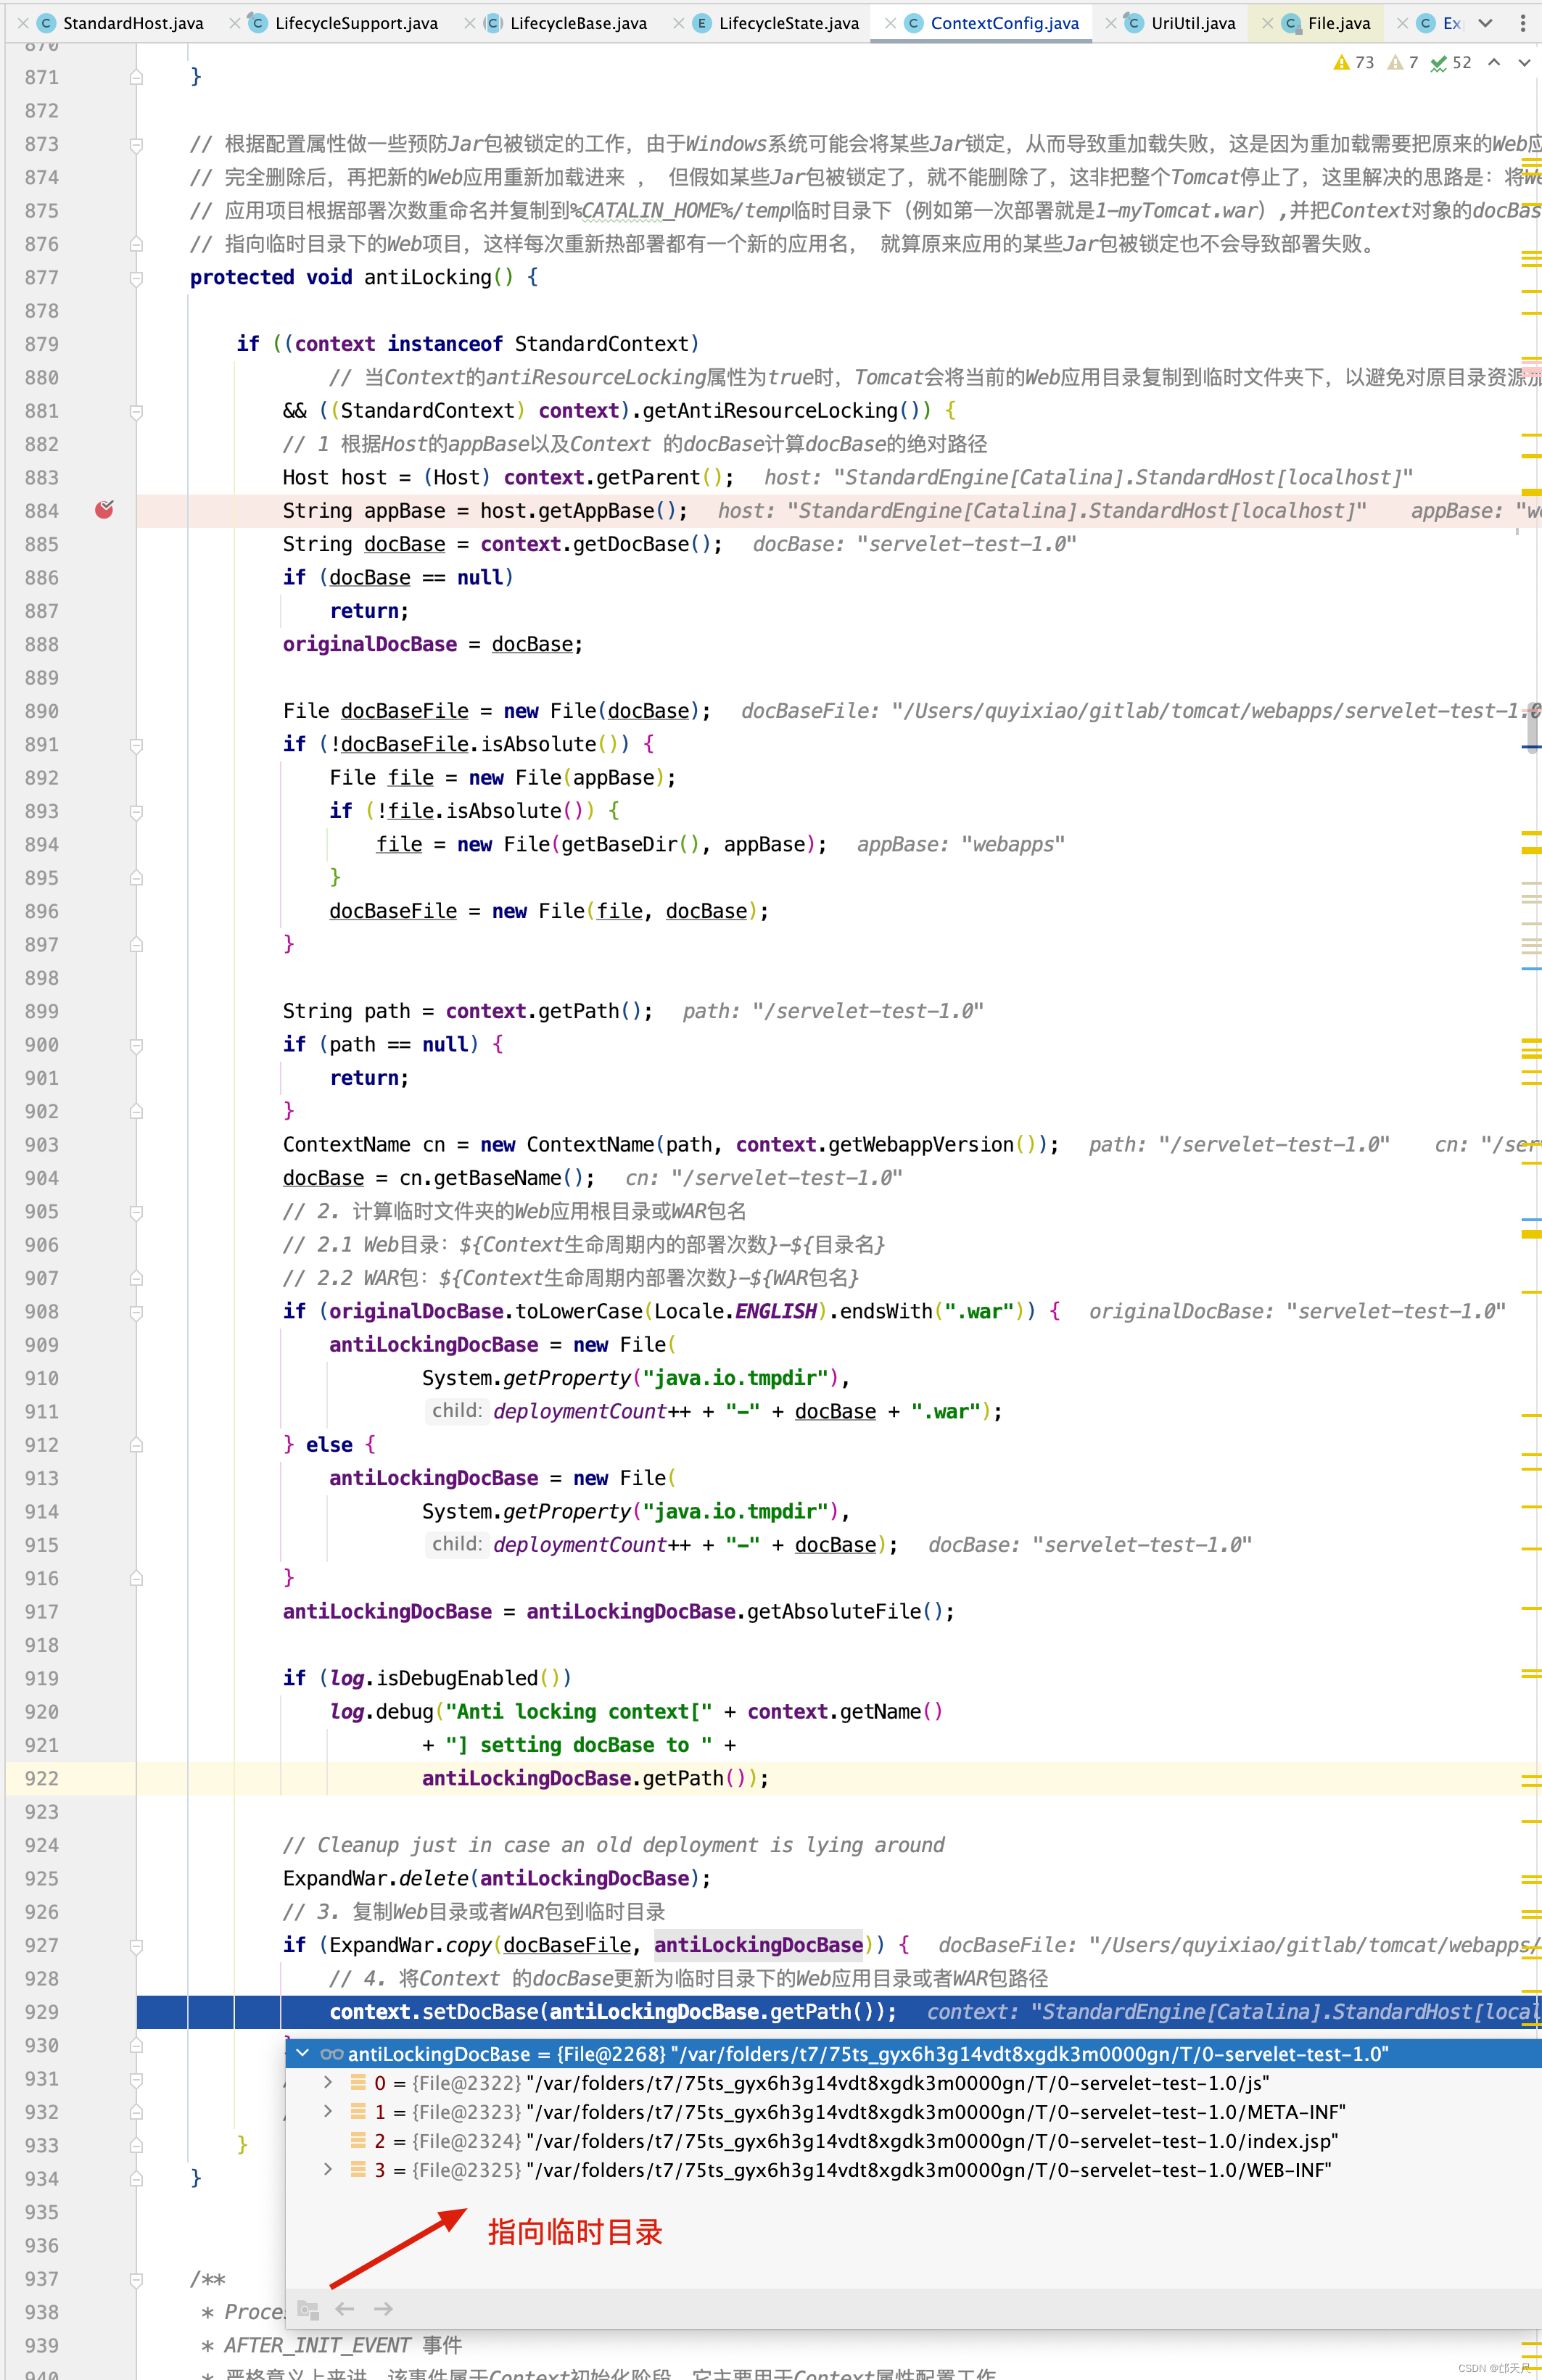
将目录拷贝到/var/folders/t7/75ts_gyx6h3g14vdt8xgdk3m0000gn/T临时目录下,当然每次热布署后。

当antiResourceLocking设置为true的时候,Tomcat不会锁定应用下的任何文件。那Tomcat是怎么做到这一点的呢?
在Tomcat的架构里,应用也是一个级别的容器,对应的接口是Context;各级容器本身都具备生命周期,而且配置了多个生命周期监听器来监听容器不同的生命周期过程。Tomcat在初始化的时候,给Context增加了一个生命周期监听器org.apache.catalina.startup.ContextConfig;然后在Context真正开始启动之前,会有一个BEFORE_START_EVENT状态,ContextConfig监听到这个状态的事件后,就会针对antiResourceLocking进行处理。
总结一下,就是如果应用的antiResourceLocking属性设置为true,就将应用的doc base移到临时目录下,让Tomca不会占用webapps下的文件。Tomcat里java.io.tmpdir默认指向Tomcat的temp目录。
【副作用】
从上面的分析来看,antiResourceLocking为true有几个副作用:
- 会延长应用的启动时间,因为多了临时目录的清理和往临时目录拷贝应用内容的操作;a
- 如果不知道这个属性的原理,修改webapps下应用的JSP,那就不会动态重加载到新的页面内容了,因为应用的doc base已经不再在webapps下了;
- 停止Tomcat的时候,临时目录下实际的doc base会被删掉,
结合第二条和第三条,如果要修改应用的JSP,那必须将改动同时拷贝到两个目录下(原始doc base和临时目录下的doc base)。
所以Tomcat里这个属性缺省为false。在使用Tomcat 6.0.24之前的版本时,如果要用这个属性解决文件被锁的问题,三思而行。

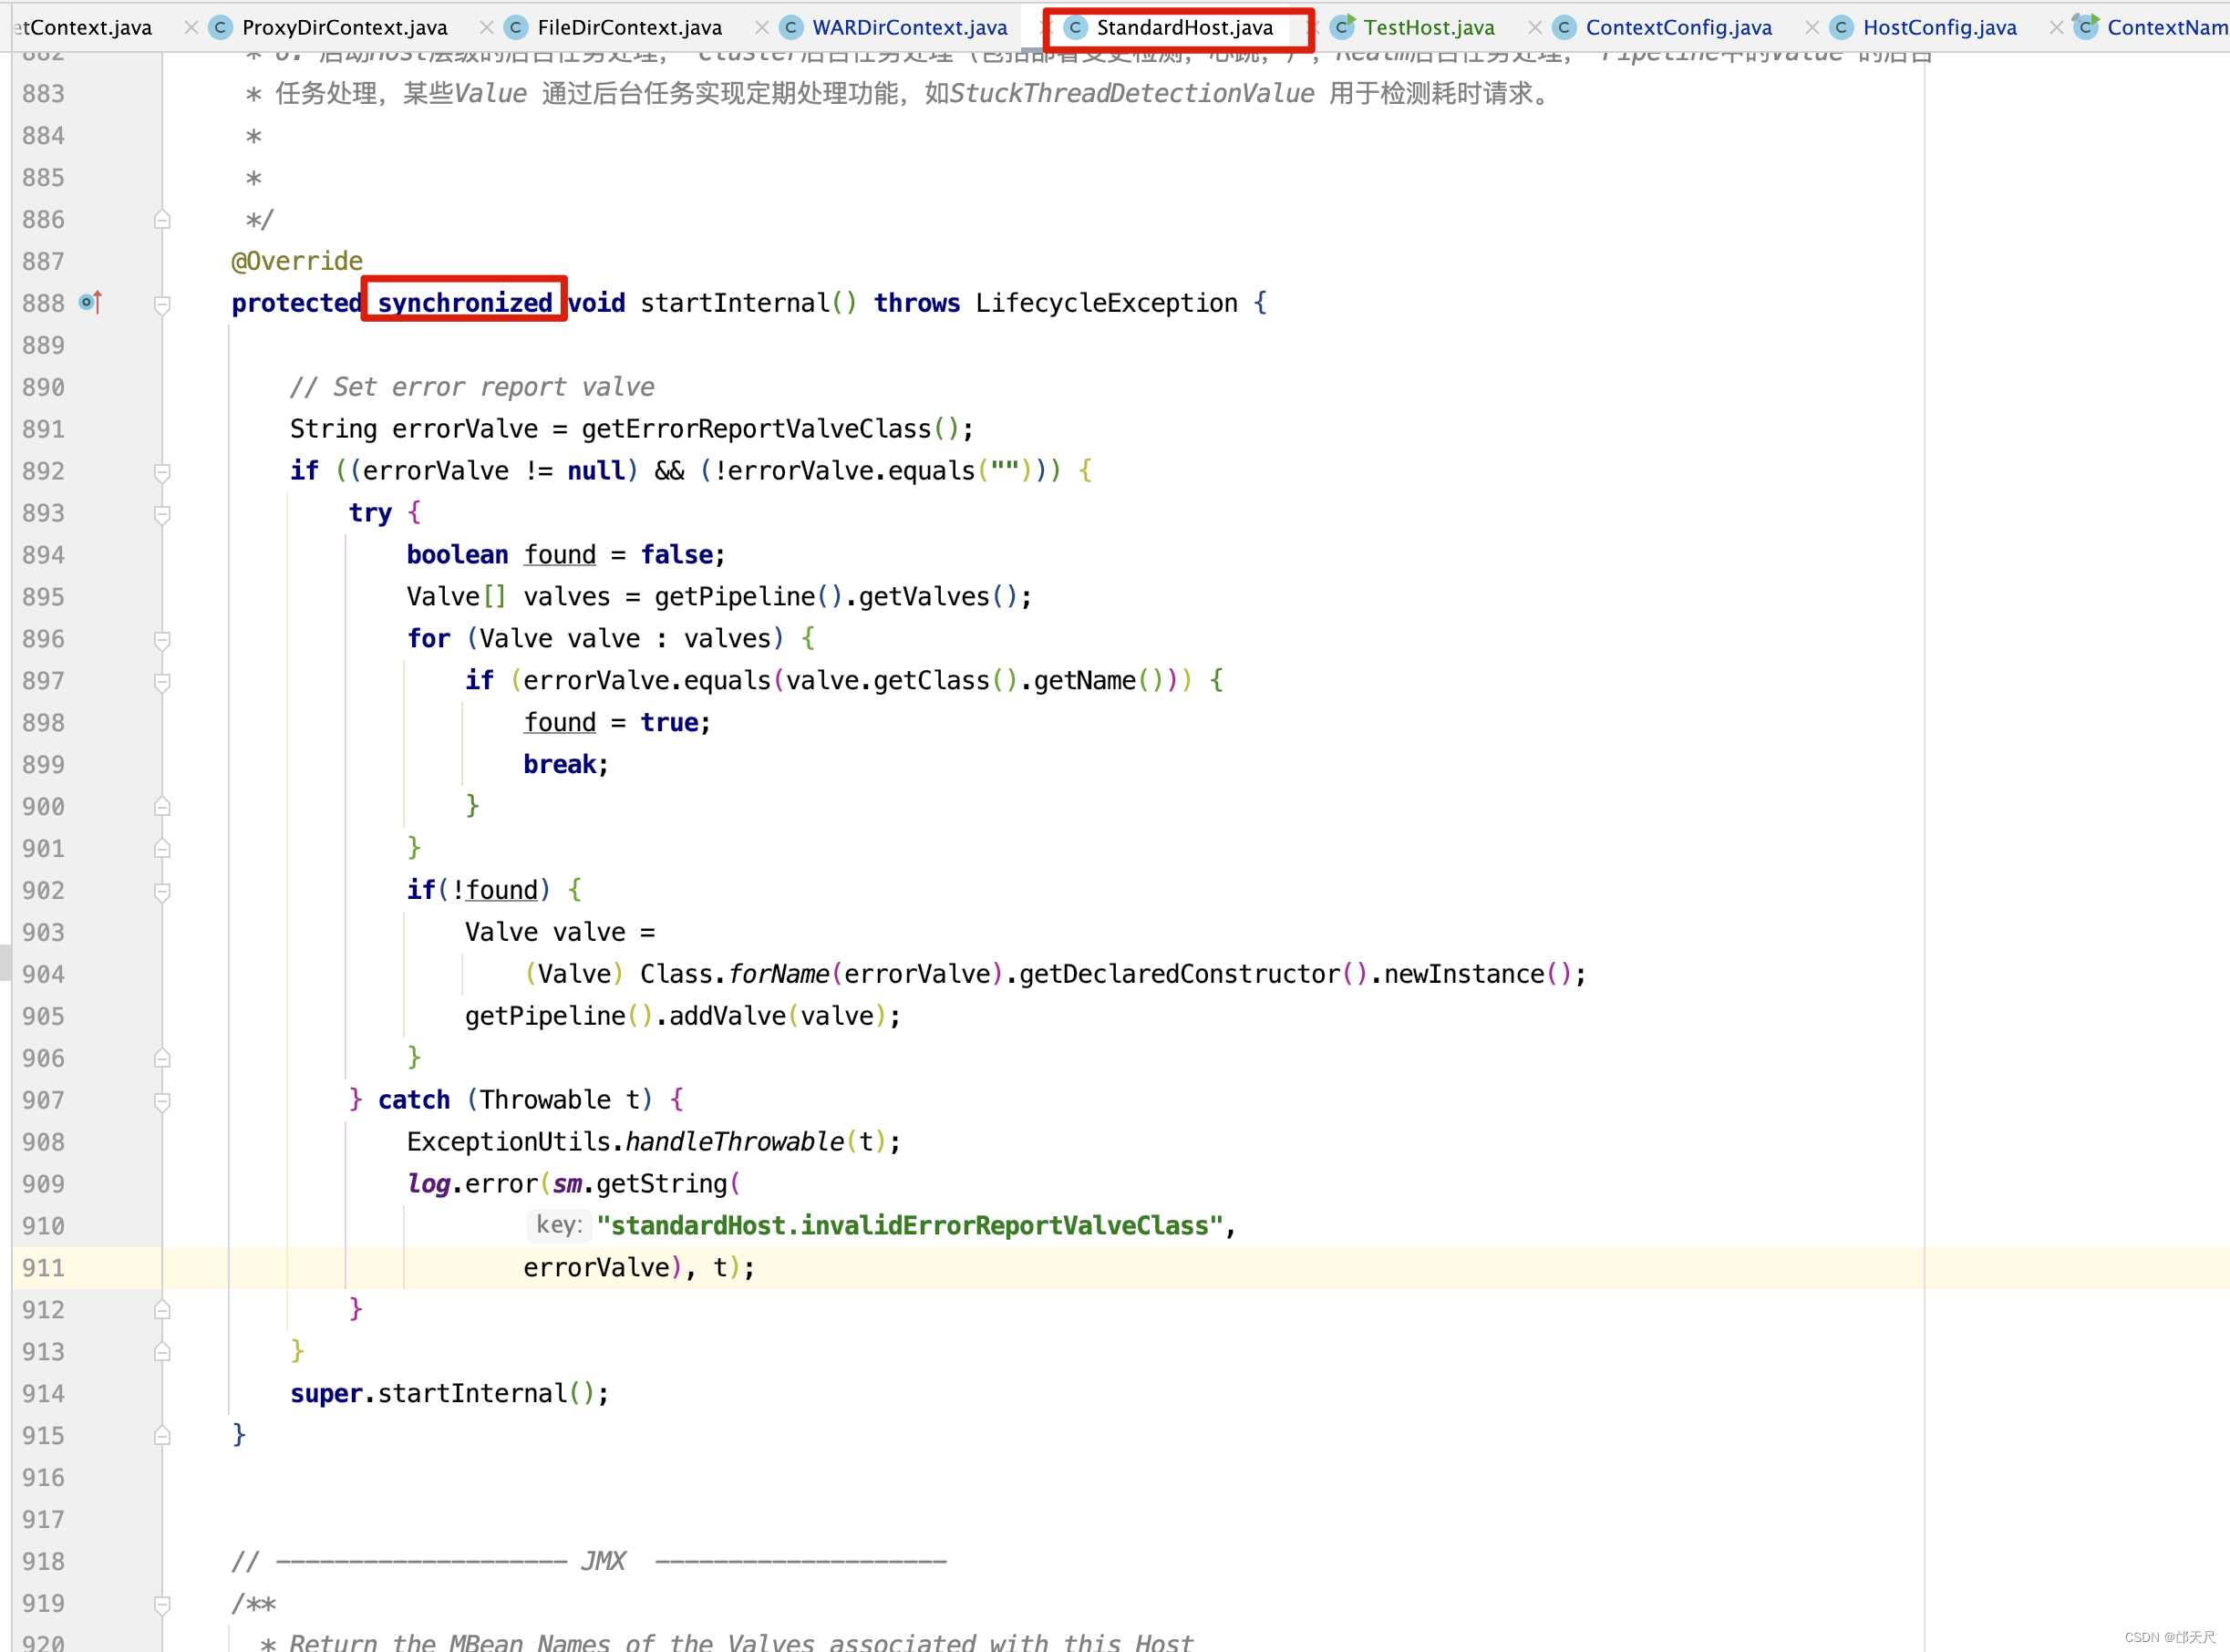
before_start事件触发了ContextConfig的beforeStart()方法调用,已经分析完了,接下来进入StandardContext的startInternal()方法 。
protected synchronized void startInternal() throws LifecycleException {
if(log.isDebugEnabled())
log.debug("Starting " + getBaseName());
// Send j2ee.state.starting notification
if (this.getObjectName() != null) {
Notification notification = new Notification("j2ee.state.starting",
this.getObjectName(), sequenceNumber.getAndIncrement());
broadcaster.sendNotification(notification);
}
setConfigured(false);
boolean ok = true;
// Currently this is effectively a NO-OP but needs to be called to
// ensure the NamingResources follows the correct lifecycle
if (namingResources != null) {
namingResources.start();
}
// Add missing components as necessary
if (webappResources == null) { // (1) Required by Loader
if (log.isDebugEnabled())
log.debug("Configuring default Resources");
try {
// 设置Context的资源
// 赋值webappResources属性
// docBase地址
String docBase = getDocBase();
if (docBase == null) {
setResources(new EmptyDirContext());
} else if (docBase.endsWith(".war")
&& !(new File(getBasePath())).isDirectory()) {
// war包
setResources(new WARDirContext());
} else {
// 文件目录, WARDirContext处理不同的是 ,WARDirContext 需要对.war 包进行解压,然后才能获取对应的文件内容,而FileDir可以直接获取文件内容
setResources(new FileDirContext());
}
} catch (IllegalArgumentException e) {
log.error(sm.getString("standardContext.resourcesInit"), e);
ok = false;
}
}
if (ok) {
// 关于resouce资源设置这一块的代码
// tomcat为什么这样做,这涉及到Tomcat的jndi相关的内容了。
// 之前写了一篇博客tomcat 关于jndi的源码 。Tomcat 源码解析一JNDI
// 有兴趣可以去看一下
if (!resourcesStart()) {
throw new LifecycleException("Error in resourceStart()");
}
}
// 如果在Context节点下配置了Loader节点,那么就会在解析配置文件的时候就会初始化Loader,比如:
// <Context path="/ServletDemo" docBase="C:\Users\周瑜\IdeaProjects\ServletDemo\target\ServletDemo" addWebinfClassesResources="true">
// <Loader/>
// </Context>
// 如果没有配,则生成一个WebappLoader
if (getLoader() == null) {
// Webapp类加载器的父类加载器为Host的ParentClassLoader,最终就是Catalina类的类加载器,其实就是CommonClassLoader
WebappLoader webappLoader = new WebappLoader(getParentClassLoader());
webappLoader.setDelegate(getDelegate());
setLoader(webappLoader);
}
// Initialize character set mapper
// 设置CharsetMapper,CharsetMapperDefault.properties
// 如果StandardContext没有,则反射创建一个org.apache.catalina.util.CharsetMapper对象
getCharsetMapper();
// Post work directory
// 创建work目录,比如work\Catalina\localhost\ServletDemo
postWorkDirectory();
// Validate required extensions
boolean dependencyCheck = true;
try {
// 验证MANIFEST.MF文件是否正确
dependencyCheck = ExtensionValidator.validateApplication
(getResources(), this);
} catch (IOException ioe) {
log.error(sm.getString("standardContext.extensionValidationError"), ioe);
dependencyCheck = false;
}
if (!dependencyCheck) {
// do not make application available if dependency check fails
ok = false;
}
// Reading the "catalina.useNaming" environment variable
String useNamingProperty = System.getProperty("catalina.useNaming");
if ((useNamingProperty != null)
&& (useNamingProperty.equals("false"))) {
useNaming = false;
}
// 添加NamingContextListener 监听器
if (ok && isUseNaming()) {
if (getNamingContextListener() == null) {
// NamingContextListener 监听器在Context 容器启动时(startInternal()方法)时添加
// 实际上,Tomcat 要完成命名目录接口需要另外一个NamingContextListener 监听器组件协同,这两个组件都属于Context 容器,
// 当Web 应用初始化时,此监听器会创建JNDI 的命名上下文及其资源绑定,以此完成Tomcat 对JNDI的支持。
// 关于NamingContextListener 之前在 Tomcat 源码解析一JNDI 博客中做了详细的分析,这里就不深入了
NamingContextListener ncl = new NamingContextListener();
ncl.setName(getNamingContextName());
ncl.setExceptionOnFailedWrite(getJndiExceptionOnFailedWrite());
addLifecycleListener(ncl);
setNamingContextListener(ncl);
}
}
// Standard container startup
if (log.isDebugEnabled())
log.debug("Processing standard container startup");
// Binding thread
// 将当前线程的类加载器设置为WebClassLoader,记录一下当前线程的classloader
ClassLoader oldCCL = bindThread();
try {
if (ok) {
// Start our subordinate components, if any
Loader loader = getLoaderInternal(); // 获取Context的类加载器
if ((loader != null) && (loader instanceof Lifecycle))
((Lifecycle) loader).start(); // 启动类加载器,包括初始话DirContext
// since the loader just started, the webapp classloader is now
// created.
// By calling unbindThread and bindThread in a row, we setup the
// current Thread CCL to be the webapp classloader
unbindThread(oldCCL);
oldCCL = bindThread();
// Initialize logger again. Other components might have used it
// too early, so it should be reset.
logger = null;
getLogger();
Cluster cluster = getClusterInternal();
if ((cluster != null) && (cluster instanceof Lifecycle))
((Lifecycle) cluster).start();
Realm realm = getRealmInternal();
if ((realm != null) && (realm instanceof Lifecycle))
((Lifecycle) realm).start();
DirContext resources = getResourcesInternal();
if ((resources != null) && (resources instanceof Lifecycle))
((Lifecycle) resources).start();
// Notify our interested LifecycleListeners
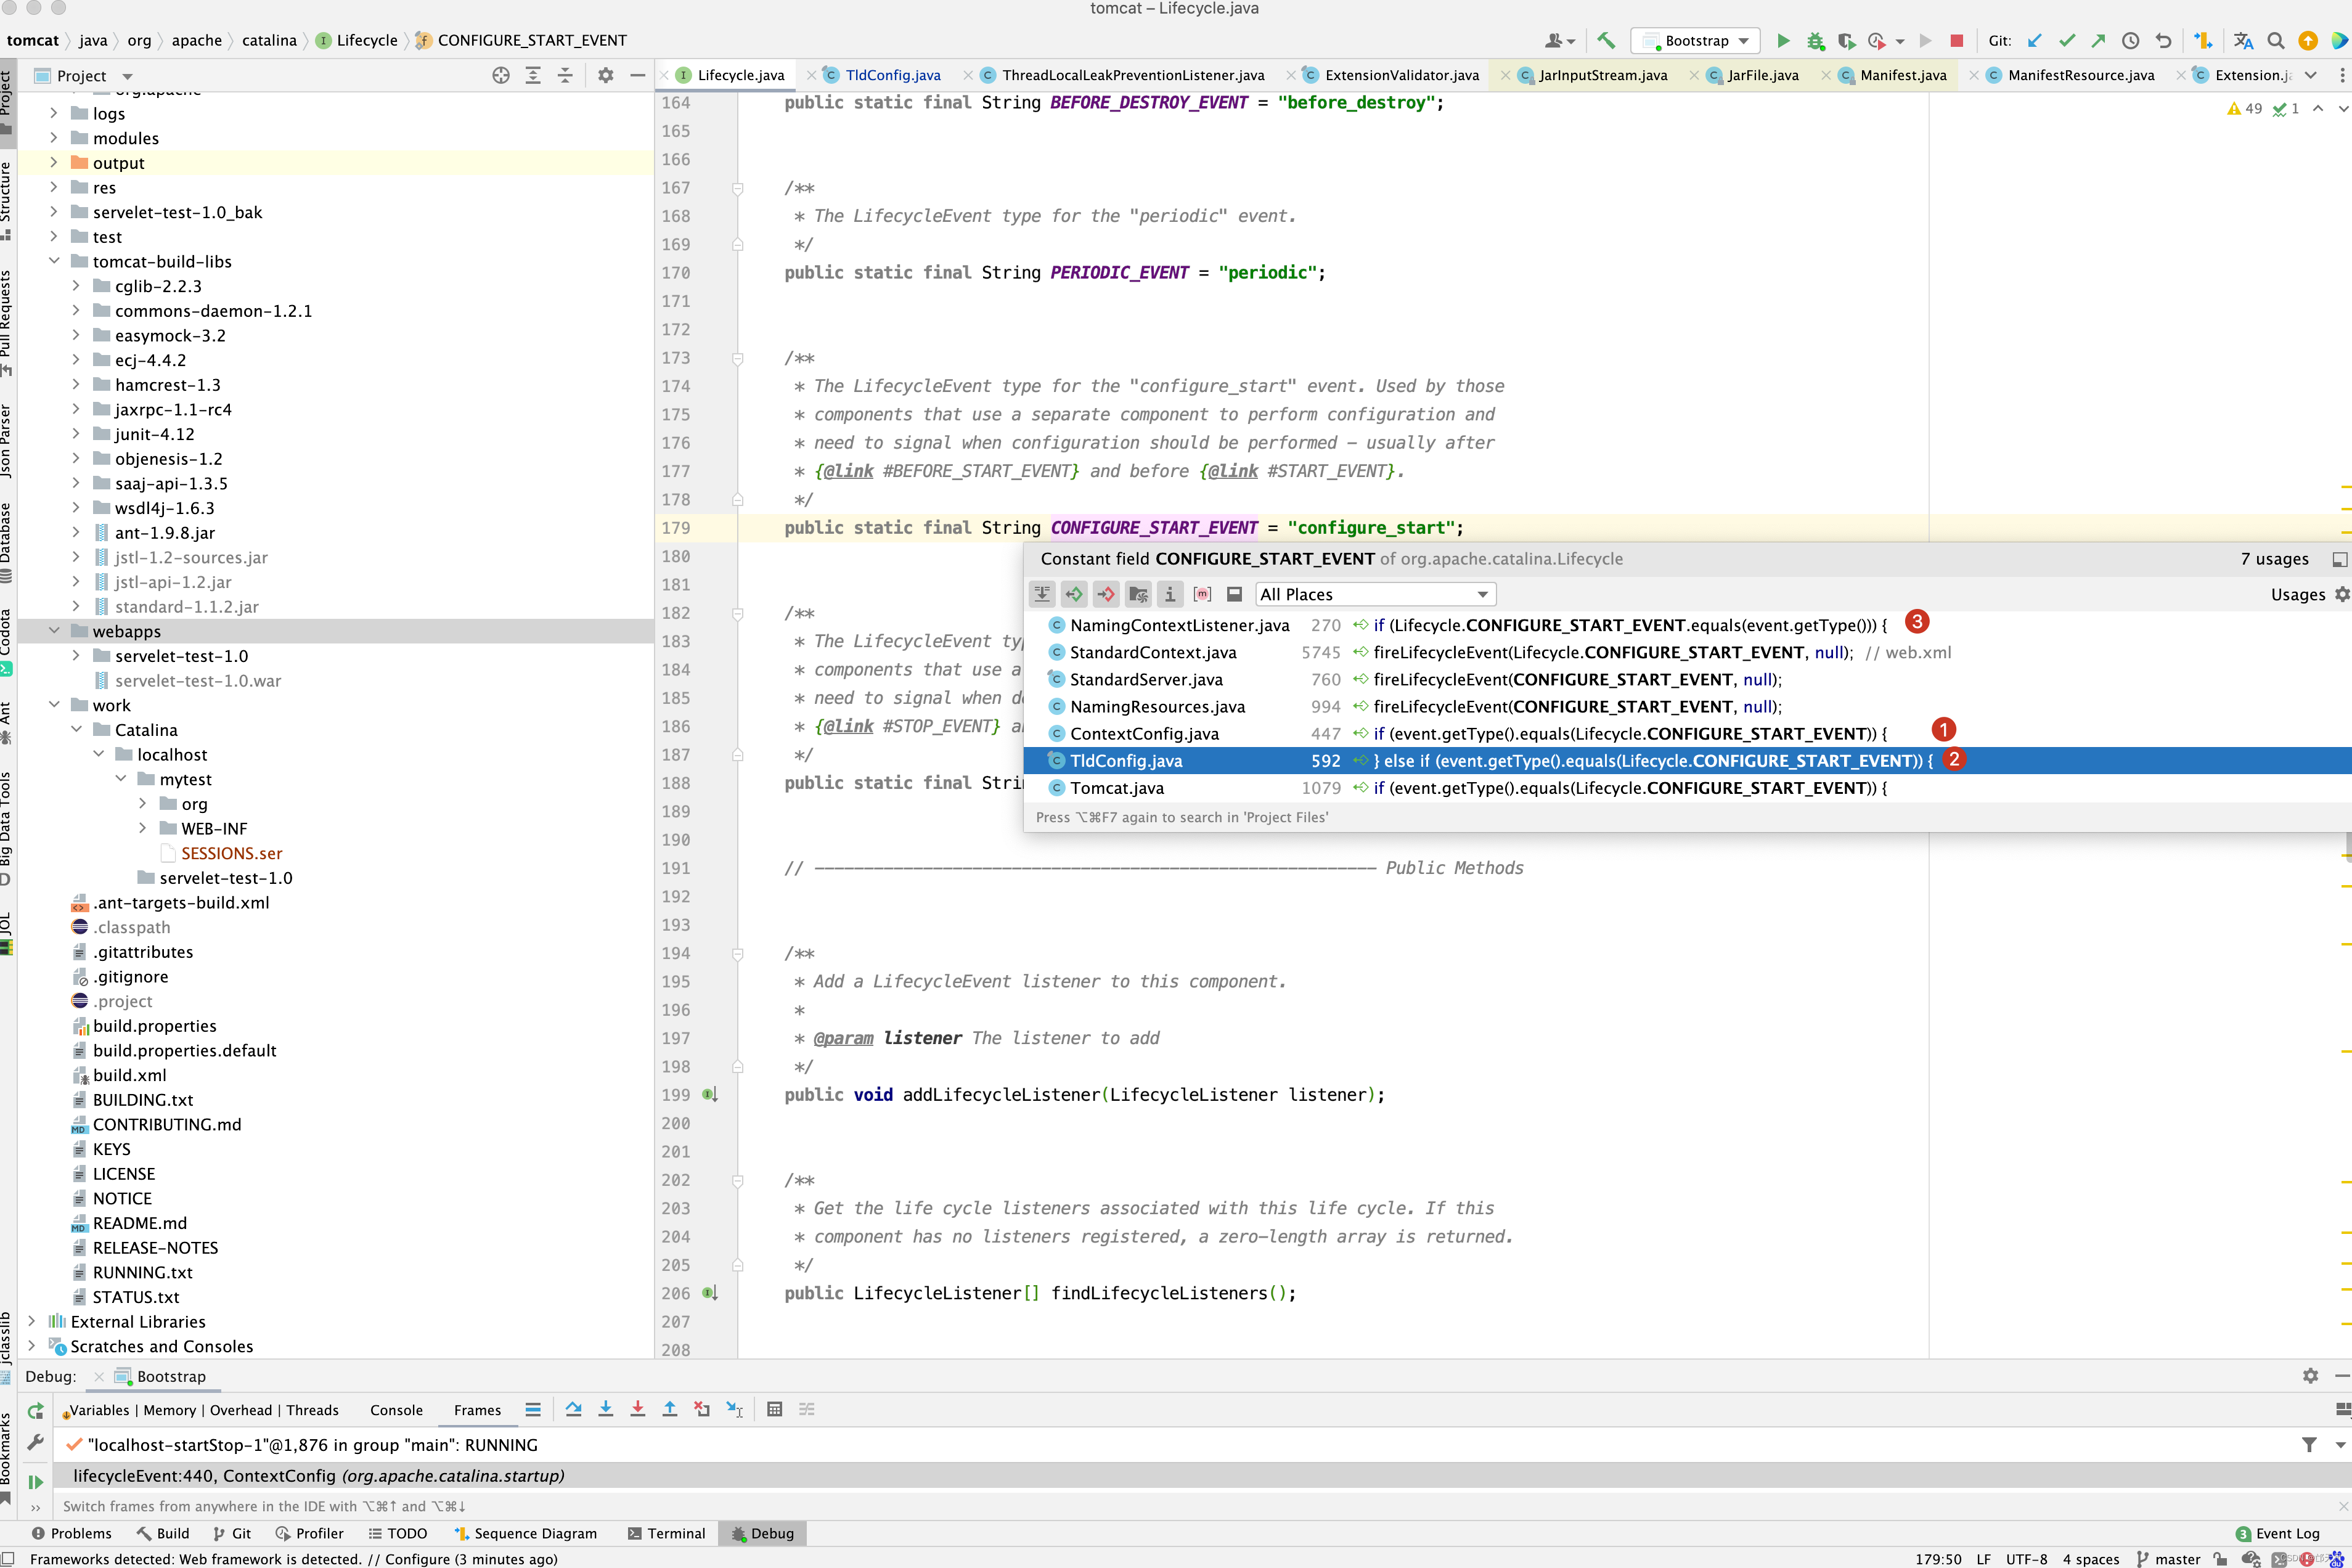
// 这里会发布一个CONFIGURE_START_EVENT事件,虽然是事件,但其实并不是异步,ContextConfig会接收到此事件
fireLifecycleEvent
(Lifecycle.CONFIGURE_START_EVENT, null); // web.xml
// Start our child containers, if not already started
// Context下是Wrapper,这些Wrapper是什么时候添加进Context中的?就是上面的CONFIGURE_START_EVENT事件触发的
// 如果Wrapper不可用就启动,默认情况下是已经启动了的。
for (Container child : findChildren()) {
if (!child.getState().isAvailable()) {
child.start();
}
}
// Start the Valves in our pipeline (including the basic),
// if any
// 启动pipeline
if (pipeline instanceof Lifecycle) {
((Lifecycle) pipeline).start();
}
// Acquire clustered manager
Manager contextManager = null;
Manager manager = getManagerInternal();
if (manager == null) {
if (log.isDebugEnabled()) {
log.debug(sm.getString("standardContext.cluster.noManager",
Boolean.valueOf((getCluster() != null)),
Boolean.valueOf(distributable)));
}
if ( (getCluster() != null) && distributable) {
try {
contextManager = getCluster().createManager(getName());
} catch (Exception ex) {
log.error("standardContext.clusterFail", ex);
ok = false;
}
} else {
contextManager = new StandardManager();
}
manager = contextManager;
}
// Configure default manager if none was specified
if (contextManager != null) {
if (log.isDebugEnabled()) {
log.debug(sm.getString("standardContext.manager",
contextManager.getClass().getName()));
}
setManager(contextManager);
}
if (manager!=null && (getCluster() != null) && distributable) {
//let the cluster know that there is a context that is distributable
//and that it has its own manager
getCluster().registerManager(manager);
}
}
} finally {
// Unbinding thread
unbindThread(oldCCL);
}
if (!getConfigured()) {
log.error(sm.getString("standardContext.configurationFail"));
ok = false;
}
// We put the resources into the servlet context
if (ok)
getServletContext().setAttribute
(Globals.RESOURCES_ATTR, getResources());
// Initialize associated mapper
mapper.setContext(getPath(), welcomeFiles, getResources());
// Binding thread
oldCCL = bindThread();
if (ok ) {
if (getInstanceManager() == null) {
javax.naming.Context context = null;
if (isUseNaming() && getNamingContextListener() != null) {
context = getNamingContextListener().getEnvContext();
}
Map<String, Map<String, String>> injectionMap = buildInjectionMap(
getIgnoreAnnotations() ? new NamingResources(): getNamingResources());
setInstanceManager(new DefaultInstanceManager(context,
injectionMap, this, this.getClass().getClassLoader()));
getServletContext().setAttribute(
InstanceManager.class.getName(), getInstanceManager());
}
}
try {
// Create context attributes that will be required
if (ok) {
getServletContext().setAttribute(
JarScanner.class.getName(), getJarScanner());
}
// Set up the context init params
mergeParameters();
// Call ServletContainerInitializers
for (Map.Entry<ServletContainerInitializer, Set<Class<?>>> entry :
initializers.entrySet()) {
try {
// Context容器启动时就会分别调用每个ServletContainerInitializer的onStartup()方法,将感兴趣的类作为参数传入
entry.getKey().onStartup(entry.getValue(),
getServletContext());
} catch (ServletException e) {
log.error(sm.getString("standardContext.sciFail"), e);
ok = false;
break;
}
}
// Configure and call application event listeners
if (ok) {
if (!listenerStart()) {
log.error(sm.getString("standardContext.listenerFail"));
ok = false;
}
}
try {
// Start manager
Manager manager = getManagerInternal();
if ((manager != null) && (manager instanceof Lifecycle)) {
((Lifecycle) getManager()).start();
}
} catch(Exception e) {
log.error(sm.getString("standardContext.managerFail"), e);
ok = false;
}
// Configure and call application filters
if (ok) {
if (!filterStart()) {
log.error(sm.getString("standardContext.filterFail"));
ok = false;
}
}
// Load and initialize all "load on startup" servlets
if (ok) {
if (!loadOnStartup(findChildren())){
log.error(sm.getString("standardContext.servletFail"));
ok = false;
}
}
// Start ContainerBackgroundProcessor thread
super.threadStart();
} finally {
// Unbinding thread
unbindThread(oldCCL);
}
// Set available status depending upon startup success
if (ok) {
if (log.isDebugEnabled())
log.debug("Starting completed");
} else {
log.error(sm.getString("standardContext.startFailed", getName()));
}
startTime=System.currentTimeMillis();
// Send j2ee.state.running notification
if (ok && (this.getObjectName() != null)) {
Notification notification =
new Notification("j2ee.state.running", this.getObjectName(),
sequenceNumber.getAndIncrement());
broadcaster.sendNotification(notification);
}
// Close all JARs right away to avoid always opening a peak number
// of files on startup
if (getLoader() instanceof WebappLoader) {
((WebappLoader) getLoader()).closeJARs(true);
}
// Reinitializing if something went wrong
if (!ok) {
setState(LifecycleState.FAILED);
} else {
setState(LifecycleState.STARTING);
}
}
创建工作目录。
private void postWorkDirectory() {
    // Acquire (or calculate) the work directory path
    String workDir = getWorkDir();
    if (workDir == null || workDir.length() == 0) {

        // Retrieve our parent (normally a host) name
        String hostName = null;
        String engineName = null;
        String hostWorkDir = null;
        Container parentHost = getParent();
        if (parentHost != null) {
        	// 获取hostName
            hostName = parentHost.getName();
            if (parentHost instanceof StandardHost) {
            	// 获取Host的workDir目录
                hostWorkDir = ((StandardHost)parentHost).getWorkDir();
            }
            // 获取Host的父亲节点,那肯定是StandardEngine
            Container parentEngine = parentHost.getParent();
            if (parentEngine != null) {
            	// 获取引擎名称
               engineName = parentEngine.getName();
            }
        }
        // 如果hostName和engineName都为空,则用_下划线替代
        if ((hostName == null) || (hostName.length() < 1))
            hostName = "_";
        if ((engineName == null) || (engineName.length() < 1))
            engineName = "_";

		// 获取StandardContext名称
        String temp = getName();
        if (temp.startsWith("/"))
            temp = temp.substring(1);
        temp = temp.replace('/', '_');
        temp = temp.replace('\\', '_');
        if (temp.length() < 1)
            temp = "_";

        if (hostWorkDir != null ) {
            workDir = hostWorkDir + File.separator + temp;
        } else {
        	// 如果没有设置Host的workDir
        	// 则workDir是 work/[EngineName]/[HostName]/[ContextName]
            workDir = "work" + File.separator + engineName +
                File.separator + hostName + File.separator + temp;
        }
        setWorkDir(workDir);
    }

    // Create this directory if necessary
    File dir = new File(workDir);
    // 如果dir不是绝对路径,则加上前缀catalina.base
    if (!dir.isAbsolute()) {
        File catalinaHome = engineBase();
        String catalinaHomePath = null;
        try {
            catalinaHomePath = catalinaHome.getCanonicalPath();
            dir = new File(catalinaHomePath, workDir);
        } catch (IOException e) {
            log.warn(sm.getString("standardContext.workCreateException",
                    workDir, catalinaHomePath, getName()), e);
        }
    }
    if (!dir.mkdirs() && !dir.isDirectory()) {
        log.warn(sm.getString("standardContext.workCreateFail", dir,
                getName()));
    }

    // Set the appropriate servlet context attribute
    if (context == null) {
        getServletContext();
    }
    context.setAttribute("javax.servlet.context.tempdir", dir);
    context.setAttributeReadOnly("javax.servlet.context.tempdir");
}
如果Host设置了workDir目录,则StandardContext的工作目录为workDir/ContextName ,但如果Host没有设置工作目录,则dir为catalina.base/work/[EngineName]/[HostName]/[ContextName] ,如下图所示 。
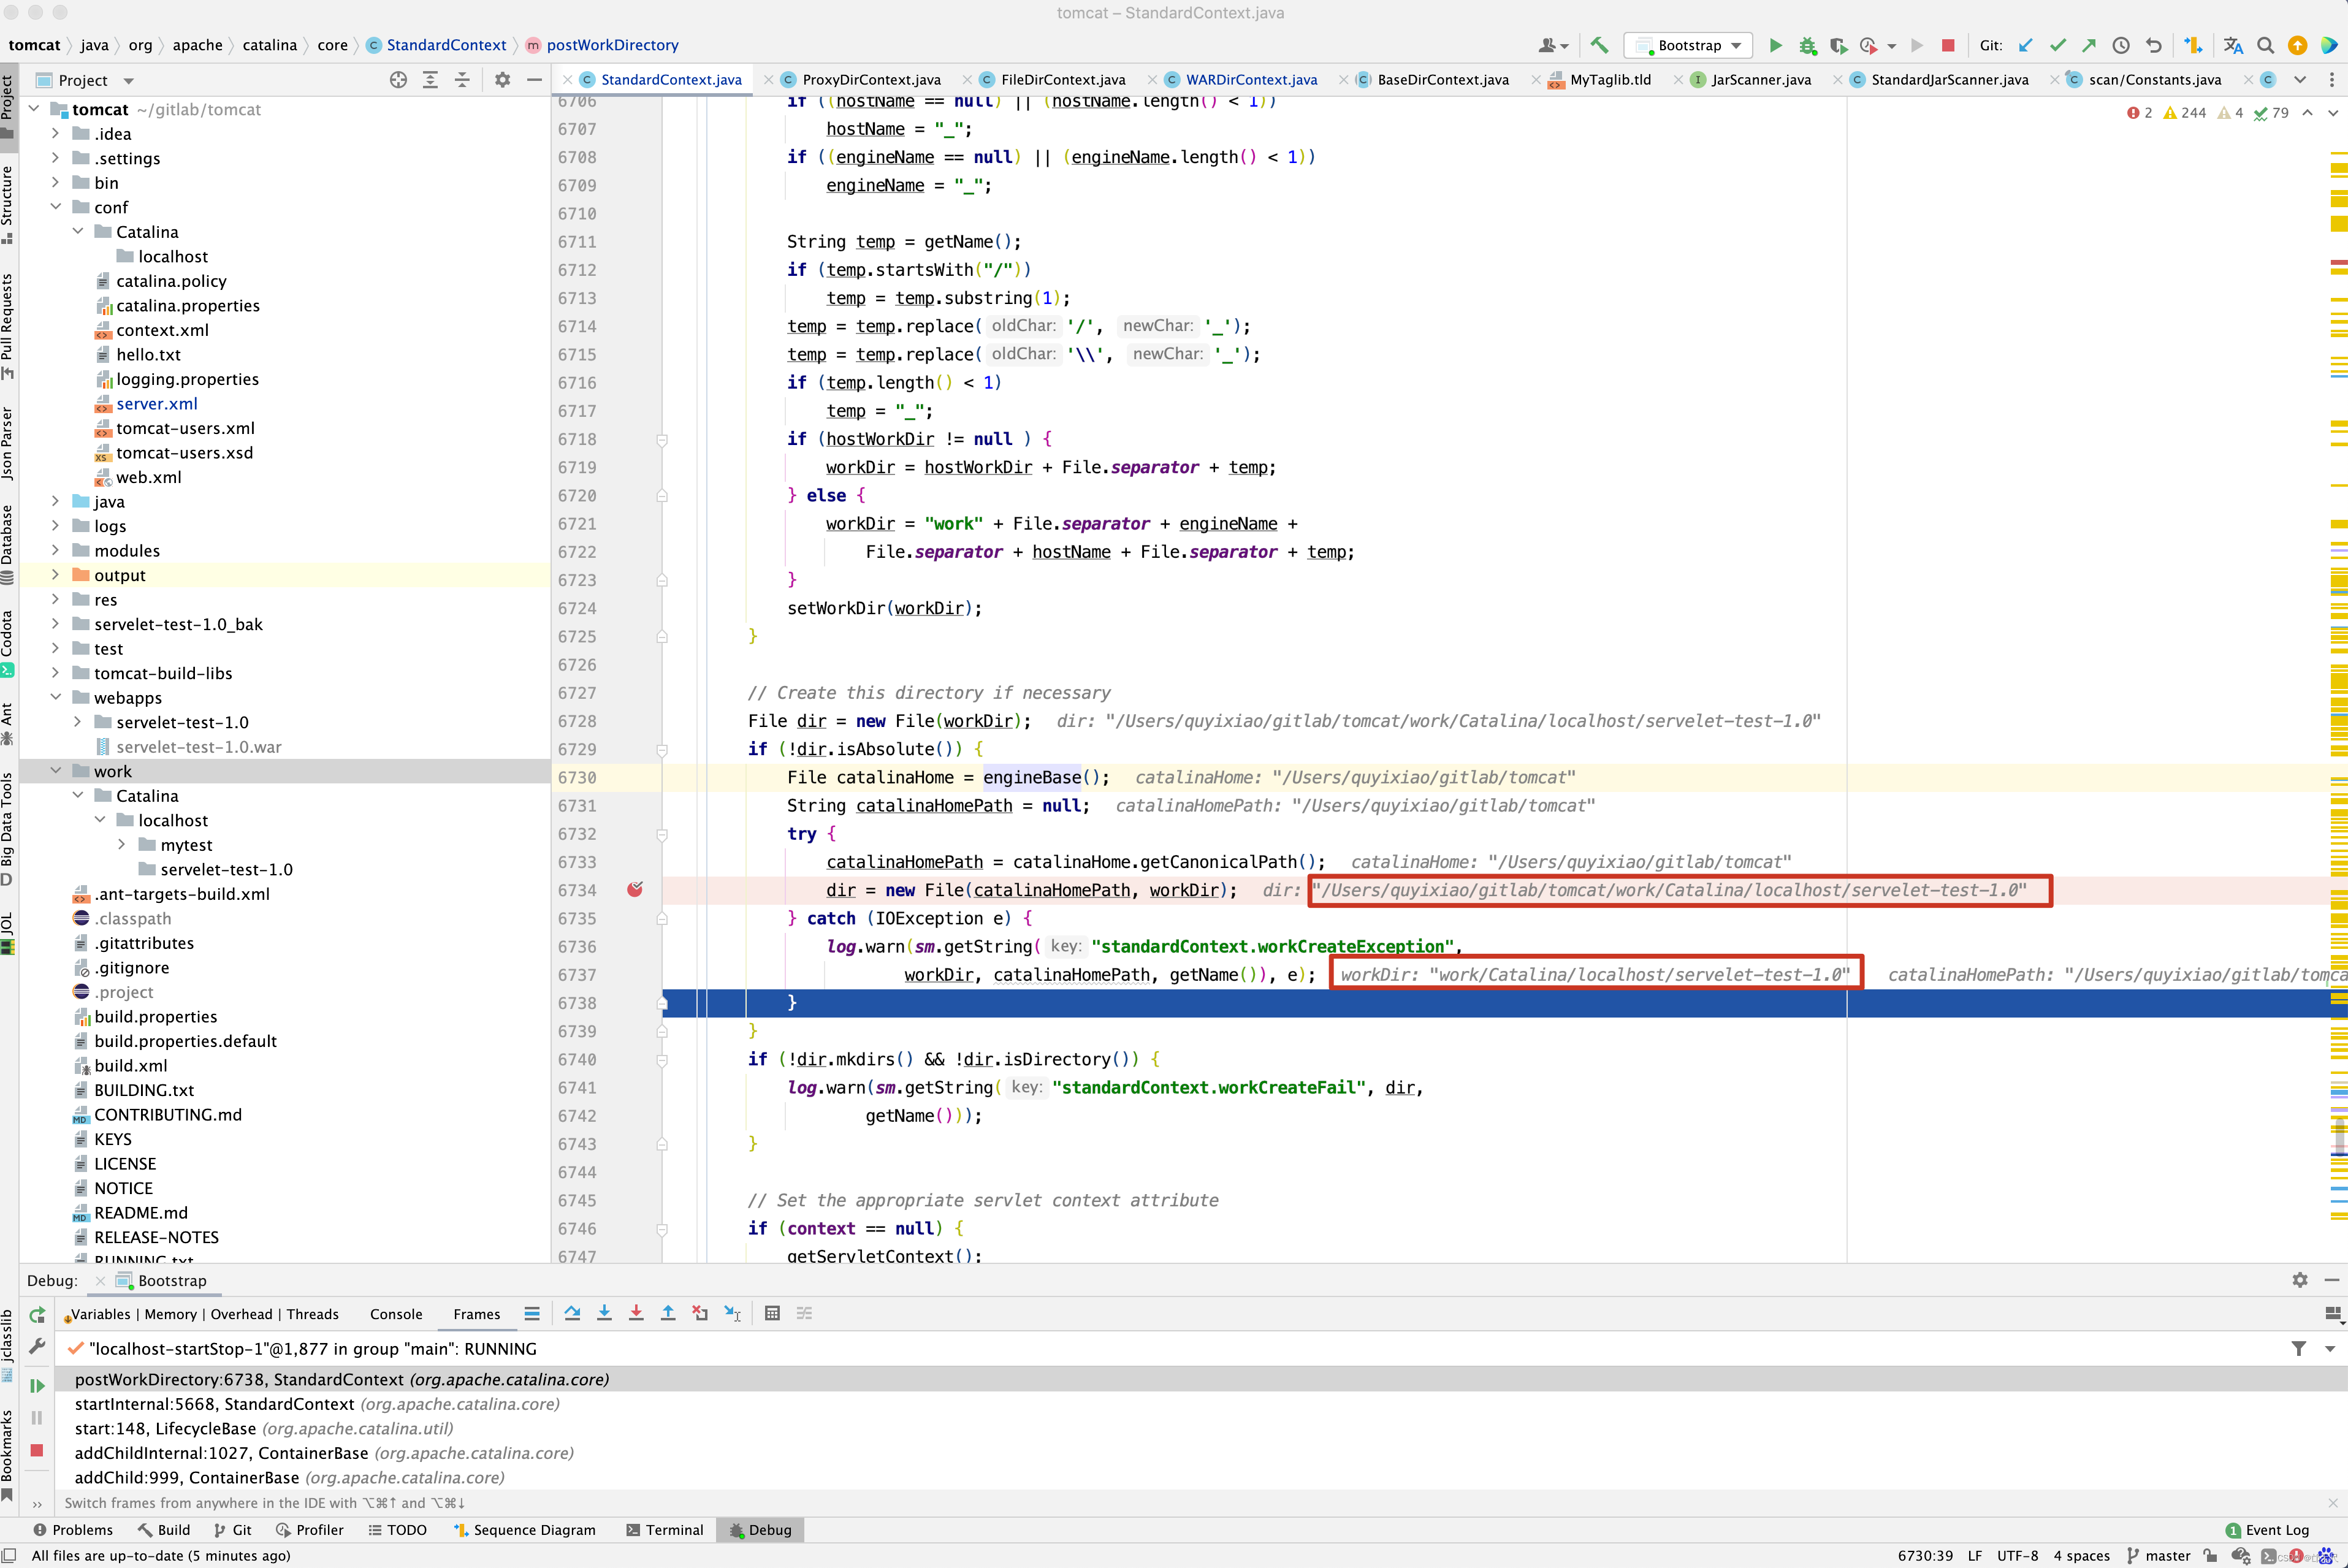
为什么我要讲这个工作目录呢?
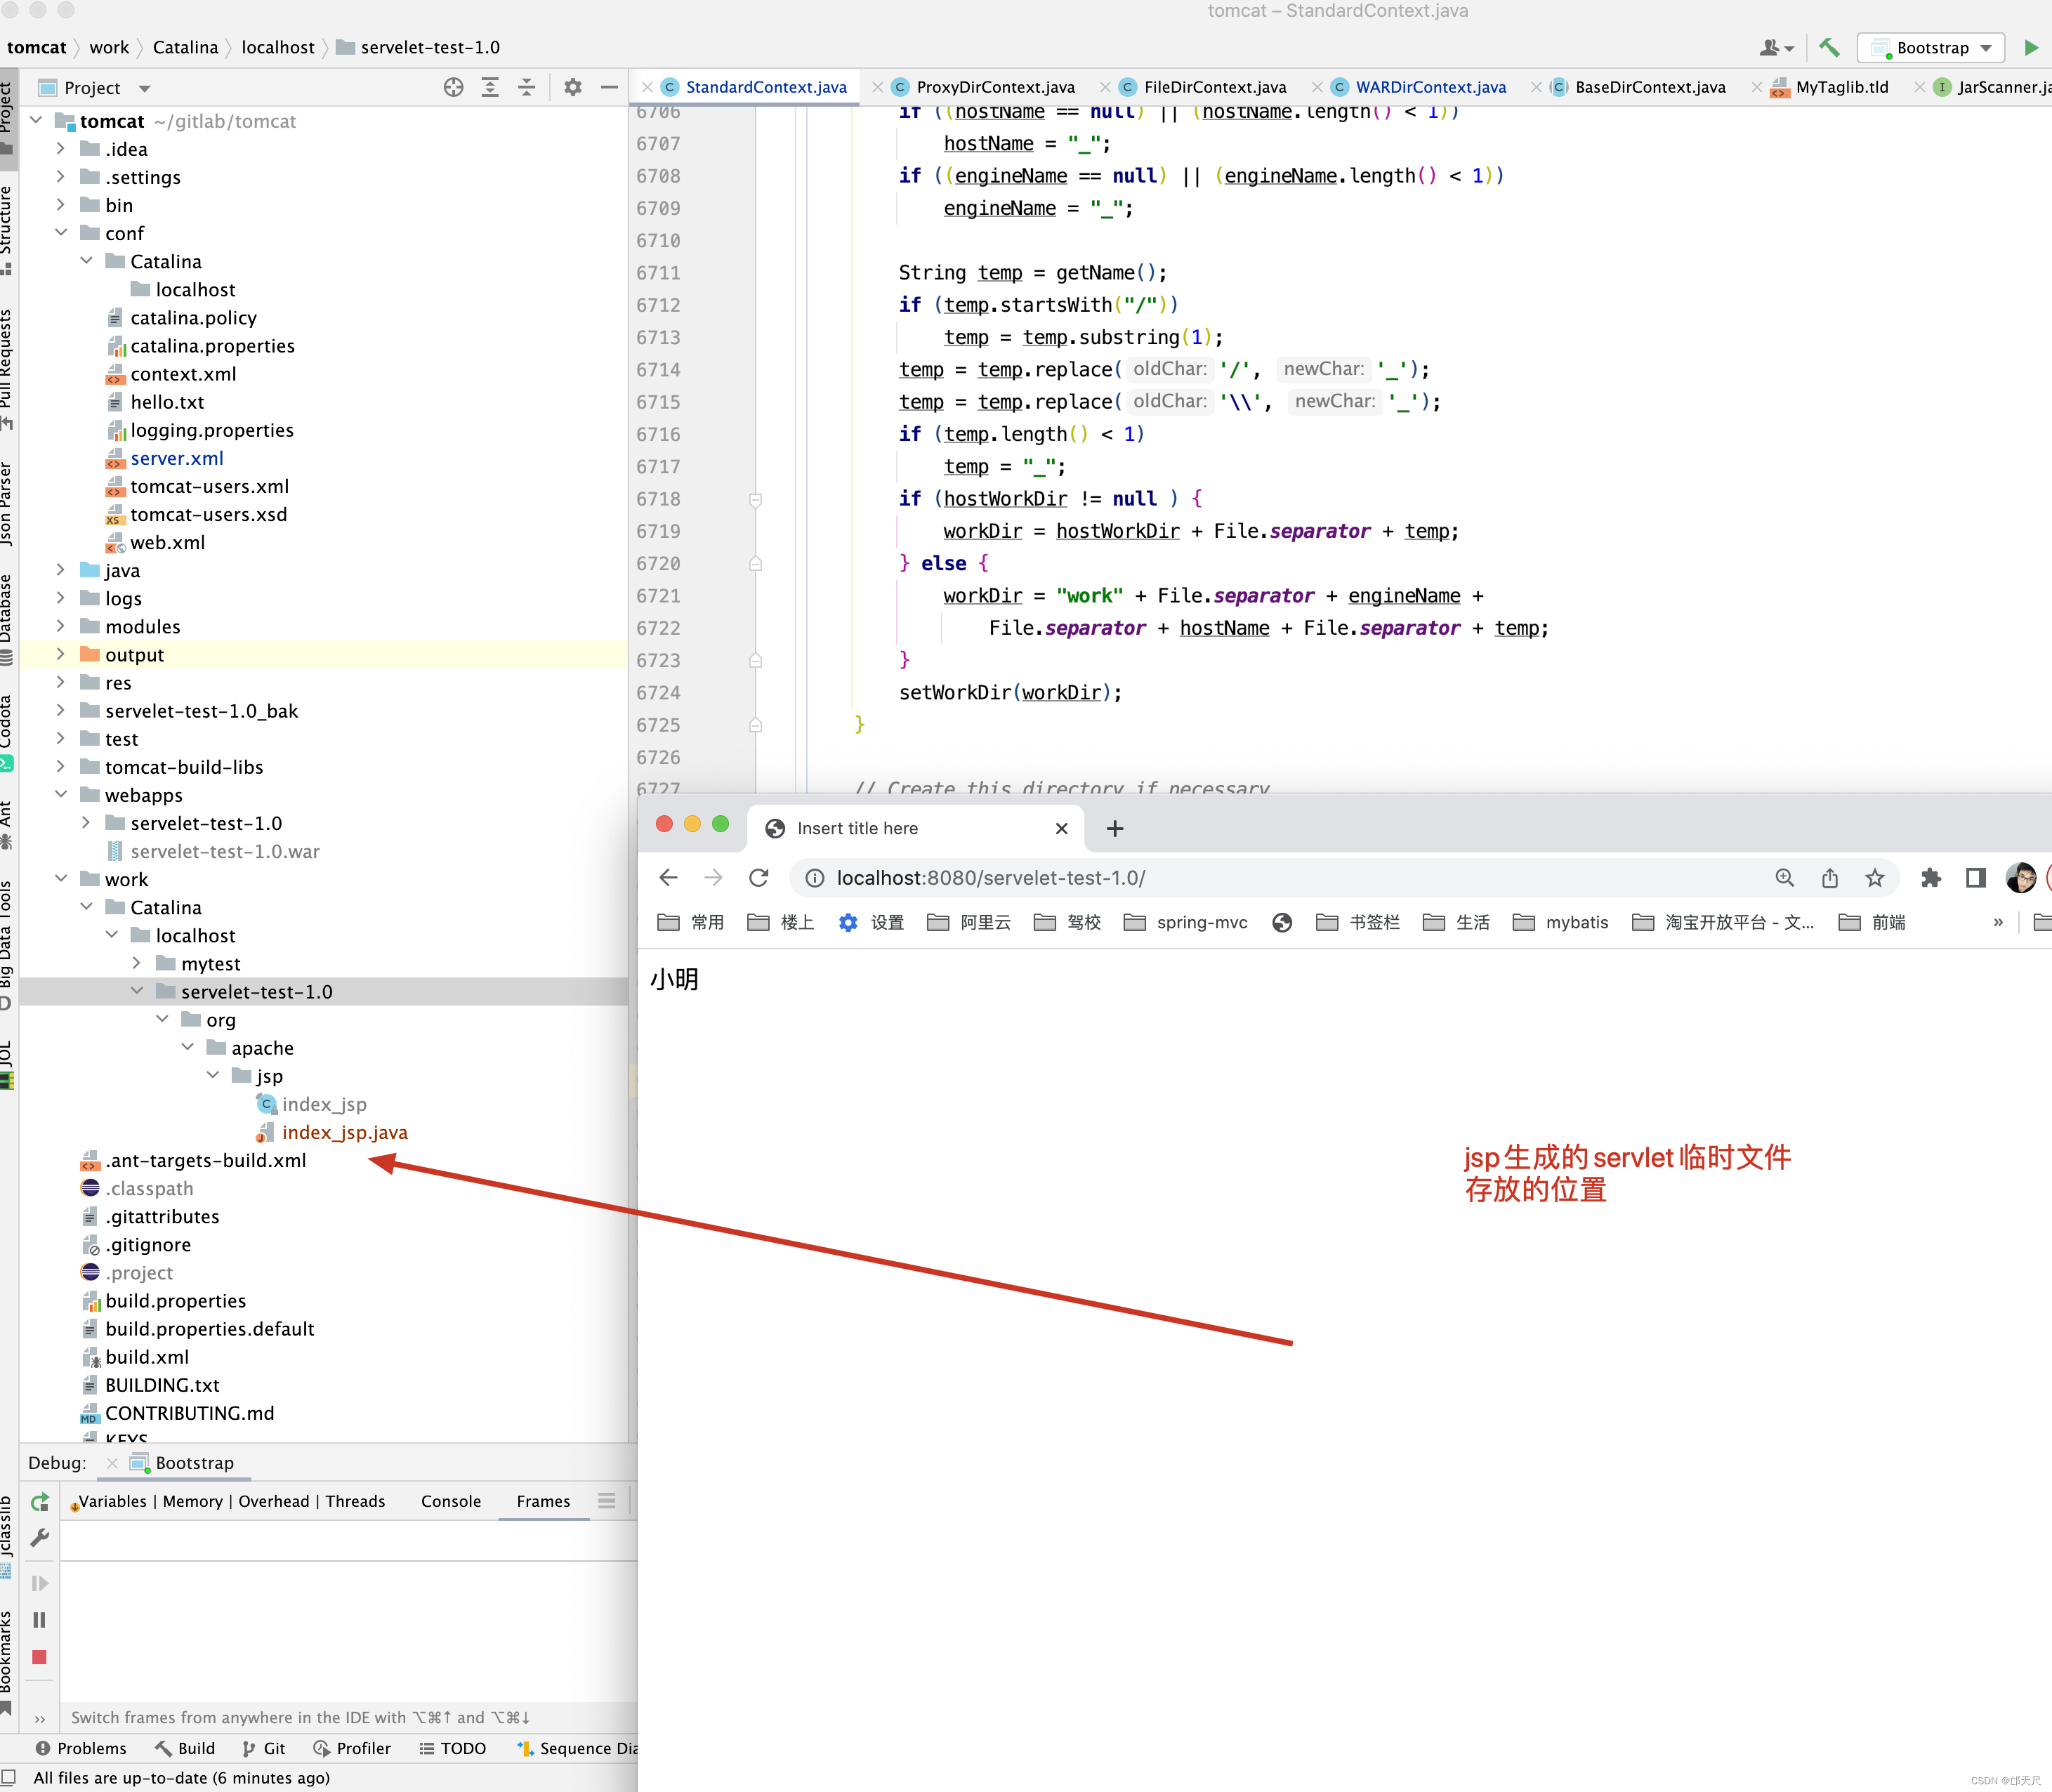
一个重要的应用就是当访问jsp文件时,jsp文件会生成xxx_jsp.java文件,而这个文件存放在工作目录下。
我相信上面有一行ExtensionValidator.validateApplication (getResources(), this);这行代码很容易被人遗漏。好像执行与不执行对tomcat启动没有什么影响,真的吗?先看源码,再来举例子。
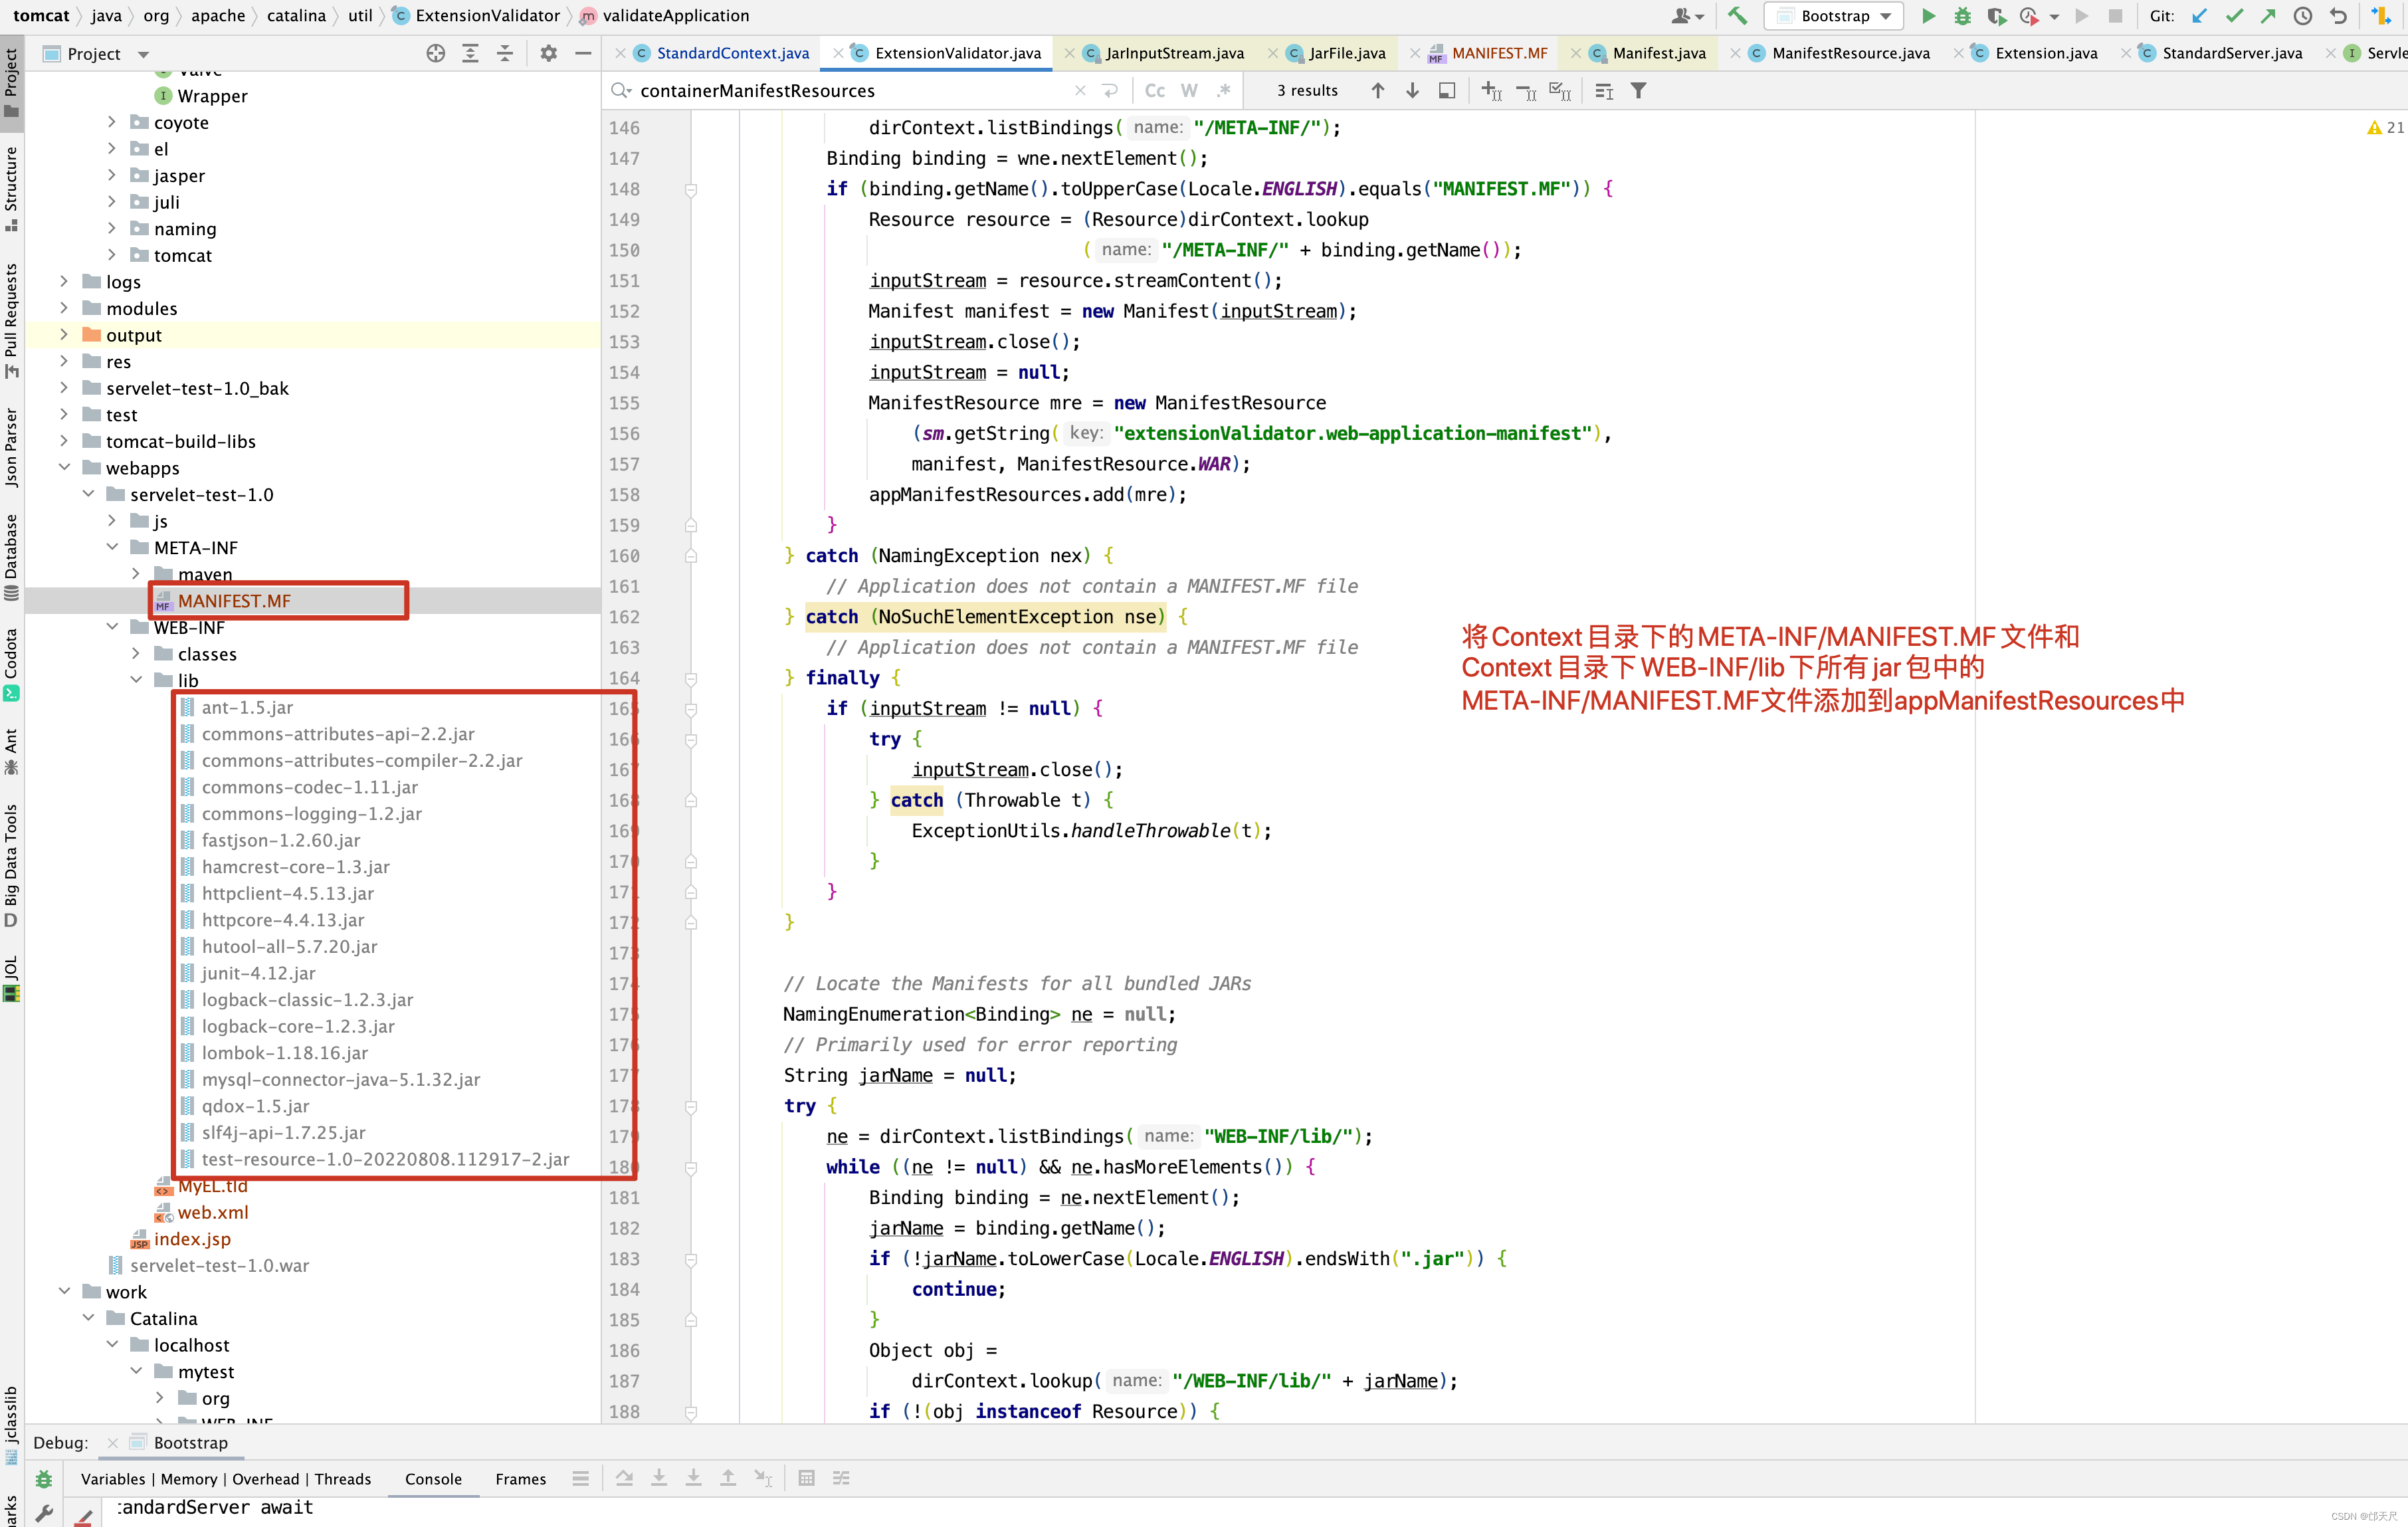
public static synchronized boolean validateApplication(
                                       DirContext dirContext,
                                       Context context)
                throws IOException {
    String appName = context.getName();
    ArrayList<ManifestResource> appManifestResources =
        new ArrayList<ManifestResource>();
    // If the application context is null it does not exist and
    // therefore is not valid
    if (dirContext == null) return false;
    // Find the Manifest for the Web Application
    InputStream inputStream = null;
    try {
    	// 通过JNDI查找/META-INF目录下的MANIFEST.MF文件
    	// 如果存在,则构建ManifestResource 保存到appManifestResources中
        NamingEnumeration<Binding> wne =
            dirContext.listBindings("/META-INF/");
        Binding binding = wne.nextElement();
        if (binding.getName().toUpperCase(Locale.ENGLISH).equals("MANIFEST.MF")) {
            Resource resource = (Resource)dirContext.lookup
                                ("/META-INF/" + binding.getName());
            inputStream = resource.streamContent();
            Manifest manifest = new Manifest(inputStream);
            inputStream.close();
            inputStream = null;
            ManifestResource mre = new ManifestResource
                (sm.getString("extensionValidator.web-application-manifest"),
                manifest, ManifestResource.WAR);
            appManifestResources.add(mre);
        }
    } catch (NamingException nex) {
        // Application does not contain a MANIFEST.MF file
    } catch (NoSuchElementException nse) {
        // Application does not contain a MANIFEST.MF file
    } finally {
        if (inputStream != null) {
            try {
                inputStream.close();
            } catch (Throwable t) {
                ExceptionUtils.handleThrowable(t);
            }
        }
    }

    // Locate the Manifests for all bundled JARs
    NamingEnumeration<Binding> ne = null;
    // Primarily used for error reporting
    String jarName = null;
    try {
    	// 遍历当前Context目录下WEB-INF/lib/文件夹下的所有jar包
    	// 看jar包下是否存在 META-INF/MANIFEST.MF ,如果存在,则构建
    	// ManifestResource 对象,添加到appManifestResources下
        ne = dirContext.listBindings("WEB-INF/lib/");
        while ((ne != null) && ne.hasMoreElements()) {
            Binding binding = ne.nextElement();
            jarName = binding.getName();
            if (!jarName.toLowerCase(Locale.ENGLISH).endsWith(".jar")) {
                continue;
            }
            Object obj =
                dirContext.lookup("/WEB-INF/lib/" + jarName);
            if (!(obj instanceof Resource)) {
                // Probably a directory named xxx.jar - ignore it
                continue;
            }
            Resource resource = (Resource) obj;
            inputStream = resource.streamContent();

            Manifest jmanifest = getManifest(inputStream);
            // 如果jar包下存在META-INF/MANIFEST.MF ,则创建ManifestResource
            if (jmanifest != null) {
                ManifestResource mre = new ManifestResource(jarName,
                        jmanifest, ManifestResource.APPLICATION);
                appManifestResources.add(mre);
            }
        }
    } catch (NamingException nex) {
        // Jump out of the check for this application because it
        // has no resources
    } catch (IOException ioe) {
        throw new IOException("Jar: " + jarName, ioe);
    } finally {
        if (inputStream != null) {
            try {
                inputStream.close();
            } catch (Throwable t) {
                ExceptionUtils.handleThrowable(t);
            }
        }
    }

    return validateManifestResources(appName, appManifestResources);
}

private static Manifest getManifest(InputStream inStream) throws IOException {
    Manifest manifest = null;
    JarInputStream jin = null;
    try {
        jin = new JarInputStream(inStream);
        // jar包下的META-INF/MANIFEST.MF是否存在
        manifest = jin.getManifest();
        jin.close();
        jin = null;
    } finally {
        if (jin != null) {
            try {
                jin.close();
            } catch (Throwable t) {
                ExceptionUtils.handleThrowable(t);
            }
        }
    }
    return manifest;
}


public JarInputStream(InputStream in, boolean verify) throws IOException {
    super(in);
    this.doVerify = verify;
    // This implementation assumes the META-INF/MANIFEST.MF entry
    // should be either the first or the second entry (when preceded
    // by the dir META-INF/). It skips the META-INF/ and then
    // "consumes" the MANIFEST.MF to initialize the Manifest object.
    JarEntry e = (JarEntry)super.getNextEntry();
    if (e != null && e.getName().equalsIgnoreCase("META-INF/"))
        e = (JarEntry)super.getNextEntry();
    first = checkManifest(e);
}

private JarEntry checkManifest(JarEntry e)
    throws IOException
{
    if (e != null && "META-INF/MANIFEST.MF".equalsIgnoreCase(e.getName())) {
        man = new Manifest();
        byte bytes[] = getBytes(new BufferedInputStream(this));
        man.read(new ByteArrayInputStream(bytes));
        closeEntry();
        if (doVerify) {
            jv = new JarVerifier(bytes);
            mev = new ManifestEntryVerifier(man);
        }
        return (JarEntry)super.getNextEntry();
    }
    return e;
}


public Manifest getManifest() {
    return man;
}
其实validateApplication()代码写了那么多,只是将/META-INF/MANIFEST.MF文件以及WEB-INF/lib下的所有jar包中的/META-INF/MANIFEST.MF构建成ManifestResource添加到appManifestResources中。
当然ManifestResource构建函数中做了哪些事情呢?
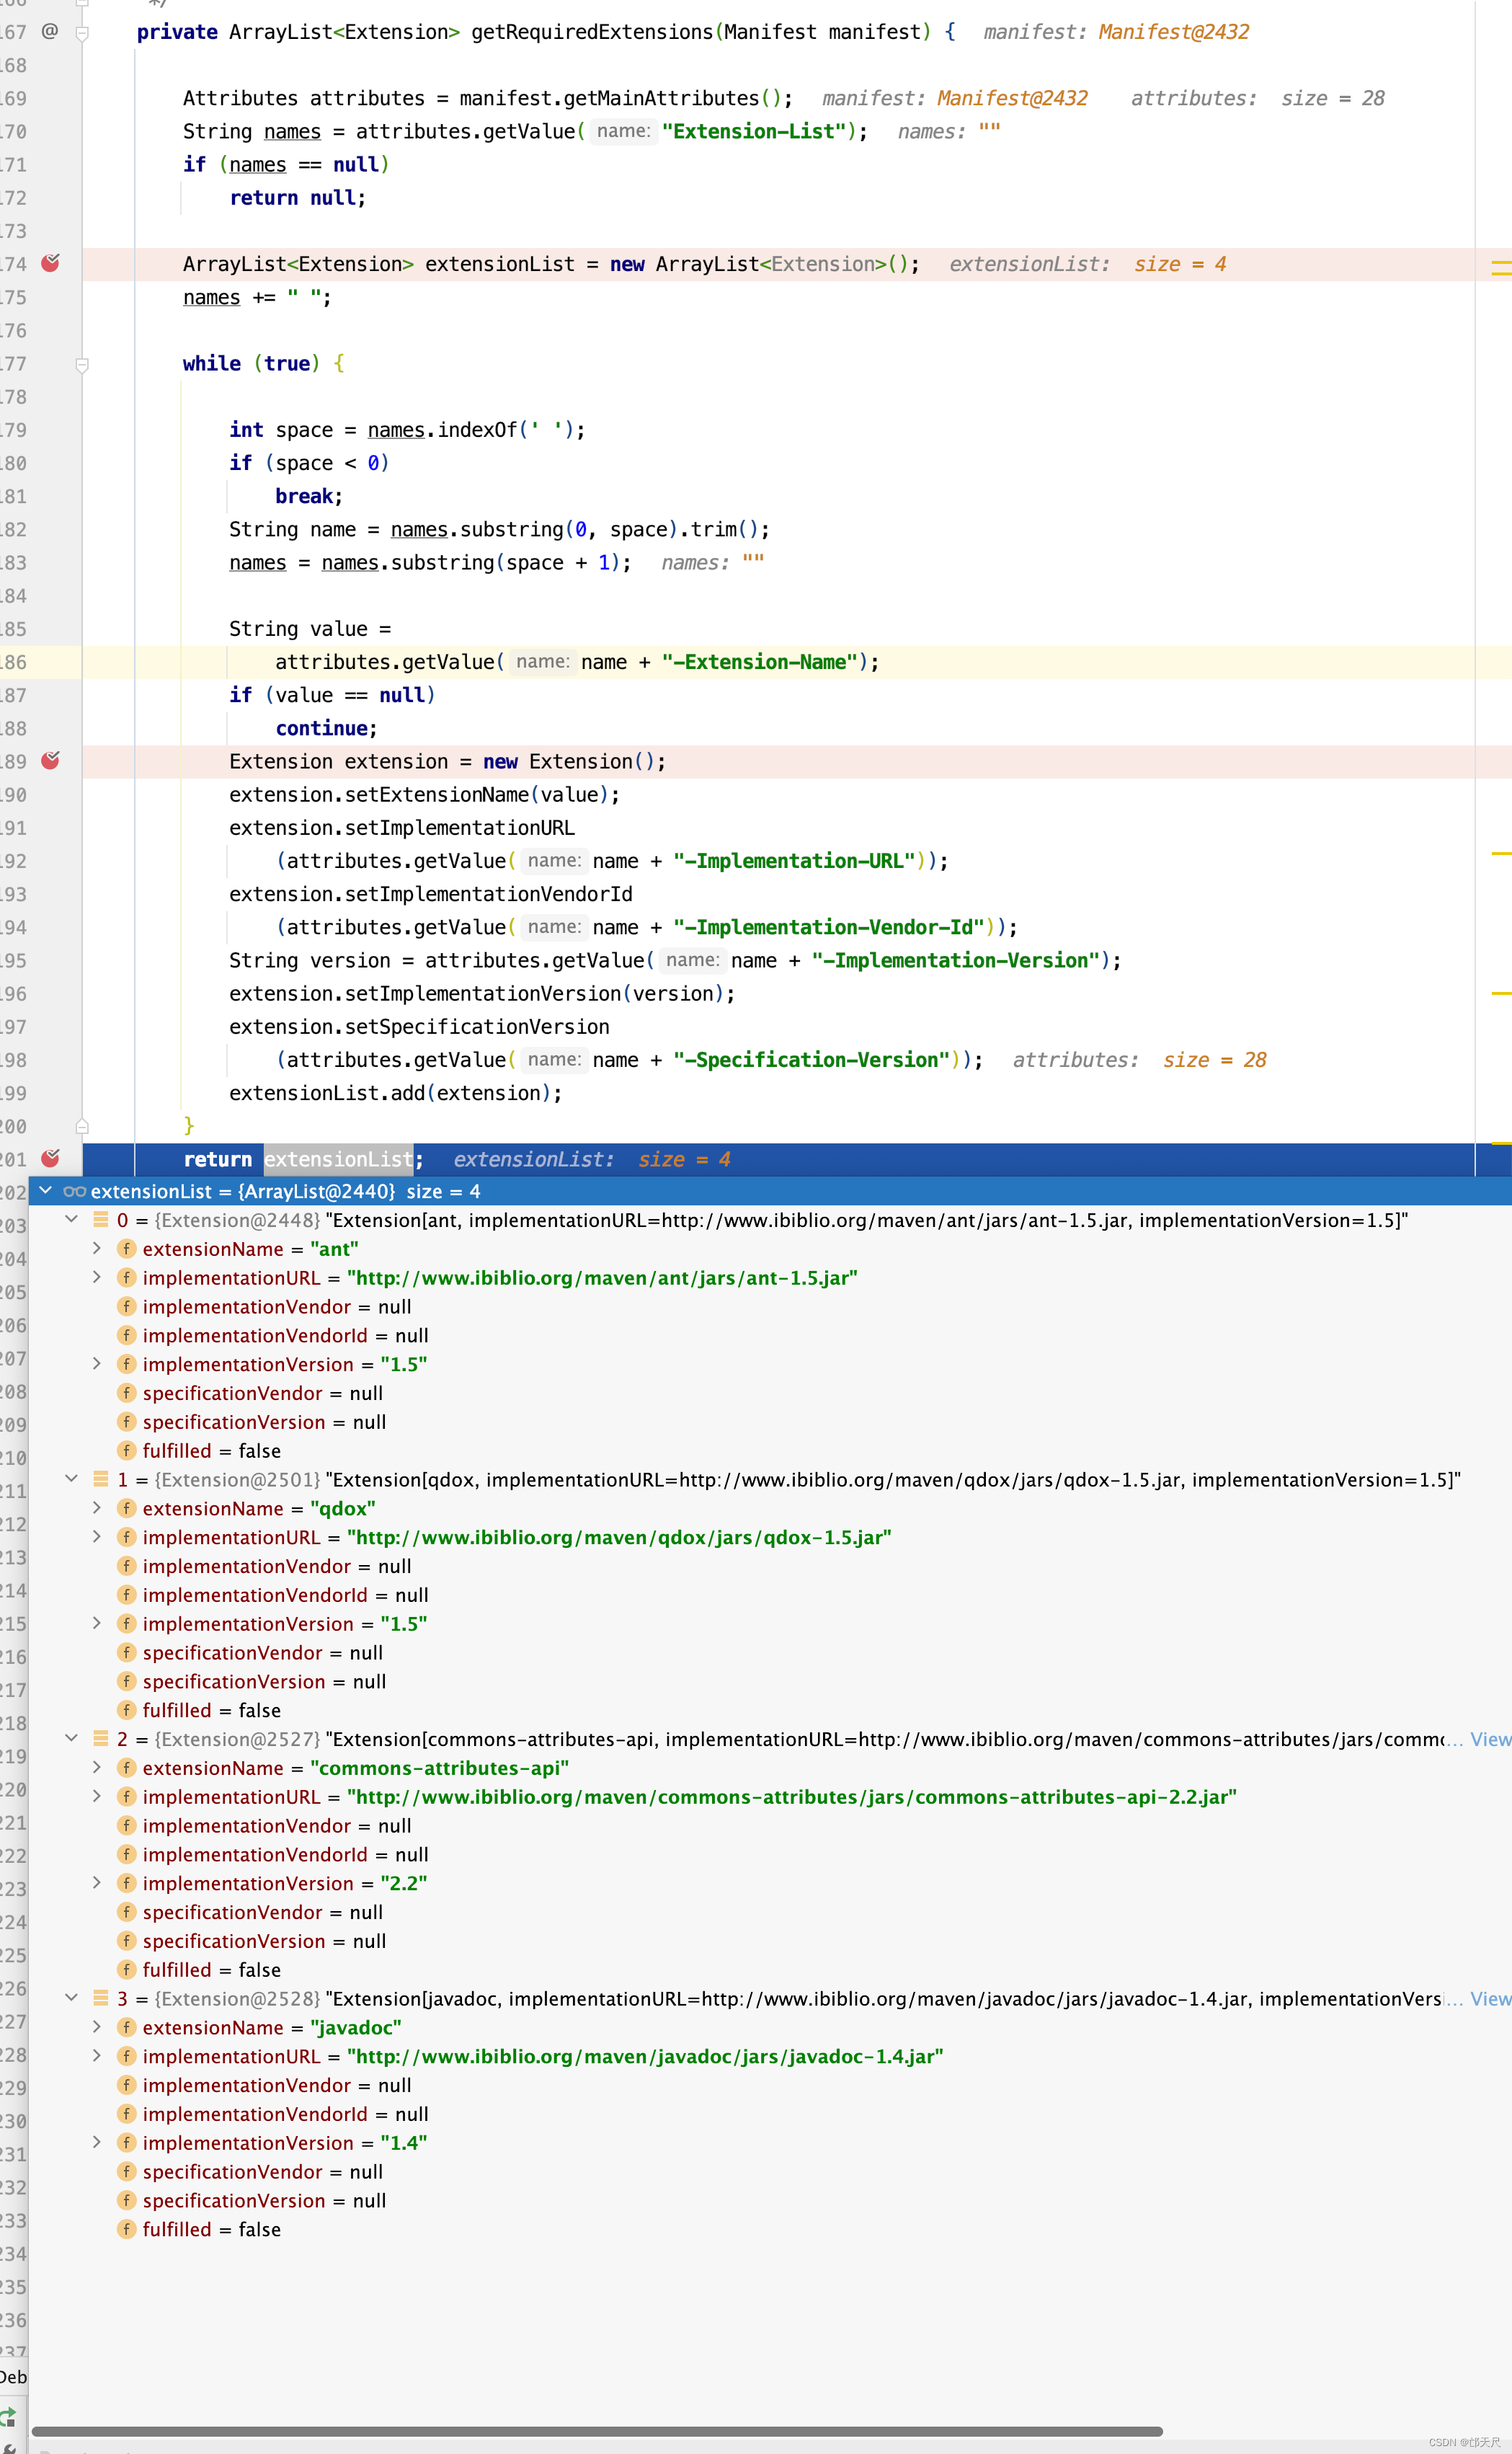
public ManifestResource(String resourceName, Manifest manifest,
                        int resourceType) {
    this.resourceName = resourceName;
    this.resourceType = resourceType;
    processManifest(manifest);
}


private void processManifest(Manifest manifest) {
    availableExtensions = getAvailableExtensions(manifest);
    requiredExtensions = getRequiredExtensions(manifest);
}


private ArrayList<Extension> getRequiredExtensions(Manifest manifest) {

    Attributes attributes = manifest.getMainAttributes();
    String names = attributes.getValue("Extension-List");
    if (names == null)
        return null;

    ArrayList<Extension> extensionList = new ArrayList<Extension>();
    names += " ";

    while (true) {

        int space = names.indexOf(' ');
        if (space < 0)
            break;
        String name = names.substring(0, space).trim();
        names = names.substring(space + 1);

        String value =
            attributes.getValue(name + "-Extension-Name");
        if (value == null)
            continue;
        Extension extension = new Extension();
        extension.setExtensionName(value);
        extension.setImplementationURL
            (attributes.getValue(name + "-Implementation-URL"));
        extension.setImplementationVendorId
            (attributes.getValue(name + "-Implementation-Vendor-Id"));
        String version = attributes.getValue(name + "-Implementation-Version");
        extension.setImplementationVersion(version);
        extension.setSpecificationVersion
            (attributes.getValue(name + "-Specification-Version"));
        extensionList.add(extension);
    }
    return extensionList;
}
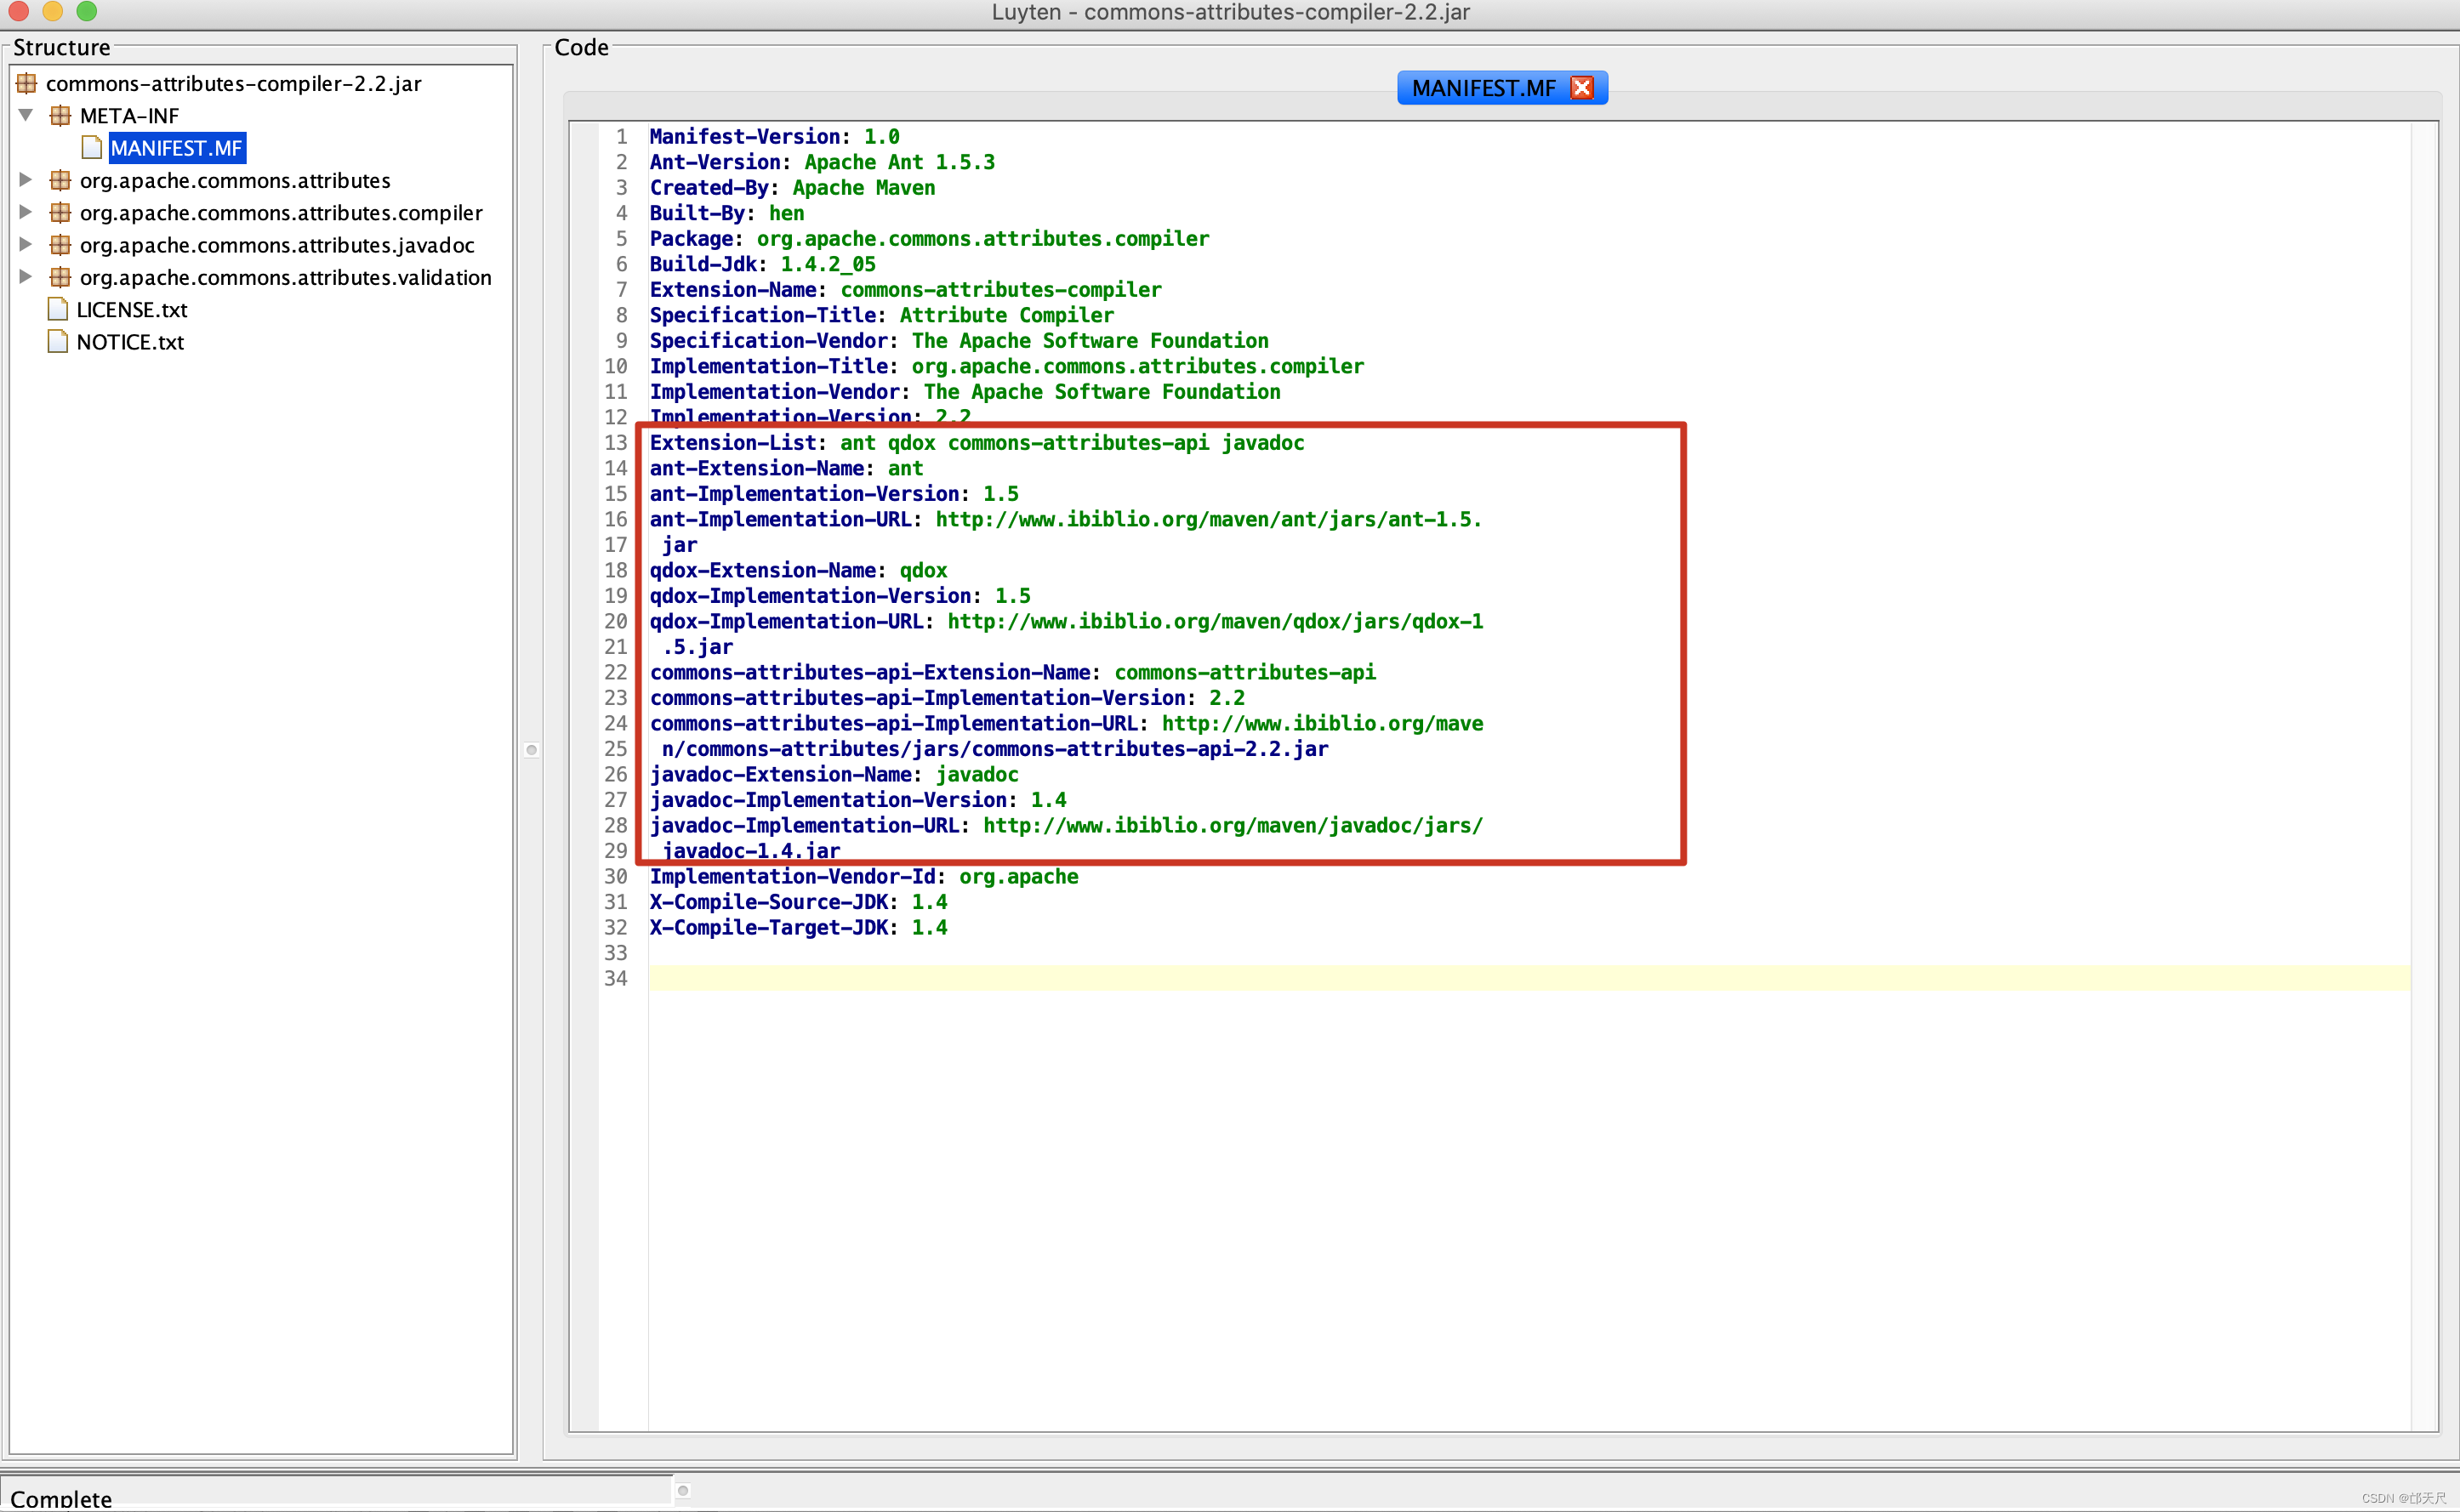
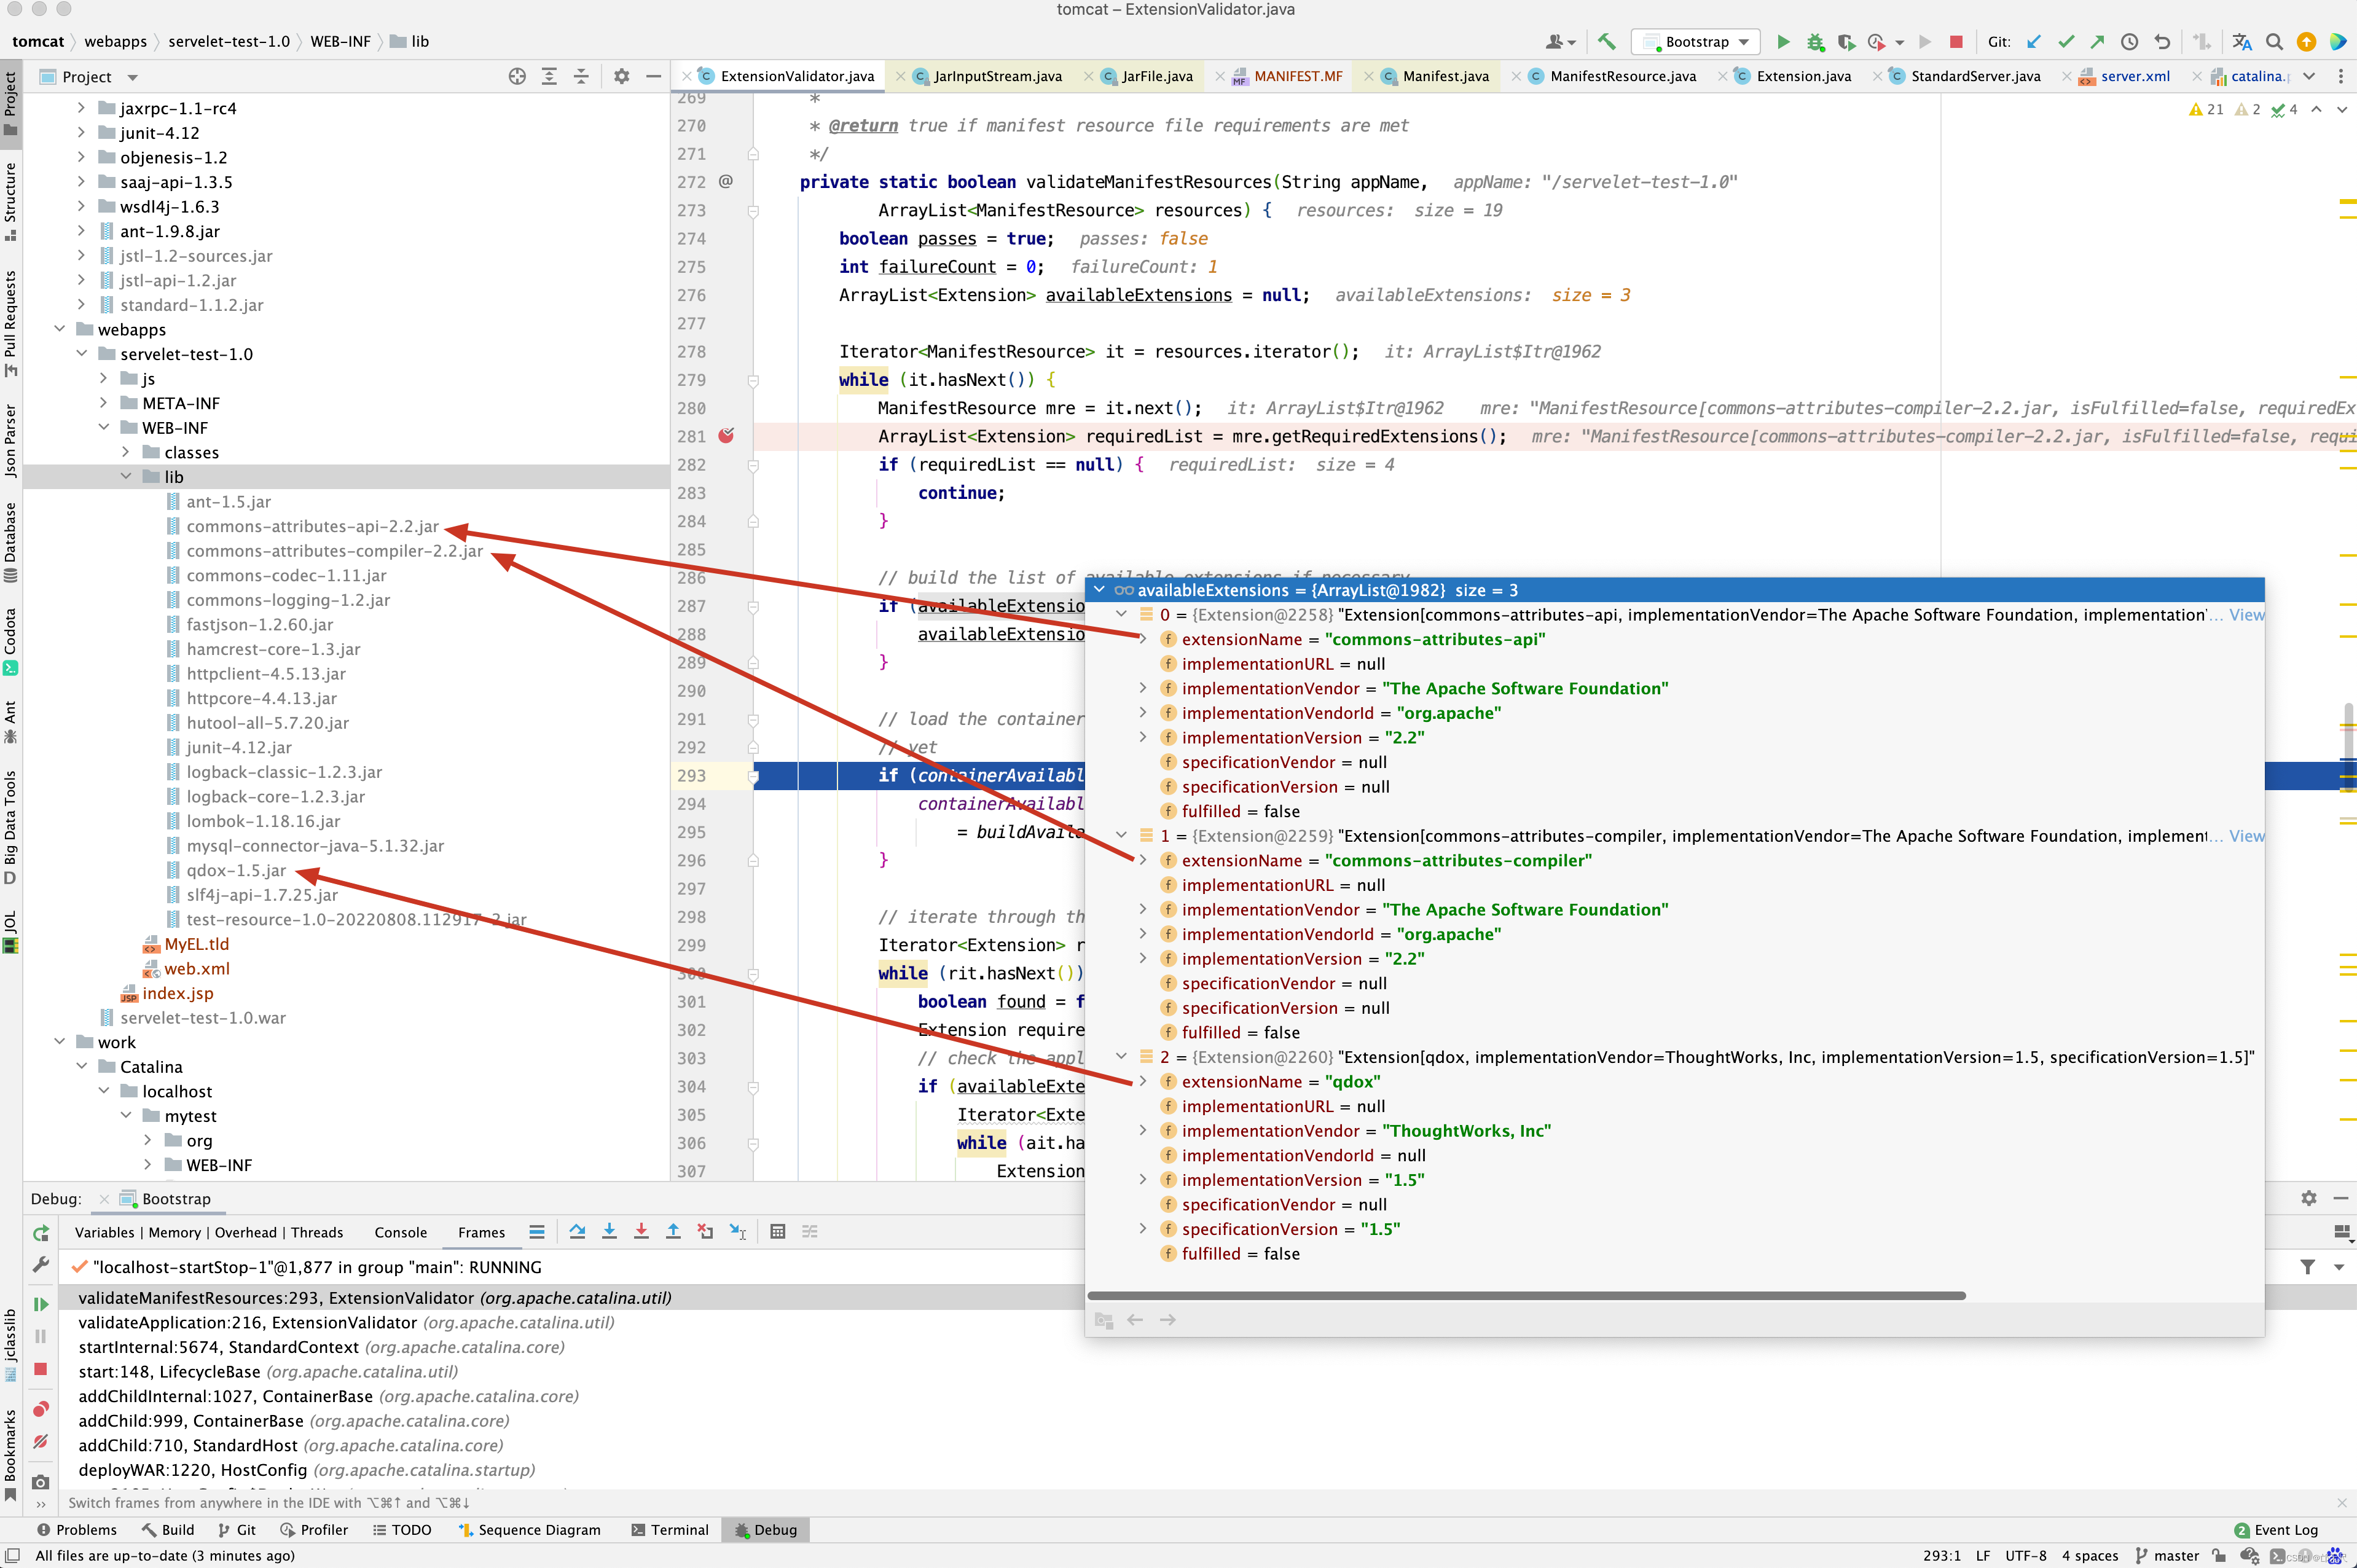
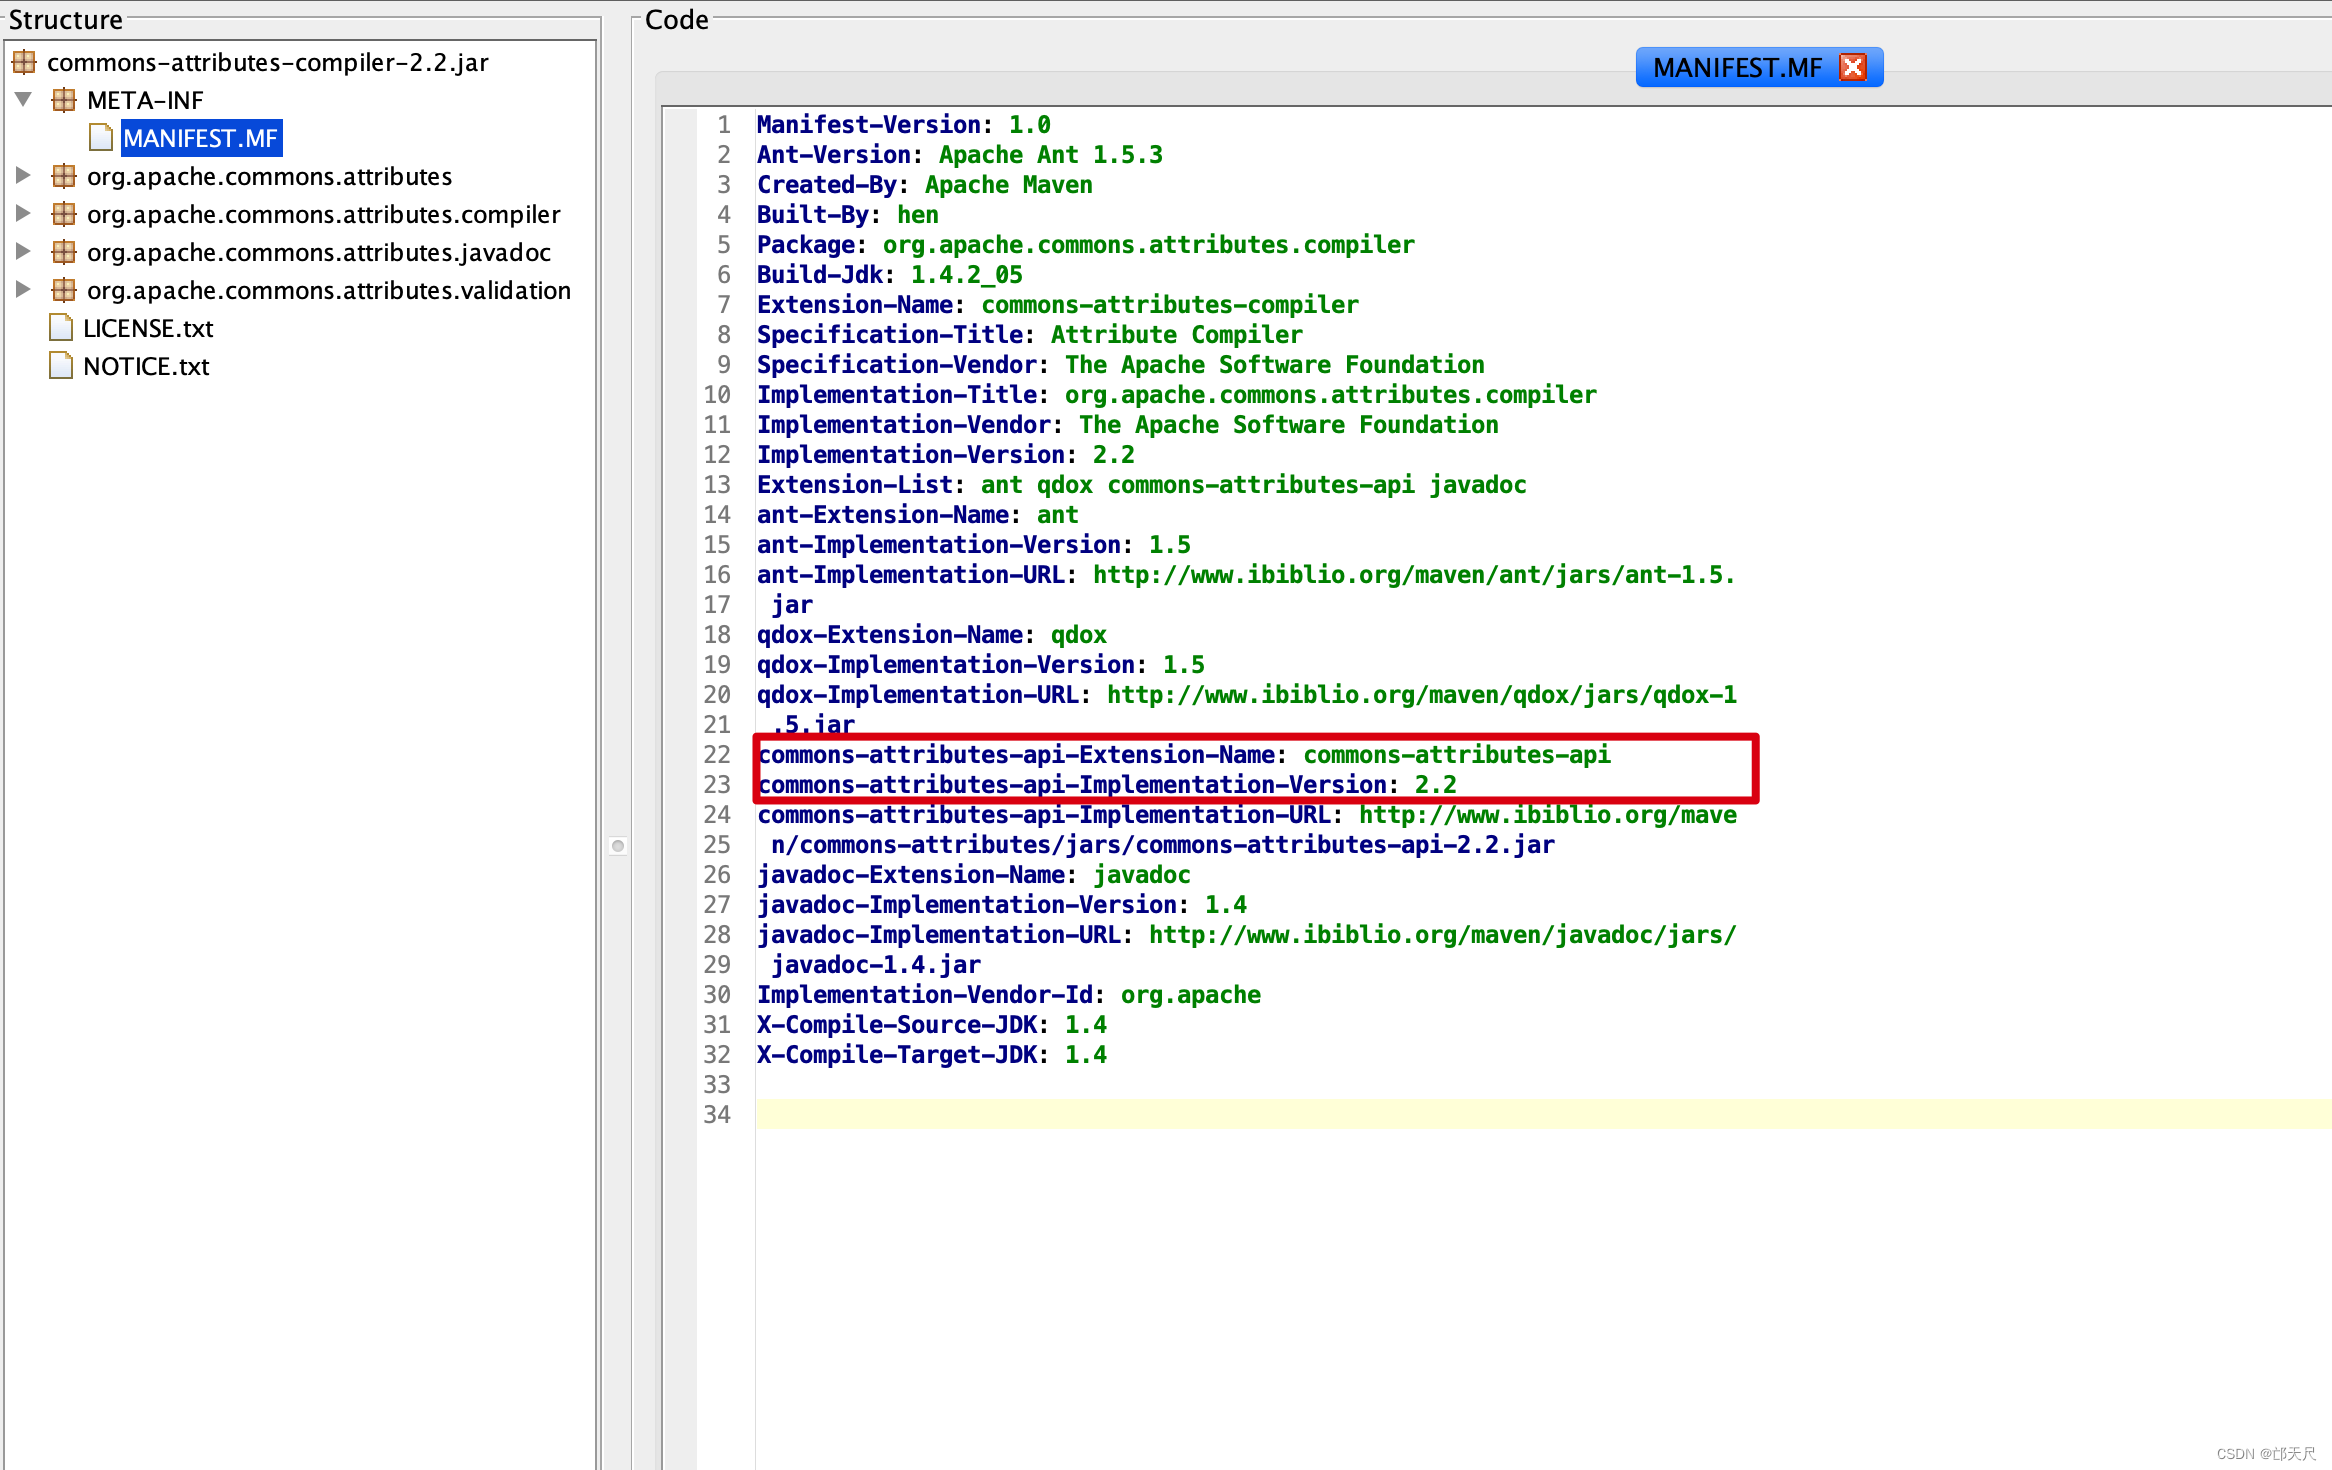
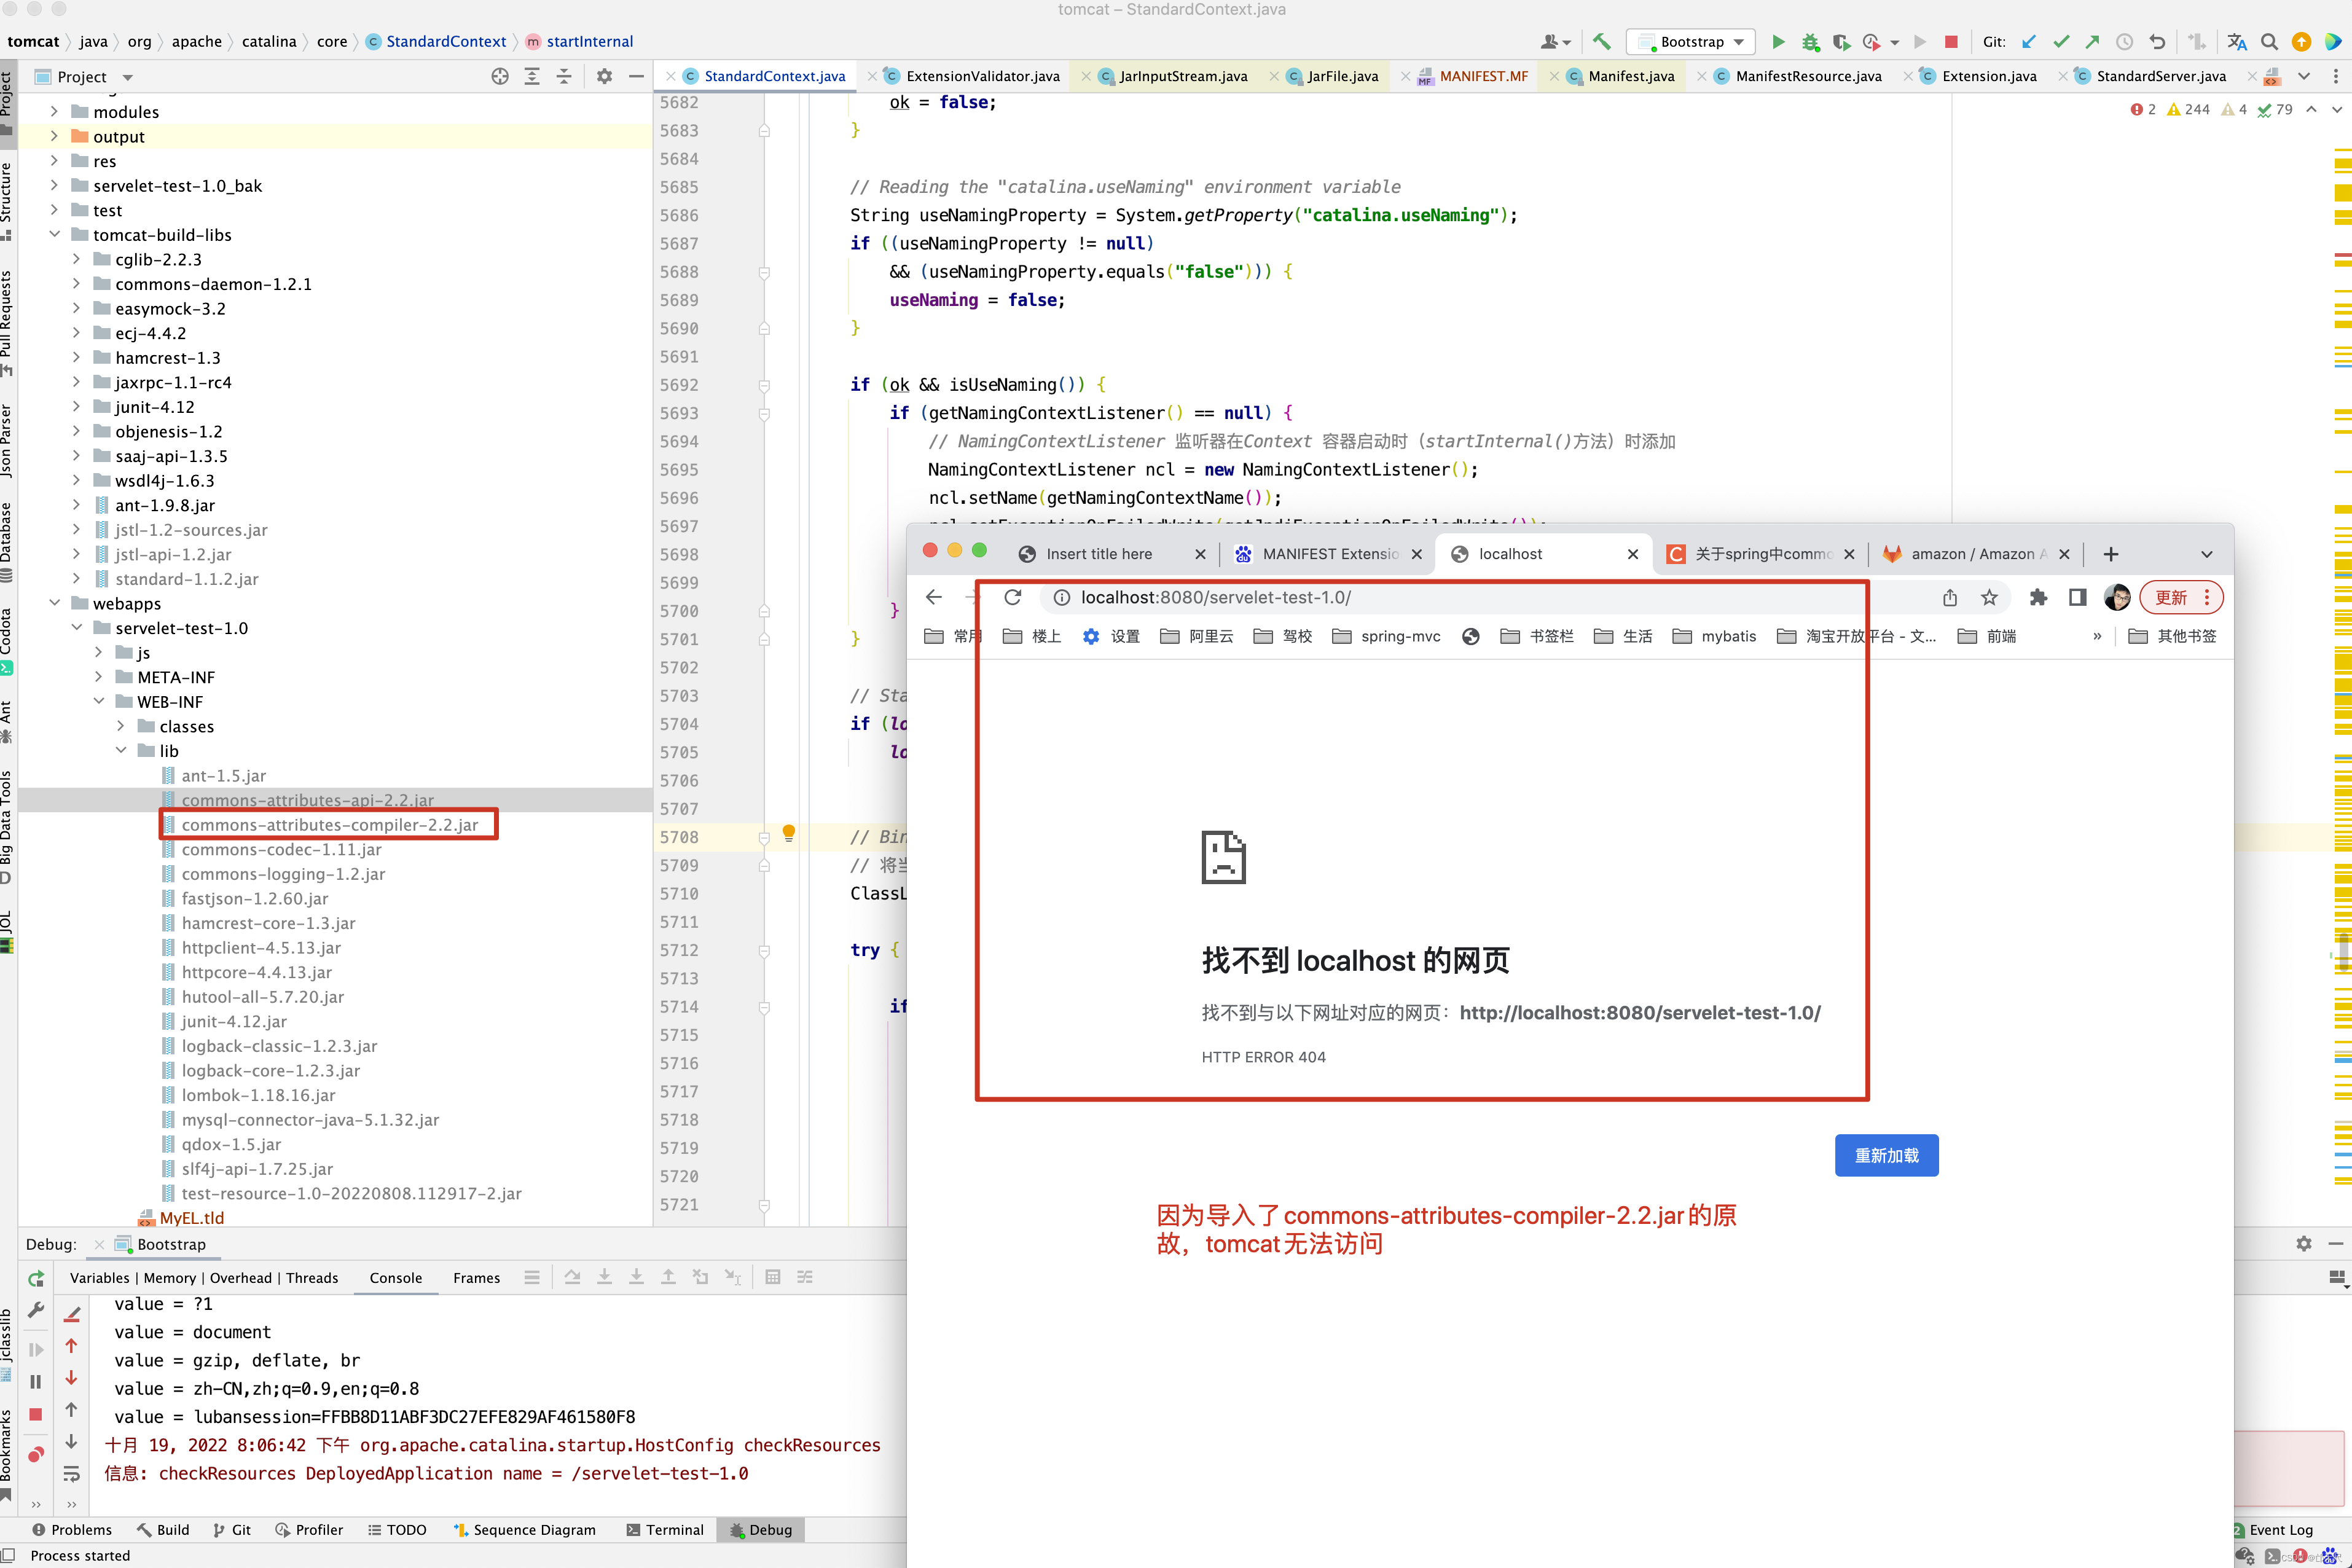
写这么多,只为分析ManifestResource的requiredExtensions属性由来,因为后面的验证需要用requiredExtensions属性,requiredExtensions来源于MANIFEST.MF的Extension-List属性,先来看一个拥有Extension-List的MANIFEST.MF文件,在网上寻寻觅觅可参考 关于spring中commons-attributes-compiler.jar的使用问题 博客 ,发现commons-attributes-compiler.jar在使用过程中就有MANIFEST.MF引起的问题,先来看看commons-attributes-compiler.jar的MANIFEST.MF文件 。
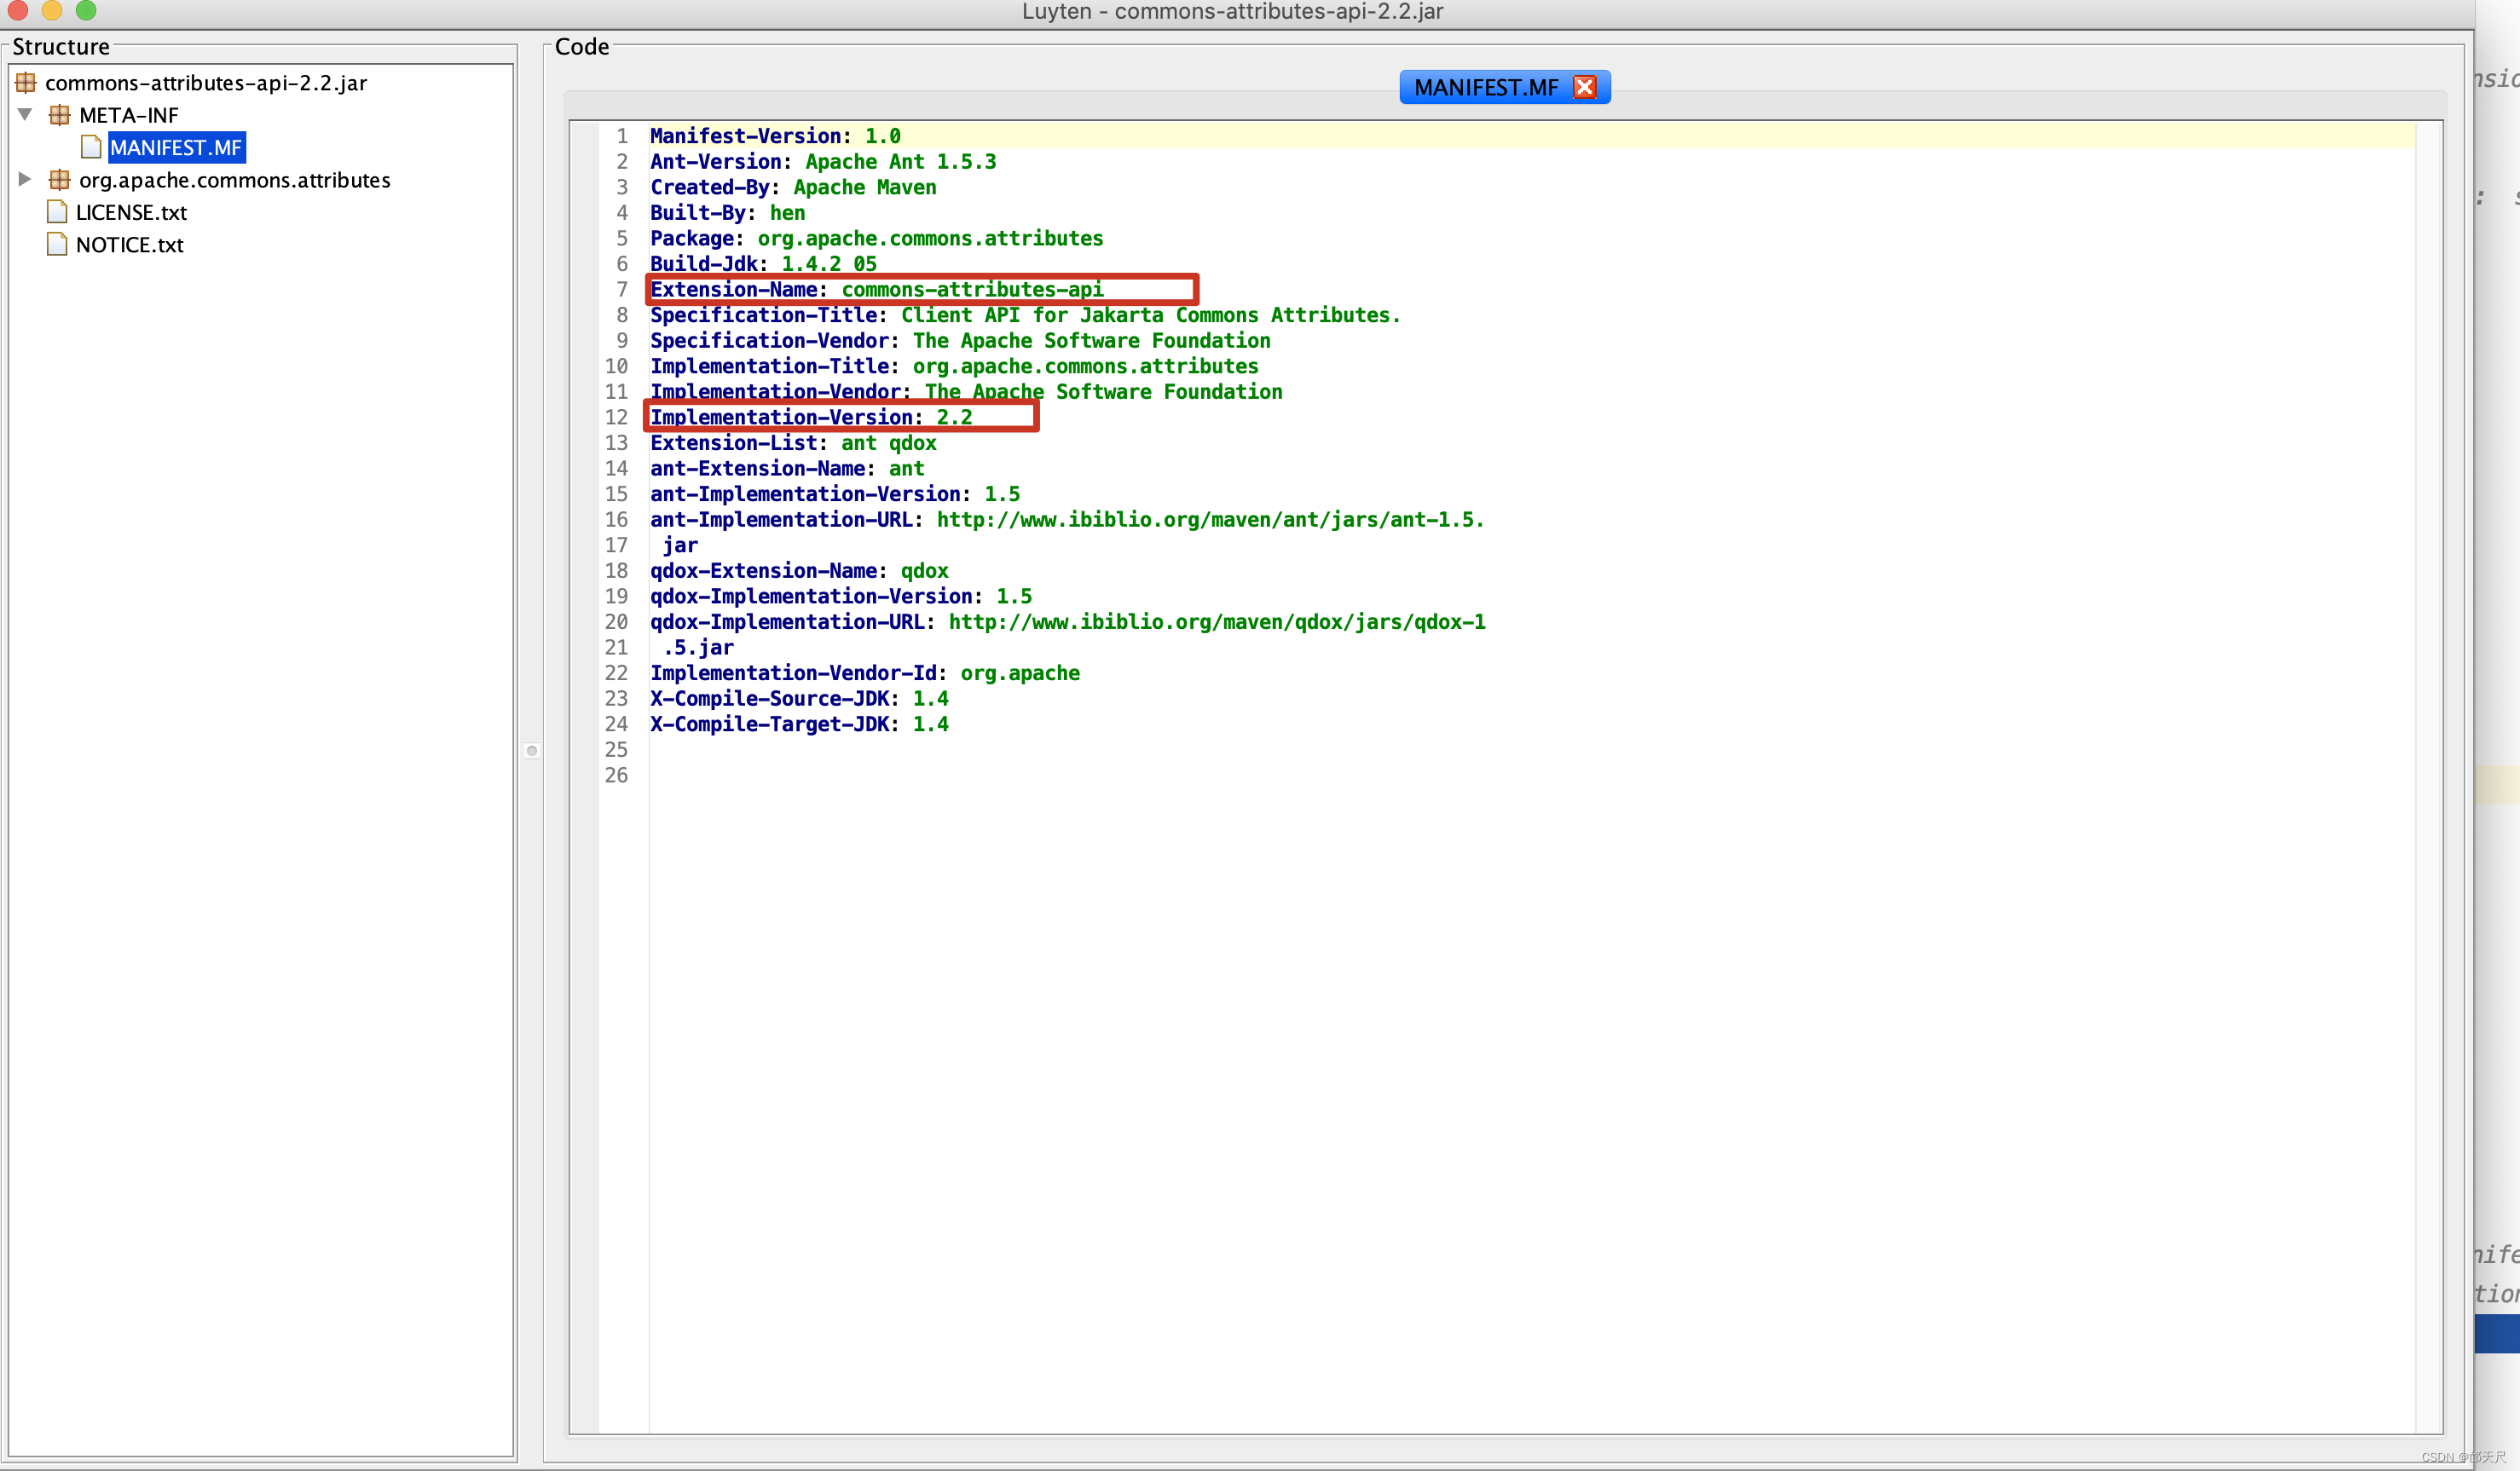
同理可以得到availableExtensions的值 。如下图所示 。
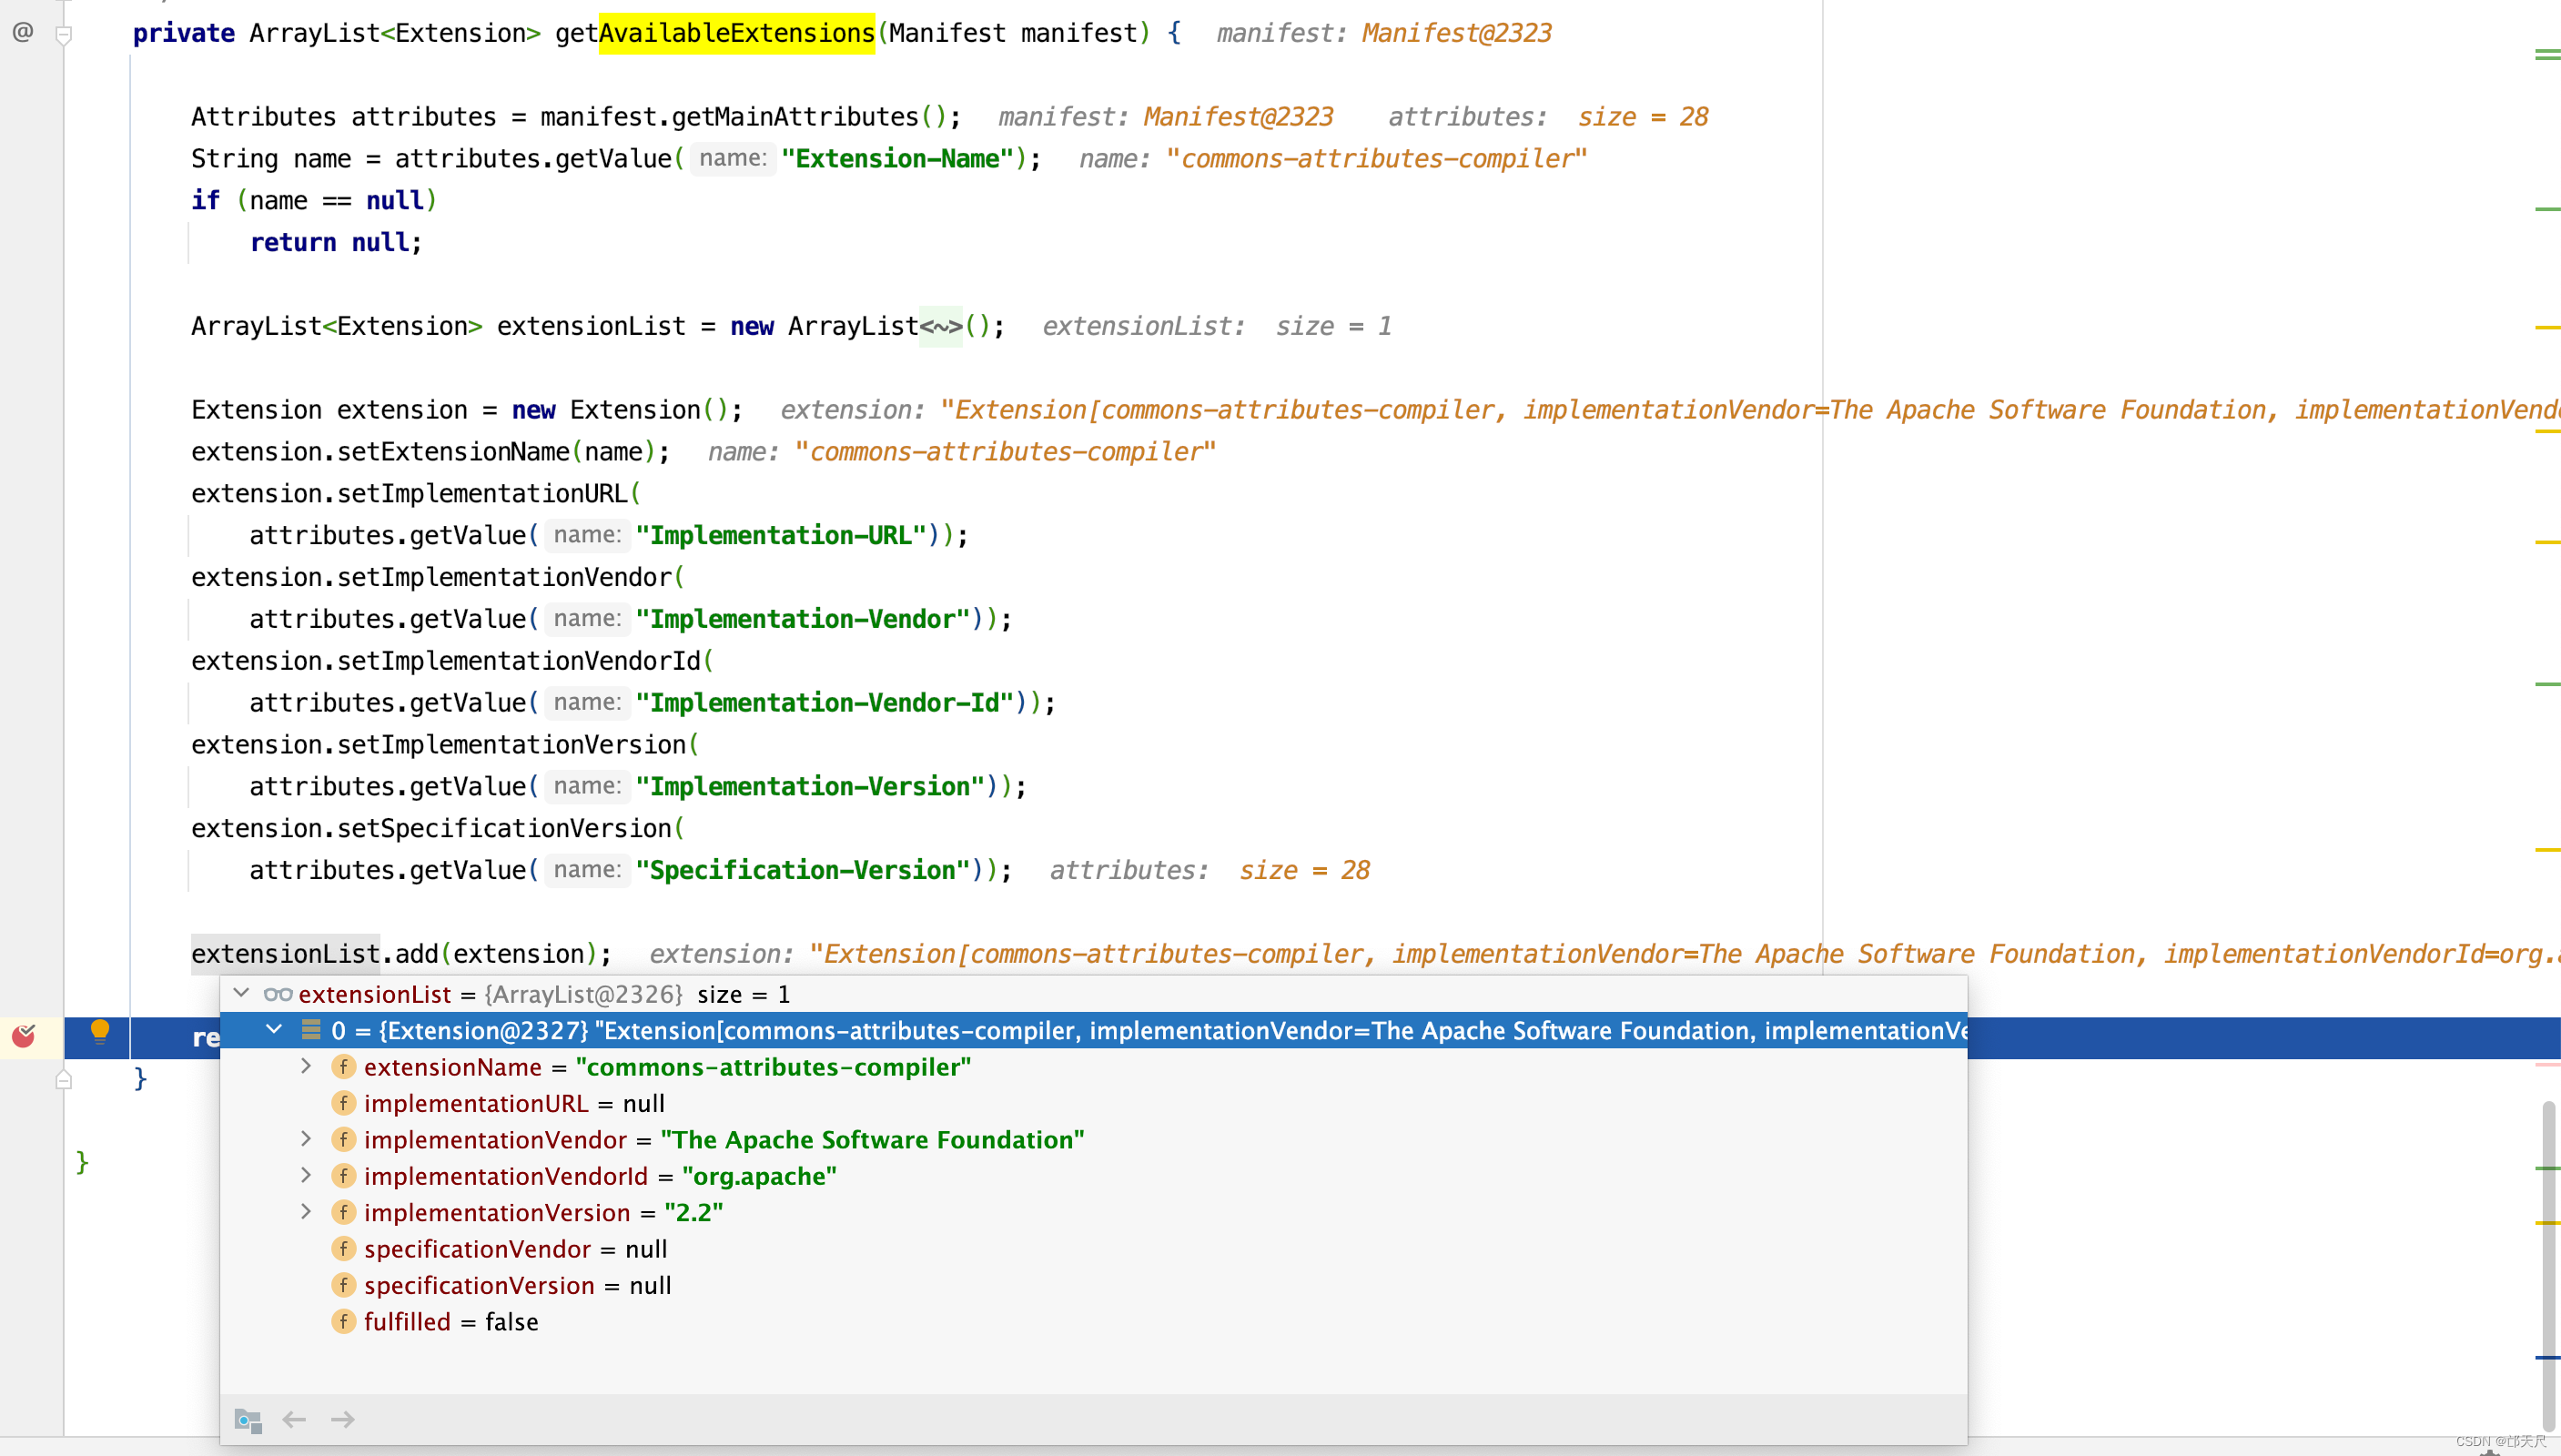
现在总知道requiredExtensions的由来了吧。 既然万事具备了,我们进入validateManifestResources()方法 。
 private static boolean validateManifestResources(String appName,
        ArrayList<ManifestResource> resources) {
    boolean passes = true;
    int failureCount = 0;
    ArrayList<Extension> availableExtensions = null;

    Iterator<ManifestResource> it = resources.iterator();
    while (it.hasNext()) {
        ManifestResource mre = it.next();
        ArrayList<Extension> requiredList = mre.getRequiredExtensions();
        if (requiredList == null) {
            continue;
        }

        // build the list of available extensions if necessary
        if (availableExtensions == null) {
            availableExtensions = buildAvailableExtensionsList(resources);
        }

        // load the container level resource map if it has not been built
        // yet
        if (containerAvailableExtensions == null) {
            containerAvailableExtensions
                = buildAvailableExtensionsList(containerManifestResources);
        }

        // iterate through the list of required extensions
        Iterator<Extension> rit = requiredList.iterator();
        while (rit.hasNext()) {
            boolean found = false;
            Extension requiredExt = rit.next();
            // check the application itself for the extension
            if (availableExtensions != null) {
                Iterator<Extension> ait = availableExtensions.iterator();
                while (ait.hasNext()) {
                    Extension targetExt = ait.next();
                    if (targetExt.isCompatibleWith(requiredExt)) {
                        requiredExt.setFulfilled(true);
                        found = true;
                        break;
                    }
                }
            }
            // check the container level list for the extension
            if (!found && containerAvailableExtensions != null) {
                Iterator<Extension> cit =
                    containerAvailableExtensions.iterator();
                while (cit.hasNext()) {
                    Extension targetExt = cit.next();
                    if (targetExt.isCompatibleWith(requiredExt)) {
                        requiredExt.setFulfilled(true);
                        found = true;
                        break;
                    }
                }
            }
            if (!found) {
                // Failure
                log.info(sm.getString(
                    "extensionValidator.extension-not-found-error",
                    appName, mre.getResourceName(),
                    requiredExt.getExtensionName()));
                passes = false;
                failureCount++;
            }
        }
    }

    if (!passes) {
        log.info(sm.getString(
                 "extensionValidator.extension-validation-error", appName,
                 failureCount + ""));
    }

    return passes;
}
在分析源码之前,还要准备一个变量,就是containerAvailableExtensions从何而来,在代码中寻寻觅觅,最终在addSystemResource()方法中看到了containerManifestResources.add(mre); 代码,在这个方法中打一个断点 。

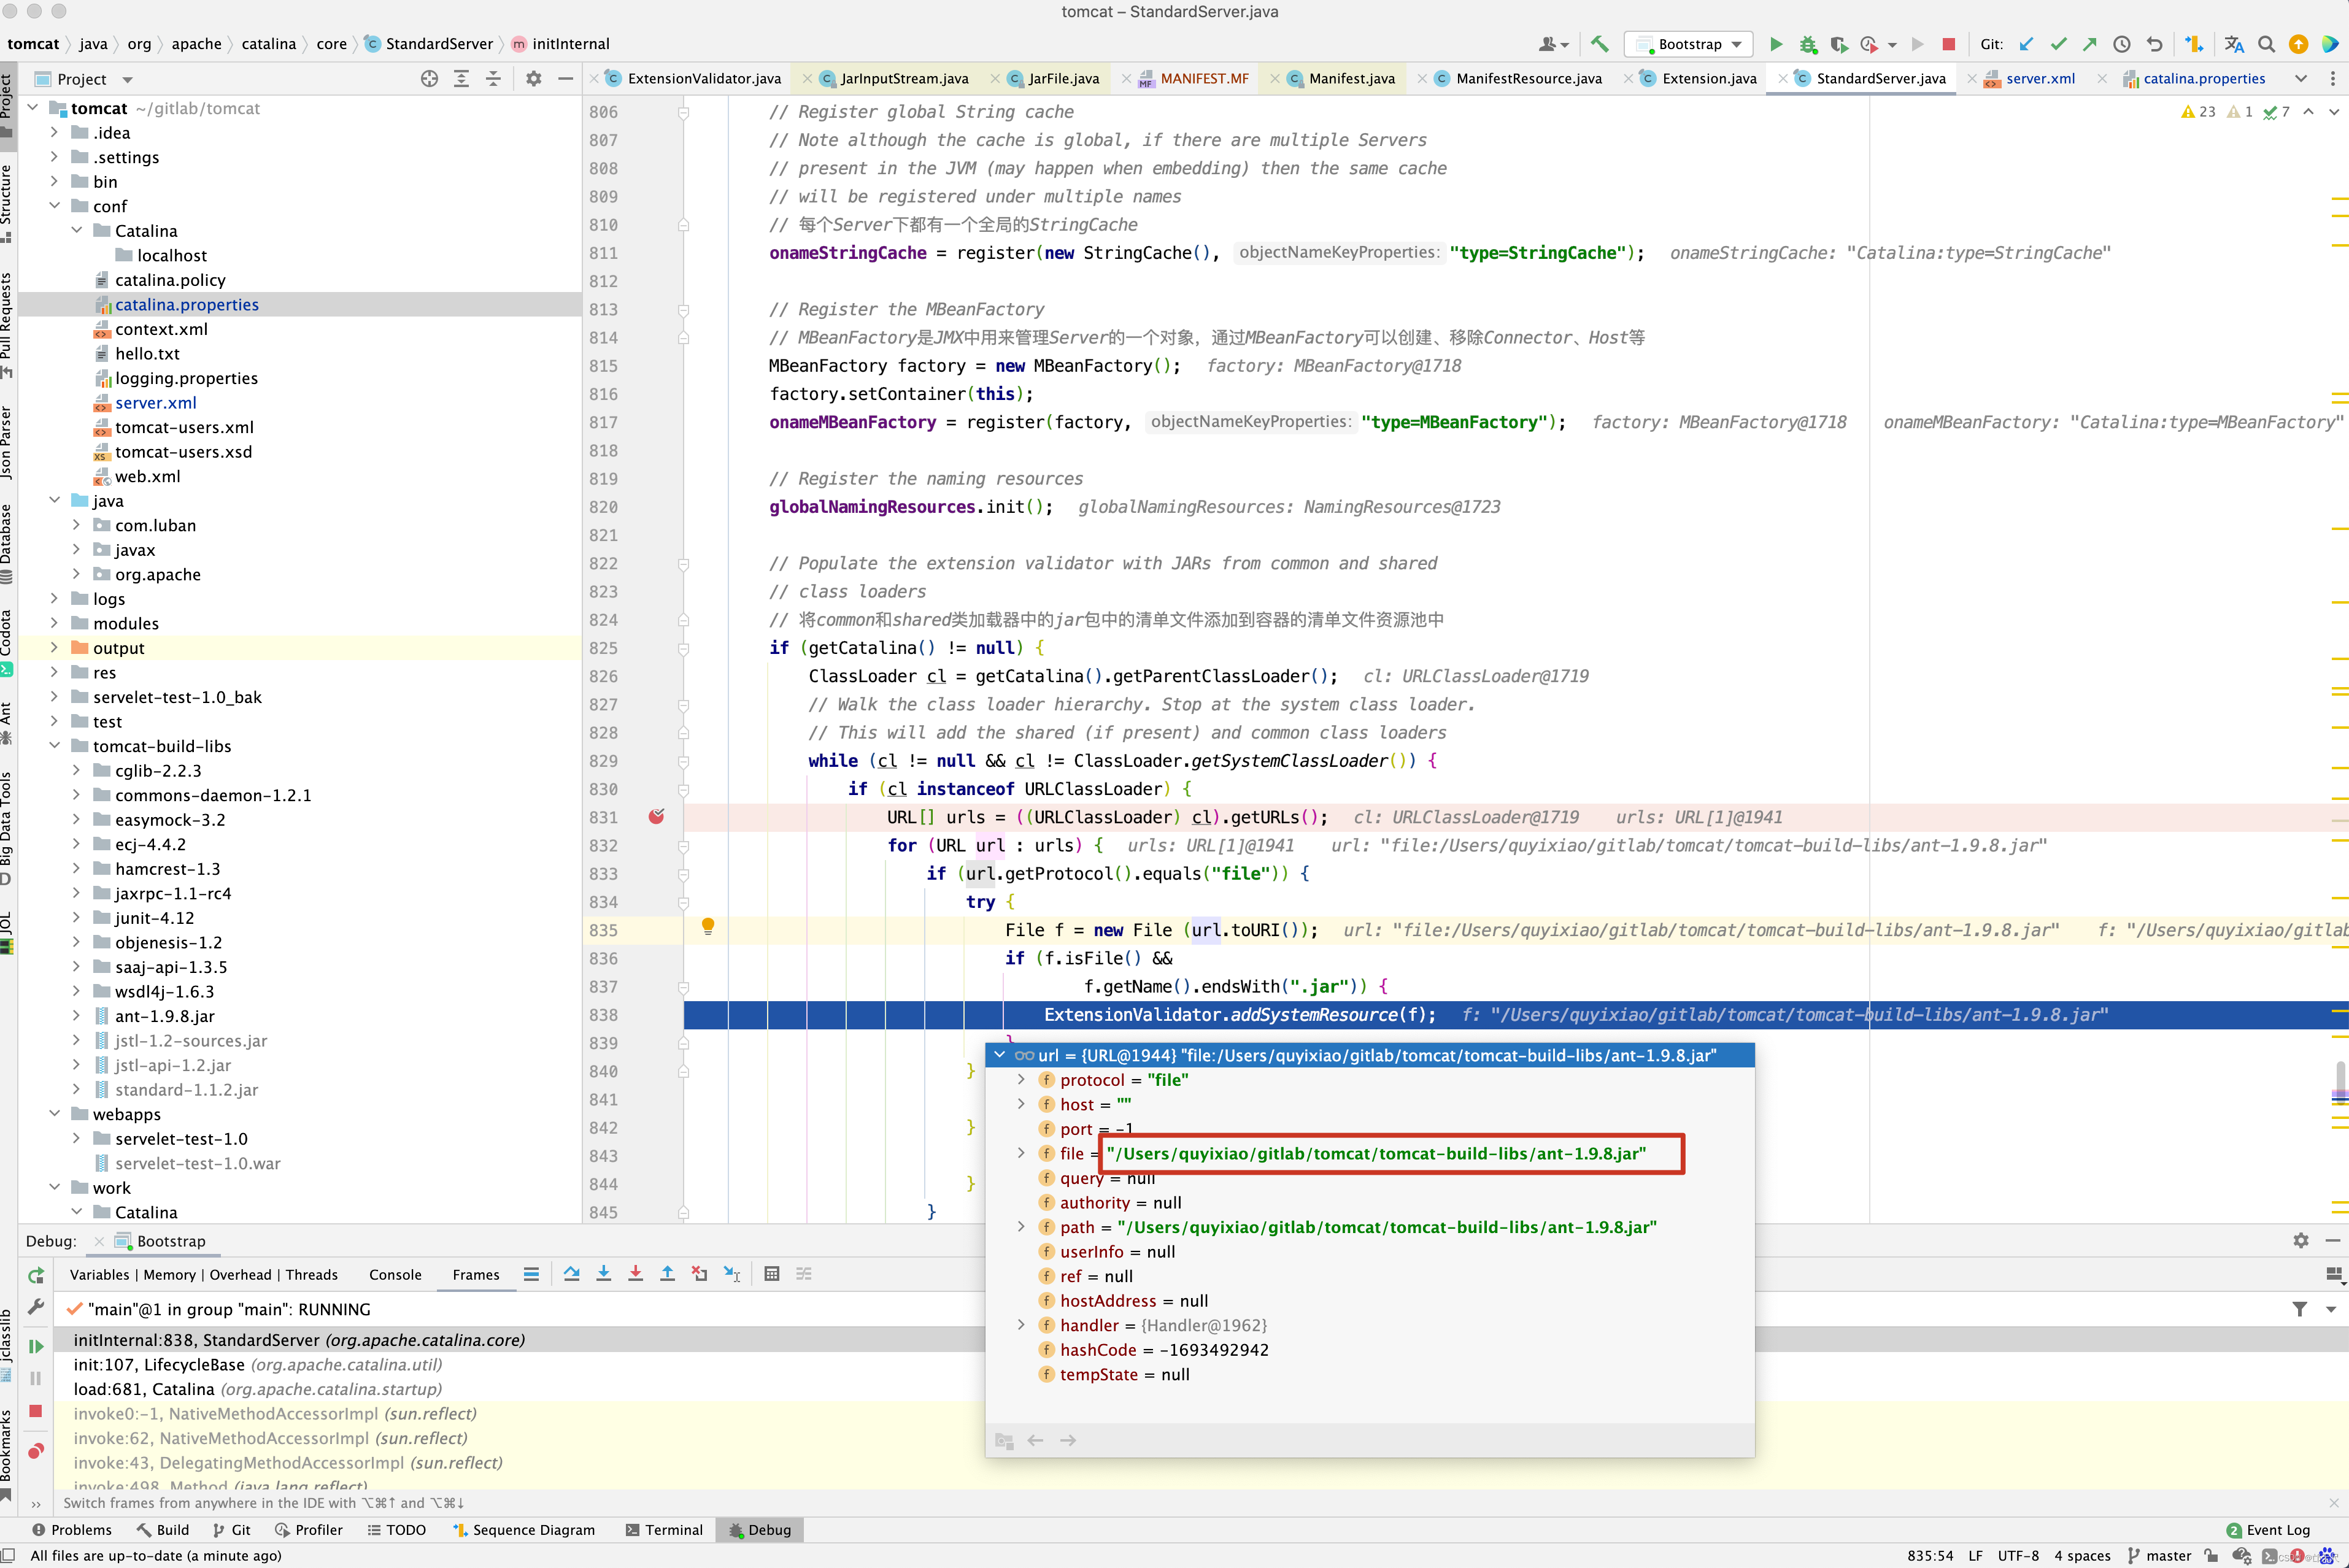
综合上述,containerAvailableExtensions来源于System.getProperty(“java.class.path”), System.getProperty(“java.ext.dirs”), 以及StandardServer启动过程中,大家可能好奇最后一张图中的/Users/quyixiao/gitlab/tomcat/tomcat-build-libs/ant-1.9.8.jar 包在哪里配置的呢?
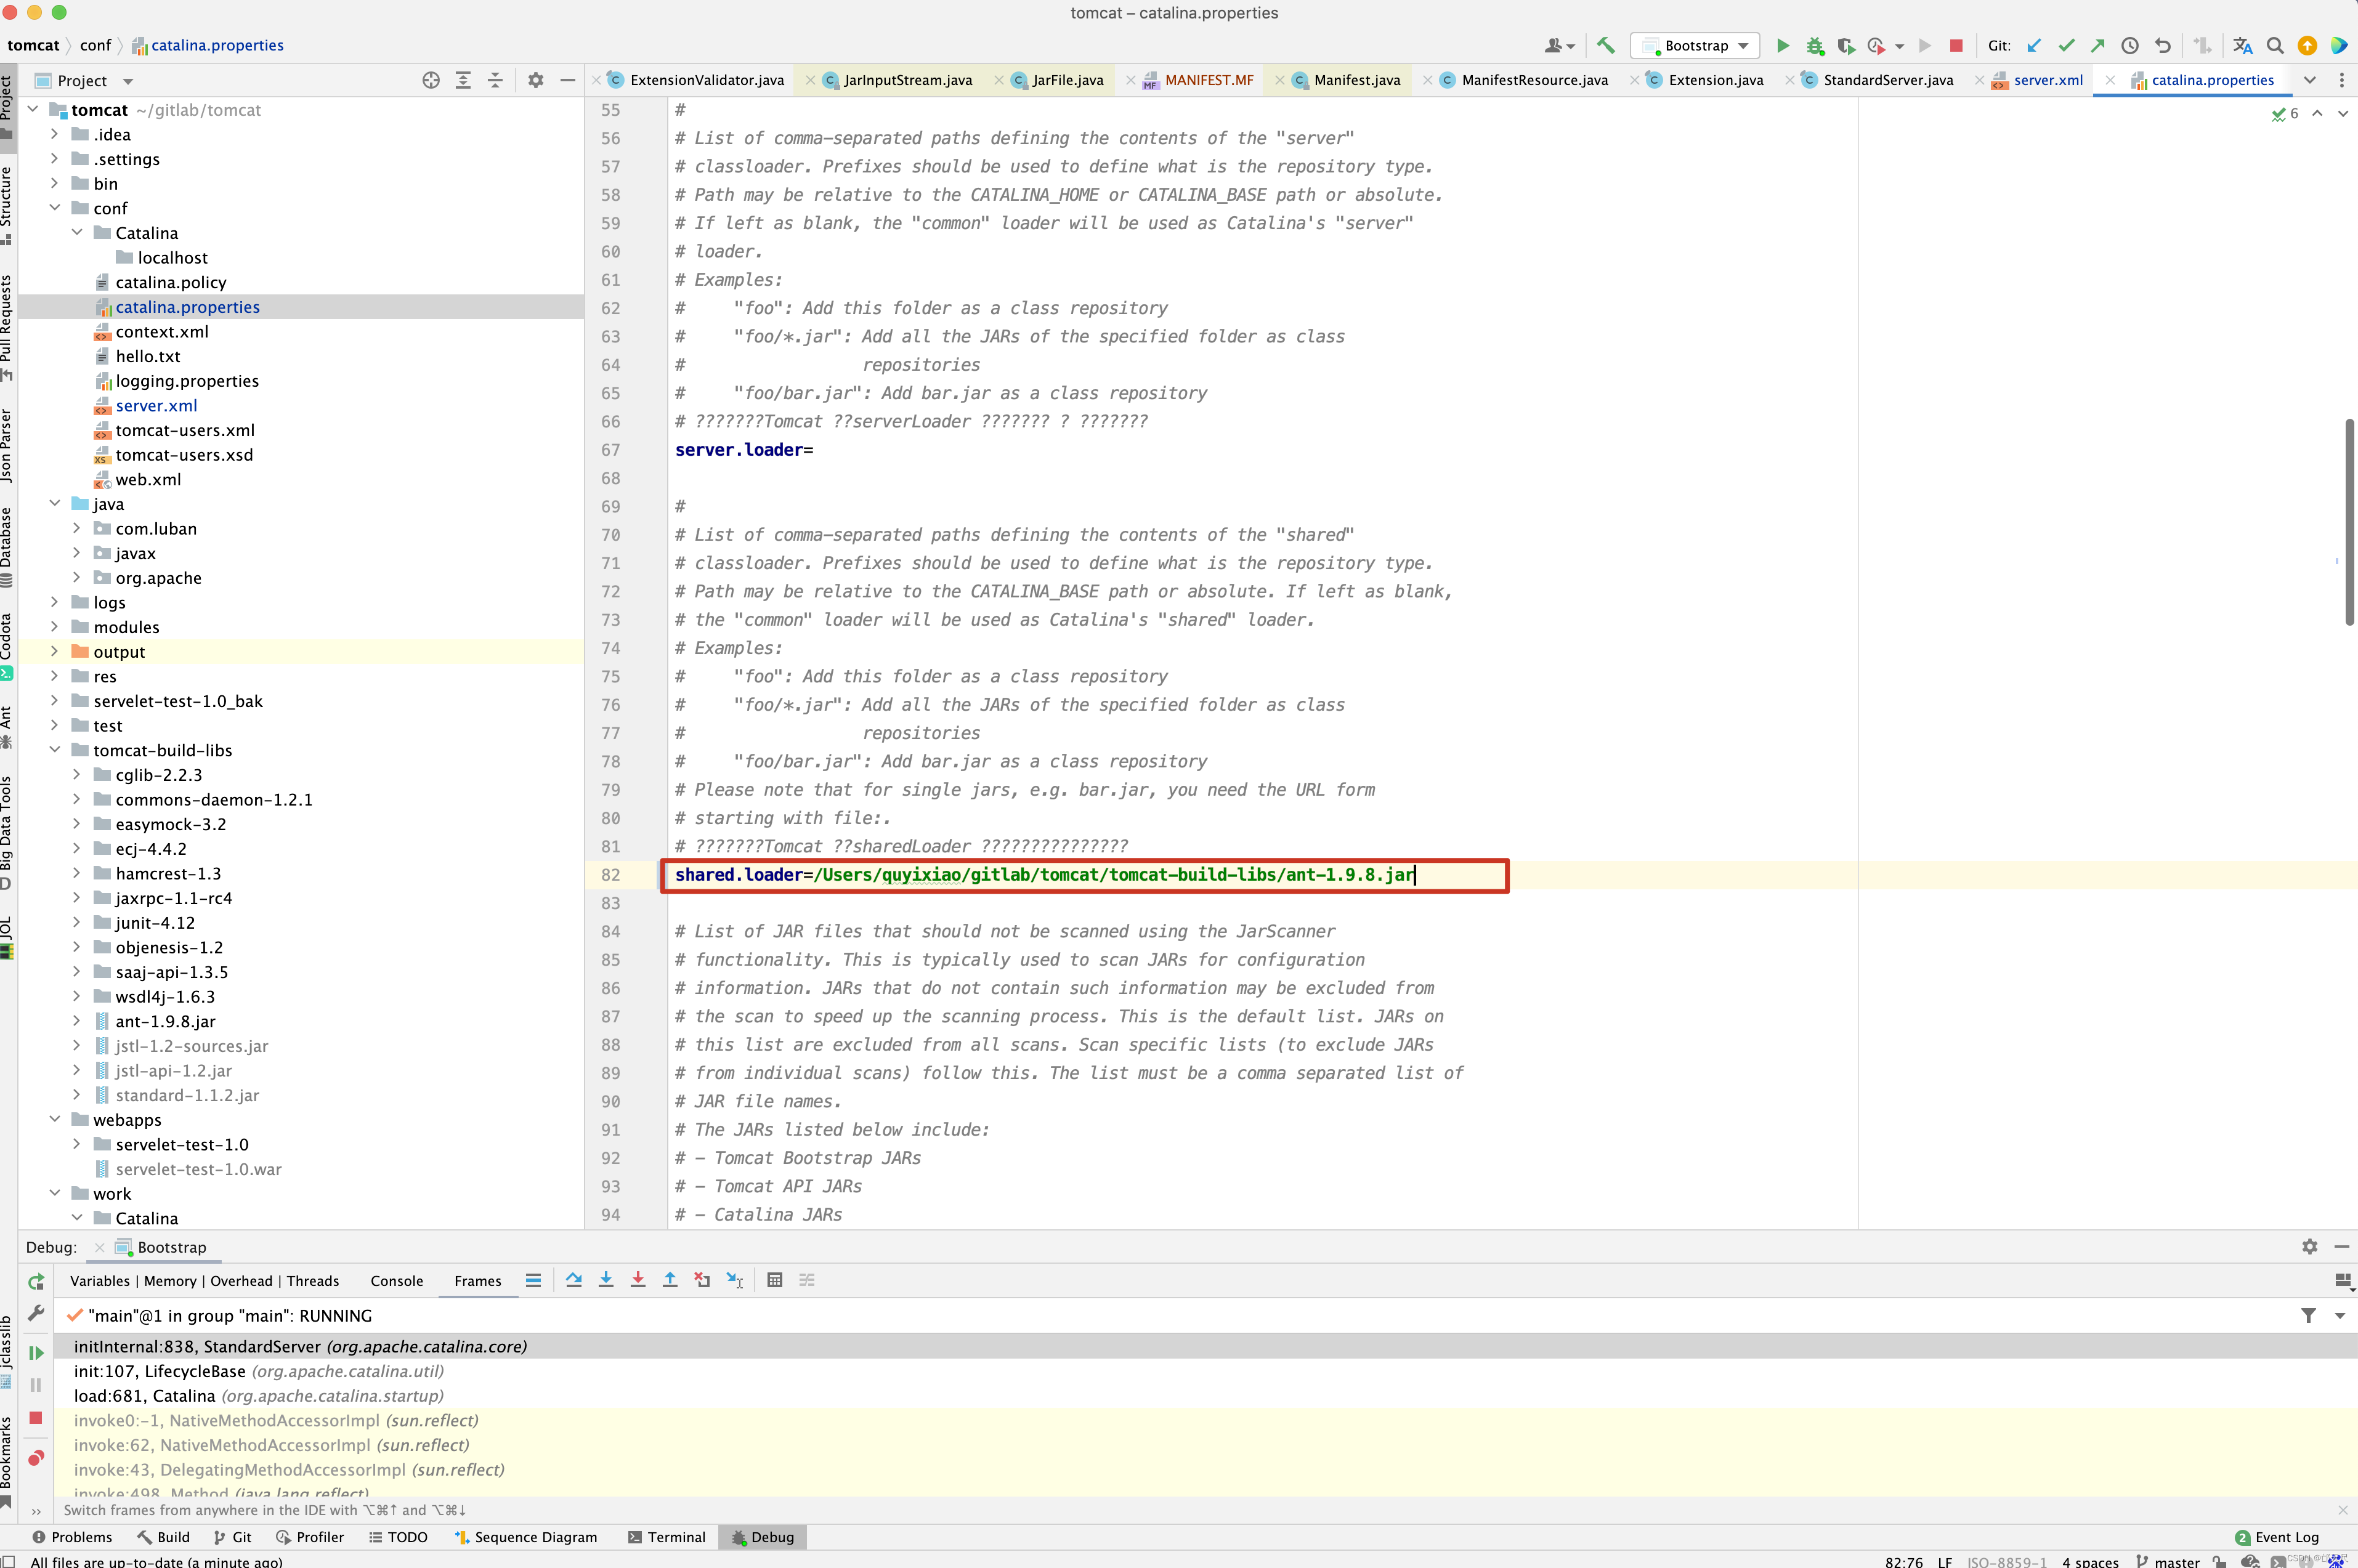
其实在catalina.base/conf/catalina.properties的shared.loader=/Users/quyixiao/gitlab/tomcat/tomcat-build-libs/ant-1.9.8.jar属性中配置即可。
我们继续分析 validateManifestResources()方法,还是以commons-attributes-compiler.jar包为例。
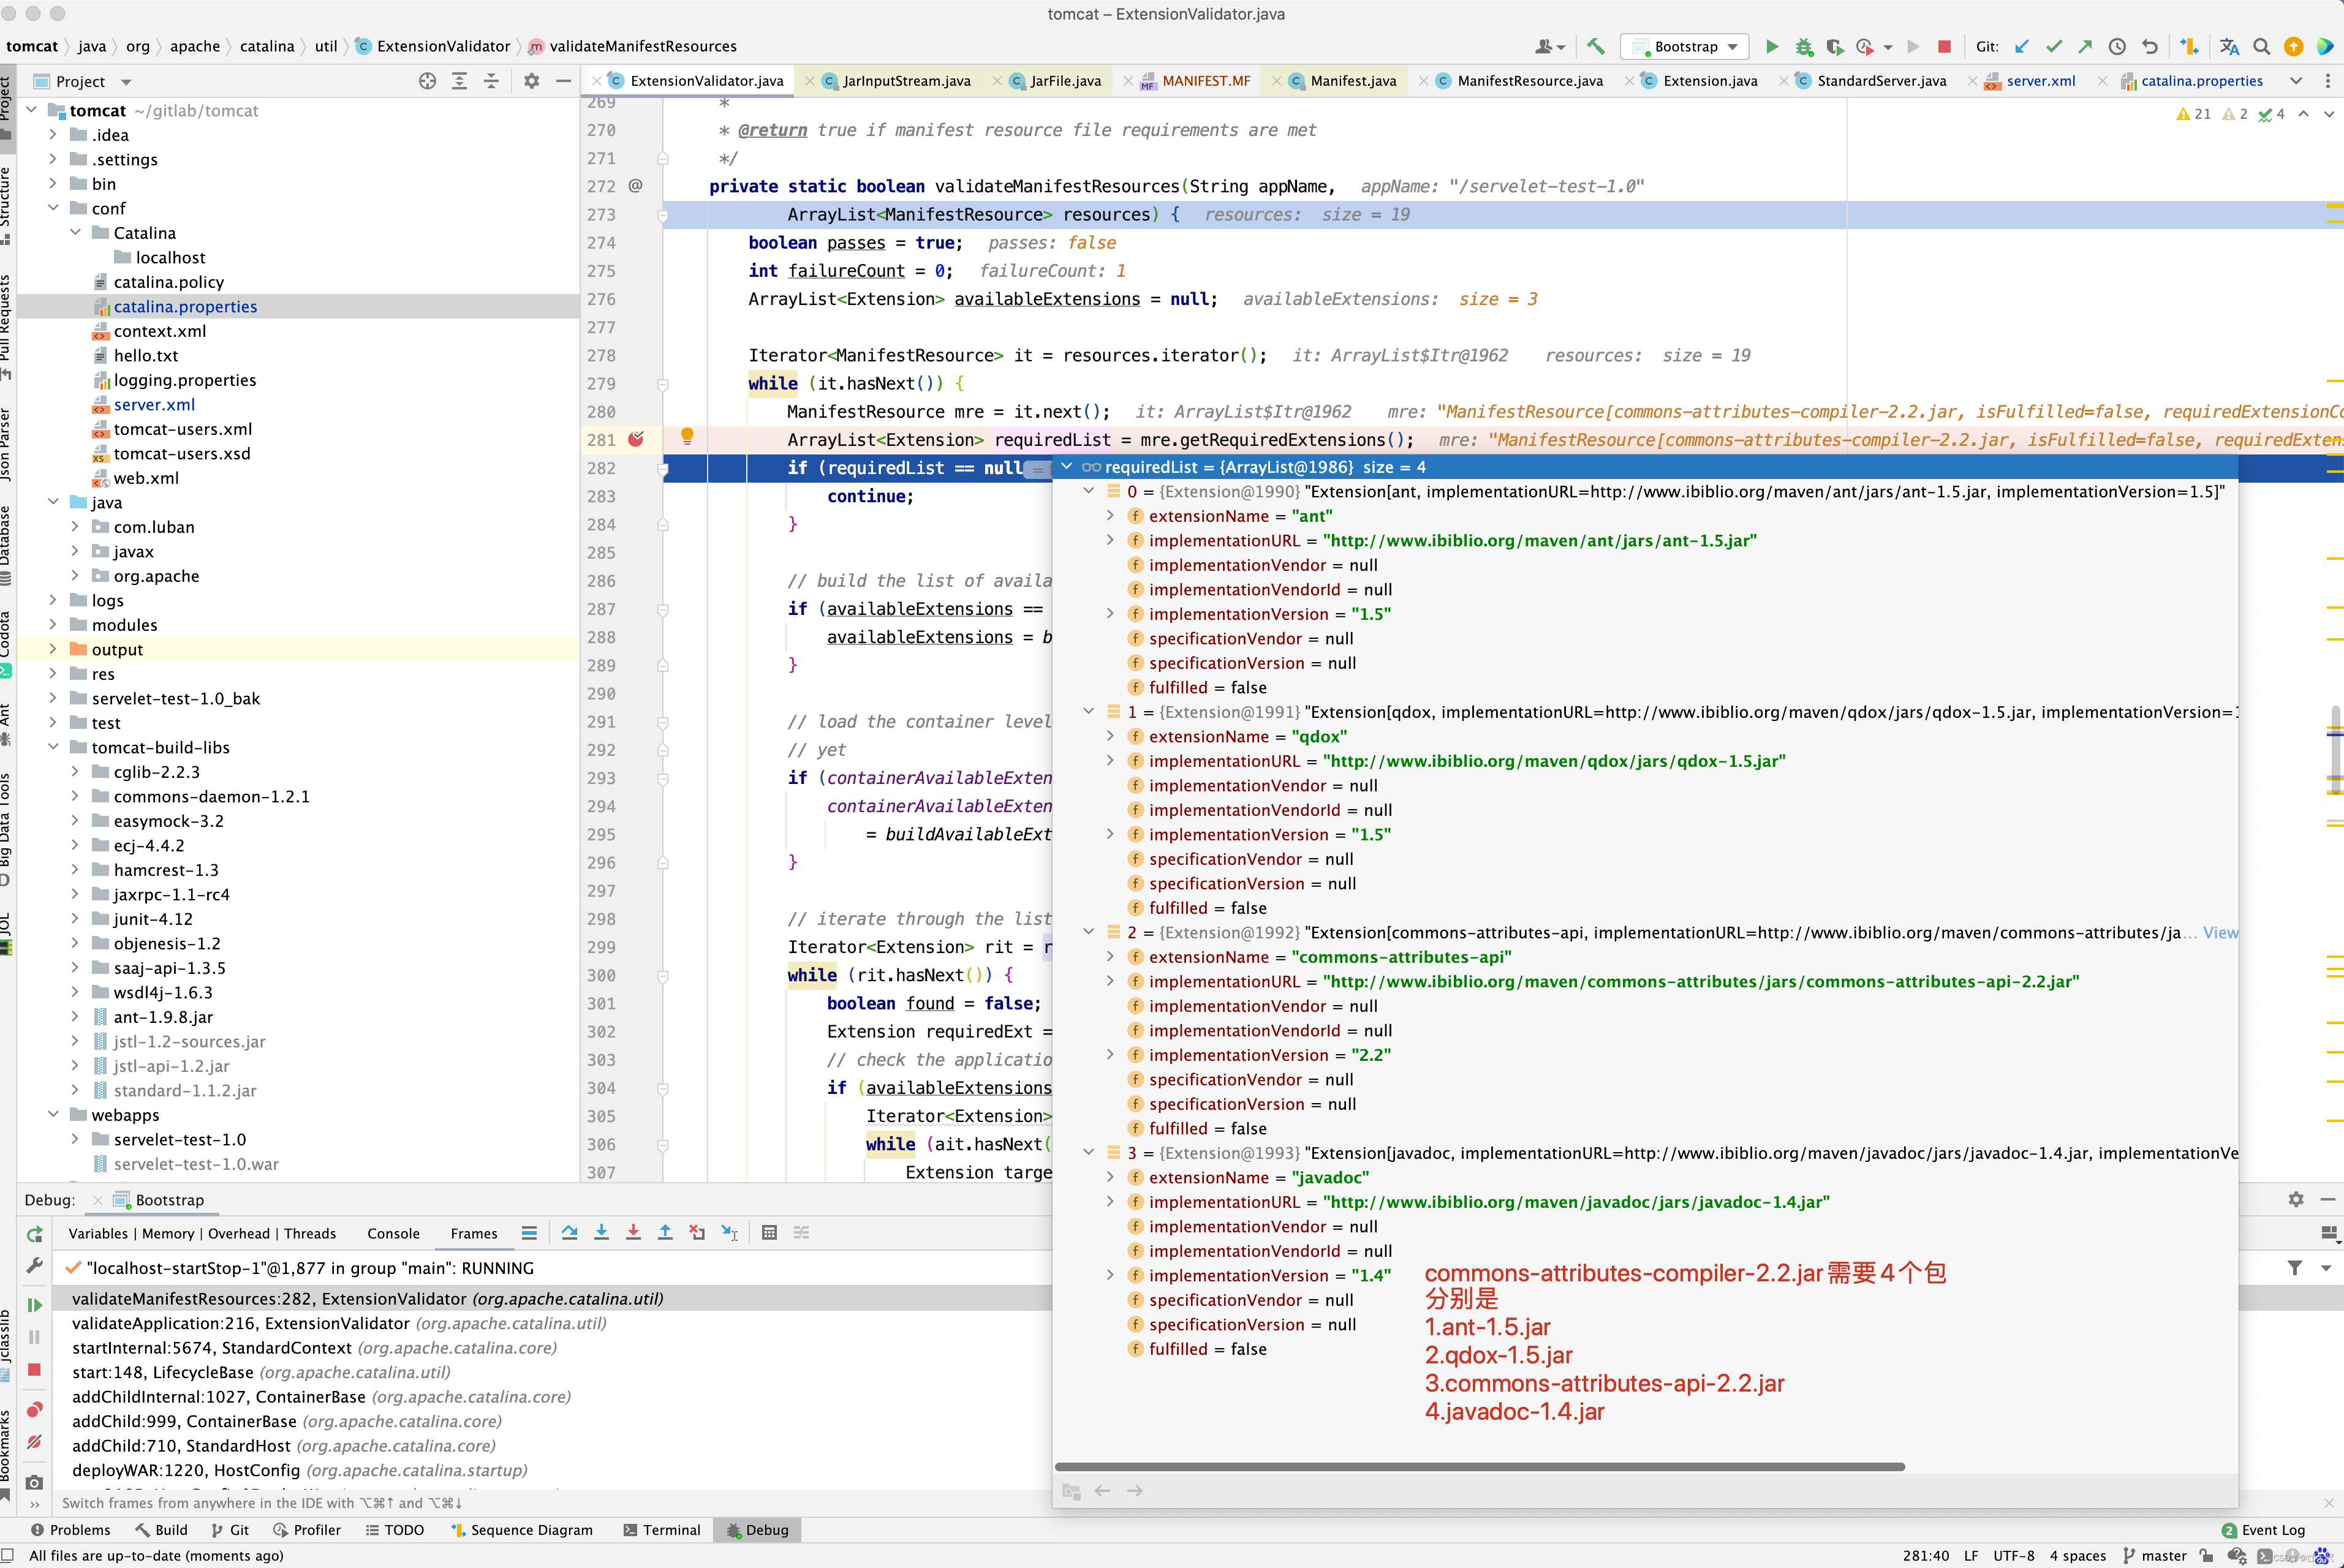
但resources下可用的只有3个包。commons-attributes-api-2.2.jar , commons-attributes-compiler-2.2.jar, qdox-1.5.jar
显然少了javadoc-1.4.jar和ant-1.5.jar两个包。 再来看全局的containerAvailableExtensions是否有这两个依赖呢?
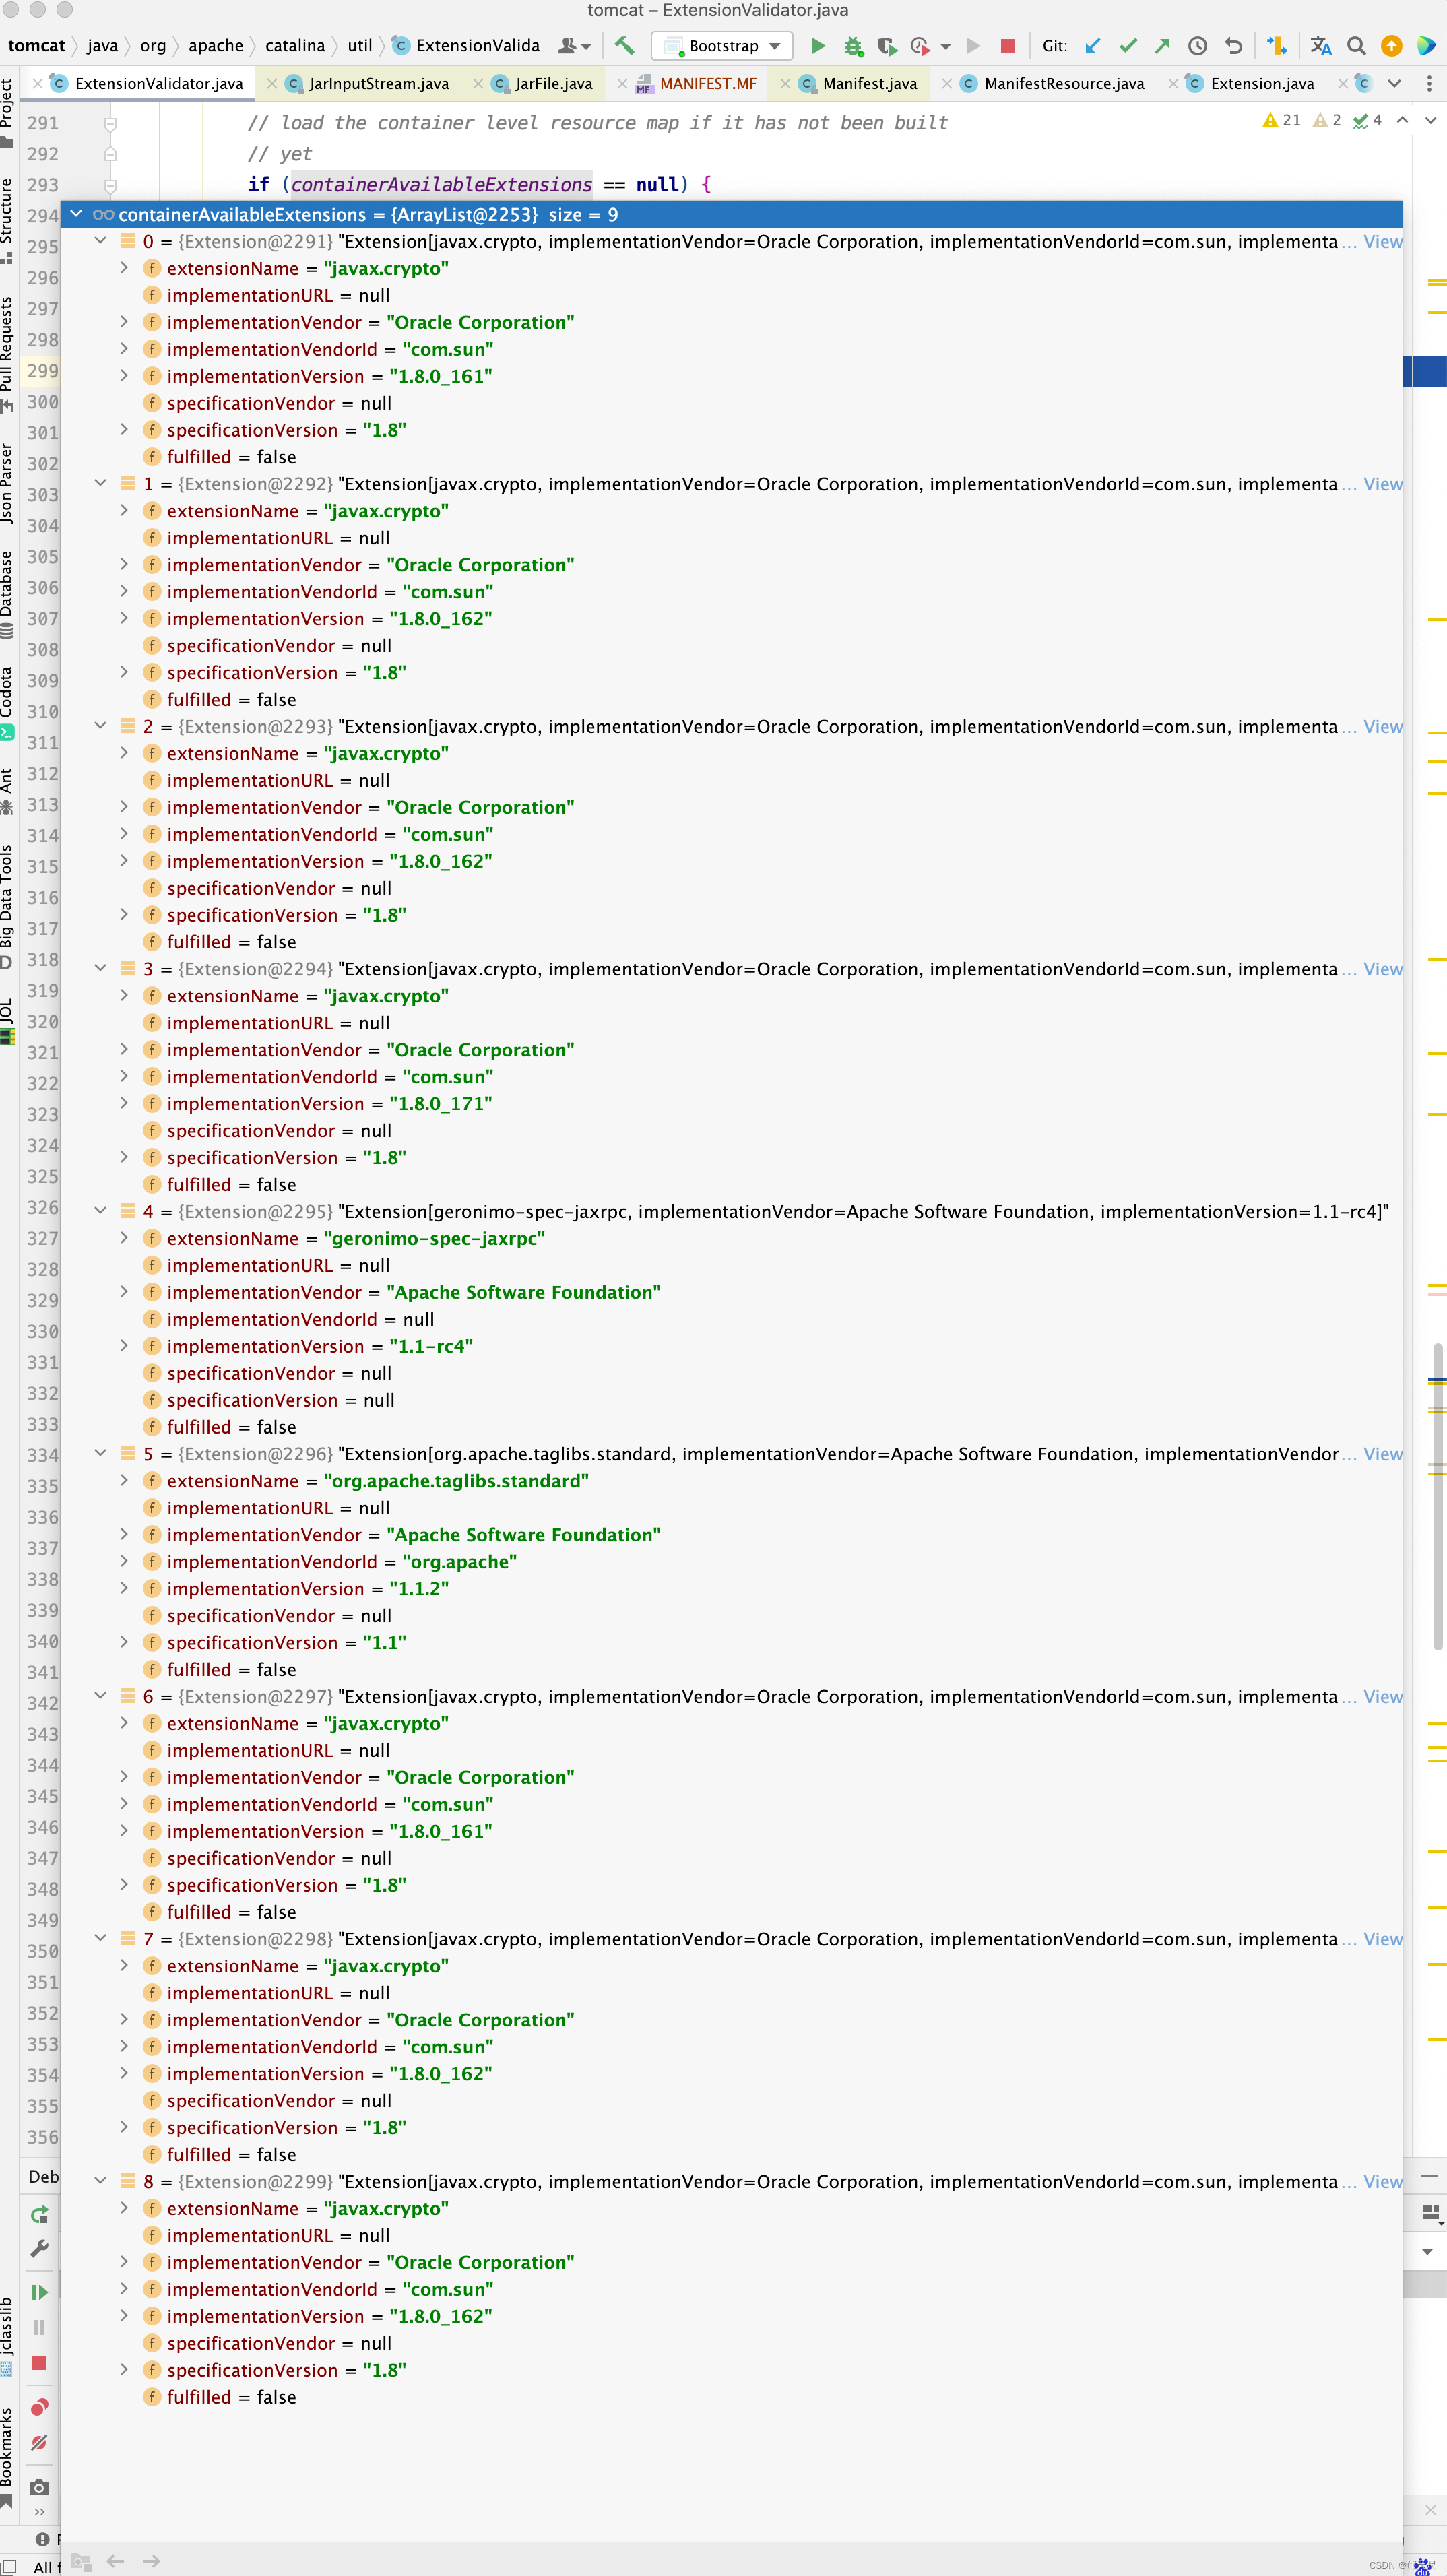
遗憾的是,这9个包中,并没有javadoc-1.4.jar和ant-1.5.jar这两个包。

最终passes为false,如果passes为false,会导致tomcat启动失败。当然还有一个方法需要分析,就是如何判断依赖是否存在呢?请看如下方法 。
 public boolean isCompatibleWith(Extension required) {

    // Extension Name must match
    if (extensionName == null)
        return (false);
    if (!extensionName.equals(required.getExtensionName()))
        return (false);

    // If specified, available specification version must be >= required
    if (required.getSpecificationVersion() != null) {
        if (!isNewer(specificationVersion,
                     required.getSpecificationVersion()))
            return (false);
    }

    // If specified, Implementation Vendor ID must match
    if (required.getImplementationVendorId() != null) {
        if (implementationVendorId == null)
            return (false);
        if (!implementationVendorId.equals(required
                .getImplementationVendorId()))
            return (false);
    }

    // If specified, Implementation version must be >= required

    if (required.getImplementationVersion() != null) {
        if (!isNewer(implementationVersion,
                     required.getImplementationVersion()))
            return (false);
    }

    // This available optional package satisfies the requirements
    return (true);

}
这个方法是什么意思呢?如commons-attributes-compiler-2.2.jar要求
commons-attributes-api-Extension-Name: commons-attributes-api
commons-attributes-api-Implementation-Version: 2.2
那么会到commons-attributes-api-2.2.jar找名称为commons-attributes-api并且版本是2.2的,即使名称相同,但版本不是2.2 也表示找到不依赖。
当然,最严格的会对Extension-Name,Implementation-Version, Implementation-Vendor-Id ,specification-Version 4个参数进行较验。
ExtensionValidator.validateApplication (getResources(), this); 这一行代码的主要作用就是检测MANIFST.MF文件中Extension-List中配置的依赖在其他的jar包是否存在 ,如本例中commons-attributes-compiler.jar的MANIFST.MF依赖ant-1.5.jar , qdx-1.5.jar , common-attributes-api-2.2.jar , javadoc-1.4.jar 4个包,但从系统类加载器目录下,扩展类加载器目录下,以及tomcat的shared.loader目录以及WEB-INF/lib目录下所有的jar包只能找到common-attributes-api-2.2.jar和qdx-1.5.jar。依赖的jar包存在并不是存在这个jar包即可,而是要求这个包有MANIFST.MF 文件,并且其对应的Extension-Name,Implementation-Version, Implementation-Vendor-Id ,specification-Version 4 个属性和请求依赖的Extension-List配置依赖的属性一样。这才算依赖成功, 只要有一个包依赖不存在,则会导致tomcat启动失败。
Web应用载入器-WebAppLoader
每个Web 应用都有各自的Class类和Jar包,一般来说,在Tomcat 启动时要准备好相应的类加载器,包括加载策略及Class文件的查找,方便后面对Web应用实例化Servlet对象时通过类加载器加载相关的类, 因为每个WEb应用不仅要达到资源的互相隔离,还要能支持重加载,所以这里需要为每个Web应用安排不同的类加载器对象加载,重加载时可直接将旧的类加载器对象丢弃而使用新的。
StandardContext使用一个继承了Loader接口的WebappLoader作为Web应用的类加载器, 作为Tomcat与Web应用的类加载器实现,它能检测是否有Web项目的Class被更改, 然后自动重加载,每个Web应用对应的WebappLoader,每个WebappLoader互相隔离,各自包含的类互相不可见。
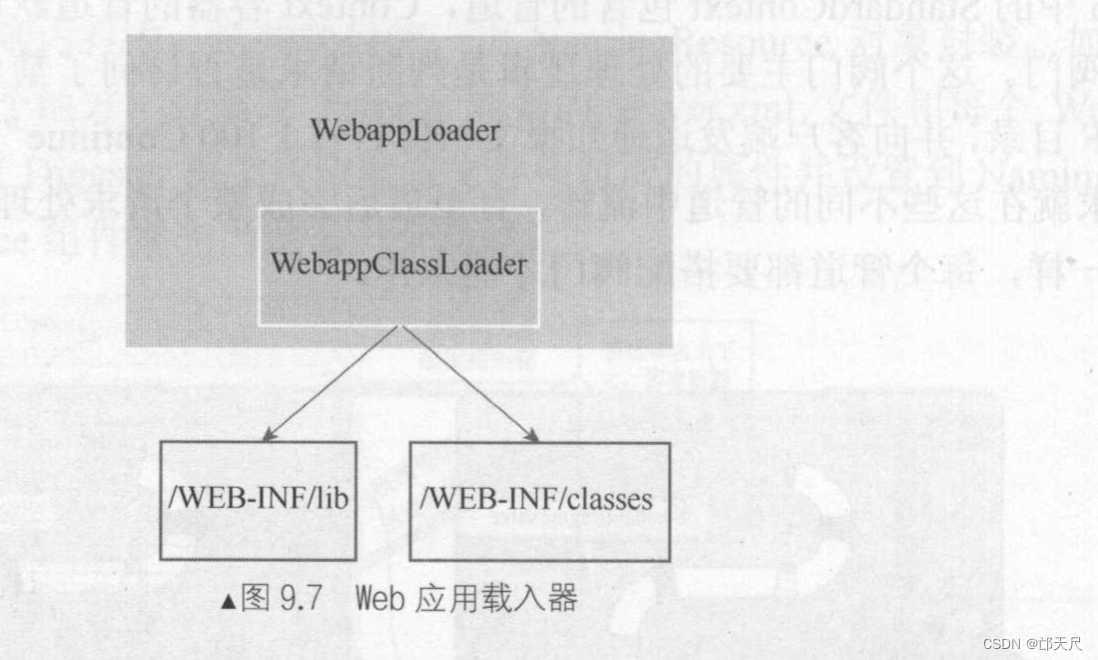
如图9.7所示 , WebappLoader的核心工作其实交给其内部WebappClassLoader,它才是真正的完成类加载工作的加载器, 它是一个自定义的类加载器, WebappClassLoader继承了URLClassLoader,只需要把/WEB-INF/lib和/WEB-INF/classes目录下的类和Jar包以URL形式添加到URLClassLoader中即可, 后面就可以使用该类加载器对类进行加载 。

WebappClassLoader类加载器是如何达到互相隔离和实现重加载的呢?
WebappClassLoader并没有遵循双亲委派机制,而是按自己的策略顺序加载类。根据委托标识,加载分为两种方式 。
- 当委托标识delegate为false时, WebappClassLoader类加载器首先尝试从本地缓存中查找该类,然后用System类加载器尝试加载类,接着由自己尝试加载类,最后才由父类加载器(Common)尝试加载,所以它的搜索目录顺序是<JAVA_HOME>/jre/lib-><JAVA_HOME>/jre/lib/ext->CLASSPATH->/WEB-INF/classes->/WEB-INF/lib->$CATALINA_BASE/lib和 $CATALINA_HOME/lib 。
- 当委托标识delegate为true时,WebappClassLoader类加载器首先尝试从本地缓存中查找加载该类, 然后用System类加载器尝试加载类,接着由父类加载器(Common)尝试加载类,最后才由自己尝试加载,所以此时它的搜索的目录顺序是<JAVA_HOME>/jre/lib-><JAVA_HOME/jre/lib/ext->CLASSPATH->$CATALINA_BASE/lib 和$ CATALINA_HOME ->WEB-INF/classes ->WEB-INF/lib。
图9.8 是WebappClassLoader 和其他类加载器关系结构图,可以看出,对于公共资源可以共享,而属于Web应用的资源则通过类加载器进行隔离 , 对于重加载的实现, 也比较清晰,只需要重新实例化一个WebappClassLoader对象并把原来的WebappLoader中旧的置换掉即可完成重加载功能,置换掉的将被GC回收。

protected synchronized void startInternal() throws LifecycleException {


    // 如果没有配,则生成一个WebappLoader
    if (getLoader() == null) {
     // Webapp类加载器的父类加载器为Host的ParentClassLoader,最终就是Catalina类的类加载器,其实就是CommonClassLoader
        WebappLoader webappLoader = new WebappLoader(getParentClassLoader());
        <Host name="localhost"  appBase="webapps"
            unpackWARs="true" autoDeploy="true" copyXML="true" deployIgnore="[1][3-9][0-9]{9}">

        <Context path="/servelet-test-1.0"  docBase="servelet-test-1.0" delegate="true" >
          <ResourceLink global="jdbc/mysql" name="jdbc/mysql" type="javax.sql.DataSource" />
        </Context>
        // 可以通过Context标签中配置delegate="true|false"对delegate属性修改,默认 delegate为false
        webappLoader.setDelegate(getDelegate());
        // 设置StandardContext的webappLoader
        setLoader(webappLoader);
    }

    try {
        if (ok) {
            // Start our subordinate components, if any
            Loader loader = getLoaderInternal(); // 获取Context的类加载器
            if ((loader != null) && (loader instanceof Lifecycle))
                ((Lifecycle) loader).start();   // 启动类加载器,包括初始话DirContext

    } finally {

    }

    ...

}
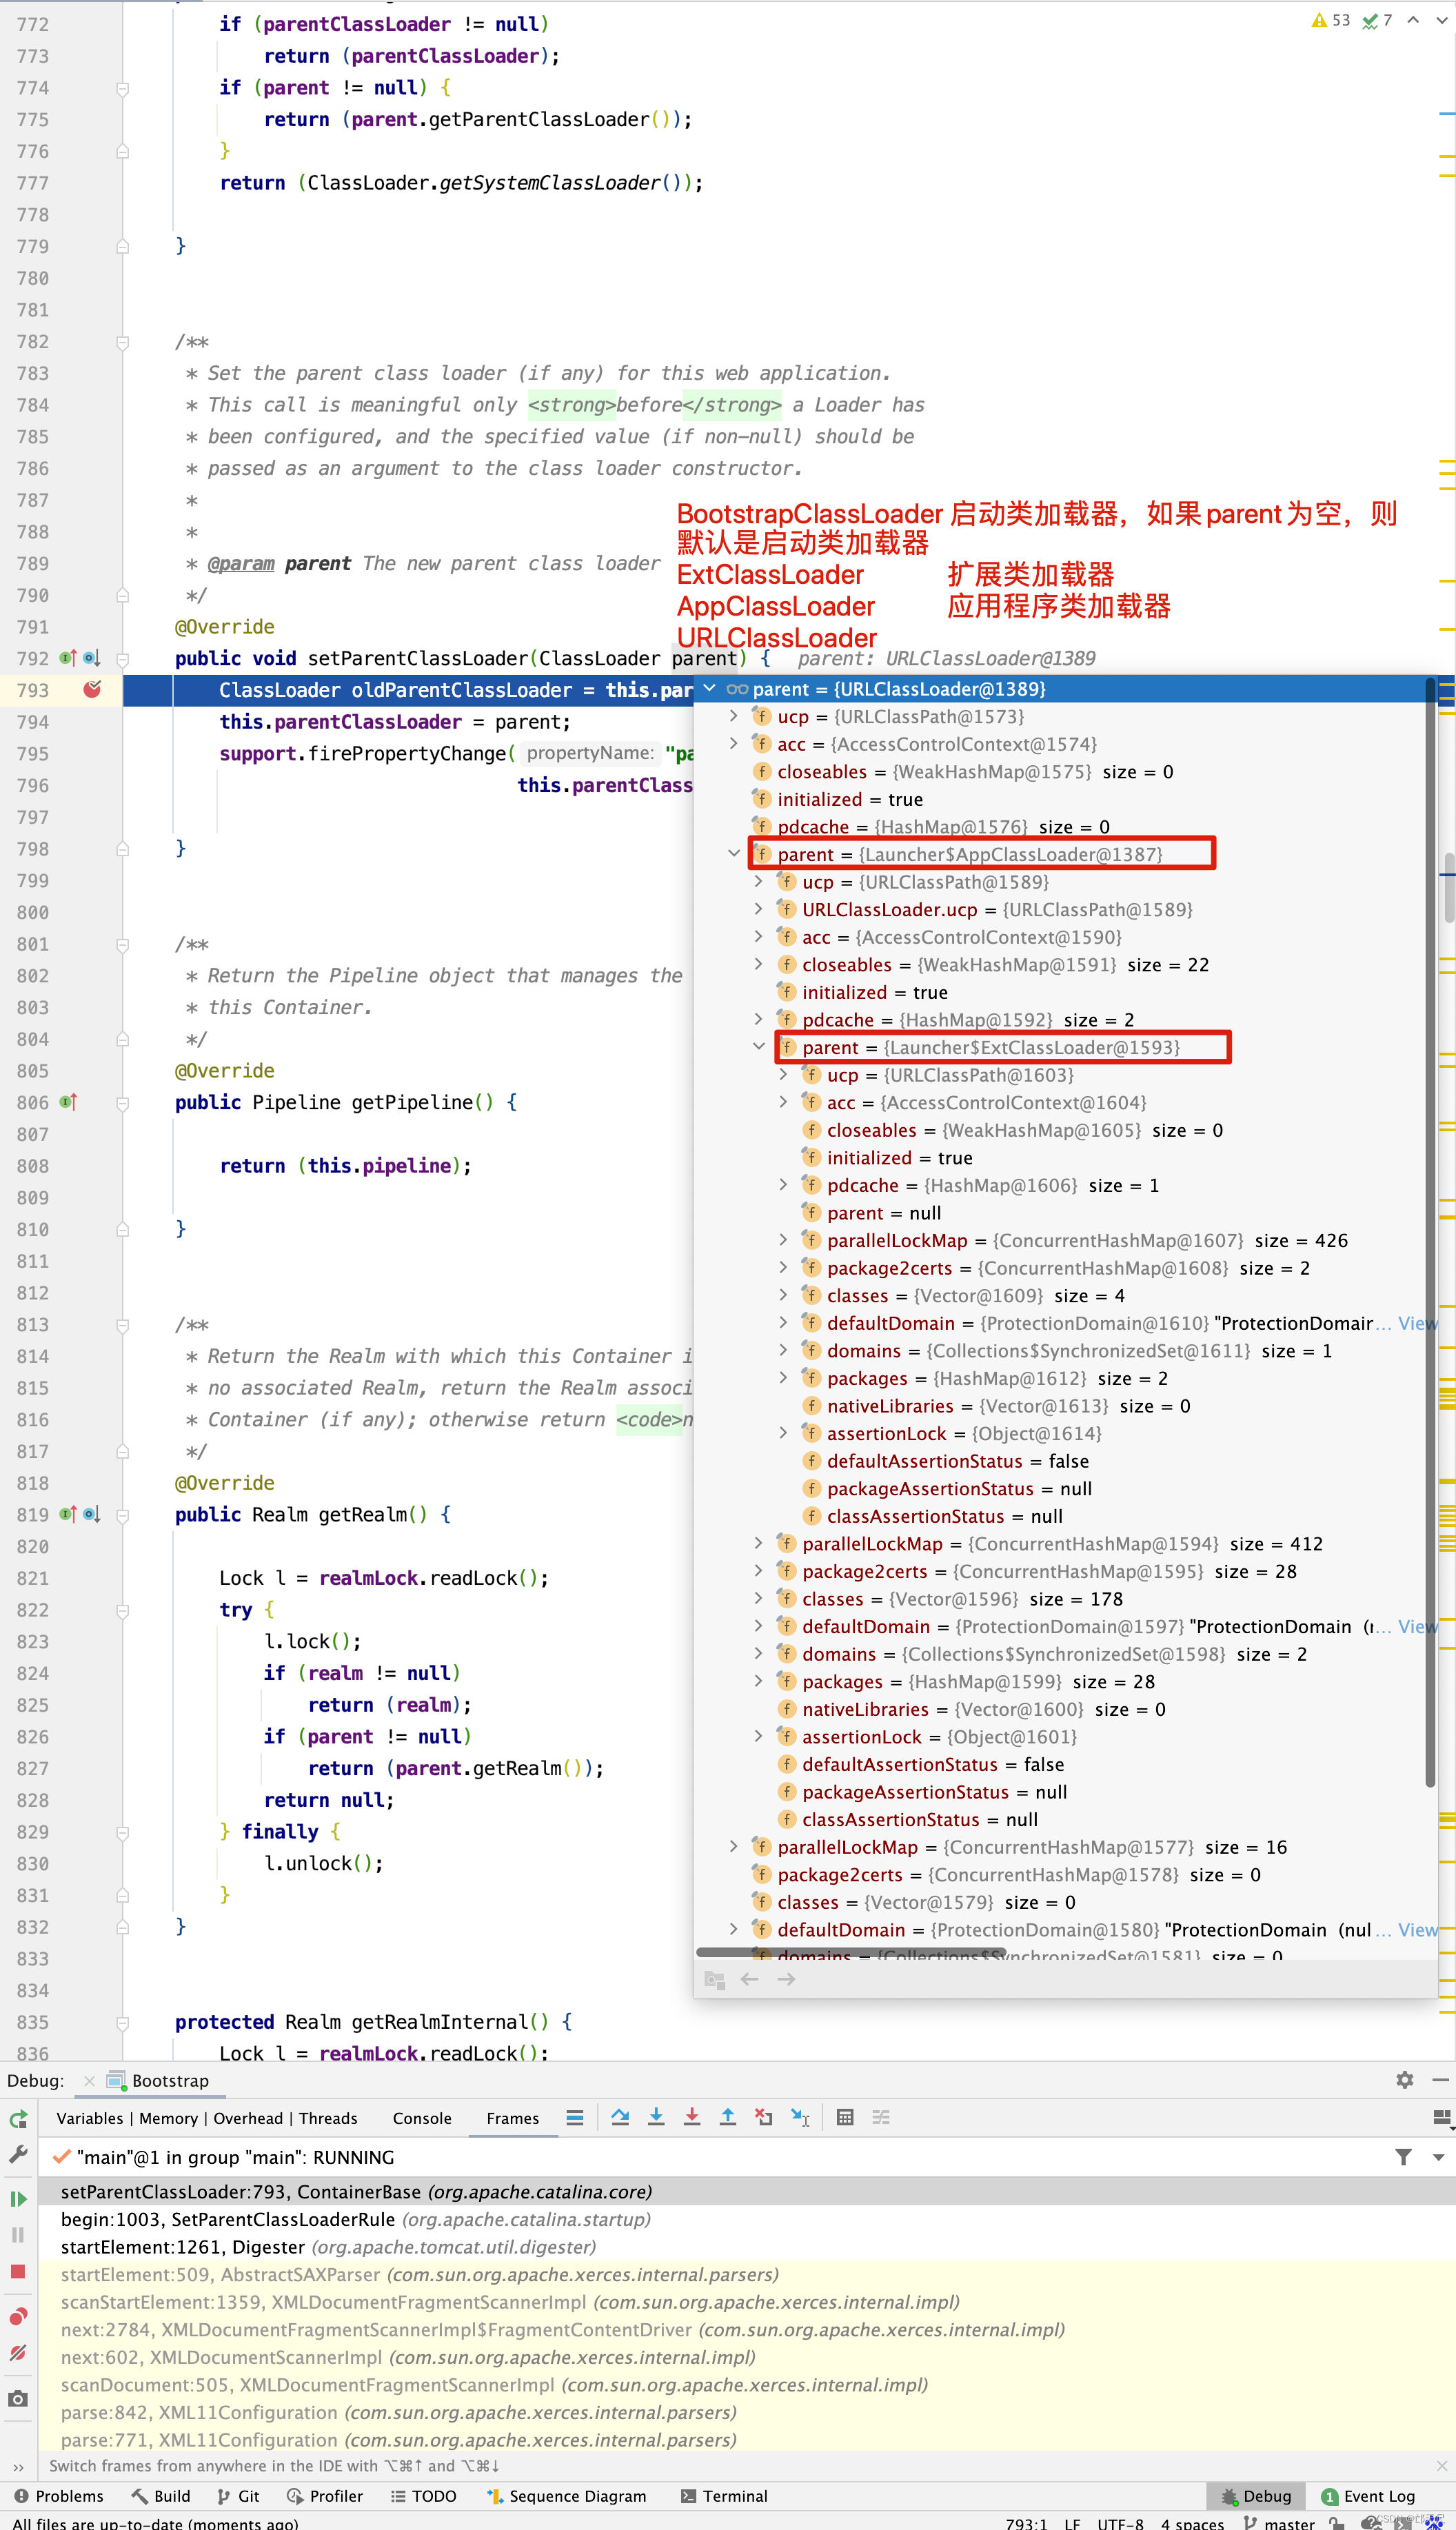
先来看parentClassLoader的获取
public ClassLoader getParentClassLoader() {
    if (parentClassLoader != null)
        return (parentClassLoader);
    if (getPrivileged()) {
        return this.getClass().getClassLoader();
    } else if (parent != null) {
        return (parent.getParentClassLoader());
    }
    return (ClassLoader.getSystemClassLoader());
}
如果StandardContext的parentClassLoader为空,则从其父亲StandardHost的parentClassLoader中获取,那StandardHost的parentClassLoader又是从哪里来的呢?在代码中寻寻觅觅,找到了setParentClassLoader()方法 ,在其中打断点 。
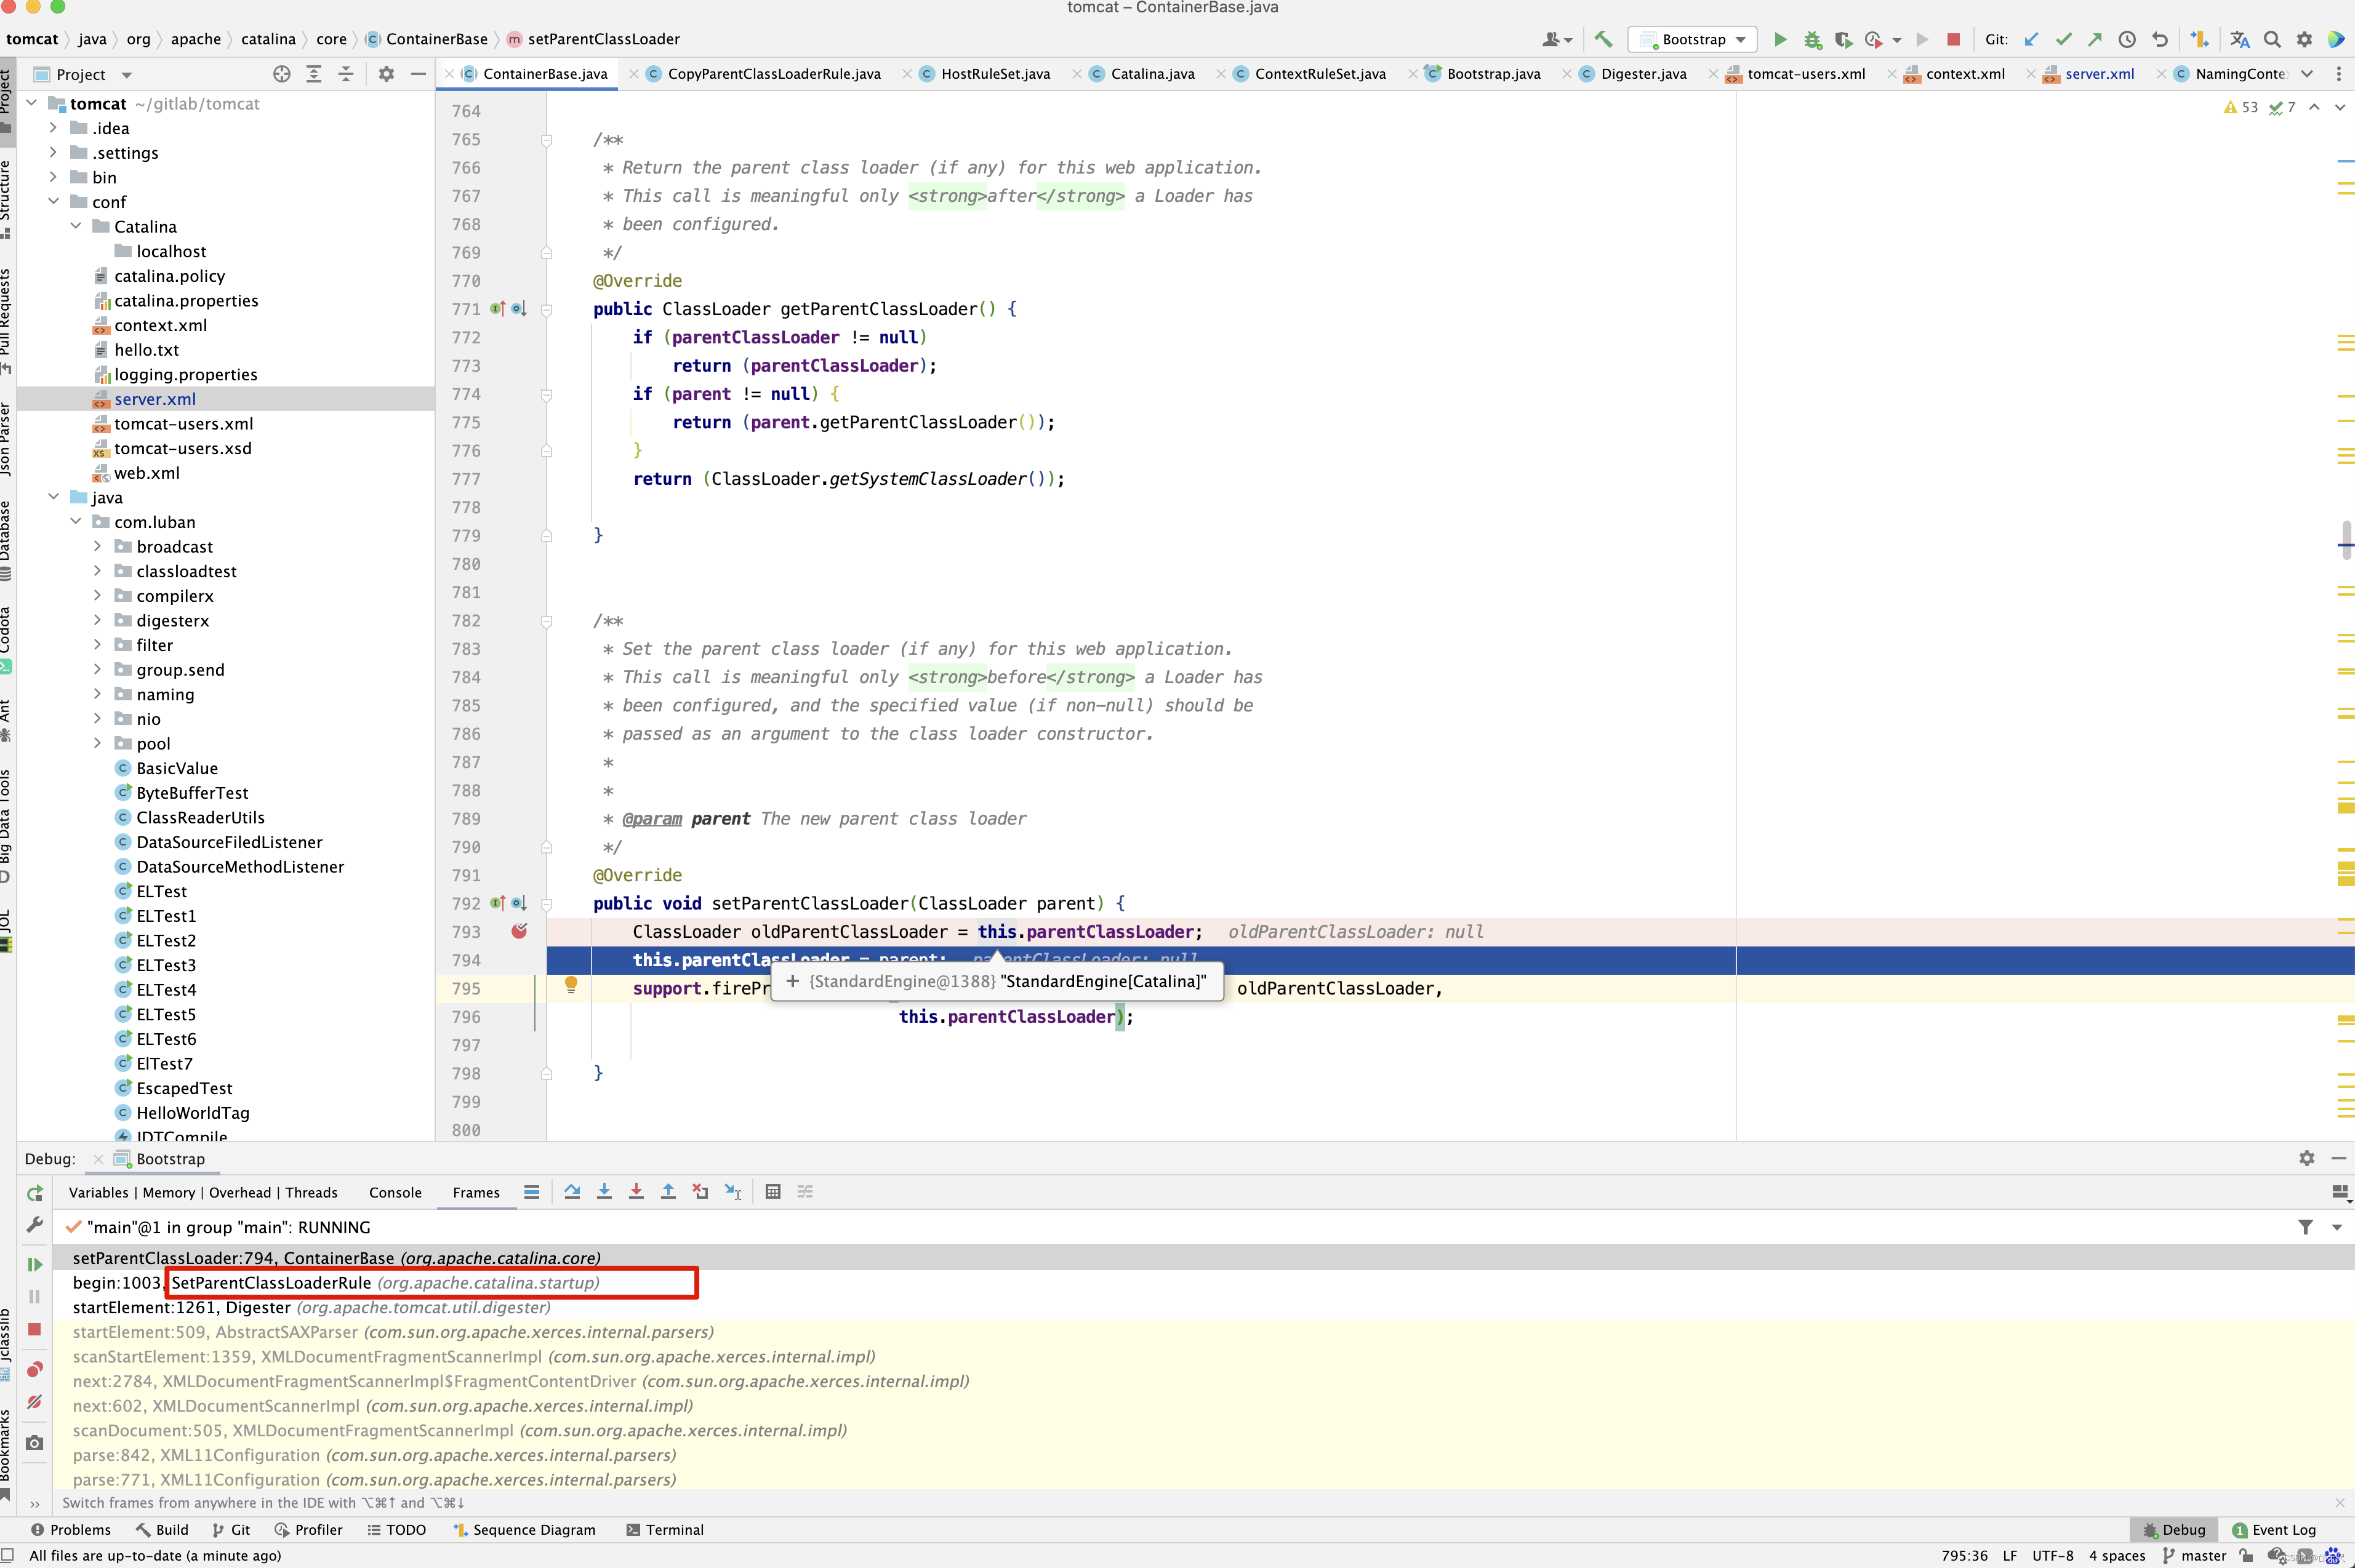
StandardEngine的parentClassLoader是在解析server.xml时的<Engine /> 时,执行SetParentClassLoaderRule规则得来的。

而Catalina中parentClassLoader = Catalina.class.getClassLoader() ,明白了StandardEngine的parentClassLoader由来 ,接下来看StandardHost的parentClassLoader由来 。 继续在原来的setParentClassLoader()方法中打断点 。
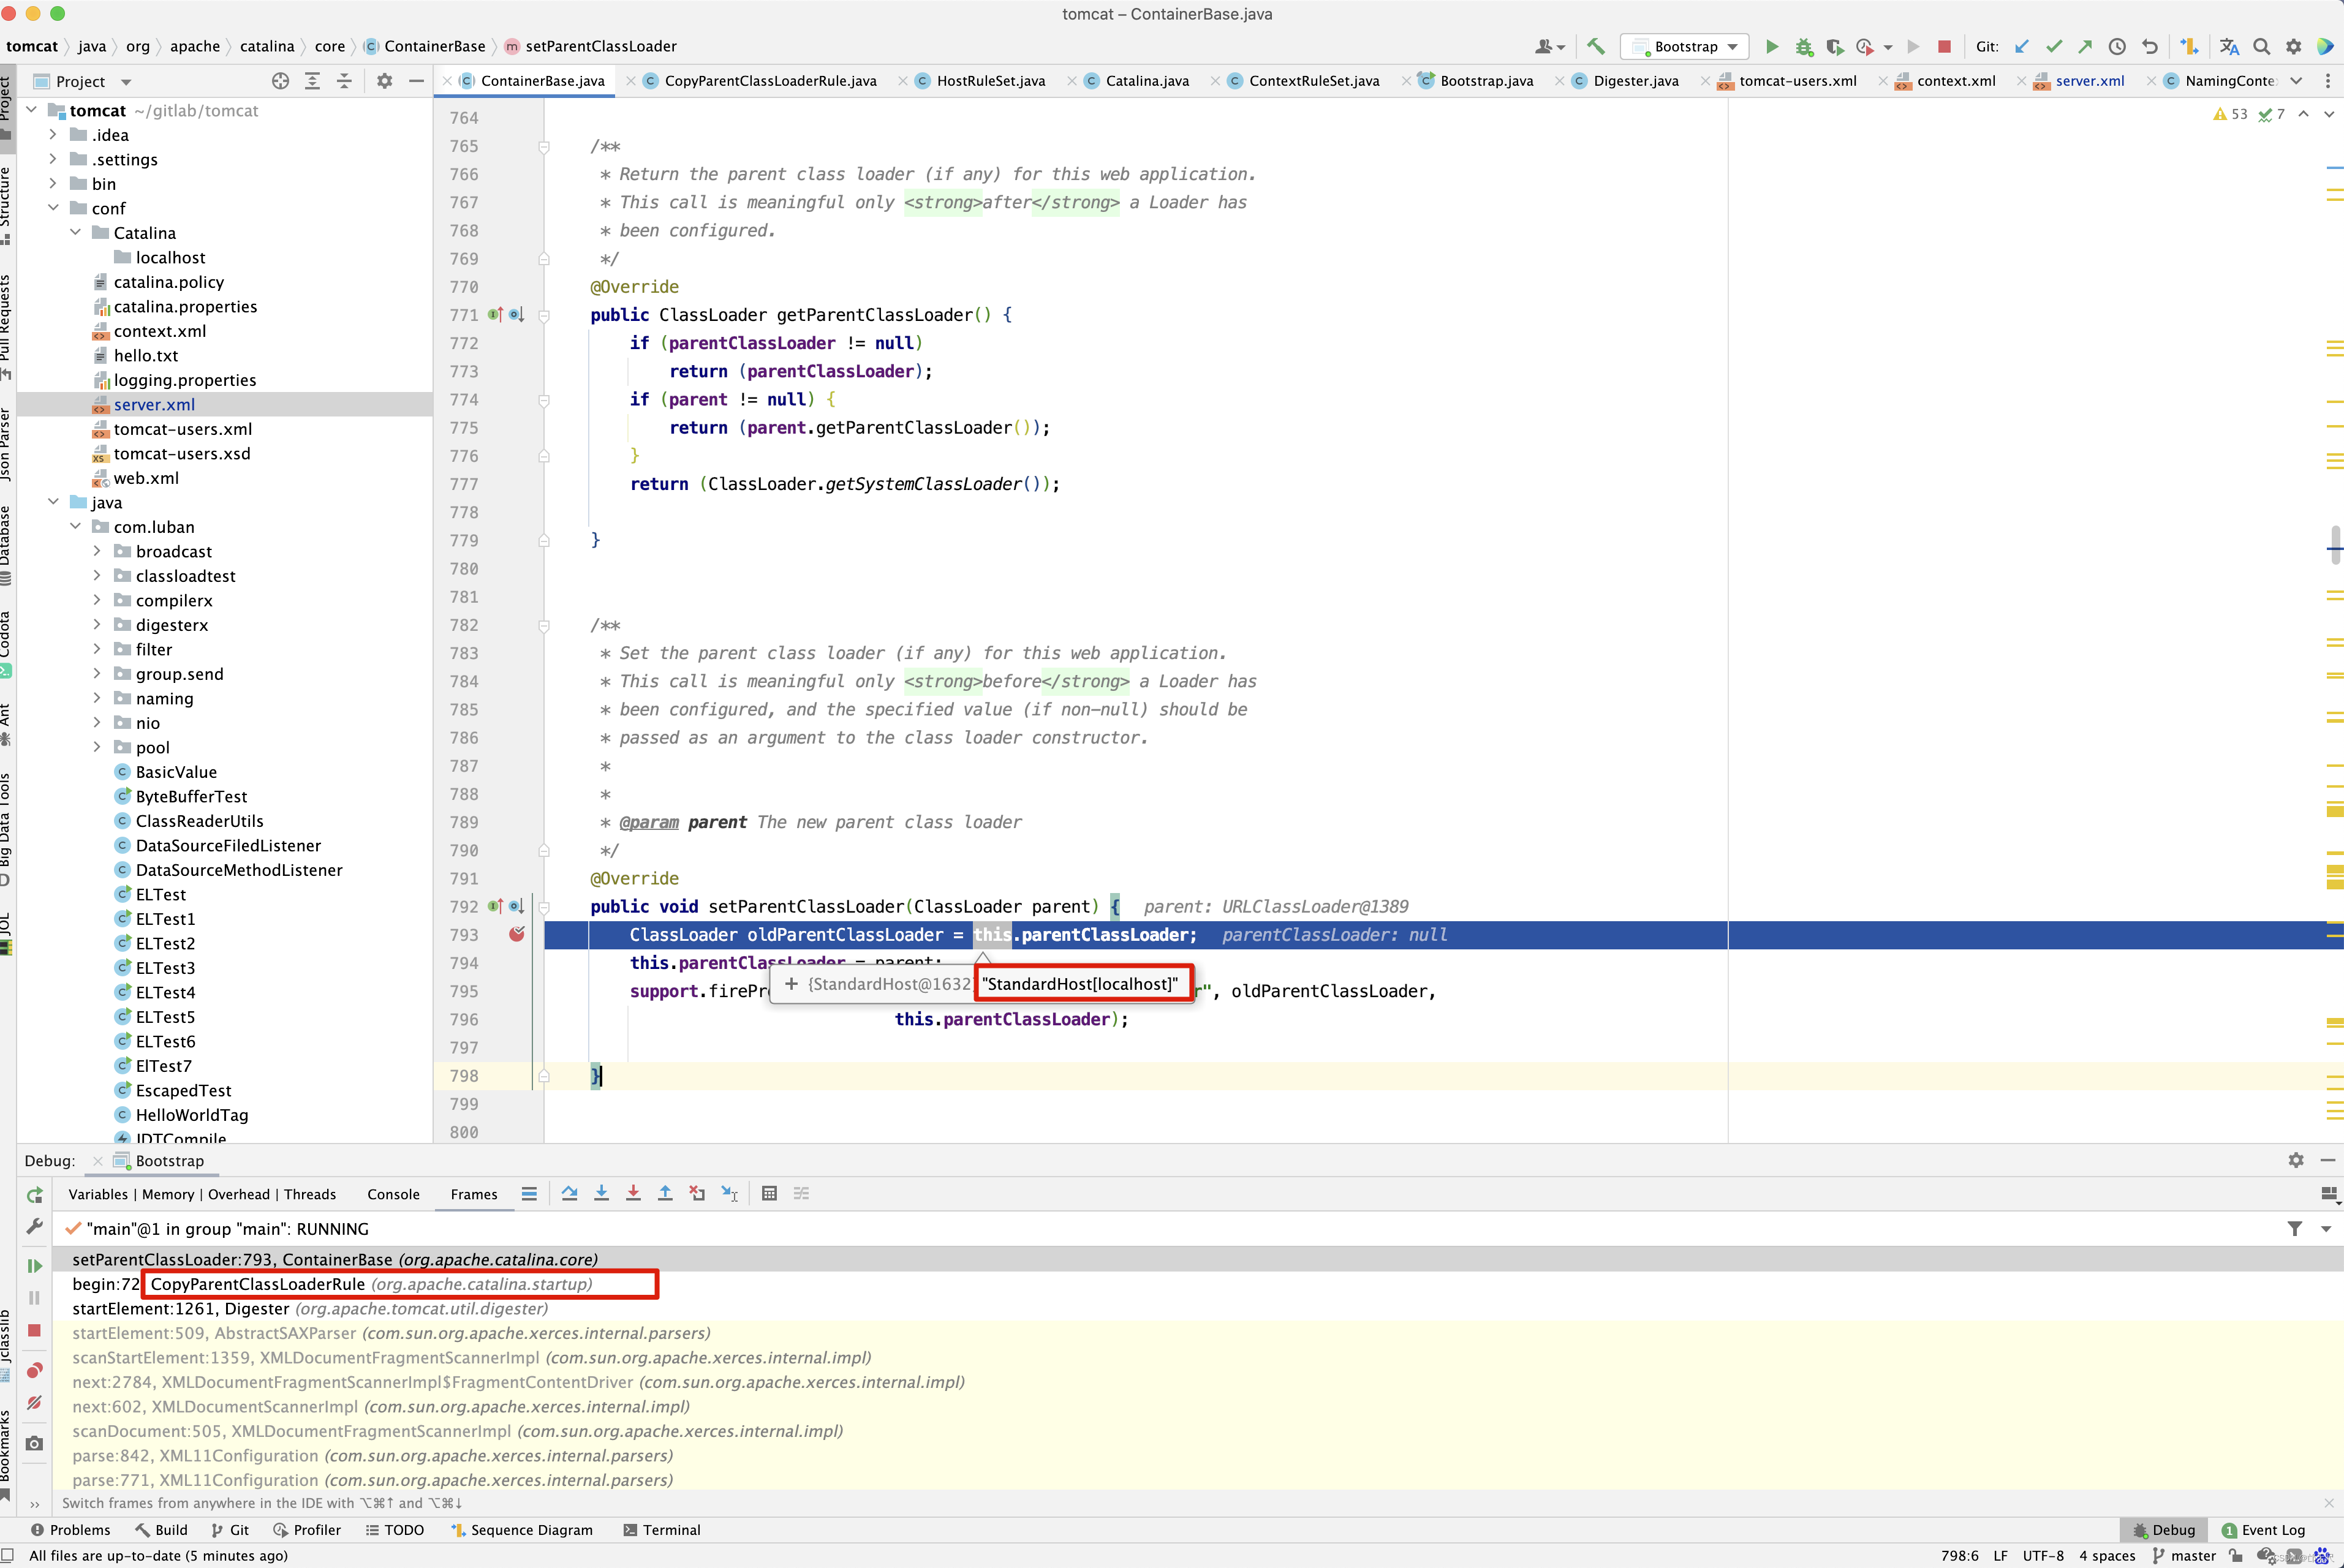
也是来源于conf/server.xml的解析,而解析规则是HostRuleSet
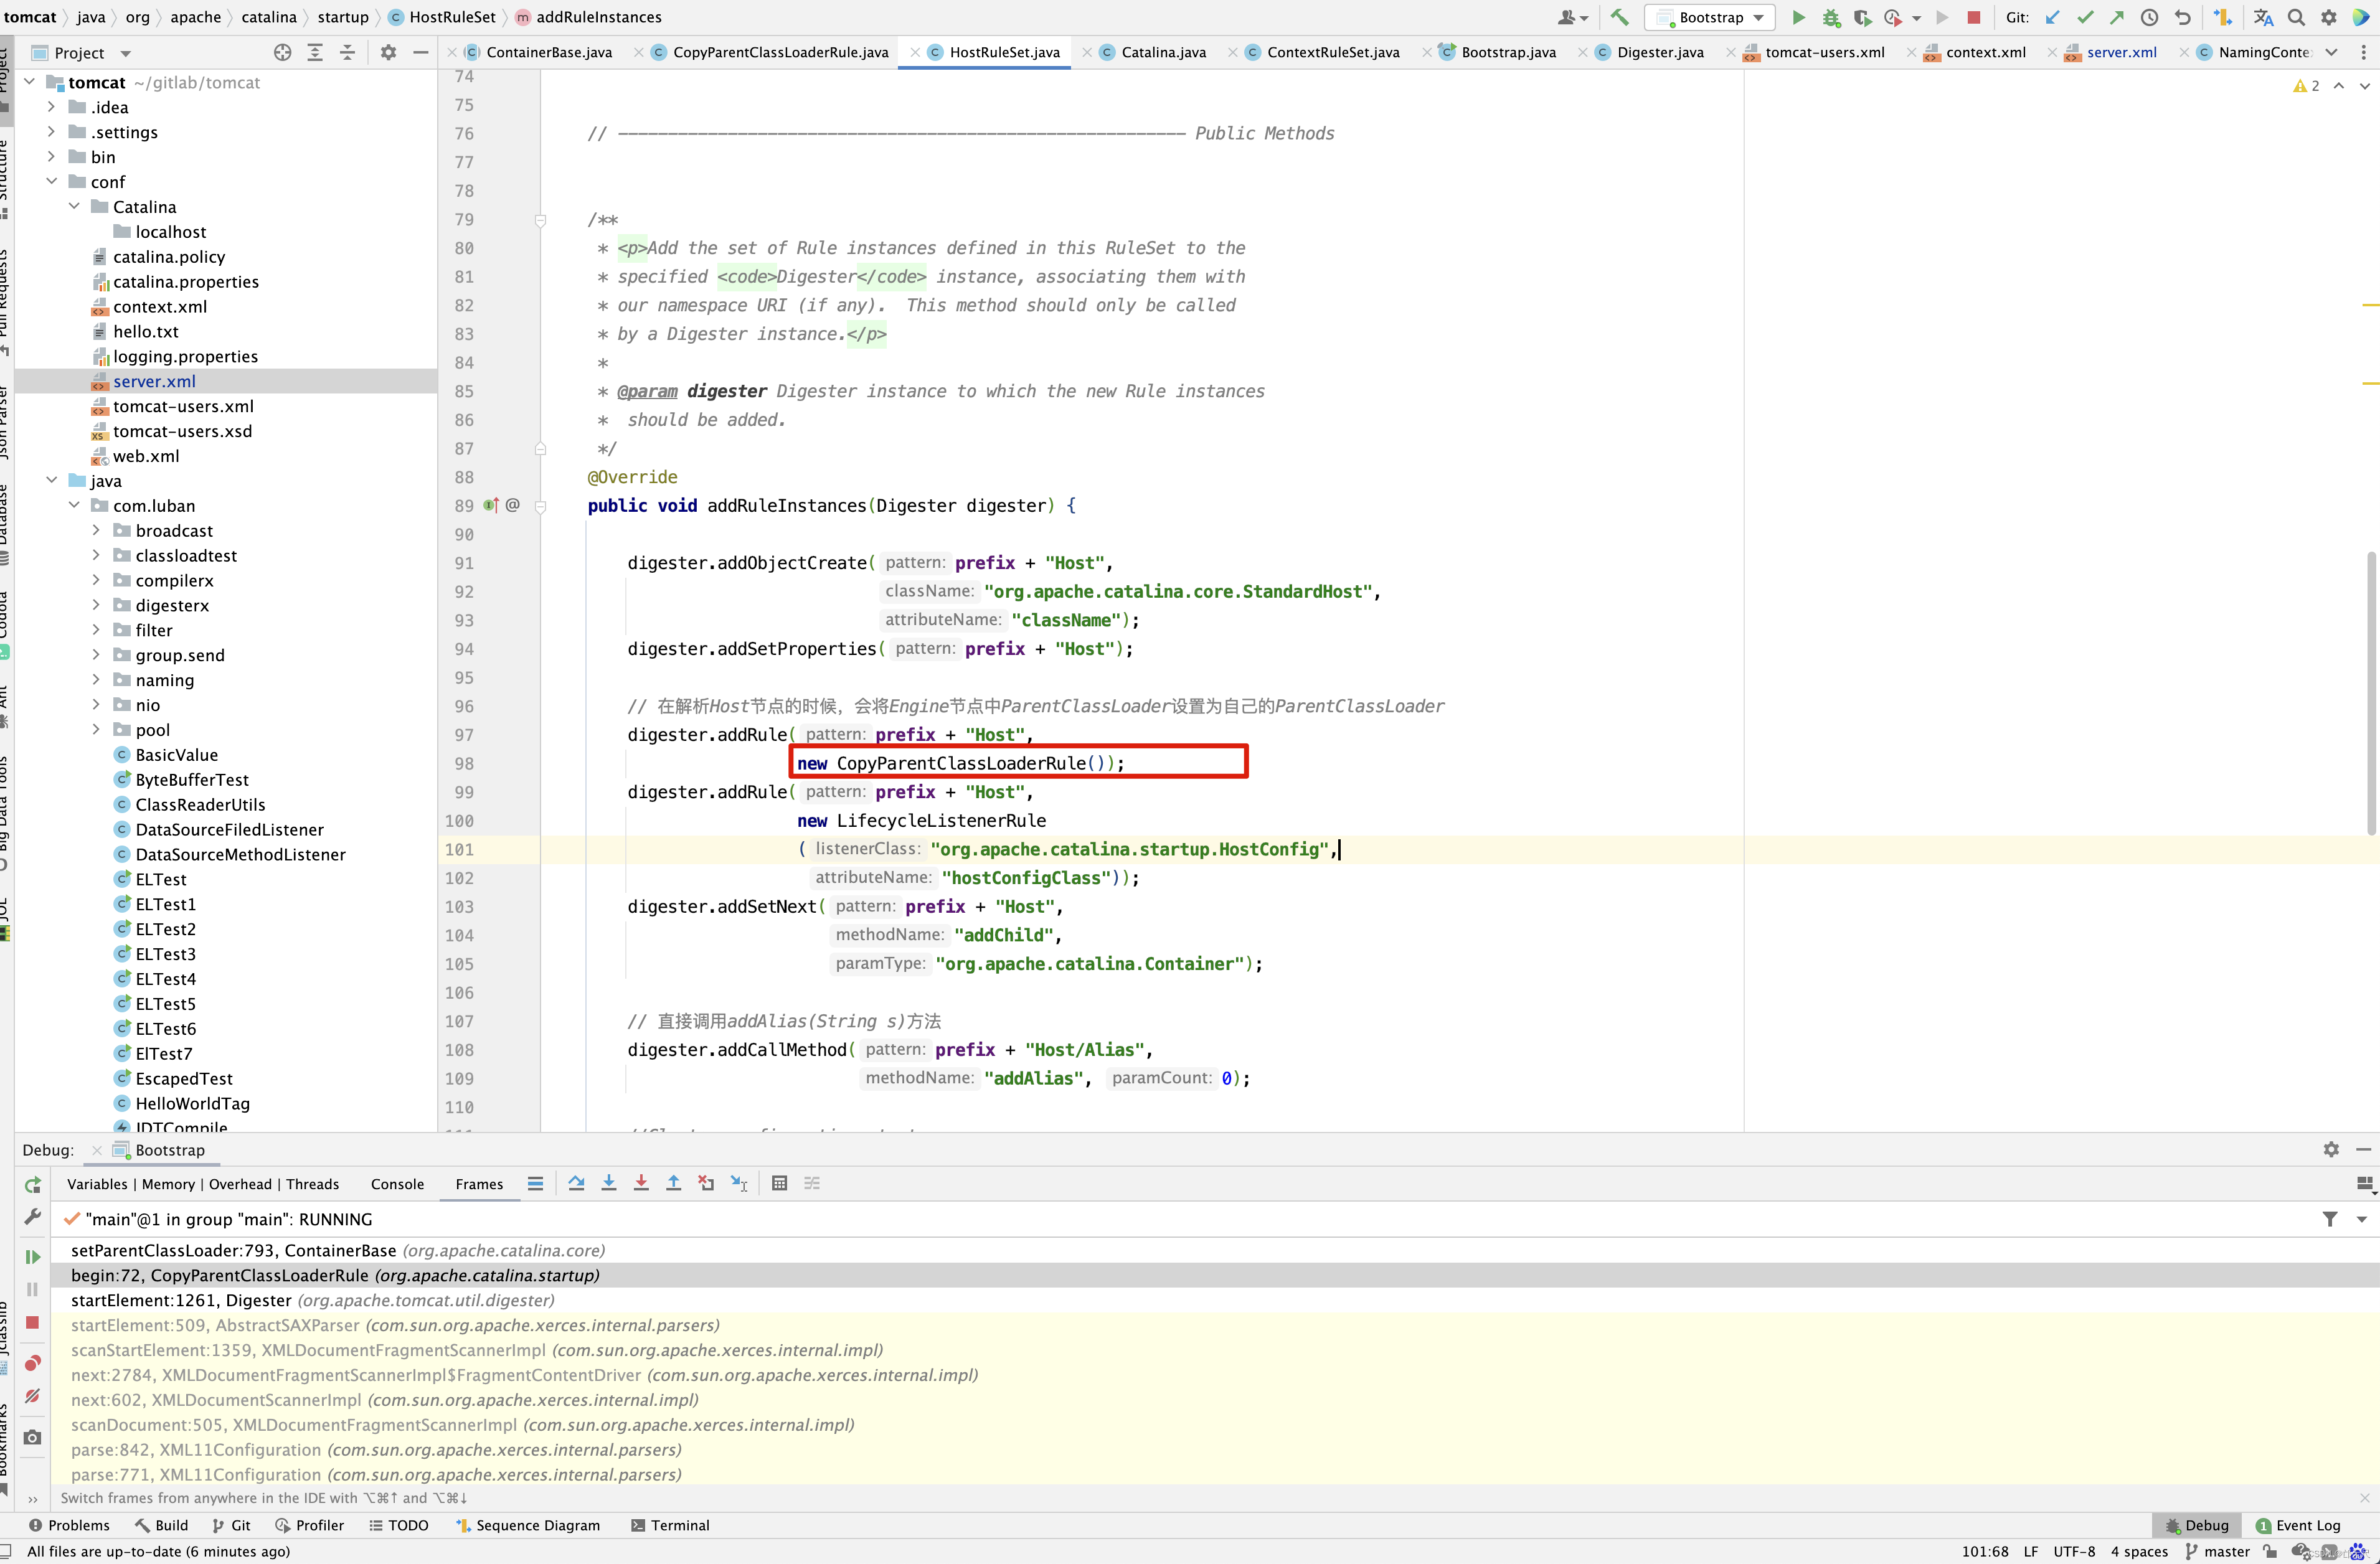
因此在解析conf/server.xml时, 当解析到<Host />时。 会走CopyParentClassLoaderRule规则 。
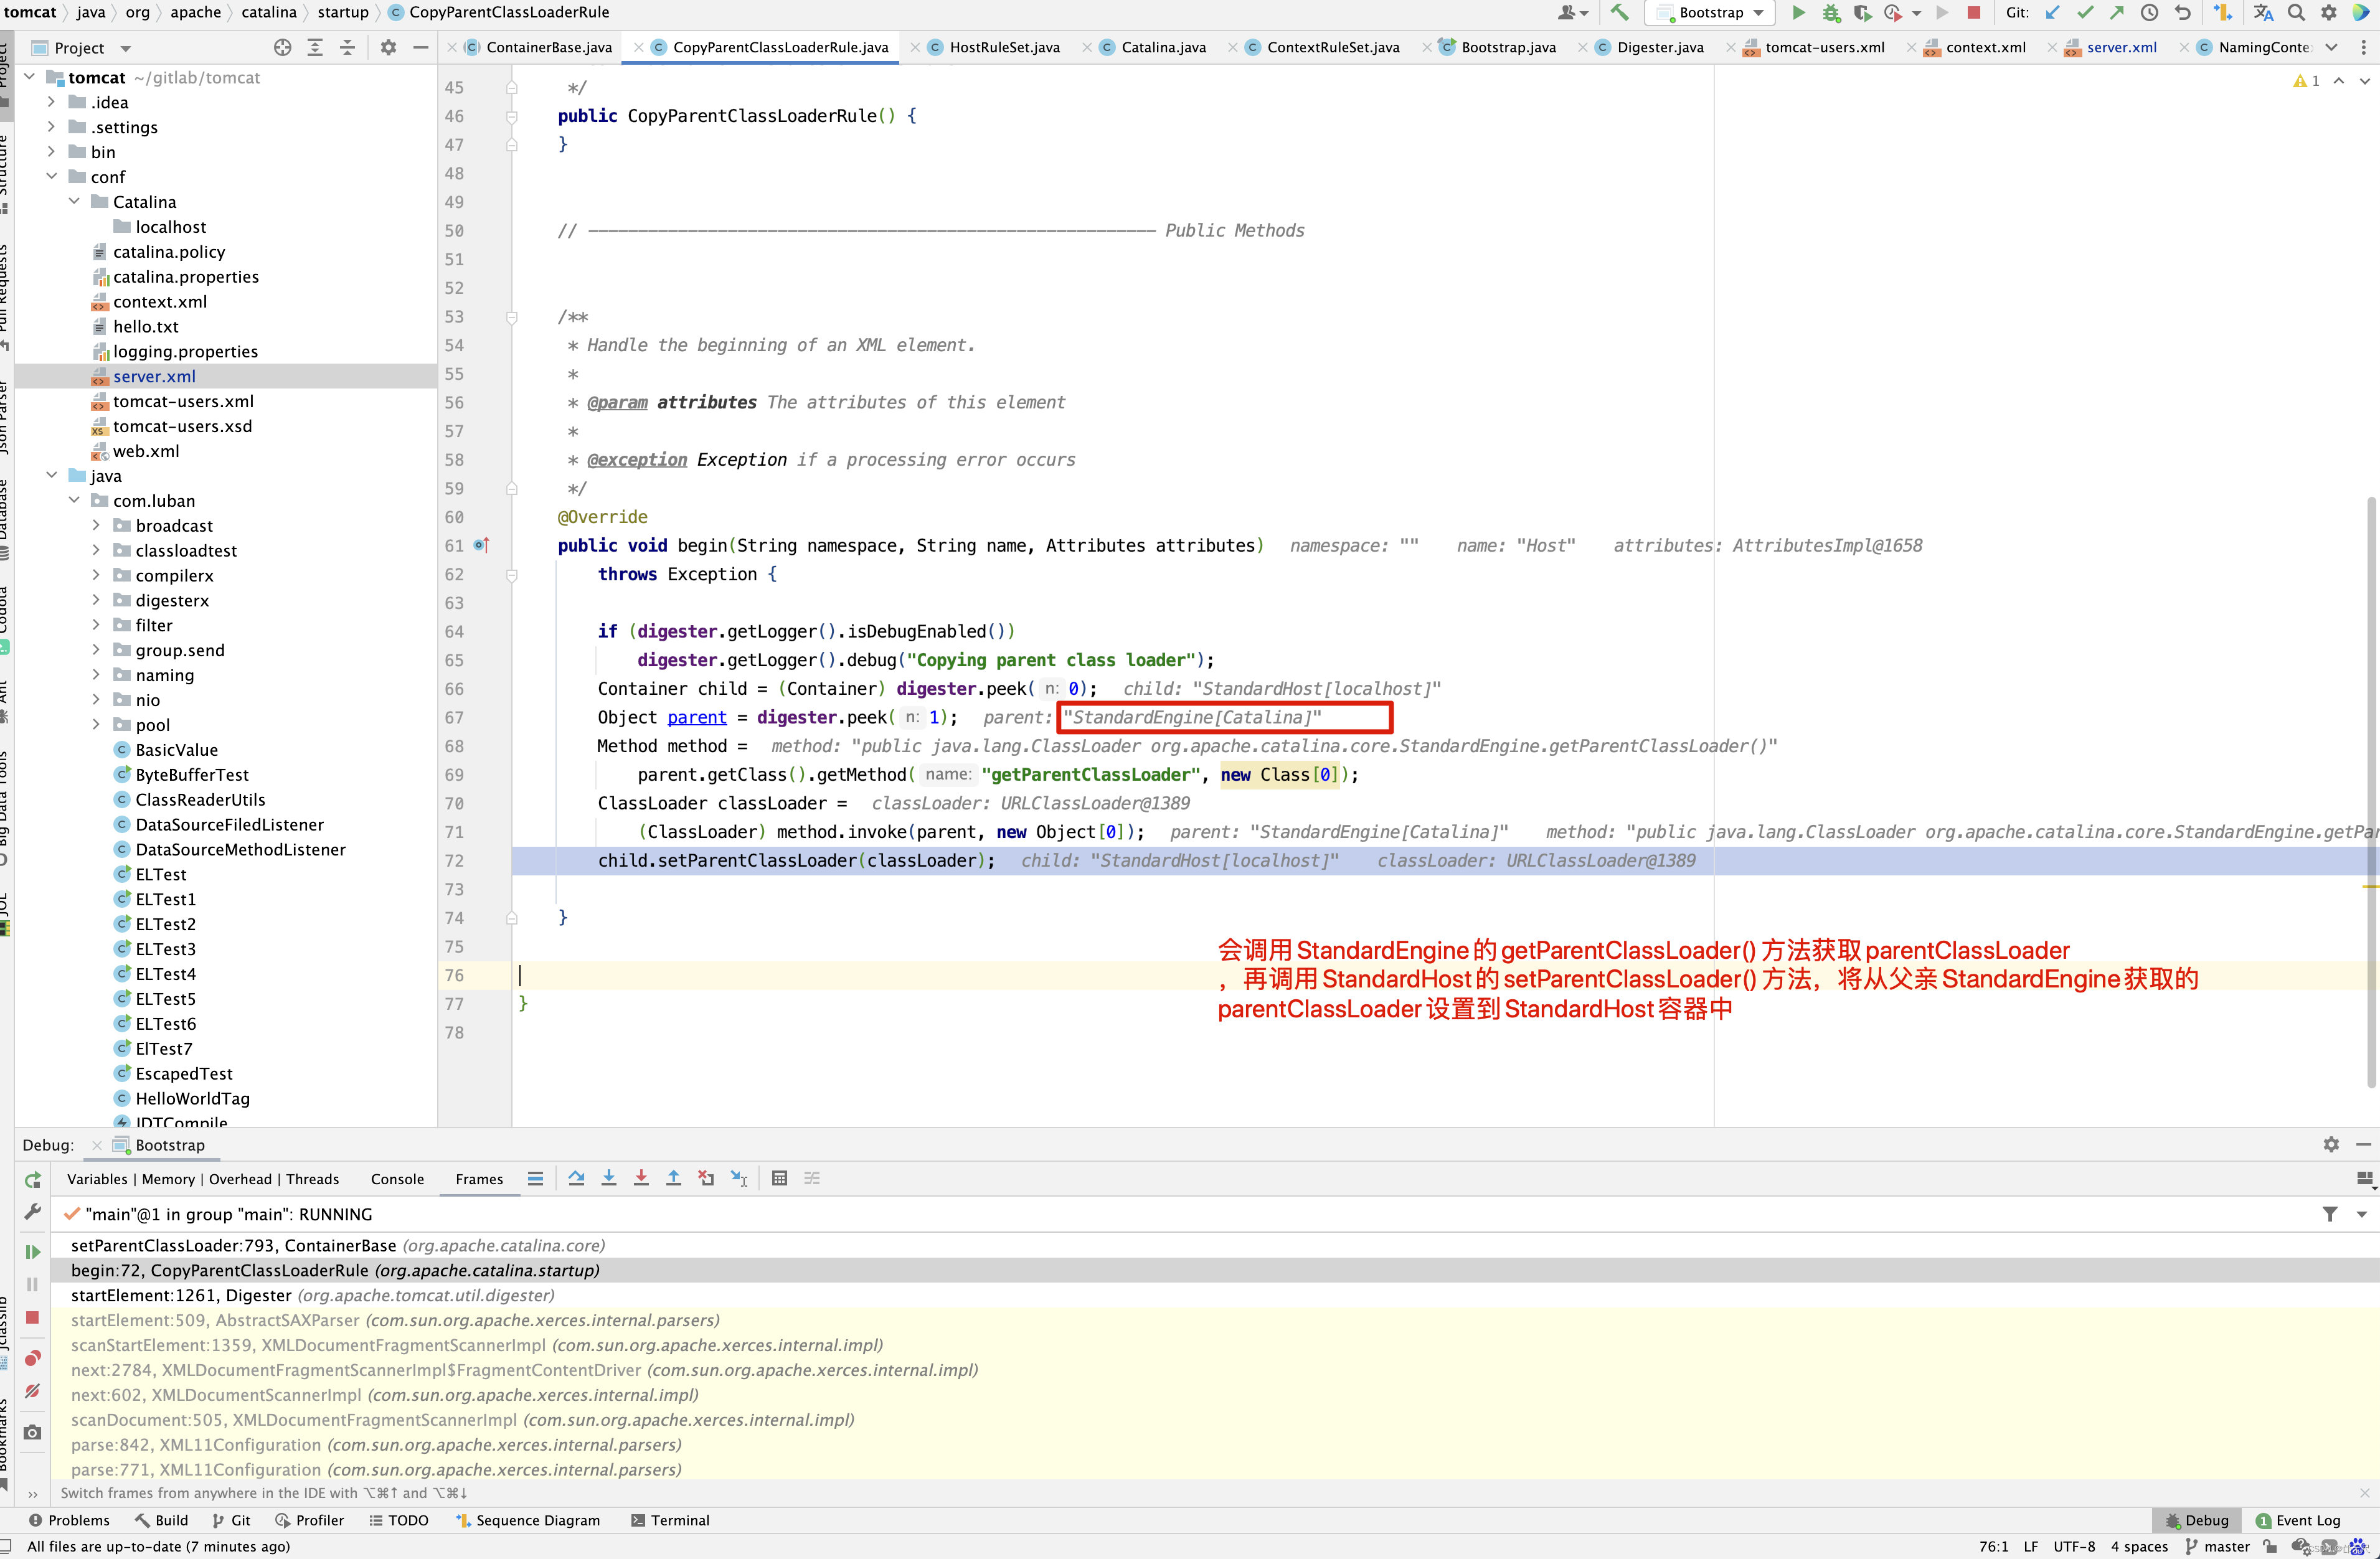
在解析到<Host /> 标签时,会执行CopyParentClassLoaderRule规则,CopyParentClassLoaderRule会将父亲StandardEngine的parentClassLoader设置到StandardHost的parentClassLoader属性中 。
那我们具体看一下Catalina.class.getClassLoader() 是什么。
接下来看StandardContext的parentClassLoader来源,如果parentClassLoader为空,则从parent.getParentClassLoader()来,而StandardContext的parent为StandardHost。
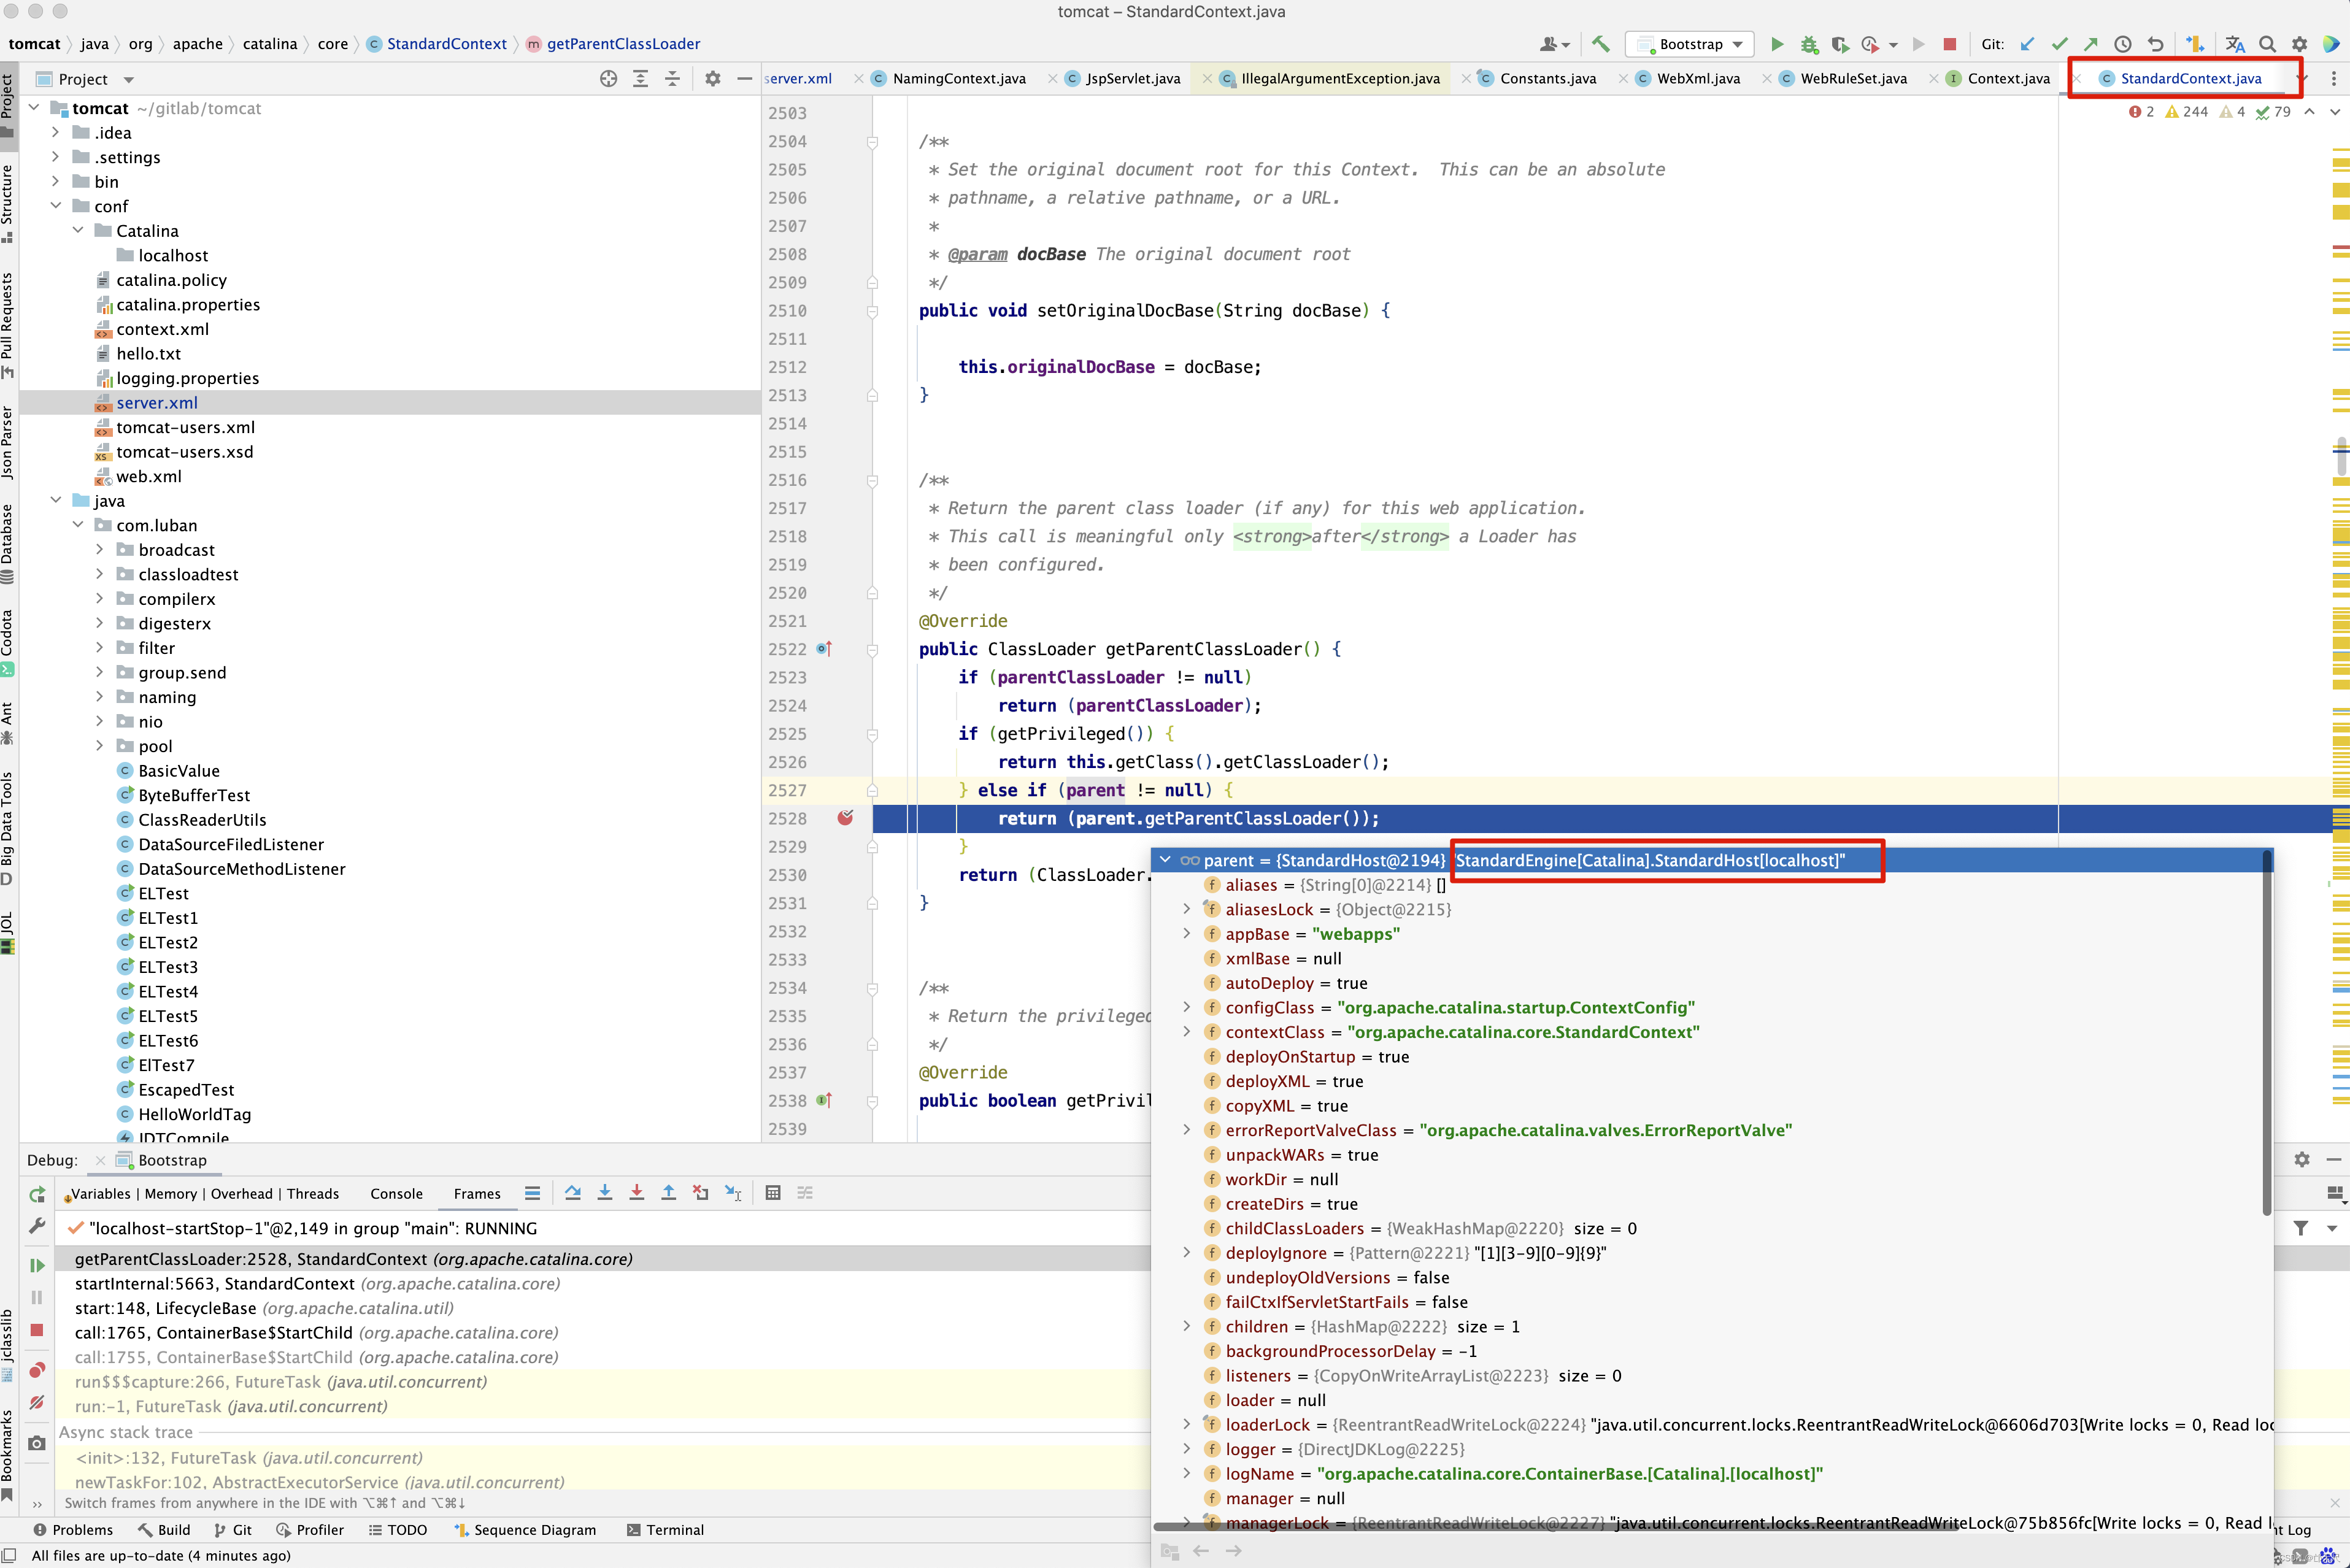
最终StandardContext的parentClassLoader加载器来源于StandardHost的parentClassLoader类加载器。
看setLoader()方法如何实现。
public void setLoader(Loader loader) {
    // 使用写锁,在同一个时间只能支持某一个线程来设置loader
    Lock writeLock = loaderLock.writeLock();
    writeLock.lock();
    Loader oldLoader = null;
    try {
        // Change components if necessary
        oldLoader = this.loader;
        if (oldLoader == loader)
            return;
        this.loader = loader;

        // Stop the old component if necessary
        // 把老的loader停止掉
        if (getState().isAvailable() && (oldLoader != null) &&
                (oldLoader instanceof Lifecycle)) {
            try {
                ((Lifecycle) oldLoader).stop();
            } catch (LifecycleException e) {
                log.error("ContainerBase.setLoader: stop: ", e);
            }
        }
        // Start the new component if necessary
        // 设置loader对应的容器,启动loader
        if (loader != null)
            loader.setContainer(this);
        // 如果StandardContext的生命周期状态不是start ,after_start ,和before_stop 状态,则不启动loader
        if (getState().isAvailable() && (loader != null) &&
                (loader instanceof Lifecycle)) {
            try {
                ((Lifecycle) loader).start();
            } catch (LifecycleException e) {
                log.error("ContainerBase.setLoader: start: ", e);
            }
        }
    } finally {
        writeLock.unlock();
    }

    // Report this property change to interested listeners
    // 发布属性改变事件
    support.firePropertyChange("loader", oldLoader, loader);
}
如果存在旧的loader,并且旧的loader和新的loader不相等,则停止旧的loader。

接下来看loader的start()方法,因为loader同样实现了Lifecycle接口,因此也会调用生命周期方法。
但是庆幸的是WebappLoader没有生命周期监听器,因此省去了很多麻烦 , 直接进入WebappLoader的startInternal()方法 。
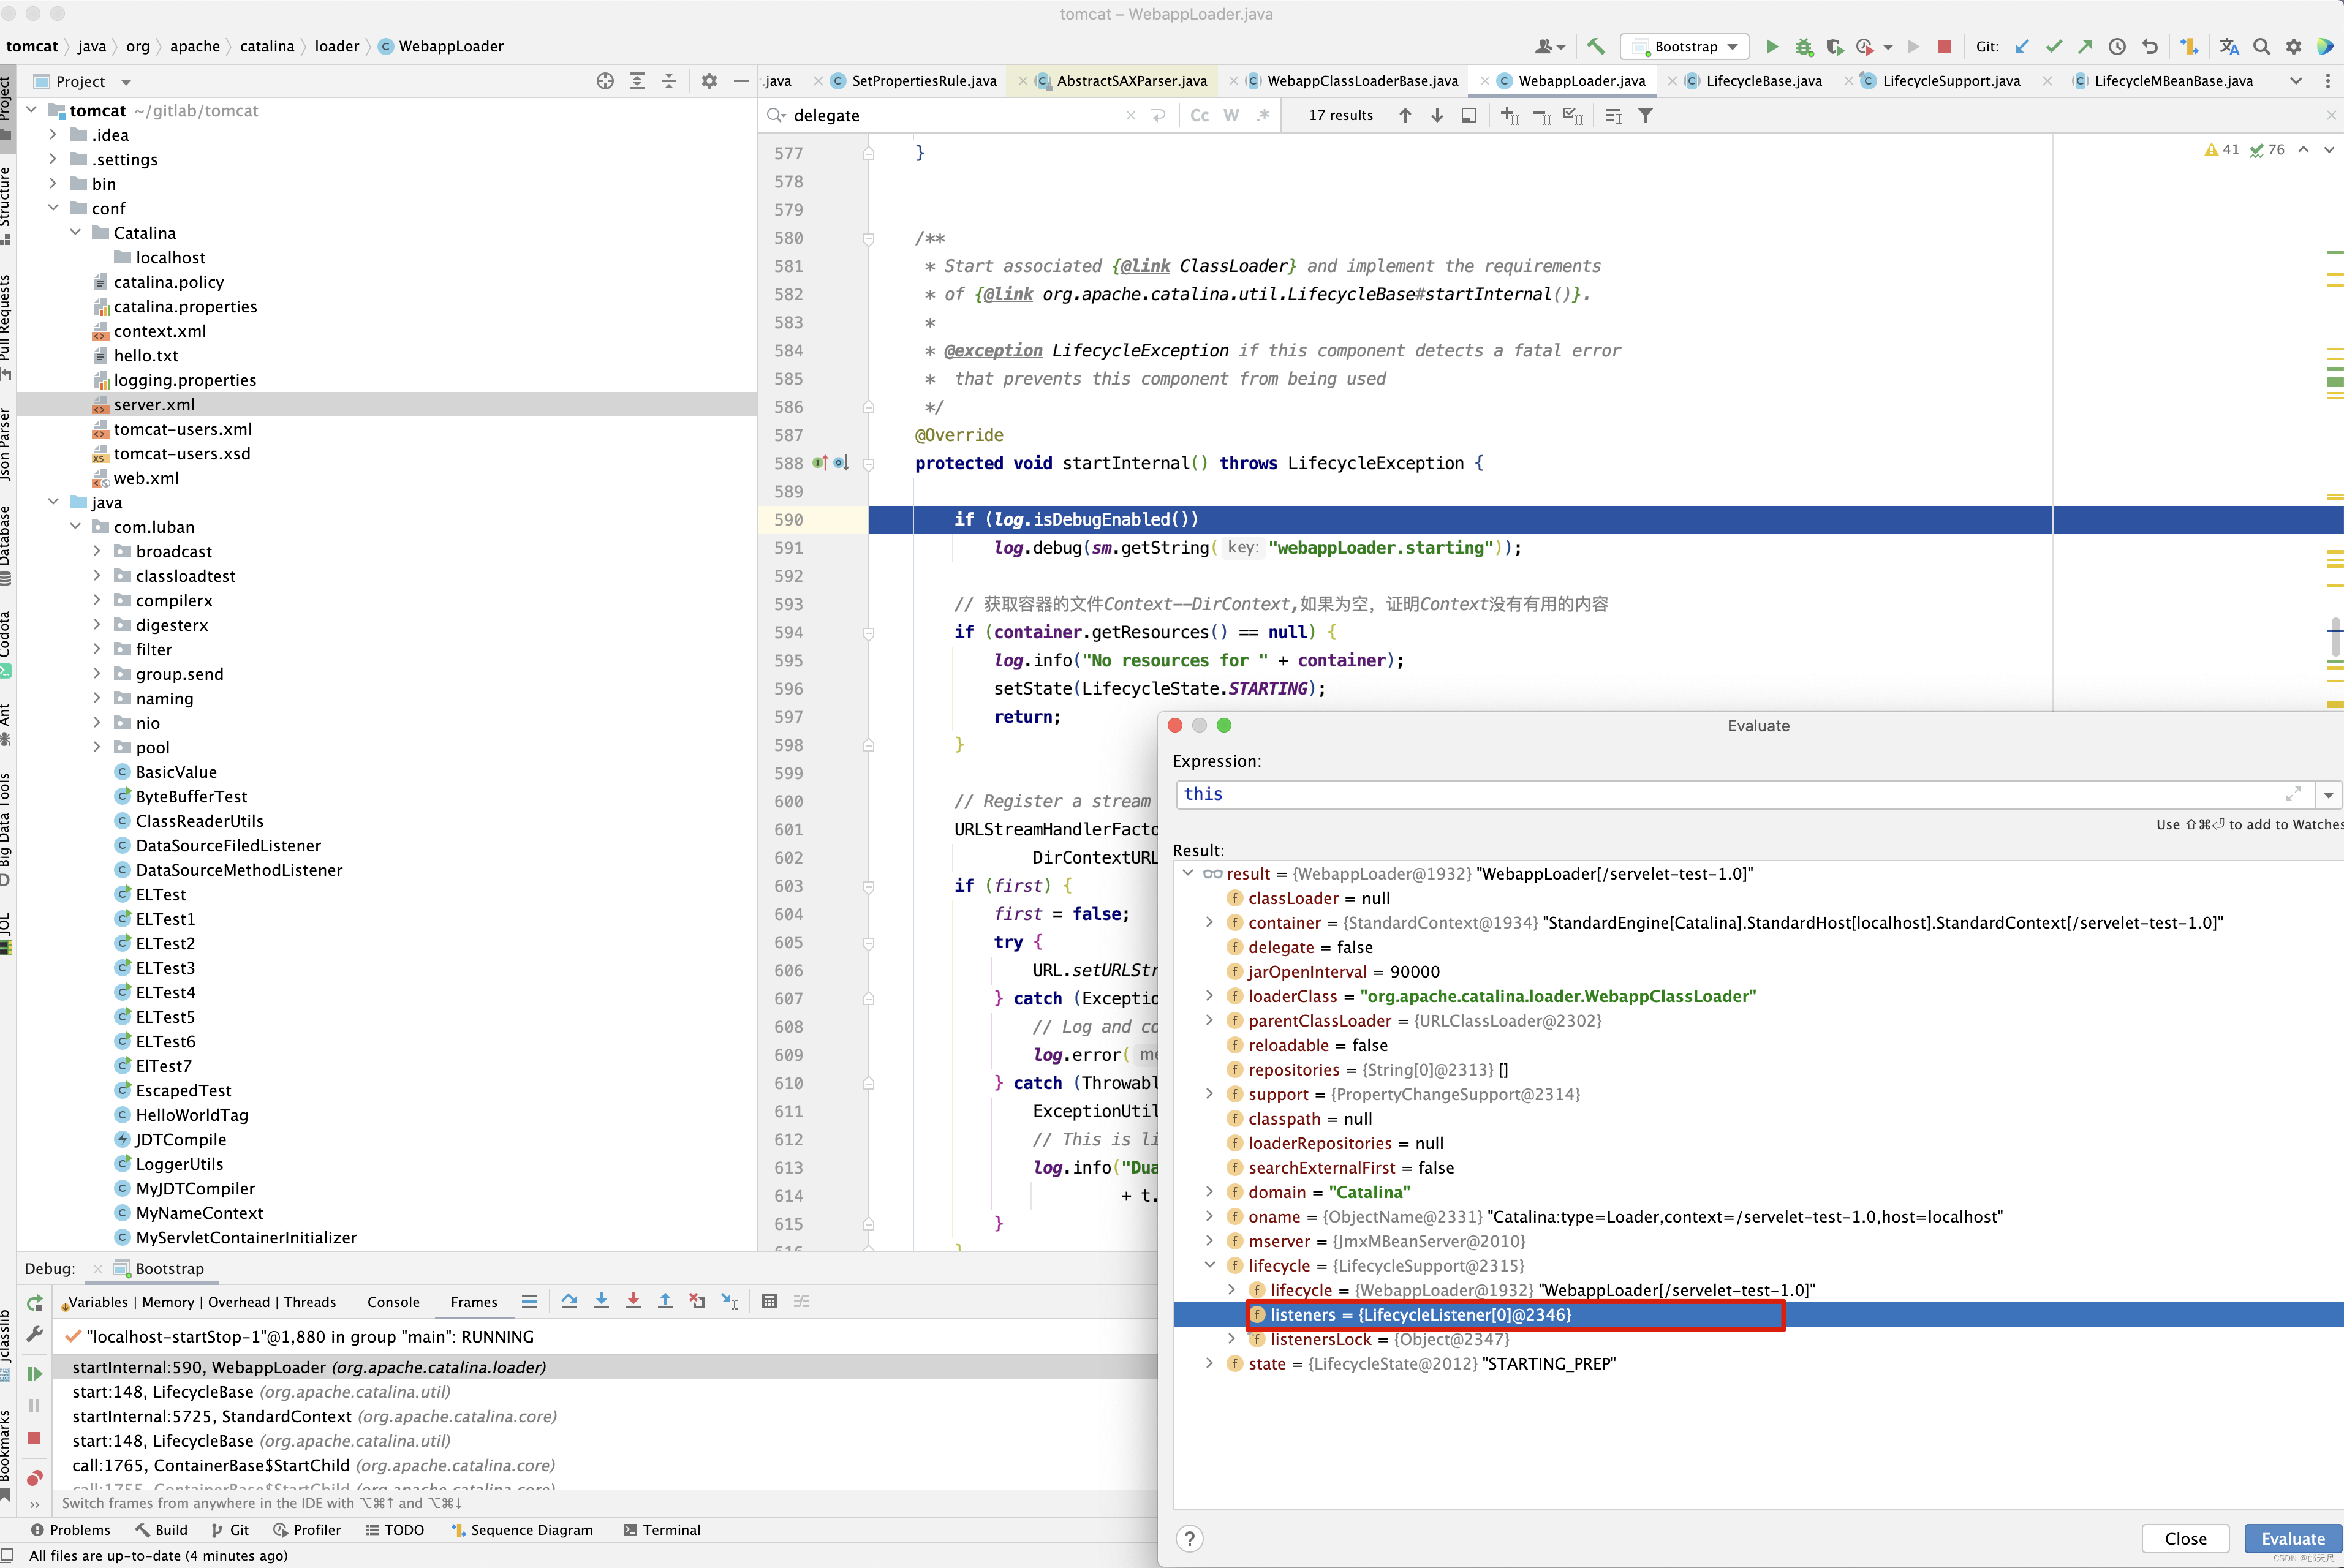
protected void startInternal() throws LifecycleException {

    if (log.isDebugEnabled())
        log.debug(sm.getString("webappLoader.starting"));

    // 获取容器的文件Context--DirContext,如果为空,证明Context没有有用的内容
    if (container.getResources() == null) {
        log.info("No resources for " + container);
        setState(LifecycleState.STARTING);
        return;
    }

    // Register a stream handler factory for the JNDI protocol
    URLStreamHandlerFactory streamHandlerFactory =
            DirContextURLStreamHandlerFactory.getInstance();
    if (first) {
    	// first的作用,保证一个StandardContext的streamHandlerFactory只被设置一次
        first = false;
        try {
            URL.setURLStreamHandlerFactory(streamHandlerFactory);
        } catch (Exception e) {
            // Log and continue anyway, this is not critical
            log.error("Error registering jndi stream handler", e);
        } catch (Throwable t) {
            ExceptionUtils.handleThrowable(t);
            // This is likely a dual registration
            log.info("Dual registration of jndi stream handler: "
                     + t.getMessage());
        }
    }

    // Construct a class loader based on our current repositories list
    try {

        classLoader = createClassLoader(); // 创建一个WebappClassLoader
        classLoader.setJarOpenInterval(this.jarOpenInterval);
        classLoader.setResources(container.getResources());
        // 1. 当委托标识delegate 为false时,WebappClassLoader 类加载器首先尝试从本地缓存中查找加载该类,然后用System类加载器尝试加载类。
		// 接着由自己的尝试加载类,最后才是由父类加载器(Common)器尝试加载,所以此时它搜索的目录顺序是<JAVA_HOME>/jre/lib -> <JAVA_HOME/jre/lib/ext
		// -> CLASSPATH->/WEB-INF/classes -> /WEB-INF/lib -> $CATALINA_BASE/lib 和 CATALINA_HOME/lib
		// 2  当委托标识delegate为true时,WebappClassLoader 类加载器首先尝试从本地缓存中查找加载该类,然后用System类加载器尝试加载类,接着由父类 加载器
		// (Common)尝试加载类,最后才由自己的尝试加载,所以此时它的搜索目录顺序为<JAVA_HOME>/jre/lib-><JAVA_HOME>/jre/lib/ext -> CLASSPATH
		// ->$CATALINA_BASE/lib 和$CATALINA_HOME/lib -> /WEB-INF/classes->/WEB-INF/lib
        classLoader.setDelegate(this.delegate);
        classLoader.setSearchExternalFirst(searchExternalFirst);
        if (container instanceof StandardContext) {
            classLoader.setAntiJARLocking(
                    ((StandardContext) container).getAntiJARLocking());
            classLoader.setClearReferencesRmiTargets(
                    ((StandardContext) container).getClearReferencesRmiTargets());
            classLoader.setClearReferencesStatic(
                    ((StandardContext) container).getClearReferencesStatic());
            classLoader.setClearReferencesStopThreads(
                    ((StandardContext) container).getClearReferencesStopThreads());
            classLoader.setClearReferencesStopTimerThreads(
                    ((StandardContext) container).getClearReferencesStopTimerThreads());
            classLoader.setClearReferencesHttpClientKeepAliveThread(
                    ((StandardContext) container).getClearReferencesHttpClientKeepAliveThread());
            classLoader.setClearReferencesObjectStreamClassCaches(
                    ((StandardContext) container).getClearReferencesObjectStreamClassCaches());
            classLoader.setClearReferencesThreadLocals(
                    ((StandardContext) container).getClearReferencesThreadLocals());
        }

        for (int i = 0; i < repositories.length; i++) {
            classLoader.addRepository(repositories[i]);
        }

        // Configure our repositories
        setRepositories();  // 将/WEB-INF/classes和/WEB-INF/lib目录添加到WebappClassLoader的Repository中,以后将从Repository中寻找并加载类
        setClassPath(); // 设置当前加载器的classpath,应该是只有在jsp中用到

        setPermissions();

        ((Lifecycle) classLoader).start();  // 调用WebappClassLoaderBase.start(),赋值webInfClassesCodeBase属性,这个属性不知道哪里会用到,表示web-inf/classes目录

        // Binding the Webapp class loader to the directory context
        // 类加载器与DirContext的一个映射关系
        DirContextURLStreamHandler.bind(classLoader,
                this.container.getResources());

        // 注册jmx
        StandardContext ctx=(StandardContext)container;
        String contextName = ctx.getName();
        if (!contextName.startsWith("/")) {
            contextName = "/" + contextName;
        }
        ObjectName cloname = new ObjectName
            (MBeanUtils.getDomain(ctx) + ":type=WebappClassLoader,context="
             + contextName + ",host=" + ctx.getParent().getName());
        Registry.getRegistry(null, null)
            .registerComponent(classLoader, cloname, null);

    } catch (Throwable t) {
        t = ExceptionUtils.unwrapInvocationTargetException(t);
        ExceptionUtils.handleThrowable(t);
        log.error( "LifecycleException ", t );
        throw new LifecycleException("start: ", t);
    }
	// 设置StandardContext的生命周期状态为启动中
    setState(LifecycleState.STARTING);
}


private WebappClassLoaderBase createClassLoader()
    throws Exception {
    // 创建一个类加载器WebappClassLoader
    Class<?> clazz = Class.forName(loaderClass);
    WebappClassLoaderBase classLoader = null;

    if (parentClassLoader == null) {
        // 父加载器为容器的父加载器
        parentClassLoader = container.getParentClassLoader();
    }

    // 下面的代码相当于 classLoader = new WebappClassLoader(parentClassLoader);
    Class<?>[] argTypes = { ClassLoader.class };
    Object[] args = { parentClassLoader };
    Constructor<?> constr = clazz.getConstructor(argTypes);
    classLoader = (WebappClassLoaderBase) constr.newInstance(args);
    return classLoader;
}
接下来看setRepositories()方法实现。
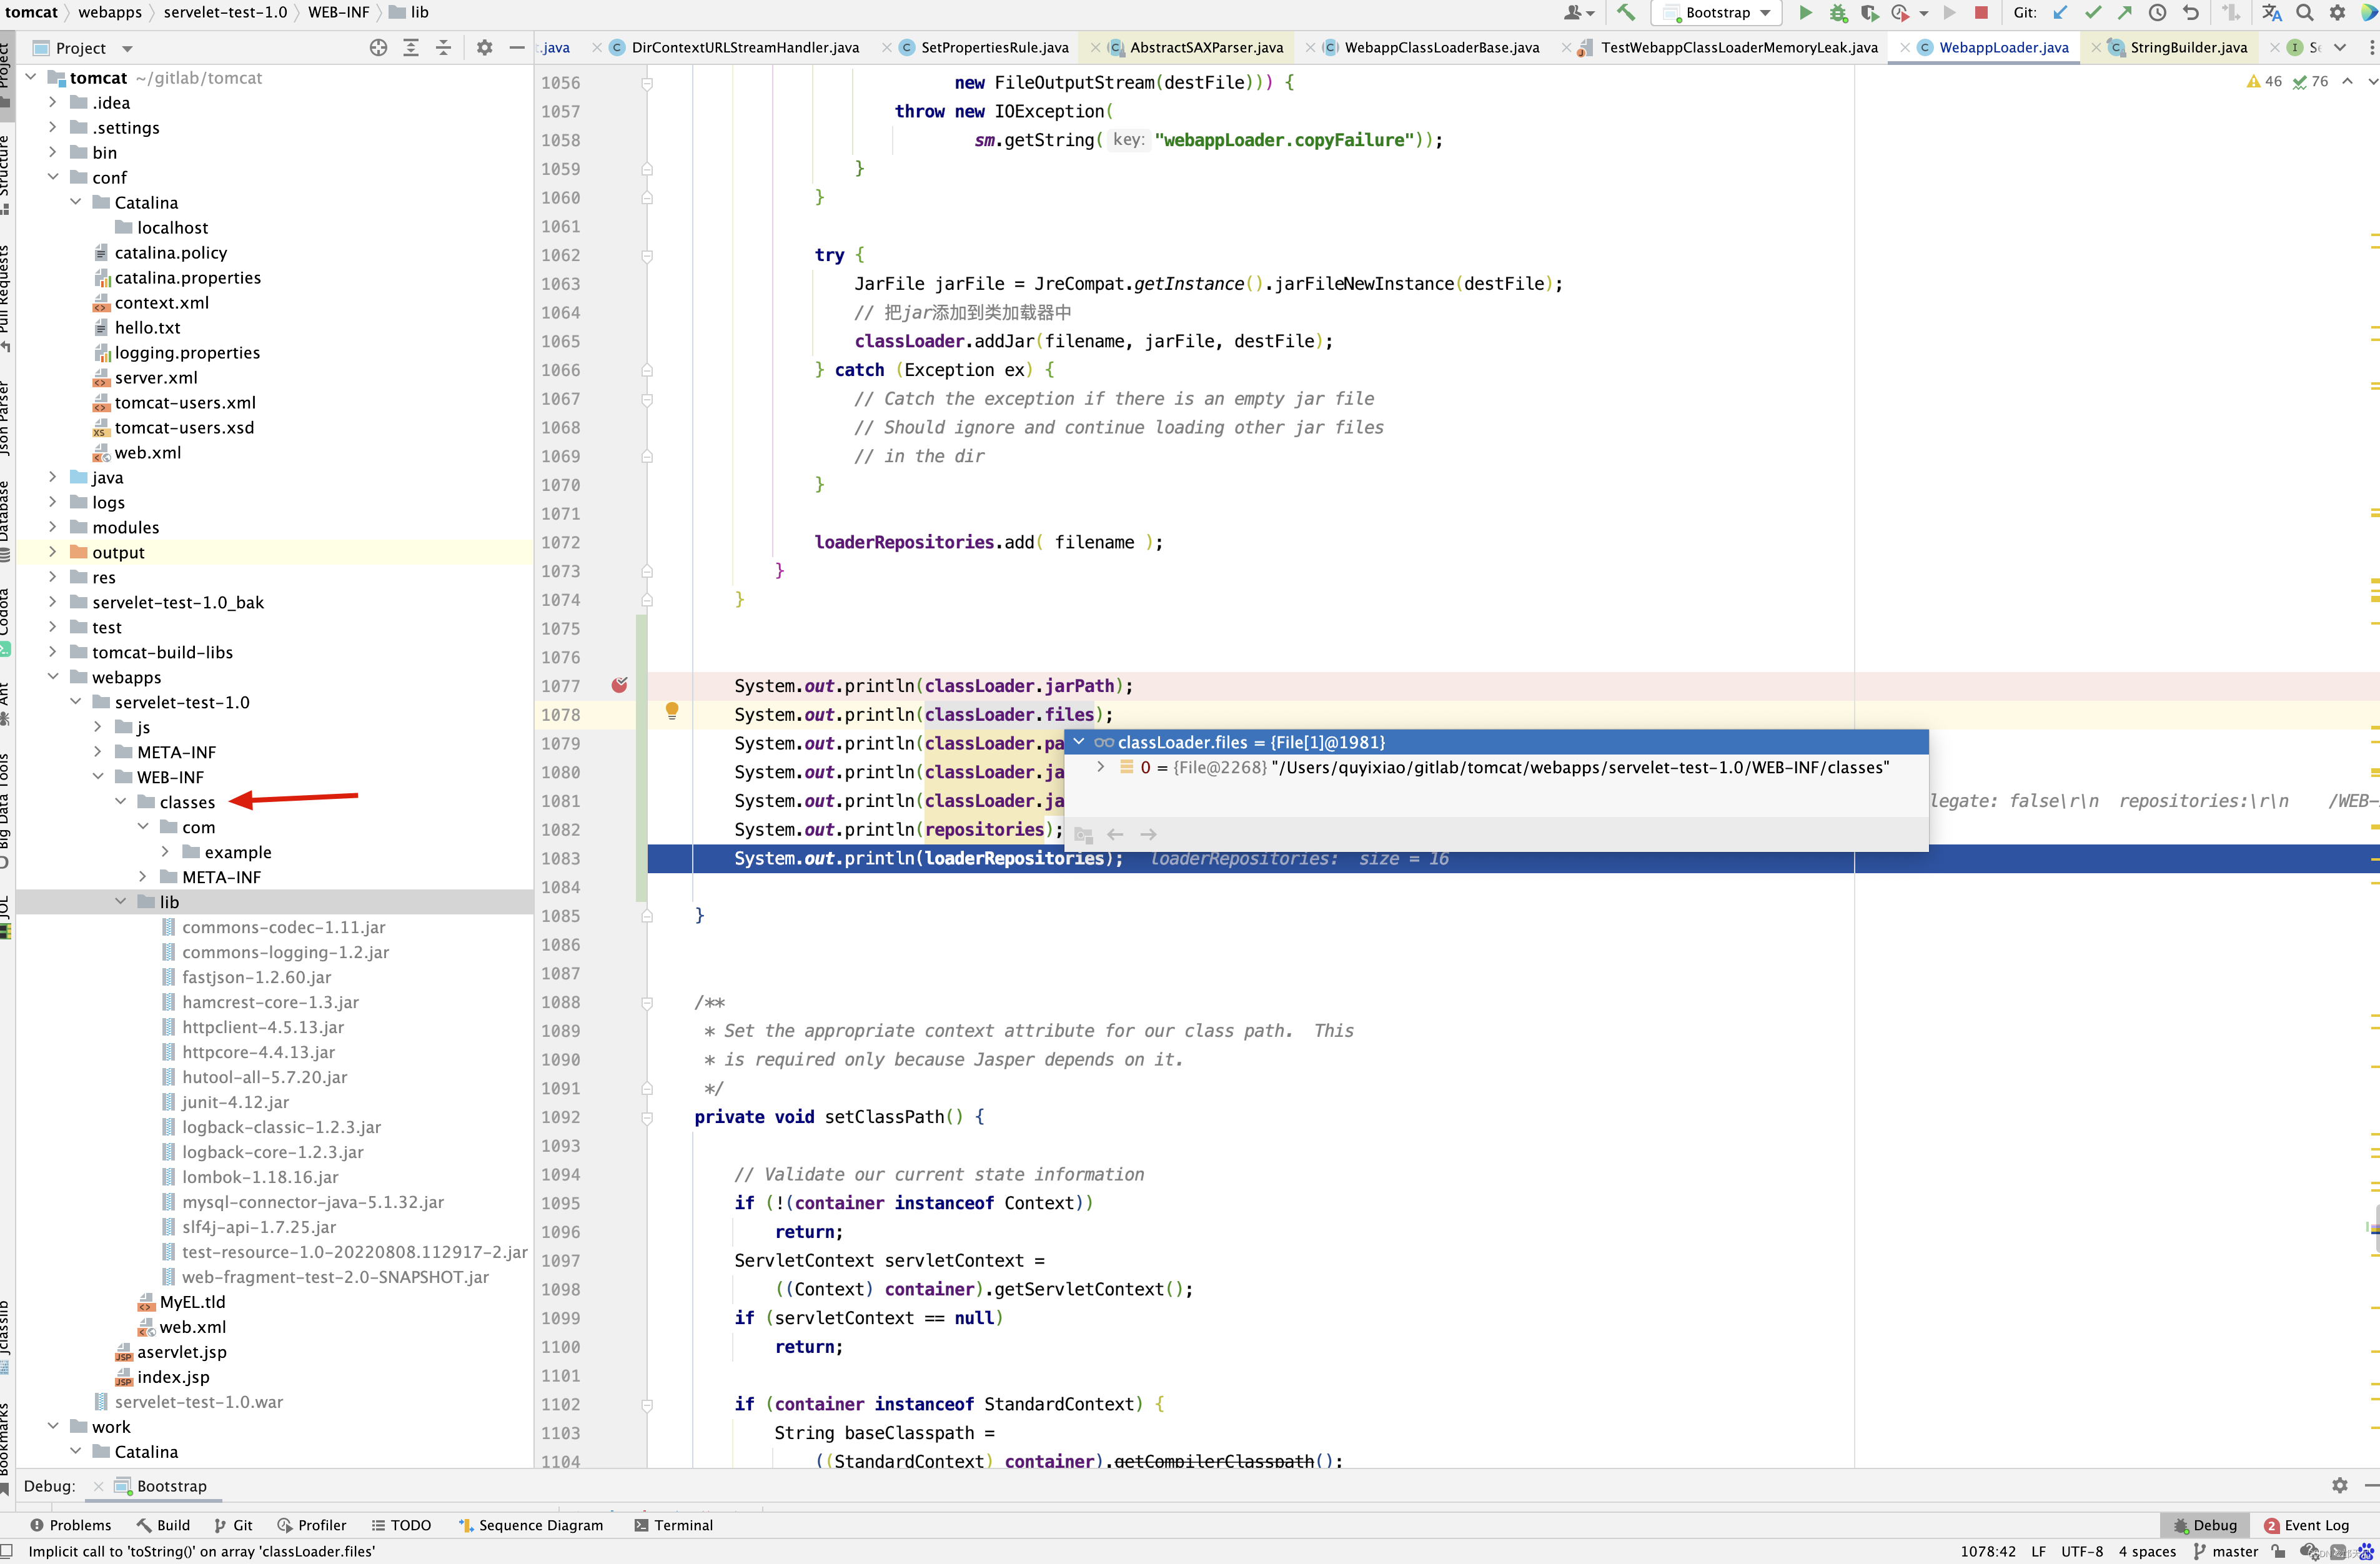
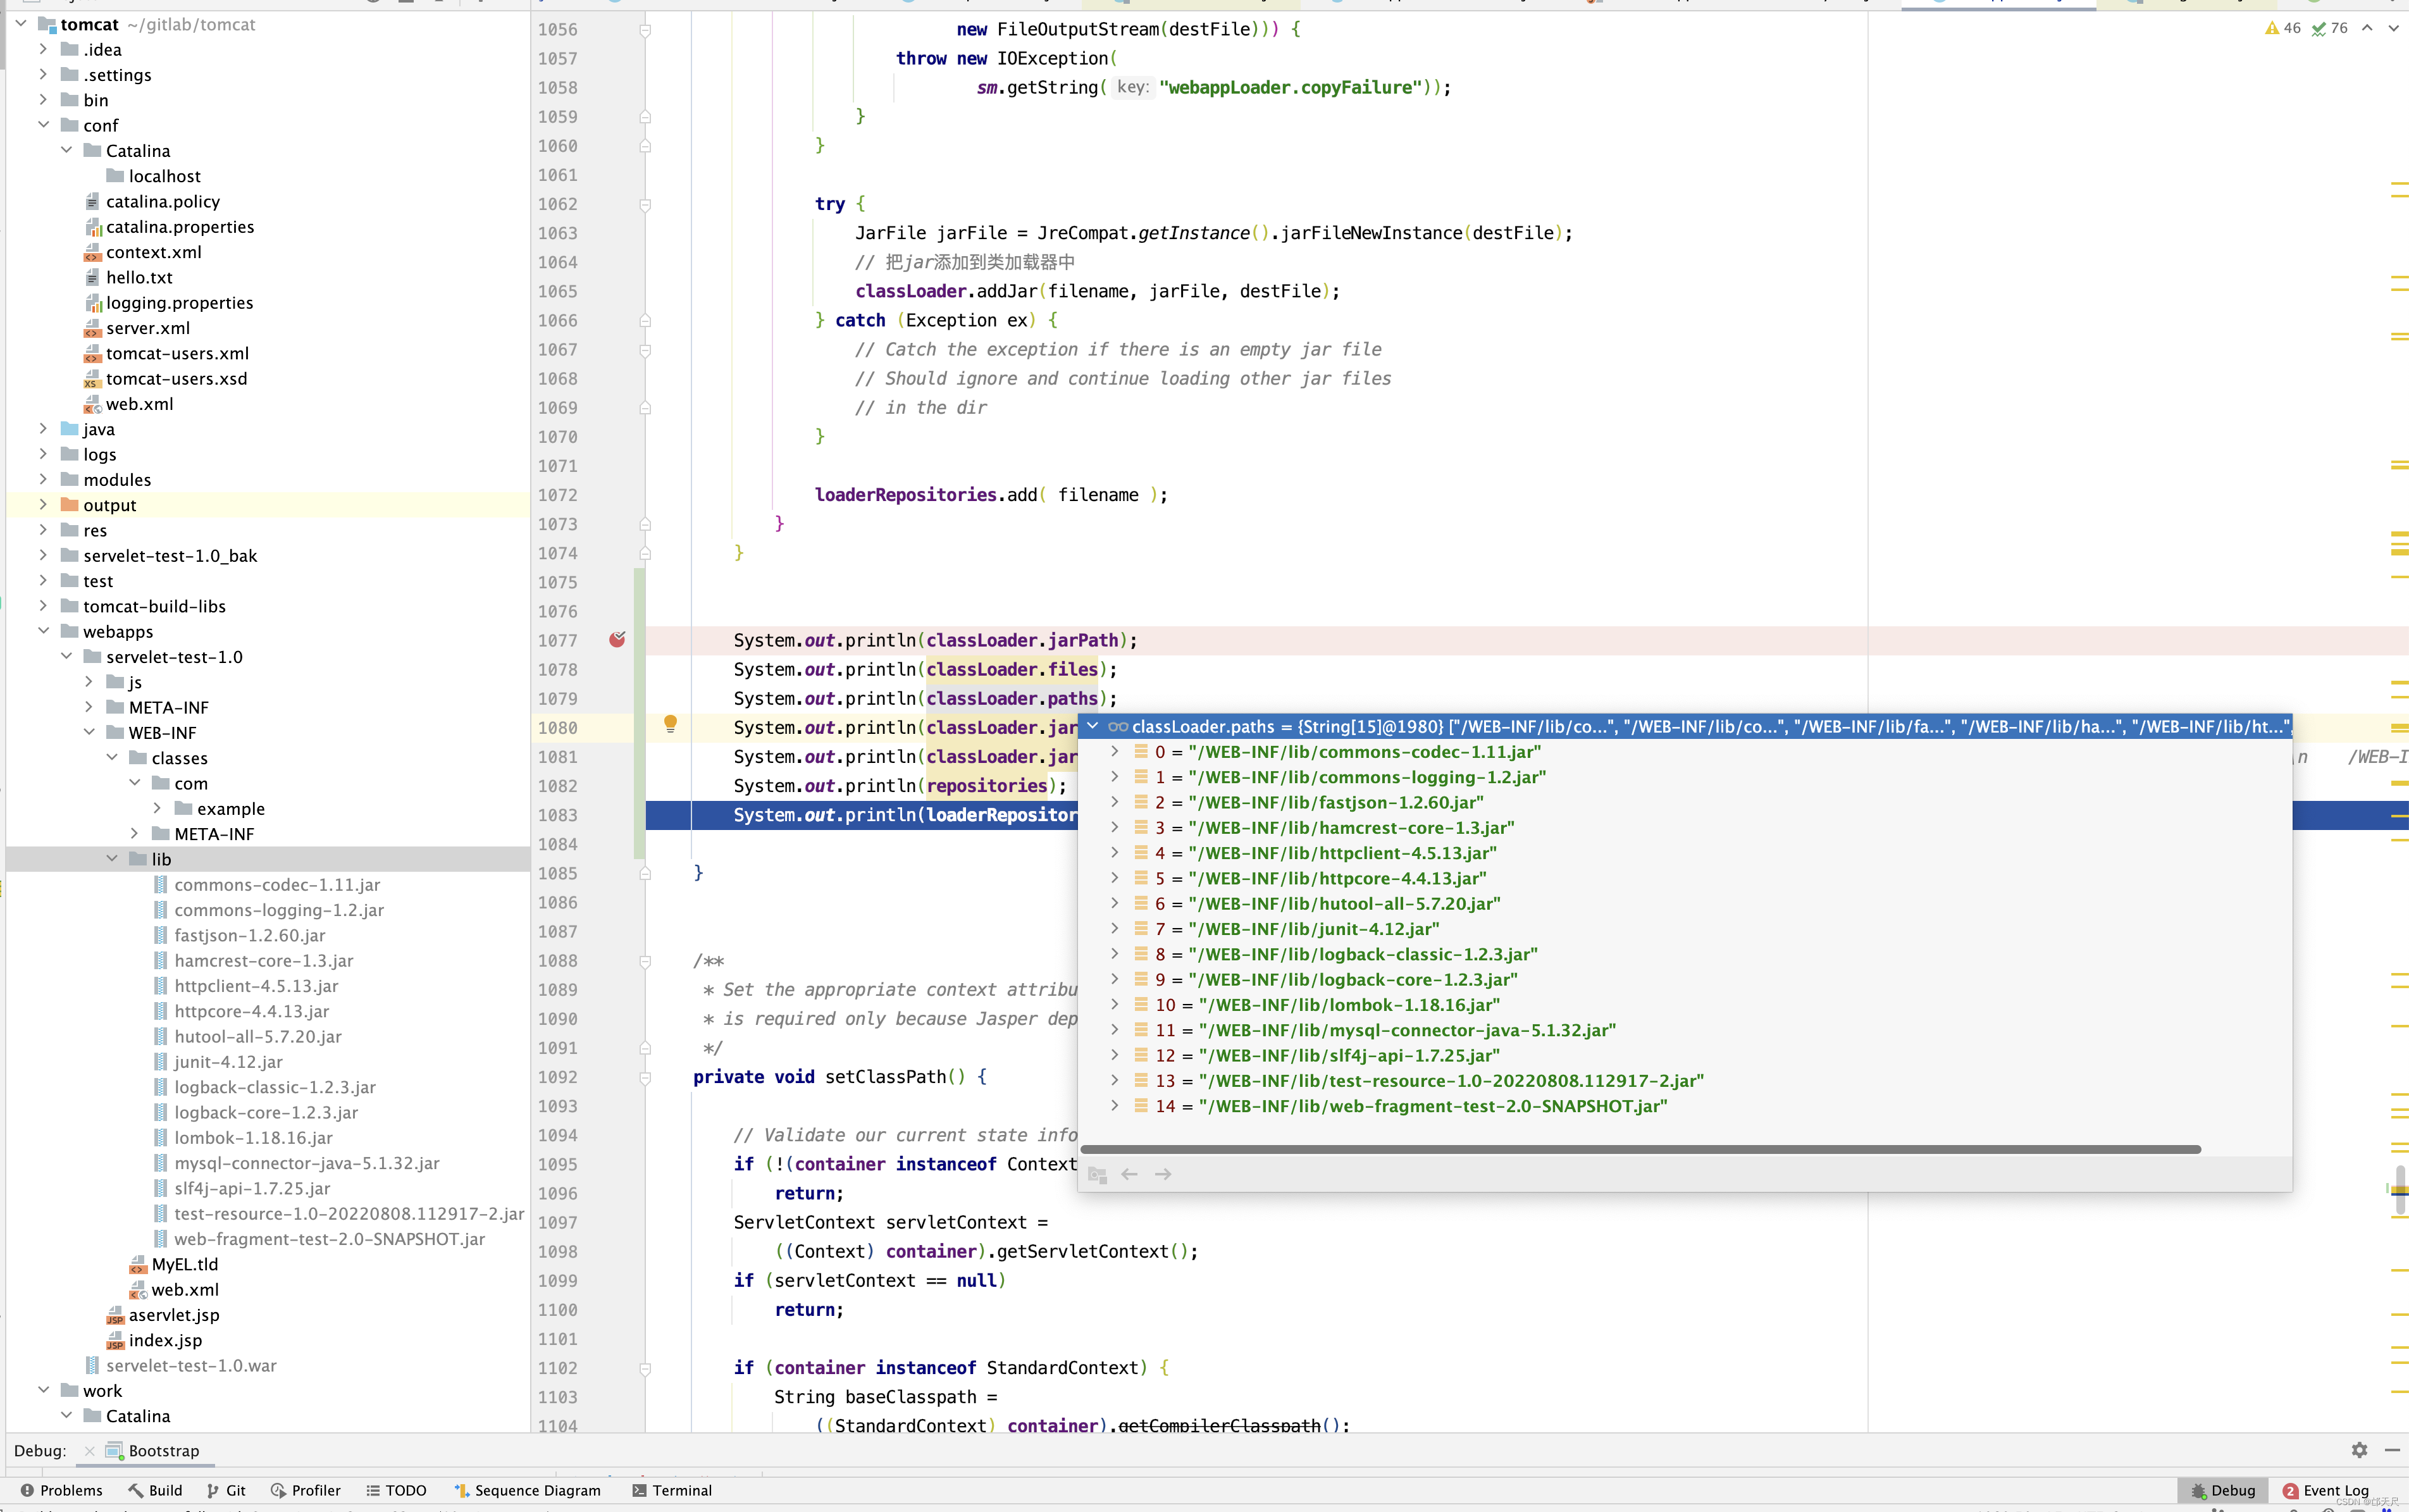
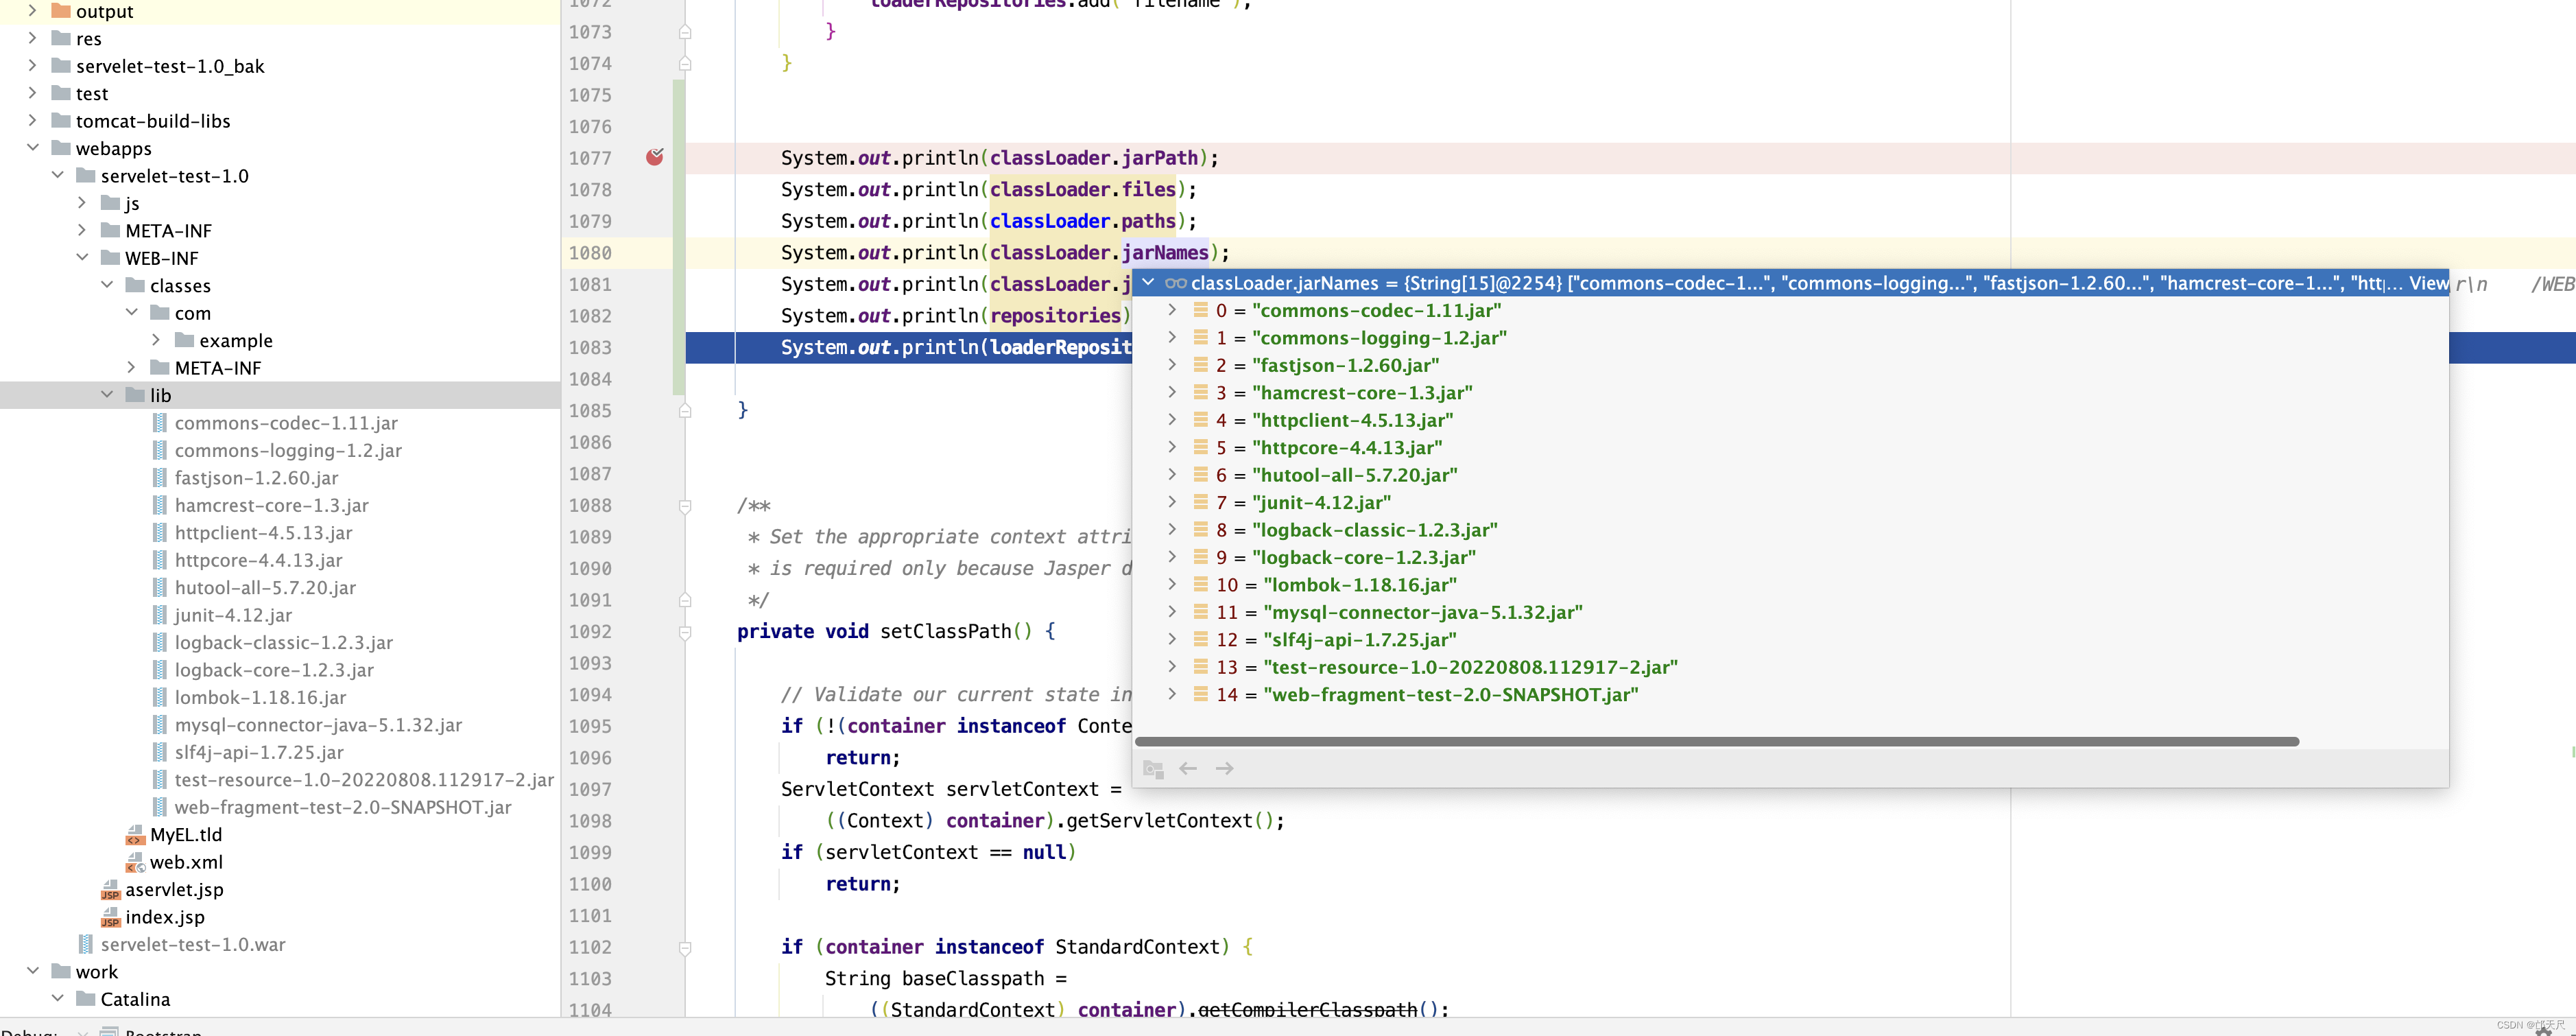
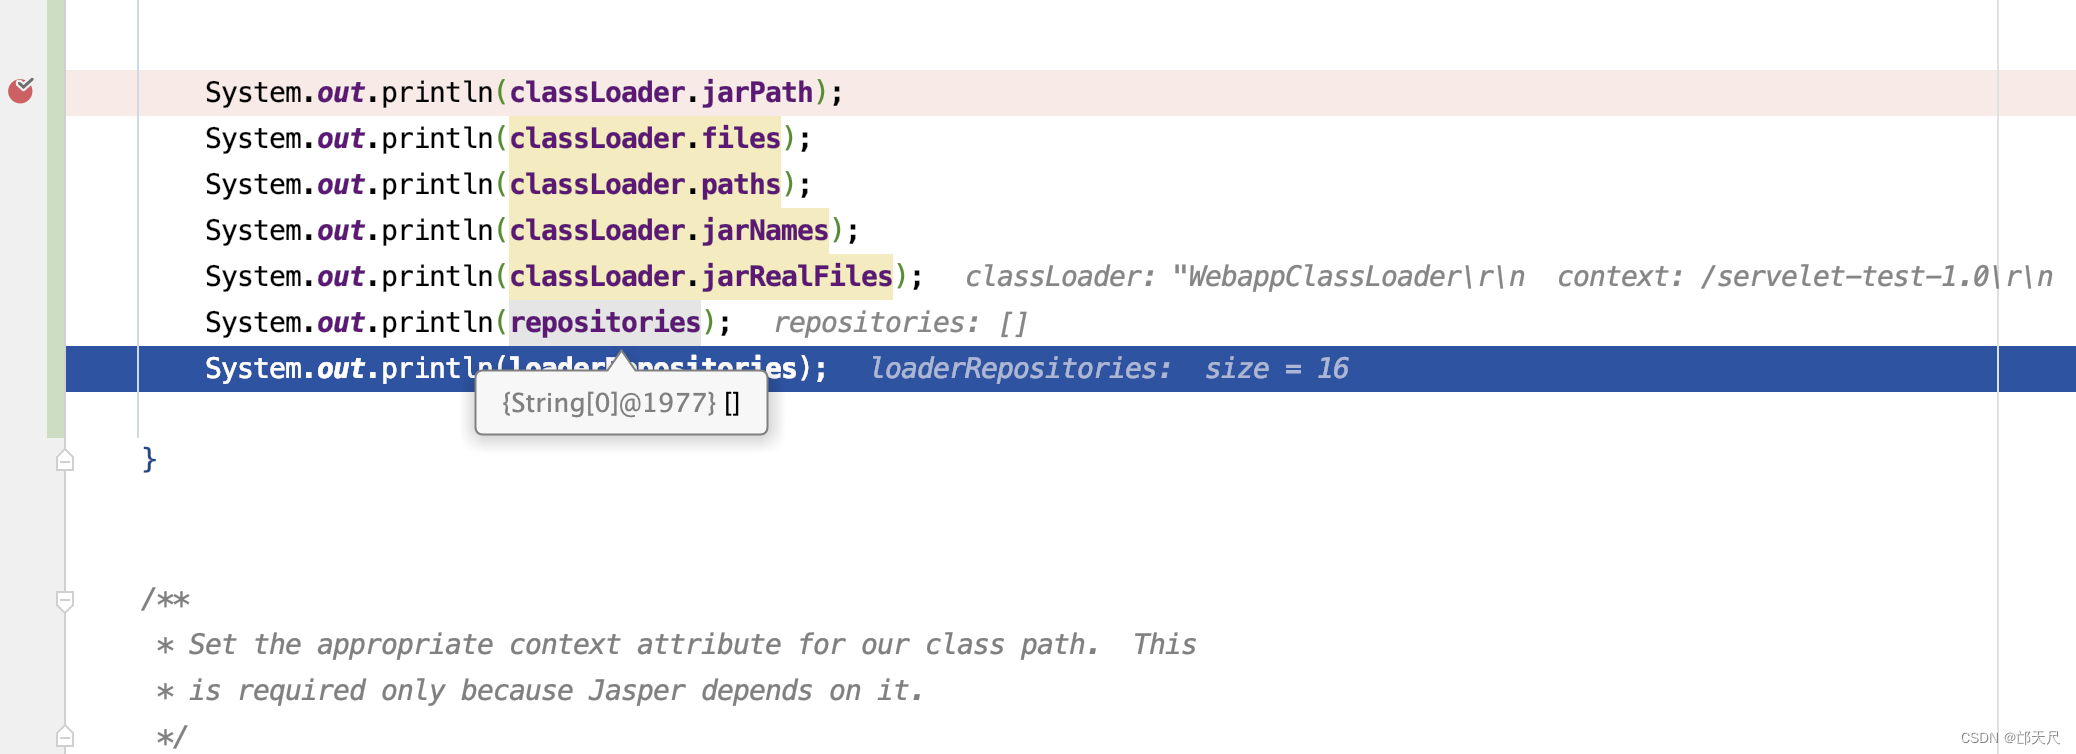
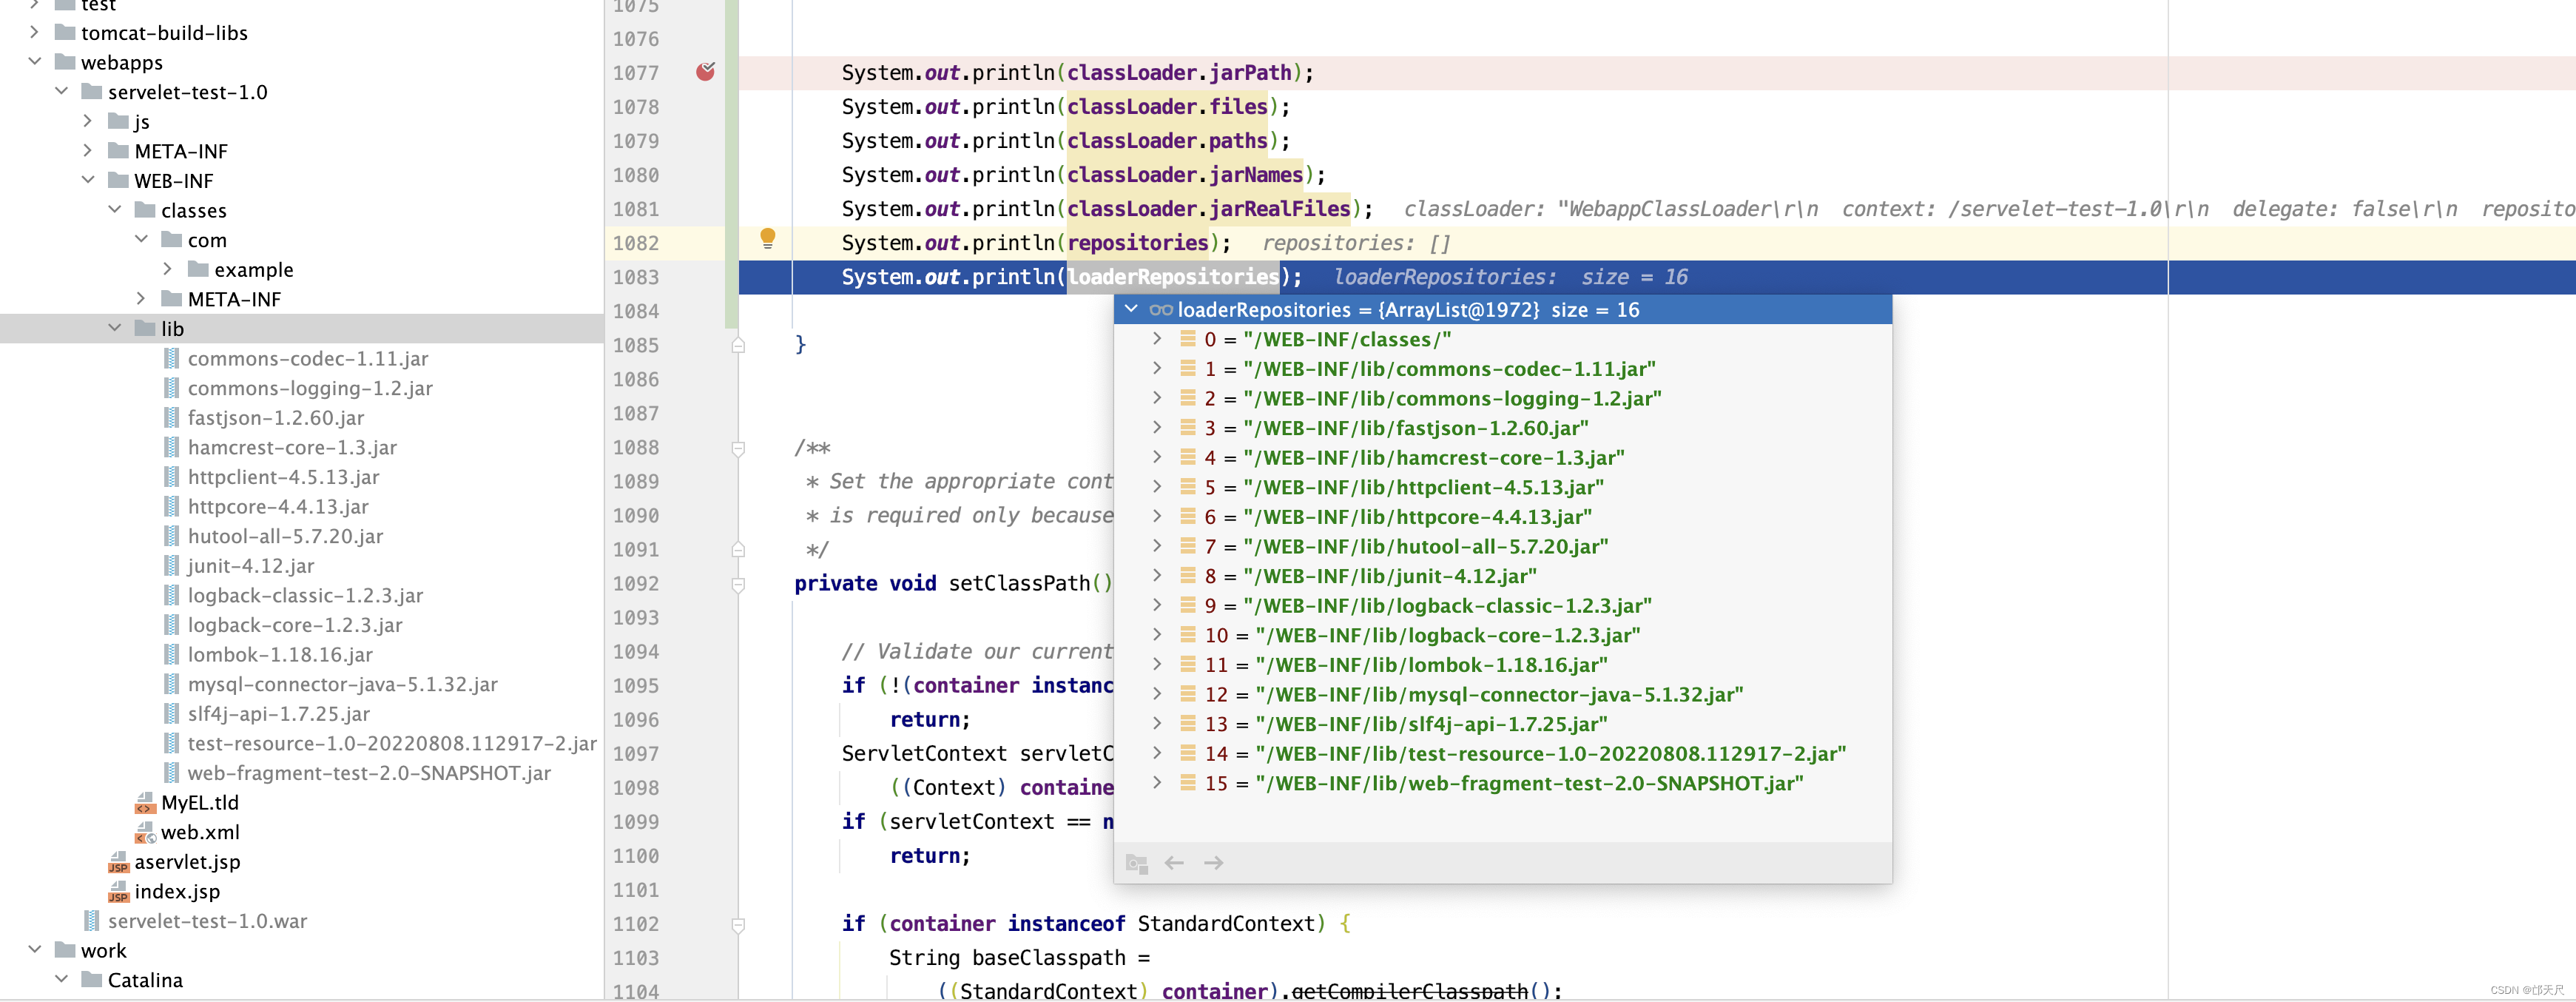
private void setRepositories() throws IOException {
	// 如果非StandardContext,则不设置
    if (!(container instanceof Context))
        return;
    ServletContext servletContext =
        ((Context) container).getServletContext();
    if (servletContext == null)
        return;

    loaderRepositories=new ArrayList<String>();
    // Loading the work directory ,工作目录
    File workDir =
        (File) servletContext.getAttribute("javax.servlet.context.tempdir");
    if (workDir == null) {
        log.info("No work dir for " + servletContext);
    }

    if( log.isDebugEnabled() && workDir != null)
        log.debug(sm.getString("webappLoader.deploy", workDir.getAbsolutePath()));

    // 设置类加载器的工作目录
    //  /Users/quyixiao/gitlab/tomcat/work/Catalina/localhost/servelet-test-1.0
    classLoader.setWorkDir(workDir);

    // 获取Context对应的文件目录DirContext
    DirContext resources = container.getResources();

    // Setting up the class repository (/WEB-INF/classes), if it exists

    String classesPath = "/WEB-INF/classes";
    DirContext classes = null;

    try {
        // 从文件目录DirContext查找"/WEB-INF/classes"文件目录
        Object object = resources.lookup(classesPath);
        if (object instanceof DirContext) {
            classes = (DirContext) object;
        }
    } catch(NamingException e) {
        // Silent catch: it's valid that no /WEB-INF/classes collection
        // exists
    }

    if (classes != null) {

        File classRepository = null;

        String absoluteClassesPath =
            servletContext.getRealPath(classesPath);

        // 如果是一个绝对路径
        if (absoluteClassesPath != null) {

            classRepository = new File(absoluteClassesPath);

        } else {

            classRepository = new File(workDir, classesPath);
            if (!classRepository.mkdirs() &&
                    !classRepository.isDirectory()) {
                throw new IOException(
                        sm.getString("webappLoader.mkdirFailure"));
            }
            if (!copyDir(classes, classRepository)) {
                throw new IOException(
                        sm.getString("webappLoader.copyFailure"));
            }

        }

        if(log.isDebugEnabled())
            log.debug(sm.getString("webappLoader.classDeploy", classesPath,
                         classRepository.getAbsolutePath()));


        // Adding the repository to the class loader
        // 将"/WEB-INF/classes"目录添加到类加载器仓库中
        classLoader.addRepository(classesPath + "/", classRepository);

		 /**
	     * Repositories that are set in the loader, for JMX.
	     * 存了/WEB-INF/classes路径
	     * 存了/WEB-INF/lib目录下的所有jar包的路径
	     */
        loaderRepositories.add(classesPath + "/" );

    }

    // Setting up the JAR repository (/WEB-INF/lib), if it exists

    String libPath = "/WEB-INF/lib";

    // 设置类加载器的jar包路径
    classLoader.setJarPath(libPath);

    DirContext libDir = null;
    // Looking up directory /WEB-INF/lib in the context
    try {
        Object object = resources.lookup(libPath);
        if (object instanceof DirContext)
            libDir = (DirContext) object;
    } catch(NamingException e) {
        // Silent catch: it's valid that no /WEB-INF/lib collection
        // exists
    }

    if (libDir != null) {
        boolean copyJars = false;
        String absoluteLibPath = servletContext.getRealPath(libPath);

        File destDir = null;
		// /Users/quyixiao/gitlab/tomcat/webapps/servelet-test-1.0/WEB-INF/lib
		// 如果是绝对路径
        if (absoluteLibPath != null) {
            destDir = new File(absoluteLibPath);
        } else {
            copyJars = true;
            destDir = new File(workDir, libPath);
            if (!destDir.mkdirs() && !destDir.isDirectory()) {
                throw new IOException(
                        sm.getString("webappLoader.mkdirFailure"));
            }
        }

        // Looking up directory /WEB-INF/lib in the context
        NamingEnumeration<NameClassPair> enumeration = null;
        try {
            enumeration = libDir.list("");
        } catch (NamingException e) {
            IOException ioe = new IOException(sm.getString(
                    "webappLoader.namingFailure", libPath));
            ioe.initCause(e);
            throw ioe;
        }

        // 便利"/WEB-INF/lib"目录下的jar包
        while (enumeration.hasMoreElements()) {
            NameClassPair ncPair = enumeration.nextElement();
            String filename = libPath + "/" + ncPair.getName();
            if (!filename.endsWith(".jar"))
                continue;

            // Copy JAR in the work directory, always (the JAR file
            // would get locked otherwise, which would make it
            // impossible to update it or remove it at runtime)
            // 如 /Users/quyixiao/gitlab/tomcat/webapps/servelet-test-1.0/WEB-INF/lib/commons-codec-1.11.jar
            File destFile = new File(destDir, ncPair.getName());

            if( log.isDebugEnabled())
            log.debug(sm.getString("webappLoader.jarDeploy", filename,
                             destFile.getAbsolutePath()));

            // Bug 45403 - Explicitly call lookup() on the name to check
            // that the resource is readable. We cannot use resources
            // returned by listBindings(), because that lists all of them,
            // but does not perform the necessary checks on each.
            Object obj = null;
            try {
                obj = libDir.lookup(ncPair.getName());
            } catch (NamingException e) {
                IOException ioe = new IOException(sm.getString(
                        "webappLoader.namingFailure", filename));
                ioe.initCause(e);
                throw ioe;
            }

            if (!(obj instanceof Resource))
                continue;

            Resource jarResource = (Resource) obj;

            if (copyJars) {
            	// 将jar包一个个复制到工作目录下,如果复制失败,则抛出异常
                if (!copy(jarResource.streamContent(),
                          new FileOutputStream(destFile))) {
                    throw new IOException(
                            sm.getString("webappLoader.copyFailure"));
                }
            }

            try {
                JarFile jarFile = JreCompat.getInstance().jarFileNewInstance(destFile);
                // 把jar添加到类加载器中
                classLoader.addJar(filename, jarFile, destFile);
            } catch (Exception ex) {
                // Catch the exception if there is an empty jar file
                // Should ignore and continue loading other jar files
                // in the dir
            }

            loaderRepositories.add( filename );
        }
    }
}

/**
 *  添加一个资源到仓库中,类加载器能在这些资源中寻找类并进行加载
 *  repository表示资源的名字,比如一个目录路径、jar包文件路径、zip文件路径
 *  其实这个方法只有一个地方调用了,传入进来的是repository=/WEB-INF/classes/, file为/WEB-INF/classes/的绝对路径file
 */
synchronized void addRepository(String repository, File file) {
    // Note : There should be only one (of course), but I think we should
    // keep this a bit generic

    if (repository == null)
        return;

    if (log.isDebugEnabled())
        log.debug("addRepository(" + repository + ")");

    int i;

    // Add this repository to our internal list
    // 将资源路径添加到repositories数组中
    String[] result = new String[repositories.length + 1];
    for (i = 0; i < repositories.length; i++) {
        result[i] = repositories[i];
    }
    result[repositories.length] = repository;
    repositories = result;

    // Add the file to the list
    // 将资源文件或目录添加到files数组中
    File[] result2 = new File[files.length + 1];
    for (i = 0; i < files.length; i++) {
        result2[i] = files[i];
    }
    result2[files.length] = file;
    files = result2;

}
setRepositories()方法没有什么技术含量,细心一点就可以看明白 ,但需要注意调用setRepositories()方法后classLoader和WebappLoader的属性值如下 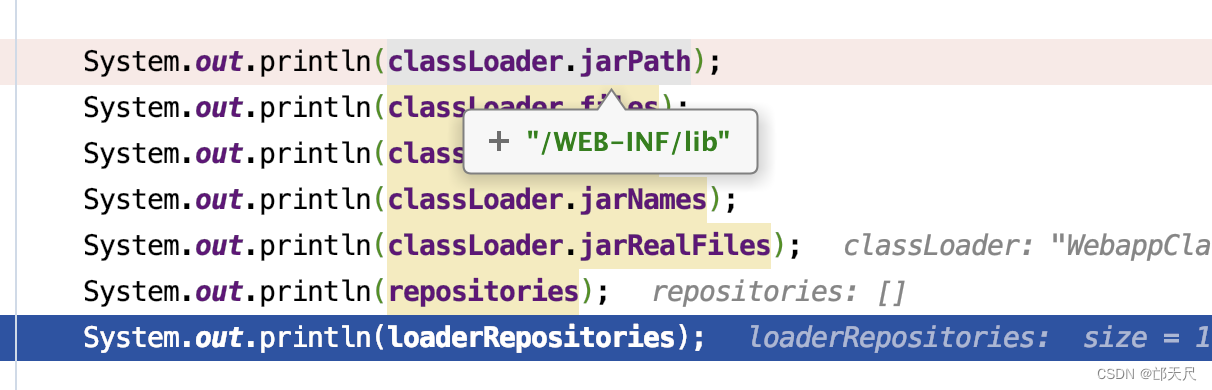

接下来看setClassPath()方法 。
private void setClassPath(){
    // Validate our current state information
    if (!(container instanceof Context))
        return;
    ServletContext servletContext =
        ((Context) container).getServletContext();
    if (servletContext == null)
        return;

    if (container instanceof StandardContext) {
        String baseClasspath =
            ((StandardContext) container).getCompilerClasspath();
        if (baseClasspath != null) {
            servletContext.setAttribute(Globals.CLASS_PATH_ATTR,
                                        baseClasspath);
            return;
        }
    }

    StringBuilder classpath = new StringBuilder();
    // Assemble the class path information from our class loader chain
    ClassLoader loader = getClassLoader();

    // 如果委托给父类,则直接从父类加载器开始组装classpath链,然后把本应用的类加载器中的资源放在最后
    if (delegate && loader != null) {
        // Skip the webapp loader for now as delegation is enabled
        loader = loader.getParent();
    }

	// 如果delegate为false,WebappClassLoader类加载器首先尝试从本地缓存中查找该类,然后用System类加载器尝试加载类,
	// 接着由自己尝试加载类,最后才由父类加载器(Common)尝试加载,所以它的搜索目录顺序是
	// /jre/lib->/jre/lib/ext->CLASSPATH->/WEB-INF/classes->/WEB-INF/lib->
	// $CATALINA_BASE/lib和 $CATALINA_HOME/lib 。
    while (loader != null) {
        if (!buildClassPath(servletContext, classpath, loader)) {
            break;
        }
        loader = loader.getParent();
    }

    if (delegate) {
        // Delegation was enabled, go back and add the webapp paths
        loader = getClassLoader();
        if (loader != null) {
            buildClassPath(servletContext, classpath, loader);
        }
    }
    this.classpath=classpath.toString();
    // Store the assembled class path as a servlet context attribute
    servletContext.setAttribute(Globals.CLASS_PATH_ATTR,
                                classpath.toString());

}

private boolean buildClassPath(ServletContext servletContext,
        StringBuilder classpath, ClassLoader loader) {
    if (loader instanceof URLClassLoader) {
        URL repositories[] = ((URLClassLoader) loader).getURLs();
            for (int i = 0; i < repositories.length; i++) {
                String repository = repositories[i].toString();
                if (repository.startsWith("file://"))
                    repository = UDecoder.URLDecode(repository.substring(7));
                else if (repository.startsWith("file:"))
                    repository = UDecoder.URLDecode(repository.substring(5));
                else if (repository.startsWith("jndi:"))
                    repository =
                        servletContext.getRealPath(repository.substring(5));
                else
                    continue;
                if (repository == null)
                    continue;
                if (classpath.length() > 0)
                    classpath.append(File.pathSeparator);
                classpath.append(repository);
            }
    } else if (loader == ClassLoader.getSystemClassLoader()){
        // Java 9 onwards. The internal class loaders no longer extend
        // URLCLassLoader
        String cp = System.getProperty("java.class.path");
        if (cp != null && cp.length() > 0) {
            if (classpath.length() > 0) {
                classpath.append(File.pathSeparator);
            }
            classpath.append(cp);
        }
        return false;
    } else {
        log.info( "Unknown loader " + loader + " " + loader.getClass());
        return false;
    }
    return true;
}
重点关注this.classpath=classpath.toString();代码的内容,delegate=false的classpath在左测,delegate=true的classpath在右侧。
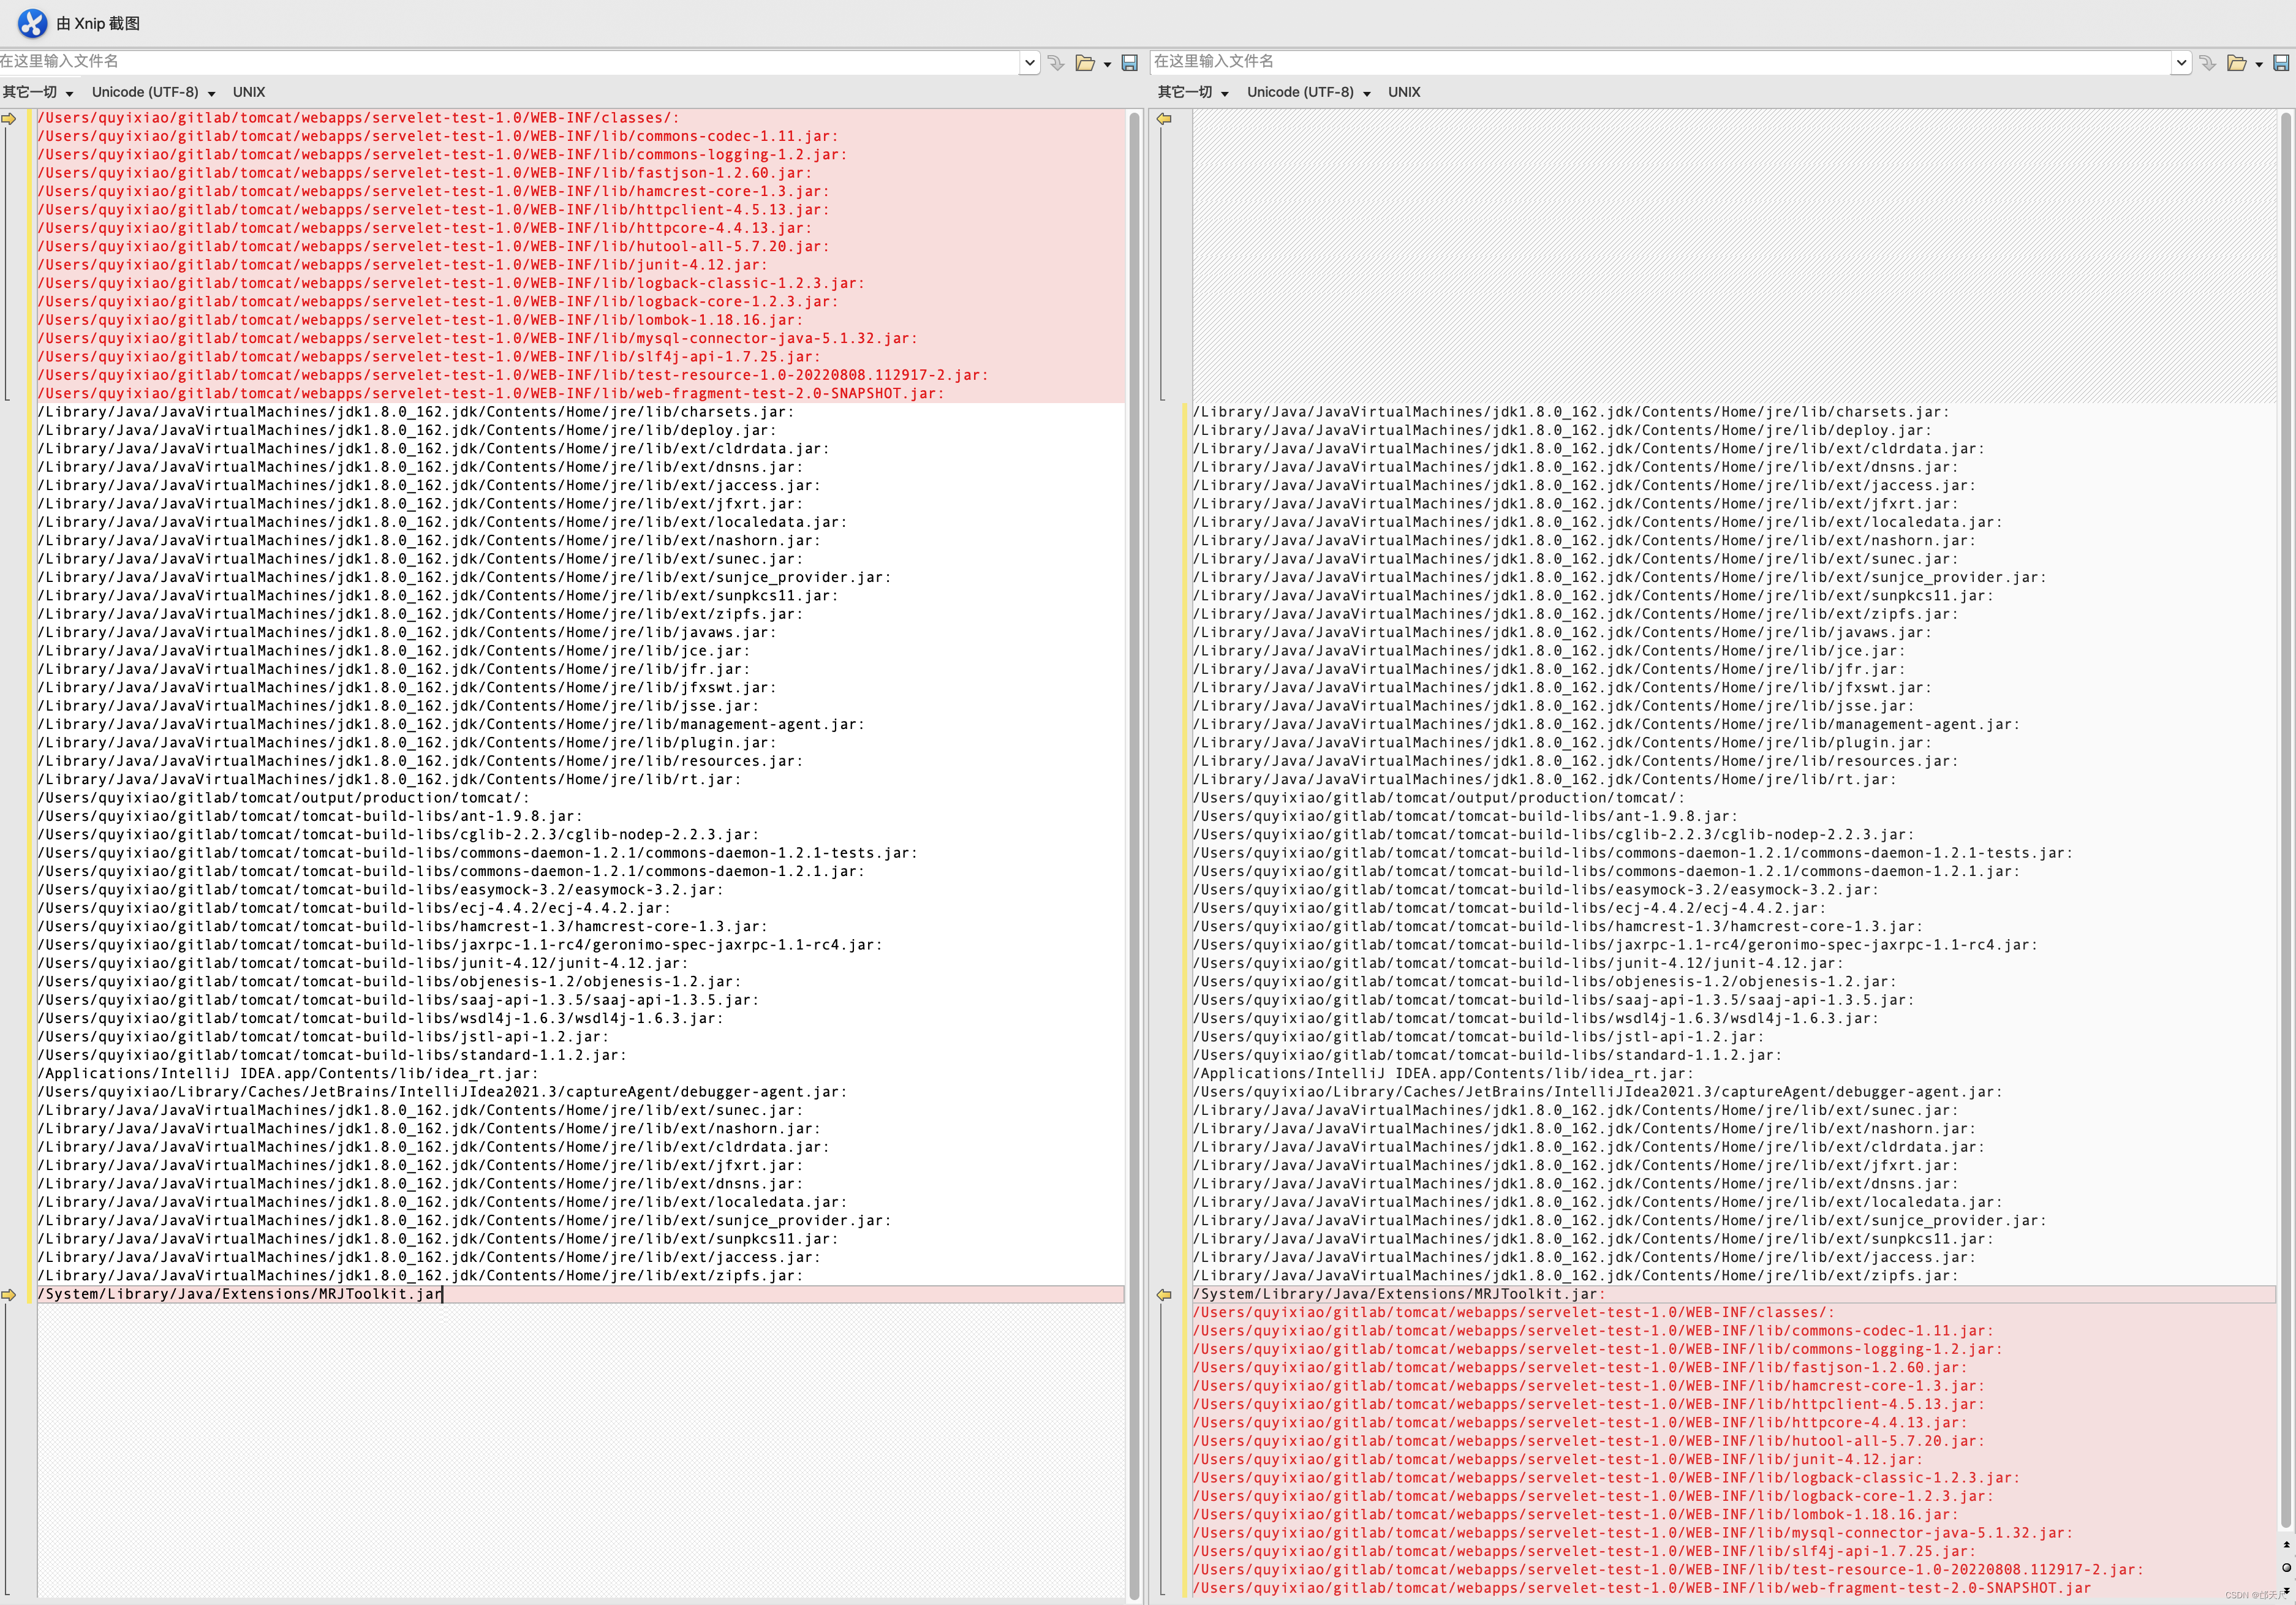
大家现在终于理解delegate="true|false"的实际影响了吧,这部分内容 :
/Users/quyixiao/gitlab/tomcat/webapps/servelet-test-1.0/WEB-INF/classes/:
/Users/quyixiao/gitlab/tomcat/webapps/servelet-test-1.0/WEB-INF/lib/commons-codec-1.11.jar:
/Users/quyixiao/gitlab/tomcat/webapps/servelet-test-1.0/WEB-INF/lib/commons-logging-1.2.jar:
/Users/quyixiao/gitlab/tomcat/webapps/servelet-test-1.0/WEB-INF/lib/fastjson-1.2.60.jar:
/Users/quyixiao/gitlab/tomcat/webapps/servelet-test-1.0/WEB-INF/lib/hamcrest-core-1.3.jar:
/Users/quyixiao/gitlab/tomcat/webapps/servelet-test-1.0/WEB-INF/lib/httpclient-4.5.13.jar:
/Users/quyixiao/gitlab/tomcat/webapps/servelet-test-1.0/WEB-INF/lib/httpcore-4.4.13.jar:
/Users/quyixiao/gitlab/tomcat/webapps/servelet-test-1.0/WEB-INF/lib/hutool-all-5.7.20.jar:
/Users/quyixiao/gitlab/tomcat/webapps/servelet-test-1.0/WEB-INF/lib/junit-4.12.jar:
/Users/quyixiao/gitlab/tomcat/webapps/servelet-test-1.0/WEB-INF/lib/logback-classic-1.2.3.jar:
/Users/quyixiao/gitlab/tomcat/webapps/servelet-test-1.0/WEB-INF/lib/logback-core-1.2.3.jar:
/Users/quyixiao/gitlab/tomcat/webapps/servelet-test-1.0/WEB-INF/lib/lombok-1.18.16.jar:
/Users/quyixiao/gitlab/tomcat/webapps/servelet-test-1.0/WEB-INF/lib/mysql-connector-java-5.1.32.jar:
/Users/quyixiao/gitlab/tomcat/webapps/servelet-test-1.0/WEB-INF/lib/slf4j-api-1.7.25.jar:
/Users/quyixiao/gitlab/tomcat/webapps/servelet-test-1.0/WEB-INF/lib/test-resource-1.0-20220808.112917-2.jar:
/Users/quyixiao/gitlab/tomcat/webapps/servelet-test-1.0/WEB-INF/lib/web-fragment-test-2.0-SNAPSHOT.jar:
一个在classpath的开头,一个在classpath的结尾 。
最终来看将StandardContext注册到jmx的代码 。
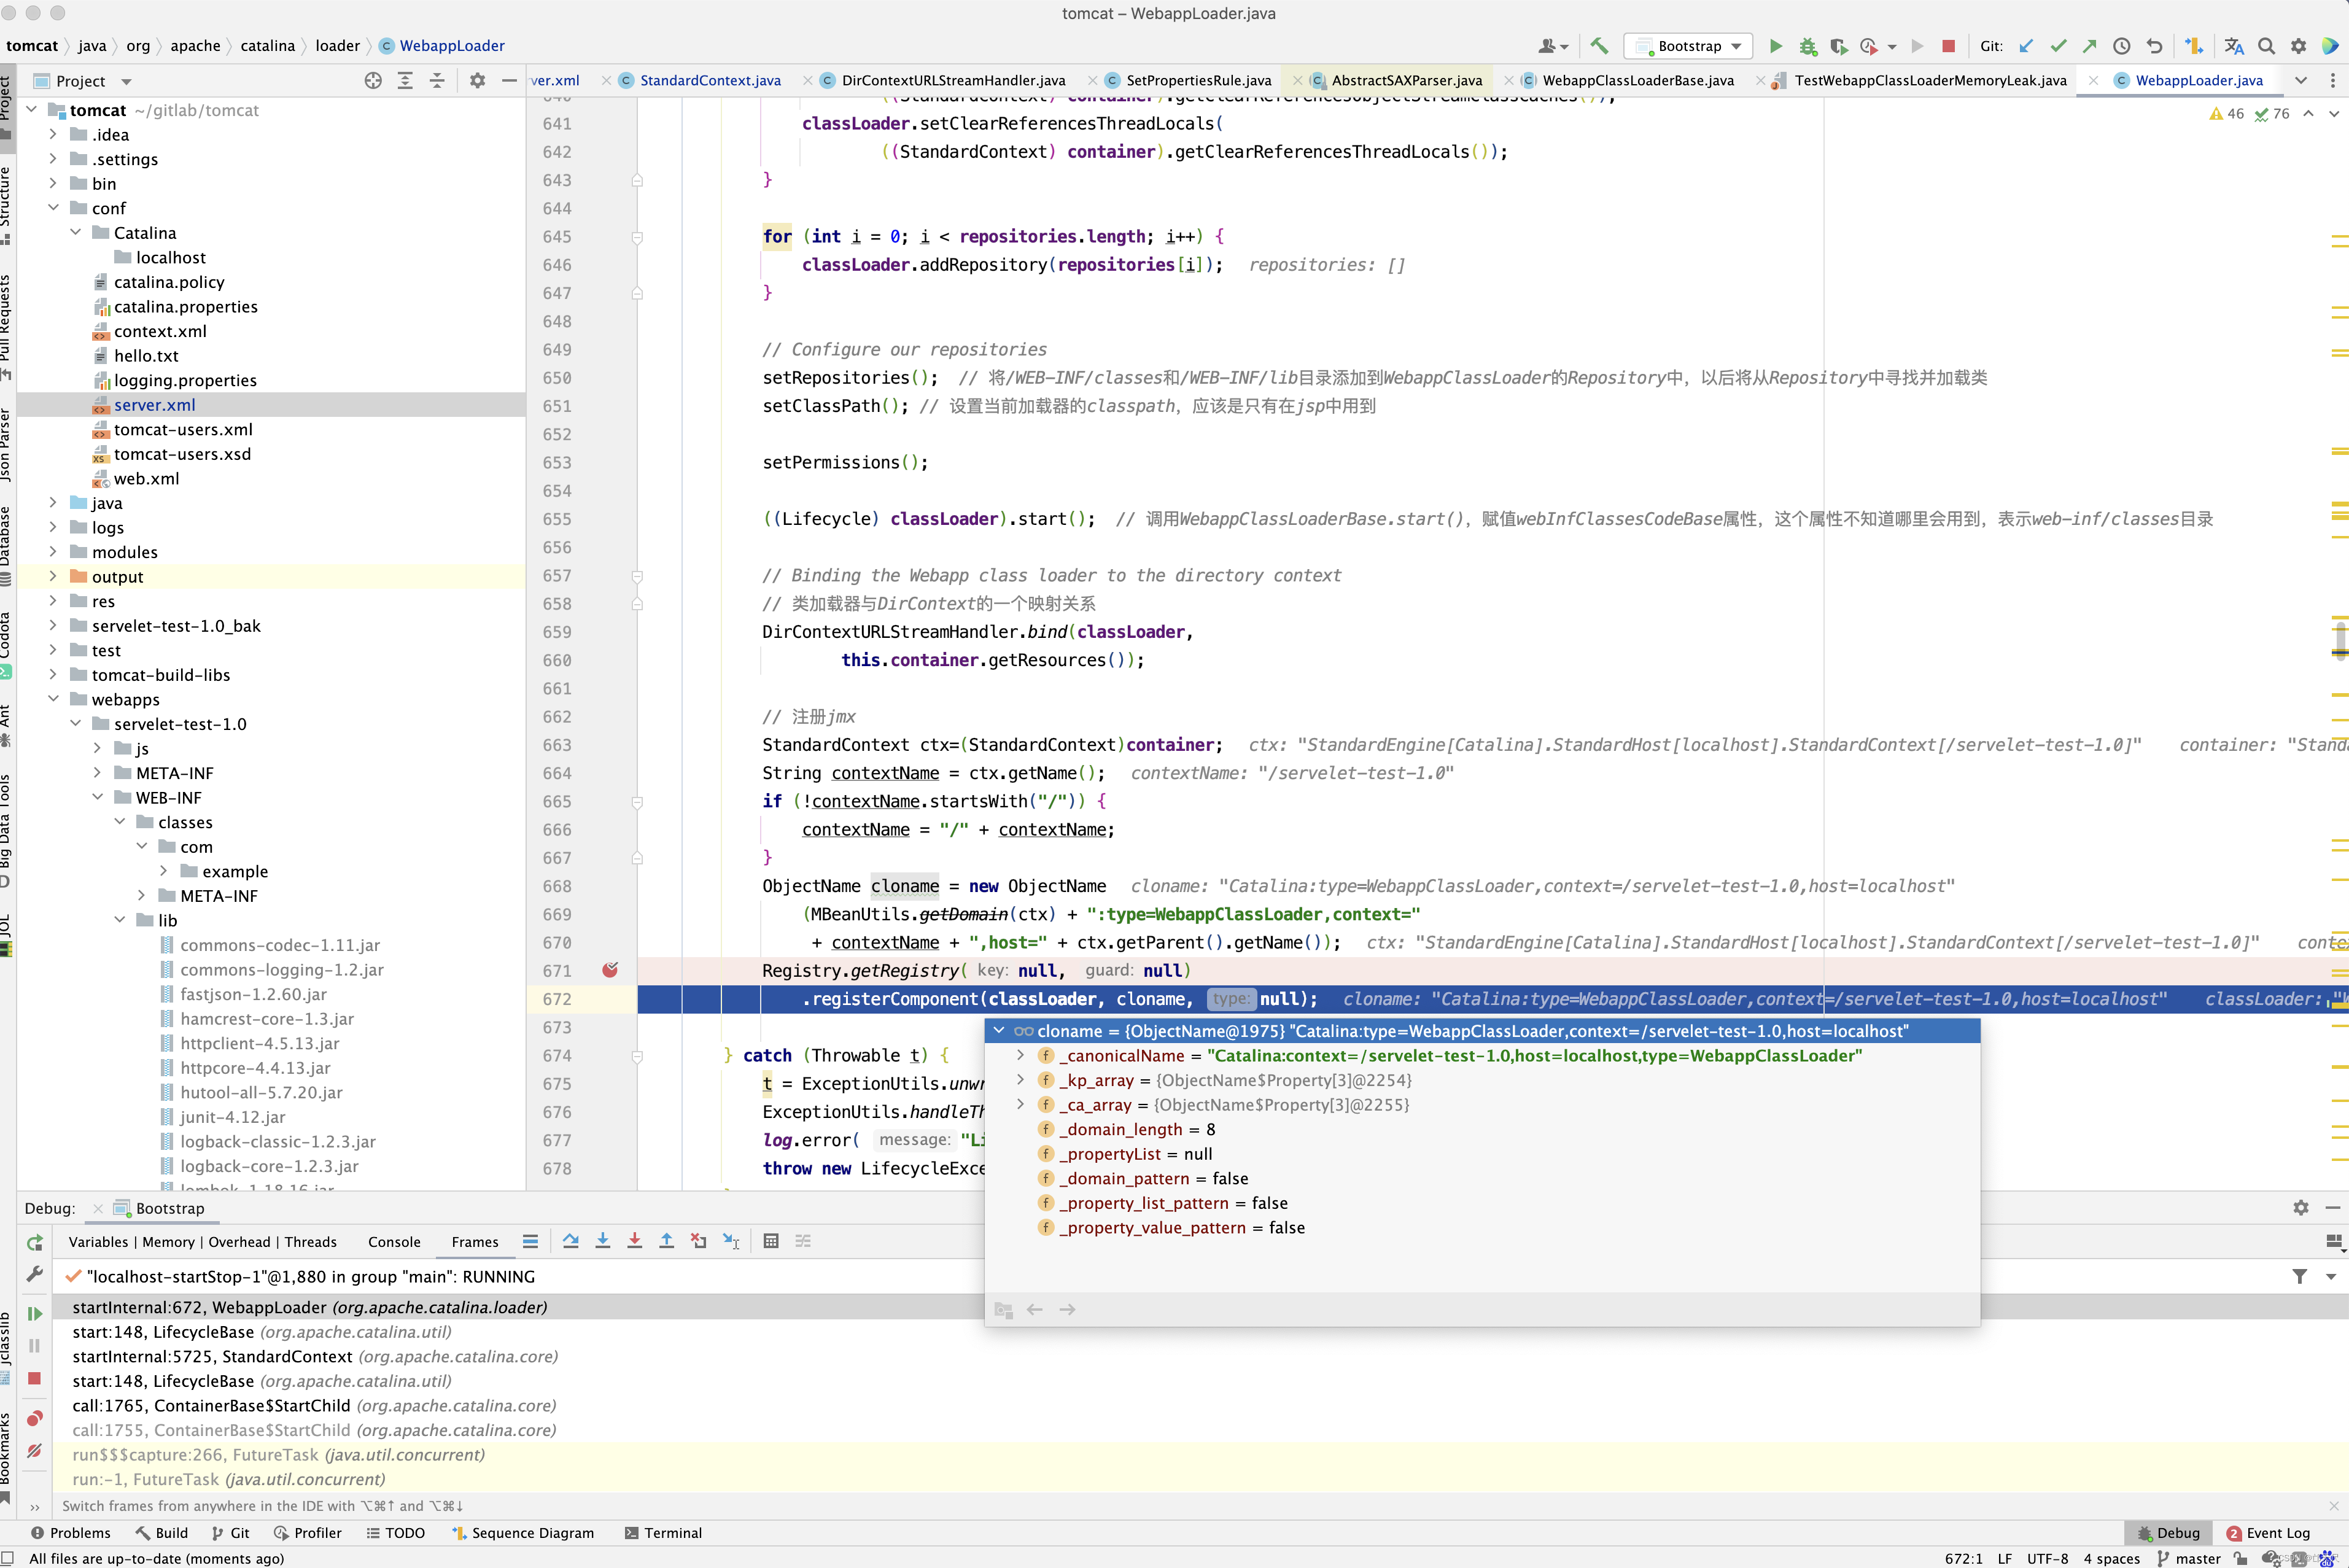
为什么要将StandardContext注册到jmx中呢?实际上是方便管理,在控制台输入jconsole,先看看StandardHost 的相关属性和操作
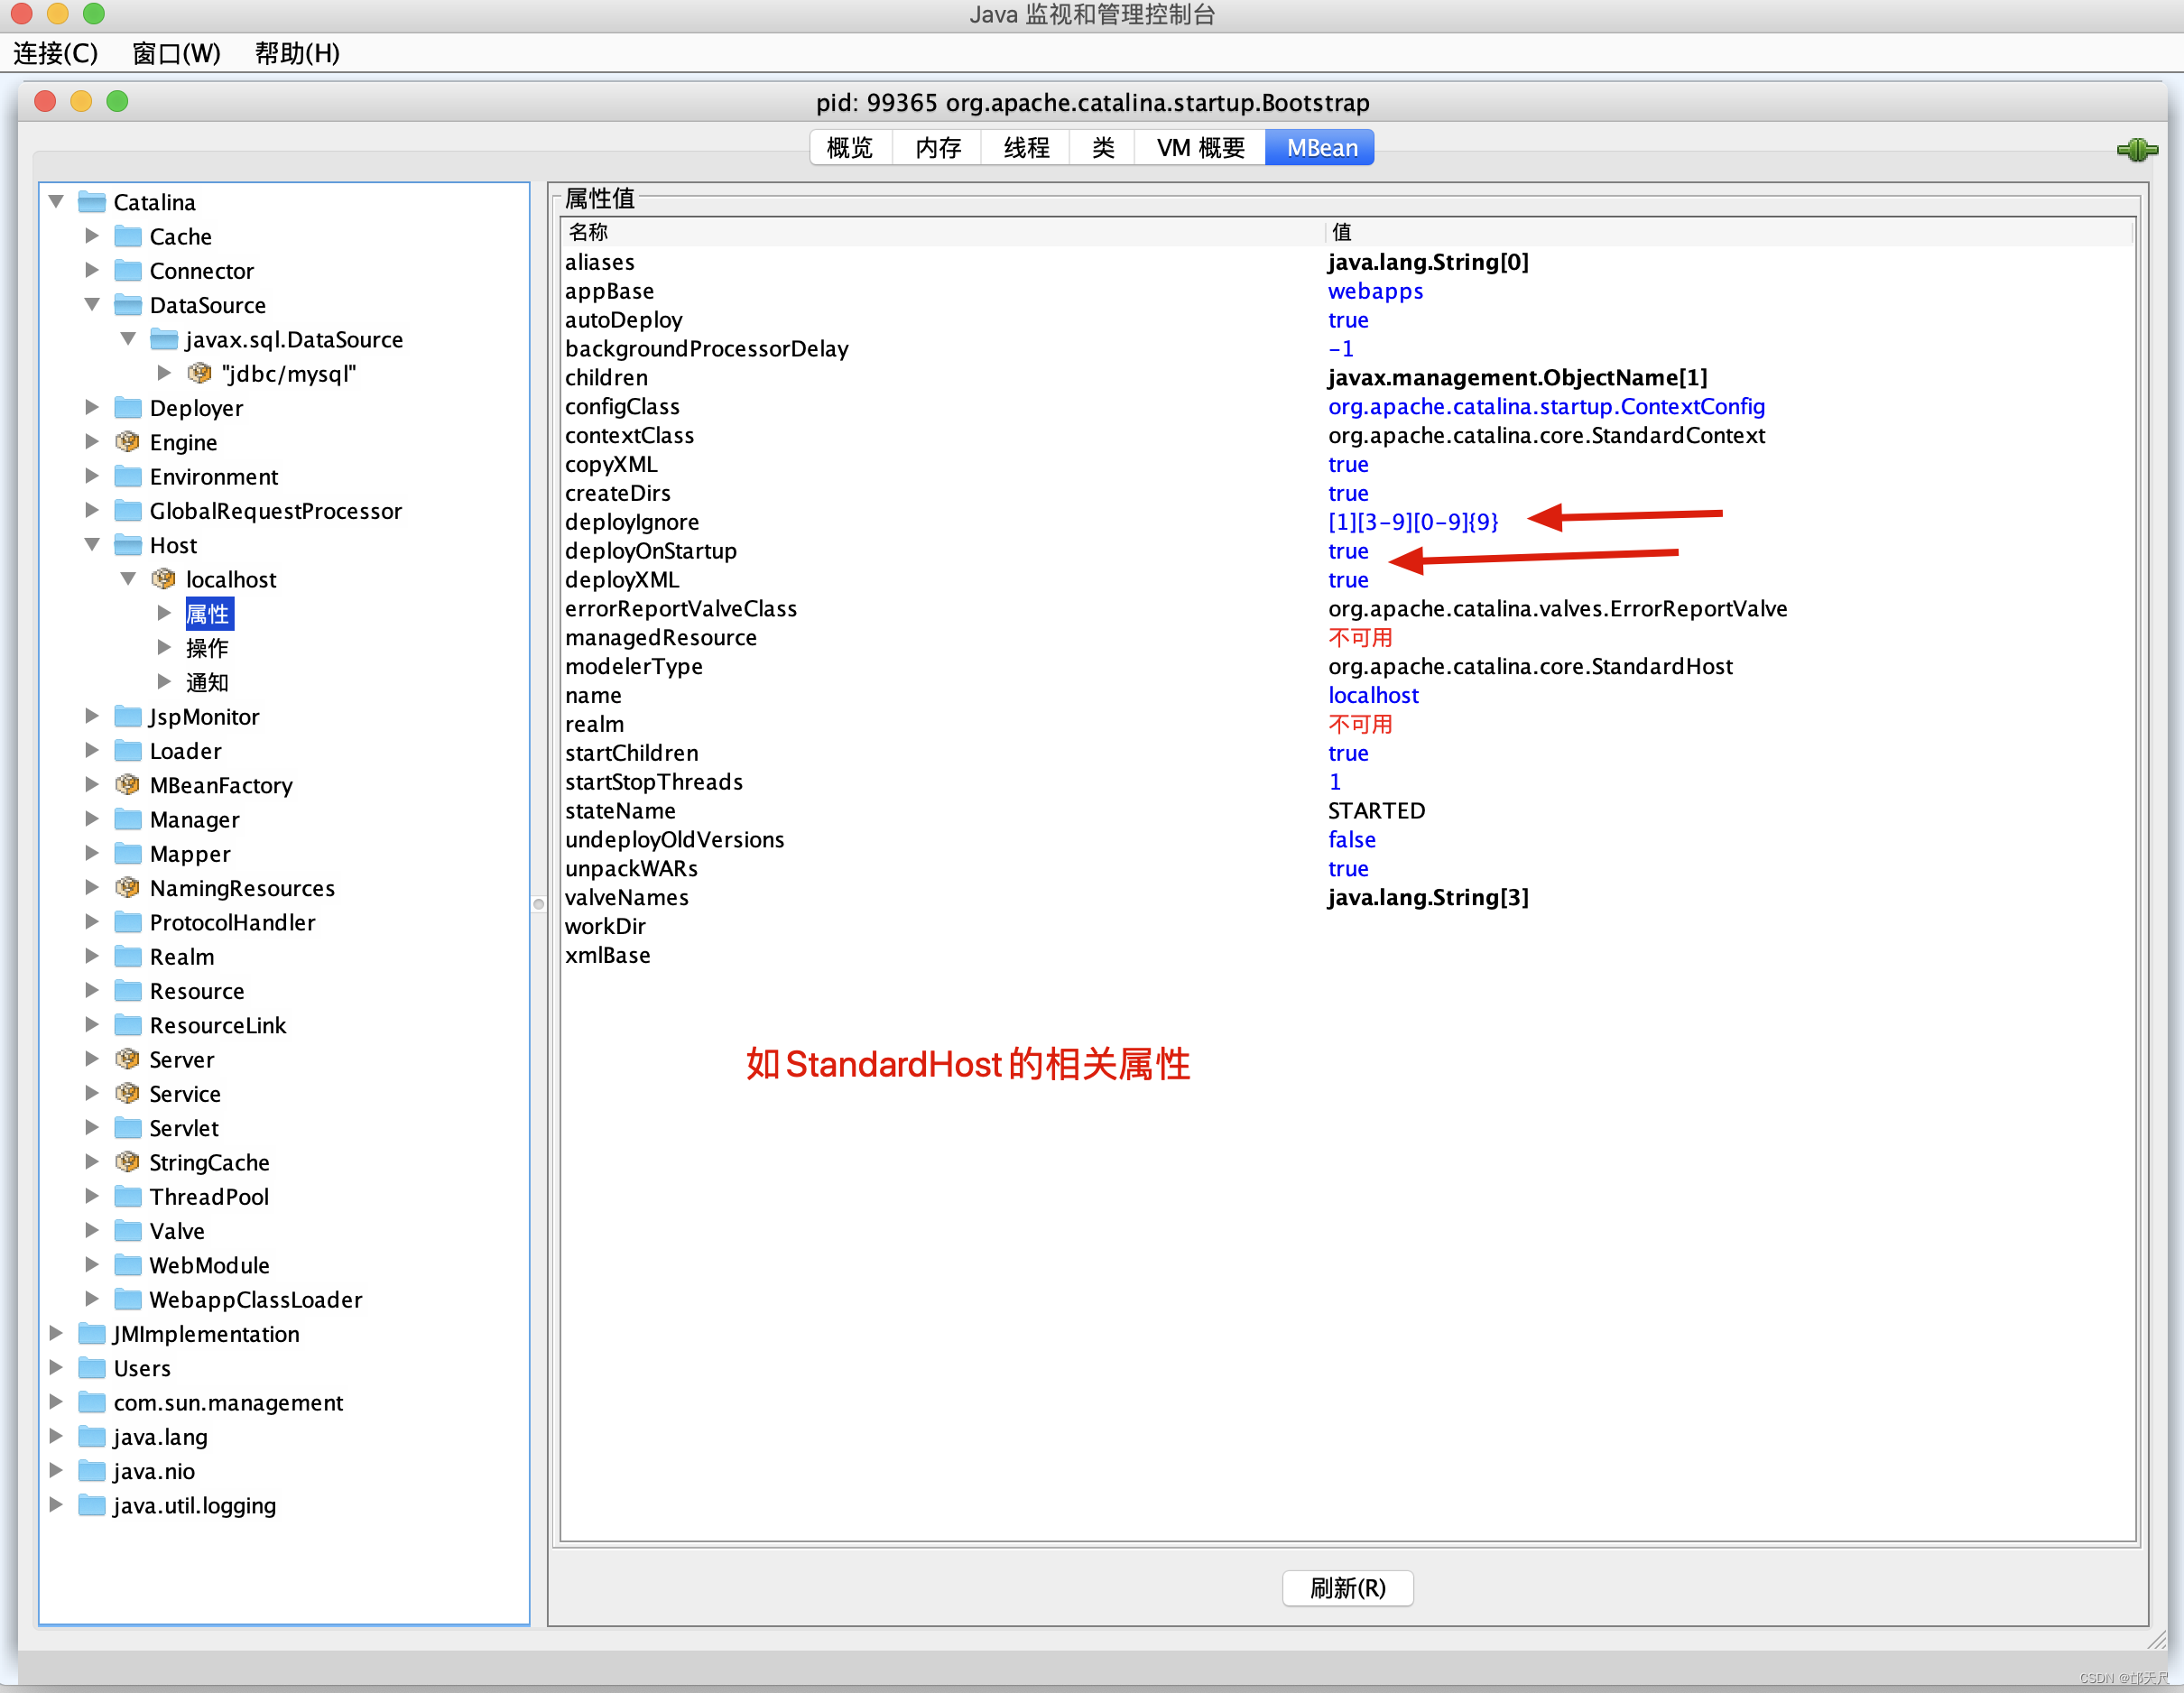
再看看StandardContext的相关属性。

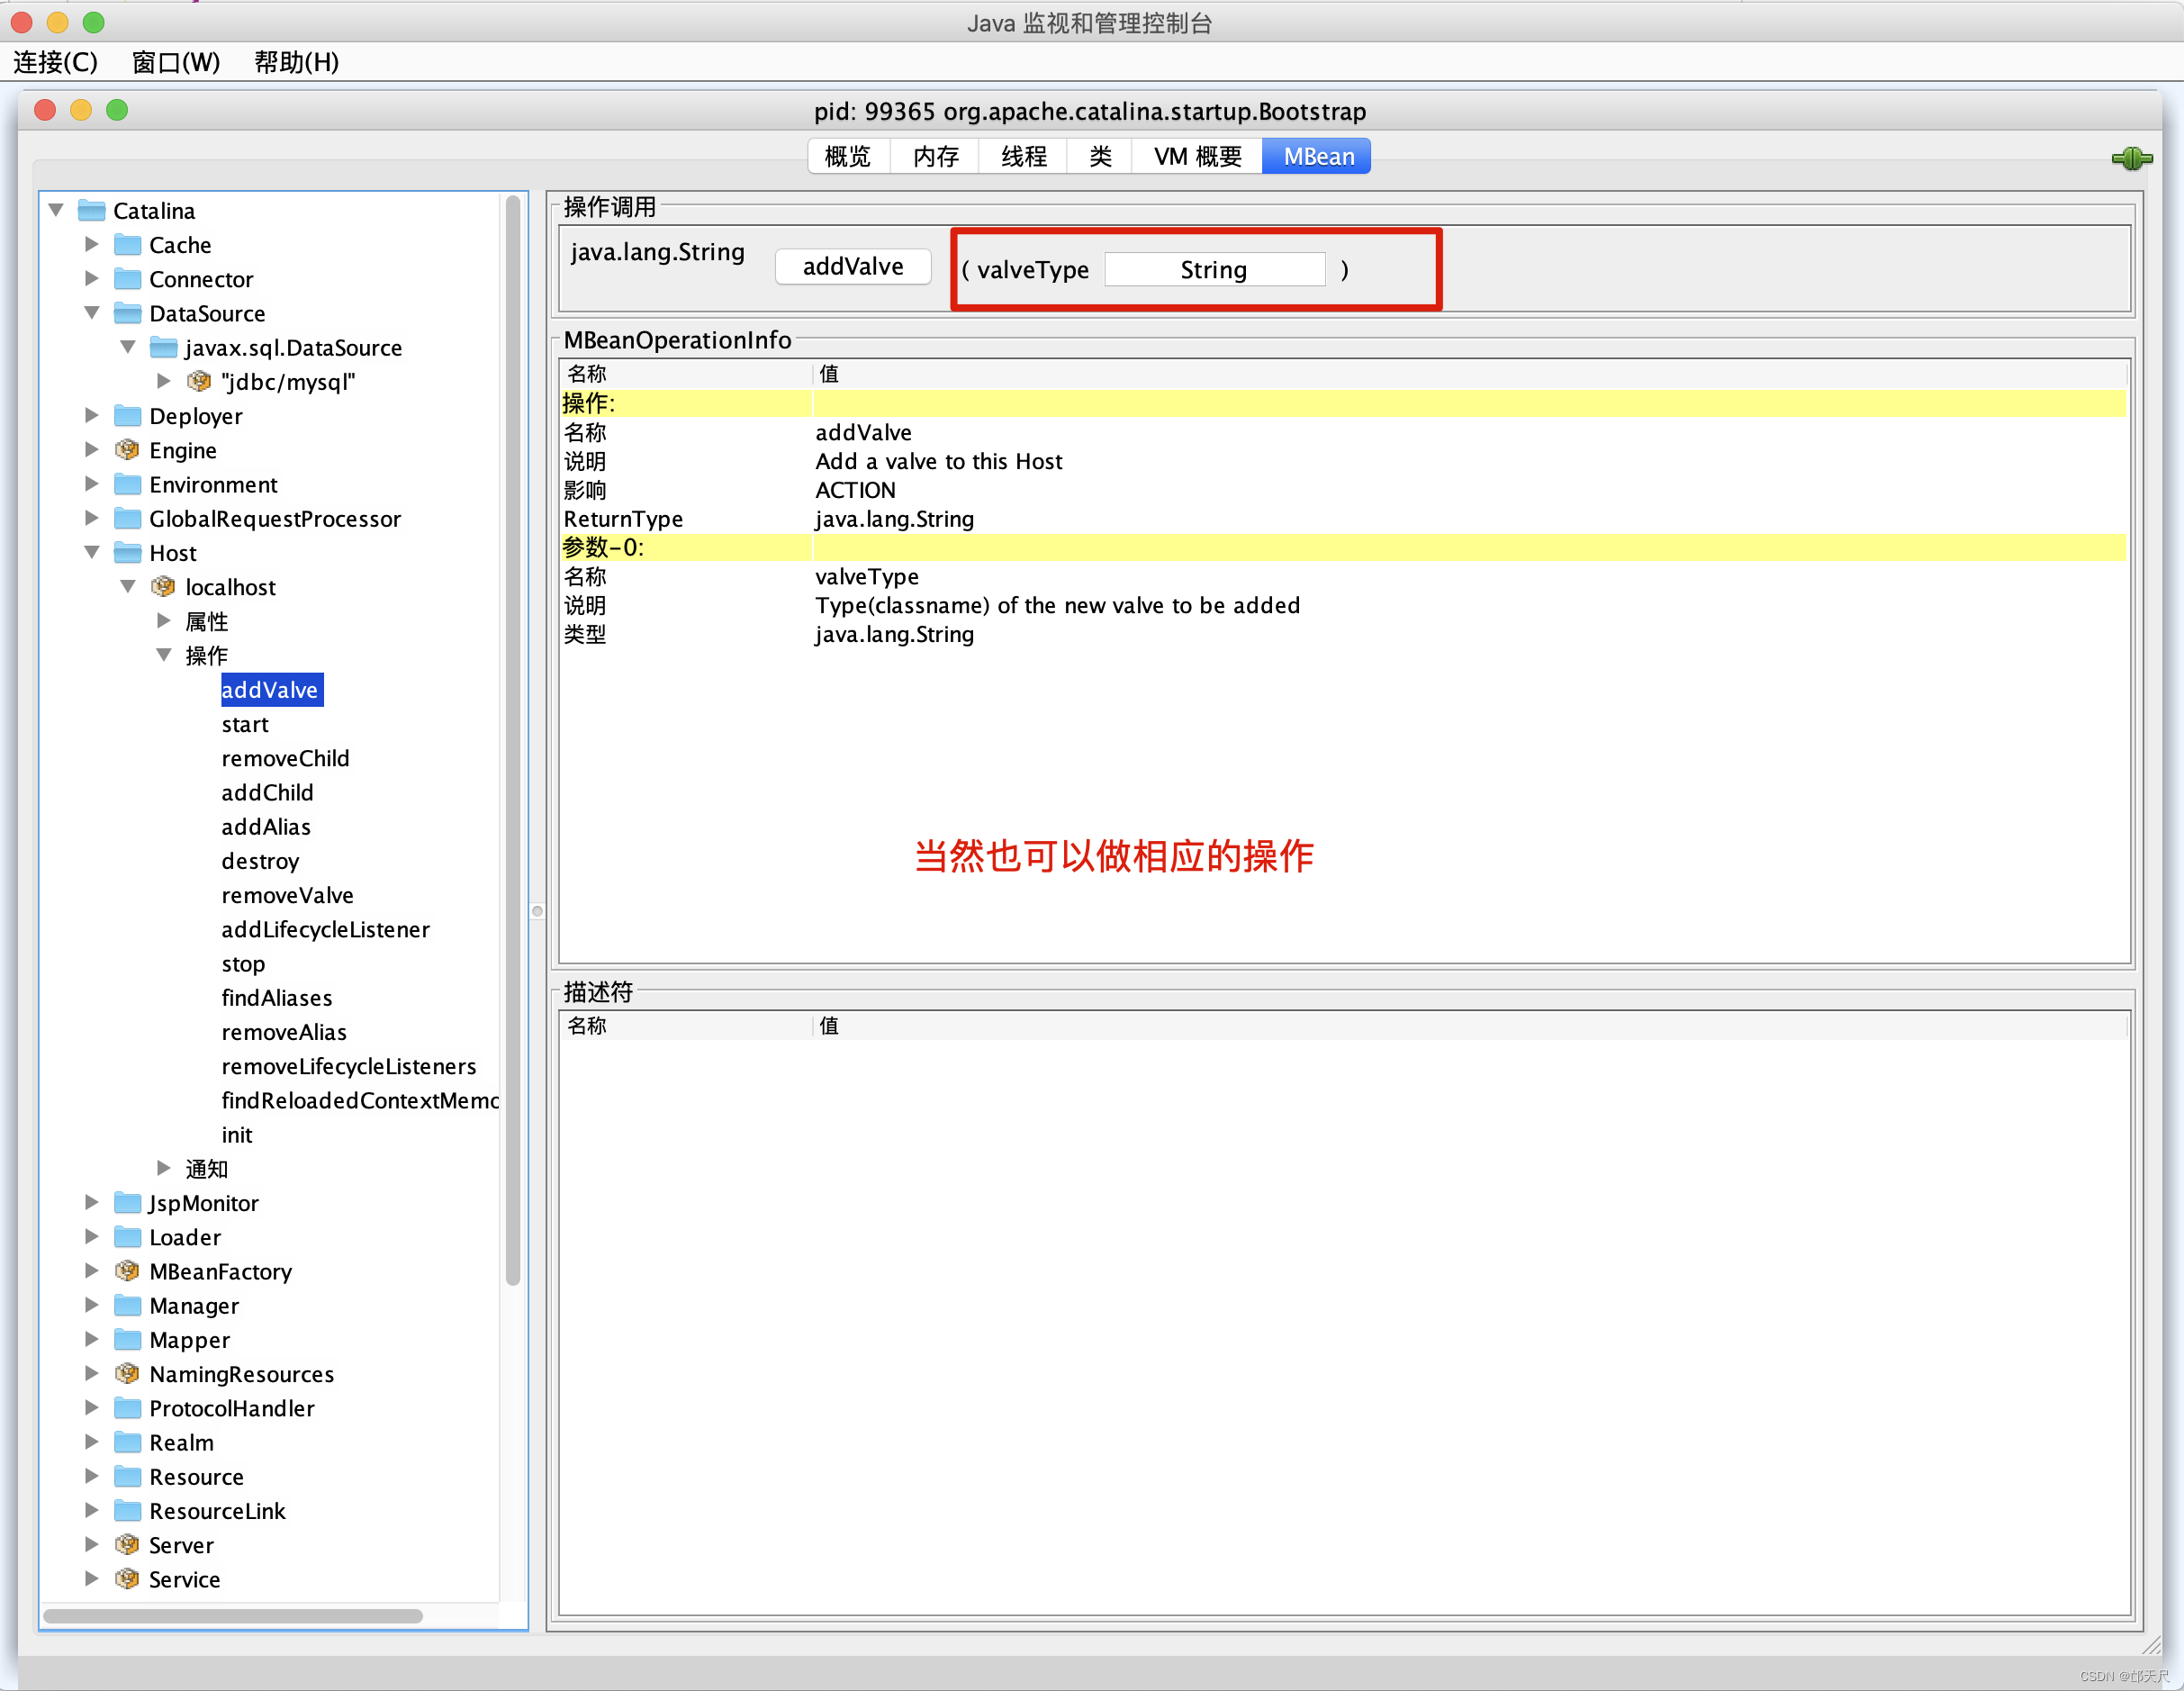
除了这里,还有哪个地方也可以将对象注册到jmx呢?
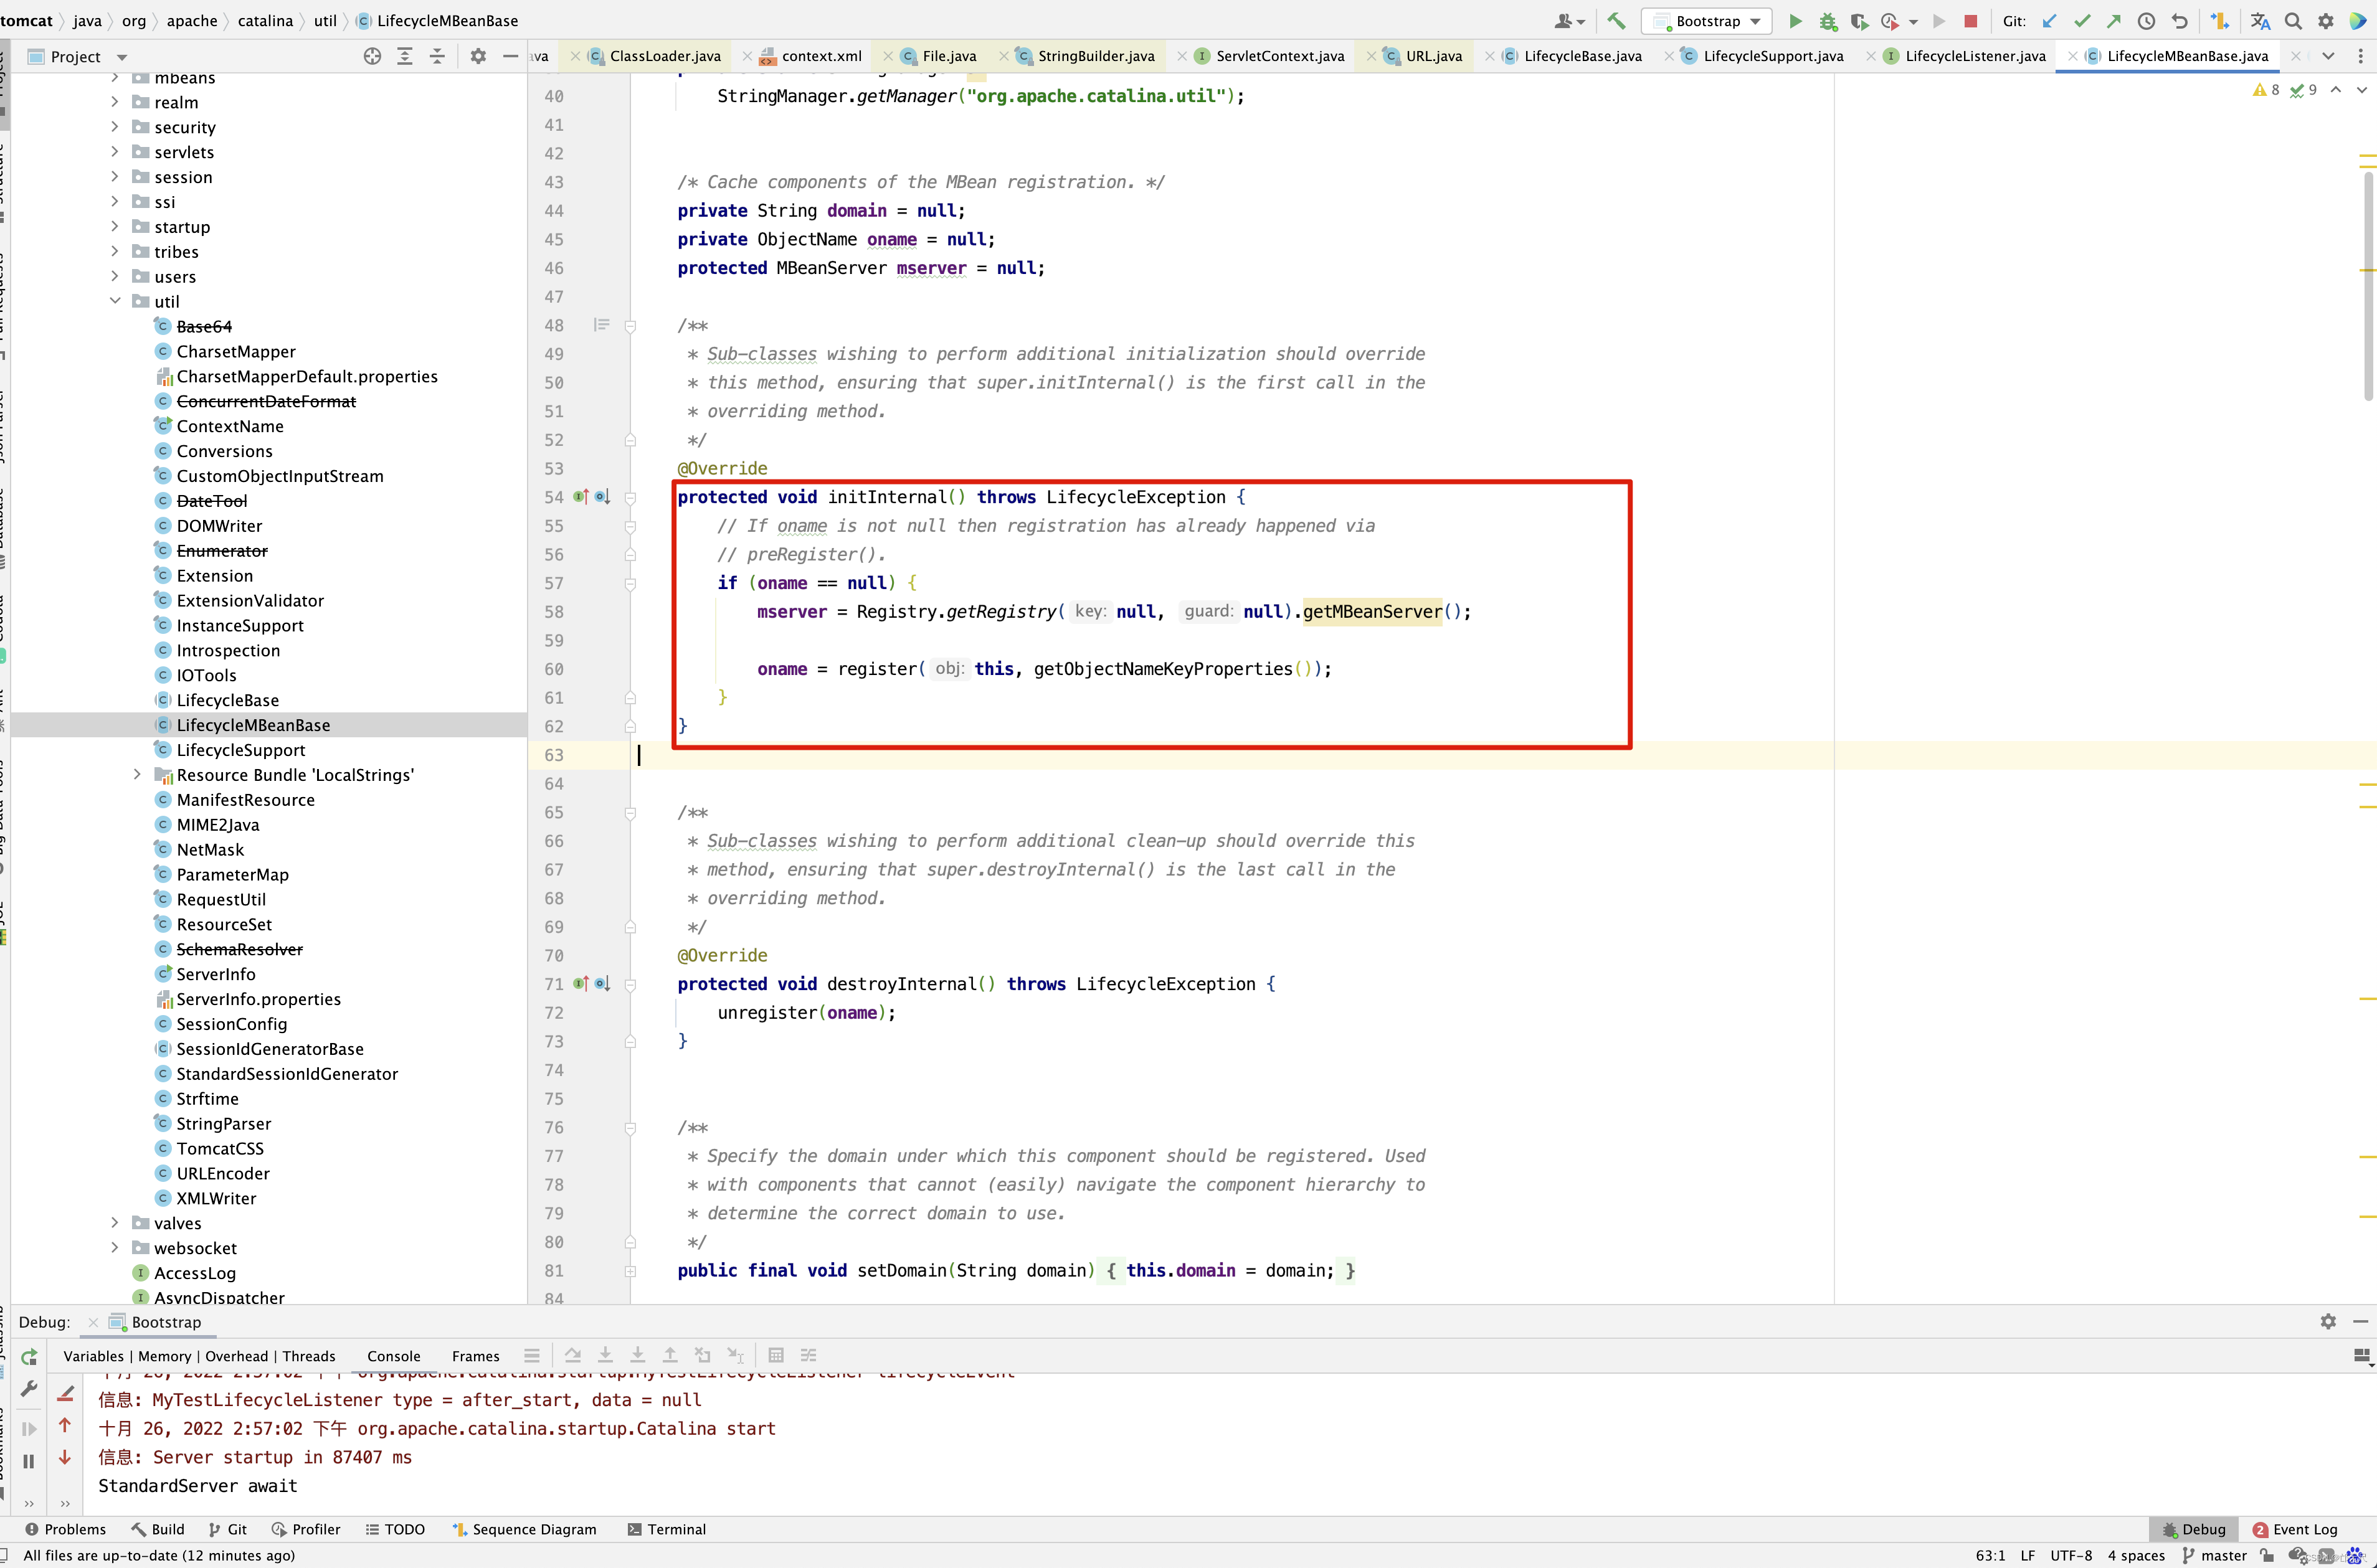
所以有个时候,大家看到这一块代码不知道什么意思,当对象注册到jmx后,我们可以在jconsole界面中对其属性进行修改,方法调用。
关于集群这一块的知识,先放一边吧。太过于复杂了,这里就不深入,接着我们进入fireLifecycleEvent(Lifecycle.CONFIGURE_START_EVENT, null); 这一行代码 。 这里会发送configure_start事件 。
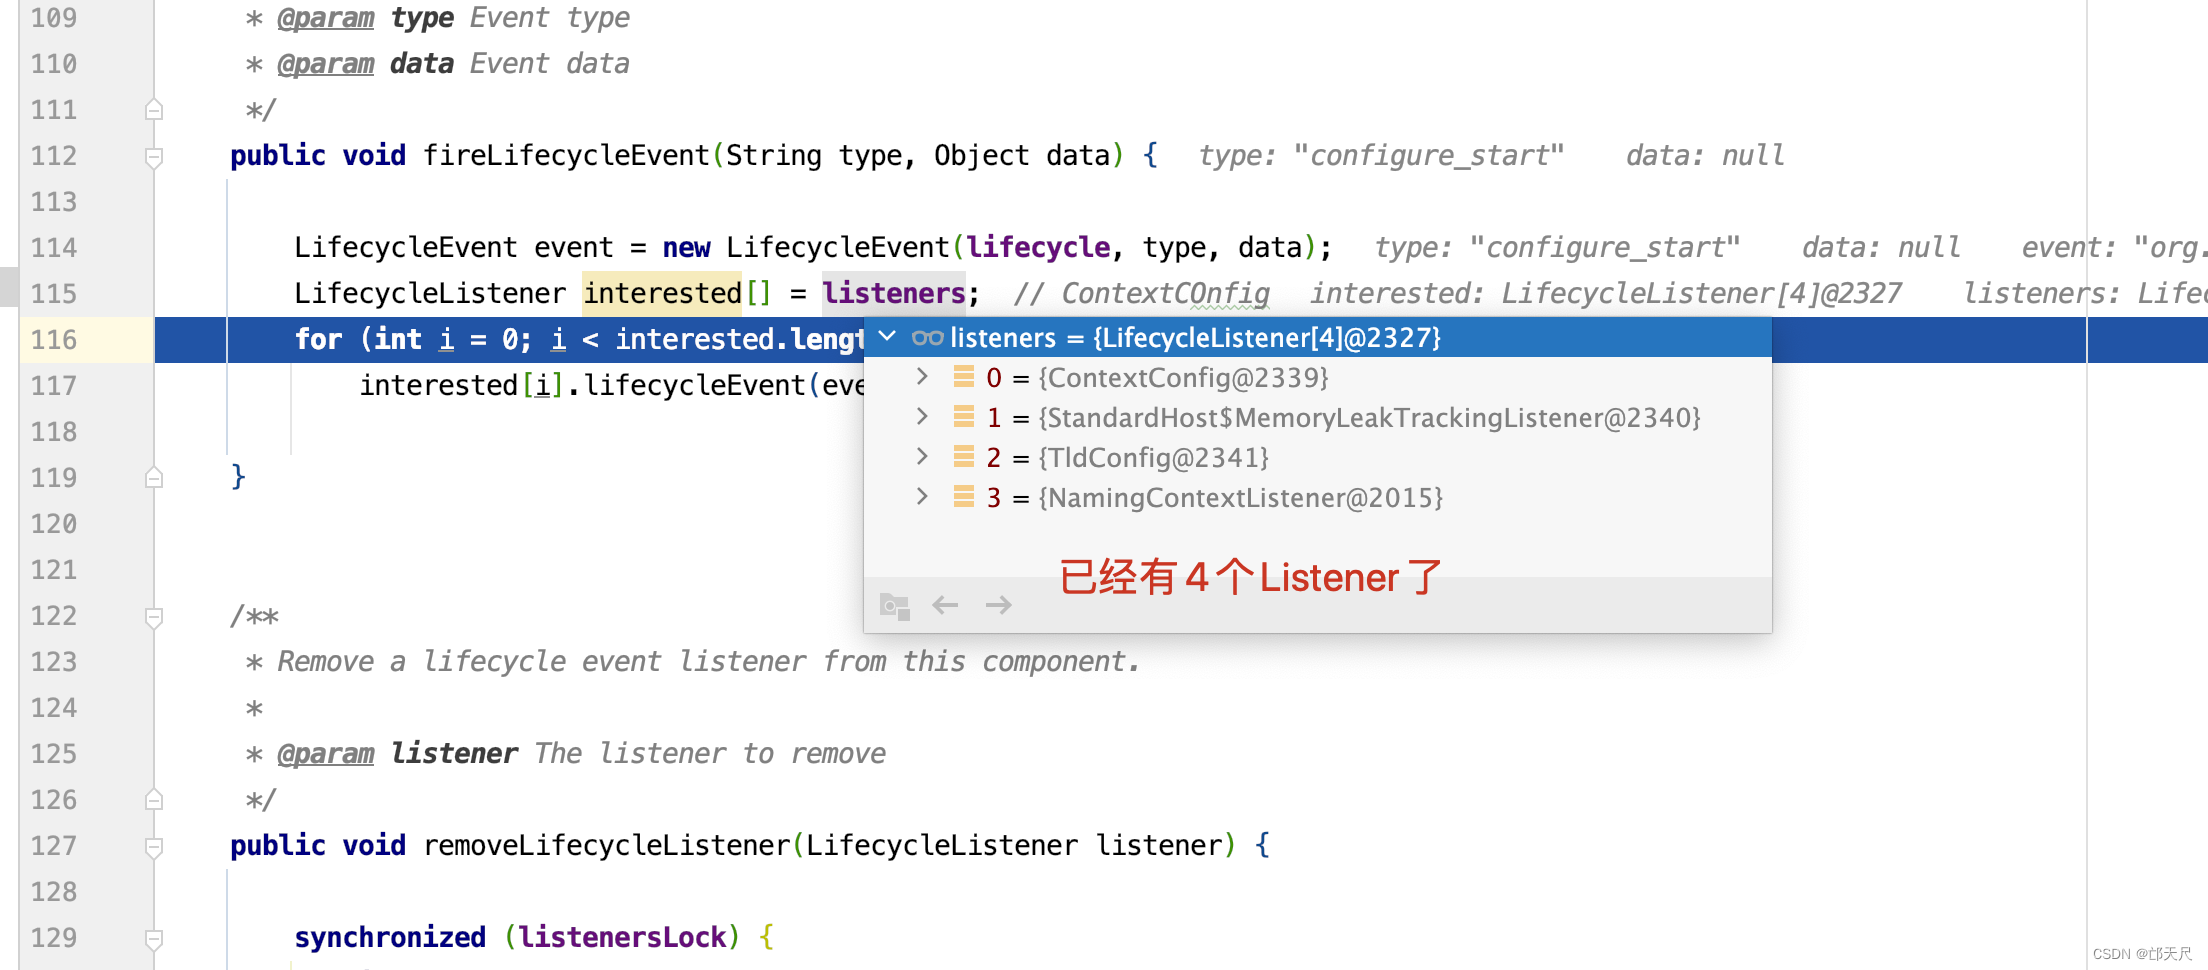
StandardContext中目前有3个监听器对configure_start做监听的。
先来看ContextConfig对configure_start事件处理。

configureStart()
进入configureStart()方法 。
protected synchronized void configureStart() {
    // Called from StandardContext.start()
    if (log.isDebugEnabled())
        log.debug(sm.getString("contextConfig.start"));

    if (log.isDebugEnabled()) {
        log.debug(sm.getString("contextConfig.xmlSettings",
                context.getName(),
                Boolean.valueOf(context.getXmlValidation()),
                Boolean.valueOf(context.getXmlNamespaceAware())));
    }

    // 根据web.xml文件对Context进行配置
    webConfig();
    // 如果StandardContext的ignoreAnnotations为false,则解析应用程序注解配置,添加相关的JNDI资源引用
    if (!context.getIgnoreAnnotations()) {
        applicationAnnotationsConfig();
    }
    if (ok) {
        validateSecurityRoles();
    }
    // Configure an authenticator if we need one
    // 用户验证配置
    if (ok)
        authenticatorConfig();

    // Dump the contents of this pipeline if requested
    if ((log.isDebugEnabled()) && (context instanceof ContainerBase)) {
        log.debug("Pipeline Configuration:");
        Pipeline pipeline = ((ContainerBase) context).getPipeline();
        Valve valves[] = null;
        if (pipeline != null)
            valves = pipeline.getValves();
        if (valves != null) {
            for (int i = 0; i < valves.length; i++) {
                log.debug("  " + valves[i].getInfo());
            }
        }

    }

    // Make our application available if no problems were encountered
    // Context已经配置成功,可以使用了
    if (ok)
        context.setConfigured(true);
    else {
        log.error(sm.getString("contextConfig.unavailable"));
        context.setConfigured(false);
    }

}
- 先来看webConfig() 方法的实现。
protected void webConfig() {
    Set<WebXml> defaults = new HashSet<WebXml>();
    // 1. 解析默认的配置,生成WebXml对象(Tomcat使用该对象表示web.xml的解析结果),先解析容器级别的配置,然后再解析Host级别的配置。
    // 这样对于同名的配置,Host级别将覆盖容器级别,为了便于后续过程描述,我们暂且称为 "默认WebXml",为了提升性能,ContextConfig
    // 对默认的WebXml进行了缓存,以避免重复解析
    defaults.add(getDefaultWebXmlFragment());
    WebXml webXml = createWebXml();

    // Parse context level web.xml
    // 2. 解析web.xml文件,如果StandardContext的altDDName不为空,则将该属性指向文件作为web.xml,否则使用默认的路径,即WEB-INF/web.xml
    // 解析结果同样为WebXml对象(此时创建的对象主为主WebXml),其他的解析结果要合并到该对象上来,暂时将其称为主WebXml
    InputSource contextWebXml = getContextWebXmlSource();
    // 解析默认WEB-INF/web.xml
    parseWebXml(contextWebXml, webXml, false);

    ServletContext sContext = context.getServletContext();

    // Ordering is important here

    // Step 1. Identify all the JARs packaged with the application
    // If the JARs have a web-fragment.xml it will be parsed at this
    // point.
    // 3. 扫描Web应用所有的Jar包,如果包含META-INF/web-fragment.xml,则解析文件并创建WebXml对象,暂时将其称为片断WebXml
    Map<String,WebXml> fragments = processJarsForWebFragments(webXml);

    // Step 2. Order the fragments.
    Set<WebXml> orderedFragments = null;
    // 4. 将web-fragment.xml创建的WebXml对象按照Servlet规范进行排序,同时将排序结果对应的JAR文件名列表设置到ServletContext属性中
    // 属性名为javax.servlet.context.orderedLibs,该排序非常重要,因为这决定了Filter等执行顺序 。
    // 【注意】:尽管Servlet规范定义了web-fragment.xml的排序(绝对排序和相对排序),但是为了降低各个模块的耦合度,Web应用在定义web-fragment.xml
    // 时应尽量保证相对独立性,减少相互间的依赖,将产生依赖过多的配置尝试放到web.xml中
    orderedFragments =
            WebXml.orderWebFragments(webXml, fragments, sContext);

    // Step 3. Look for ServletContainerInitializer implementations
    // 处理ServletContainerInitializers
    if (ok) {
        // 5.查找ServletContainerInitializer实现,并创建实例,查找范围分为两部分。
        // 5.1 Web应用下的包,如果javax.servlet.context.orderedLibs不为空,仅搜索该属性包含的包,否则搜索WEB-INF/lib下所有的包
        // 5.2 容器包:搜索所有的包
        // Tomcat返回查找结果列表时,确保Web应用的顺序的容器后,因此容器中实现将先加载 。
        // 6. 根据ServletContainerInitializer查询结果以及javax.servlet.annotation.HandleTypes 注解配置,初始化typeInitializerMap和
        // initializerClassMap 两个映射(主要用于后续注解检测),前者表示类对应ServletContainerInitializer集合,而后者表示每个
        // ServletContainerInitializer 对应的类的集合,具体类由javax.servlet.annotation.HandleTypes注解指定。
        processServletContainerInitializers();
    }
    // 7. 当主WebXml 的metadataComplete为false,或者typeInitializerMap不为空时
    if  (!webXml.isMetadataComplete() || typeInitializerMap.size() > 0) {
        // Steps 4 & 5.
        // 检测javax.servlet.annotation.HandlesTypes注解
        // 当WebXml的metadataComplete为false, 查找javax.servlet.annotation.WebServlet ,javax.servlet.annotation.WebFilter
        // javax.servlet.annotation.WebListener注解配置, 将其合并到WebXml
        // 处理JAR包内的注解,只处理包含web-fragment.xml的JAR,对于JAR包中的每个类做如下处理。
        // 检测javax.servlet.annotation.HandlesTypes注解
        // 当 "主WebXml"和片段"WebXml"的metadataComplete均为false,查找javax.servlet.annotation.WebServlet,javax.servlet.annotation.WebFilter
        // javax.servlet.annotation.WebListener注解配置,将其合并到"片段WebXml"
        processClasses(webXml, orderedFragments);
    }

    if (!webXml.isMetadataComplete()) {
        // Step 6. Merge web-fragment.xml files into the main web.xml
        // file.
        if (ok) {
            // 如果"主WebXml"的metadataComple为false, 将所有的片段WebXml按照排序合并到"WebXml"中
            ok = webXml.merge(orderedFragments);
        }

        // Step 7. Apply global defaults
        // Have to merge defaults before JSP conversion since defaults
        // provide JSP servlet definition.
        // 9 将默认的"WebXml" 合并到"主WebXml"中
        webXml.merge(defaults);

        // Step 8. Convert explicitly mentioned jsps to servlets
        if (ok) {
            // 配置JspServlet,对于当前Web应用中JspFile属性不为空的Servlet,将其servletClass设置为org.apache.jsper.servlet.JspServlet
            // (Tomcat提供了JSP引擎),将JspFile设置为Servlet初始化参数,同时将名称 "jsp" 的Servlet(见conf/web.xml) 的初始化参数也
            // 复制到该Servlet中
            convertJsps(webXml);
        }

        // Step 9. Apply merged web.xml to Context
        if (ok) {
            // 使用"主WebXml"配置当前StandardContext ,包括Servlet,Filter,Listener 等Servlet 规范中支持的组件,对于ServletContext
            // 层级对象,直接由StandardContext维护,对于Servlet,则创建StandardWrapper子对象,并添加StandardContext实例。
            webXml.configureContext(context);
        }
    } else {
        webXml.merge(defaults); // 默认情况下, defaults就是conf/web.xml文件对应的WebXml对象
        convertJsps(webXml);    // 将jsp转化为Servlet
        webXml.configureContext(context);   // 根据webxml配置context,比如把定义的servlet转化为wrapper,然后添加到StandardContext中,还包括很多其他的
    }

    // Step 9a. Make the merged web.xml available to other
    // components, specifically Jasper, to save those components
    // from having to re-generate it.
    // TODO Use a ServletContainerInitializer for Jasper
    // 将合并后的WebXml保存到ServletContext属性中,便于后续处理复用,属性名为org.apache.tomcat.util.scan.MergeWebXml
    String mergedWebXml = webXml.toXml();
    sContext.setAttribute(
           org.apache.tomcat.util.scan.Constants.MERGED_WEB_XML,
           mergedWebXml);
    if (context.getLogEffectiveWebXml()) {
        log.info("web.xml:\n" + mergedWebXml);
    }

    // Always need to look for static resources
    // Step 10. Look for static resources packaged in JARs
    if (ok) {
        // Spec does not define an order.
        // Use ordered JARs followed by remaining JARs
        Set<WebXml> resourceJars = new LinkedHashSet<WebXml>();
        for (WebXml fragment : orderedFragments) {
            //
            resourceJars.add(fragment);
        }
        for (WebXml fragment : fragments.values()) {
            if (!resourceJars.contains(fragment)) {
                resourceJars.add(fragment);
            }
        }
        // 查找JAR 包的"META-INF/resource/"下的静态资源,并添加到StandardContext中
        processResourceJARs(resourceJars);
        // See also StandardContext.resourcesStart() for
        // WEB-INF/classes/META-INF/resources configuration
    }

    // Step 11. Apply the ServletContainerInitializer config to the
    // context
    if (ok) {
        // 将ServletContainerInitializer 扫描结果添加到StandardContext,以便StandardContext启动时使用
        for (Map.Entry<ServletContainerInitializer,
                Set<Class<?>>> entry :
                    initializerClassMap.entrySet()) {
            if (entry.getValue().isEmpty()) {
                context.addServletContainerInitializer(
                        entry.getKey(), null);
            } else {
                context.addServletContainerInitializer(
                        entry.getKey(), entry.getValue());
            }
        }
    }
    // 至此,StandardContext 在正式启动StandardWrapper子对象之前,完成了Web 应用容器的初始化,包括Servlet规范中的各类组件,注解
    // 以及可编程方式的支持
    // 应用程序注解配置
    // 当StandardContext 的ignoreAnnotations 为false时,Tomcat 支持读取如下接口的Java命名服务注解配置,添加相关的JNDI 引用,以便
    // 在实例化相关的接口时,进行JNDI 资源依赖注入 .
    // 支持读取接口如下 :
    // Web应用程序监听器
    // javax.servlet.ServletContextAttributeListener
    // javax.servlet.ServletRequestListener
    // javax.servlet.http.HttpSessionAttributeListener
    // javax.servlet.http.HttpSessionListener
    // javax.servlet.ServletContextListener
    // javax.servlet.Filter
    // javax.servlet. Servlet
    // 支持读取注解包括注解,属性注解,方法注解,具体注解如下
    // 类:javax.annotion.Resource ,javax.annotation.Resources
    // 属性和方法:javax.annotation.Resource
}
应用程序的web.xml优先于主机级别或全局级别的根据配置创建Wrapper(Servlet),Filter,ServletContextListener等,完成Web容器的初始化,除了解析Web应用目录下的Web.xml外,还包括Tomcat默认配置,web-fragment.xml ,ServletContainerInitializer,以及相关的XML文件的排序和合并。
来看看获取默认的WebXml实现。
private WebXml getDefaultWebXmlFragment() {

    // Host should never be null
    Host host = (Host) context.getParent();

    // 从缓存里面获取WebXml对象
    DefaultWebXmlCacheEntry entry = hostWebXmlCache.get(host);
	// 获取全局范围内的web.xml文件InputSource,在默认情况下就是取catalina.base目录下的conf/web.xml文件
	// 如 file:/Users/quyixiao/gitlab/tomcat/conf/web.xml
    InputSource globalWebXml = getGlobalWebXmlSource();
    // 获取Host范围内的web.xml文件InputSource,在默认情况下就是取catalina.base目录下的conf/engine名字/host名字/web.xml.default
    // 如  file:/Users/quyixiao/gitlab/tomcat/conf/Catalina/localhost/web.xml/default
    InputSource hostWebXml = getHostWebXmlSource();

    long globalTimeStamp = 0;
    long hostTimeStamp = 0;

    // 寻找globalWebXml文件的最近修改时间
    if (globalWebXml != null) {
        URLConnection uc = null;
        try {
            URL url = new URL(globalWebXml.getSystemId());
            uc = url.openConnection();
            globalTimeStamp = uc.getLastModified();
        } catch (IOException e) {
            globalTimeStamp = -1;
        } finally {
            if (uc != null) {
                try {
                    uc.getInputStream().close();
                } catch (IOException e) {
                    ExceptionUtils.handleThrowable(e);
                    globalTimeStamp = -1;
                }
            }
        }
    }

    // 寻找hostWebXml文件的最近修改时间
    if (hostWebXml != null) {
        URLConnection uc = null;
        try {
            URL url = new URL(hostWebXml.getSystemId());
            uc = url.openConnection();
            hostTimeStamp = uc.getLastModified();
        } catch (IOException e) {
            hostTimeStamp = -1;
        } finally {
            if (uc != null) {
                try {
                    uc.getInputStream().close();
                } catch (IOException e) {
                    ExceptionUtils.handleThrowable(e);
                    hostTimeStamp = -1;
                }
            }
        }
    }

    // 如果发现找出来的webxml文件和缓存中的webxml文件最近的修改时间相等,
    // 就代表没有修改过,那么直接返回缓存中的WebXml对象
    if (entry != null && entry.getGlobalTimeStamp() == globalTimeStamp &&
            entry.getHostTimeStamp() == hostTimeStamp) {
        InputSourceUtil.close(globalWebXml);
        InputSourceUtil.close(hostWebXml);
        return entry.getWebXml();
    }

    // Parsing global web.xml is relatively expensive. Use a sync block to
    // make sure it only happens once. Use the pipeline since a lock will
    // already be held on the host by another thread
    // 这里用到了双重较验锁
    // 解析web.xml文件比较耗时。使用同步块确保只会执行一次。为什么用host.getPipeline()作为锁?
    // 使用管道,因为另一个线程已在主机上持有锁
    synchronized (host.getPipeline()) {
        // 再一次判断是不是可以直接返回缓存中的WebXML对象,这里使用的是双重判断检查
        entry = hostWebXmlCache.get(host);
        if (entry != null && entry.getGlobalTimeStamp() == globalTimeStamp &&
                entry.getHostTimeStamp() == hostTimeStamp) {
            return entry.getWebXml();
        }

        // 解析web.xml为WebXml对象
        WebXml webXmlDefaultFragment = createWebXml();
        webXmlDefaultFragment.setOverridable(true);
        // Set to distributable else every app will be prevented from being
        // distributable when the default fragment is merged with the main
        // web.xml
        webXmlDefaultFragment.setDistributable(true);
        // When merging, the default welcome files are only used if the app has
        // not defined any welcomes files.
        webXmlDefaultFragment.setAlwaysAddWelcomeFiles(false);

        // Parse global web.xml if present
        if (globalWebXml == null) {
            // This is unusual enough to log
            log.info(sm.getString("contextConfig.defaultMissing"));
        } else {
            parseWebXml(globalWebXml, webXmlDefaultFragment, false);
        }

        // Parse host level web.xml if present
        // Additive apart from welcome pages
        webXmlDefaultFragment.setReplaceWelcomeFiles(true);

        parseWebXml(hostWebXml, webXmlDefaultFragment, false);

        // Don't update the cache if an error occurs
        if (globalTimeStamp != -1 && hostTimeStamp != -1) {
            entry = new DefaultWebXmlCacheEntry(webXmlDefaultFragment,
                    globalTimeStamp, hostTimeStamp);
            hostWebXmlCache.put(host, entry);
        }

        return webXmlDefaultFragment;
    }
}
查找全局webxml文件的流程:
- 先确定查找的目录
- 再确定查找的文件名
确定查找目录:
- 如果在Engine上配置了baseDir属性,那么将直接在属性对应的目录下查找
- 如果在Engine上没有配置baseDir属性,那么将在catalina.base所对应的目录下查找
- 如果catalina.base为空,那么将在catalina.home所对应的目录下查找
查找并不是直接找目录下的web.xml文件,而是:
- 如果Context配置了defaultWebXml属性,那么将查找该属性所对应的文件,前提是该属性配置的是相对路径
- 如果Context配置的defaultWebXml属性是绝对路径,那么将直接取该绝对路径所对应的文件
- 如果Context没有配置defaultWebXml属性,那么将查找conf/web.xml
但上面有一行加粗代码需要注意( synchronized (host.getPipeline()) ), 为什么使用StandardHost的管道加锁,而不是使用Host加锁呢, 注释(
// Parsing global web.xml is relatively expensive. Use a sync block to
// make sure it only happens once. Use the pipeline since a lock will
// already be held on the host by another thread)上说有另外一个线程已经使用了Host加锁,到底又是哪个线程呢? 带着疑问,在代码中寻寻觅觅 。
看到没有,StandardHost启动时,就已经对自身加锁了,因为启动StandardContext是一个耗时操作,因此也是用线程池来启动,这样就可以模拟StandardHost和StandardContext启动来做一个实验 。 请看如下例子
public class TestStandardHost {

    protected synchronized void startInternal() {
        Object obj = this;
        new Thread(new Runnable() {
            @Override
            public void run() {
                synchronized (obj){
                    System.out.println("1");
                }
            }
        }).start();
        try {
            Thread.sleep(3000);
            System.out.println("2");
        } catch (InterruptedException e) {
            e.printStackTrace();
        }
    }

    public static void main(String[] args) {
        TestStandardHost testHost = new TestStandardHost();
        testHost.startInternal();
    }
}
大家猜猜,结果会输出什么?肯定是
2
1
大家现在应该明白为什么这里解析web.xml时使用host.getPipeline()作为加锁对象了吧,因为解析全局的web.xml本来是StandardContext之间的事情,没有必要和主线程StandardHost所在线程抢锁操作,而每一个容器都有唯一一个StandardPipeline与之对应 ,因此用StandardPipeline作为加锁条件再合适不过。
接下来看全局WebXml资源获取的方法
protected InputSource getGlobalWebXmlSource() {
    // 首先获取Context上有没有指定defaultWebXml
    // 如果没有,则获取conf/web.xml目录下的文件
    // 将文件转化为InputSource,后续会解析xml
    // Is a default web.xml specified for the Context?
    if (defaultWebXml == null && context instanceof StandardContext) {
        defaultWebXml = ((StandardContext) context).getDefaultWebXml();
    }
    // Set the default if we don't have any overrides
    if (defaultWebXml == null) getDefaultWebXml();

    // Is it explicitly suppressed, e.g. in embedded environment?
    if (""org/apache/catalina/startup/NO_DEFAULT_XML"".equals(defaultWebXml)) {
        return null;
    }
    return getWebXmlSource(defaultWebXml, getBaseDir());
}


public String getDefaultWebXml() {
	// 如果defaultWebXml为空,则设置为默认的conf/web.xml
    if( defaultWebXml == null ) {
        defaultWebXml="conf/web.xml";
    }
    return (this.defaultWebXml);
}
接下来,看HostWebXml的获取 。
protected InputSource getHostWebXmlSource() {
    File hostConfigBase = getHostConfigBase();
    if (!hostConfigBase.exists())
        return null;
    // 获取hostConfigBase下的web.xml.default
    return getWebXmlSource("web.xml.default", hostConfigBase.getPath());
}
getHostConfigBase() 总结
- 如果Host上配置了xmlBase属性,并且该属性是绝对路径的话,将直接把该路径下的web.xml.default文件返回
- 如果Host上配置的xmlBase属性是相对路径,那么将把getBaseDir()+xmlBase路径下的web.xml.default文件返回
- 如果Host上没有配置xmlBase属性,那么将把getBaseDir() + “/conf” + engine名字 + “/” + host名字路径下的web.xml.default文件返回
protected File getHostConfigBase() {
    File file = null;
    Container container = context;
    Host host = null;
    Engine engine = null;
    // 赋值host和engine
    while (container != null) {
        if (container instanceof Host) {
            host = (Host)container;
        }
        if (container instanceof Engine) {
            engine = (Engine)container;
        }
        container = container.getParent();
    }
    // 如果host配置了xmlBase
    if (host != null && host.getXmlBase()!=null) {
        String xmlBase = host.getXmlBase();
        file = new File(xmlBase);
        if (!file.isAbsolute())
            file = new File(getBaseDir(), xmlBase);
    } else {
        StringBuilder result = new StringBuilder();
        if (engine != null) {
            result.append(engine.getName()).append('/');
        }
        if (host != null) {
            result.append(host.getName()).append('/');
        }
        // 如果host没有配置xmlBase,那么则获取getBaseDir()下conf目录下的--engine名字+"/"+host名字--的配置文件
        file = new File (getConfigBase(), result.toString());
    }
    try {
        // 返回绝对路径
        return file.getCanonicalFile();
    } catch (IOException e) {
        return file;
    }
}

protected File getConfigBase() {
    File configBase = new File(getBaseDir(), "conf");
    if (!configBase.exists()) {
        return null;
    }
    return configBase;
}

// 先获取Engine上配置的baseDir
// 如果Engine上没有配置baseDir,那么则获取环境变量catalina.base所指定的路径
// 如果catalina.base没有指定路径,那么则获取环境变量catalina.home所指定的路径
protected String getBaseDir() {
    Container engineC=context.getParent().getParent();
    if( engineC instanceof StandardEngine ) {
        // 注意getBaseDir()方法内的实现
        return ((StandardEngine)engineC).getBaseDir();
    }
    return System.getProperty("catalina.base");
}
确定Host配置文件基本路径----就是我要找某个配置文件时,要从这个目录下去找
步骤如下:
- 如果Host上配置了xmlBase属性,并且该属性是绝对路径的话,将直接以该路径作为基本路径
- 如果Host上配置的xmlBase属性是相对路径,那么将以getBaseDir()+xmlBase做为基本路径
- 如果Host上没有配置xmlBase属性,那么将以getBaseDir() + “/conf” + engine名字 + “/” + host名字作为基本路径
接下来看, parseWebXml()的实现。
 protected void parseWebXml(InputSource source, WebXml dest,
        boolean fragment) {

    if (source == null) return;

    XmlErrorHandler handler = new XmlErrorHandler();

    Digester digester;
    WebRuleSet ruleSet;
    //fragment为false,则对web.xml解析
    // 如果fragment为true,则对web-fragment.xml解析
    if (fragment) {
        digester = webFragmentDigester;
        ruleSet = webFragmentRuleSet;
    } else {
        digester = webDigester;
        ruleSet = webRuleSet;
    }

	// 将解析的值封装到WebXml中
    digester.push(dest);
    digester.setErrorHandler(handler);

    if(log.isDebugEnabled()) {
        log.debug(sm.getString("contextConfig.applicationStart",
                source.getSystemId()));
    }

    try {
        digester.parse(source);

        if (handler.getWarnings().size() > 0 ||
                handler.getErrors().size() > 0) {
            ok = false;
            handler.logFindings(log, source.getSystemId());
        }
    } catch (SAXParseException e) {
        log.error(sm.getString("contextConfig.applicationParse",
                source.getSystemId()), e);
        log.error(sm.getString("contextConfig.applicationPosition",
                         "" + e.getLineNumber(),
                         "" + e.getColumnNumber()));
        ok = false;
    } catch (Exception e) {
        log.error(sm.getString("contextConfig.applicationParse",
                source.getSystemId()), e);
        ok = false;
    } finally {
        digester.reset();
        ruleSet.recycle();
        InputSourceUtil.close(source);
    }
}
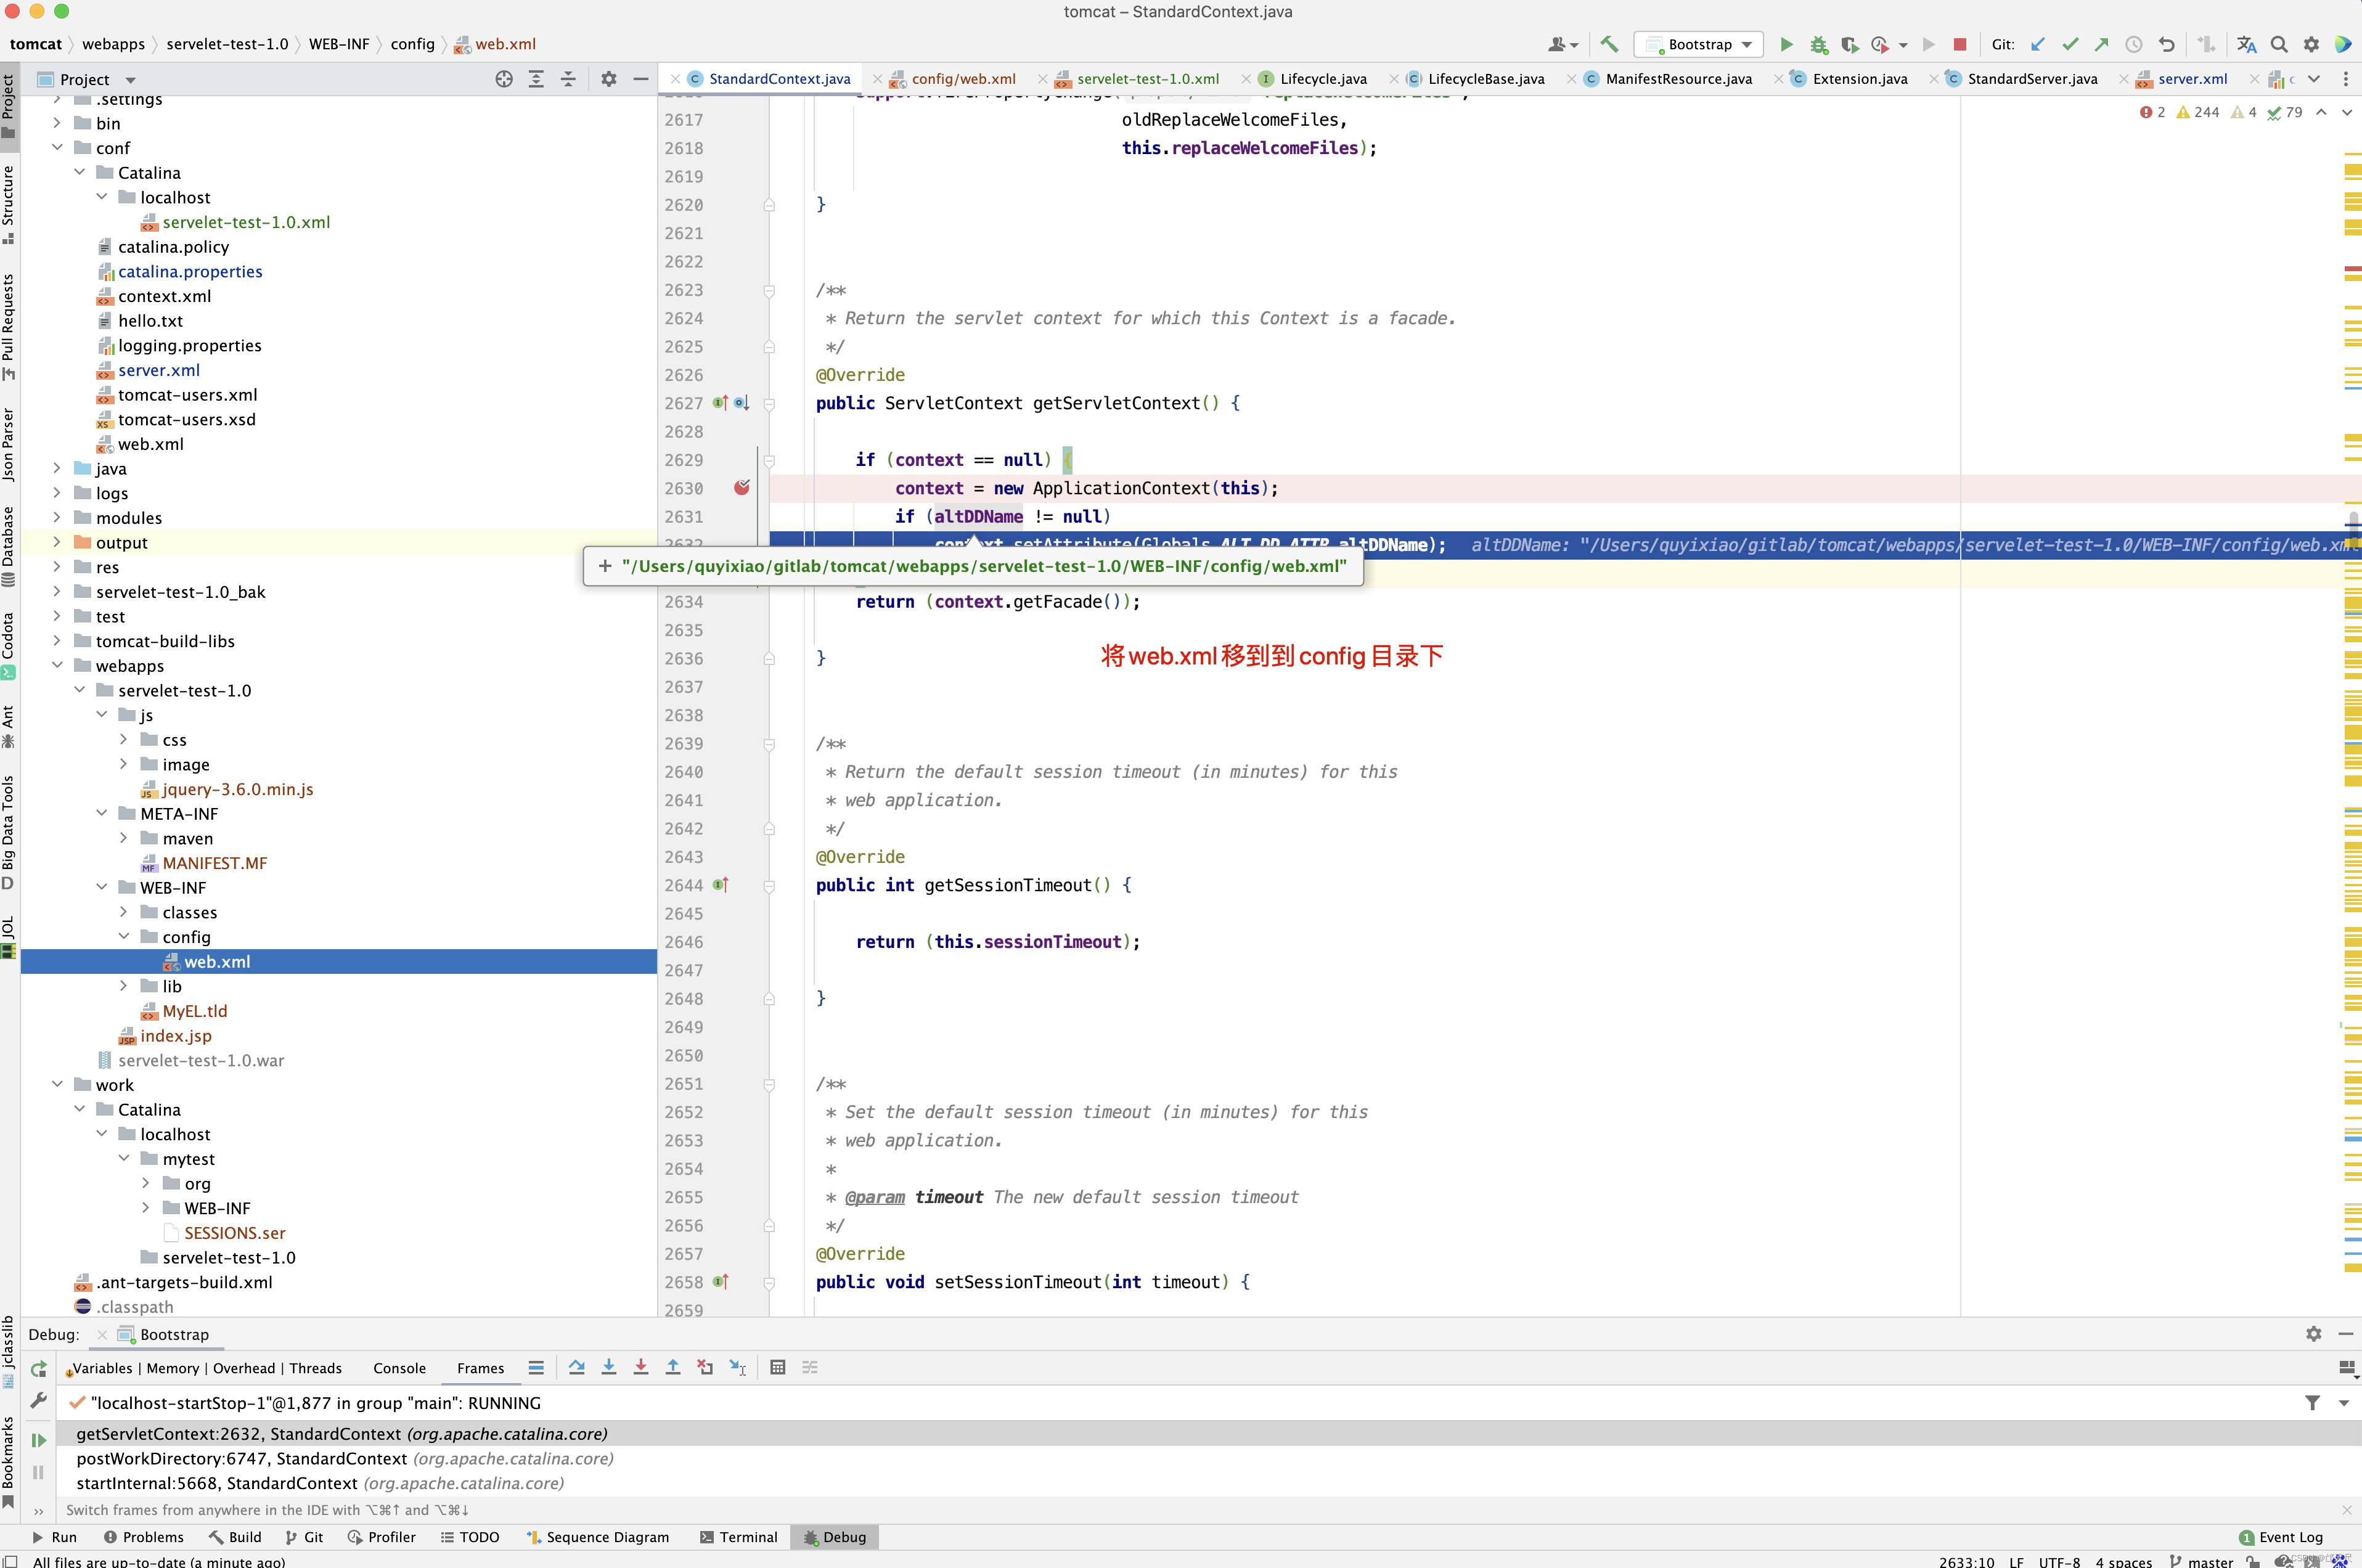
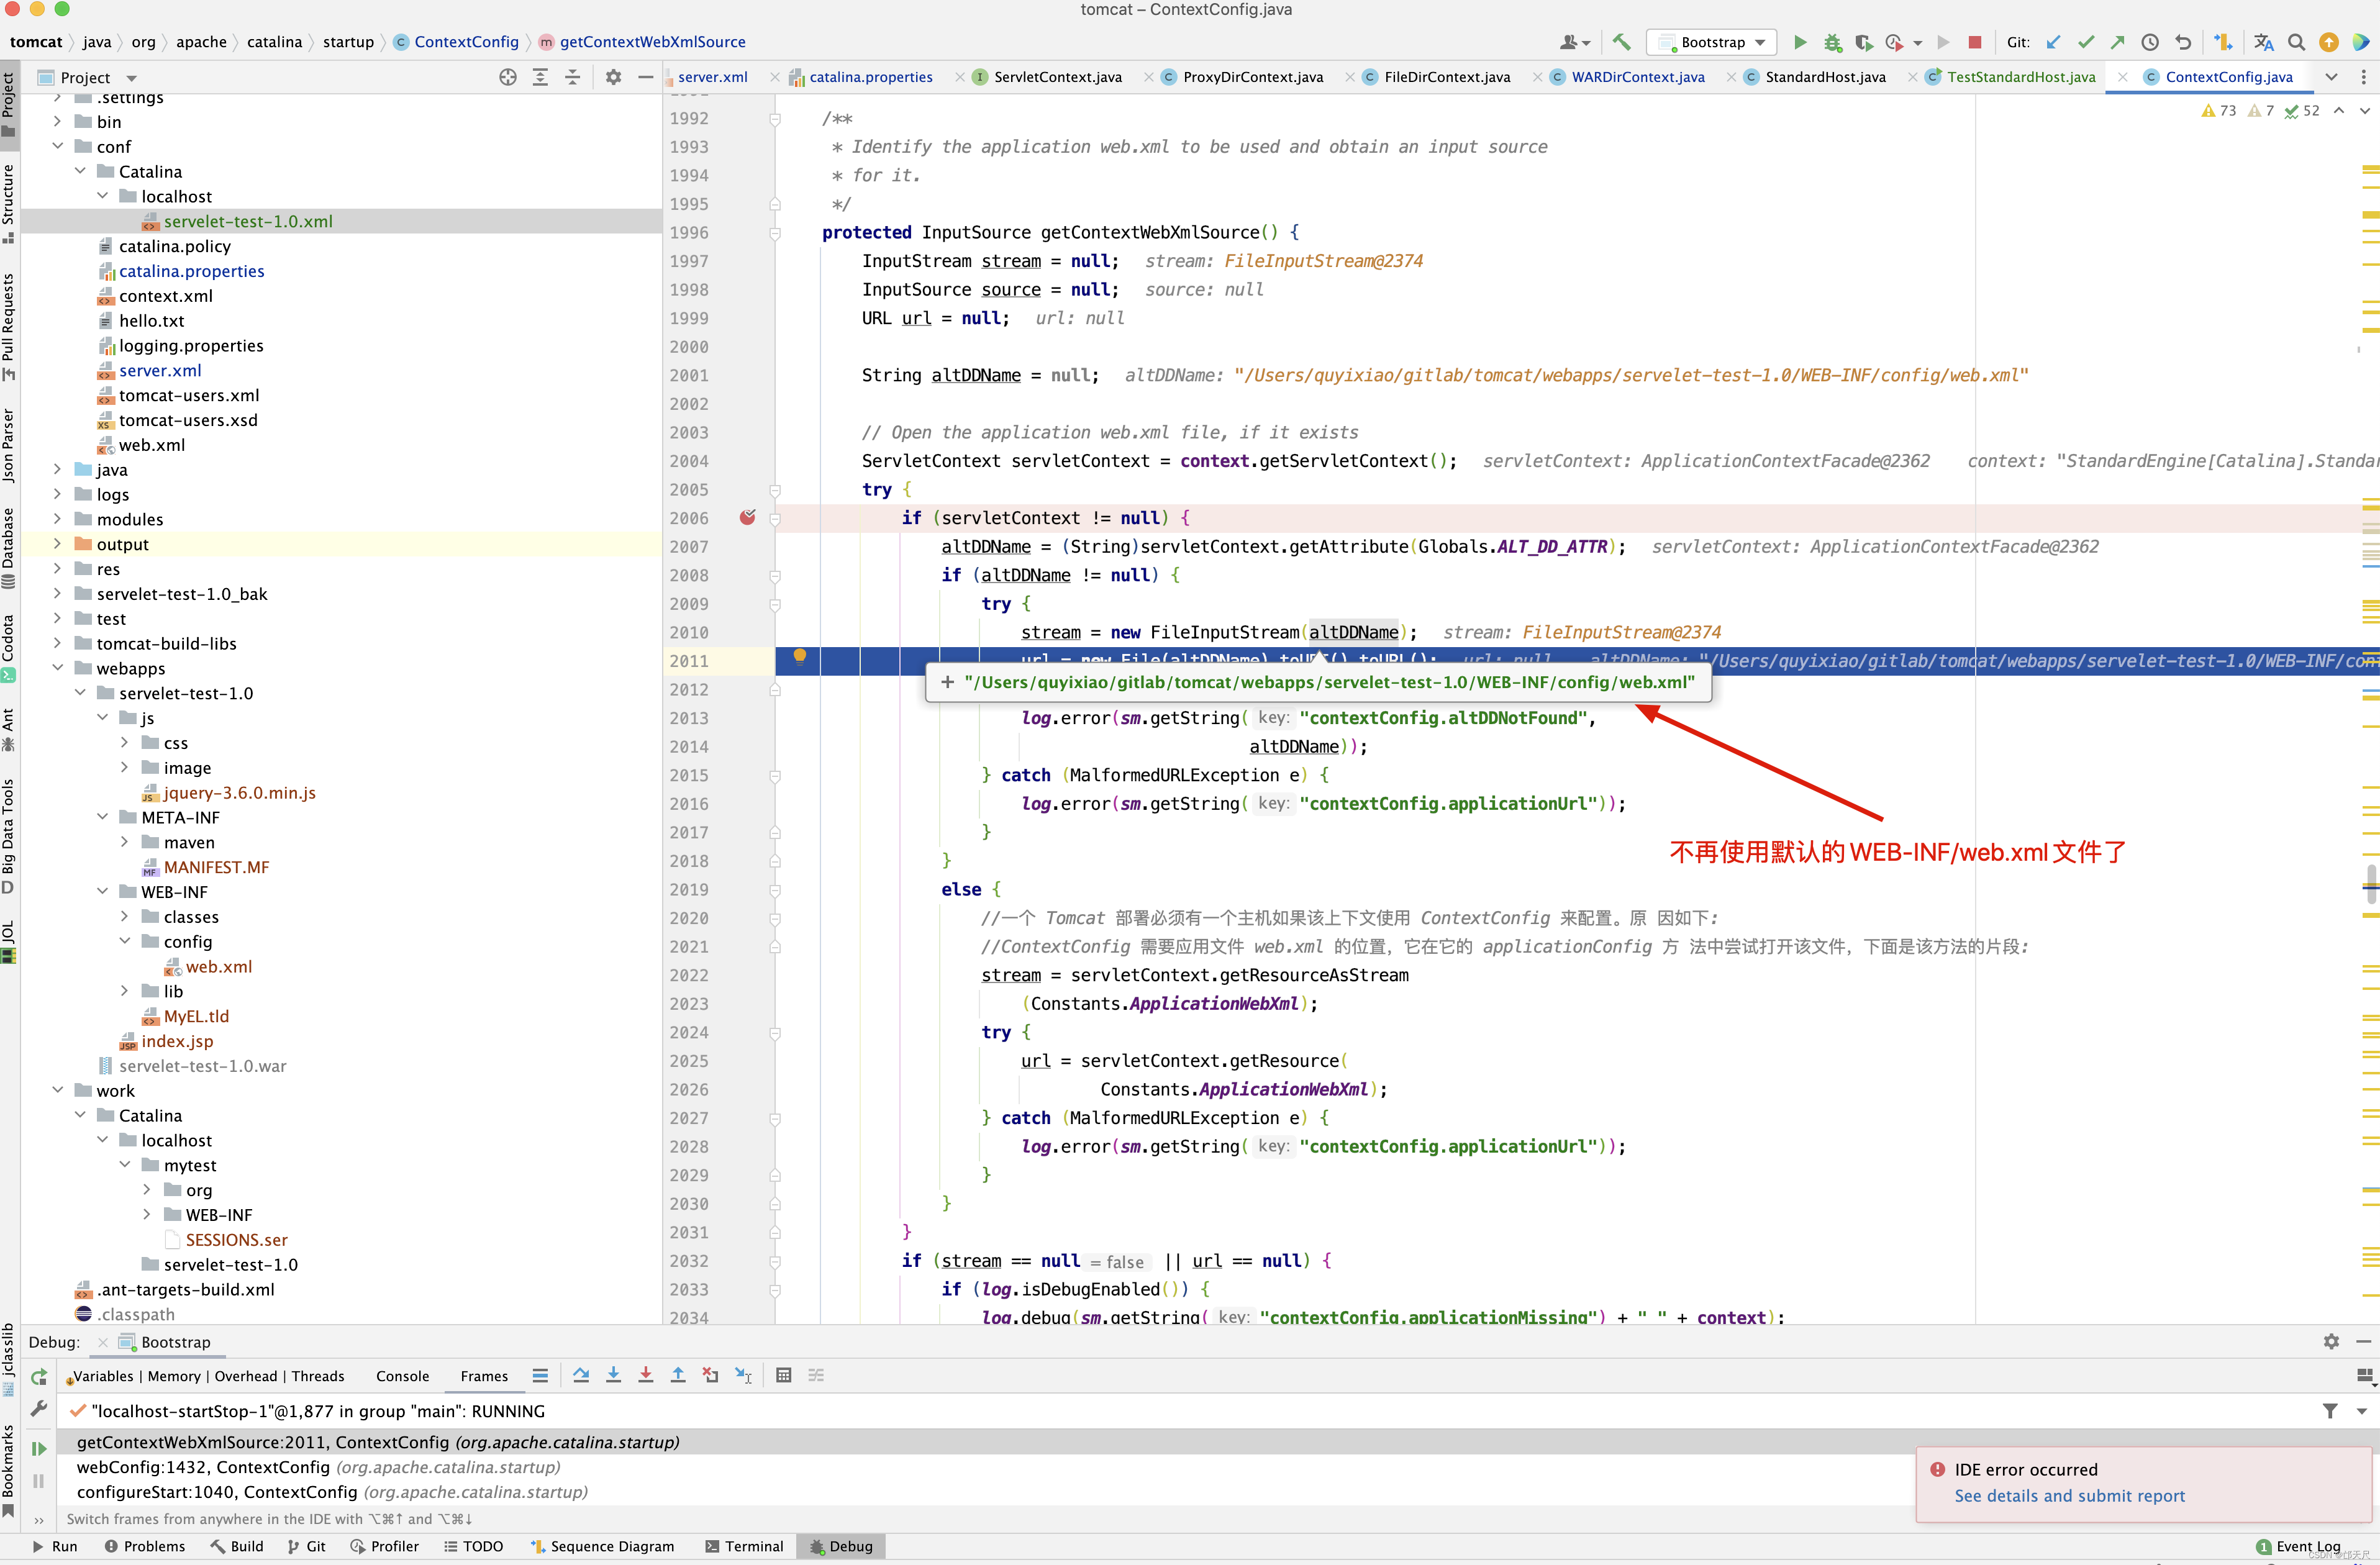
看Context 的 WebXml获取
protected InputSource getContextWebXmlSource() {
    InputStream stream = null;
    InputSource source = null;
    URL url = null;

    String altDDName = null;

    // Open the application web.xml file, if it exists
    ServletContext servletContext = context.getServletContext();
    try {
        if (servletContext != null) {
            altDDName = (String)servletContext.getAttribute("org.apache.catalina.deploy.alt_dd");
            if (altDDName != null) {
                try {
                    stream = new FileInputStream(altDDName);
                    url = new File(altDDName).toURI().toURL();
                } catch (FileNotFoundException e) {
                    log.error(sm.getString("contextConfig.altDDNotFound",
                                           altDDName));
                } catch (MalformedURLException e) {
                    log.error(sm.getString("contextConfig.applicationUrl"));
                }
            }
            else {
                //一个 Tomcat 部署必须有一个主机如果该上下文使用 ContextConfig 来配置。原 因如下:
                //ContextConfig 需要应用文件 web.xml 的位置,它在它的 applicationConfig 方 法中尝试打开该文件,下面是该方法的片段:
                stream = servletContext.getResourceAsStream
                    ("/WEB-INF/web.xml");
                try {
                    url = servletContext.getResource(
                            "/WEB-INF/web.xml");
                } catch (MalformedURLException e) {
                    log.error(sm.getString("contextConfig.applicationUrl"));
                }
            }
        }
        if (stream == null || url == null) {
            if (log.isDebugEnabled()) {
                log.debug(sm.getString("contextConfig.applicationMissing") + " " + context);
            }
        } else {
            source = new InputSource(url.toExternalForm());
            source.setByteStream(stream);
        }
    } finally {
        if (source == null && stream != null) {
            try {
                stream.close();
            } catch (IOException e) {
                // Ignore
            }
        }
    }

    return source;
}
上面这个方法的逻辑很简单,就是看ServletContext中是否有org.apache.catalina.deploy.alt_dd属性,如果有,则取之,否则取项目目录下的/WEB-INF/web.xml文件,那ServletContext的org.apache.catalina.deploy.alt_dd这个属性又是从何而来呢?
public ServletContext getServletContext() {
    if (context == null) {
        context = new ApplicationContext(this);
        if (altDDName != null)
            context.setAttribute("org.apache.catalina.deploy.alt_dd",altDDName);
    }
    return (context.getFacade());

}
看到没有,最终来源于StandardContext的altDDName属性,因此可以在<Context />标签中配置此属性,从而来修改Context 的WebXml。
ServletContext的实现-ApplicationContext
在Servlet的规范中规定了一个ServletContext接口,它提供了Web应用所有的Servlet的视图, 通过它可以对某个Web应用的各种资源和功能进行访问 。
ServletContext接口包含了主要常见方法如下 :
- addFilter , 往Servlet上下文中添加Filter 。
- addListener ,往Servlet上下文中添加Listener。
- addServlet ,往Servlet上下文中添加servlet 。
- getAttribute , 从Servlet上下文中获取某个属性值 。
- setAttribute, 设置Servlet上下文中某个属性值 。
- removeAttribute ,从Servlet上下文中删除某个属性。
- setInitParameter , 设置Web应用配置的初始化值 。
- getInitParameter , 获取WEb应用配置的初始化值 。
- getResourceAsStream , 从Servlet上下文中获取某个资源流。
对于Tomcat 容器, Context 容器才是其运行时真正的环境,为了满足Servlet规范,它必须包含一个ServletContext接口的实现, 这个实现就是ApplicationContext ,ApplicationContext是ServletContext的标准实现, 用它来表示某个Web应用的运行环境,每个Tomcat 的Context 容器都会包含一个ApplicationContext 。
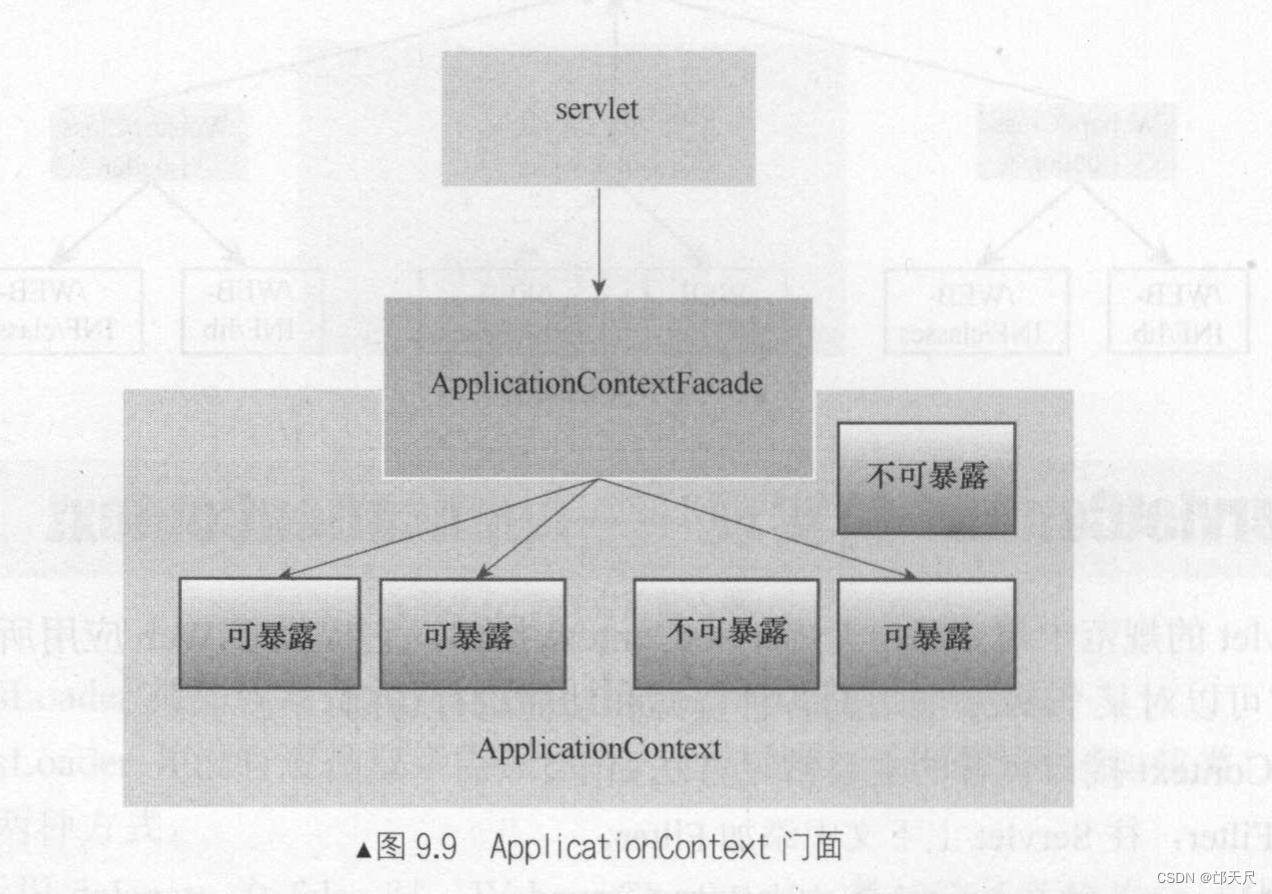
ApplicationContext对ServletContext接口的所有方法都进行了实现, 所以Web开发人员可以在Servlet中通过getServletContext()方法获得该上下文,进行再对上下文进行操作或获取上下文的各种资源 , 但实际上getServletContext()获取到的并非是ApplicationContext对象,而是一个ApplicationContext的门面对象ApplicationContextFacade , 门面模式的作用就是提供了一个类似于代理的访问模式,把ApplicationContext里面不该暴露的地方和属性屏蔽掉, 不让Web开发人员访问 。
如图9.9所示 ,ApplicationContext提供了一个ApplicationContextFacade的门面对象,Web开发人员编写Servlet逻辑时只能获取到该门面对象,该门面对象只提供了ApplicationContext可暴露的方法和属性访问,对于一些运行时重要属性和内部方法则不能给暴露给Web开发人员,以免影响整个Web应用的运行。
ApplicationContext的实现很大程序上依赖于Tomcat 的Context容器,它需要从Context容器中获取各种资源 , 如Servlet信息,Filter信息, 而像getResourceAsStream方法其实也获取Context容器里面 的某资源然后返回流。
所以总的来说,ApplicationContext 就是为了满足Servlet标准ServletContext接口而实现的一个类, 它按Servlet的规范要求提供了各种实现方法 。
接下来看从jar包中扫描web-fragment.xml实现。
protected Map<String,WebXml> processJarsForWebFragments(WebXml application) {
	//  默认值为StandardJarScanner
    JarScanner jarScanner = context.getJarScanner();

    boolean parseRequired = true;
    Set<String> absoluteOrder = application.getAbsoluteOrdering();
    if (absoluteOrder != null && absoluteOrder.isEmpty() &&
            !context.getXmlValidation()) {
        // Skip parsing when there is an empty absolute ordering and
        // validation is not enabled
        parseRequired = false;
    }

    FragmentJarScannerCallback callback =
            new FragmentJarScannerCallback(parseRequired);

    jarScanner.scan(context.getServletContext(),
            context.getLoader().getClassLoader(), callback,
            pluggabilityJarsToSkip);

    return callback.getFragments();
}
进入StandardJarScanner的scan()方法 ,这里需要注意, callback是FragmentJarScannerCallback,因此在找到文件回调时,我们直接进入FragmentJarScannerCallback分析即可。
public void scan(ServletContext context, ClassLoader classloader,
        JarScannerCallback callback, Set<String> jarsToSkip) {

    if (log.isTraceEnabled()) {
        log.trace(sm.getString("jarScan.webinflibStart"));
    }

    final Set<String> ignoredJars;
    if (jarsToSkip == null) {
    	// 默认取System.getProperty("tomcat.util.scan.DefaultJarScanner.jarsToSkip");
        ignoredJars = defaultJarsToSkip;
    } else {
        ignoredJars = jarsToSkip;
    }

    // Scan WEB-INF/lib
    Set<String> dirList = context.getResourcePaths("/WEB-INF/lib/");
    if (dirList != null) {
        for (String path : dirList) {
            if (path.endsWith(".jar") &&
                !Matcher.matchName(ignoredJars,
                    path.substring(path.lastIndexOf('/')+1))) {
                // Need to scan this JAR
                if (log.isDebugEnabled()) {
                    log.debug(sm.getString("jarScan.webinflibJarScan", path));
                }
                URL url = null;
                try {
                    // File URLs are always faster to work with so use them
                    // if available.
                    String realPath = context.getRealPath(path);
                    if (realPath == null) {
                        url = context.getResource(path);
                    } else {
                        url = (new File(realPath)).toURI().toURL();
                    }
                    process(callback, url);
                } catch (IOException e) {
                    log.warn(sm.getString("jarScan.webinflibFail", url), e);
                }
            } else {
                if (log.isTraceEnabled()) {
                    log.trace(sm.getString("jarScan.webinflibJarNoScan", path));
                }
            }
        }
    }

    // Scan the classpath
    if (scanClassPath && classloader != null) {
        doScanClassPath(classloader, callback, ignoredJars);
    }
}


protected void doScanClassPath(ClassLoader classloader, JarScannerCallback callback,
        Set<String> ignoredJars) {

    if (log.isTraceEnabled()) {
        log.trace(sm.getString("jarScan.classloaderStart"));
    }

    ClassLoader loader = classloader;

    ClassLoader stopLoader = null;
    if (!scanBootstrapClassPath) {
        // Stop when we reach the bootstrap class loader
        stopLoader = ClassLoader.getSystemClassLoader().getParent();
    }

    Set<URL> processedURLs = new HashSet<URL>();

    while (loader != null && loader != stopLoader) {
        if (loader instanceof URLClassLoader) {
            URL[] urls = ((URLClassLoader) loader).getURLs();
            for (int i=0; i<urls.length; i++) {
                // Extract the jarName if there is one to be found
                String jarName = getJarName(urls[i]);

                // Skip JARs known not to be interesting and JARs
                // in WEB-INF/lib we have already scanned
                if (jarName != null &&
                    !(Matcher.matchName(ignoredJars, jarName) ||
                    	// 它将对Web 应用的WEB-INF/lib目录的Jar 包进行扫描,它支持声明忽略某些Jar包
                    	// 同时它还支持classpath 下的jar 包进行扫描,然而,如果classpath 下的jar
                    	// 包与WEB-INF/lib 目录下的JAR包相同 。则会被忽略掉。
                        urls[i].toString().contains(
                              "/WEB-INF/lib/" + jarName))) {
                    if (log.isDebugEnabled()) {
                        log.debug(sm.getString("jarScan.classloaderJarScan", urls[i]));
                    }
                    try {
                        process(callback, urls[i]);
                        // 如果jdk8和jdk9都有相同的包,优先使用jdk8
                        processedURLs.add(urls[i]);
                    } catch (IOException ioe) {
                        log.warn(sm.getString("jarScan.classloaderFail",urls[i]), ioe);
                    }
                } else {
                    if (log.isTraceEnabled()) {
                        log.trace(sm.getString("jarScan.classloaderJarNoScan", urls[i]));
                    }
                }
            }
        }
        loader = loader.getParent();
    }

	// java9不考虑
    if (JreCompat.isJre9Available()) {
        // The application and platform class loaders are not
        // instances of URLClassLoader. Use the class path in this
        // case.
        List<URL> urls = getClassPath();
        // Also add any modules
        Deque<URL> modulePathUrls = new LinkedList<URL>();
        JreCompat.getInstance().addBootModulePath(modulePathUrls);
        urls.addAll(modulePathUrls);
        // Process URLs
        for (URL url : urls) {
            if (!processedURLs.contains(url)) {
                // Avoid duplicates
                processedURLs.add(url);

                // Extract the jarName if there is one to be found
                String jarName = getJarName(url);
                if (jarName != null && Matcher.matchName(ignoredJars, jarName)) {
                    continue;
                }

                try {
                    process(callback, url);
                } catch (IOException ioe) {
                    log.warn(sm.getString("jarScan.classloaderFail",url), ioe);
                }
            }
        }
    }
}
其实上面的代码那么多,实现逻辑还是很简单的。 Tomcat 中的JarScanner 的标准实现为StandardJarScanner ,它将对Web 应用的WEB-INF/lib目录的Jar 包进行扫描,它支持声明忽略某些Jar包同时它还支持classpath 下的jar 包进行扫描,然而,如果classpath 下的jar 包与WEB-INF/lib 目录下的JAR包相同 。则会被忽略掉。扫描到的url都由process()方法处理,进入process()方法 。
protected void process(JarScannerCallback callback, URL url)
        throws IOException {

    if (log.isTraceEnabled()) {
        log.trace(sm.getString("jarScan.jarUrlStart", url));
    }

    URLConnection conn = url.openConnection();
    if (conn instanceof JarURLConnection) {
        callback.scan((JarURLConnection) conn);
    } else {
        String urlStr = url.toString();
        if (urlStr.startsWith("file:") || urlStr.startsWith("jndi:") ||
                urlStr.startsWith("http:") || urlStr.startsWith("https:")) {
            if (urlStr.endsWith(".jar")) {
                URL jarURL = UriUtil.buildJarUrl(urlStr);
                callback.scan((JarURLConnection) jarURL.openConnection());
            } else {
                File f;
                try {
                    f = new File(url.toURI());
                    if (f.isFile() && scanAllFiles) {
                        // Treat this file as a JAR
                        URL jarURL = UriUtil.buildJarUrl(f);
                        callback.scan((JarURLConnection) jarURL.openConnection());
                    } else if (f.isDirectory() && scanAllDirectories) {
                        File metainf = new File(f.getAbsoluteFile() +
                                File.separator + "META-INF");
                        if (metainf.isDirectory()) {
                            callback.scan(f);
                        }
                    }
                } catch (Throwable t) {
                    ExceptionUtils.handleThrowable(t);
                    // Wrap the exception and re-throw
                    IOException ioe = new IOException();
                    ioe.initCause(t);
                    throw ioe;
                }
            }
        }
    }
}
上面scan方法分两种情况,一种是jar包,另外一种是文件目录,并且目录下有META-INF 也是一个目录 。
 private class FragmentJarScannerCallback implements JarScannerCallback {

    private static final String FRAGMENT_LOCATION =
        "META-INF/web-fragment.xml";

    @Override
    public void scan(JarURLConnection jarConn) throws IOException {

        URL url = jarConn.getURL();
        URL resourceURL = jarConn.getJarFileURL();
        Jar jar = null;
        InputStream is = null;
        WebXml fragment = new WebXml();

        try {
            jar = JarFactory.newInstance(url);
            if (parseRequired || context.getXmlValidation()) {
                is = jar.getInputStream(FRAGMENT_LOCATION);
            }

            if (is == null) {
                // If there is no web-fragment.xml to process there is no
                // impact on distributable
                fragment.setDistributable(true);
            } else {
                InputSource source = new InputSource(
                        "jar:" + resourceURL.toString() + "!/" +
                        FRAGMENT_LOCATION);
                source.setByteStream(is);
                parseWebXml(source, fragment, true);
            }
        } finally {
            if (jar != null) {
                jar.close();
            }
            addFragment(fragment, url);
        }
    }


    @Override
    public void scan(File file) throws IOException {
        InputStream stream = null;
        WebXml fragment = new WebXml();

        try {
            File fragmentFile = new File(file, FRAGMENT_LOCATION);
            if (fragmentFile.isFile()) {
                stream = new FileInputStream(fragmentFile);
                InputSource source =
                    new InputSource(fragmentFile.toURI().toURL().toString());
                source.setByteStream(stream);
                parseWebXml(source, fragment, true);
            } else {
                // If there is no web.xml, normal folder no impact on
                // distributable
                fragment.setDistributable(true);
            }
        } finally {
            if (stream != null) {
                try {
                    stream.close();
                } catch (IOException e) {
                }
            }
            addFragment(fragment, file.toURI().toURL());
        }
    }

    private void addFragment(WebXml fragment, URL url) {
        fragment.setURL(url);
        if (fragment.getName() == null) {
            fragment.setName(url.toString());
        }
        fragment.setJarName(extractJarFileName(url));
        if (fragments.containsKey(fragment.getName())) {
            // Duplicate. Mark the fragment that has already been found with
            // this name as having a duplicate so Tomcat can handle it
            // correctly when the fragments are being ordered.
            String duplicateName = fragment.getName();
            fragments.get(duplicateName).setDuplicated(true);
            // Rename the current fragment so it doesn't clash
            fragment.setName(url.toString());
         }
        fragments.put(fragment.getName(), fragment);
    }

    public Map<String,WebXml> getFragments() {
        return fragments;
    }
}
JarScanner 在设计上采用了回调机制,每扫描到一个Jar包时都会调用回调对象进行处理,回调对象需要实现JarScannerCallBack 接口,此接口包含了scan(JarURLConnection urlConn) 和scan(File file) 两个方法,我们只需要将对Jar包处理的逻辑写入到这两个方法即可,JarScanner 在扫描到每个Jar 包后都会调用一次此方法,执行对该Jar 包的逻辑处理。
Jar 包扫描器为Context 容器的启动过程提供了方便的扫描Jar包的功能,它让开发过程中不必关注Web 应用Jar 包的搜索,而是专注于编写对Jar包中的TLD 文件和web-fragment.xml 文件的处理逻辑 。
接下来看扫描jar包下的web-fragment.xml生成的WebXml如何进行排序
public static Set<WebXml> orderWebFragments(WebXml application,
        Map<String,WebXml> fragments, ServletContext servletContext) {

    Set<WebXml> orderedFragments = new LinkedHashSet<WebXml>();

    boolean absoluteOrdering =
        (application.getAbsoluteOrdering() != null);
    boolean orderingPresent = false;

    if (absoluteOrdering) {
        orderingPresent = true;
        // Only those fragments listed should be processed
        Set<String> requestedOrder = application.getAbsoluteOrdering();

        for (String requestedName : requestedOrder) {
            if (WebXml.ORDER_OTHERS.equals(requestedName)) {
                // Add all fragments not named explicitly at this point
                for (Entry<String, WebXml> entry : fragments.entrySet()) {
                    if (!requestedOrder.contains(entry.getKey())) {
                        WebXml fragment = entry.getValue();
                        if (fragment != null) {
                            orderedFragments.add(fragment);
                        }
                    }
                }
            } else {
                WebXml fragment = fragments.get(requestedName);
                if (fragment != null) {
                    orderedFragments.add(fragment);
                } else {
                    log.warn(sm.getString("webXml.wrongFragmentName",requestedName));
                }
            }
        }
    } else {
        // Stage 0. Check there were no fragments with duplicate names
        // 如果有同名的fragment,则抛出异常
        for (WebXml fragment : fragments.values()) {
            if (fragment.isDuplicated()) {
                throw new IllegalArgumentException(
                        sm.getString("webXml.duplicateFragment", fragment.getName()));
            }
        }
        // Stage 1. Make all dependencies bi-directional - this makes the
        //          next stage simpler.
        for (WebXml fragment : fragments.values()) {
            Iterator<String> before =
                    fragment.getBeforeOrdering().iterator();
            while (before.hasNext()) {
                orderingPresent = true;
                String beforeEntry = before.next();
                if (!beforeEntry.equals(ORDER_OTHERS)) {
                    WebXml beforeFragment = fragments.get(beforeEntry);
                    if (beforeFragment == null) {
                        before.remove();
                    } else {
                        beforeFragment.addAfterOrdering(fragment.getName());
                    }
                }
            }
            Iterator<String> after = fragment.getAfterOrdering().iterator();
            while (after.hasNext()) {
                orderingPresent = true;
                String afterEntry = after.next();
                if (!afterEntry.equals(ORDER_OTHERS)) {
                    WebXml afterFragment = fragments.get(afterEntry);
                    if (afterFragment == null) {
                        after.remove();
                    } else {
                        afterFragment.addBeforeOrdering(fragment.getName());
                    }
                }
            }
        }

        // Stage 2. Make all fragments that are implicitly before/after
        //          others explicitly so. This is iterative so the next
        //          stage doesn't have to be.
        for (WebXml fragment : fragments.values()) {
            if (fragment.getBeforeOrdering().contains(ORDER_OTHERS)) {
                makeBeforeOthersExplicit(fragment.getAfterOrdering(), fragments);
            }
            if (fragment.getAfterOrdering().contains(ORDER_OTHERS)) {
                makeAfterOthersExplicit(fragment.getBeforeOrdering(), fragments);
            }
        }

        // Stage 3. Separate into three groups
        Set<WebXml> beforeSet = new HashSet<WebXml>();
        Set<WebXml> othersSet = new HashSet<WebXml>();
        Set<WebXml> afterSet = new HashSet<WebXml>();

        for (WebXml fragment : fragments.values()) {
            if (fragment.getBeforeOrdering().contains(ORDER_OTHERS)) {
                beforeSet.add(fragment);
                fragment.getBeforeOrdering().remove(ORDER_OTHERS);
            } else if (fragment.getAfterOrdering().contains(ORDER_OTHERS)) {
                afterSet.add(fragment);
                fragment.getAfterOrdering().remove(ORDER_OTHERS);
            } else {
                othersSet.add(fragment);
            }
        }

        // Stage 4. Decouple the groups so the ordering requirements for
        //          each fragment in the group only refer to other fragments
        //          in the group. Ordering requirements outside the group
        //          will be handled by processing the groups in order.
        //          Note: Only after ordering requirements are considered.
        //                This is OK because of the processing in stage 1.
        decoupleOtherGroups(beforeSet);
        decoupleOtherGroups(othersSet);
        decoupleOtherGroups(afterSet);

        // Stage 5. Order each group
        //          Note: Only after ordering requirements are considered.
        //                This is OK because of the processing in stage 1.
        orderFragments(orderedFragments, beforeSet);
        orderFragments(orderedFragments, othersSet);
        orderFragments(orderedFragments, afterSet);
    }

    // Avoid NPE when unit testing
    if (servletContext != null) {
        // Publish the ordered fragments
        List<String> orderedJarFileNames = null;
        if (orderingPresent) {
            orderedJarFileNames = new ArrayList<String>();
            for (WebXml fragment: orderedFragments) {
                orderedJarFileNames.add(fragment.getJarName());
            }
        }
        servletContext.setAttribute(ServletContext.ORDERED_LIBS,
                orderedJarFileNames);
    }

    return orderedFragments;
}
orderWebFragments()方法确实复杂,与其说是源码,不如说是算法更加确切,因此这里就不再深入每一行源码的研究了,但找了一个测试类,有兴趣可以研究一下算法。
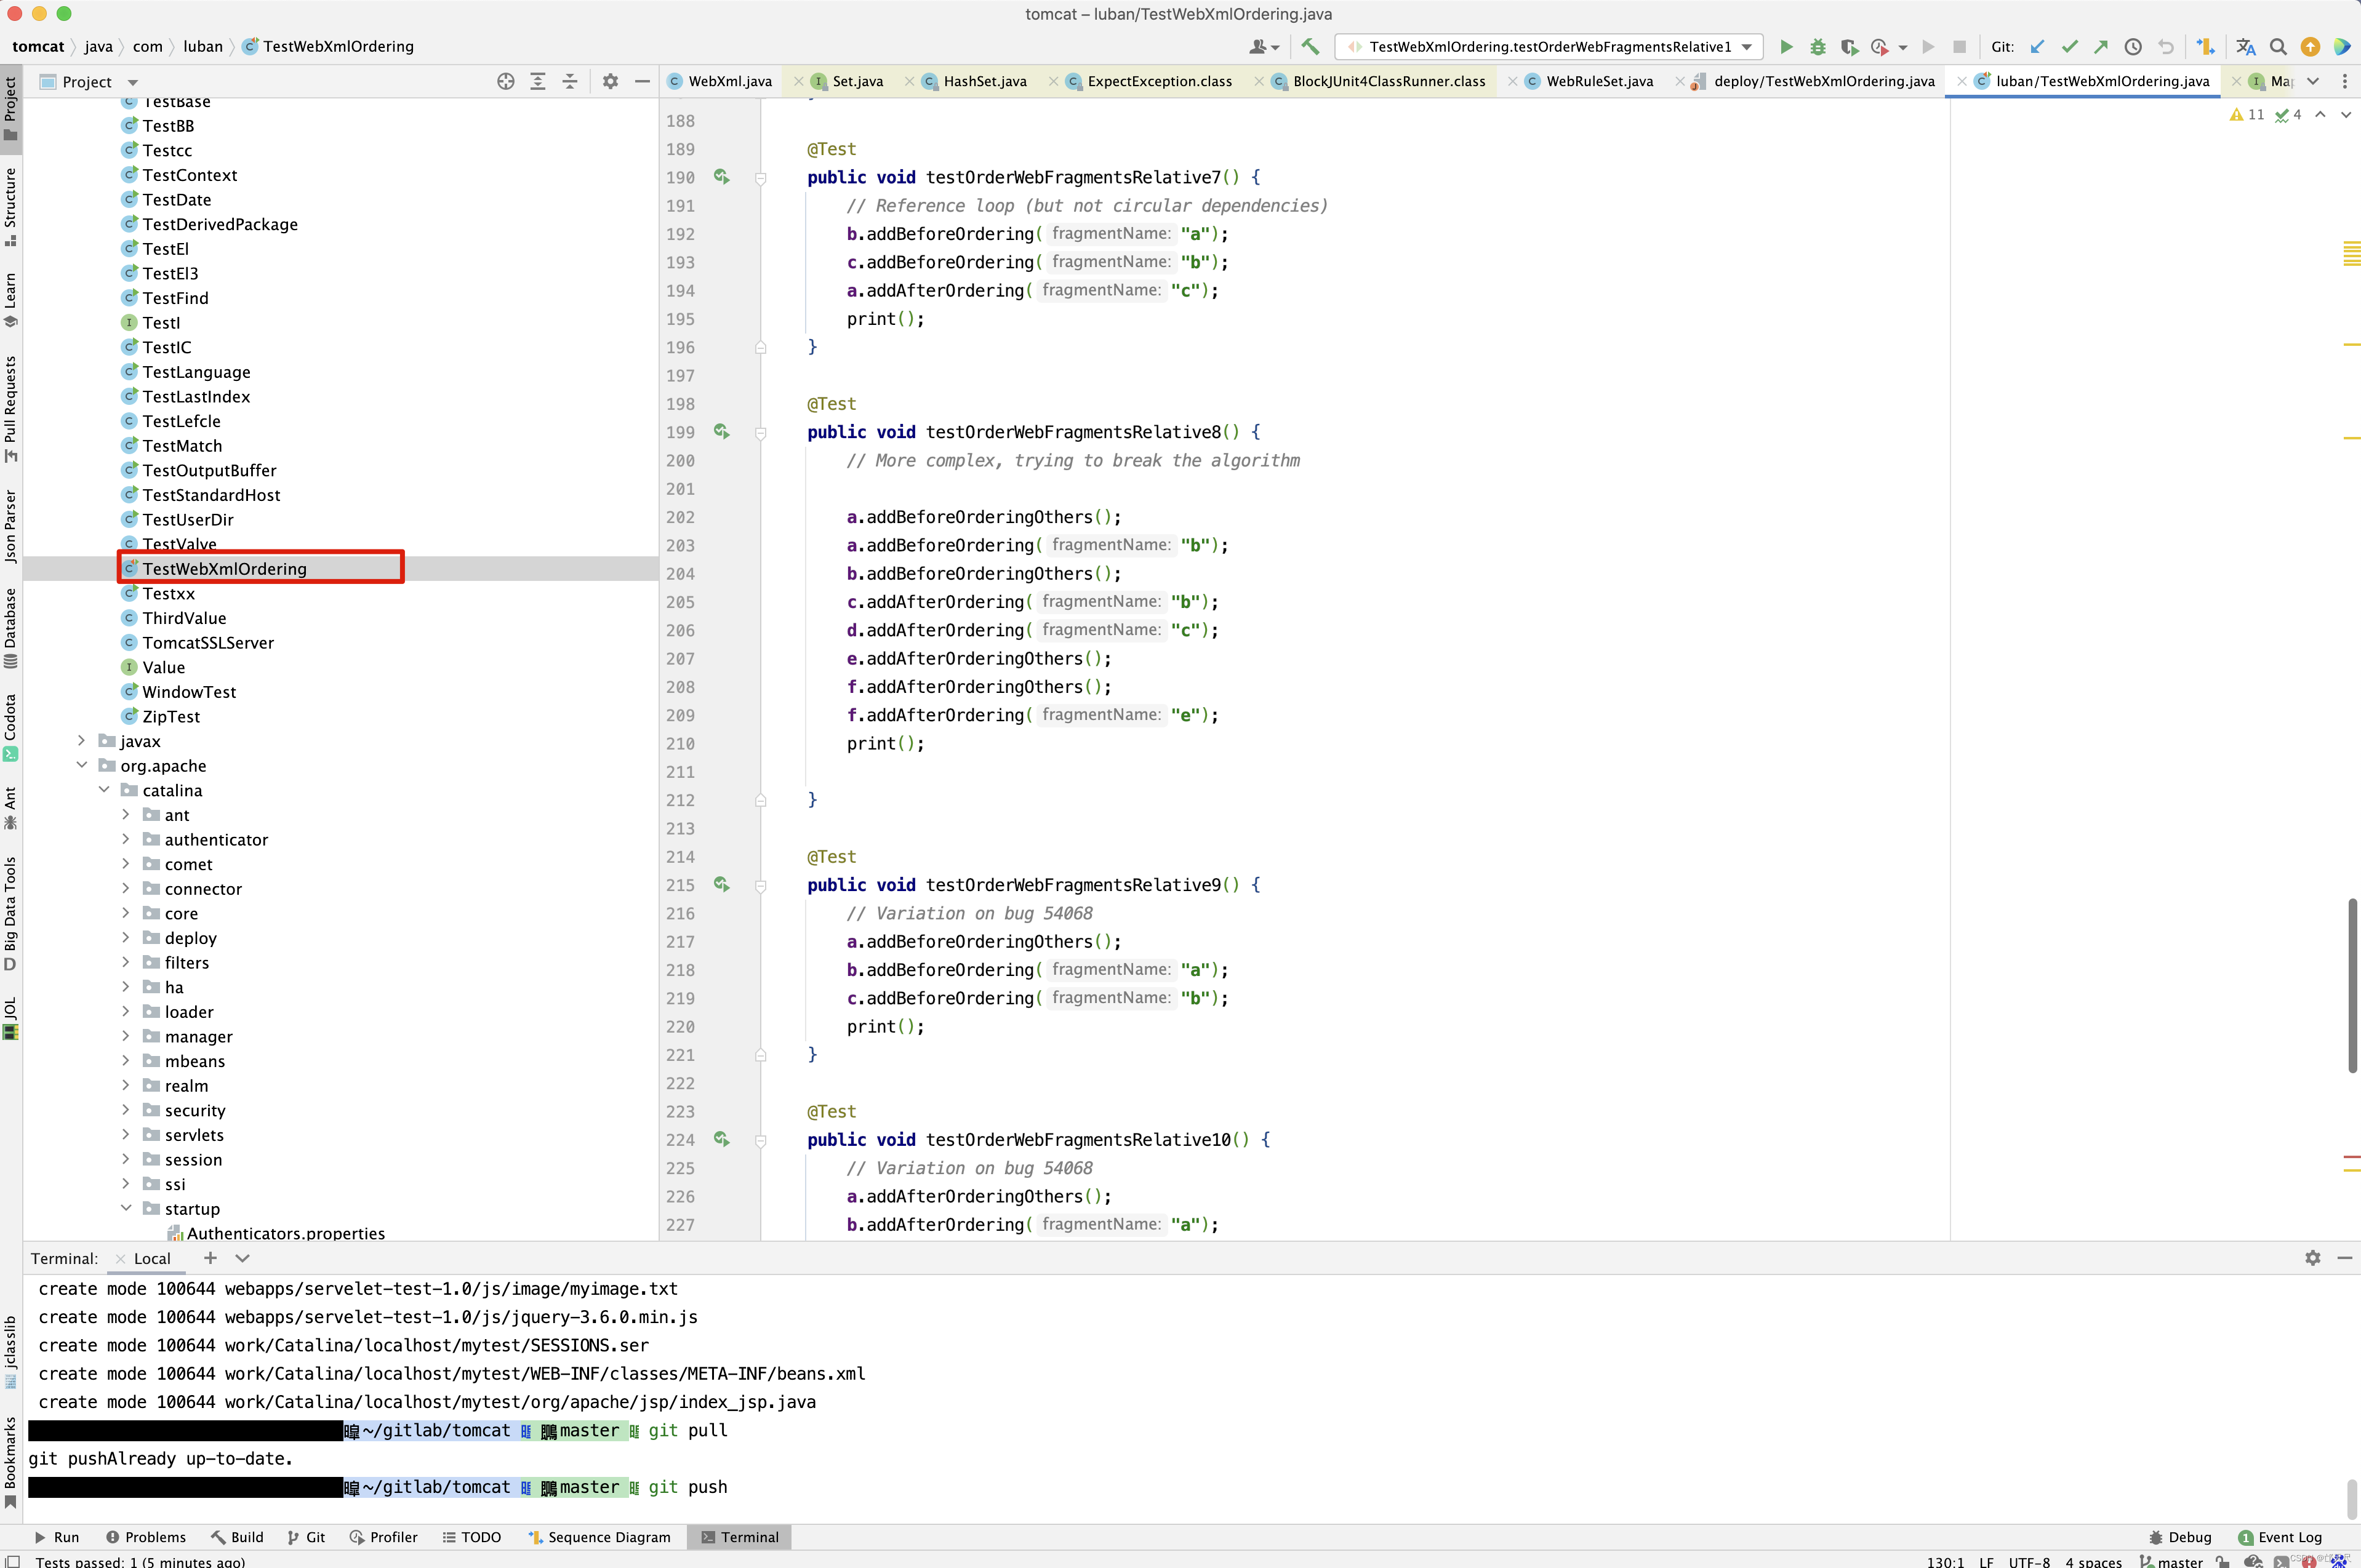
以testOrderWebFragmentsRelative8()为例。
@Before
public void setUp() {
    app = new WebXml();
    a = new WebXml();
    a.setName("a");
    b = new WebXml();
    b.setName("b");
    c = new WebXml();
    c.setName("c");
    d = new WebXml();
    d.setName("d");
    e = new WebXml();
    e.setName("e");
    f = new WebXml();
    f.setName("f");
  	// Control the input order
    fragments = new LinkedHashMap<String, WebXml>();
    fragments.put("a", a);
    fragments.put("b", b);
    fragments.put("c", c);
    fragments.put("d", d);
    fragments.put("e", e);
    fragments.put("f", f);
}

@Test
public void testOrderWebFragmentsRelative8() {
    a.addBeforeOrderingOthers();
    a.addBeforeOrdering("b");
    b.addBeforeOrderingOthers();
    c.addAfterOrdering("b");
    d.addAfterOrdering("c");
    e.addAfterOrderingOthers();
    f.addAfterOrderingOthers();
    f.addAfterOrdering("e");
    print();
}

public void print() {
    Set<WebXml> ordered = WebXml.orderWebFragments(app, fragments, null);
    Iterator<WebXml> iter = ordered.iterator();
    while (iter.hasNext()) {
        WebXml webXml = iter.next();
        System.out.println(webXml.getName());
    }
}
向fragments中添加名称为a,b,c,d,e,f的WebXml,再测试testOrderWebFragmentsRelative8()方法 ,我们从语义上来理解最后fragments的顺序 。 a在其他WebXml前面,a 在b 的WebXml前面, b 在其他WebXml前面,c 要在b 的WebXml后面,d 要在c 的WebXml后面,e 在其他WebXml后面,f 要在e 的WebXml后面。最终得到顺序
a
b
c
d
e
f
大家可能对addBeforeOrderingOthers() , addBeforeOrdering() … 这些方法不熟悉,tomcat是什么时候调用了这些方法呢?还是看XML的解析规则 。
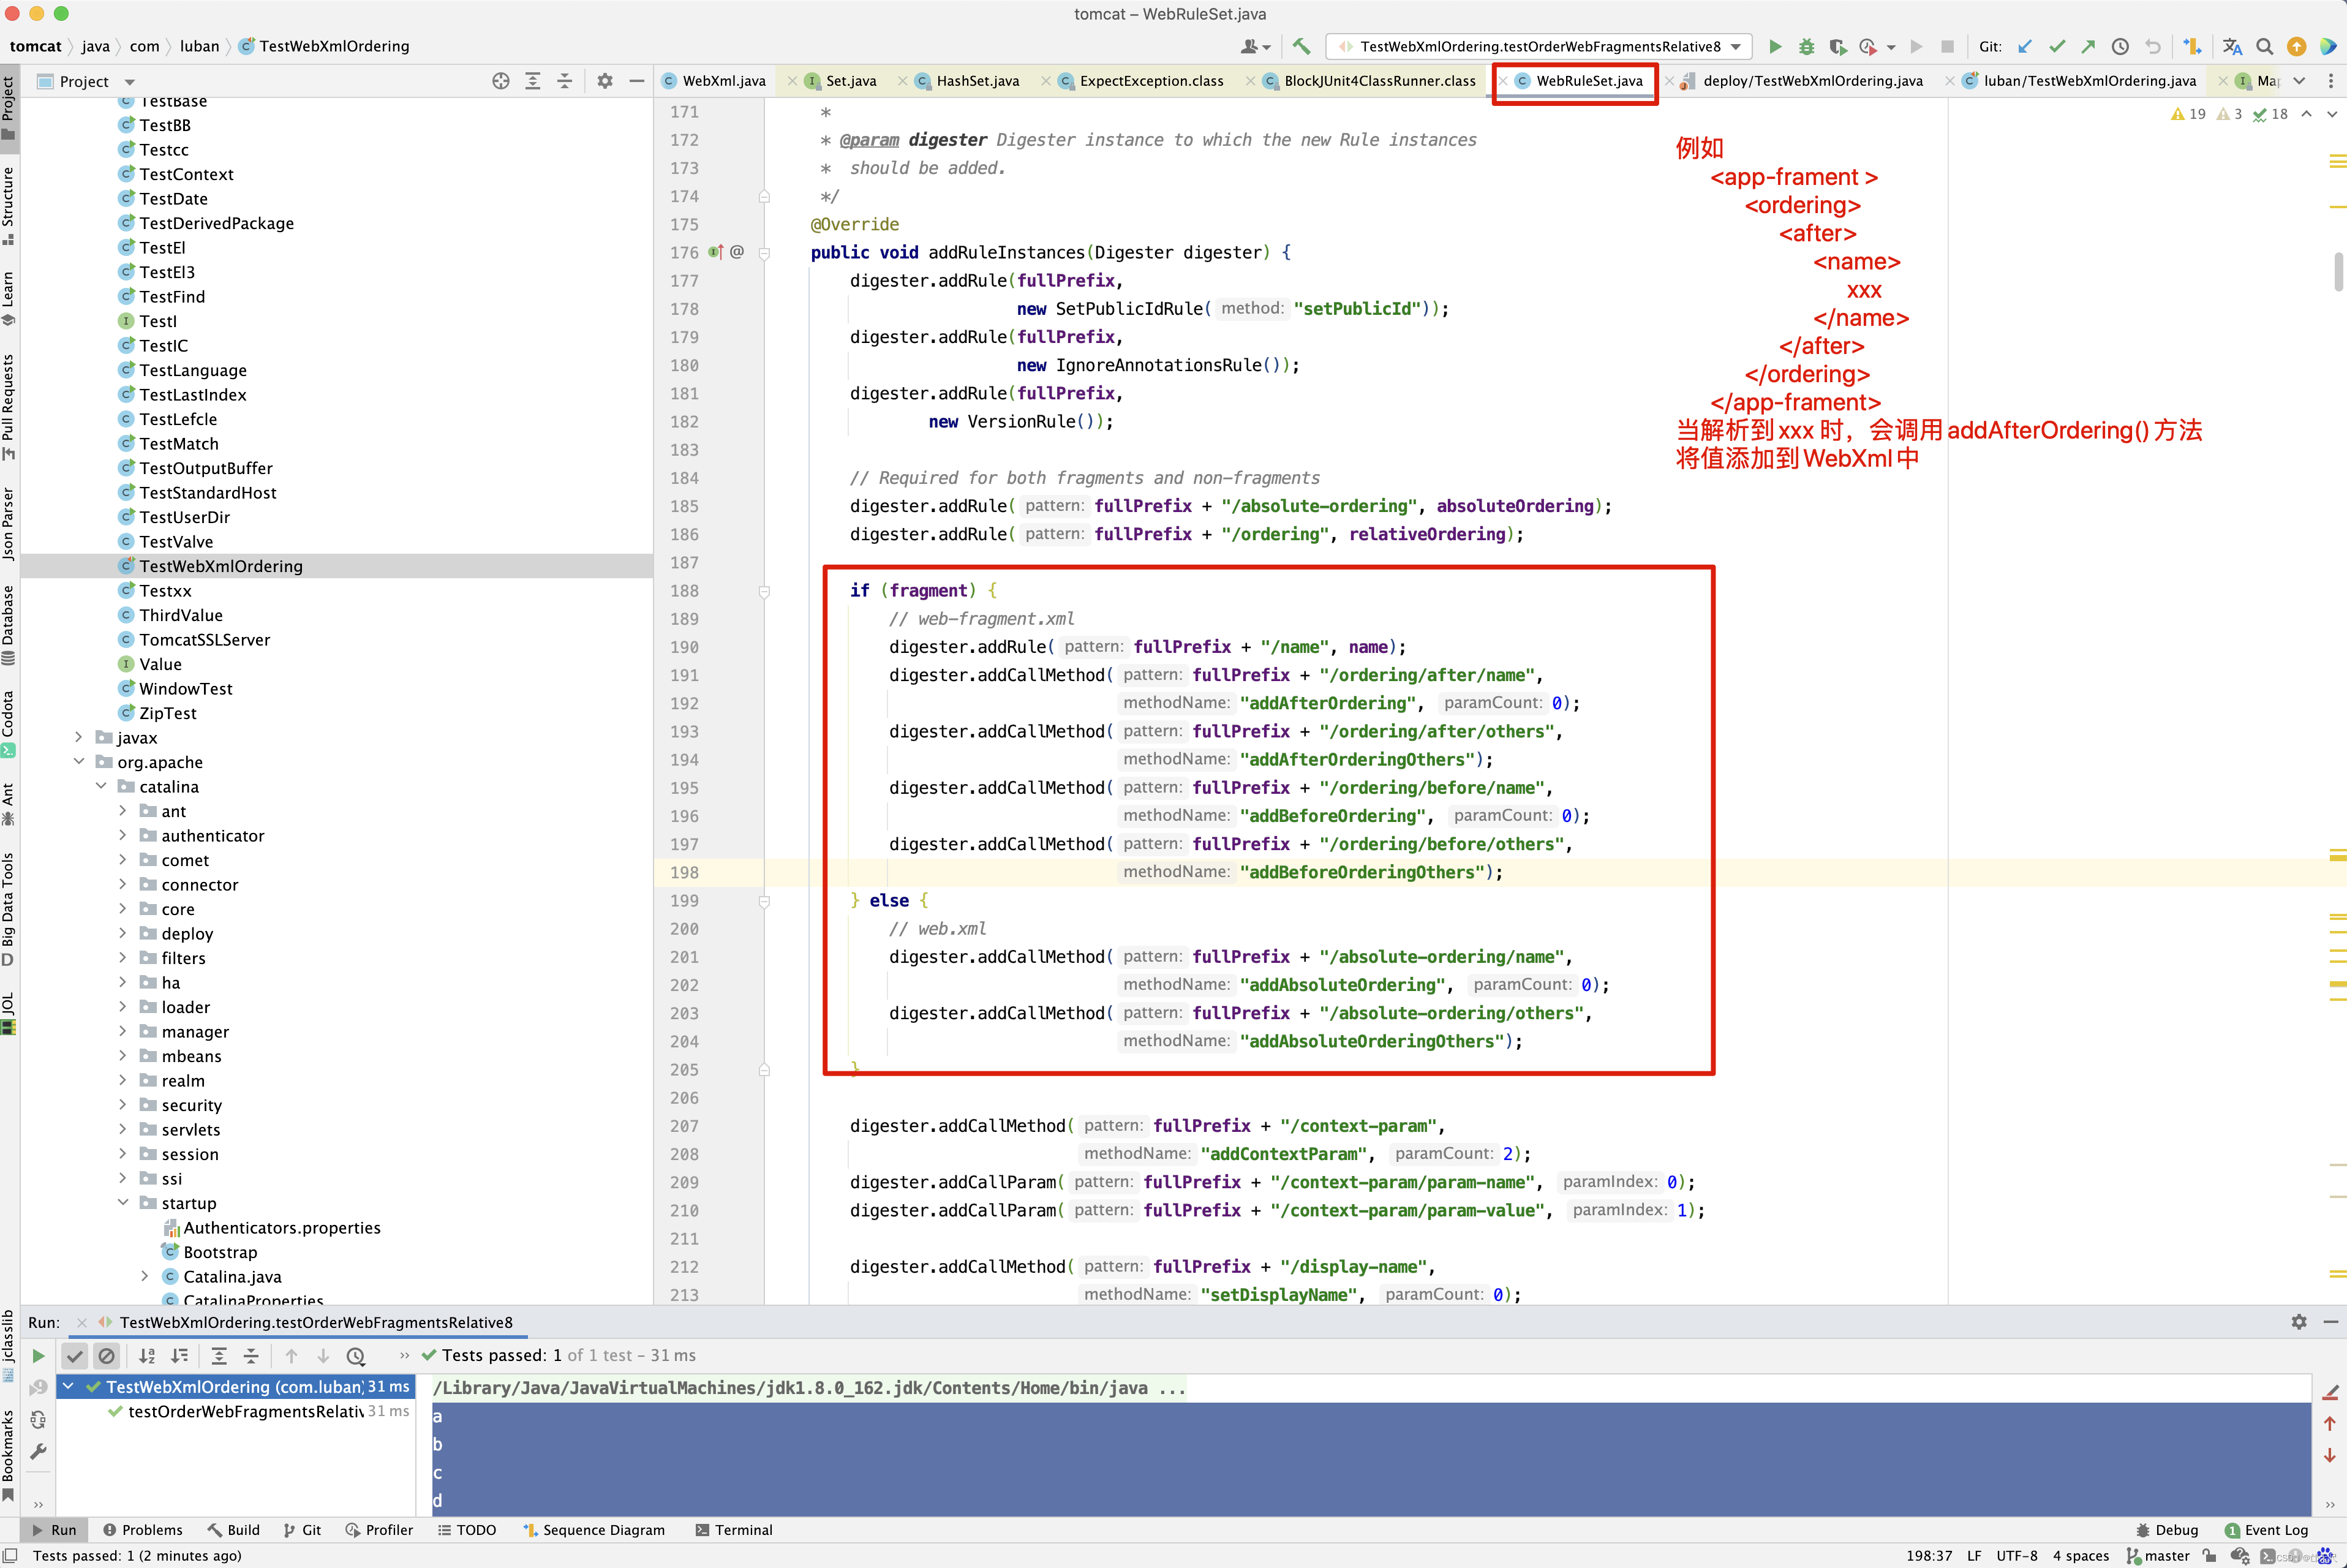
也就是说,我们可以在web.xml中配置,当前xml必须在哪个包的xml解析后面,或者当前xml在哪个包解析前面,或者在其他包的解析后面。建议还是去多测试一下TestWebXmlOrdering类,对其中的方法多打断点调试,才能理解WebFragments的排序规则。
ServletContainerInitializer 初始化器
在Web容器启动时为了让第三方组件机做一些初始化工作,例如,注册Servlet或者Filters等, Servlet 规范中通过ServletContainerInitializer实现些功能,每个框架要使用ServletContainerInitializer就必须对应Jar包的META-INF/services ,目录中创建一个名为javax.servlet.ServletContainerInitializer的文件,文件内容指定的具体的ServletContainerInitializer的实现类, 于是 ,当Web容器启动时,就会运行这个初始化器做一些组件内的初始化工作 。
一般伴随着ServletContainerInitialzer一起使用的还有HandlesTypes注解,通过HandlesTypes可以将感兴趣的一些类注入到ServletContainerInitializer的onStartup方法中作为参数传入。
Tomcat容器的ServletContainerInitializer机制,主要交由Context容器和ContextConfig监听器共同实现,ContextConfig监听器首先负责在容器启动时读取每个Web应用的WEB-INF/lib目录下包含的Jar包的META-INF/services/javax.servlet.ServletContainerInitializer,以及Web目录下的META-INF/services/javax.servlet.ServletContainerInitializer, 通过反射完成这些ServletContainerInitializer的实例化,然后再设置到 Context容器中, 最后,Context容器启动时就会分别调用每个ServletContainerInitializer的onStartup方法 ,并将感兴趣的类作为参数传入 。
基本的实现机制如图9.10所示,首先,通过ContextConfig 监听器遍历每个Jar包或Web根目录的META-INF/services/javax.server.ServletContainerInitializer文件,根据读到的类的路径实体化每个ServletContainerInitializer,然后再分别将实例化的ServletContainerInitializer设置到Context容器中, 最后,Context容器启动时分别调用所有的ServletContainerInitializer对象的onStartup方法 。
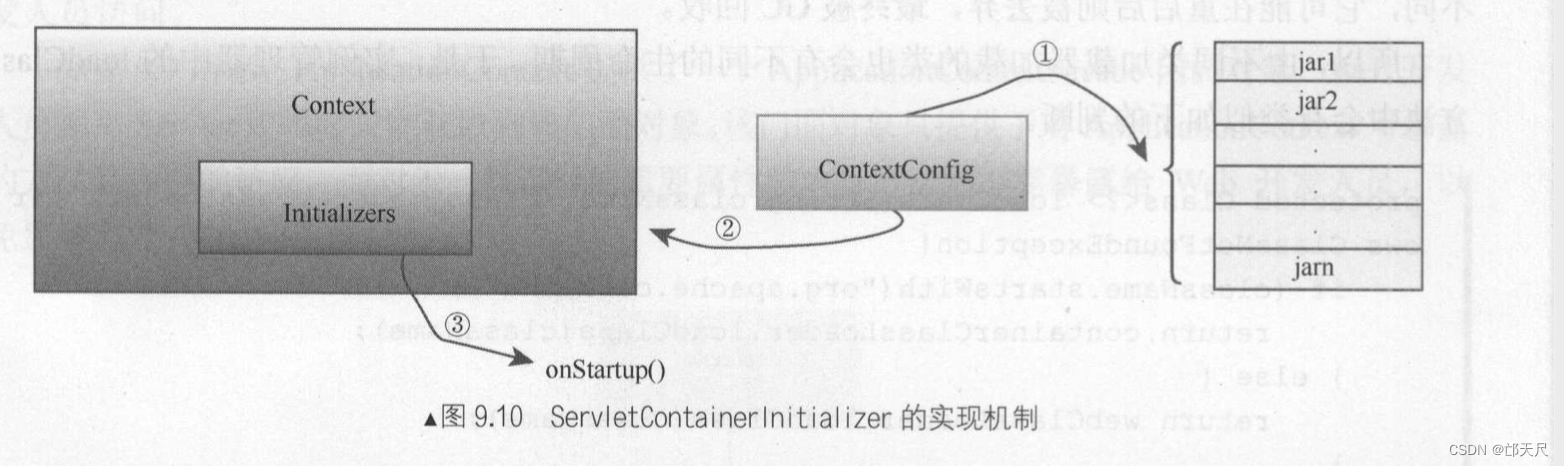
protected void processServletContainerInitializers() {
    List<ServletContainerInitializer> detectedScis;
    try {
        WebappServiceLoader<ServletContainerInitializer> loader =
                new WebappServiceLoader<ServletContainerInitializer>(
                        context);
        // 1. Tomcat容器的ServletContainerInitializer机制,主要交由Context 容器和ContextConfig监听器共同实现, ContextConfig
        // 监听器首先负责在容器启动时读取每个Web应用的WEB-INF/lib目录下包含的Jar包的META-INF/lib/javax.servlet.ServletContainerInitializer
        // 2. 以及Web根目录下的META-INF/services/javax.servlet.ServletContainerInitializer ,通过反射完成这些ServletContainerInitializer
        // 的实例化,然后再设置到Context 容器中
        detectedScis = loader.load(ServletContainerInitializer.class);
    } catch (IOException e) {
        log.error(sm.getString(
                "contextConfig.servletContainerInitializerFail",
                context.getName()),
            e);
        ok = false;
        return;
    }

    for (ServletContainerInitializer sci : detectedScis) {
        initializerClassMap.put(sci, new HashSet<Class<?>>());

        HandlesTypes ht;
        try {
            ht = sci.getClass().getAnnotation(HandlesTypes.class);
        } catch (Exception e) {
            if (log.isDebugEnabled()) {
                log.info(sm.getString("contextConfig.sci.debug",
                                sci.getClass().getName()),
                        e);
            } else {
                log.info(sm.getString("contextConfig.sci.info",
                        sci.getClass().getName()));
            }
            continue;
        }
        // 如果ServletContainerInitializer没有HandlesTypes注解,则
        // 忽略掉
        if (ht == null) {
            continue;
        }
        // 假如读出来的内容为com.seaboat.mytomcat.CustomServletContainerInitializer ,则通过反射实例化一个CustomServletContainerInitializer
        // 这里涉及到一个@HandlerTypes 注解的处理,被它标明的类需要作为参数传入 onStartup 方法中, 如下所示
        // @HandlesTypes({HttpServlet.class,Filter.class})
        // public class CustomServletContainerInitializer implements ServletContainerInitializer{
        //      public void onStartup(Set<Class<?>> classes, ServletContext servletContext) throws ServletException{
        //          for(Class c : classes ){
        //              System.out.println(c.getName());
        //          }
        //      }
        // }
        //  其中@HandlesTypes 标明的HttpServlet和Filter两个Class被注入onStartup方法中,所以这个注解也需要在 ContextConfig监听器
        // 中处理,前面已经介绍了注解的实现原理,由于有了编译器的协助,因此我们可以方便的通过ServletContainerInitializer 的Class
        // 对象获取到HandlesTypes对象,进而再获取到注解声明的类数组,下面就是代码的实现的地方
        // 获取到HttpServlet和Filter的Class对象数组,后面的Context 容器调用了CustomServletContainerInitializer对象的onStartup
        // 方法时作为参数传入,至此,即完成了Servlet规范的ServeltContainerInitializer 初始化smsm。
        Class<?>[] types = ht.value();
        if (types == null) {
            continue;
        }

        for (Class<?> type : types) {
            if (type.isAnnotation()) {
            	// @HandlerTypes 的values中有注解类型
                handlesTypesAnnotations = true;
            } else {
            	// @HandlerTypes 的values中有无注解类型
                handlesTypesNonAnnotations = true;
            }
            Set<ServletContainerInitializer> scis =
                    typeInitializerMap.get(type);
            if (scis == null) {
                scis = new HashSet<ServletContainerInitializer>();
                typeInitializerMap.put(type, scis);
            }
            scis.add(sci);
        }
    }
}
当读取到ClassLoader和WebappClassLoader中的META-INF/services/javax.servlet.ServletContainerInitializer文件内容,并将其中配置的类通过反射并存储于detectedScis中,此时关注ContextConfig中initializerClassMap和typeInitializerMap两个变量,initializerClassMap存储key是ServletContainerInitializer对象,而typeInitializerMap存储的是ServletContainerInitializer对象有@HandlesTypes注解,并且以HandlesTypes的values为key,而ServletContainerInitializer为value,如
MyServletContainerInitializer 和 YouServletContainerInitializer都配置了@HandlesTypes(value = {Filter.class}) 注解,因此typeInitializerMap中会存储key为Filter.class,值为拥有 MyServletContainerInitializer和YouServletContainerInitializer 两个对象的HashSet。
接下来看load()方法 。 load()方法的用意就是加载当前容器 /WEB-INF/classes/ 和WEB-INF/lib下寻找所有ServletContainerInitializer
public List<T> load(Class<T> serviceType) throws IOException {
	// META-INF/services/javax.servlet.ServletContainerInitializer
    String configFile = "META-INF/services/" + serviceType.getName();

    LinkedHashSet<String> applicationServicesFound = new LinkedHashSet<String>();
    LinkedHashSet<String> containerServicesFound = new LinkedHashSet<String>();

    ClassLoader loader = servletContext.getClassLoader();

    // if the ServletContext has ORDERED_LIBS, then use that to specify the
    // set of JARs from WEB-INF/lib that should be used for loading services
    @SuppressWarnings("unchecked")
    // 如果配置了javax.servlet.context.orderedLibs,则从这个目录下取,将扫描到的值保存到applicationServicesFound中
    List<String> orderedLibs =
            (List<String>) servletContext.getAttribute("javax.servlet.context.orderedLibs");
    if (orderedLibs != null) {
        // handle ordered libs directly, ...
        for (String lib : orderedLibs) {
            URL jarUrl = servletContext.getResource("/WEB-INF/lib/" + lib);
            if (jarUrl == null) {
                // should not happen, just ignore
                continue;
            }

            String base = jarUrl.toExternalForm();
            URL url;
            if (base.endsWith("/")) {
                url = new URL(base + configFile);
            } else {
                url = UriUtil.buildJarUrl(base, configFile);
            }
            try {
                parseConfigFile(applicationServicesFound, url);
            } catch (FileNotFoundException e) {
                // no provider file found, this is OK
            }
        }

        // and the parent ClassLoader for all others
        loader = context.getParentClassLoader();
    }

    Enumeration<URL> resources;
    if (loader == null) {
        resources = ClassLoader.getSystemResources(configFile);
    } else {
        resources = loader.getResources(configFile);
    }
    while (resources.hasMoreElements()) {
        parseConfigFile(containerServicesFound, resources.nextElement());
    }

    // Filter the discovered container SCIs if required
    if (containerSciFilterPattern != null) {
        Iterator<String> iter = containerServicesFound.iterator();
        while (iter.hasNext()) {
        	// 以containerSciFilterPattern为规则
        	// 过滤掉containerServicesFound中找到的ServletContainerInitializer
            if (containerSciFilterPattern.matcher(iter.next()).find()) {
                iter.remove();
            }
        }
    }

    // Add the application services after the container services to ensure
    // that the container services are loaded first
    containerServicesFound.addAll(applicationServicesFound);

    // load the discovered services
    if (containerServicesFound.isEmpty()) {
        return Collections.emptyList();
    }

    // 首先,通过ContextConfig 监听器遍历每个Jar 包或者Web 根目录的META-INF/services/javax.servlet.ServletContainerInitializer文件 。
    // 根据读到的类路径实例化每个ServletContainerInitalizer ,然后,再分别将实例化ServletContainerInitializer 设置进Context 容器
    // 中,最后,Context 容器启动时分别调用所有的ServletContainerInitializer对象onStartup方法 。
    return loadServices(serviceType, containerServicesFound);
}
load()方法的原理很简单,先看是否配置了javax.servlet.context.orderedLibs目录,如果配置了,则从这个目录中查找,如果没有配置,则从当前StandardContext的WebappLoader的resources()中查找,当然啦,如果StandardContext中配置了containerSciFilter正则表达式,则过滤掉满足containerSciFilter正则的ServletContainerInitializer配置,接下来看 getResources()方法 。
public Enumeration<URL> getResources(String name) throws IOException {

    Enumeration<URL> parentResources = getParent().getResources(name);
	// 从WebappClassLoader中查找资源
    Enumeration<URL> localResources = findResources(name);

    // Need to combine these enumerations. The order in which the
    // Enumerations are combined depends on how delegation is configured
    if (delegate) {
        return new CombinedEnumeration(parentResources, localResources);
    } else {
        return new CombinedEnumeration(localResources, parentResources);
    }
}
先来看getParent()是什么 ?
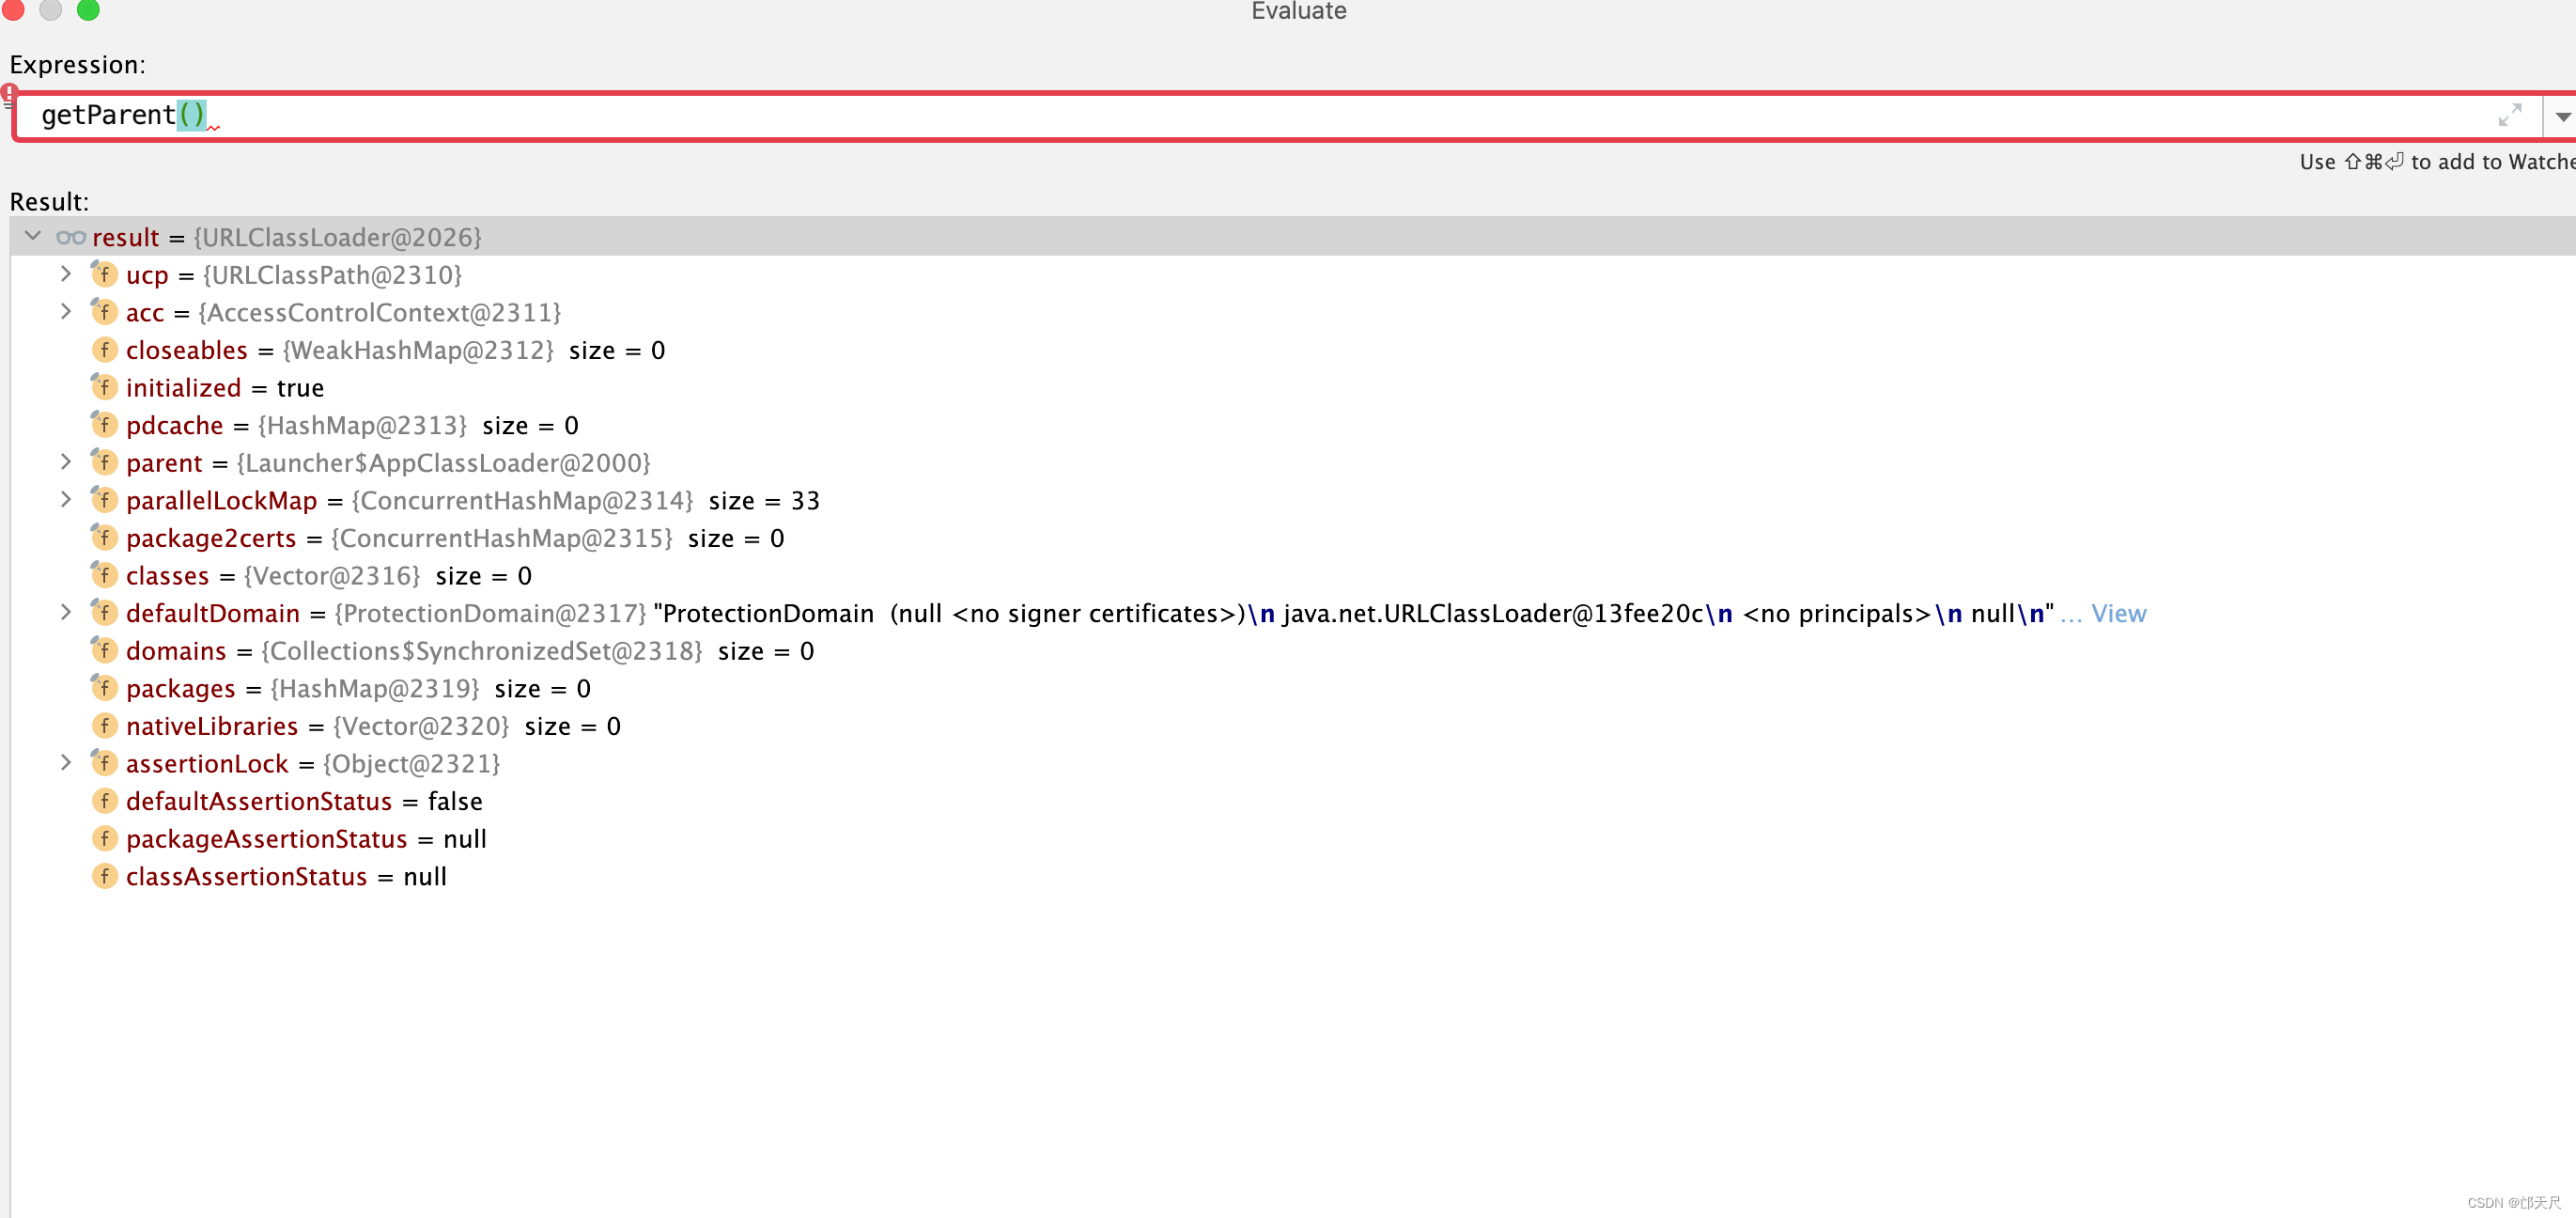
public Enumeration<URL> getResources(String name) throws IOException {
    @SuppressWarnings("unchecked")
    Enumeration<URL>[] tmp = (Enumeration<URL>[]) new Enumeration<?>[2];
    // 如果父类加载器存在,则从父类加载器中查找Resource
    if (parent != null) {
        tmp[0] = parent.getResources(name);
    } else {
    	// 如果父类加载器为空,则从启动类加载器中查找
        tmp[0] = getBootstrapResources(name);
    }
    // 从自身中查找
    tmp[1] = findResources(name);

    return new CompoundEnumeration<>(tmp);
}
大家看到这里,发现这不就是双亲委派模型不,先从父类加载器中查找类或资源,如果父类加载器为空,则从启动类加载器中查找,如果还查找不到,再从自身类加载器中查找,这段代码用到了递归查找,需要大家注意 。 结合之前的类加载图更加清晰。
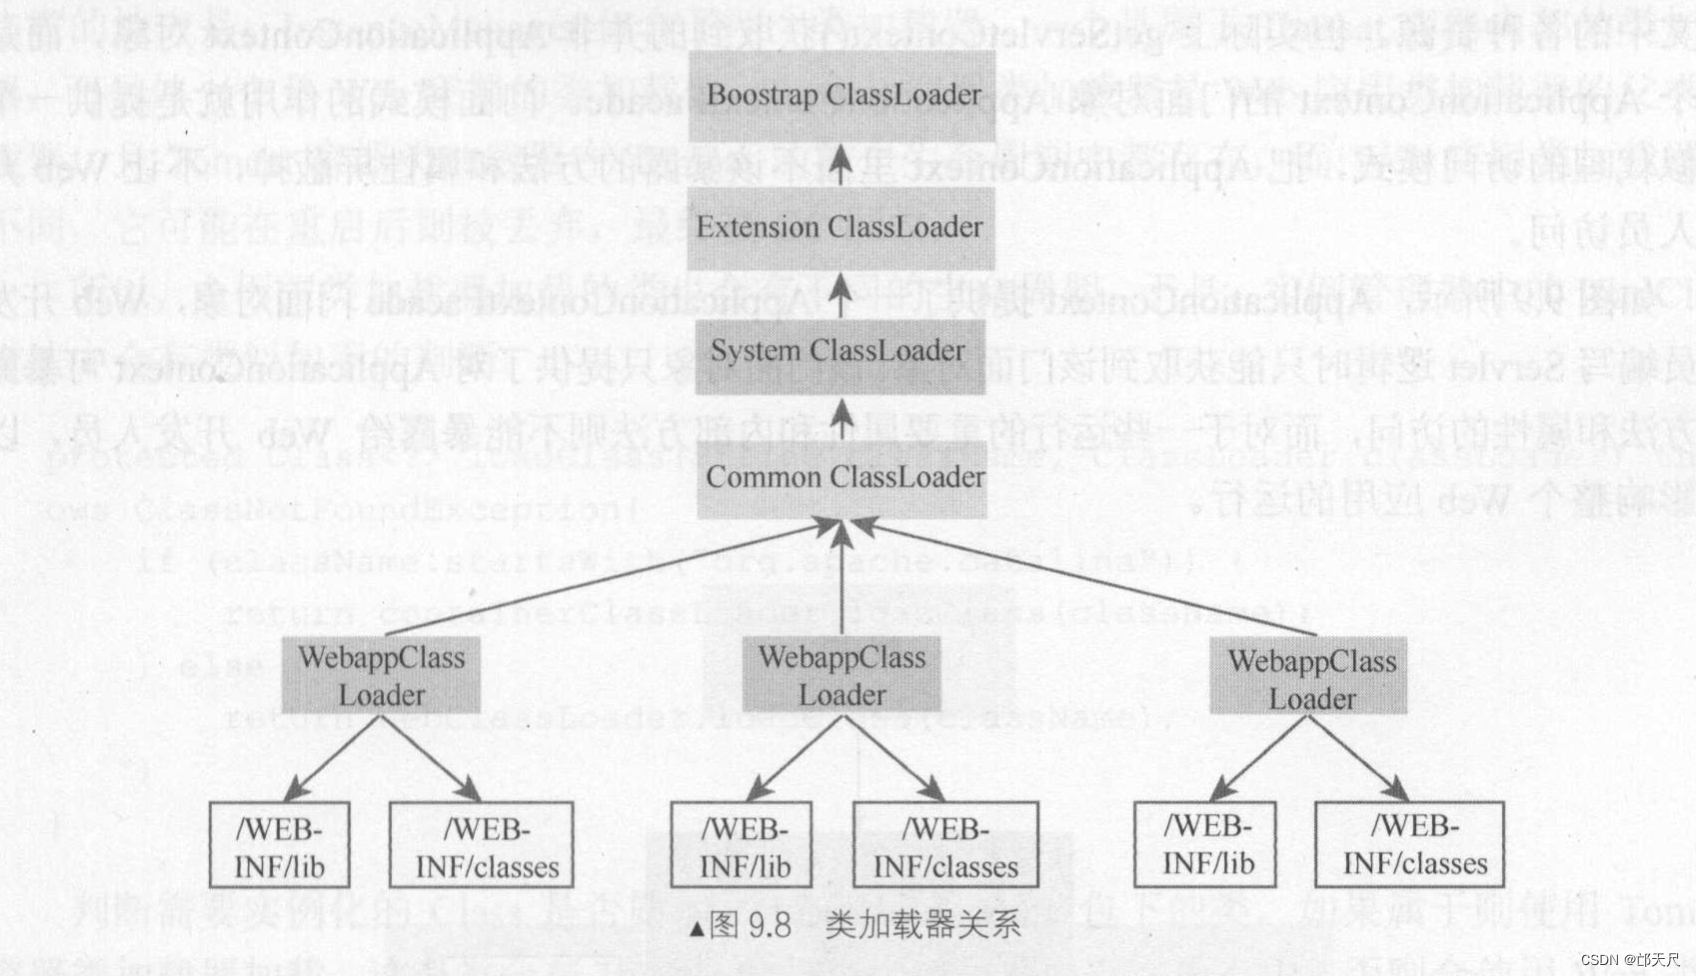
再回头来看getResources()方法,之前在类加载时提到过的。
-
当委托标识delegate为false时, WebappClassLoader类加载器首先尝试从本地缓存中查找该类,然后用System类加载器尝试加载类,接着由自己尝试加载类,最后才由父类加载器(Common)尝试加载,所以它的搜索目录顺序是<JAVA_HOME>/jre/lib-><JAVA_HOME>/jre/lib/ext->CLASSPATH->/WEB-INF/classes->/WEB-INF/lib->$CATALINA_BASE/lib和 $CATALINA_HOME/lib 。
当委托标识delegate为false, new CombinedEnumeration(localResources, parentResources); ,localResources在前, parentResources在后。 -
当委托标识delegate为true时,WebappClassLoader类加载器首先尝试从本地缓存中查找加载该类, 然后用System类加载器尝试加载类,接着由父类加载器(Common)尝试加载类,最后才由自己尝试加载,所以此时它的搜索的目录顺序是<JAVA_HOME>/jre/lib-><JAVA_HOME/jre/lib/ext->CLASSPATH->$CATALINA_BASE/lib 和$ CATALINA_HOME ->WEB-INF/classes ->WEB-INF/lib。
当委托标识delegate为true时, new CombinedEnumeration(parentResources, localResources);
parentResources在前, localResources在后。
现在对resources的查找顺序应该有了新的认识了, 接下来分析,在StandardContext中又是如何查找resource的呢?
public Enumeration<URL> findResources(String name) throws IOException {

    if (log.isDebugEnabled())
        log.debug("    findResources(" + name + ")");

    //we use a LinkedHashSet instead of a Vector to avoid duplicates with virtualmappings
    LinkedHashSet<URL> result = new LinkedHashSet<URL>();

    int jarFilesLength = jarFiles.length;
    int repositoriesLength = repositories.length;
    int i;

    // Adding the results of a call to the superclass
    if (hasExternalRepositories && searchExternalFirst) {

        Enumeration<URL> otherResourcePaths = super.findResources(name);

        while (otherResourcePaths.hasMoreElements()) {
            result.add(otherResourcePaths.nextElement());
        }

    }
    // Looking at the repositories
    for (i = 0; i < repositoriesLength; i++) {
        try {
            String fullPath = repositories[i] + name;
            // resources的默认值为ProxyDirContext
            // 可以去看 Tomcat 源码解析一JNDI这篇博客
            resources.lookup(fullPath);
            // Note : Not getting an exception here means the resource was
            // found
            try {
                result.add(getURI(new File(files[i], name)));
            } catch (MalformedURLException e) {
                // Ignore
            }
        } catch (NamingException e) {
            // Ignore
        }
    }

    // Looking at the JAR files
    synchronized (jarFiles) {
        if (openJARs()) {
            for (i = 0; i < jarFilesLength; i++) {
                JarEntry jarEntry = jarFiles[i].getJarEntry(name);
                if (jarEntry != null) {
                    try {
                        String jarFakeUrl = getURI(jarRealFiles[i]).toString();
                        result.add(UriUtil.buildJarUrl(jarFakeUrl, name));
                    } catch (MalformedURLException e) {
                        // Ignore
                    }
                }
            }
        }
    }

    // Adding the results of a call to the superclass
    if (hasExternalRepositories && !searchExternalFirst) {
        Enumeration<URL> otherResourcePaths = super.findResources(name);
        while (otherResourcePaths.hasMoreElements()) {
            result.add(otherResourcePaths.nextElement());
        }
    }
    return Collections.enumeration(result);
}
上面代码写了那么多,只要弄明白两个变量jarFiles和repositories两个变量,所有的问题将迎刃而解。
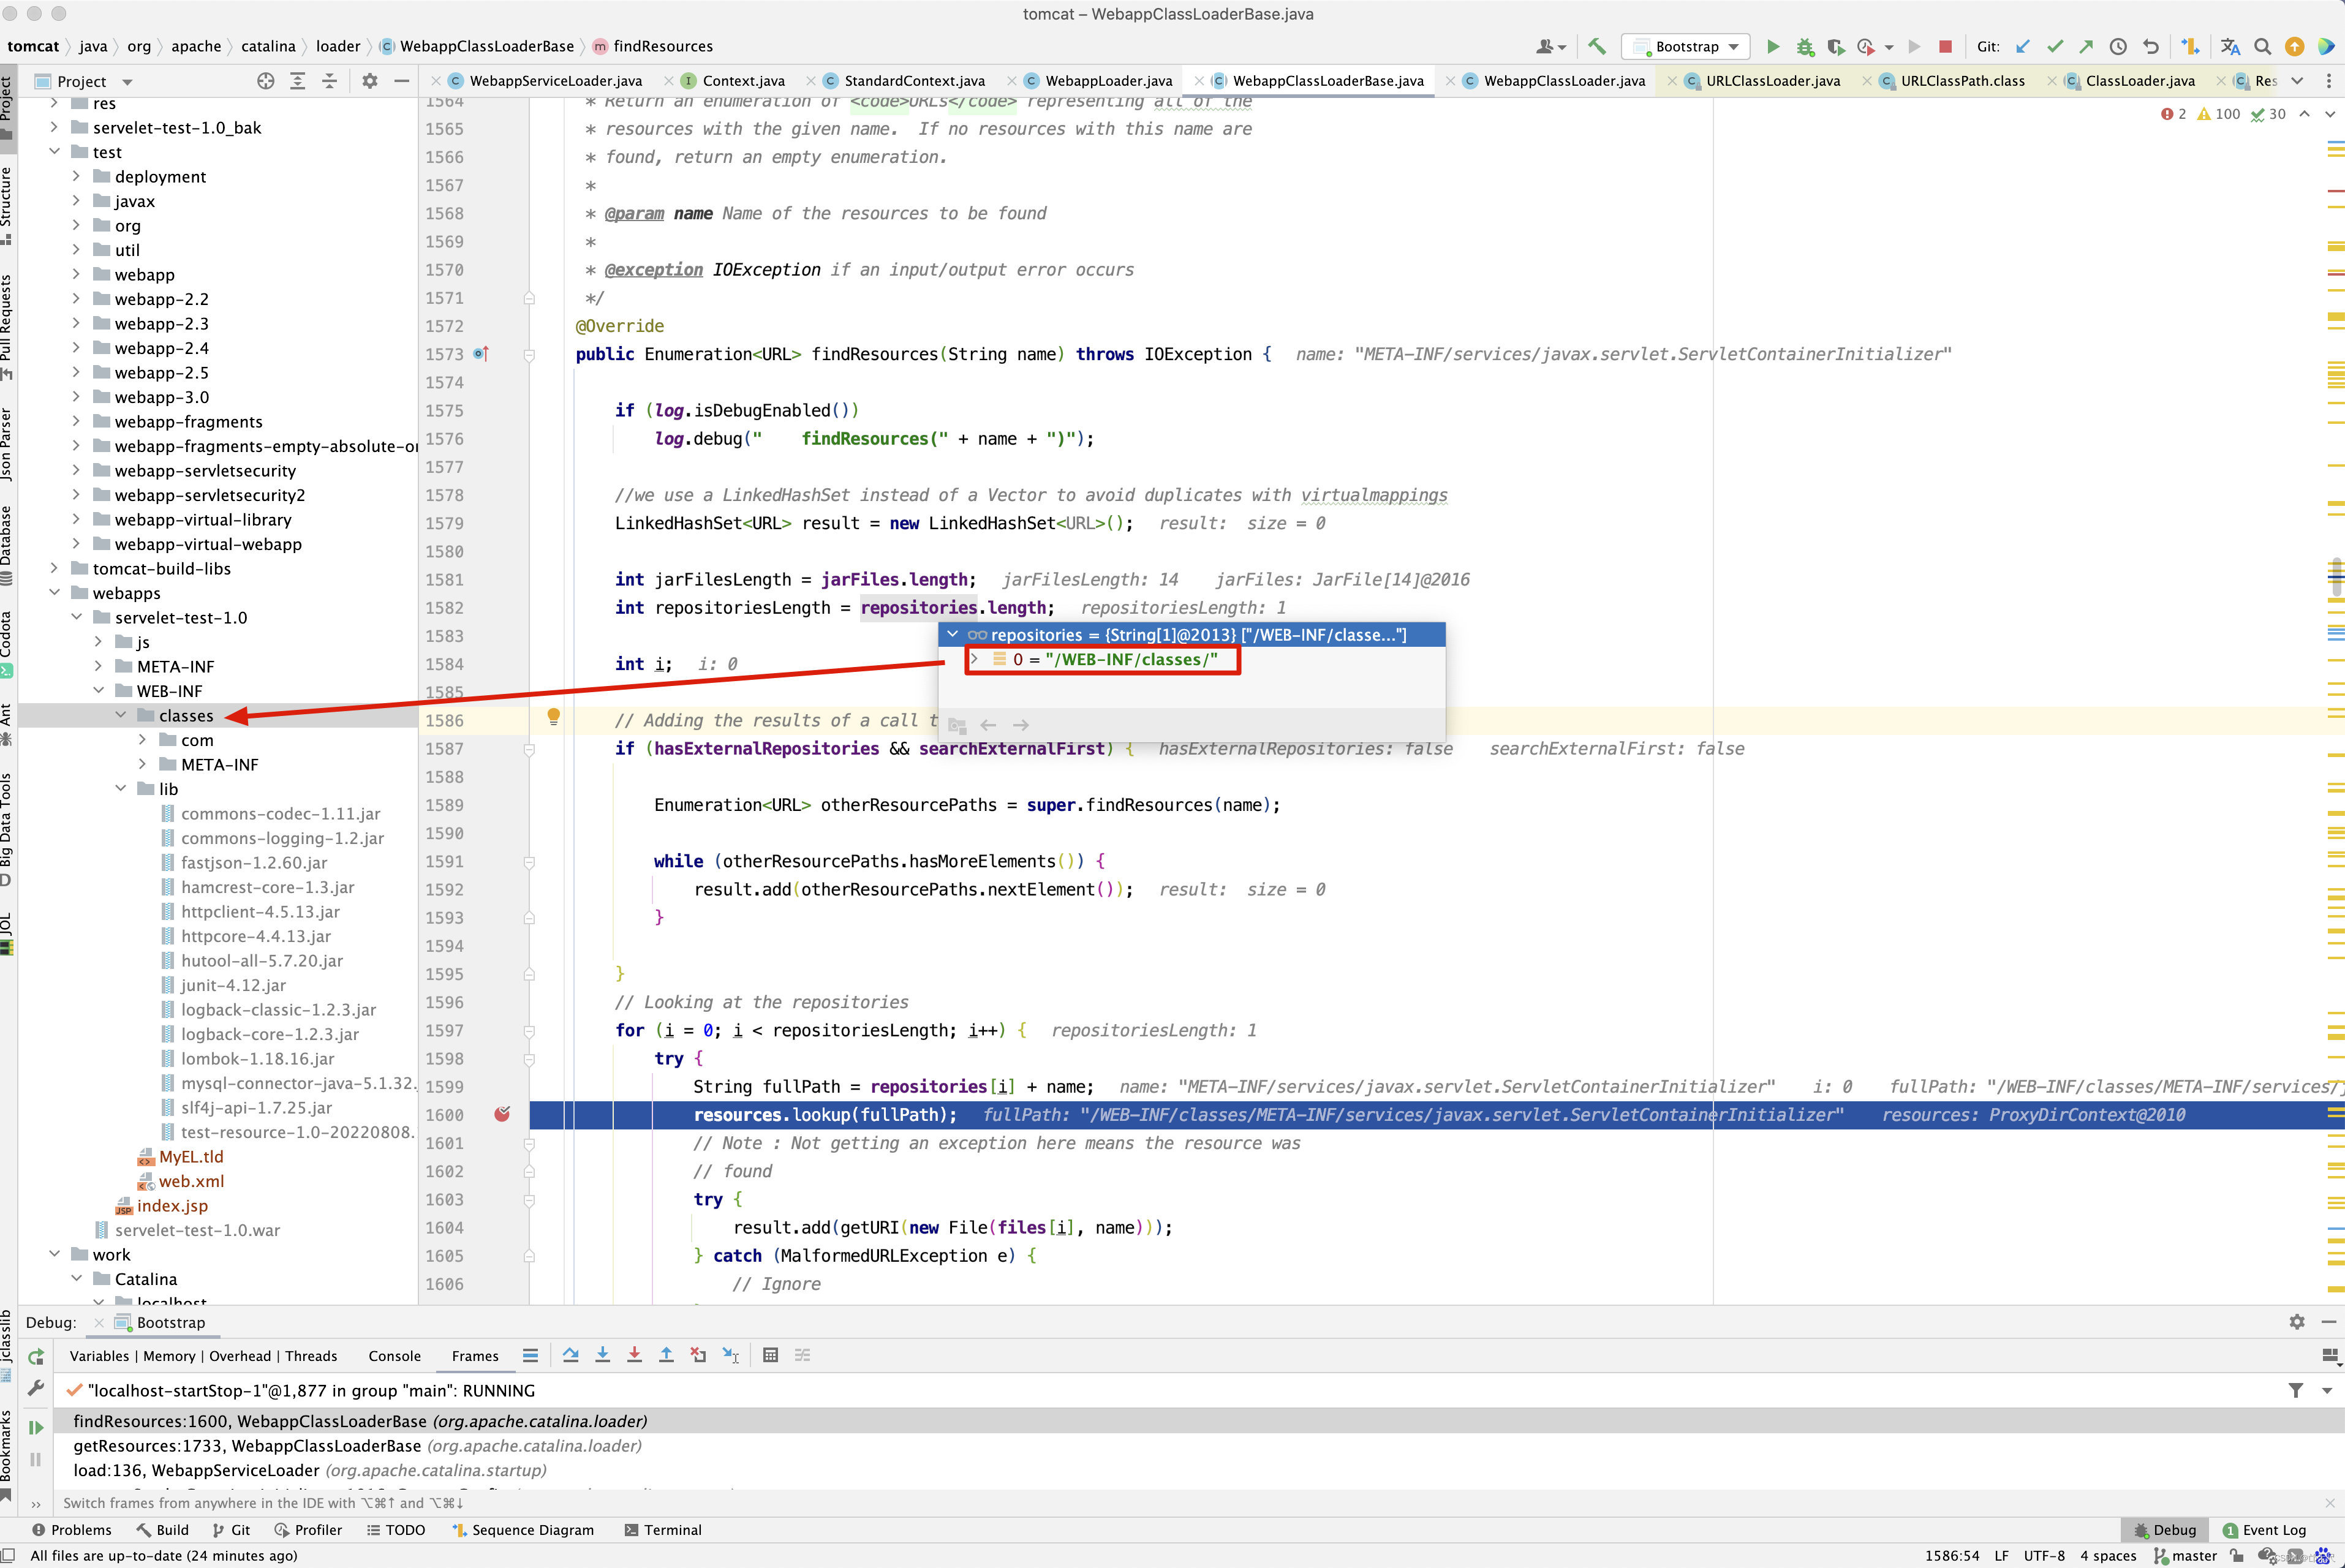
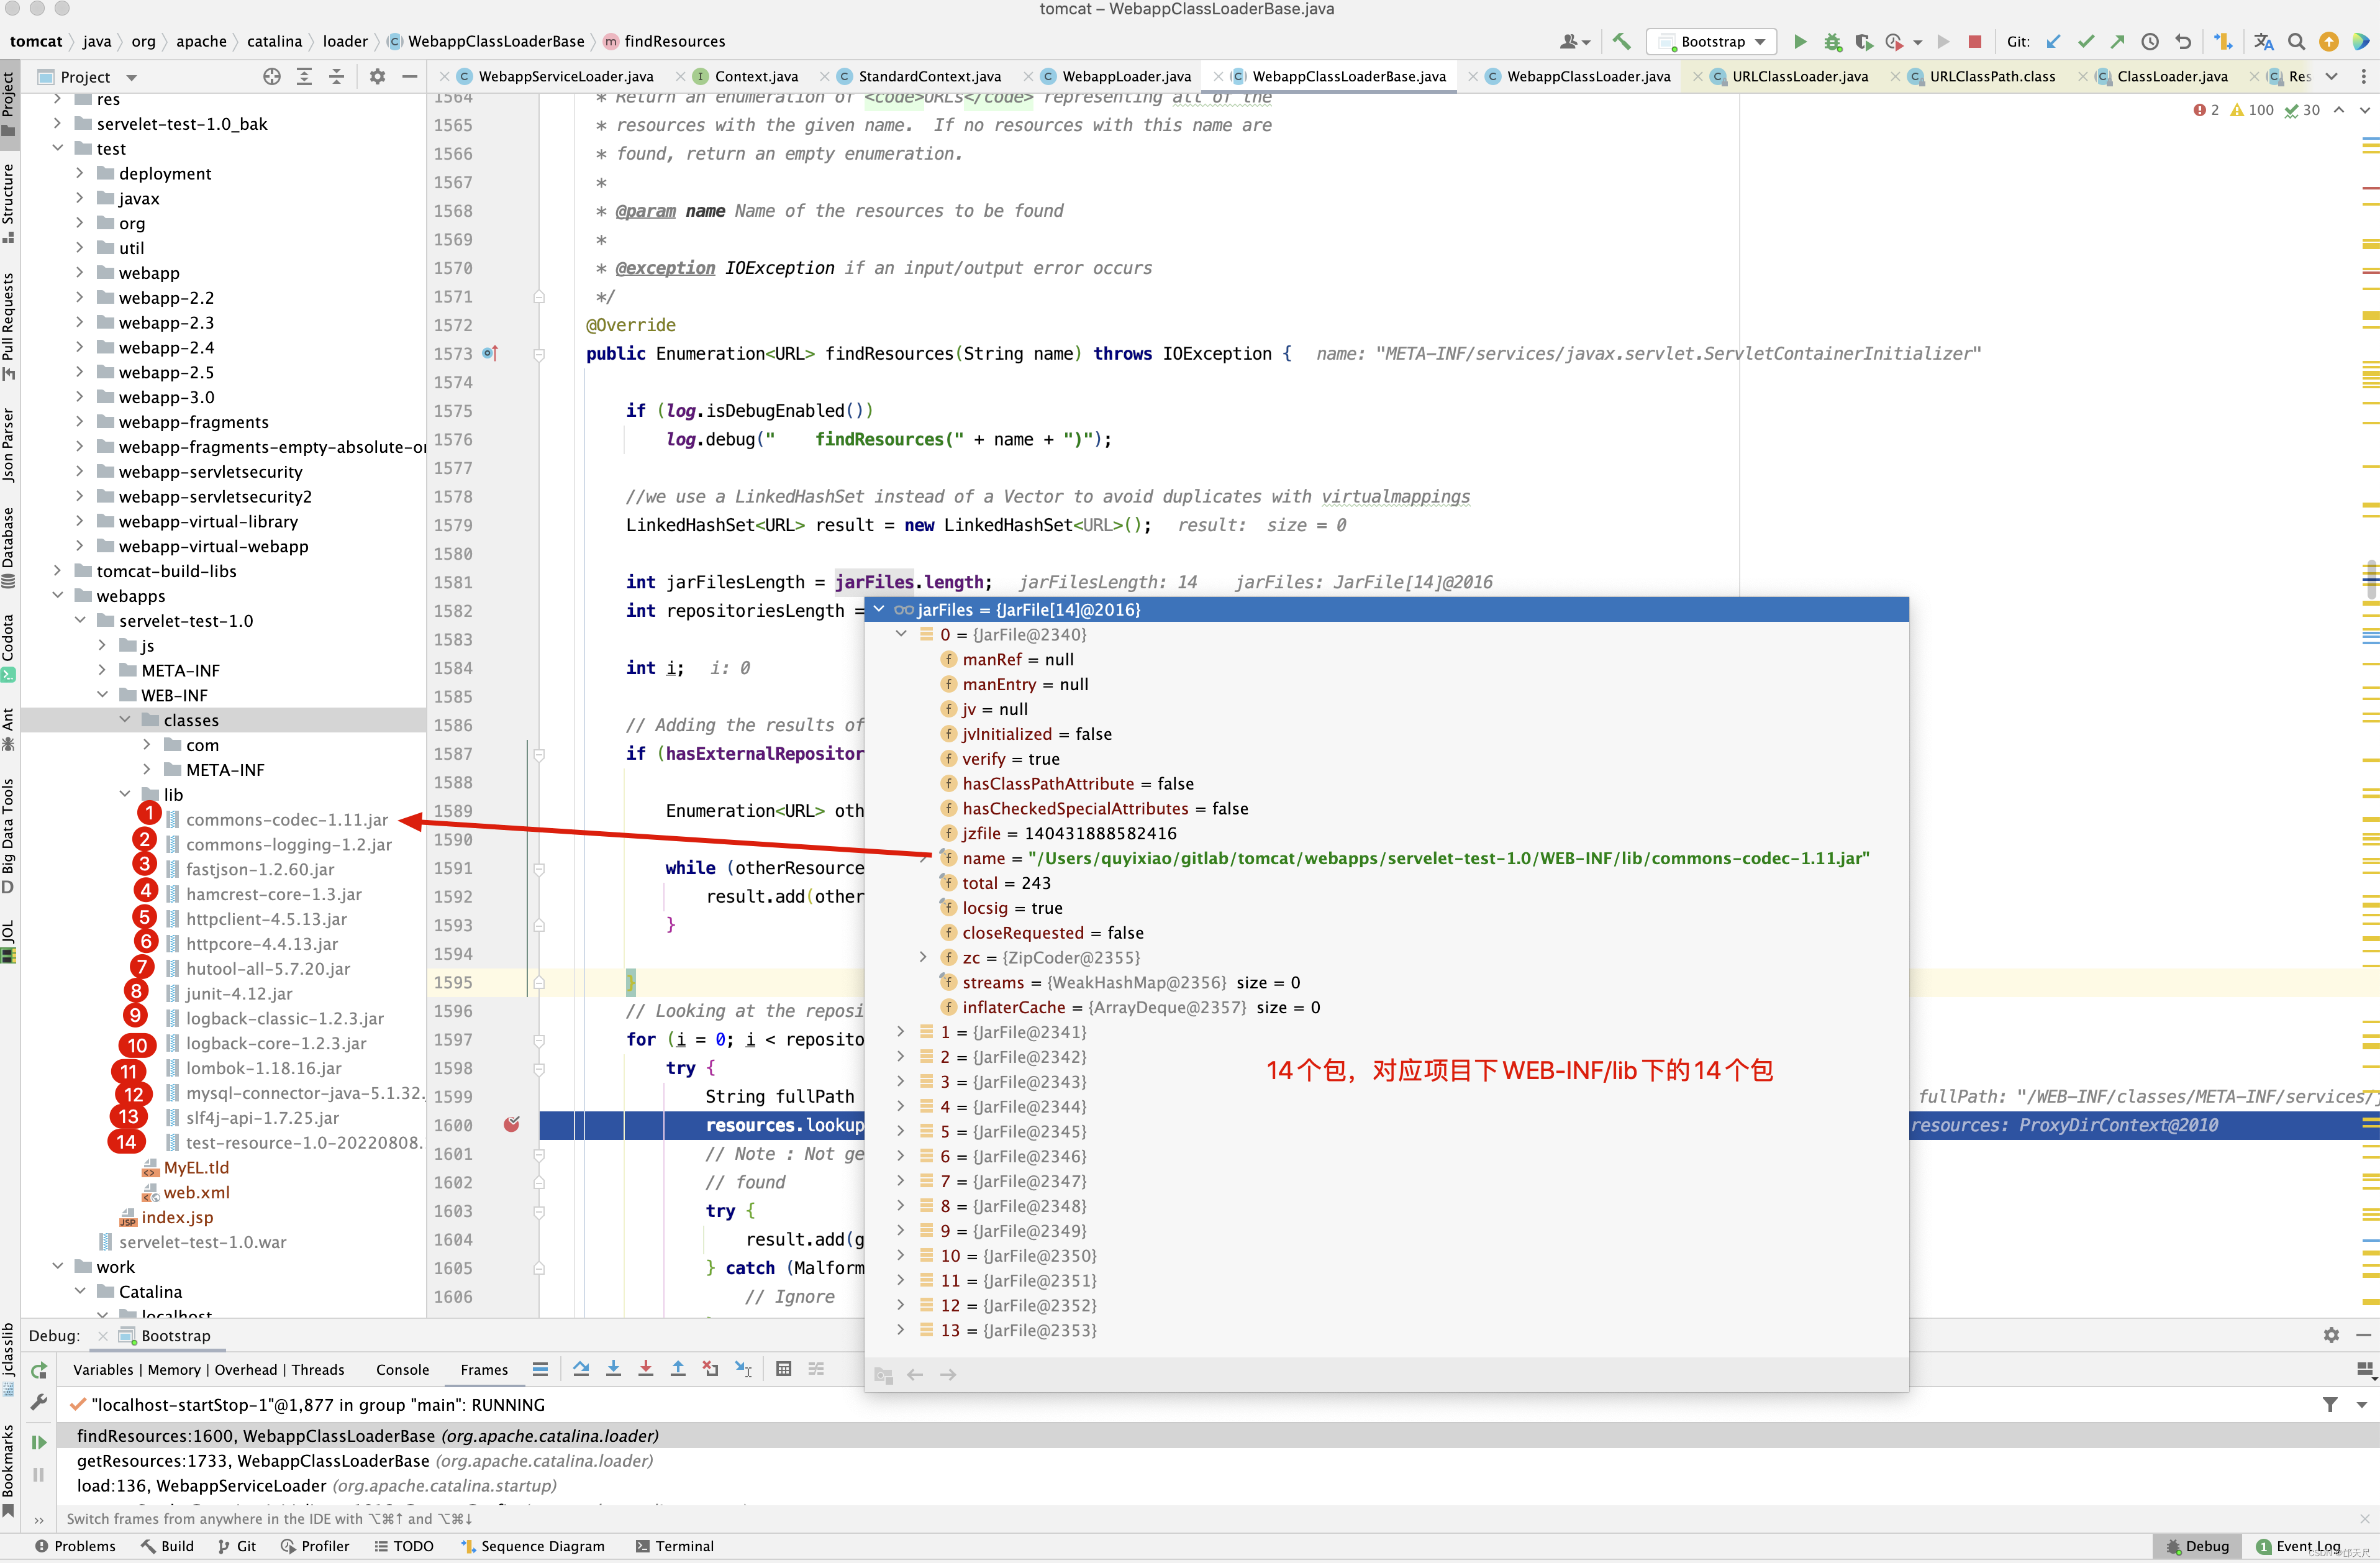
findResources()方法的源码就很简单了,到WEB-INF/classes下和WEB-INF/lib下所有jar包中查找META-INF/services/javax.servlet.ServletContainerInitializer文件是否存在,如果存在,将文件转变为URI存储于集合中并返回,当然接下来就是读取文件中的内容 。
private void parseConfigFile(LinkedHashSet<String> servicesFound, URL url)
        throws IOException {
    InputStream is = null;
    BufferedReader reader = null;
    try {
        is = url.openStream();
        InputStreamReader in = new InputStreamReader(is, UTF8);
        reader = new BufferedReader(in);
        String line;
        while ((line = reader.readLine()) != null) {
        	// 当然文件的读取就很简单了,就是一行一行的读取,如果行中有# ,则只截取#前的内容
            int i = line.indexOf('#');
            if (i >= 0) {
                line = line.substring(0, i);
            }
            line = line.trim();
            if (line.length() == 0) {
                continue;
            }
            servicesFound.add(line);
        }
    } finally {
        if (reader != null) {
            reader.close();
        }
        if (is != null) {
            is.close();
        }
    }
}
parseConfigFile()方法的读取过程就很简单了, 通过InputStreamReader流读取,过滤掉以#开头的行,也就是说如果以#开头,表示是注释行。 当然如果一行的内容为
com.luban.MyServletContainerInitializer # bbbbbbbbbbb
则#之前的内容依然有用。而#之后的内容当作注释。最后再来看一下loadServices()方法 。
private List<T> loadServices(Class<T> serviceType, LinkedHashSet<String> servicesFound)
        throws IOException {
    ClassLoader loader = servletContext.getClassLoader();
    List<T> services = new ArrayList<T>(servicesFound.size());
    for (String serviceClass : servicesFound) {
        try {
            Class<?> clazz = Class.forName(serviceClass, true, loader);
            services.add(serviceType.cast(clazz.newInstance()));
        } catch (ClassNotFoundException e) {
            throw new IOException(e);
        } catch (InstantiationException e) {
            throw new IOException(e);
        } catch (IllegalAccessException e) {
            throw new IOException(e);
        } catch (ClassCastException e) {
            throw new IOException(e);
        }
    }
    return Collections.unmodifiableList(services);
}
当然loadServices()方法的源码就更加简单了,直接用反射创建对象返回即可。 但值得注意的是,用的是servletContext的类加载器来加载ServletContainerInitializer。
Class类处理
接下来看Class类处理
protected void processClasses(WebXml webXml, Set<WebXml> orderedFragments) {
   // Step 4. Process /WEB-INF/classes for annotations
    if (ok) {
        // Hack required by Eclipse's "serve modules without
        // publishing" feature since this backs WEB-INF/classes by
        // multiple locations rather than one.
        NamingEnumeration<Binding> listBindings = null;
        try {
            try {
                listBindings = context.getResources().listBindings(
                        "/WEB-INF/classes");
            } catch (NameNotFoundException ignore) {
                // Safe to ignore
            }
            while (listBindings != null &&
                    listBindings.hasMoreElements()) {
                Binding binding = listBindings.nextElement();
                if (binding.getObject() instanceof FileDirContext) {
                    File webInfClassDir = new File(
                            ((FileDirContext) binding.getObject()).getDocBase());
                    processAnnotationsFile(webInfClassDir, webXml,
                            webXml.isMetadataComplete());
                } else if ("META-INF".equals(binding.getName())) {
                    // Skip the META-INF directory from any JARs that have been
                    // expanded in to WEB-INF/classes (sometimes IDEs do this).
                } else {
                    String resource =
                            "/WEB-INF/classes/" + binding.getName();
                    try {
                        URL url = context.getServletContext().getResource(resource);
                        processAnnotationsUrl(url, webXml,
                                webXml.isMetadataComplete());
                    } catch (MalformedURLException e) {
                        log.error(sm.getString(
                                "contextConfig.webinfClassesUrl",
                                resource), e);
                    }
                }
            }
        } catch (NamingException e) {
            log.error(sm.getString(
                    "contextConfig.webinfClassesUrl",
                    "/WEB-INF/classes"), e);
        }
    }

    // Step 5. Process JARs for annotations - only need to process
    // those fragments we are going to use
    if (ok) {
    	// 处理web-fragment.xml文件及其所在包的.class文中配置的@WebServlet, @WebFilter 和 @WebListener 注解的合并
        processAnnotations(
                orderedFragments, webXml.isMetadataComplete());
    }
    // Cache, if used, is no longer required so clear it
    javaClassCache.clear();
}
processClasses()首先对StandardContext下/WEB-INF/classes目录下的资源进行绑定。
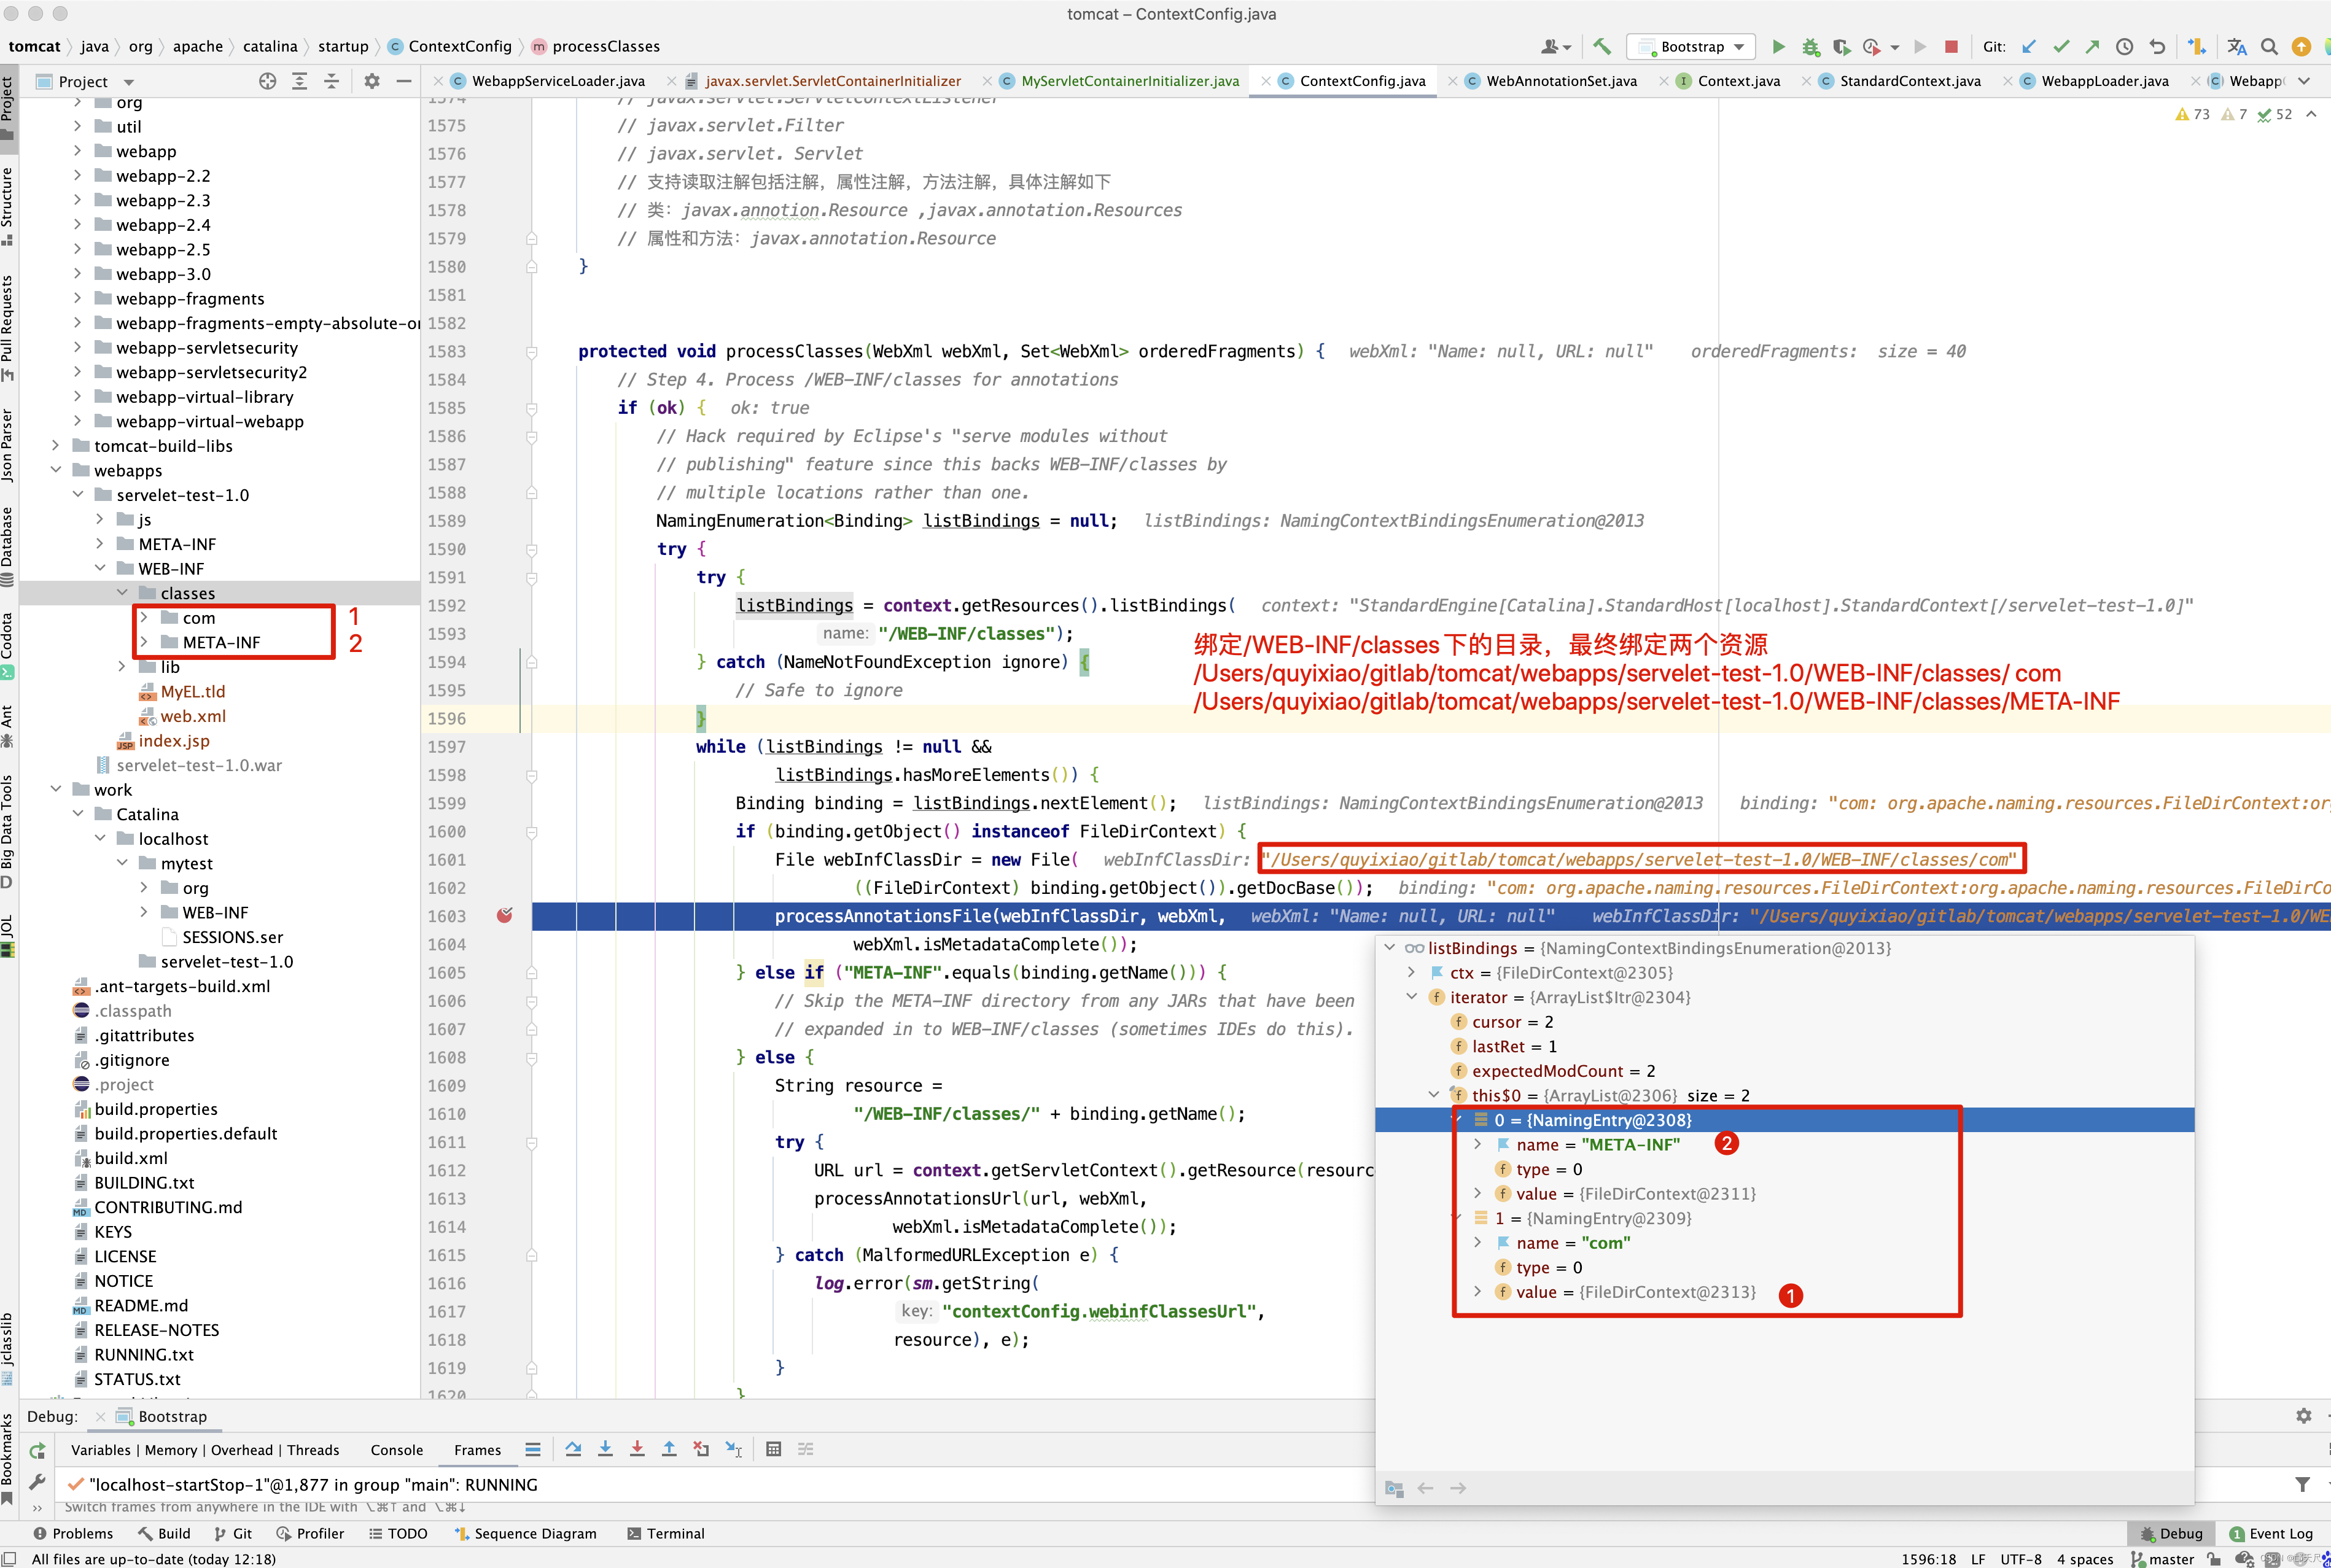
如果资源不是FileDirContext,而是单纯的名字META-INF,则忽略掉,否则到ServletContext下查找/WEB-INF/classes/binding.getName()的资源。再调用processAnnotationsUrl()方法进行处理。因此processClasses()方法对资源的处理分两种情况,如果是FileDirContext,则调用processAnnotationsFile()进行处理,否则使用JNDI从Resource中获取,调用processAnnotationsUrl()进行处理,先来看processAnnotationsFile()方法 。
protected void processAnnotationsFile(File file, WebXml fragment,
        boolean handlesTypesOnly) {

    if (file.isDirectory()) {
        // Returns null if directory is not readable
        String[] dirs = file.list();
        if (dirs != null) {
            if (log.isDebugEnabled()) {
                log.debug(sm.getString(
                        "contextConfig.processAnnotationsDir.debug", file));
            }
            for (String dir : dirs) {
                processAnnotationsFile(
                        new File(file,dir), fragment, handlesTypesOnly);
            }
        }
    } else if (file.getName().endsWith(".class") && file.canRead()) {
        FileInputStream fis = null;
        try {
            fis = new FileInputStream(file);
            processAnnotationsStream(fis, fragment, handlesTypesOnly);
        } catch (IOException e) {
            log.error(sm.getString("contextConfig.inputStreamFile",
                    file.getAbsolutePath()),e);
        } catch (ClassFormatException e) {
            log.error(sm.getString("contextConfig.inputStreamFile",
                    file.getAbsolutePath()),e);
        } finally {
            if (fis != null) {
                try {
                    fis.close();
                } catch (Throwable t) {
                    ExceptionUtils.handleThrowable(t);
                }
            }
        }
    }
}
processAnnotationsFile()方法的逻辑就是递归查找目录下所有以.class结尾的文件,最终调用processAnnotationsStream()进行处理,先不急着进入processAnnotationsStream()方法,先看看
protected void processAnnotationsUrl(URL url, WebXml fragment,
        boolean handlesTypesOnly) {
    if (url == null) {
        // Nothing to do.
        return;
    } else if ("jar".equals(url.getProtocol())) {
        processAnnotationsJar(url, fragment, handlesTypesOnly);
    } else if ("jndi".equals(url.getProtocol())) {
        processAnnotationsJndi(url, fragment, handlesTypesOnly);
    } else if ("file".equals(url.getProtocol())) {
        try {
            processAnnotationsFile(
                    new File(url.toURI()), fragment, handlesTypesOnly);
        } catch (URISyntaxException e) {
            log.error(sm.getString("contextConfig.fileUrl", url), e);
        }
    } else {
        log.error(sm.getString("contextConfig.unknownUrlProtocol",
                url.getProtocol(), url));
    }
}
如果url的协议是jar包,则调用processAnnotationsJar()方法处理,如果url的协议是jndi,则调用processAnnotationsJndi()处理,如果是文件,则调用之前的processAnnotationsFile()方法处理。先来看jar包的处理。
protected void processAnnotationsJar(URL url, WebXml fragment,  boolean handlesTypesOnly) {
    Jar jar = null;
    InputStream is;
    try {
        jar = JarFactory.newInstance(url);
        if (log.isDebugEnabled()) {
            log.debug(sm.getString(
                    "contextConfig.processAnnotationsJar.debug", url));
        }
        jar.nextEntry();
        String entryName = jar.getEntryName();
        while (entryName != null) {
        	// 遍历jar包下所有.class文件
            if (entryName.endsWith(".class")) {
                is = null;
                try {
                    is = jar.getEntryInputStream();
                    processAnnotationsStream( is, fragment, handlesTypesOnly);
                } catch (IOException e) {
                    log.error(sm.getString("contextConfig.inputStreamJar",
                            entryName, url),e);
                } catch (ClassFormatException e) {
                    log.error(sm.getString("contextConfig.inputStreamJar",
                            entryName, url),e);
                } finally {
                    if (is != null) {
                        try {
                            is.close();
                        } catch (IOException ioe) {
                            // Ignore
                        }
                    }
                }
            }
            jar.nextEntry();
            entryName = jar.getEntryName();
        }
    } catch (IOException e) {
        log.error(sm.getString("contextConfig.jarFile", url), e);
    } finally {
        if (jar != null) {
            jar.close();
        }
    }
}
接下来看processAnnotationsJndi()方法处理。
protected void processAnnotationsJndi(URL url, WebXml fragment,
        boolean handlesTypesOnly) {
    try {
        URLConnection urlConn = url.openConnection();
        DirContextURLConnection dcUrlConn;
        if (!(urlConn instanceof DirContextURLConnection)) {
            // This should never happen
            sm.getString("contextConfig.jndiUrlNotDirContextConn", url);
            return;
        }

        dcUrlConn = (DirContextURLConnection) urlConn;
        dcUrlConn.setUseCaches(false);

        String type = dcUrlConn.getHeaderField(ResourceAttributes.TYPE);
        if (ResourceAttributes.COLLECTION_TYPE.equals(type)) {
            // Collection
            Enumeration<String> dirs = dcUrlConn.list();

            if (log.isDebugEnabled() && dirs.hasMoreElements()) {
                log.debug(sm.getString(
                        "contextConfig.processAnnotationsWebDir.debug",
                        url));
            }

            while (dirs.hasMoreElements()) {
                String dir = dirs.nextElement();
                URL dirUrl = new URL(url.toString() + '/' + dir);
                processAnnotationsJndi(dirUrl, fragment, handlesTypesOnly);
            }

        } else {
            // Single file
            if (url.getPath().endsWith(".class")) {
                InputStream is = null;
                try {
                    is = dcUrlConn.getInputStream();
                    processAnnotationsStream(
                            is, fragment, handlesTypesOnly);
                } catch (IOException e) {
                    log.error(sm.getString("contextConfig.inputStreamJndi",
                            url),e);
                } catch (ClassFormatException e) {
                    log.error(sm.getString("contextConfig.inputStreamJndi",
                            url),e);
                } finally {
                    if (is != null) {
                        try {
                            is.close();
                        } catch (Throwable t) {
                            ExceptionUtils.handleThrowable(t);
                        }
                    }
                }
            }
        }
    } catch (IOException e) {
        log.error(sm.getString("contextConfig.jndiUrl", url), e);
    }
}
processAnnotationsJndi()的处理和processAnnotationsFile()处理类似,都是递归查找目录下的所有.class文件,如果文件存在,则调用 processAnnotationsStream()处理,大家发现规率没有,先查找文件目录下的所有.class文件,如果是url,则根据不同的协议,如果是jar包,以读取jar包的方式遍历所有的.class文件,如果是jndi协议,则以jndi的方式遍历所有的.class文件,无论.class文件从哪里来的,最终都是调用了 processAnnotationsStream()方法处理。
protected void processAnnotationsStream(InputStream is, WebXml fragment,
        boolean handlesTypesOnly)
        throws ClassFormatException, IOException {

    ClassParser parser = new ClassParser(is);
    JavaClass clazz = parser.parse();
    checkHandlesTypes(clazz);
	// <web-app xmlns:xsi="http://www.w3.org/2001/XMLSchema-instance"
	// xmlns="http://java.sun.com/xml/ns/javaee"
	// xsi:schemaLocation="http://java.sun.com/xml/ns/javaee
	// http://java.sun.com/xml/ns/javaee/web-app_3_0.xsd" id="WebApp_ID"
	// version="3.0" metadata-complete="true">
	// metadata-complete="true",会在启动时不扫描注解(annotation)。
	// 如果不扫描注解的话,用注解进行的配置就无法生效,例如:@WebServlet,@WebServlet,@WebListener
    if (handlesTypesOnly) {
        return;
    }
    // @WebServlet,@WebServlet,@WebListener  注解处理
    processClass(fragment, clazz);
}
如果要理解上面两行加粗代码,至少需要掌握Class字节码结构,才看得懂加粗代码 。 粗略看一下parse()方法 。
public JavaClass parse() throws IOException, ClassFormatException {
    /****************** Read headers ********************************/
    // Check magic tag of class file
    readID();
    // Get compiler version
    readVersion();
   /****************** Read constant pool and related **************/
    // Read constant pool entries
    readConstantPool();
    // Get class information
    readClassInfo();
    // Get interface information, i.e., implemented interfaces
    readInterfaces();
    /****************** Read class fields and methods ***************/
    // Read class fields, i.e., the variables of the class
    readFields();
    // Read class methods, i.e., the functions in the class
    readMethods();
    // Read class attributes
    readAttributes();
    // Return the information we have gathered in a new object
    return new JavaClass(class_name, superclass_name,
            access_flags, constant_pool, interface_names,
            runtimeVisibleAnnotations);
}


// class 文件结构
ClassFile {
    u4             magic;
    u2             minor_version;
    u2             major_version;
    u2             constant_pool_count;
    cp_info        constant_pool[constant_pool_count-1];
    u2             access_flags;
    u2             this_class;
    u2             super_class;
    u2             interfaces_count;
    u2             interfaces[interfaces_count];
    u2             fields_count;
    field_info     fields[fields_count];
    u2             methods_count;
    method_info    methods[methods_count];
    u2             attributes_count;
    attribute_info attributes[attributes_count];
}
class文件结构,先魔数,次版本号,主版本号,常量池个数,常量池, 类访问标识,当前类名,父类名,接口个数,接口,属性个数,属性,方法个数,方法信息,其他属性等 ,关于字节码结构这里不做过多分析,感兴趣可以看 Java字节码文件结构剖析(一) ,和 自己动手写Java虚拟机 (Java核心技术系列)_java版 这两篇博客,虽然不分析,我觉得tomcat解析Class结构的源码还是写得很好的,因此我给抽取出来,github地址 https://github.com/quyixiao/tomcat-class-parser.git, 举个例子来理解这部分代码 。
- 创建一个类, 加上WebFilter注解。并配置上属性
@WebFilter(value = {"a","b"},description="我的测试" )
public class TestAnnotation {
}
- 读取TestAnnotation字节码,获取注解的属性
public static void main(String[] args)  throws Exception{

    FileInputStream fis =   new FileInputStream(new File("/Users/quyixiao/github/tomcat-class-parser/target/test-classes/com/test/TestAnnotation.class"));;

    ClassParser parser = new ClassParser(fis);
    JavaClass clazz = parser.parse();

    AnnotationEntry[] annotationsEntries = clazz.getAnnotationEntries();
    if (annotationsEntries != null) {
        String className = clazz.getClassName();
        for (AnnotationEntry ae : annotationsEntries) {
            String type = ae.getAnnotationType();
            System.out.println("annotaionType = " + type);
            List<ElementValuePair> elementValuePairs = ae.getElementValuePairs();
            for(ElementValuePair elementValuePair : elementValuePairs){
                System.out.println("====================");
                System.out.println(elementValuePair.getNameString());
                ElementValue elementValue = elementValuePair.getValue();
                System.out.println(elementValue.stringifyValue());

            }
        }
    }
}
- 结果输出
annotaionType = Ljavax/servlet/annotation/WebFilter;
====================
value
[a,b]
====================
description
我的测试
字节码读取这一块之前也分析过,就不做过多深入了,接下来进入checkHandlesTypes()方法分析。
protected void checkHandlesTypes(JavaClass javaClass) {
    // Skip this if we can
 	// 如果没有任何XXXServletContainerInitializer配置@ HandlesTypes注解
 	// 则直接返回,之前分析过typeInitializerMap中存储的是key是HandlesTypes注解的属性值,
 	// value为HashSet,并且HashSet存储的为 XXXServletContainerInitializer对象
    if (typeInitializerMap.size() == 0)
        return;

    // 如果class是注解类型,则直接忽略
    if ((javaClass.getAccessFlags() &
            org.apache.tomcat.util.bcel.Const.ACC_ANNOTATION) != 0) {
        // Skip annotations.
        return;
    }

    String className = javaClass.getClassName();

    Class<?> clazz = null;
    // 如果有XXXServletContainerInitializer的@ HandlesTypes注解
	// 的属性值为非注解类型
    if (handlesTypesNonAnnotations) {
        // This *might* be match for a HandlesType.
        populateJavaClassCache(className, javaClass);
        JavaClassCacheEntry entry = javaClassCache.get(className);
        if (entry.getSciSet() == null) {
            try {
                populateSCIsForCacheEntry(entry);
            } catch (StackOverflowError soe) {
                throw new IllegalStateException(sm.getString(
                        "contextConfig.annotationsStackOverflow",
                        context.getName(),
                        classHierarchyToString(className, entry)));
            }
        }
        if (!entry.getSciSet().isEmpty()) {
            // Need to try and load the class
            clazz = Introspection.loadClass(context, className);
            if (clazz == null) {
                // Can't load the class so no point continuing
                return;
            }

            for (ServletContainerInitializer sci : entry.getSciSet()) {
                Set<Class<?>> classes = initializerClassMap.get(sci);
                if (classes == null) {
                    classes = new HashSet<Class<?>>();
                    // 之前的initializerClassMap属性并没有设置值
                    // 此时在这里设置值 ,key 为ServletContainerInitializer对象,值为
                    // HashSet,并且值的内容为在 ServletContainerInitializer的@HandlesTypes
                    // 注解中配置的class值,保证Class被context的类加载器加载
                    initializerClassMap.put(sci, classes);
                }
                classes.add(clazz);
            }
        }
    }

	 // 如果有XXXServletContainerInitializer的@ HandlesTypes注解
	// 的属性值为注解类型
    if (handlesTypesAnnotations) {
        for (Map.Entry<Class<?>, Set<ServletContainerInitializer>> entry :
                typeInitializerMap.entrySet()) {
            if (entry.getKey().isAnnotation()) {
                AnnotationEntry[] annotationEntries = javaClass.getAnnotationEntries();
                if (annotationEntries != null) {
                    for (AnnotationEntry annotationEntry : annotationEntries) {
                        if (entry.getKey().getName().equals(
                                getClassName(annotationEntry.getAnnotationType()))) {
                            if (clazz == null) {
                                clazz = Introspection.loadClass(
                                        context, className);
                                if (clazz == null) {
                                    // Can't load the class so no point
                                    // continuing
                                    return;
                                }
                            }
                            // 如果当前类有注解,并且注解类型和ServletContainerInitializer的
                            // @HandlesTypes注解属性值一样,则将当前类加initializerClassMap中
                            for (ServletContainerInitializer sci : entry.getValue()) {
                                initializerClassMap.get(sci).add(clazz);
                            }
                            break;
                        }
                    }
                }
            }
        }
    }
}
对于checkHandlesTypes()方法注解这一块的理解,我们再来看一个例子。
- 在servelet-test/src/main/resources/META-INF/services目录创建javax.servlet.ServletContainerInitializer,文件内容为com.example.servelettest.MyServletContainerInitializer
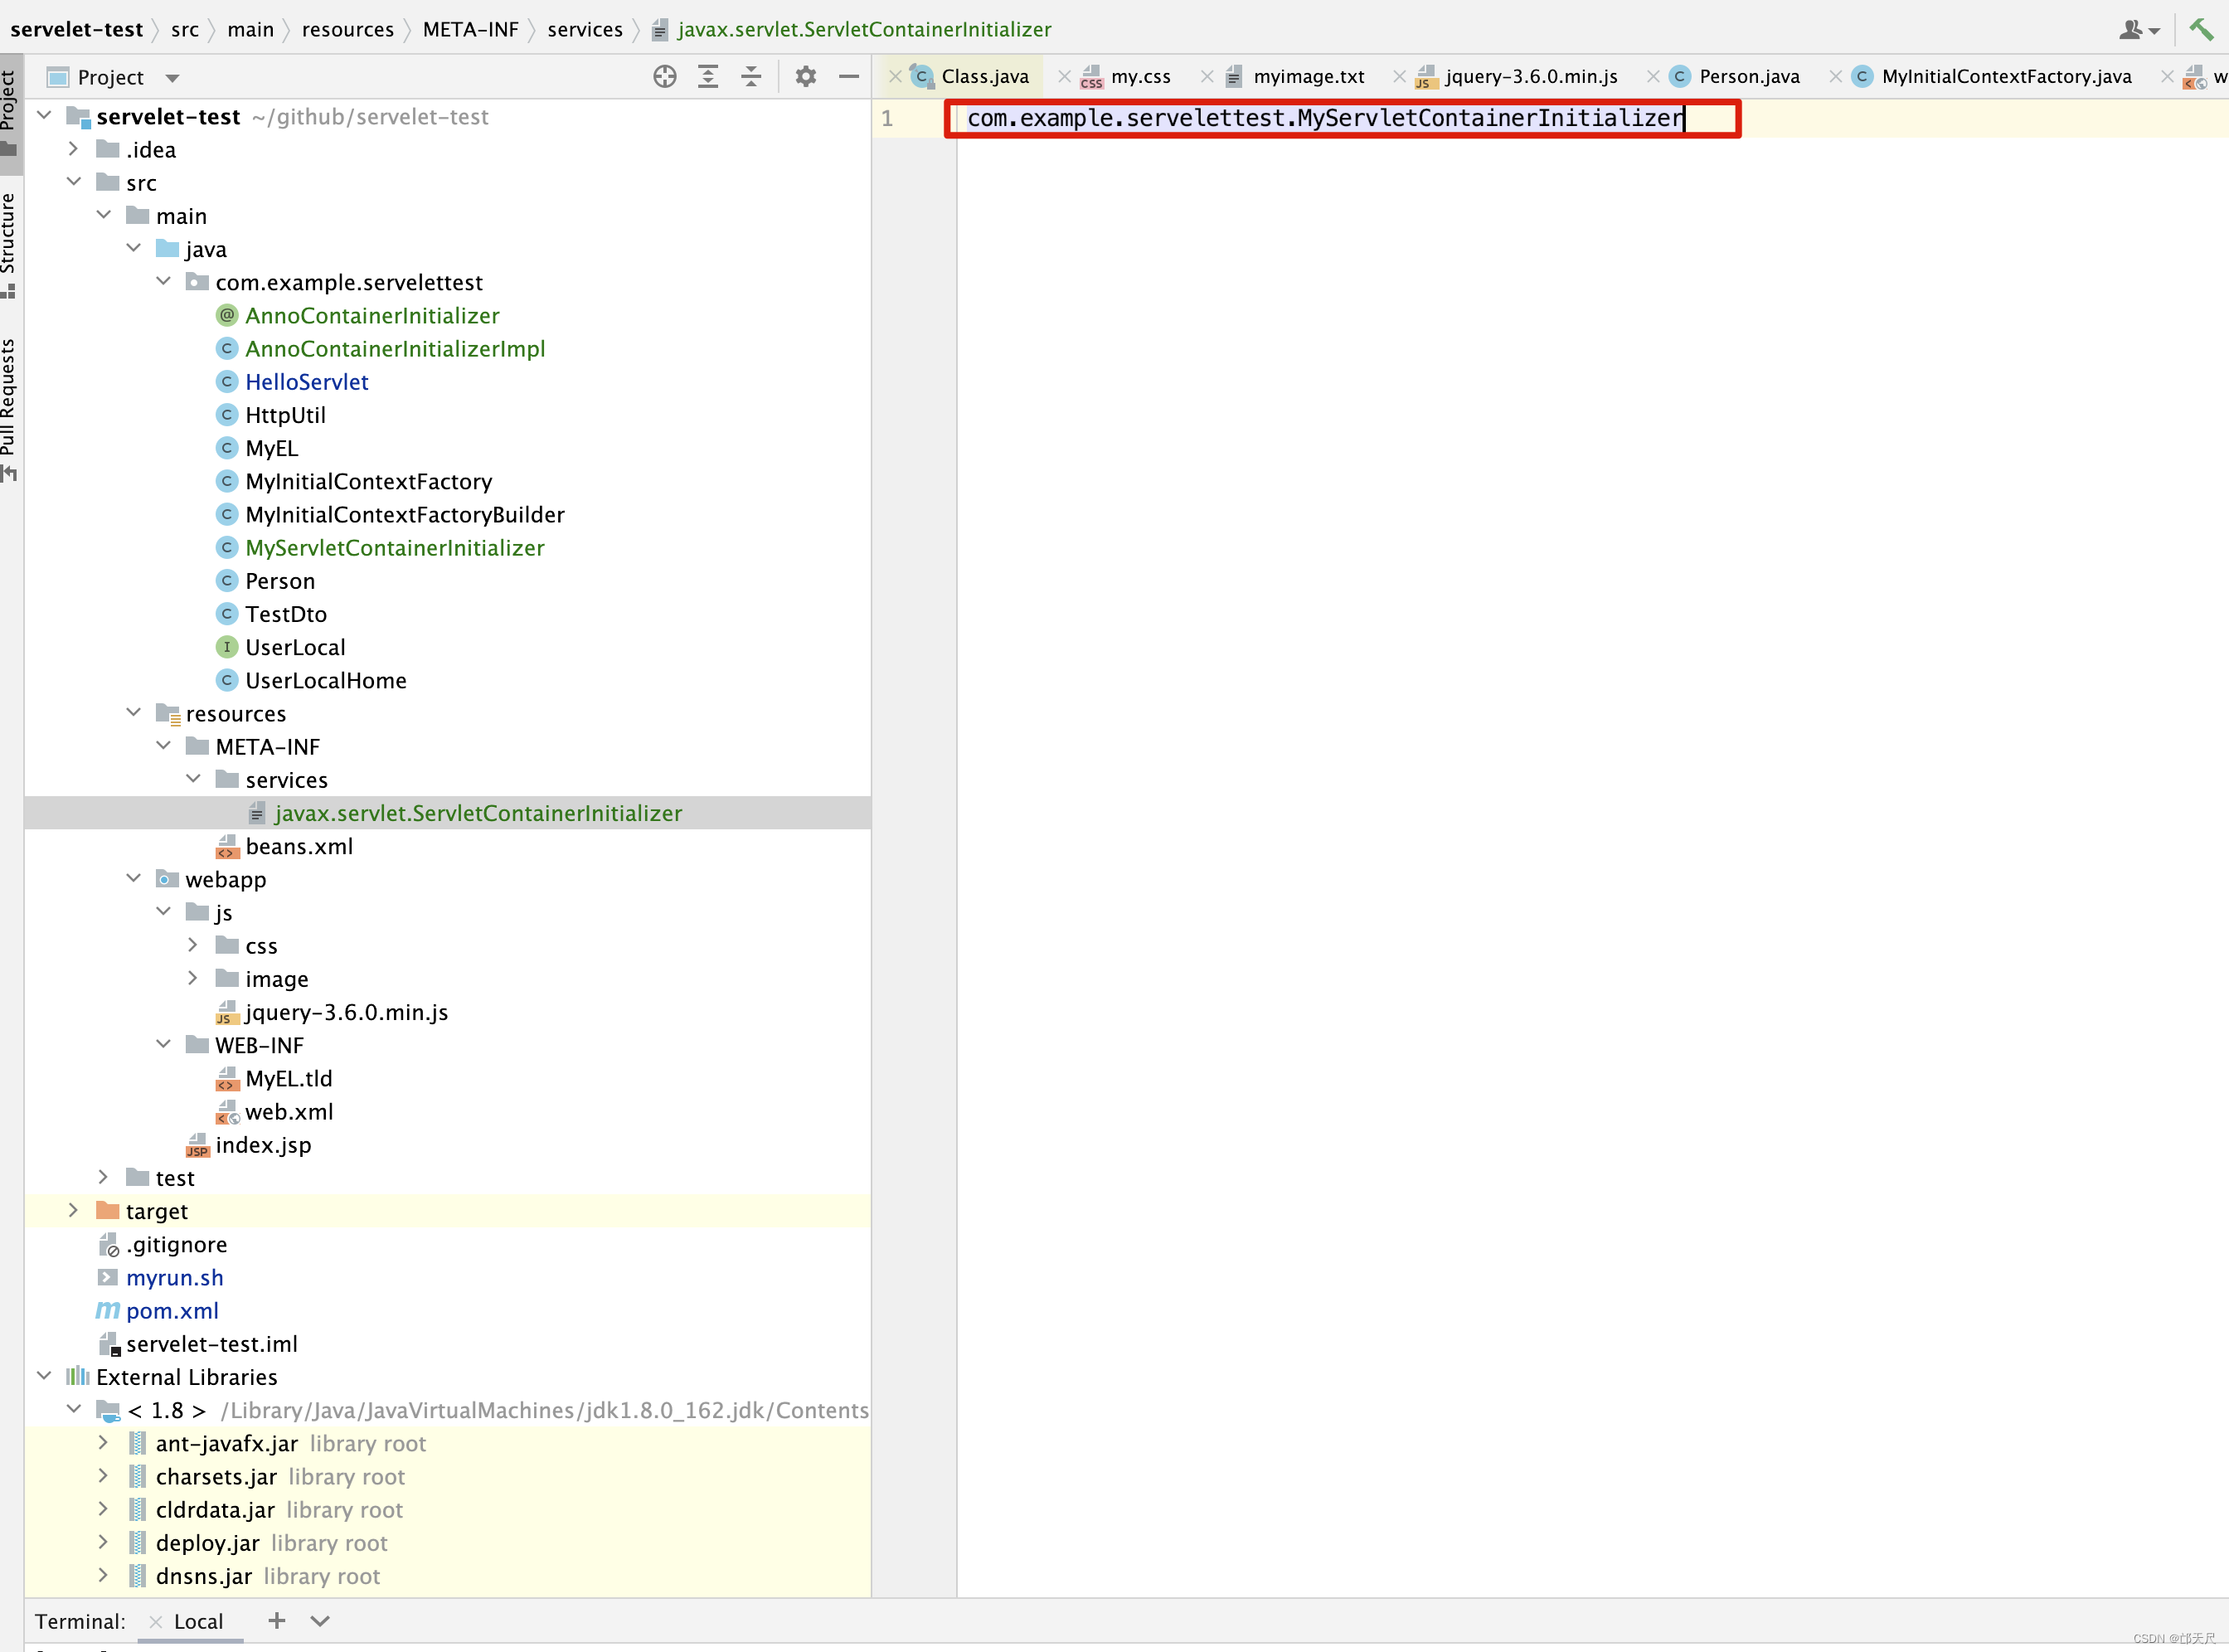
2. 创建注解AnnoContainerInitializer,被注解修饰的类AnnoContainerInitializerImpl 以及MyServletContainerInitializer。
AnnoContainerInitializer
@Target({ElementType.TYPE, ElementType.METHOD})
@Retention(RetentionPolicy.RUNTIME)
@Documented
public @interface AnnoContainerInitializer {
    String[] value() default {};
}
AnnoContainerInitializerImpl
@AnnoContainerInitializer("test哈哈")
public class AnnoContainerInitializerImpl {
}
MyServletContainerInitializer
@HandlesTypes(value = {AnnoContainerInitializer.class,Filter.class})
public class MyServletContainerInitializer implements ServletContainerInitializer {
    @Override
    public void onStartup(Set<Class<?>> set, ServletContext servletContext) throws ServletException {
        for (Class clazz : set) {
            System.out.println("获取的class..." + clazz);
        }
    }
}
- 将servelet-test放到tomcat目录下
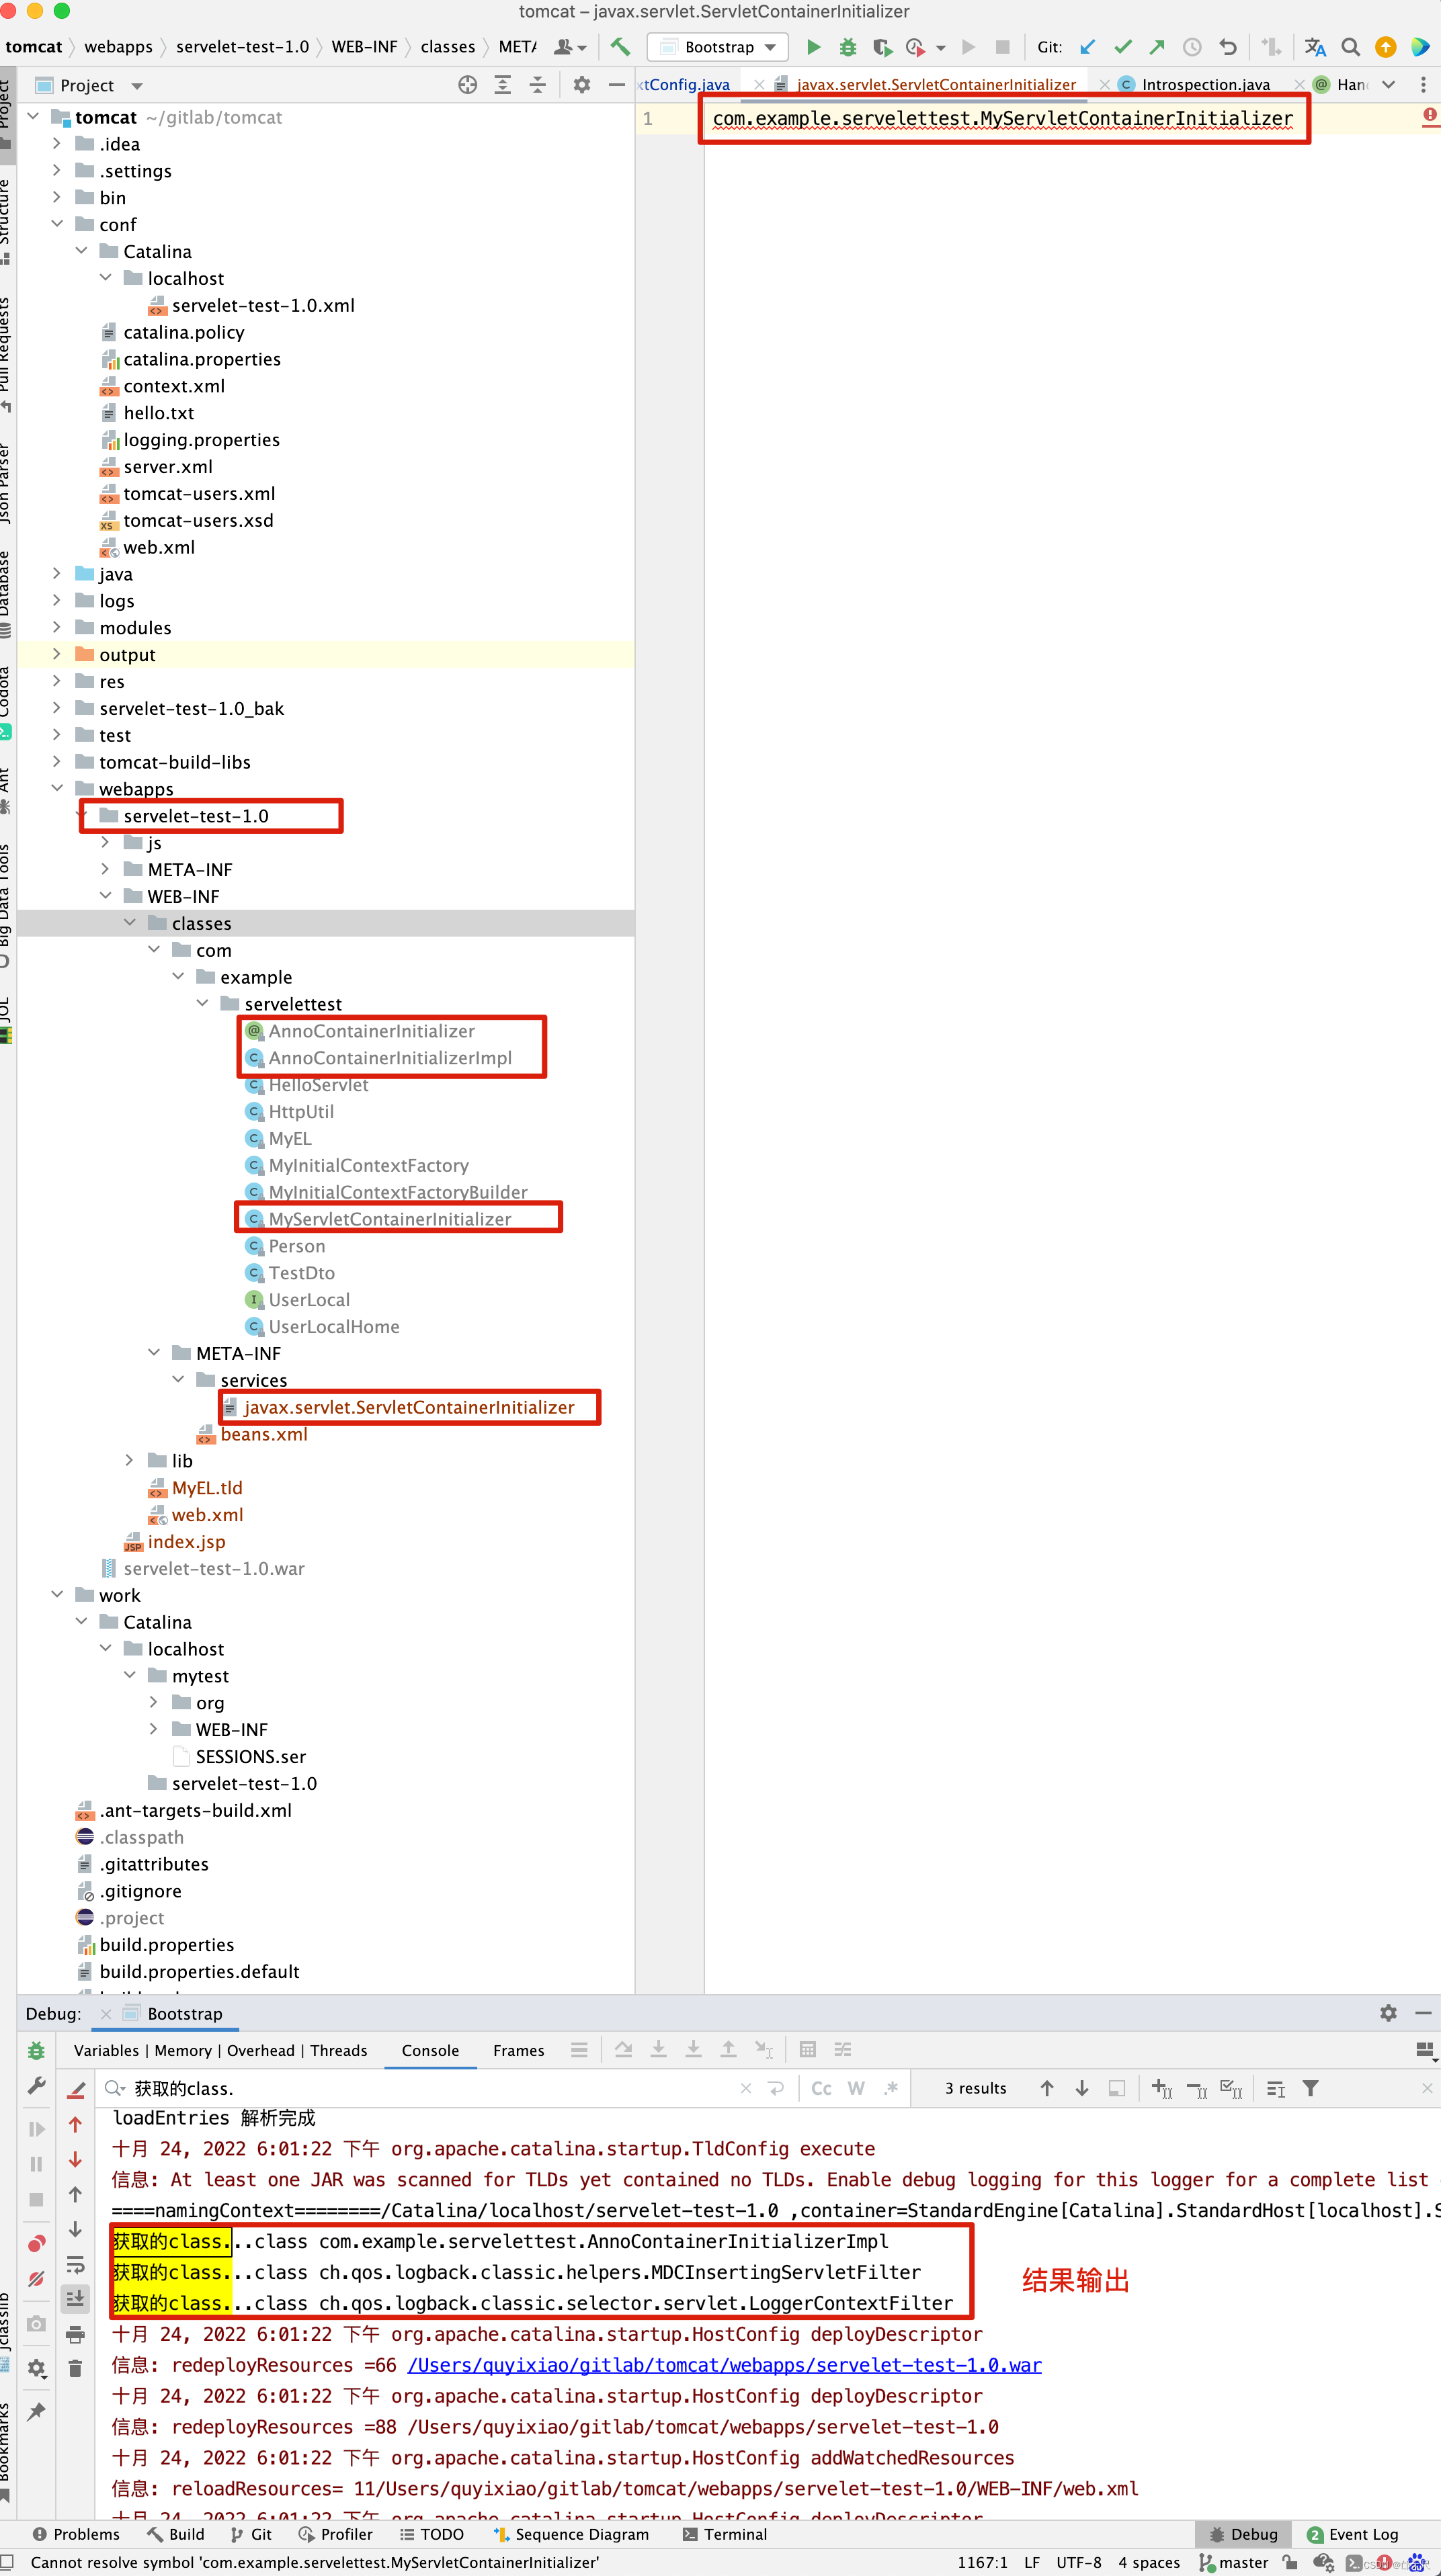
- 打断点调试
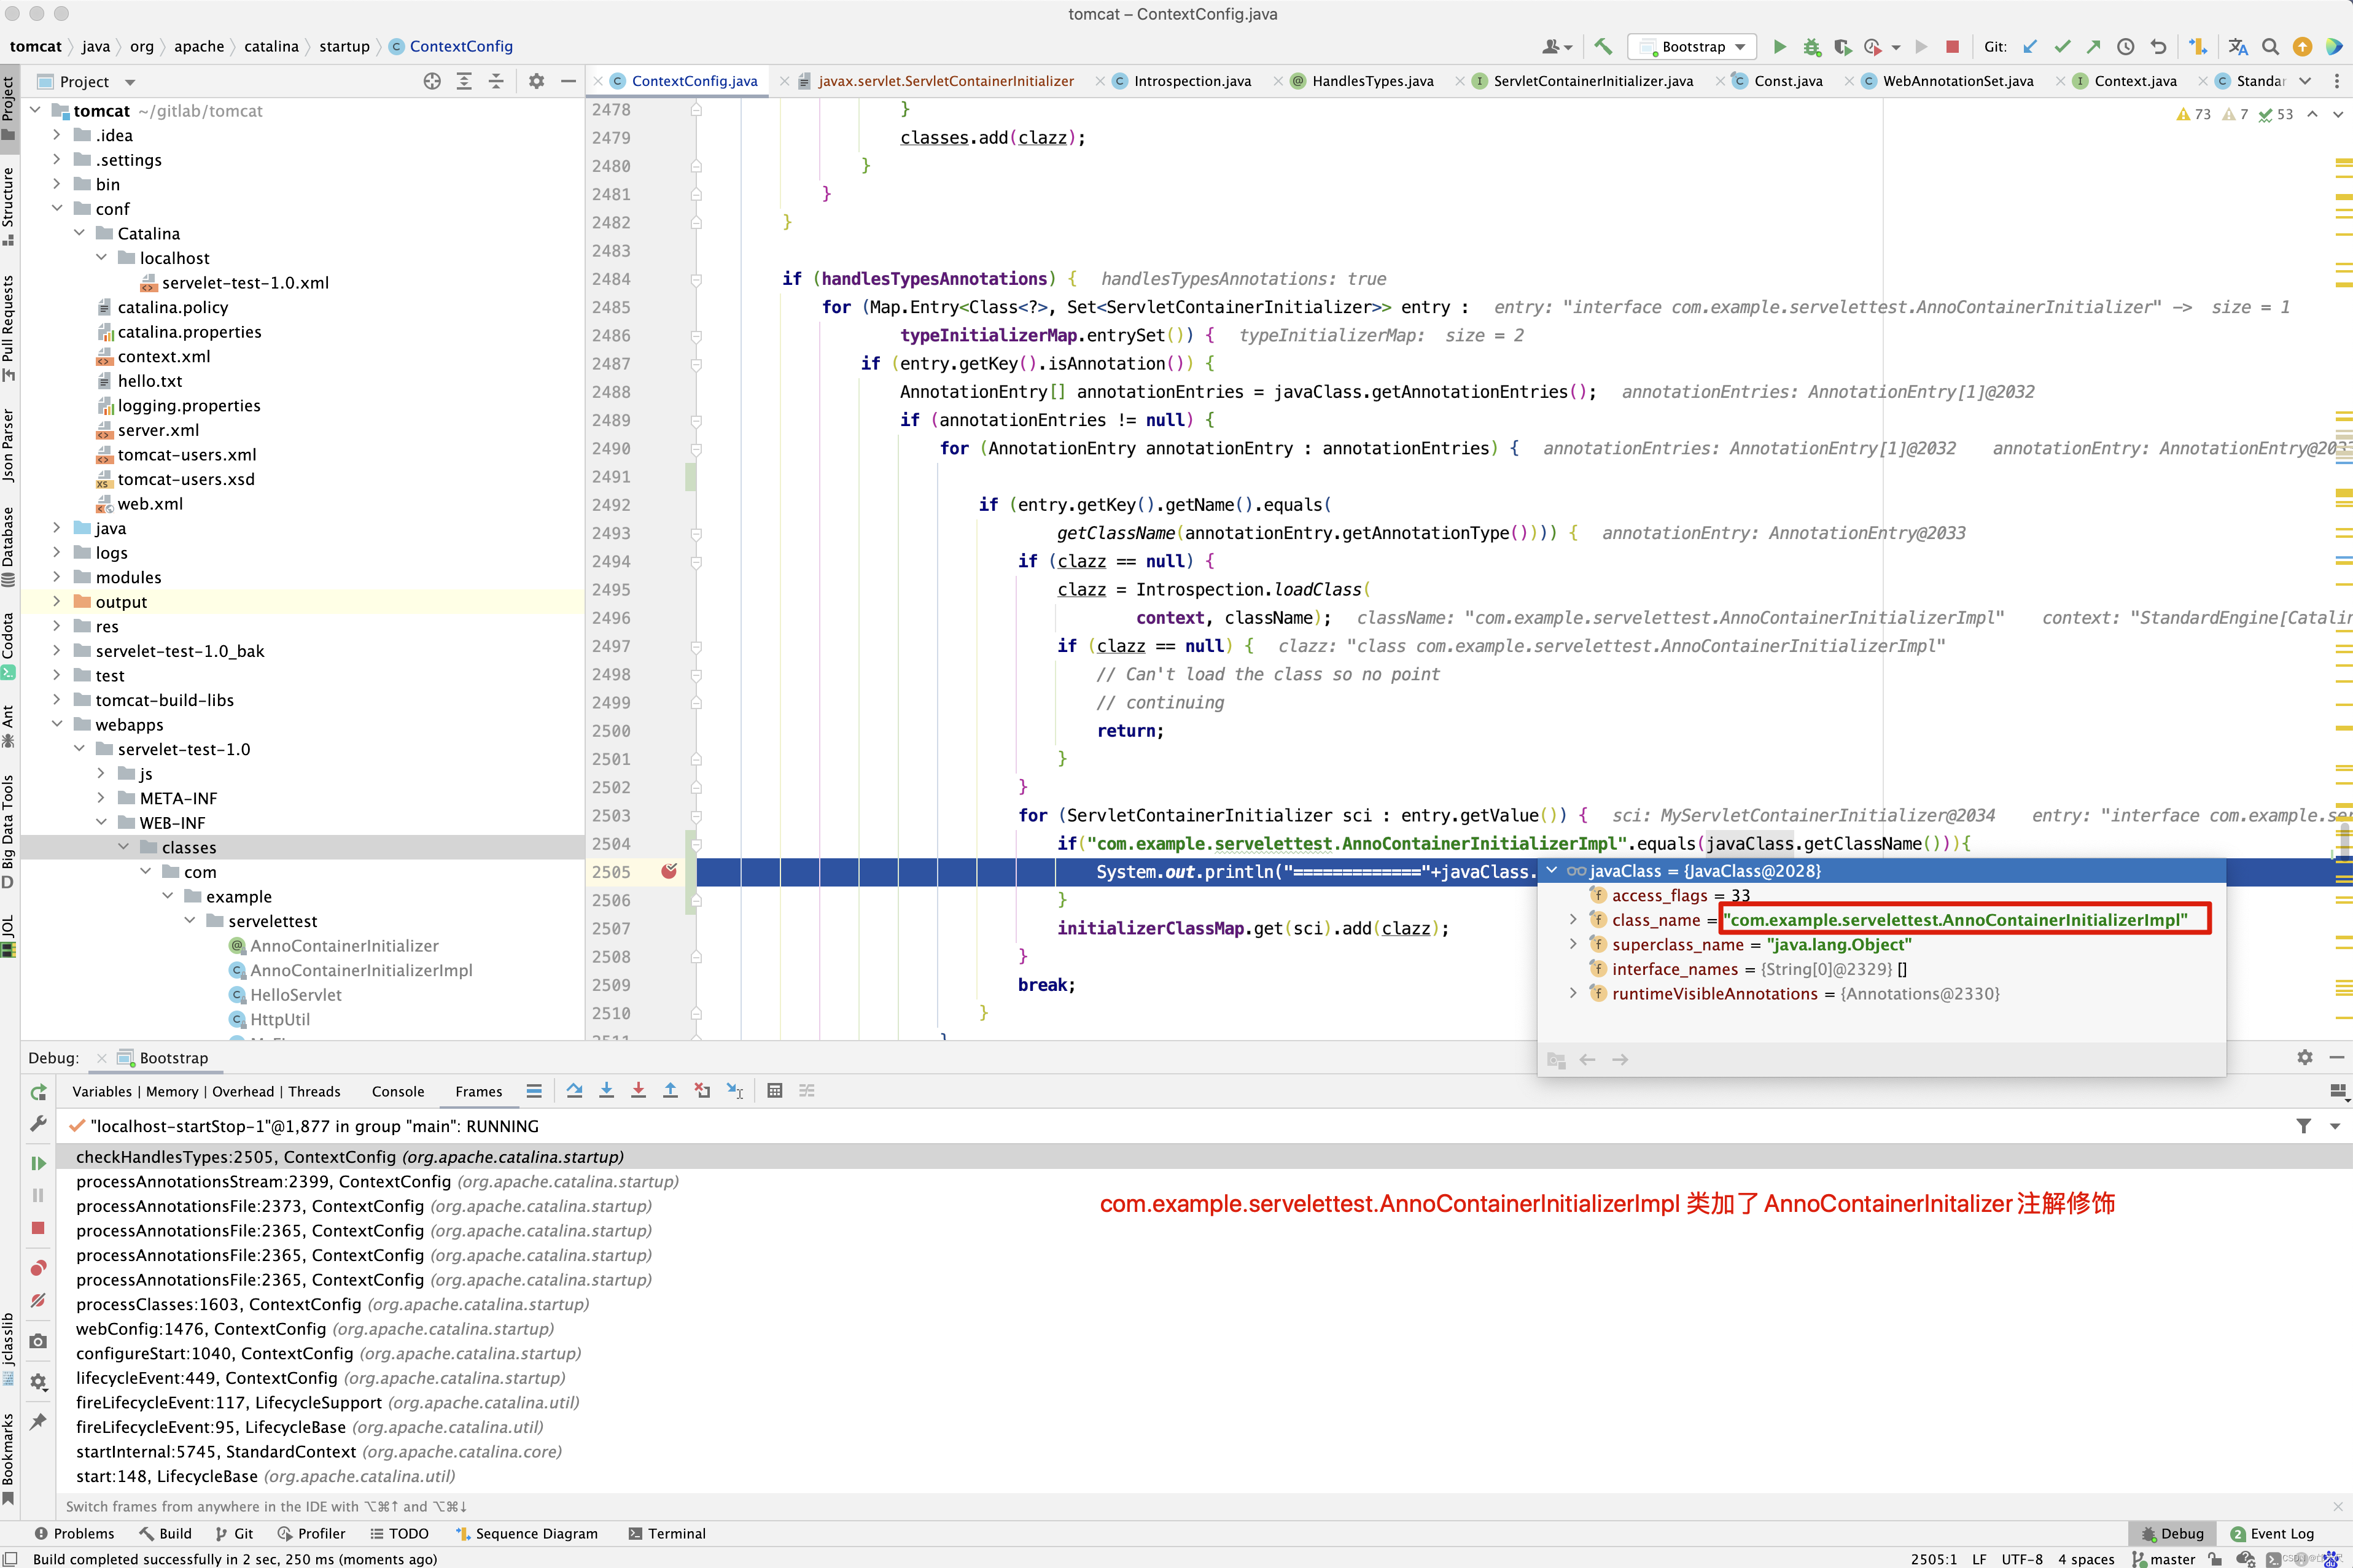
所以读源码读到这里就需要注意一点了,@HandlesTypes(value = {AnnoContainerInitializer.class,Filter.class}) 注解的value值,只能是父类,接口,或注解,而不能写AnnoContainerInitializerImpl类本身,写了也没用,经过测试,将AnnoContainerInitializer注解值改成具体的类AnnoContainerInitializerImpl,执行结果如下 。
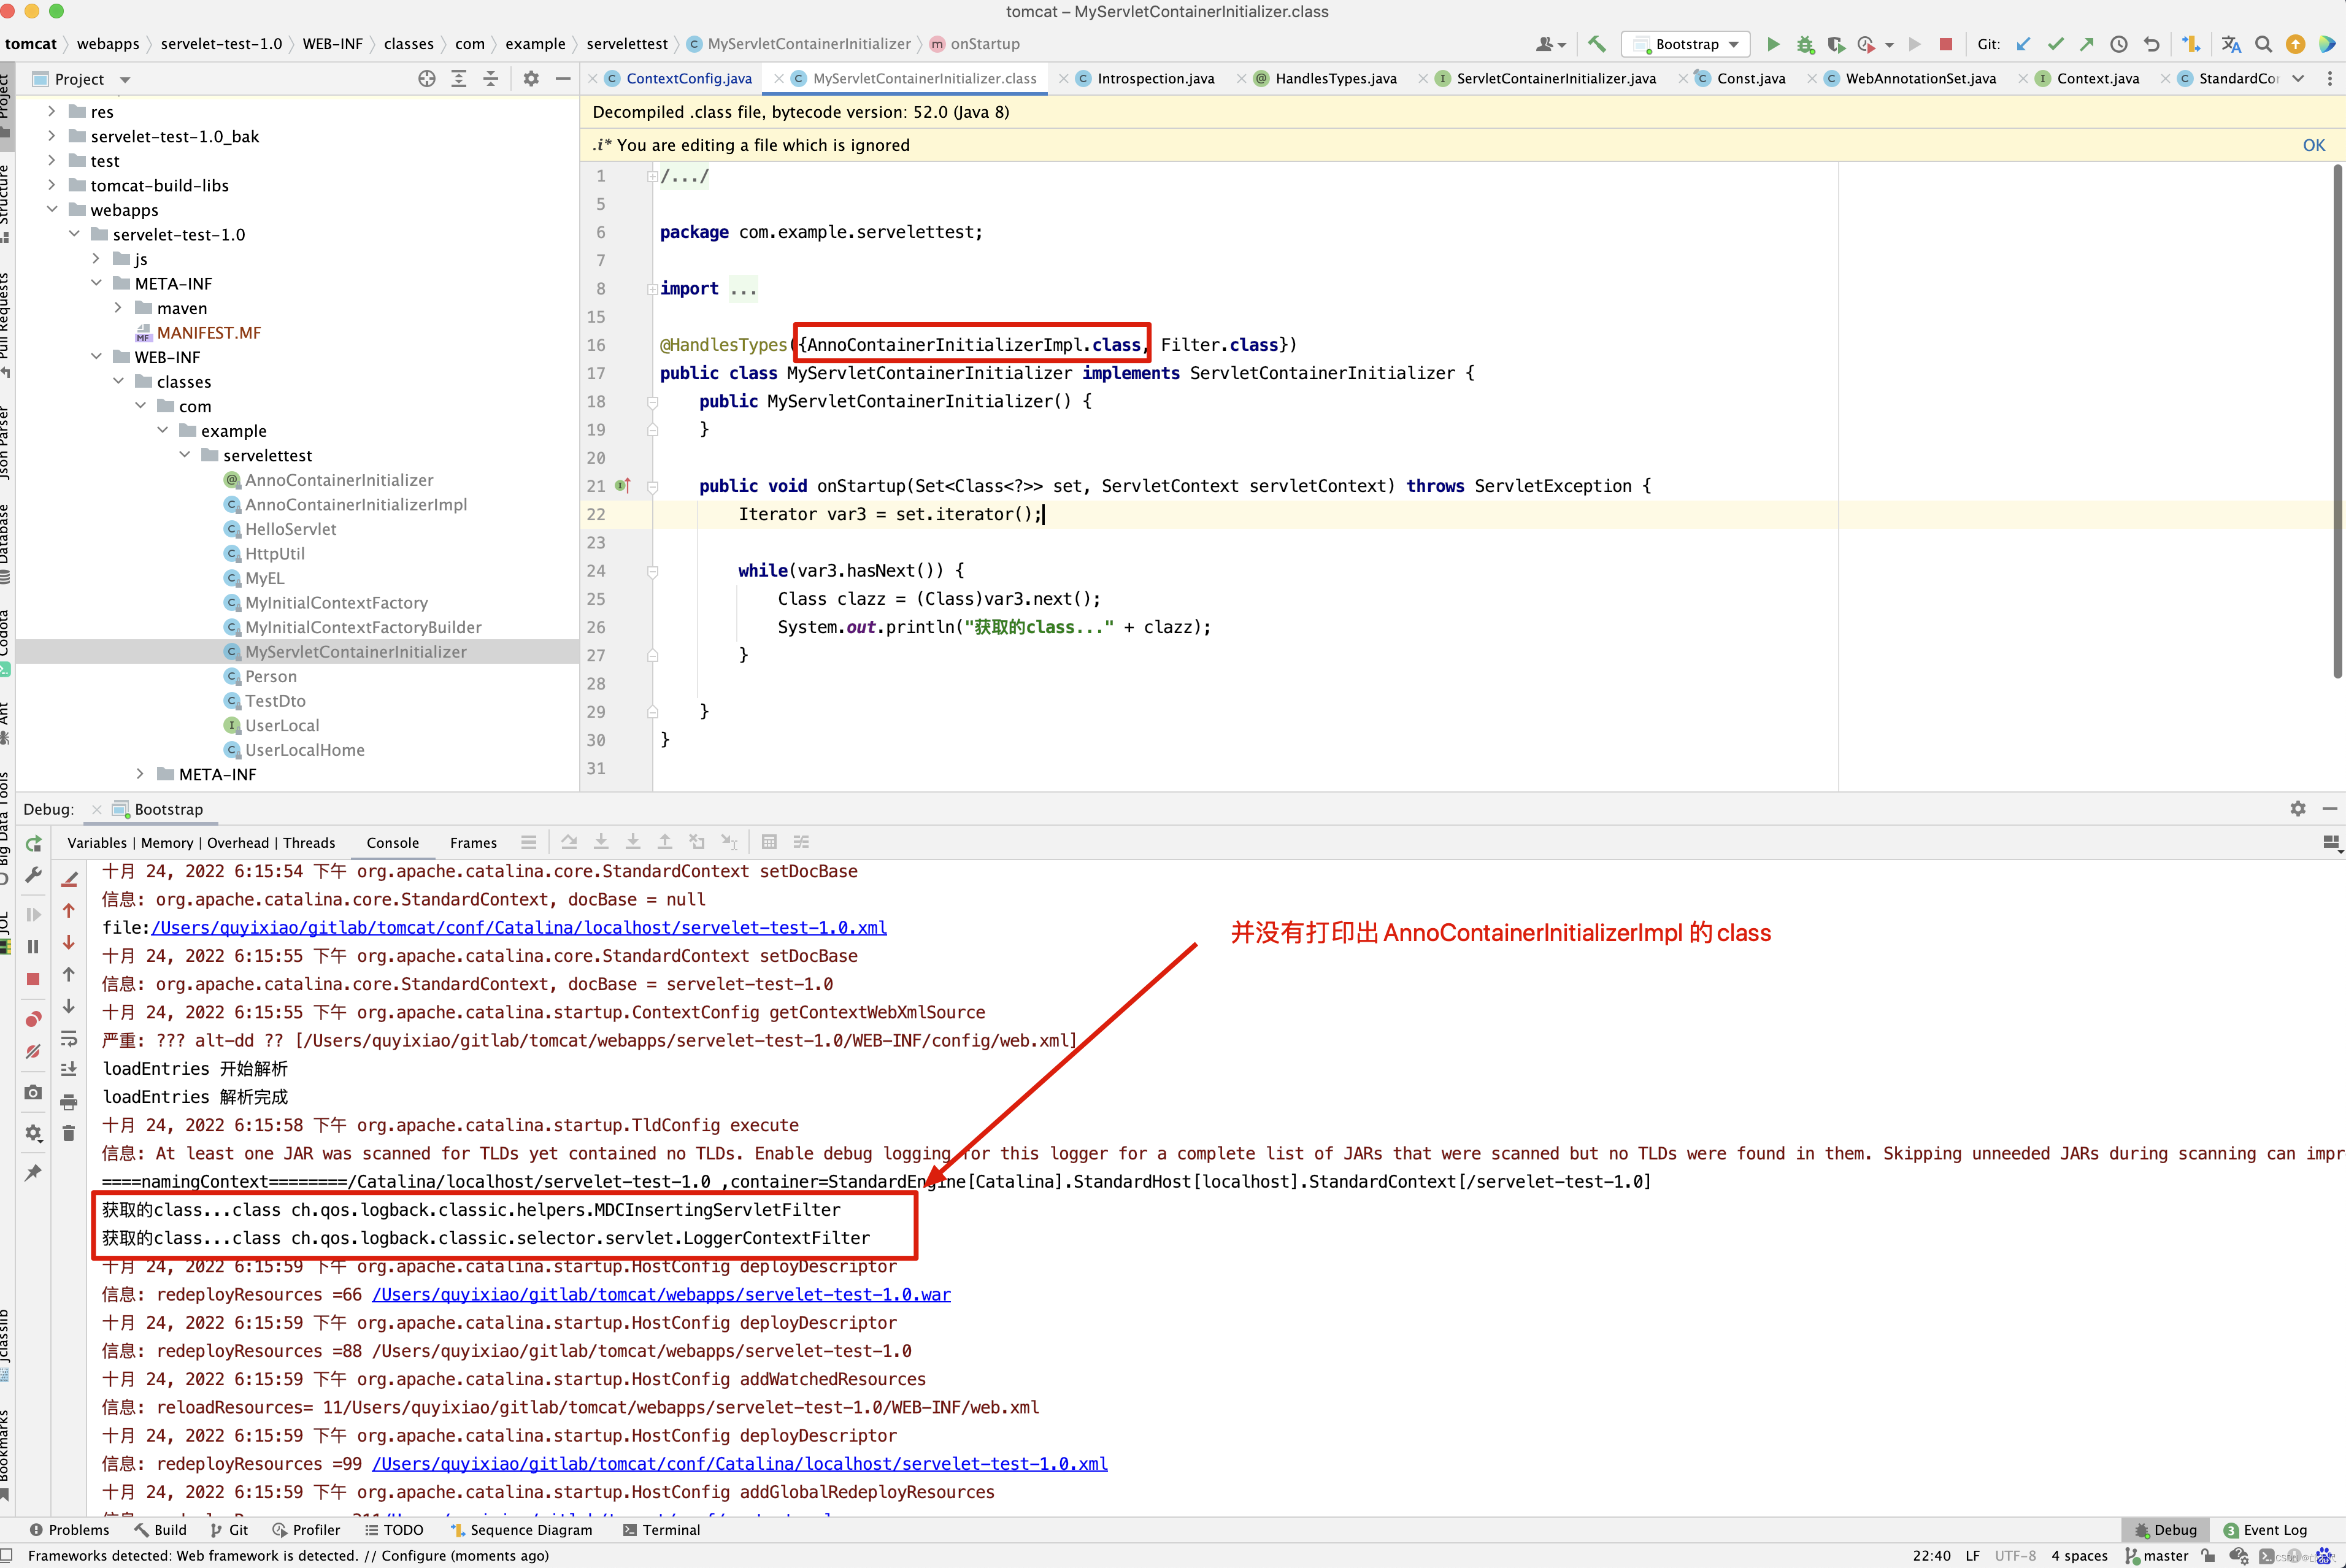
这个例子的用意应该明显了, 创建注解AnnoContainerInitializer,在AnnoContainerInitializerImpl类上配置AnnoContainerInitializer注解,自定义MyServletContainerInitializer类, 在tomcat启动时,打印了获取的class…AnnoContainerInitializerImpl,也就是说,只要在MyServletContainerInitializer的HandlesTypes中配置了注解AnnoContainerInitializer,其他类只要加了AnnoContainerInitializer注解,在tomcat启动时,在调用onStartup()方法时,会将AnnoContainerInitializerImpl的Class信息作为onStartup()方法的参数传入。有了这个例子,你对ServletContainerInitializer的源码也理解了,tomcat会扫描当前classLoader中所有的类,只要其父类或接口或注解配置在MyServletContainerInitializer的HandlesTypes中,则在启动时,会将该类作为MyServletContainerInitializer的onStartup()方法的参数传入。
接下来看解析父类及接口存储到javaClassCache中如何实现。
private void populateJavaClassCache(String className, JavaClass javaClass) {
    if (javaClassCache.containsKey(className)) {
        return;
    }

    // Add this class to the cache
    javaClassCache.put(className, new JavaClassCacheEntry(javaClass));

    populateJavaClassCache(javaClass.getSuperclassName());

    for (String interfaceName : javaClass.getInterfaceNames()) {
        populateJavaClassCache(interfaceName);
    }
}

private void populateJavaClassCache(String className) {
    if (!javaClassCache.containsKey(className)) {
        String name = className.replace('.', '/') + ".class";
        InputStream is =
                context.getLoader().getClassLoader().getResourceAsStream(name);
        if (is == null) {
            return;
        }
        ClassParser parser = new ClassParser(is);
        try {
            JavaClass clazz = parser.parse();
            populateJavaClassCache(clazz.getClassName(), clazz);
        } catch (ClassFormatException e) {
            log.debug(sm.getString("contextConfig.invalidSciHandlesTypes",
                    className), e);
        } catch (IOException e) {
            log.debug(sm.getString("contextConfig.invalidSciHandlesTypes",
                    className), e);
        } finally {
            try {
                is.close();
            } catch (IOException e) {
                // ignore
            }
        }
    }
}
populateJavaClassCache()方法也是递归解析当前类的父类及接口,并将解析的javaClass对象封装成JavaClassCacheEntry存储到javaClassCache中 ,当然JavaClassCacheEntry结构如下 。
private static class JavaClassCacheEntry {
    public final String superclassName;

    public final String[] interfaceNames;

    private Set<ServletContainerInitializer> sciSet = null;

    public JavaClassCacheEntry(JavaClass javaClass) {
        superclassName = javaClass.getSuperclassName();
        interfaceNames = javaClass.getInterfaceNames();
    }

    public String getSuperclassName() {
        return superclassName;
    }

    public String[] getInterfaceNames() {
        return interfaceNames;
    }

    public Set<ServletContainerInitializer> getSciSet() {
        return sciSet;
    }

    public void setSciSet(Set<ServletContainerInitializer> sciSet) {
        this.sciSet = sciSet;
    }
}
从JavaClassCacheEntry的结构得知,sciSet的值来源于sciSet()方法,而setSciSet()方法在populateSCIsForCacheEntry()方法内部调用。 进入populateSCIsForCacheEntry()方法 。
private void populateSCIsForCacheEntry(JavaClassCacheEntry cacheEntry) {
    Set<ServletContainerInitializer> result =
            new HashSet<ServletContainerInitializer>();

    // Super class
    String superClassName = cacheEntry.getSuperclassName();
    JavaClassCacheEntry superClassCacheEntry =
            javaClassCache.get(superClassName);

    // Avoid an infinite loop with java.lang.Object
   // 当java.lang.Object的父类JavaClassCacheEntry 等于自身
   // 因此设置其sciSet为空Set集合
    if (cacheEntry.equals(superClassCacheEntry)) {
        cacheEntry.setSciSet(EMPTY_SCI_SET);
        return;
    }

    // May be null of the class is not present or could not be loaded.
    if (superClassCacheEntry != null) {
        if (superClassCacheEntry.getSciSet() == null) {
            populateSCIsForCacheEntry(superClassCacheEntry);
        }
        result.addAll(superClassCacheEntry.getSciSet());
    }
    result.addAll(getSCIsForClass(superClassName));

    // Interfaces
    for (String interfaceName : cacheEntry.getInterfaceNames()) {
        JavaClassCacheEntry interfaceEntry =
                javaClassCache.get(interfaceName);
        // A null could mean that the class not present in application or
        // that there is nothing of interest. Either way, nothing to do here
        // so move along
        if (interfaceEntry != null) {
            if (interfaceEntry.getSciSet() == null) {
                populateSCIsForCacheEntry(interfaceEntry);
            }
            result.addAll(interfaceEntry.getSciSet());
        }
        result.addAll(getSCIsForClass(interfaceName));
    }

    cacheEntry.setSciSet(result.isEmpty() ? EMPTY_SCI_SET : result);
}


private Set<ServletContainerInitializer> getSCIsForClass(String className) {
    for (Map.Entry<Class<?>, Set<ServletContainerInitializer>> entry :
            typeInitializerMap.entrySet()) {
        Class<?> clazz = entry.getKey();
        if (!clazz.isAnnotation()) {
            if (clazz.getName().equals(className)) {
                return entry.getValue();
            }
        }
    }
    return EMPTY_SCI_SET;
}
populateSCIsForCacheEntry()方法看上去很复杂,原理还是很简单,只要当前类的父类或接口(【注意】不包含当前类自己)被XXXServletContainerInitializer的@HandlesTypes(value = {YYY.class}) 注解的value值配置,如YYYY.class, 因为扫描当前类会生成一个JavaClassCacheEntry对象,并存储于cacheEntry缓存中, 如果当前类的父类或接口或祖先类或祖先接口是YYYY, 则将XXXServletContainerInitializer对象设置到当前类的JavaClassCacheEntry的sciSet中。
接着看checkHandlesTypes()方法中的loadClass()方法 。
public static Class<?> loadClass(Container container, String className) {
    ClassLoader cl = container.getLoader().getClassLoader();
    Log log = container.getLogger();
    Class<?> clazz = null;
    try {
        clazz = cl.loadClass(className);
    } catch (ClassNotFoundException e) {
        log.debug(sm.getString("introspection.classLoadFailed", className), e);
    } catch (NoClassDefFoundError e) {
        log.debug(sm.getString("introspection.classLoadFailed", className), e);
    } catch (ClassFormatError e) {
        log.debug(sm.getString("introspection.classLoadFailed", className), e);
    } catch (Throwable t) {
        ExceptionUtils.handleThrowable(t);
        log.debug(sm.getString("introspection.classLoadFailed", className), t);
    }
    return clazz;
}
这里用到的类加载器是container的类加载器。
代码分析到这里,我相信你对ServletContainerInitializer的原理已经理解了。自定义MyServletContainerInitializer配置了@HandlesTypes({AnnoContainerInitializerImpl.class, Filter.class})注解,实际上tomcat会从类加载器中扫描所有的class文件,如果其父类或接口,或祖先类或祖先接口,只要其祖先类或接口配置在HandlesTypes注解中, 则将当前类的Class添加到key为MyServletContainerInitializer对象,值为当前类的Class(其实是HashSet集合)的initializerClassMap中,如果HandlesTypes中配置了注解,则将配置了注解的类的Class 添加到initializerClassMap的集合中。 如MyServletContainerInitializer, @HandlesTypes({AnnoContainerInitializerImpl.class, Filter.class}),会将被注解修饰的类AnnoContainerInitializerImpl,以及实现了Filter接口的ch.qos.logback.classic.helpers.MDCInsertingServletFilter和ch.qos.logback.classic.selector.servlet.LoggerContextFilter添加到initializerClassMap中。
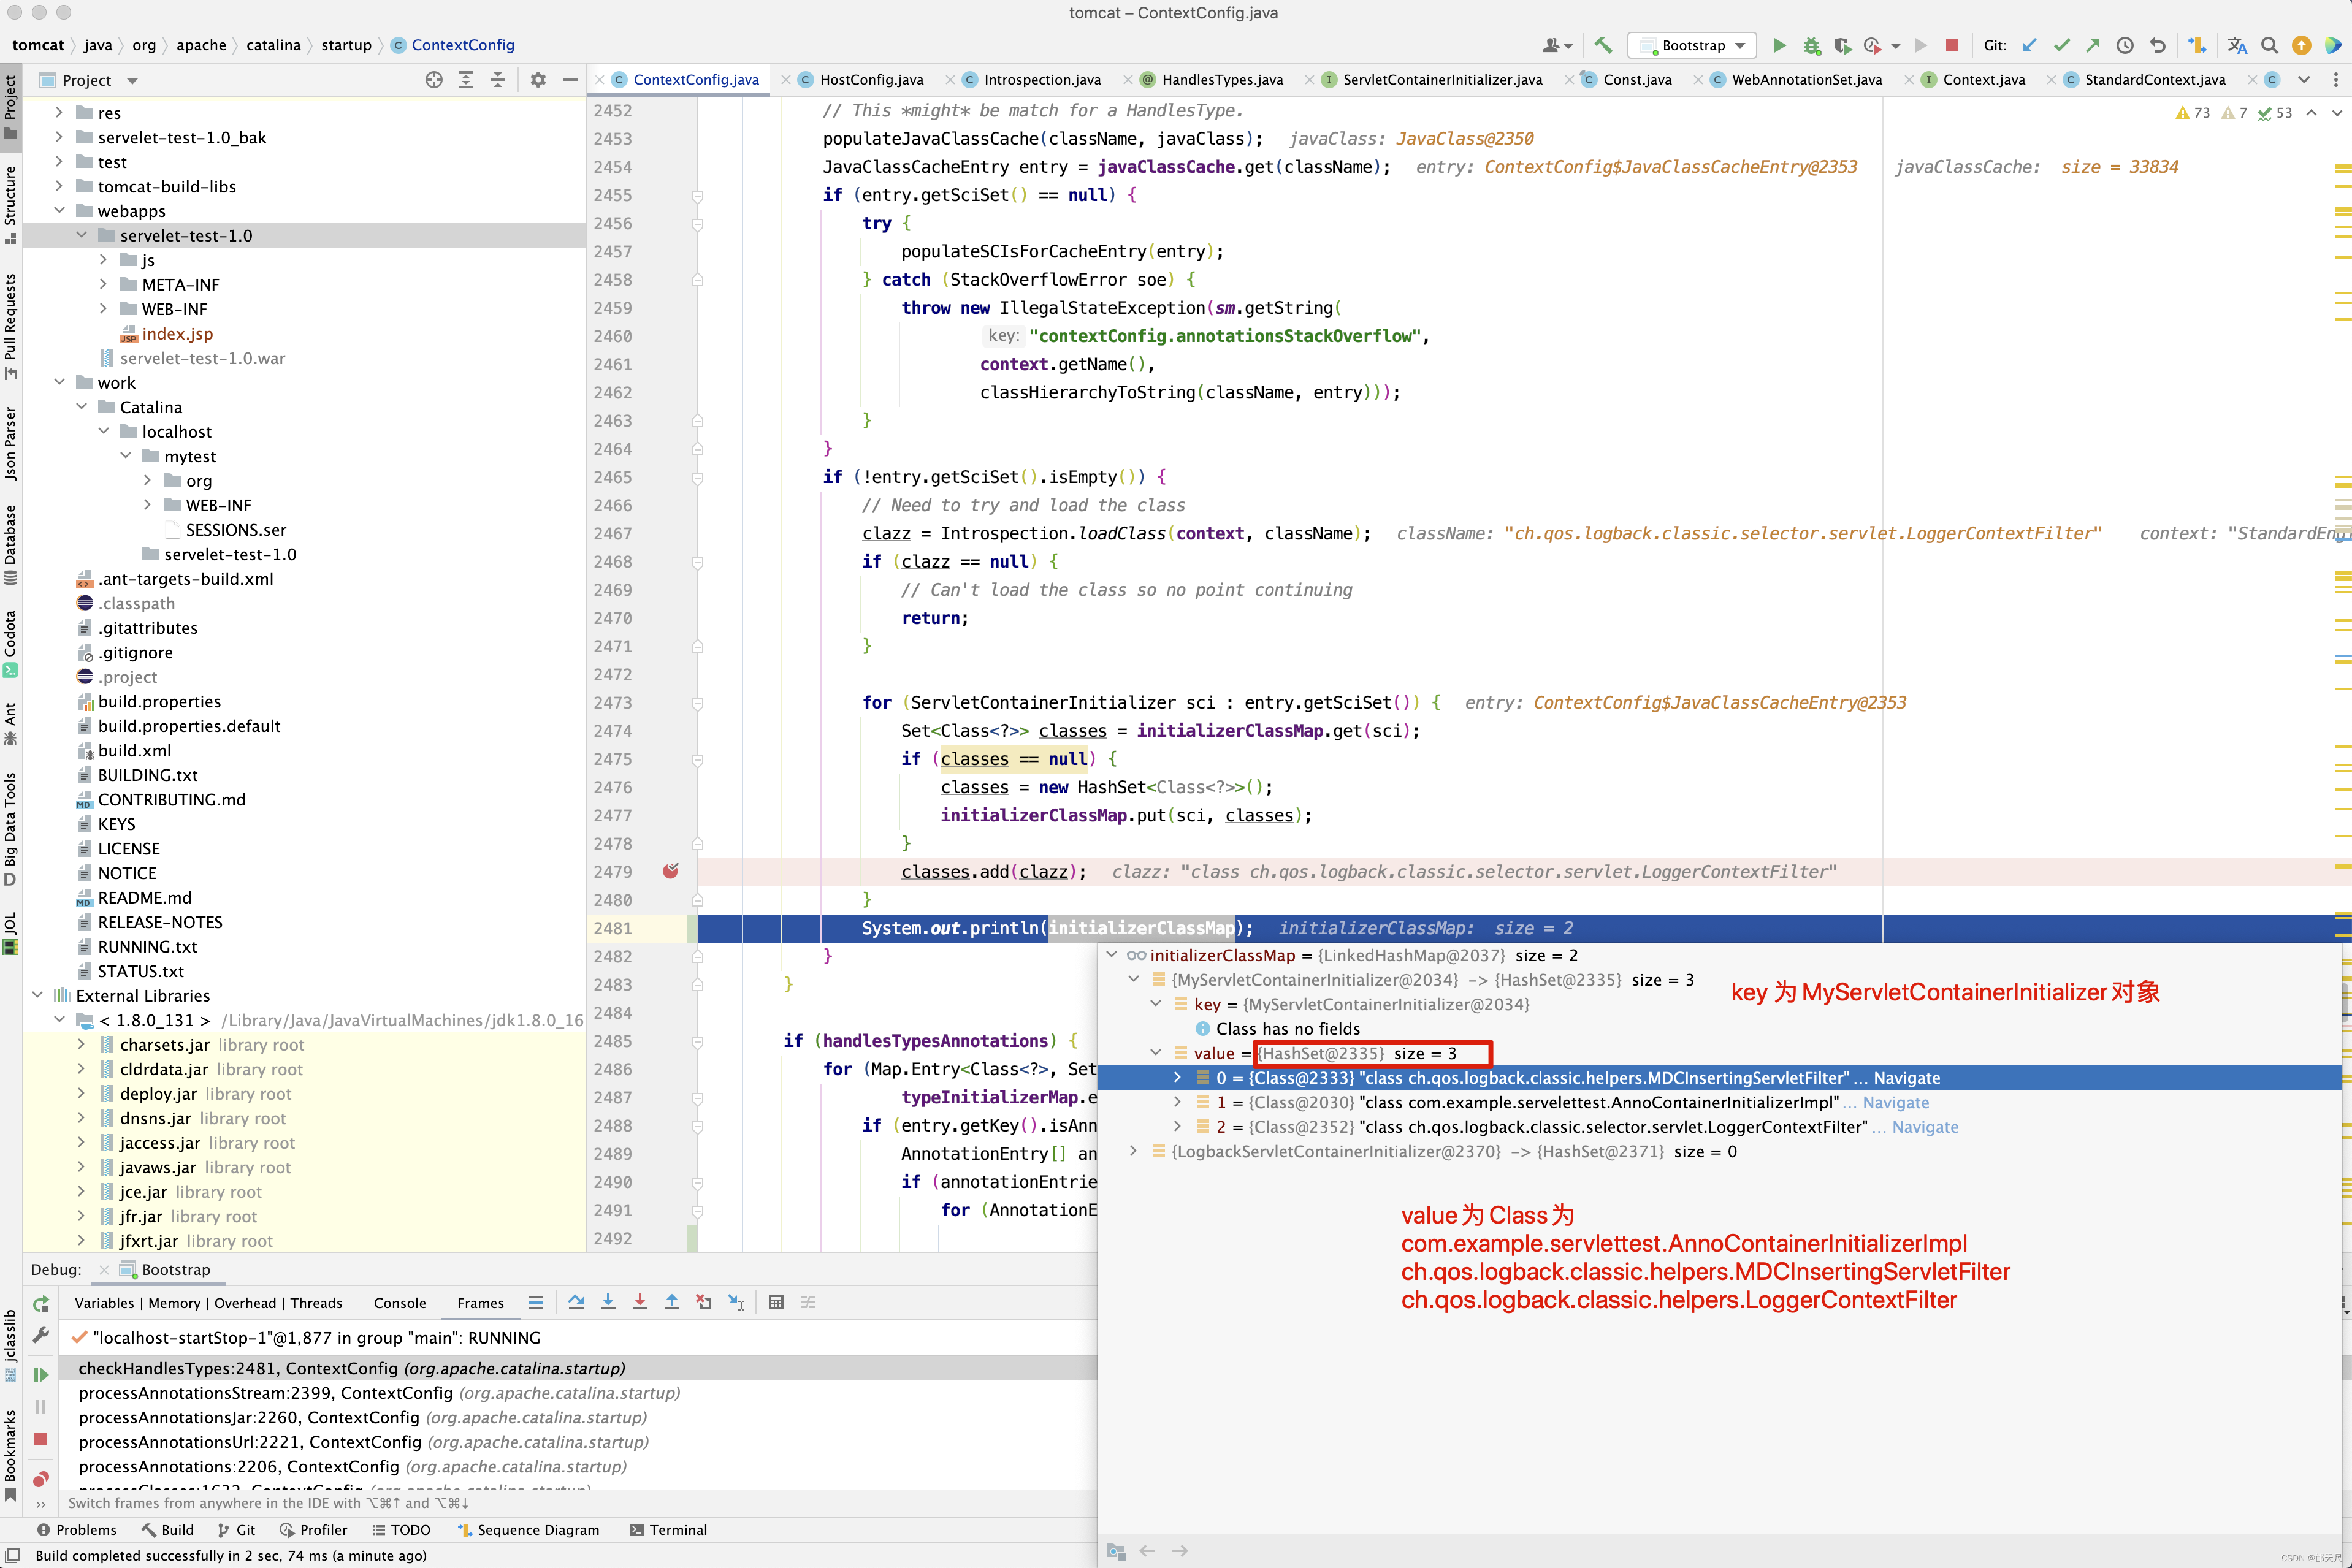
再以实战项目为例,如SpringServletContainerInitializer配置了@HandlesTypes(WebApplicationInitializer.class)

因此所有实现了WebApplicationInitializer接口的类在启动时onStartup()方法都被调用。并且将servletContext作为参数传入。
接下来看@WebServlet 和 @WebFilter 以及@WebListener 注解的处理。
// 处理注解
protected void processClass(WebXml fragment, JavaClass clazz) {
    AnnotationEntry[] annotationsEntries = clazz.getAnnotationEntries();
    if (annotationsEntries != null) {
        String className = clazz.getClassName();
        for (AnnotationEntry ae : annotationsEntries) {
            String type = ae.getAnnotationType();
            if ("Ljavax/servlet/annotation/WebServlet;".equals(type)) {
                processAnnotationWebServlet(className, ae, fragment);
            }else if ("Ljavax/servlet/annotation/WebFilter;".equals(type)) {
                processAnnotationWebFilter(className, ae, fragment);
            }else if ("Ljavax/servlet/annotation/WebListener;".equals(type)) {
                fragment.addListener(className);
            } else {
                // Unknown annotation - ignore
            }
        }
    }
}
上面对注解分三种情况处理,第一种情况WebServlet注解,则调用processAnnotationWebServlet()方法,WebFilter注解则调用processAnnotationWebFilter()方法,而WebListener注解,则直接将类名添加到fragment即可, 先来看WebFilter注解的解析。
/**
 *
 * @param className 被@WebServlet注解的类名
 * @param ae        @WebServlet注解对象
 * @param fragment
 */
protected void processAnnotationWebServlet(String className,
        AnnotationEntry ae, WebXml fragment) {
    String servletName = null;
    // must search for name s. Spec Servlet API 3.0 - 8.2.3.3.n.ii page 81
    List<ElementValuePair> evps = ae.getElementValuePairs();
    // 遍历注解上配置的name:value对
    for (ElementValuePair evp : evps) {
        String name = evp.getNameString();
        // @WebServlet中的name为servletName
        if ("name".equals(name)) {
            servletName = evp.getValue().stringifyValue();
            break;
        }
    }
    // 如果没有配置name,那么servletName为类名
    if (servletName == null) {
        // classname is default servletName as annotation has no name!
        servletName = className;
    }
    // 查看该servletName是否在webxml中存在
    ServletDef servletDef = fragment.getServlets().get(servletName);

    boolean isWebXMLservletDef;
    // 如果没有在webxml中定义,那么就定义一个Servlet
    if (servletDef == null) {
        servletDef = new ServletDef();
        servletDef.setServletName(servletName);
        servletDef.setServletClass(className);
        isWebXMLservletDef = false;
    } else {
        isWebXMLservletDef = true;
    }

    boolean urlPatternsSet = false;
    String[] urlPatterns = null;  // 可以配置多个urlPatterns

    // List<ElementValuePair> evps = ae.getElementValuePairs();
    for (ElementValuePair evp : evps) {
        String name = evp.getNameString();
        if ("value".equals(name) || "urlPatterns".equals(name)) {
            if (urlPatternsSet) {
                throw new IllegalArgumentException(sm.getString(
                        "contextConfig.urlPatternValue", "WebServlet", className));
            }
            urlPatternsSet = true;
            urlPatterns = processAnnotationsStringArray(evp.getValue());
        } else if ("description".equals(name)) {
            if (servletDef.getDescription() == null) {
                servletDef.setDescription(evp.getValue().stringifyValue());
            }
        } else if ("displayName".equals(name)) {
            if (servletDef.getDisplayName() == null) {
                servletDef.setDisplayName(evp.getValue().stringifyValue());
            }
        } else if ("largeIcon".equals(name)) {
            if (servletDef.getLargeIcon() == null) {
                servletDef.setLargeIcon(evp.getValue().stringifyValue());
            }
        } else if ("smallIcon".equals(name)) {
            if (servletDef.getSmallIcon() == null) {
                servletDef.setSmallIcon(evp.getValue().stringifyValue());
            }
        } else if ("asyncSupported".equals(name)) {
            if (servletDef.getAsyncSupported() == null) {
                servletDef.setAsyncSupported(evp.getValue()
                        .stringifyValue());
            }
        } else if ("loadOnStartup".equals(name)) {
            if (servletDef.getLoadOnStartup() == null) {
                servletDef
                        .setLoadOnStartup(evp.getValue().stringifyValue());
            }
        } else if ("initParams".equals(name)) {
            // 初始化参数键值对
            Map<String, String> initParams = processAnnotationWebInitParams(evp
                    .getValue());
            if (isWebXMLservletDef) {
                // 如果该servlet在webxml中也定义了,将注解上定义的initparams和webxml中定义的initparams合并
                Map<String, String> webXMLInitParams = servletDef
                        .getParameterMap();
                for (Map.Entry<String, String> entry : initParams
                        .entrySet()) {
                    if (webXMLInitParams.get(entry.getKey()) == null) {
                        servletDef.addInitParameter(entry.getKey(), entry
                                .getValue());
                    }
                }
            } else {
                for (Map.Entry<String, String> entry : initParams
                        .entrySet()) {
                    servletDef.addInitParameter(entry.getKey(), entry
                            .getValue());
                }
            }
        }
    }
    if (!isWebXMLservletDef && urlPatterns != null) {
    	// 将Servlet定义添加到fragment中
        fragment.addServlet(servletDef);
    }
    if (urlPatterns != null) {
        // 如果webxml中对当前servletname没有配置mapping关系
        if (!fragment.getServletMappings().containsValue(servletName)) {
            for (String urlPattern : urlPatterns) {
                fragment.addServletMapping(urlPattern, servletName);
            }
        }
    }
}

 protected String[] processAnnotationsStringArray(ElementValue ev) {
    ArrayList<String> values = new ArrayList<String>();
    if (ev instanceof ArrayElementValue) {
        ElementValue[] arrayValues =
            ((ArrayElementValue) ev).getElementValuesArray();
        for (ElementValue value : arrayValues) {
            values.add(value.stringifyValue());
        }
    } else {
        values.add(ev.stringifyValue());
    }
    String[] result = new String[values.size()];
    return values.toArray(result);
}

protected Map<String,String> processAnnotationWebInitParams(
        ElementValue ev) {
    Map<String, String> result = new HashMap<String,String>();
    if (ev instanceof ArrayElementValue) {
        ElementValue[] arrayValues =
            ((ArrayElementValue) ev).getElementValuesArray();
        for (ElementValue value : arrayValues) {
            if (value instanceof AnnotationElementValue) {
                List<ElementValuePair> evps = ((AnnotationElementValue) value)
                        .getAnnotationEntry().getElementValuePairs();
                String initParamName = null;
                String initParamValue = null;
                for (ElementValuePair evp : evps) {
                    if ("name".equals(evp.getNameString())) {
                        initParamName = evp.getValue().stringifyValue();
                    } else if ("value".equals(evp.getNameString())) {
                        initParamValue = evp.getValue().stringifyValue();
                    } else {
                        // Ignore
                    }
                }
                result.put(initParamName, initParamValue);
            }
        }
    }
    return result;
}
processAnnotationWebServlet()方法就是解析WebServlet注解中的属性并添加到servletDef中,接下来看WebFilter注解解析。
 protected void processAnnotationWebFilter(String className,
        AnnotationEntry ae, WebXml fragment) {
    String filterName = null;
    // must search for name s. Spec Servlet API 3.0 - 8.2.3.3.n.ii page 81

    List<ElementValuePair> evps = ae.getElementValuePairs();
    for (ElementValuePair evp : evps) {
        String name = evp.getNameString();
        if ("filterName".equals(name)) {
            filterName = evp.getValue().stringifyValue();
            break;
        }
    }
    if (filterName == null) {
        // classname is default filterName as annotation has no name!
        filterName = className;
    }
    FilterDef filterDef = fragment.getFilters().get(filterName);
    FilterMap filterMap = new FilterMap();

    boolean isWebXMLfilterDef;
    if (filterDef == null) {
        filterDef = new FilterDef();
        filterDef.setFilterName(filterName);
        filterDef.setFilterClass(className);
        isWebXMLfilterDef = false;
    } else {
        isWebXMLfilterDef = true;
    }

    boolean urlPatternsSet = false;
    boolean servletNamesSet = false;
    boolean dispatchTypesSet = false;
    String[] urlPatterns = null;

    for (ElementValuePair evp : evps) {
        String name = evp.getNameString();
        if ("value".equals(name) || "urlPatterns".equals(name)) {
            if (urlPatternsSet) {
                throw new IllegalArgumentException(sm.getString(
                        "contextConfig.urlPatternValue", "WebFilter", className));
            }
            urlPatterns = processAnnotationsStringArray(evp.getValue());
            urlPatternsSet = urlPatterns.length > 0;
            for (String urlPattern : urlPatterns) {
                filterMap.addURLPattern(urlPattern);
            }
        } else if ("servletNames".equals(name)) {
            String[] servletNames = processAnnotationsStringArray(evp
                    .getValue());
            servletNamesSet = servletNames.length > 0;
            for (String servletName : servletNames) {
                filterMap.addServletName(servletName);
            }
        } else if ("dispatcherTypes".equals(name)) {
            String[] dispatcherTypes = processAnnotationsStringArray(evp
                    .getValue());
            dispatchTypesSet = dispatcherTypes.length > 0;
            for (String dispatcherType : dispatcherTypes) {
                filterMap.setDispatcher(dispatcherType);
            }
        } else if ("description".equals(name)) {
            if (filterDef.getDescription() == null) {
                filterDef.setDescription(evp.getValue().stringifyValue());
            }
        } else if ("displayName".equals(name)) {
            if (filterDef.getDisplayName() == null) {
                filterDef.setDisplayName(evp.getValue().stringifyValue());
            }
        } else if ("largeIcon".equals(name)) {
            if (filterDef.getLargeIcon() == null) {
                filterDef.setLargeIcon(evp.getValue().stringifyValue());
            }
        } else if ("smallIcon".equals(name)) {
            if (filterDef.getSmallIcon() == null) {
                filterDef.setSmallIcon(evp.getValue().stringifyValue());
            }
        } else if ("asyncSupported".equals(name)) {
            if (filterDef.getAsyncSupported() == null) {
                filterDef
                        .setAsyncSupported(evp.getValue().stringifyValue());
            }
        } else if ("initParams".equals(name)) {
            Map<String, String> initParams = processAnnotationWebInitParams(evp
                    .getValue());
            if (isWebXMLfilterDef) {
                Map<String, String> webXMLInitParams = filterDef
                        .getParameterMap();
                for (Map.Entry<String, String> entry : initParams
                        .entrySet()) {
                    if (webXMLInitParams.get(entry.getKey()) == null) {
                        filterDef.addInitParameter(entry.getKey(), entry
                                .getValue());
                    }
                }
            } else {
                for (Map.Entry<String, String> entry : initParams
                        .entrySet()) {
                    filterDef.addInitParameter(entry.getKey(), entry
                            .getValue());
                }
            }
        }
    }

    if (!isWebXMLfilterDef) {
        fragment.addFilter(filterDef);
        if (urlPatternsSet || servletNamesSet) {
            filterMap.setFilterName(filterName);
            fragment.addFilterMapping(filterMap);
        }
    }
    if (urlPatternsSet || dispatchTypesSet) {
        Set<FilterMap> fmap = fragment.getFilterMappings();
        FilterMap descMap = null;
        for (FilterMap map : fmap) {
            if (filterName.equals(map.getFilterName())) {
                descMap = map;
                break;
            }
        }
        if (descMap != null) {
            String[] urlsPatterns = descMap.getURLPatterns();
            if (urlPatternsSet
                    && (urlsPatterns == null || urlsPatterns.length == 0)) {
                for (String urlPattern : filterMap.getURLPatterns()) {
                    descMap.addURLPattern(urlPattern);
                }
            }
            String[] dispatcherNames = descMap.getDispatcherNames();
            if (dispatchTypesSet
                    && (dispatcherNames == null || dispatcherNames.length == 0)) {
                for (String dis : filterMap.getDispatcherNames()) {
                    descMap.setDispatcher(dis);
                }
            }
        }
    }
}
WebFilter注解的解析也很简单,就是将注解中的属性保存到FilterDef中,但大家解析到这里,千万不要被代码搞晕了,一定要明白此时的WebXml是谁的WebXml,如果此时扫描的是/Users/quyixiao/gitlab/tomcat/webapps/servelet-test-1.0/WEB-INF/classes下的类的注解时,此时WebXml一定是解析了/Users/quyixiao/gitlab/tomcat/webapps/servelet-test-1.0/WEB-INF/web.xml生成的WebXm,也就是主WebXml,如果WebXml是解析的是jar包下的web-fragment.xml生成的WebXml, 则都存储在Set<WebXml> fragments中,如processAnnotations()方法。
protected void processAnnotations(Set<WebXml> fragments,
        boolean handlesTypesOnly) {
    for(WebXml fragment : fragments) {
        WebXml annotations = new WebXml();
        // no impact on distributable
        // 如果支持@WebServlet , @WebFilter , @WebListener注解
        // 则将扫描.class得到的ServletDef , FilterDef和Listener添加到
        // annotations中
        annotations.setDistributable(true);
        URL url = fragment.getURL();
        // 只要servelet-test-1.0/WEB-INF/web.xml 的metadata-complete为true
        // 或 jar包下的web-fragment.xml的metadata-complete属性为true
        processAnnotationsUrl(url, annotations,
                (handlesTypesOnly || fragment.isMetadataComplete()));
        Set<WebXml> set = new HashSet<WebXml>();
        set.add(annotations);
        // Merge annotations into fragment - fragment takes priority
        fragment.merge(set);
    }
}
最终将解析web.xml或web-fragment.xml的内容与扫描.class文件的@WebServlet和@WebFilter及@WebListener得到的ServletDef和FilterDef和Listener合并在一起。 这里需要注意。 fragment.merge(set); 合并。
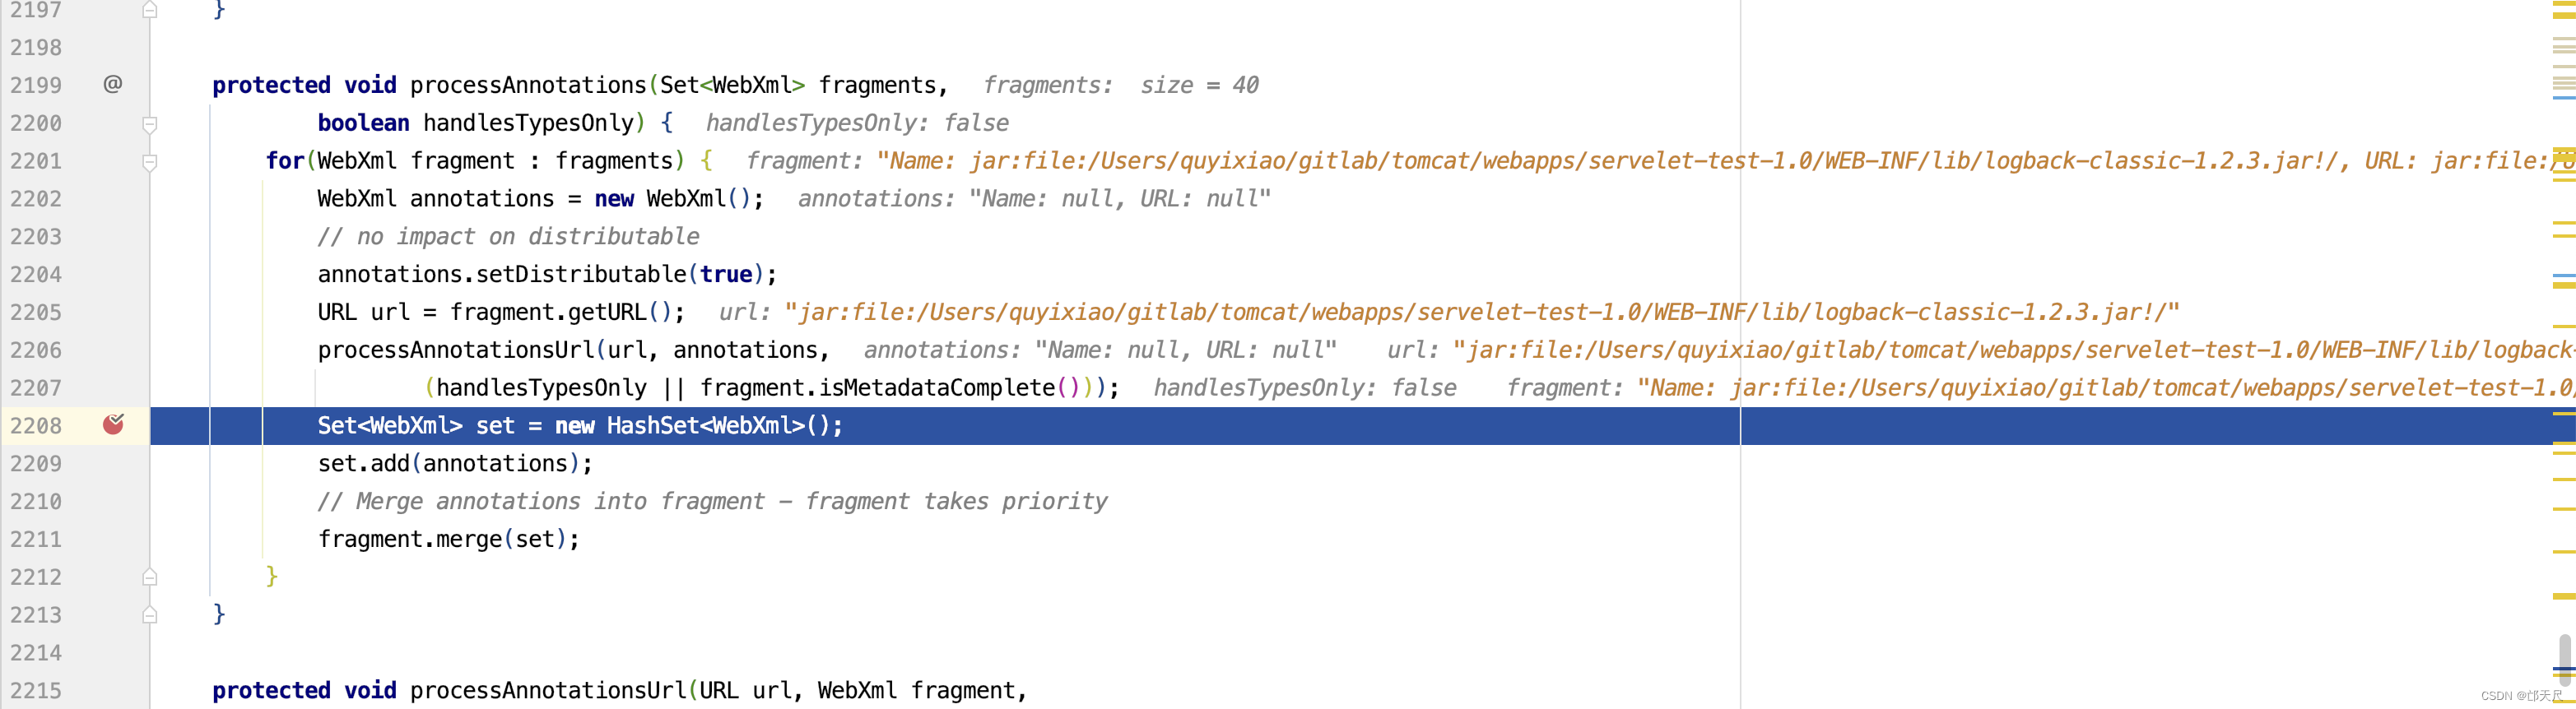
如URL为jar:file:/Users/quyixiao/gitlab/tomcat/webapps/servelet-test-1.0/WEB-INF/lib/logback-classic-1.2.3.jar!/的WebXml只会与
logback-classic-1.2.3.jar包内部的扫描到.class的注解合并,先自己包的web-fragment.xml与自己包扫描class得到的ServletDef, FilterDef 及Listener合并。在processAnnotations()方法中不会发生包与包之间的web-fragment之间合并。
再回头来看webConfig()方法, 有一段代码很是诡异,请看如下
protected void webConfig() {
    ...

    if (!webXml.isMetadataComplete()) {
        // Step 6. Merge web-fragment.xml files into the main web.xml
        // file.
        if (ok) {
            ok = webXml.merge(orderedFragments);
        }

        webXml.merge(defaults);

        // Step 8. Convert explicitly mentioned jsps to servlets
        if (ok) {
            convertJsps(webXml);
        }

        // Step 9. Apply merged web.xml to Context
        if (ok) {
            webXml.configureContext(context);
        }
    } else {
        webXml.merge(defaults); // 默认情况下, defaults就是conf/web.xml文件对应的WebXml对象
        convertJsps(webXml);    // 将jsp转化为Servlet
        webXml.configureContext(context);   // 根据webxml配置context,比如把定义的servlet转化为wrapper,然后添加到StandardContext中,还包括很多其他的
    }


    String mergedWebXml = webXml.toXml();
    sContext.setAttribute(
           org.apache.tomcat.util.scan.Constants.MERGED_WEB_XML,
           mergedWebXml);
    // 打印合并好的WebXml
    if (true || context.getLogEffectiveWebXml()) {
        log.info("web.xml:\n" + mergedWebXml);
    }
   ...
}
如果/Users/quyixiao/gitlab/tomcat/webapps/servelet-test-1.0/WEB-INF/web.xml文件中配置了metadata-complete=“true”,则不会合并orderedFragments。这什么意思呢?如下
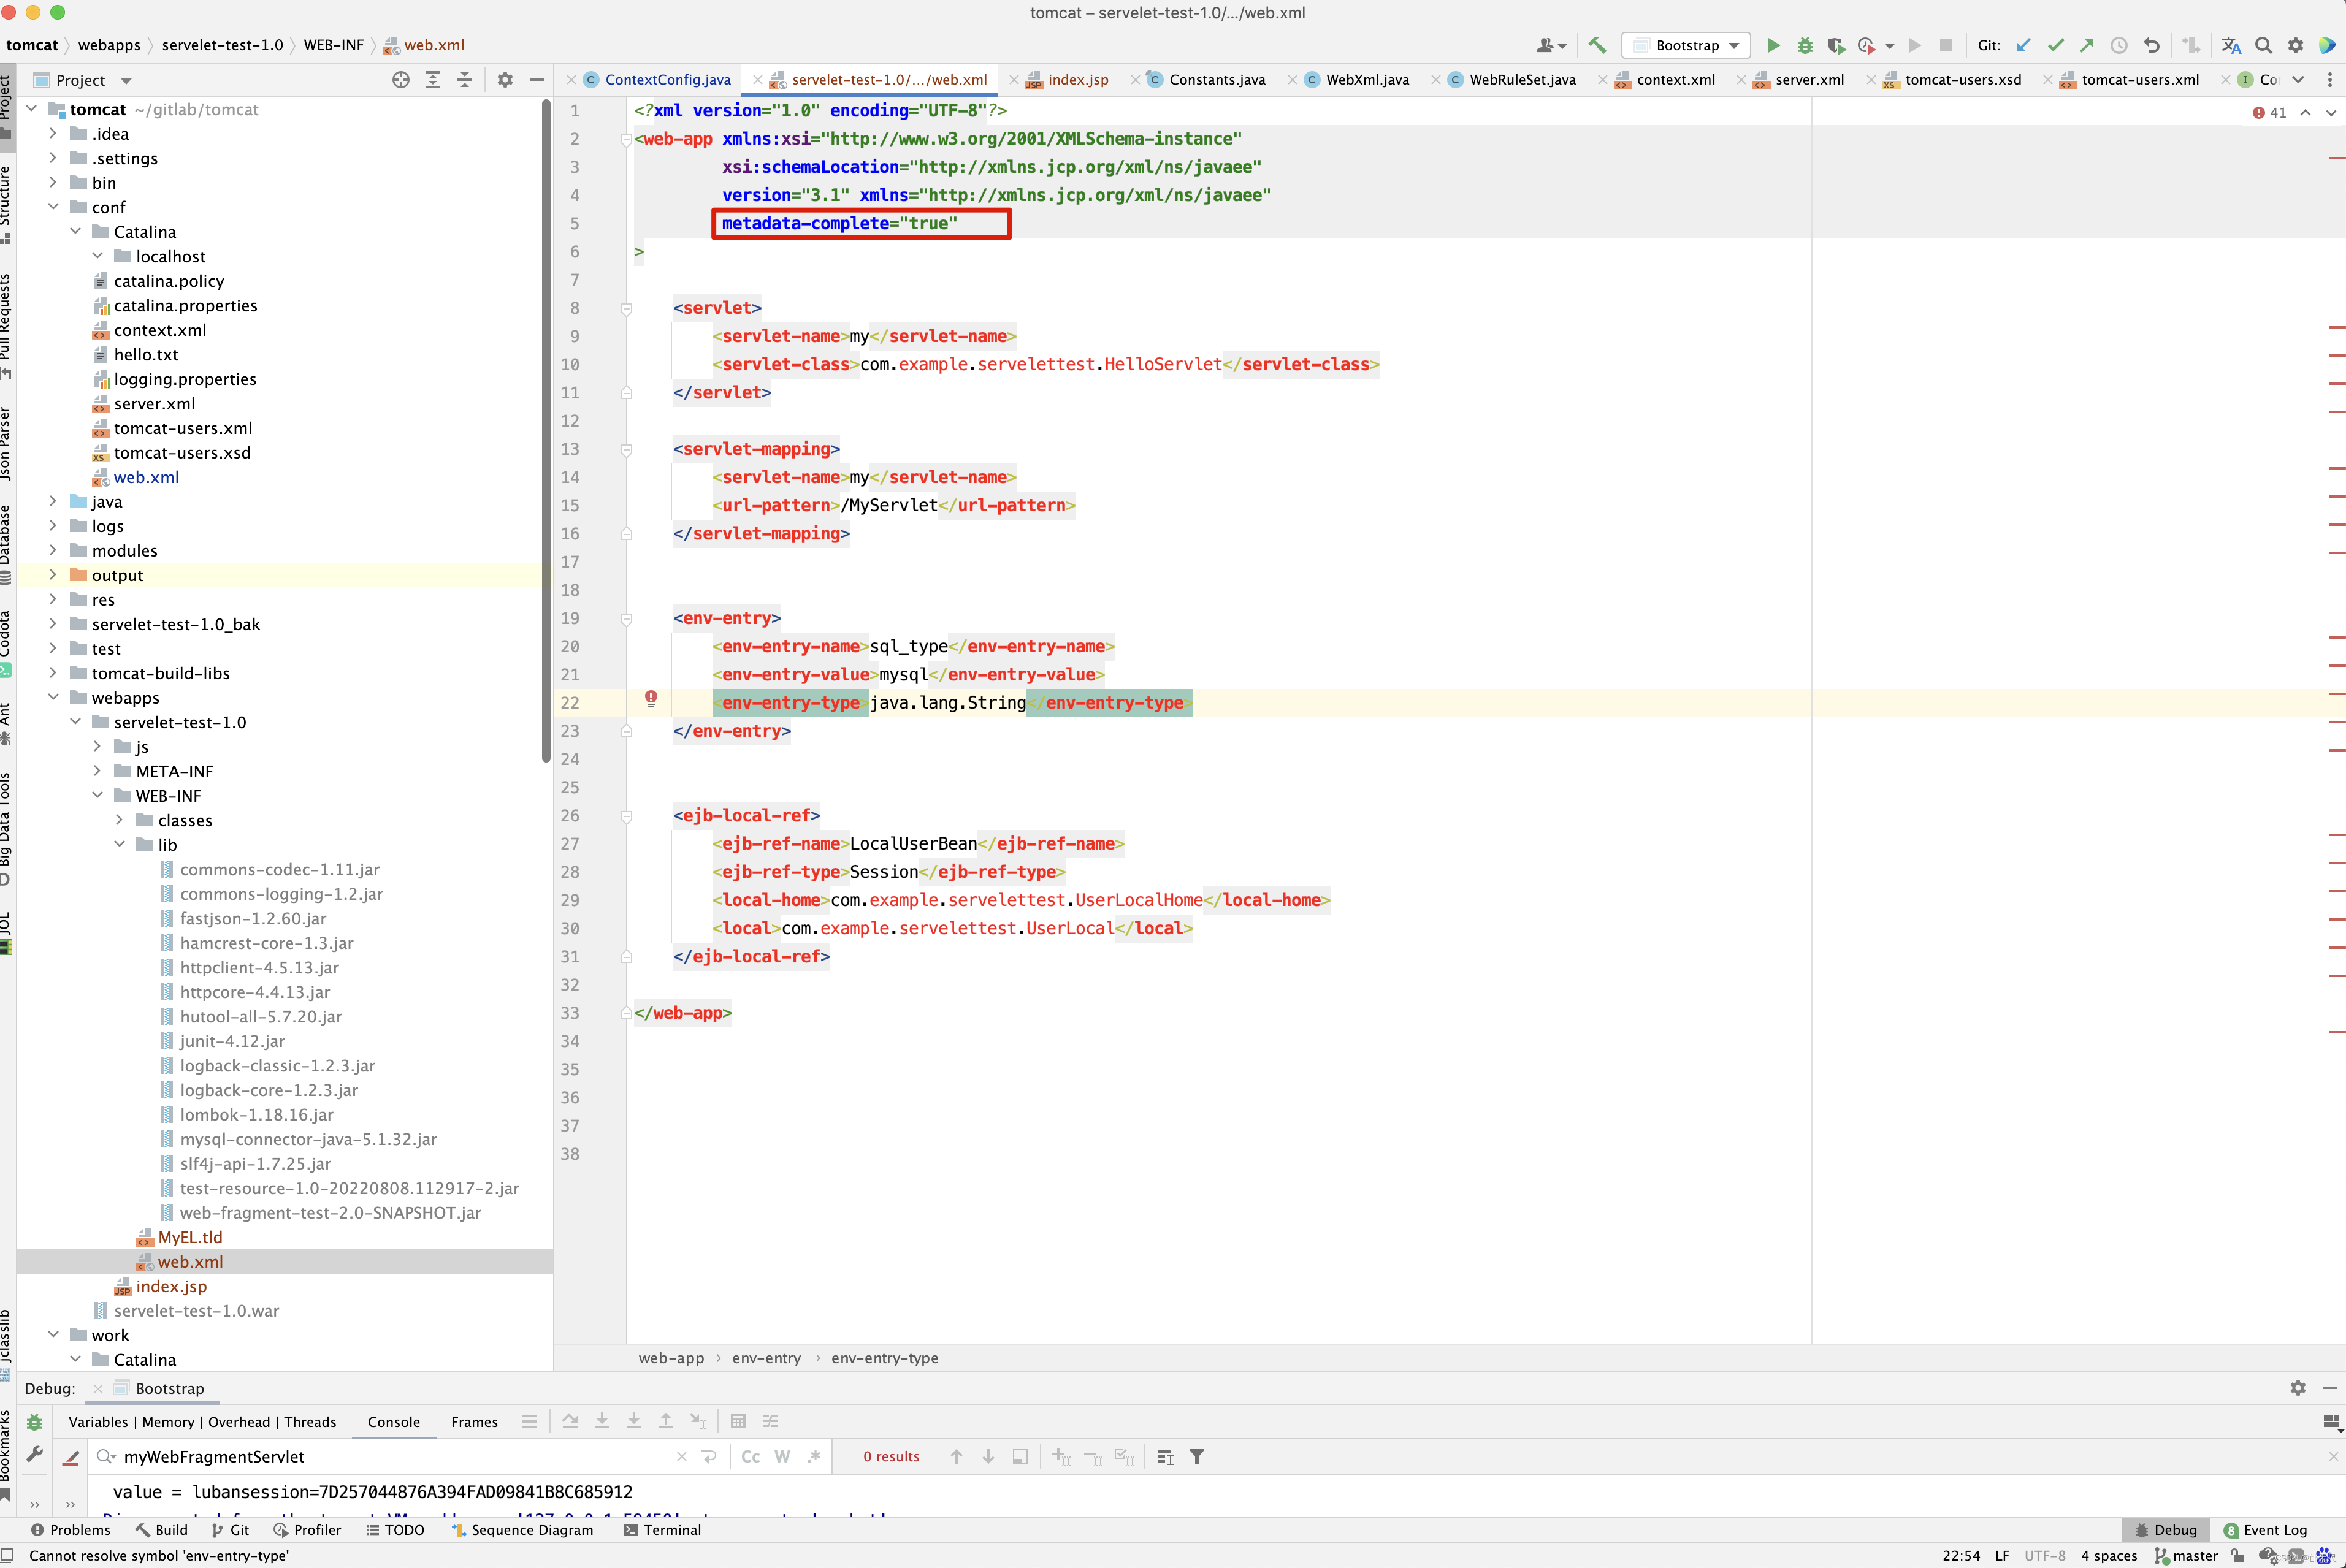
也就是说,只要web.xml中配置了metadata-complete=“true”,则丢弃扫描到jar包的web-fragment.xml及jar包的@WebServlet , @WebFilter 以及@WebListener注解。说这么多,还是来看个例子。
-
创建 web-fragment-test 项目 ,目录结构如下
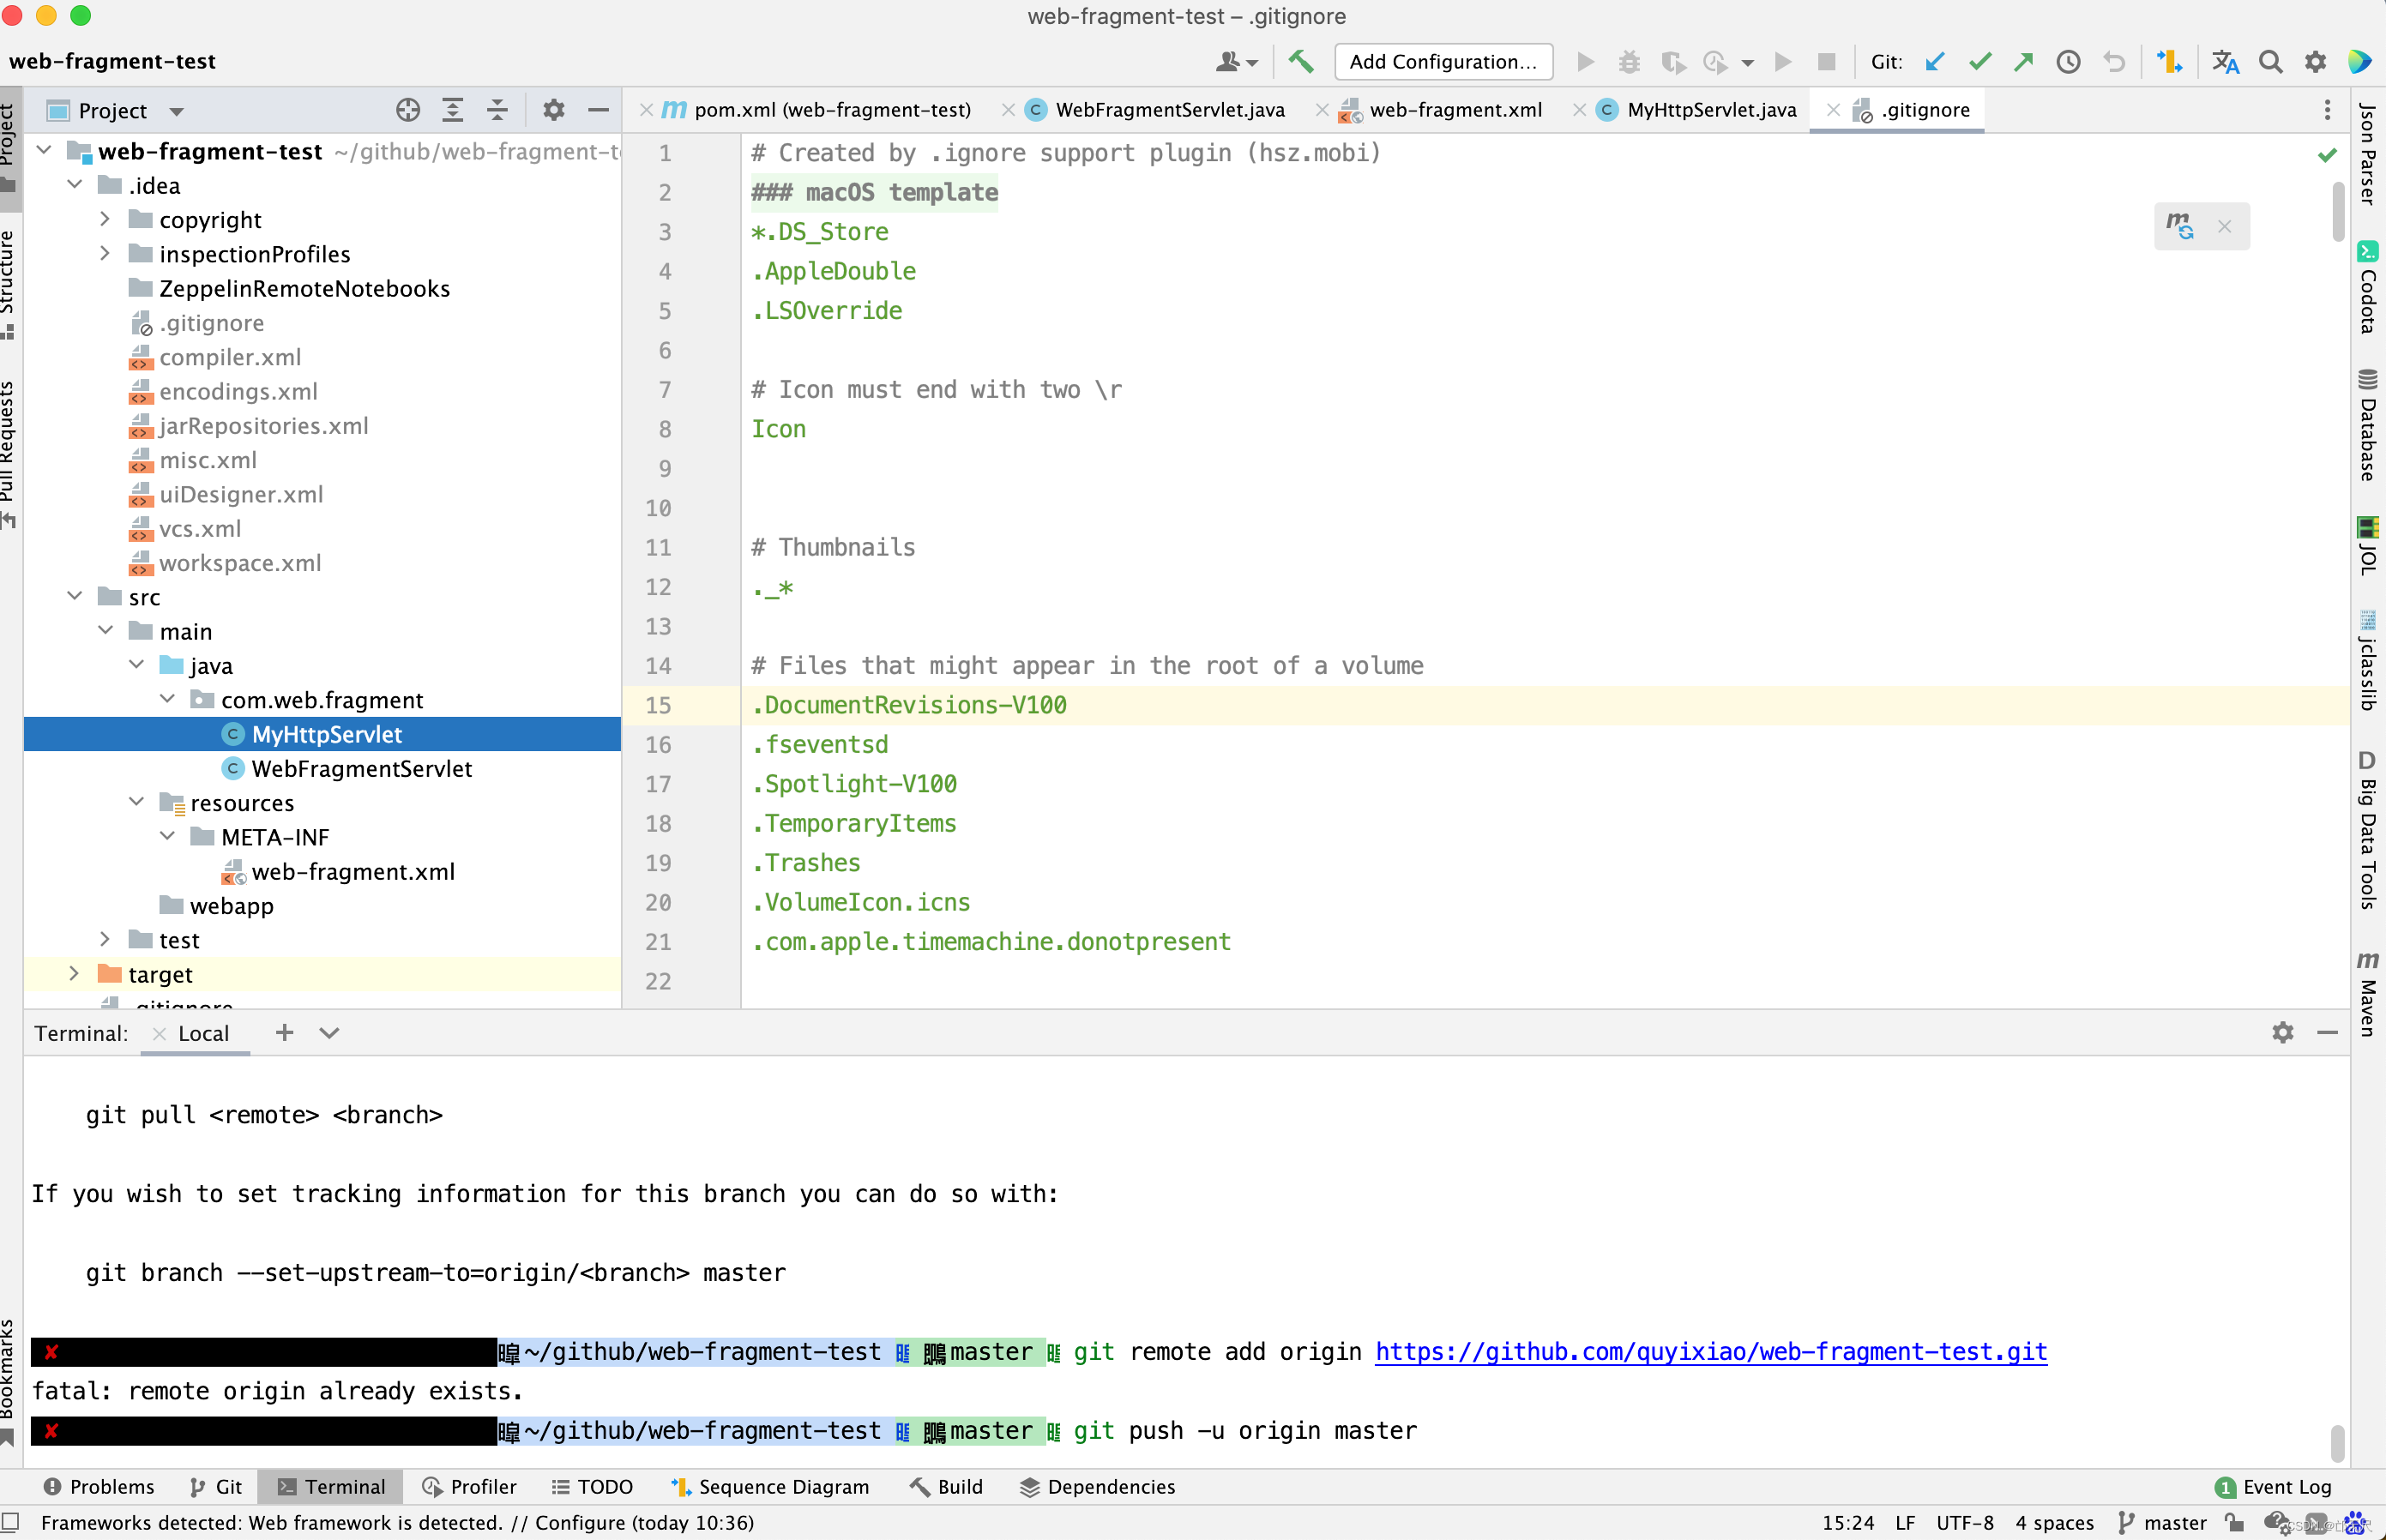
-
创建 MyHttpServlet , WebFragmentServlet 以及web-fragment.xml
@WebServlet(asyncSupported = true, name = "MyHttpServlet", description = "name描述", loadOnStartup = 1, urlPatterns = {
        "/myHttpServlet"}, initParams = {
        @WebInitParam(name = "Hello", value = "MyHttpServlet!", description = "init参数1"),
        @WebInitParam(name = "Hi", value = "World!", description = "init参数2")})

public class MyHttpServlet extends HttpServlet {

    public void doGet(HttpServletRequest req, HttpServletResponse resp) throws ServletException, IOException {
        //获取Servlet初始化参数
        ServletConfig config = this.getServletConfig();
        String hello = config.getInitParameter("Hello");
        String Hi = config.getInitParameter("Hi");
        resp.setContentType("text/html;charset=UTF-8");
        PrintWriter writer = resp.getWriter();
        writer.write("Hello:" + hello + " Hi:" + Hi);
        writer.close();
    }

    public void doPost(HttpServletRequest req, HttpServletResponse resp) throws ServletException, IOException {

    }
}


public class WebFragmentServlet extends HttpServlet {


    protected void  doGet(HttpServletRequest request, HttpServletResponse response) throws ServletException, IOException {
        try {
            System.out.println("WebFragmentServlet ......");
        } catch (Exception e) {
            e.printStackTrace();
        } finally {
        }
    }

    protected void doPost(HttpServletRequest req, HttpServletResponse resp) throws ServletException, IOException {
        System.out.println("doGet方法执行");
        this.doGet(req, resp);
    }

}

web-fragment.xml

<?xml version="1.0" encoding="UTF-8"?>
<web-fragment xmlns:xsi="http://www.w3.org/2001/XMLSchema-instance"
         xsi:schemaLocation="http://xmlns.jcp.org/xml/ns/javaee"
         version="3.1" xmlns="http://xmlns.jcp.org/xml/ns/javaee"
              metadata-complete="false"
>

    <servlet>
        <servlet-name>webFragmentServlet</servlet-name>
        <servlet-class>com.web.fragment.WebFragmentServlet</servlet-class>
    </servlet>

    <servlet-mapping>
        <servlet-name>webFragmentServlet</servlet-name>
        <url-pattern>/myWebFragmentServlet</url-pattern>
    </servlet-mapping>
</web-fragment>
-
运行mvn clean deploy 命令,打包项目 ,并将web-fragment-test包导入到servelet-test项目中。
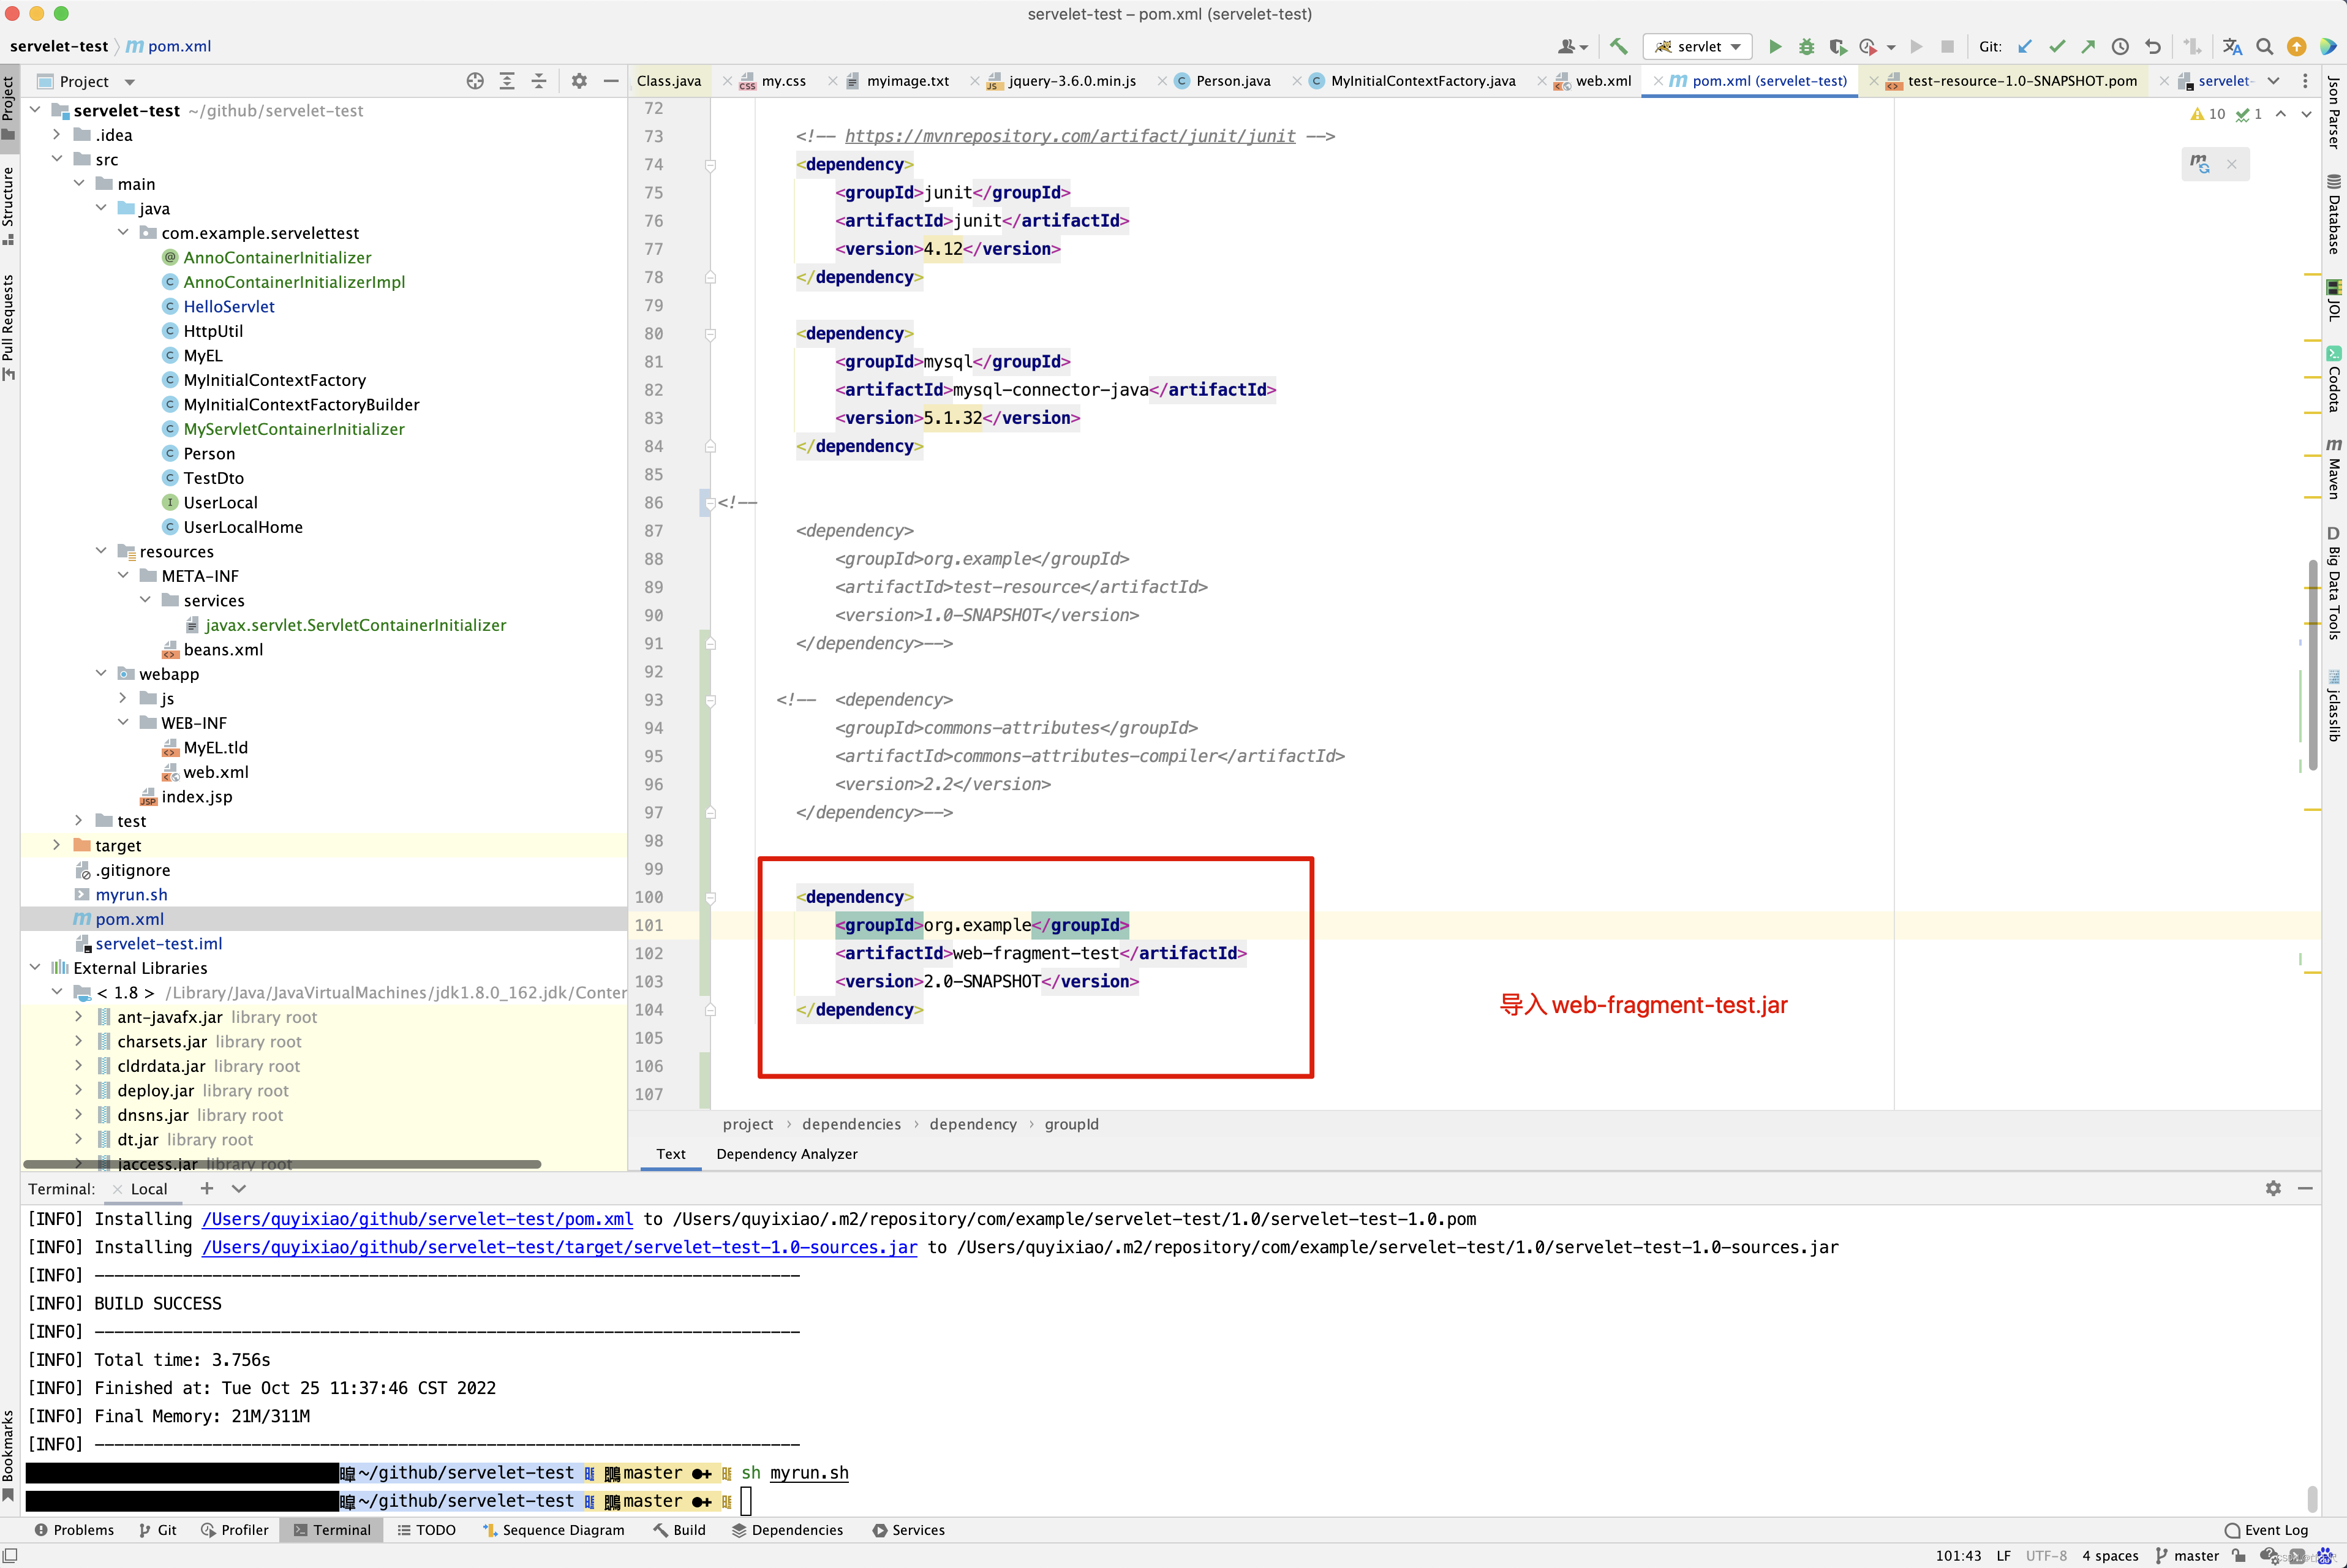
servlet-test-1.0的WEB-INF/web.xml文件中配置metadata-complete=“false”
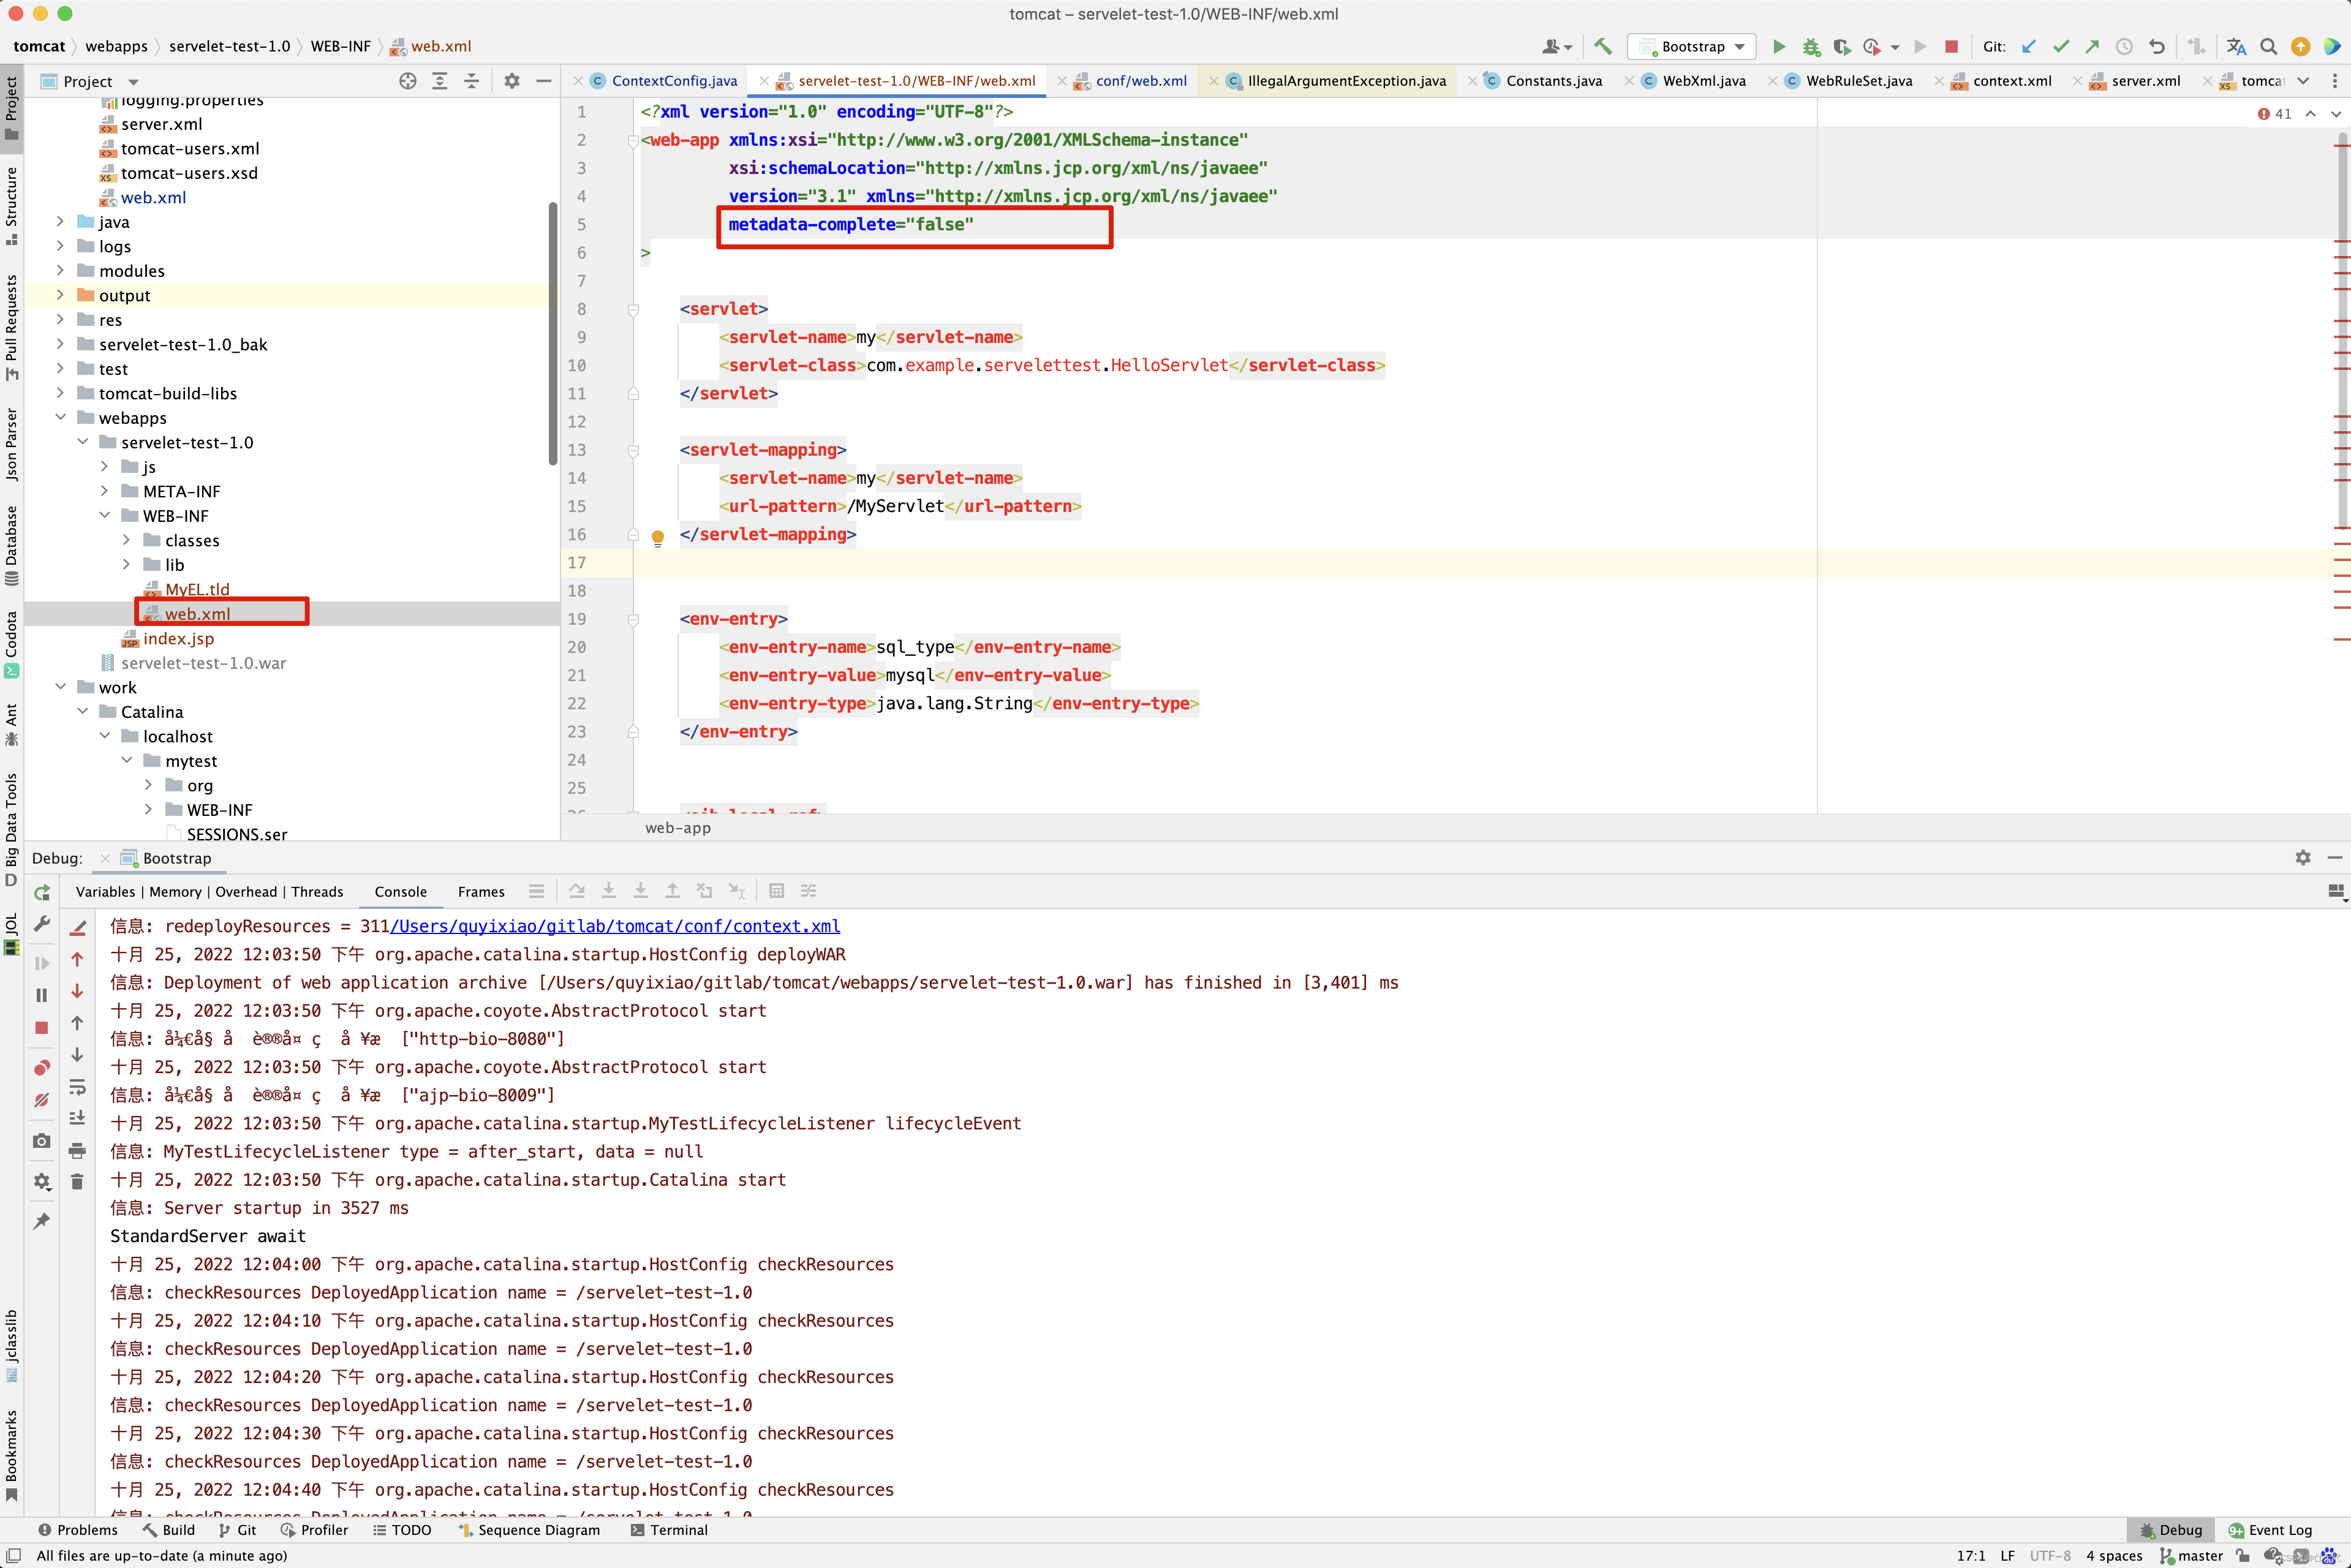
-
打印合并后的WebXml
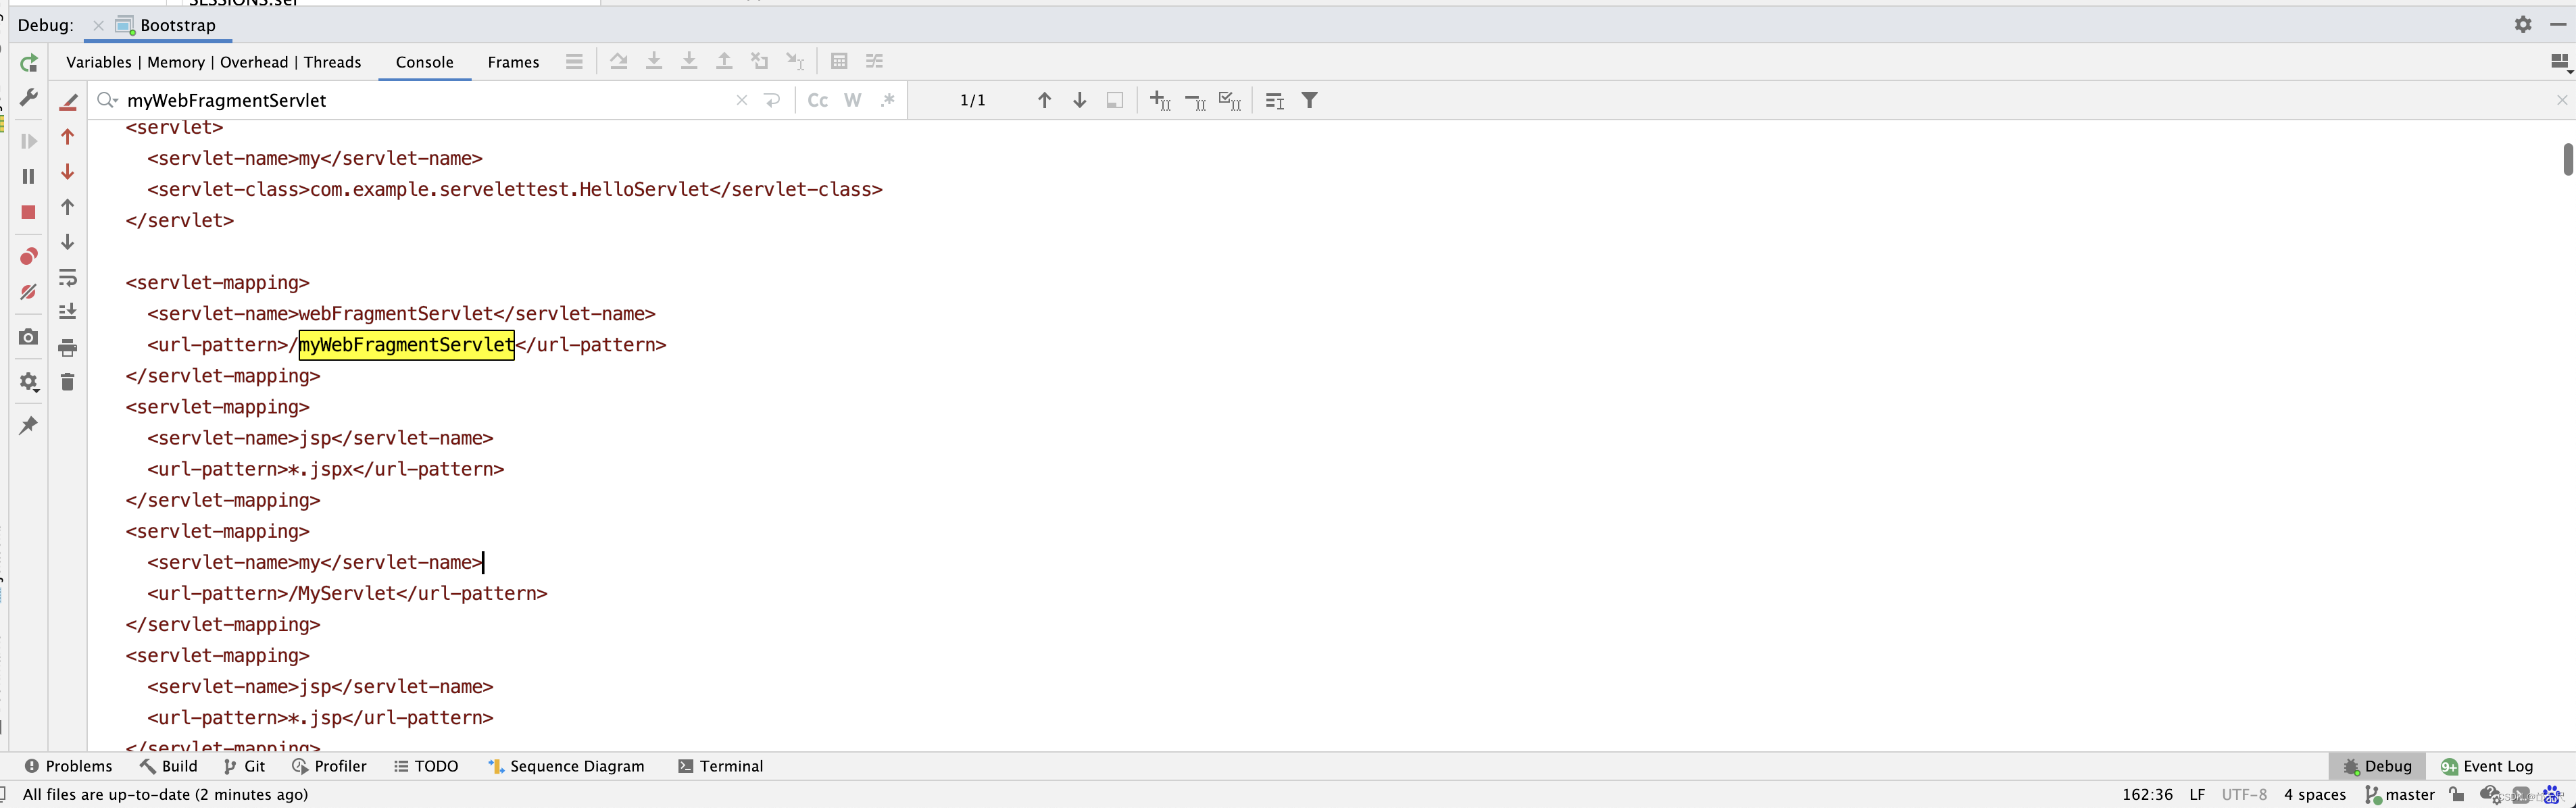
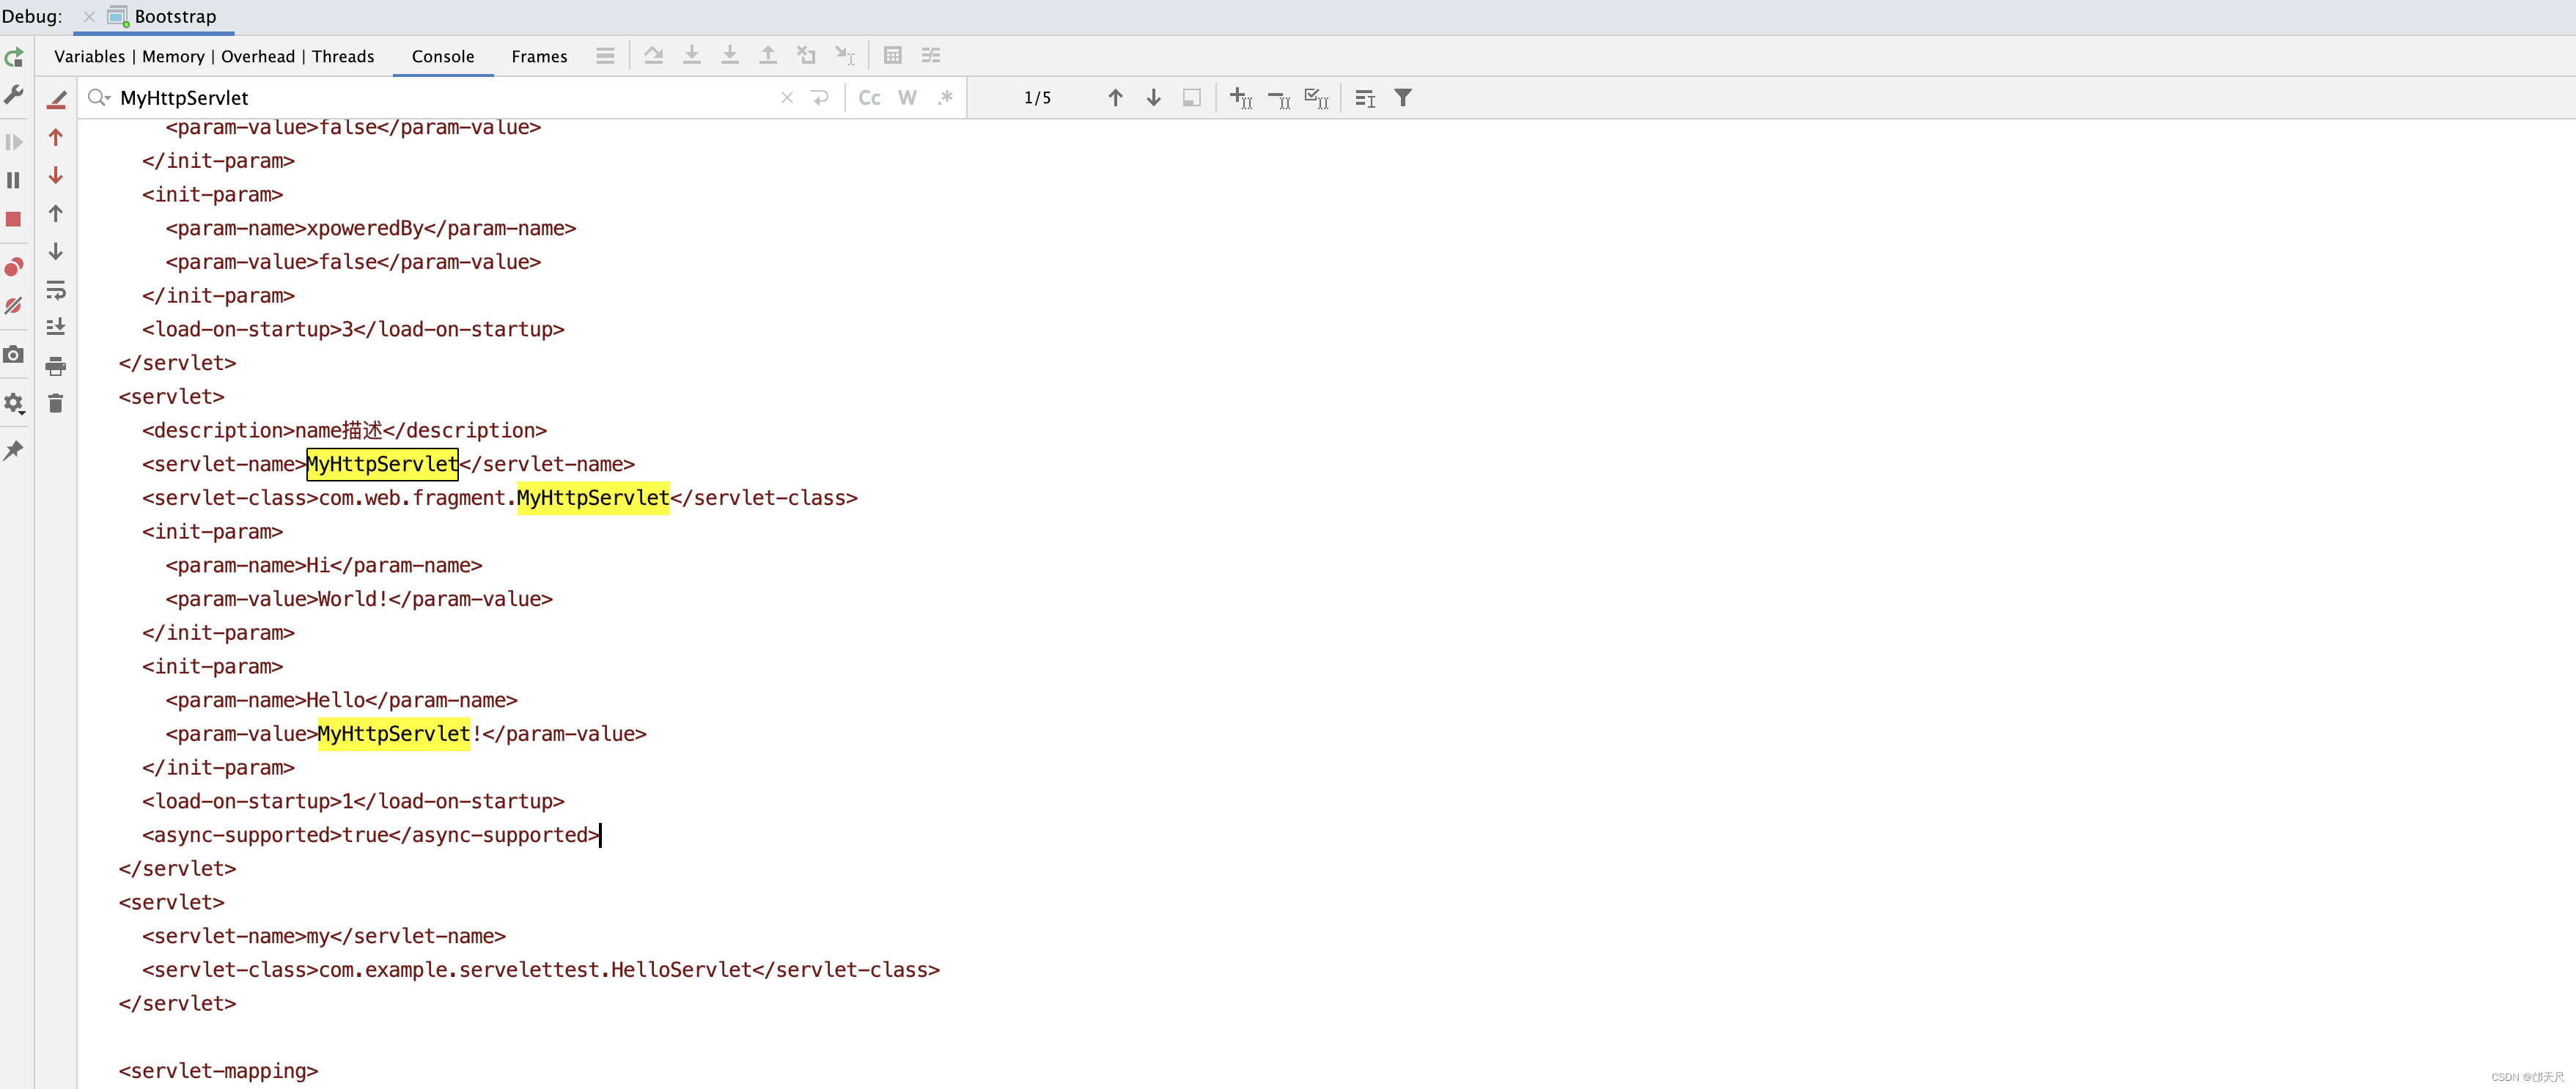
-
测试myHttpServlet的servlet, myHttpServlet提供服务 。
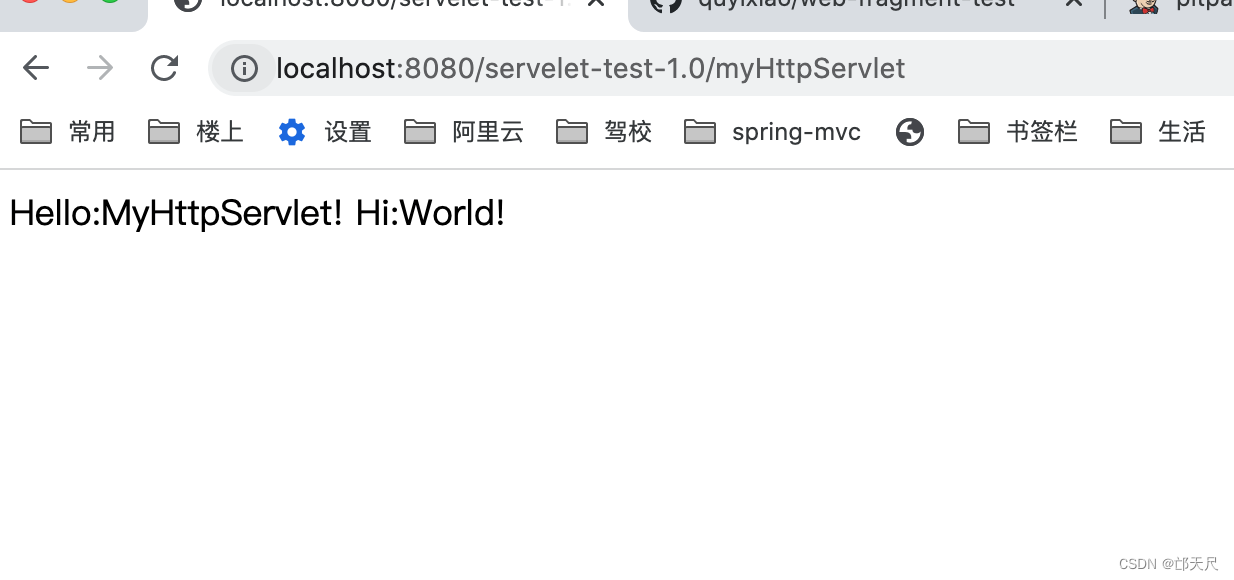
6.将servelet-test-1.0/WEB-INF/web.xml中 metadata-complete=“true”,重启项目 ,启动日志中打印合并后的WebXml,无myWebFragmentServlet和myHttpServlet


-
测试http://localhost:8080/servelet-test-1.0/myHttpServlet ,无法访问 。
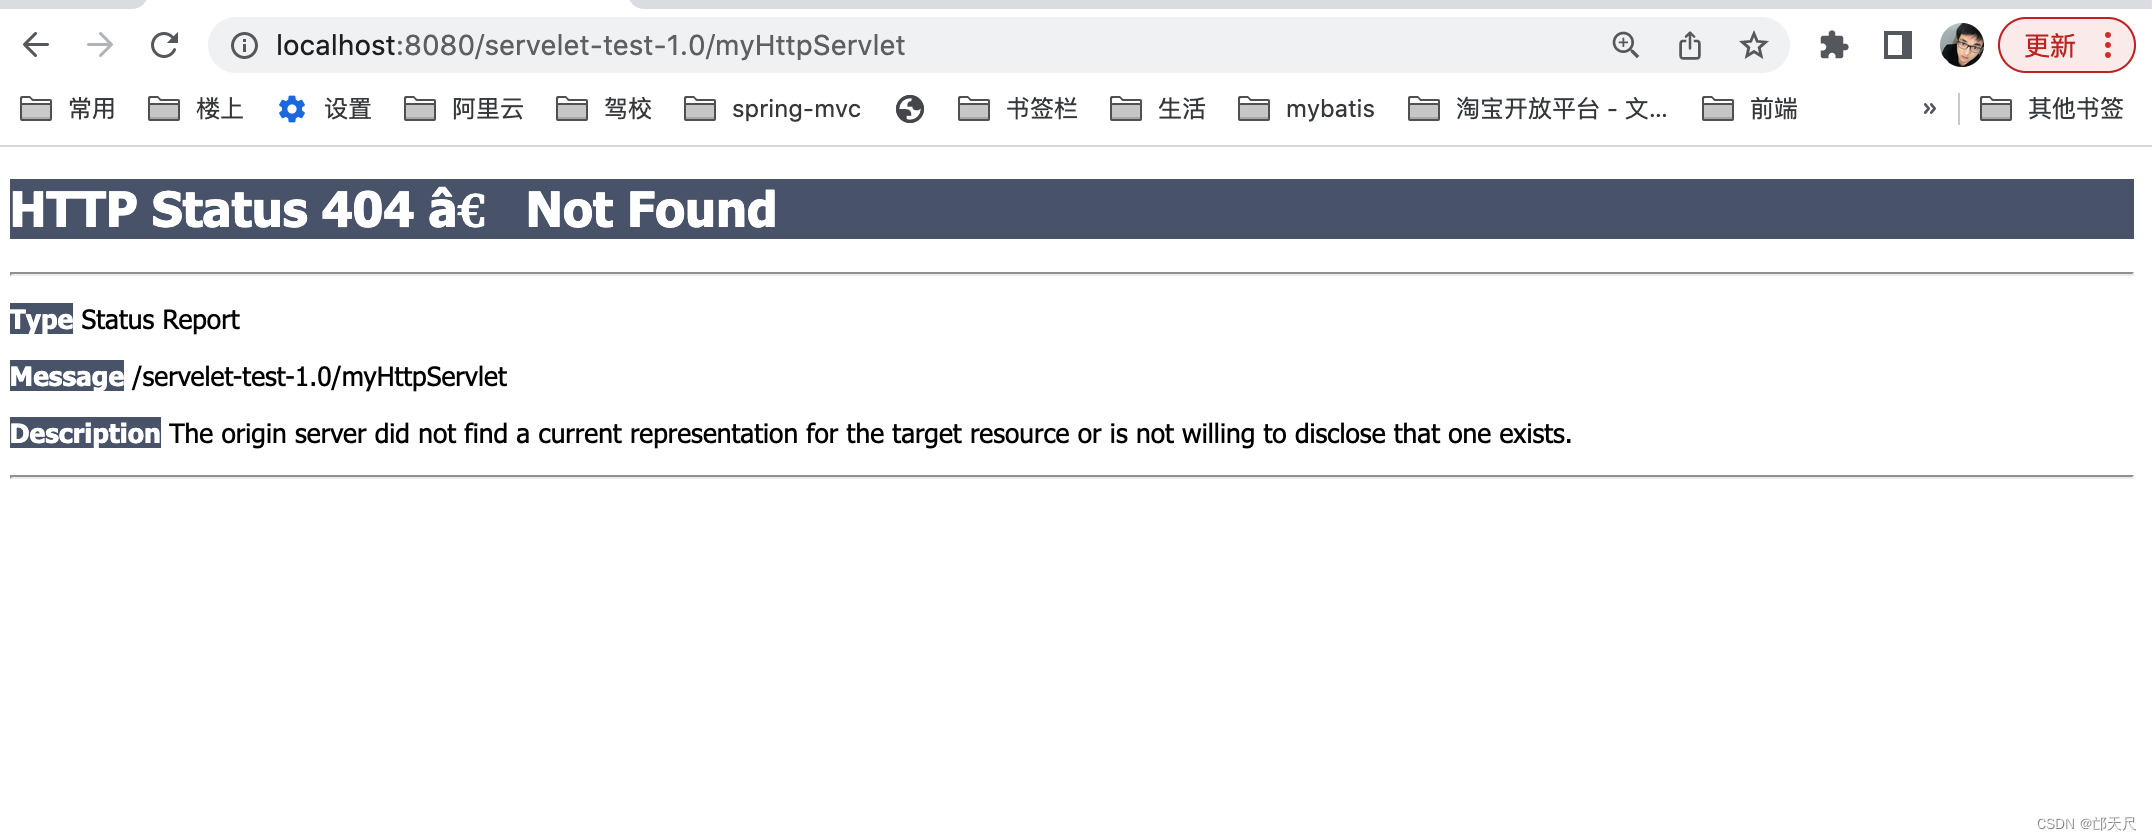
现在来总结一下metadata-complete="true|false"的用途了, 但这里要区分一下主web.xml下配置的metadata-complete和jar包下web-fragment.xml配置的metadata-complete,再来回顾一下之前分析过的3个方法。
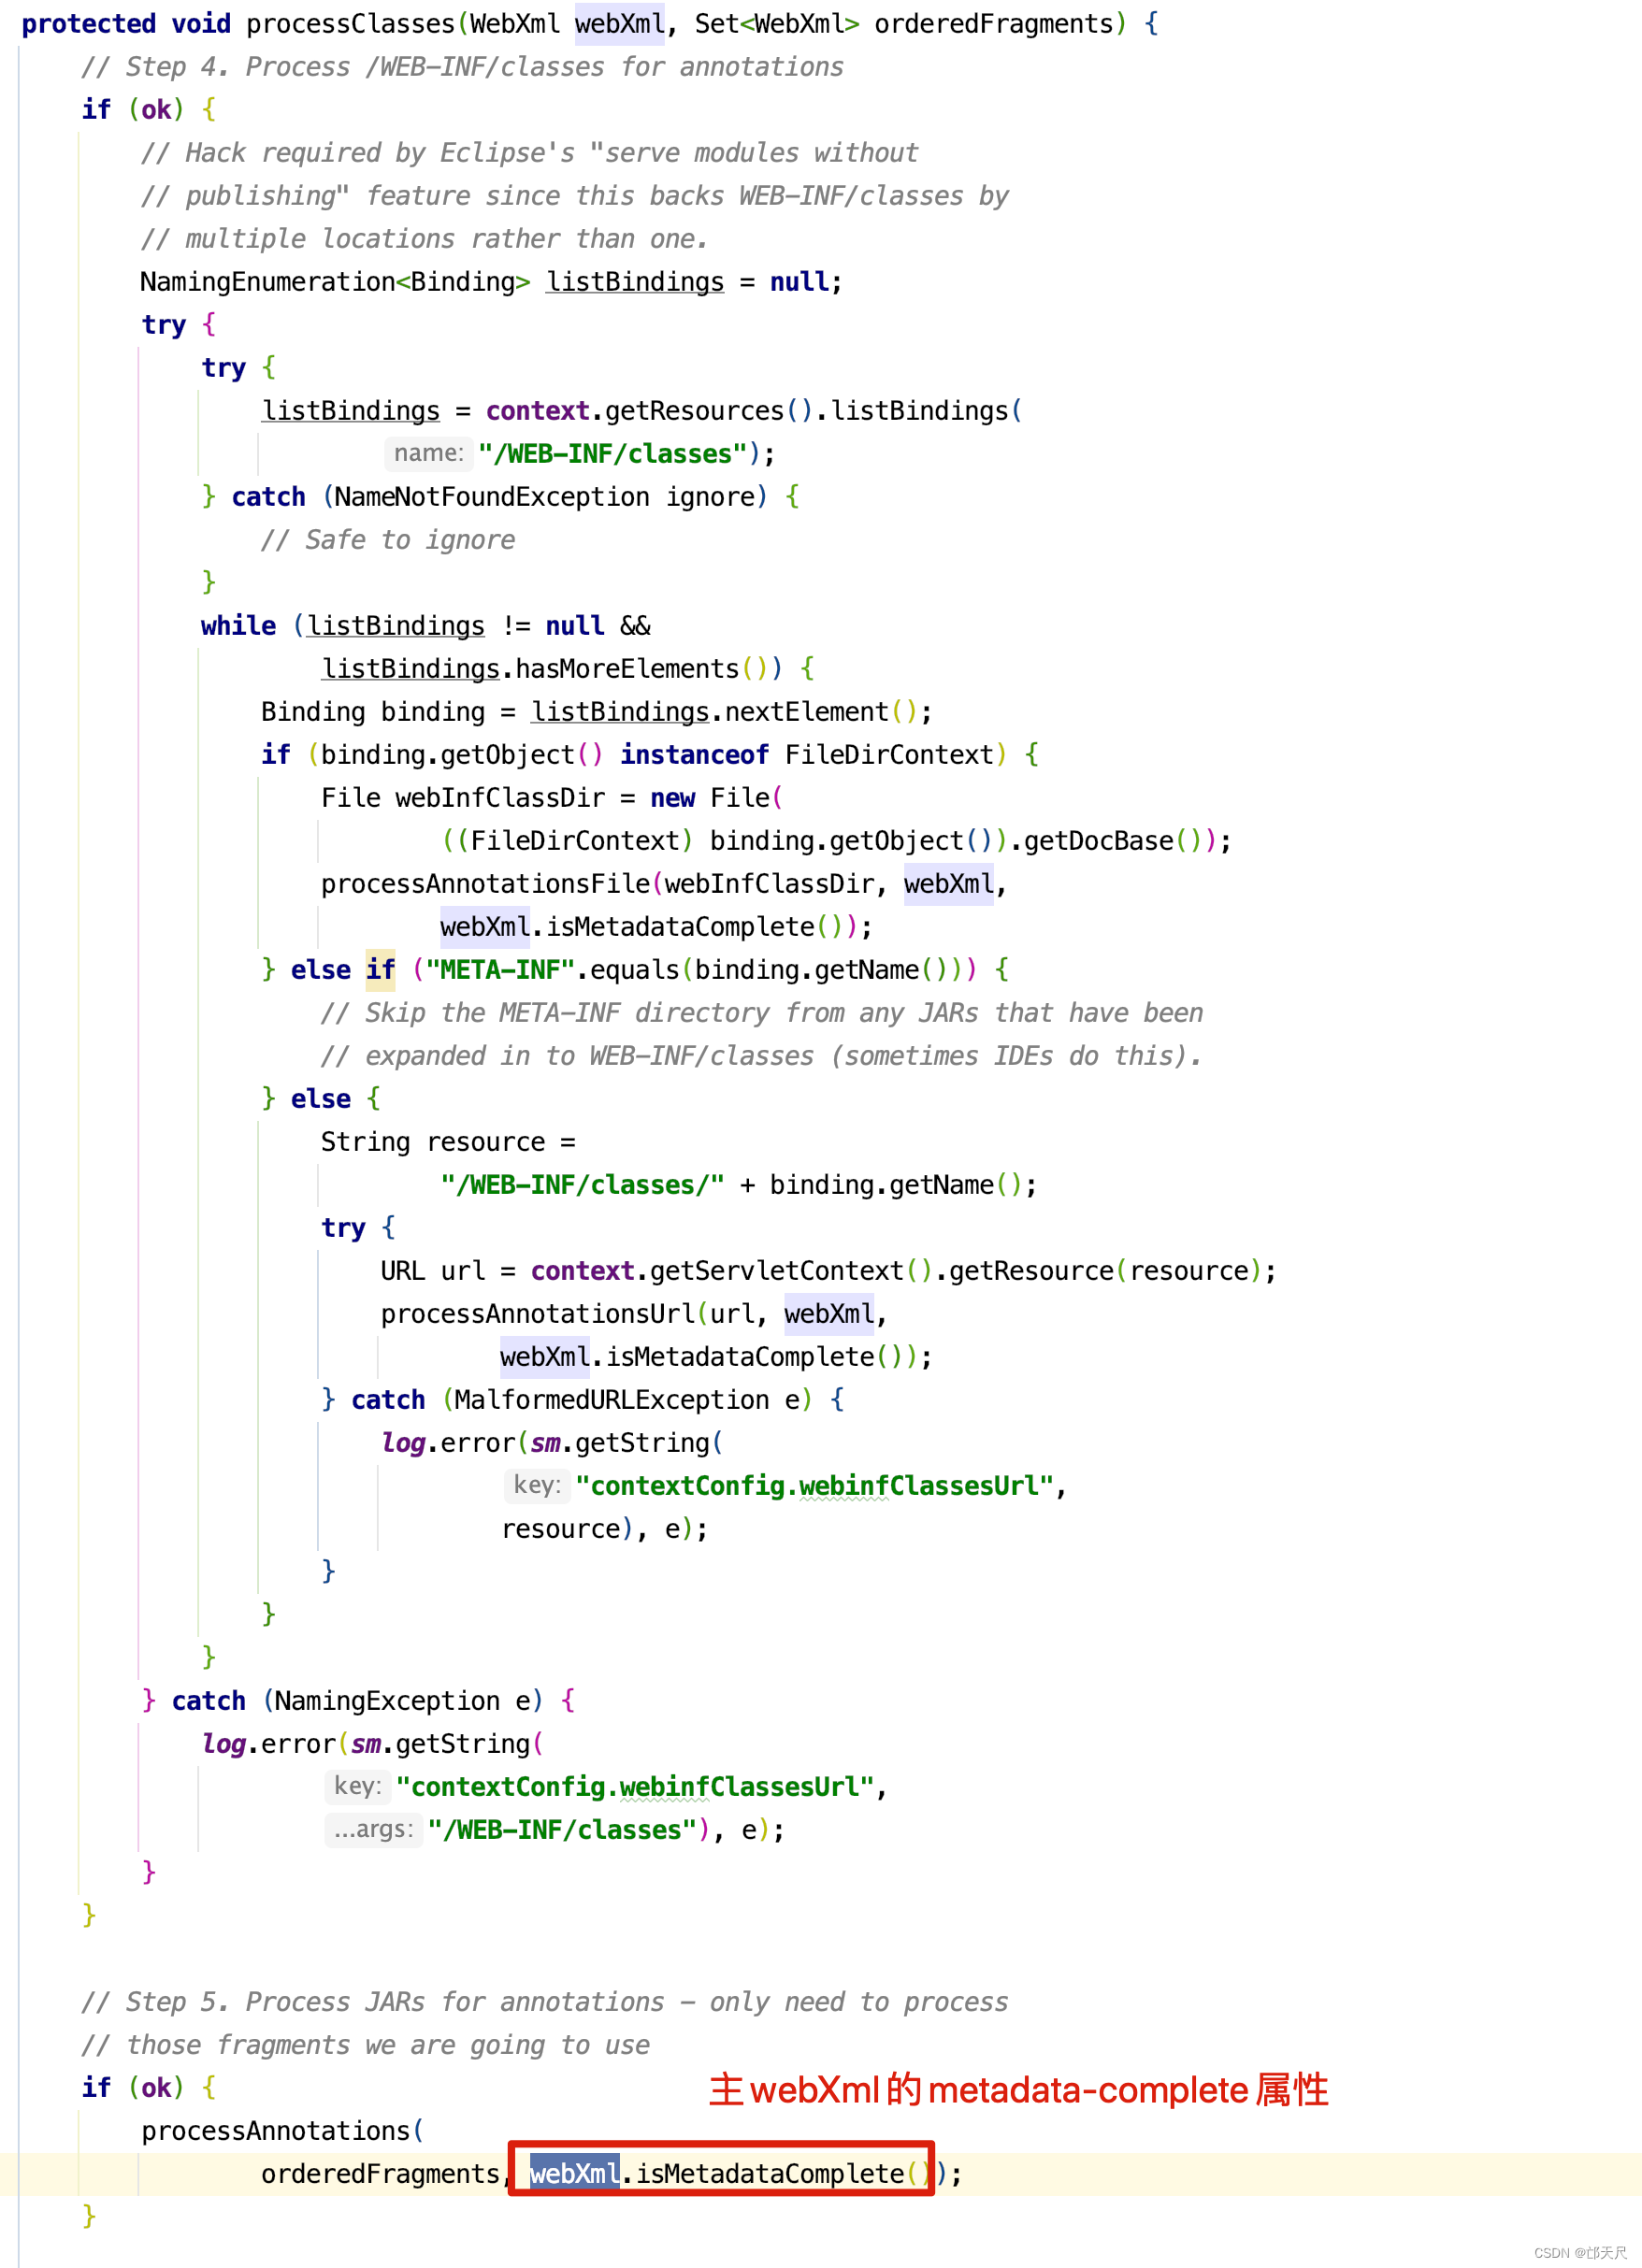

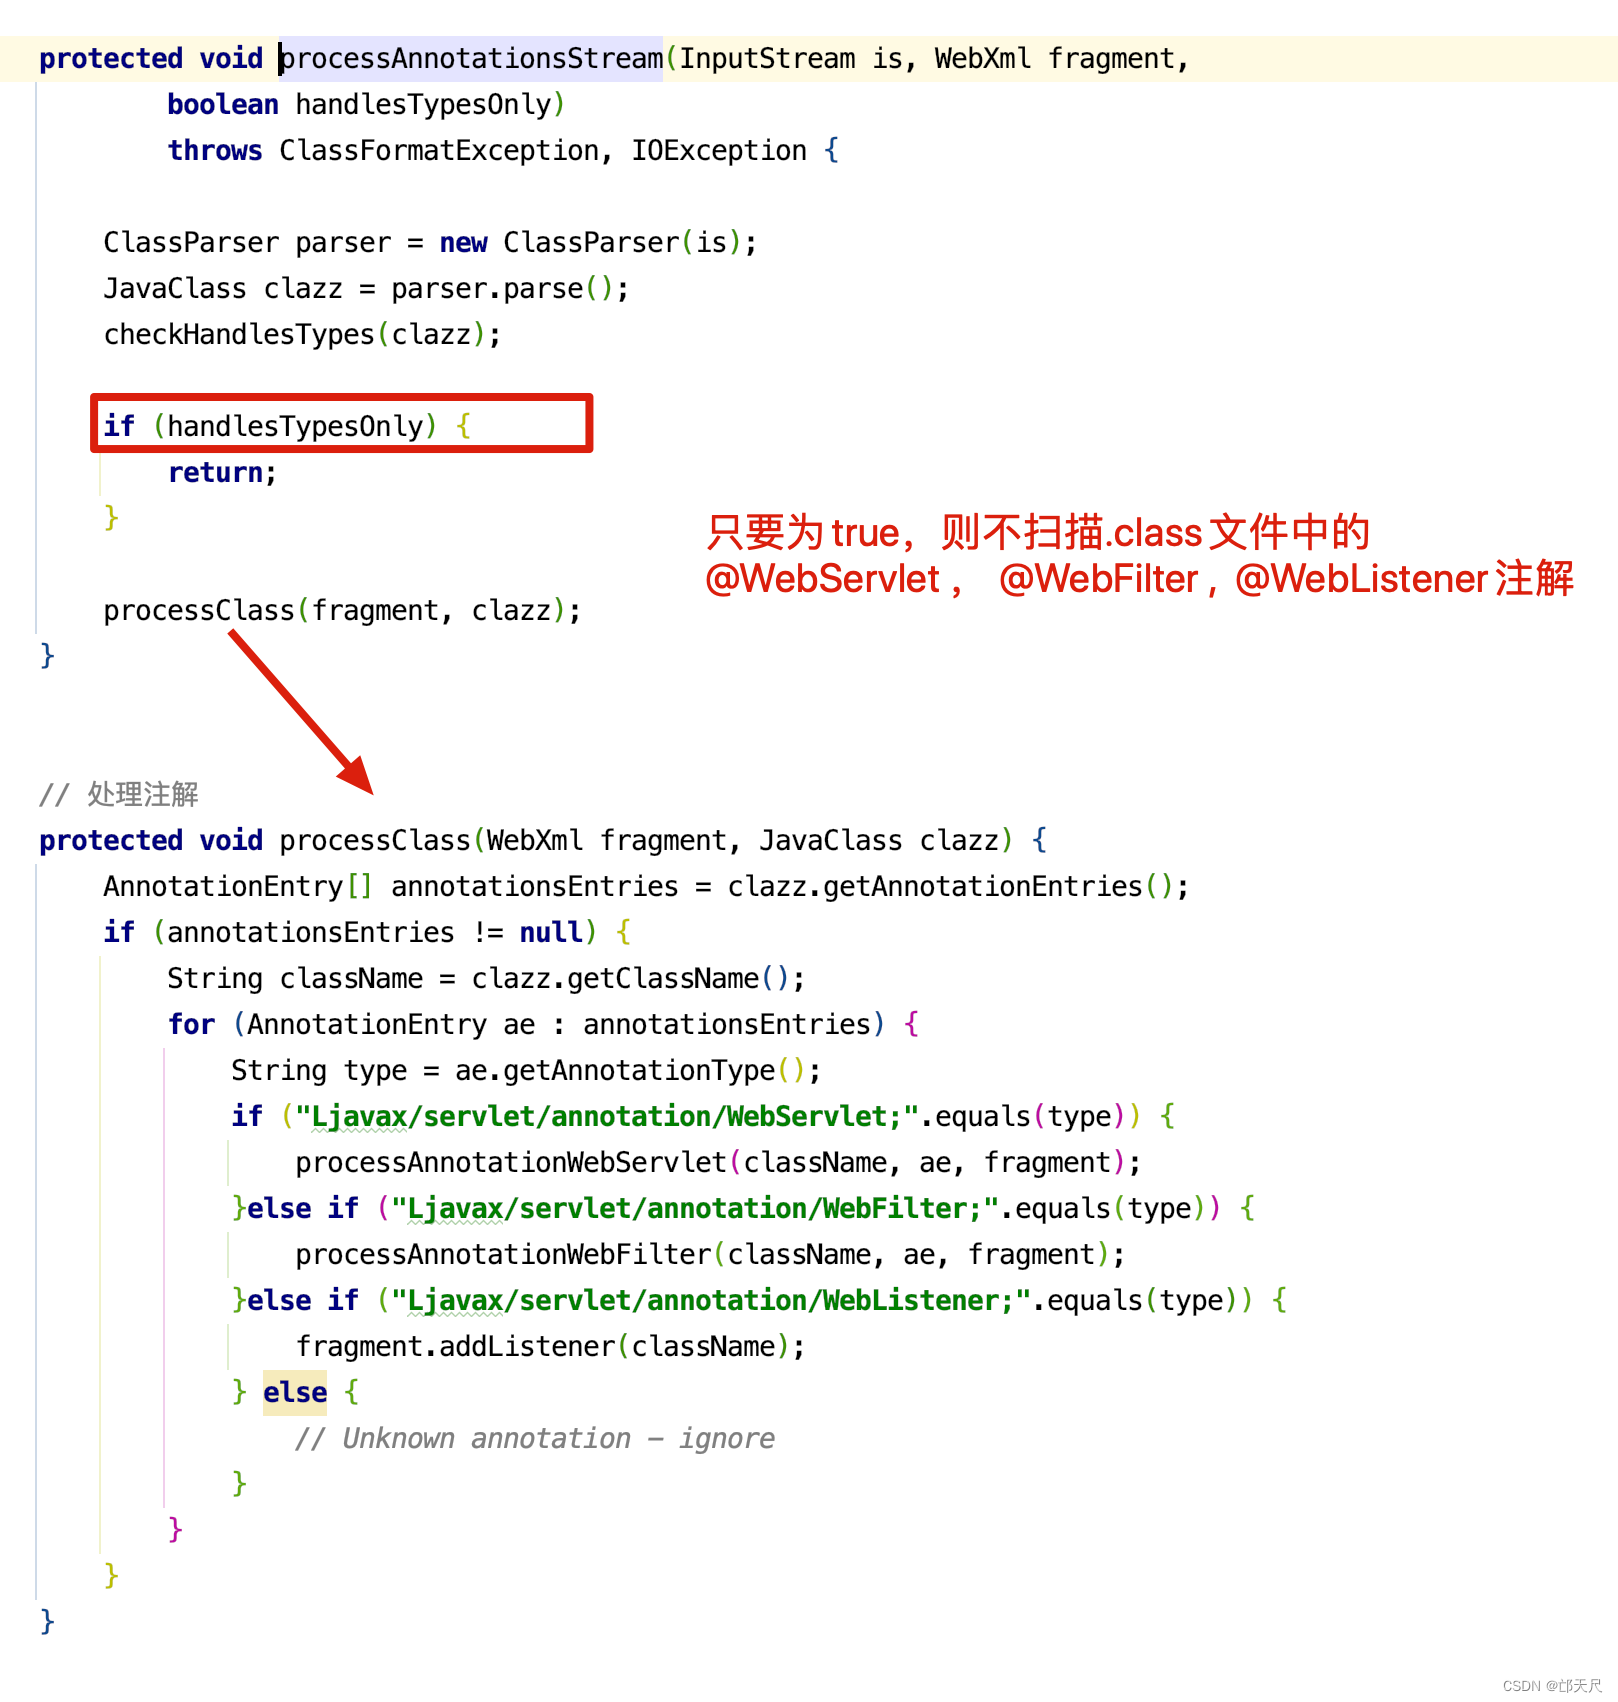
metadata-complete总结
以servelet-test-1.0项目为例,这里注解表示@WebServlet, @WebFilter , @Weblistener注解
- 如果主web.xml和jar中的web-fragment.xml都配置了metadata-complete=“true”,则不会扫描项目下的/Users/quyixiao/gitlab/tomcat/webapps/servelet-test-1.0/WEB-INF/classes的class文件中的注解,也不会扫描jar包中的class文件中的注解,而扫描到的web-fragment.xml文件中的内容也不会合并到主WebXml中
- 如果主web.xml的metadata-complete=“true”,但web-fragment.xml都配置了metadata-complete=“false”,jar包下的WebXml是不会扫描其.class文件的注解的,同时扫描web-fragment.xml文件生成的WebXml也不会合并到主WebXml中,同样也不会扫描项目下的/Users/quyixiao/gitlab/tomcat/webapps/servelet-test-1.0/WEB-INF/classes的class文件中的注解
- 如果主web.xml的metadata-complete="false"和jar中的web-fragment.xml都配置了metadata-complete=“true” , 会扫描/Users/quyixiao/gitlab/tomcat/webapps/servelet-test-1.0/WEB-INF/classes的class文件中的注解,但不会扫描jar包文件中.class文件中注解,但会将解析jar包下的web-fragment.xml文件生成的WebXml合并到主WebXml中。
- 如果主web.xml和jar中的web-fragment.xml都配置了metadata-complete=“false”,则会扫描/Users/quyixiao/gitlab/tomcat/webapps/servelet-test-1.0/WEB-INF/classes的class文件中的注解, 同时会扫描jar包内class文件的注解,合并到其jar包对应的web-fragment.xml生成的WebXml中,最后会将所有的jar包下的WebXml合并到主的WebXml中。
当然,默认情况下metadata-complete=“false”,我相信只有这样分析,才能真正的明白metadata-complete的作用,因此网上一般只会讲到主web.xml中配置metadata-complete的作用,并没有考虑其WEB-INF/lib下jar包的web-fragment.xml中配置的metadata-complete,同样网上也忽略了,【如果主web.xml中配置了metadata-complete="true"时,则不会将lib/jar包中的web-fragment.xml生成的WebXml合并到主WebXml中来。】
WebXml合并
public boolean merge(Set<WebXml> fragments) {
    // As far as possible, process in alphabetical order so it is easy to
    // check everything is present

    // Merge rules vary from element to element. See SRV.8.2.3

    WebXml temp = new WebXml();

    for (WebXml fragment : fragments) {
    	// 如果主web.xml没有配置context-param标签,但
    	// lib/jar包中配置了context-param标签 。
    	// 如果a.jar和b.jar的WebXml都配置了context-param,但value值不相等,则返回false
        if (!mergeMap(fragment.getContextParams(), contextParams,
                temp.getContextParams(), fragment, "Context Parameter")) {
            return false;
        }
    }
    contextParams.putAll(temp.getContextParams());

	// 如果主WebXml中已经有displayName不为空,则不会扫描jar包中的WebXml的displayName属性了
    if (displayName == null) {
        for (WebXml fragment : fragments) {
            String value = fragment.getDisplayName();
            if (value != null) {
                if (temp.getDisplayName() == null) {
                    temp.setDisplayName(value);
                } else {
                	// 如果a.jar和b.jar的WebXml中的displayName不相等
                	// 则打印错误并返回
                    log.error(sm.getString(
                            "webXml.mergeConflictDisplayName",
                            fragment.getName(),
                            fragment.getURL()));
                    return false;
                }
            }
        }
        displayName = temp.getDisplayName();
    }

	// 无论是主WebXml还是jar包的WebXml中distributable,只要有一个WebXml为false,则distributable为false
    if (distributable) {
        for (WebXml fragment : fragments) {
            if (!fragment.isDistributable()) {
                distributable = false;
                break;
            }
        }
    }

    for (WebXml fragment : fragments) {
    	// 如果主WebXml中存在,则将所有的jar包中的配置加到主WebXml中,
    	// 如果主WebXml中不存在,jar包的WebXml冲突了,则打印错误日志并返回false
        if (!mergeResourceMap(fragment.getEjbLocalRefs(), ejbLocalRefs,
                temp.getEjbLocalRefs(), fragment)) {
            return false;
        }
    }
    ejbLocalRefs.putAll(temp.getEjbLocalRefs());
    for (WebXml fragment : fragments) {

        if (!mergeResourceMap(fragment.getEjbRefs(), ejbRefs,
                temp.getEjbRefs(), fragment)) {
            return false;
        }
    }

    ejbRefs.putAll(temp.getEjbRefs());
    for (WebXml fragment : fragments) {
        if (!mergeResourceMap(fragment.getEnvEntries(), envEntries,
                temp.getEnvEntries(), fragment)) {
            return false;
        }
    }
    envEntries.putAll(temp.getEnvEntries());
    for (WebXml fragment : fragments) {
        if (!mergeMap(fragment.getErrorPages(), errorPages,
                temp.getErrorPages(), fragment, "Error Page")) {
            return false;
        }
    }
    errorPages.putAll(temp.getErrorPages());
 	....
合并WebXml这一块的代码真多,但原理很简单,如果主WebXml没有,但jar包的WebXml有,则将WebXml添加到主的WebXml中,但如果jar包之间的WebXml属性冲突时,则打印错误日志,并返回,大部分都是这样的实现逻辑,代码不难,细心一点就能看明白,这里就不深入了。
再来看convertJsps()这段代码的实现。
private void convertJsps(WebXml webXml) {
    Map<String,String> jspInitParams;
    ServletDef jspServlet = webXml.getServlets().get("jsp");
    if (jspServlet == null) {
        jspInitParams = new HashMap<String,String>();
        Wrapper w = (Wrapper) context.findChild("jsp");
        if (w != null) {
            String[] params = w.findInitParameters();
            for (String param : params) {
                jspInitParams.put(param, w.findInitParameter(param));
            }
        }
    } else {
        jspInitParams = jspServlet.getParameterMap();
    }
    for (ServletDef servletDef: webXml.getServlets().values()) {
        if (servletDef.getJspFile() != null) {
            convertJsp(servletDef, jspInitParams);
        }
    }
}

private void convertJsp(ServletDef servletDef,
        Map<String,String> jspInitParams) {
    servletDef.setServletClass("org.apache.jasper.servlet.JspServlet");
    String jspFile = servletDef.getJspFile();
    if ((jspFile != null) && !jspFile.startsWith("/")) {
        if (context.isServlet22()) {
            if(log.isDebugEnabled())
                log.debug(sm.getString("contextConfig.jspFile.warning",
                                   jspFile));
            jspFile = "/" + jspFile;
        } else {
            throw new IllegalArgumentException
                (sm.getString("contextConfig.jspFile.error", jspFile));
        }
    }
    servletDef.getParameterMap().put("jspFile", jspFile);
    servletDef.setJspFile(null);
    for (Map.Entry<String, String> initParam: jspInitParams.entrySet()) {
        servletDef.addInitParameter(initParam.getKey(), initParam.getValue());
    }
}
convertJsps()方法的用意是什么呢?来看个例子。
- 在在servlet-test项目的web.xml添加servlet配置,配置中有jsp-file标签
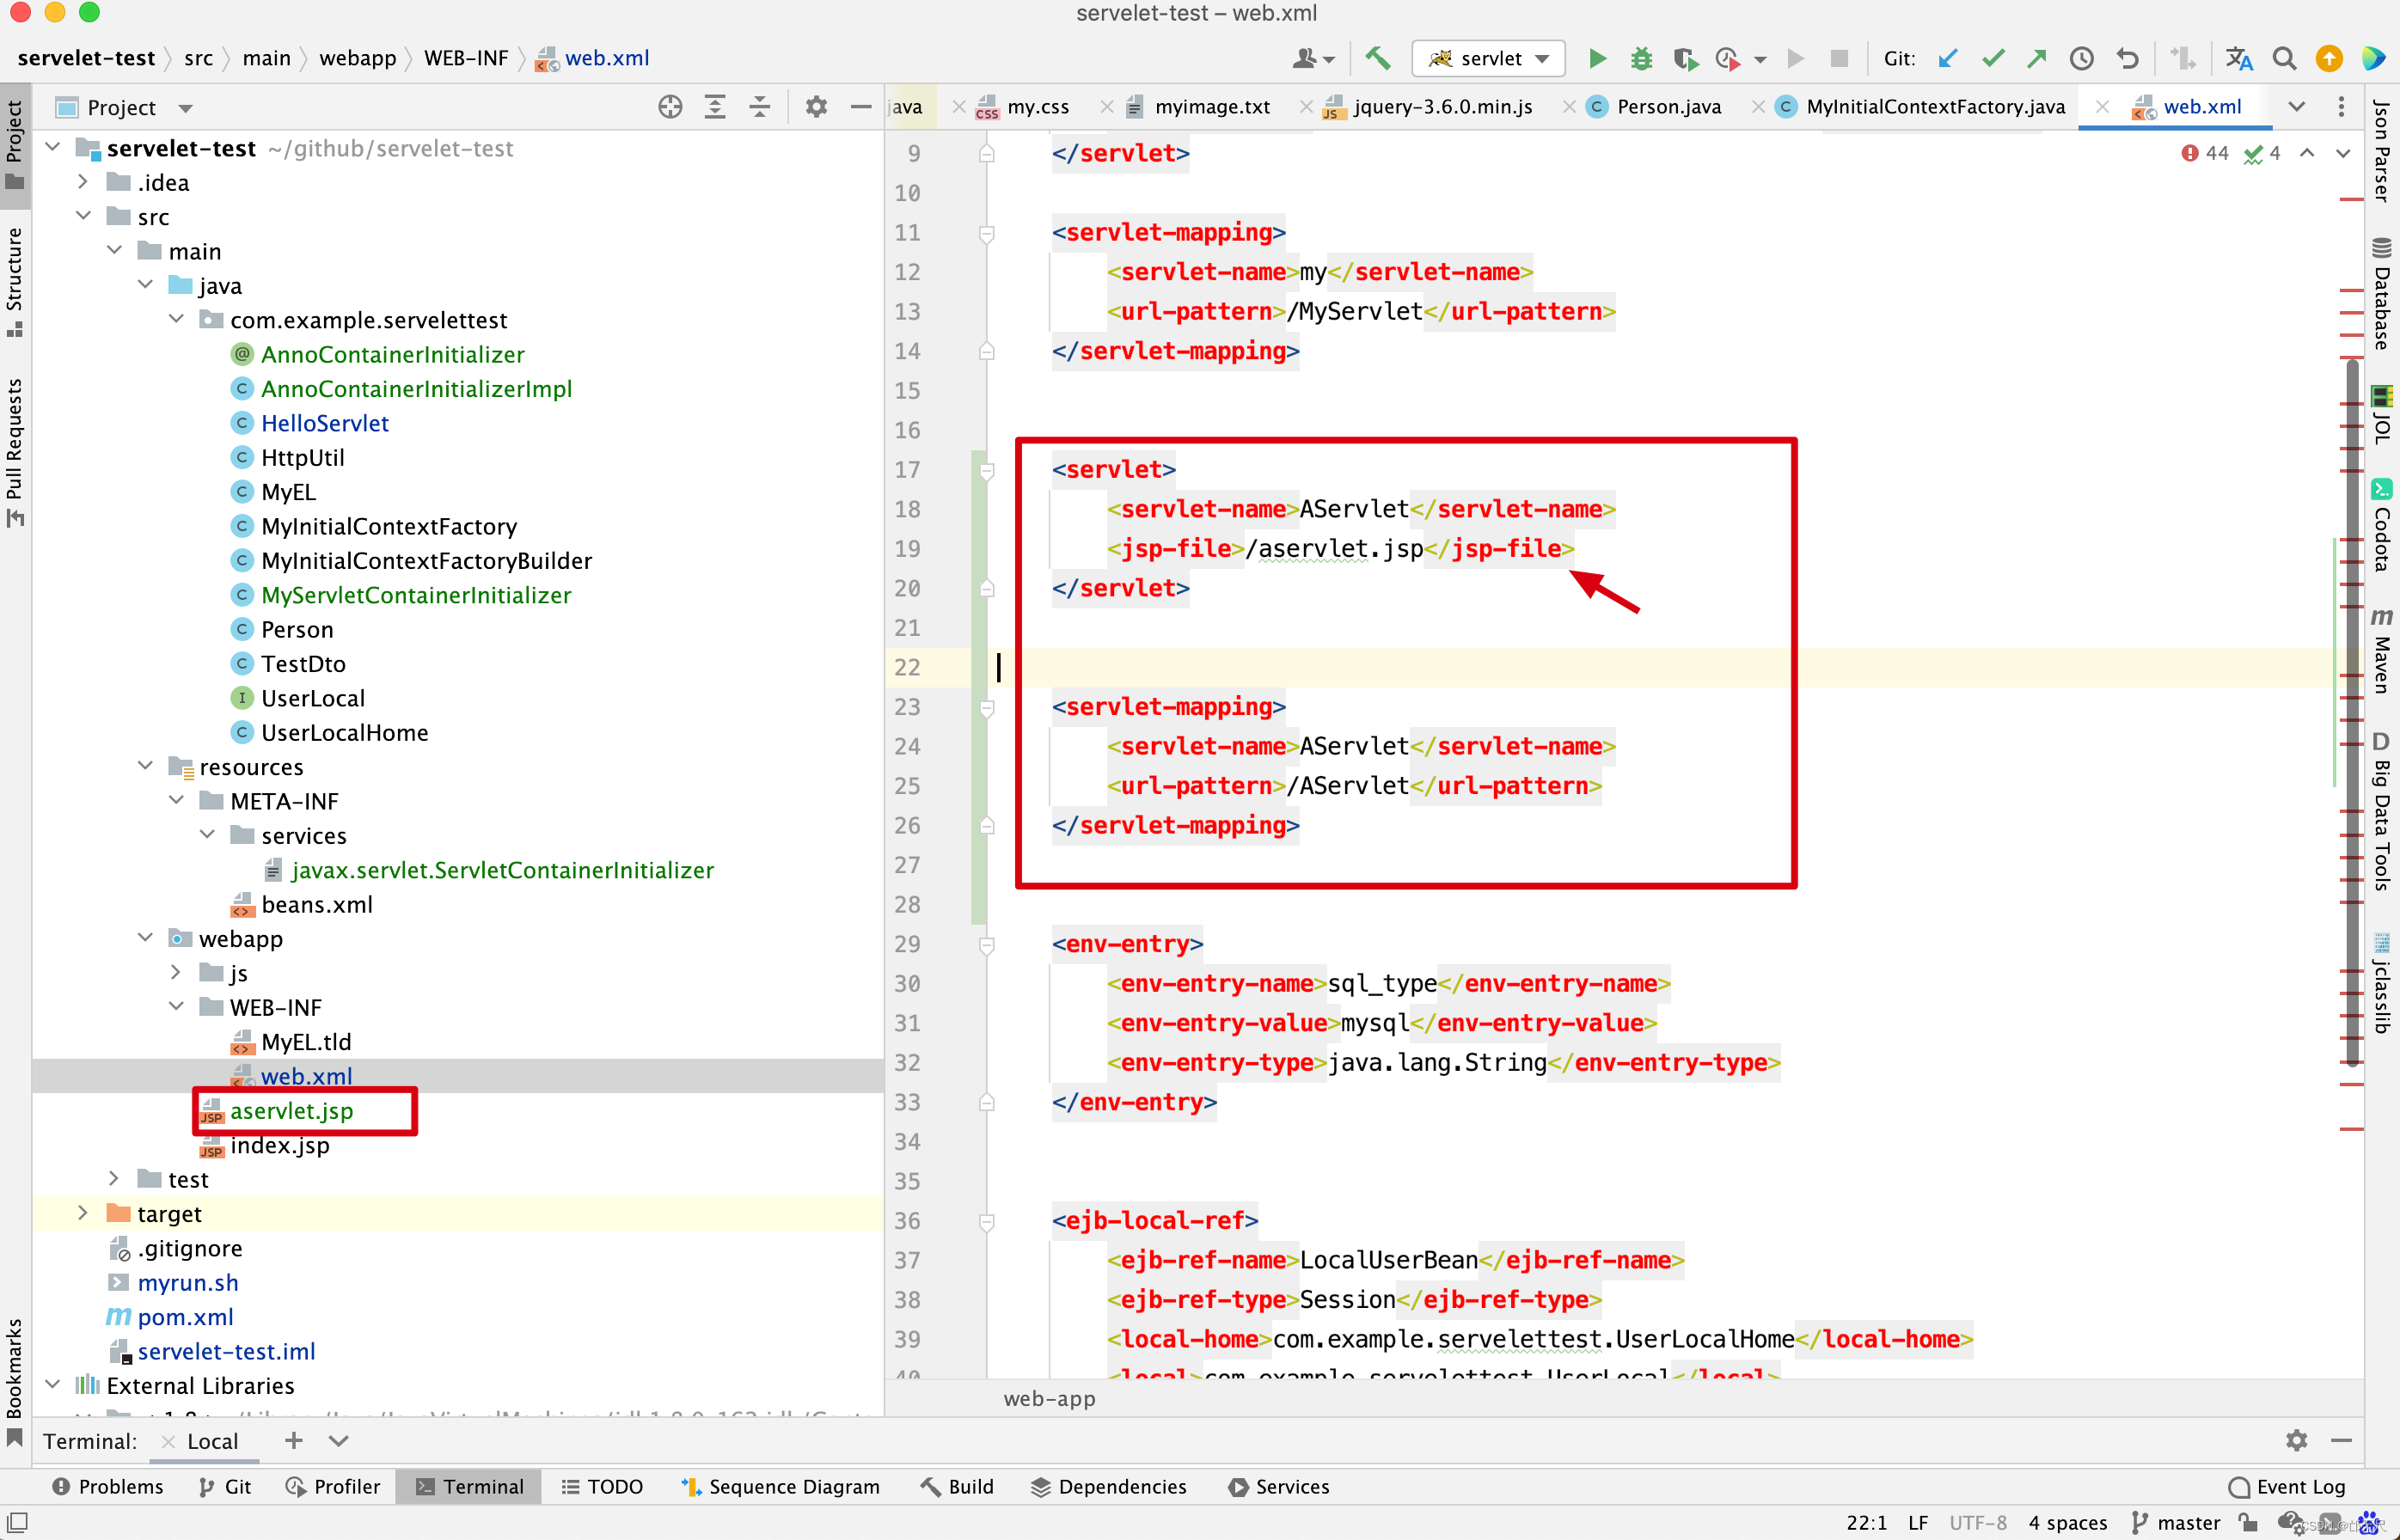
web.xml
<servlet>
    <servlet-name>AServlet</servlet-name>
    <jsp-file>/aservlet.jsp</jsp-file>
</servlet>


<servlet-mapping>
    <servlet-name>AServlet</servlet-name>
    <url-pattern>/AServlet</url-pattern>
</servlet-mapping>
aservlet.jsp
<%@ page language="java" contentType="text/html; charset=UTF-8"
         pageEncoding="UTF-8"%>
<!DOCTYPE html PUBLIC "-//W3C//DTD HTML 4.01 Transitional//EN" "http://www.w3.org/TR/html4/loose.dtd">
<html>
<head>
    <meta http-equiv="Content-Type" content="text/html; charset=UTF-8">
    <title>Insert title here</title>
</head>
<body>

    AServlet

</body>
</html>
-
在convertJsp()方法中打断点 。
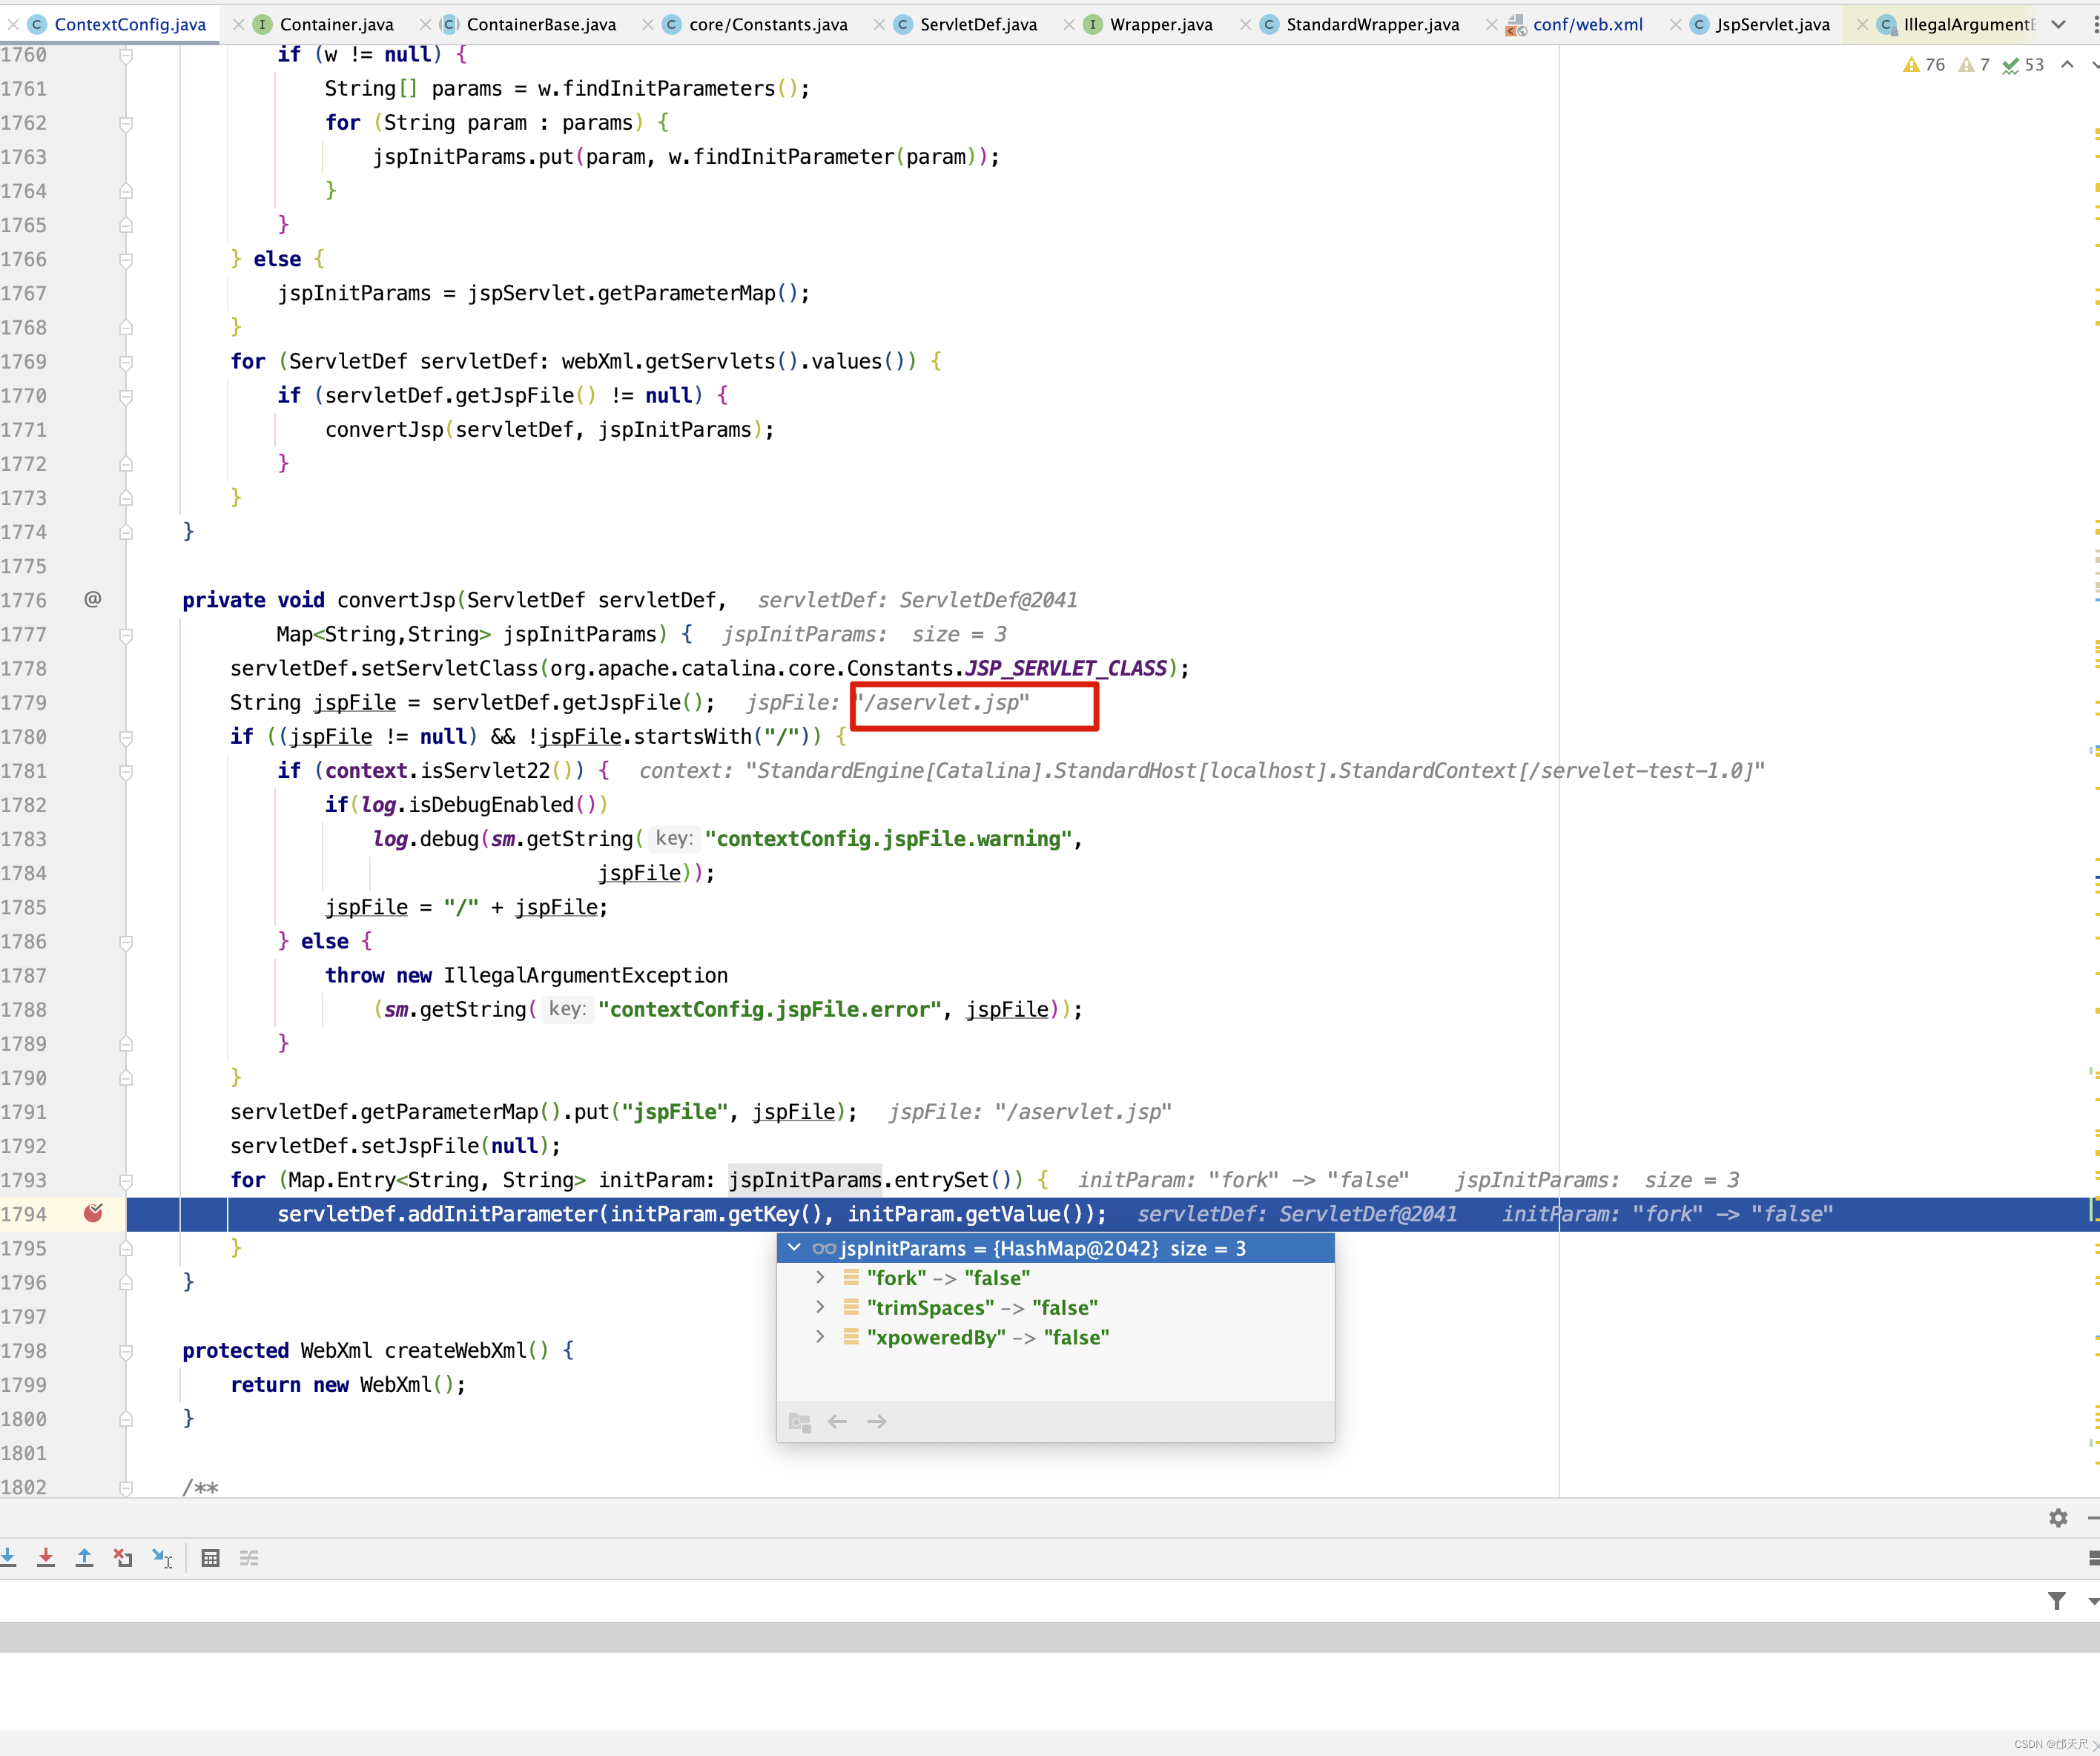
-
再看catalina.base/conf/web.xml中的jsp配置
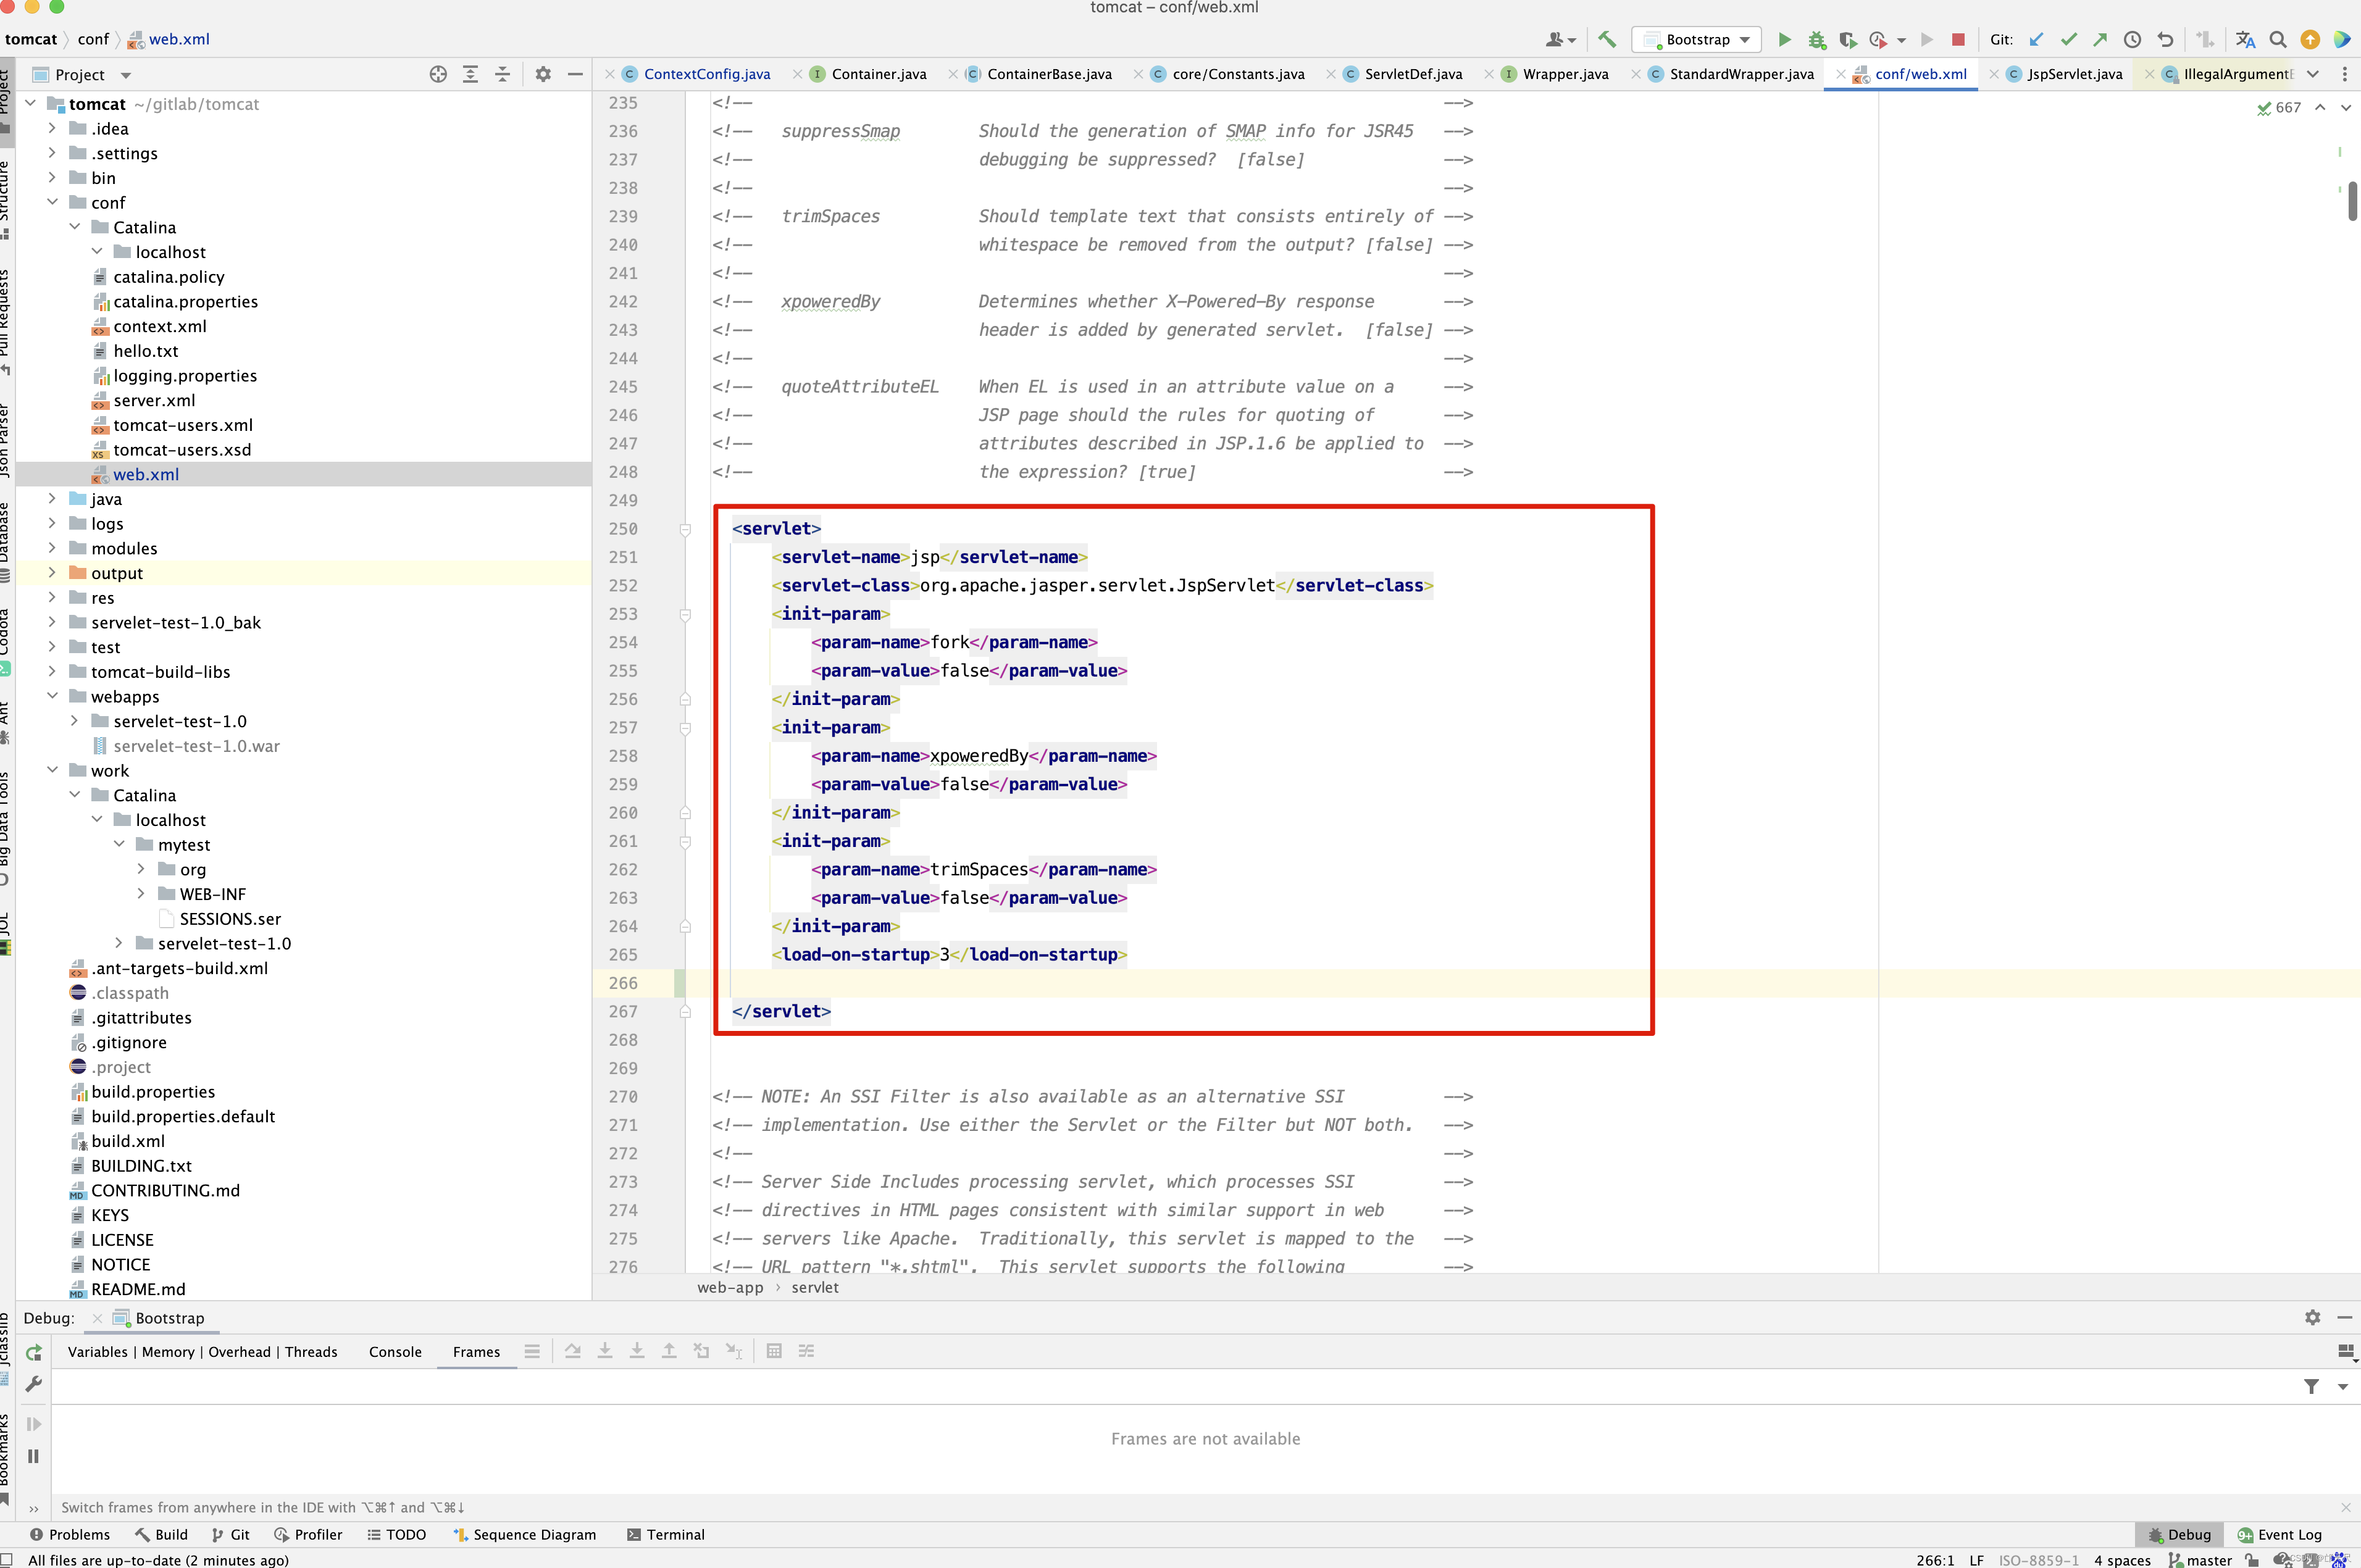
所以convertJsps()方法的主要目的就是将默认的jsp标签的初始化配置设置到项目中配置了jsp-file标签的Servlet中,当然如果项目中配置了jsp-file,<servlet-class />将无用,在项目的web.xml中添加<servlet-class>com.example.servelettest.AAAServlet</servlet-class>
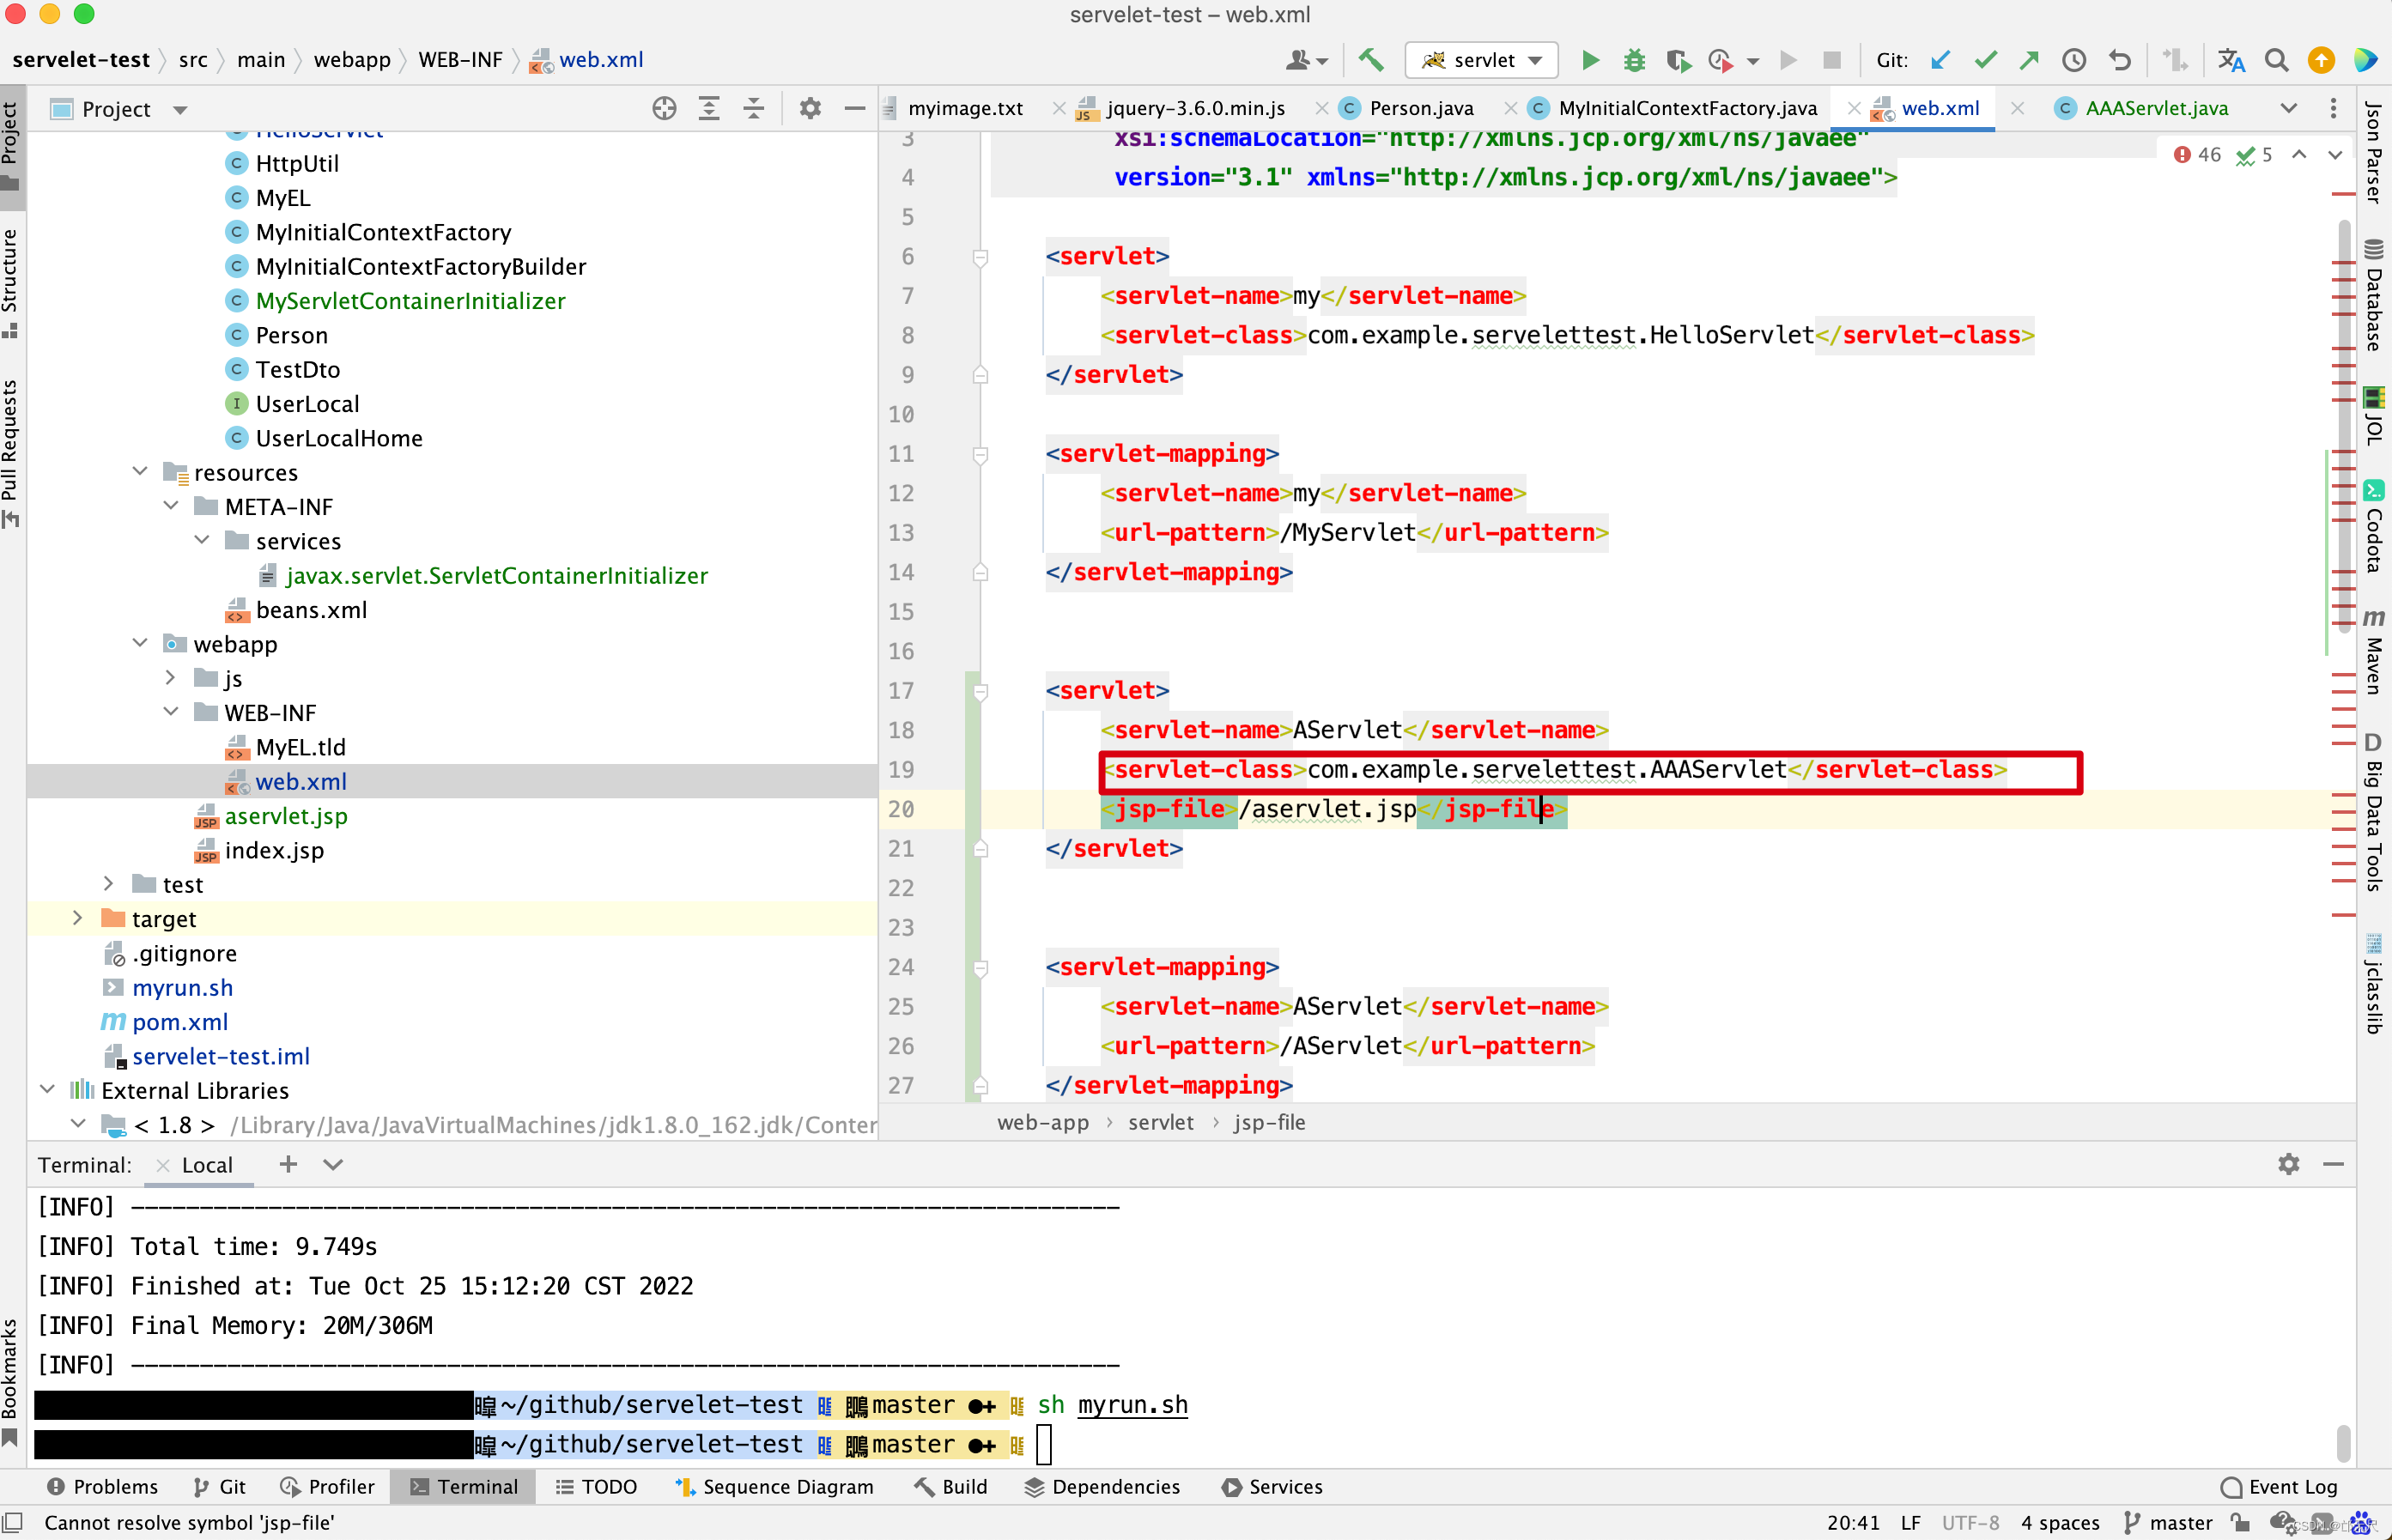
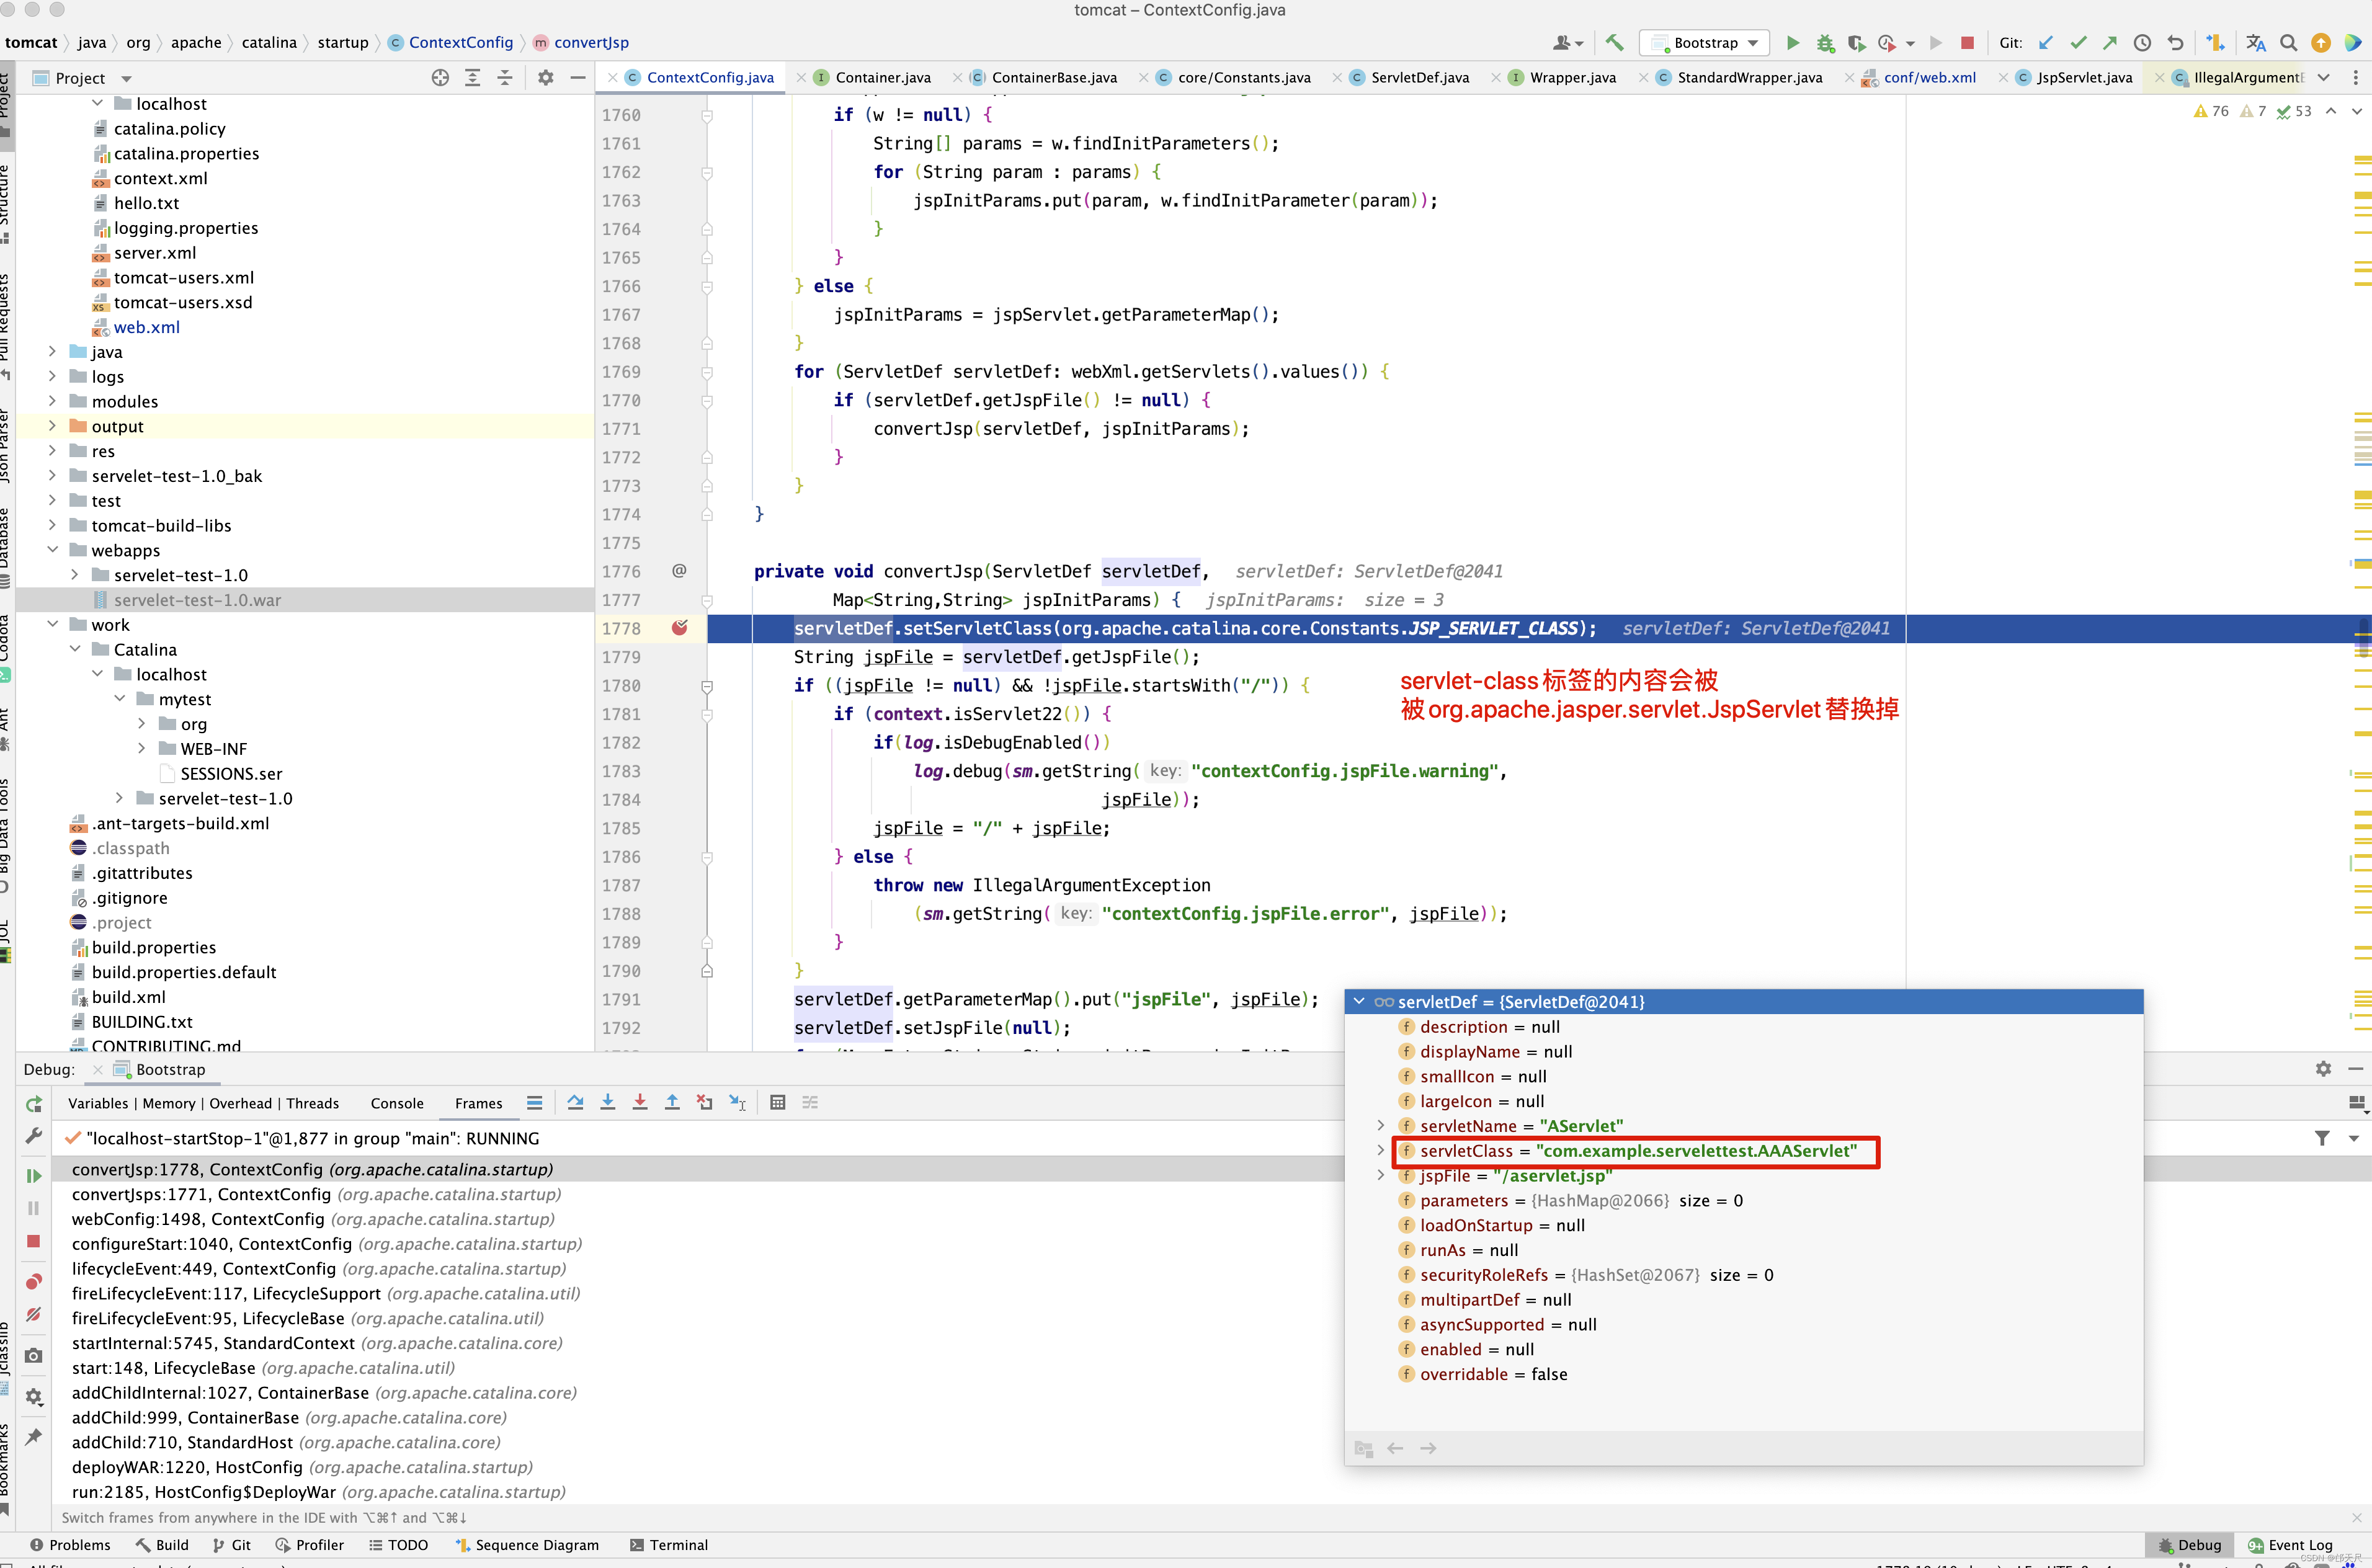
com.example.servelettest.AAAServlet会被默认的org.apache.jasper.servlet.JspServlet替换掉。
我相信你已经对convertJsp()方法有所理解了, 接下来看configureContext()方法
 public void configureContext(Context context) {
    // As far as possible, process in alphabetical order so it is easy to
    // check everything is present
    // Some validation depends on correct public ID
    context.setPublicId(publicId);

    // Everything else in order
    context.setEffectiveMajorVersion(getMajorVersion());
    context.setEffectiveMinorVersion(getMinorVersion());

    for (Entry<String, String> entry : contextParams.entrySet()) {
        context.addParameter(entry.getKey(), entry.getValue());
    }
    context.setDisplayName(displayName);
    context.setDistributable(distributable);
    for (ContextLocalEjb ejbLocalRef : ejbLocalRefs.values()) {
        context.getNamingResources().addLocalEjb(ejbLocalRef);
    }
    for (ContextEjb ejbRef : ejbRefs.values()) {
        context.getNamingResources().addEjb(ejbRef);
    }
    for (ContextEnvironment environment : envEntries.values()) {
        context.getNamingResources().addEnvironment(environment);
    }
    for (ErrorPage errorPage : errorPages.values()) {
        context.addErrorPage(errorPage);
    }
    for (FilterDef filter : filters.values()) {
        if (filter.getAsyncSupported() == null) {
            filter.setAsyncSupported("false");
        }
        context.addFilterDef(filter);
    }
    for (FilterMap filterMap : filterMaps) {
        context.addFilterMap(filterMap);
    }
    for (JspPropertyGroup jspPropertyGroup : jspPropertyGroups) {
        JspPropertyGroupDescriptor descriptor =
            new ApplicationJspPropertyGroupDescriptor(jspPropertyGroup);
        context.getJspConfigDescriptor().getJspPropertyGroups().add(
                descriptor);
    }
    for (String listener : listeners) {
        context.addApplicationListener(listener);
    }
    for (Entry<String, String> entry : localeEncodingMappings.entrySet()) {
        context.addLocaleEncodingMappingParameter(entry.getKey(),
                entry.getValue());
    }
    // Prevents IAE
    if (loginConfig != null) {
        context.setLoginConfig(loginConfig);
    }
    for (MessageDestinationRef mdr : messageDestinationRefs.values()) {
        context.getNamingResources().addMessageDestinationRef(mdr);
    }

    // messageDestinations were ignored in Tomcat 6, so ignore here

    context.setIgnoreAnnotations(metadataComplete);
    for (Entry<String, String> entry : mimeMappings.entrySet()) {
        context.addMimeMapping(entry.getKey(), entry.getValue());
    }
    // Name is just used for ordering
    for (ContextResourceEnvRef resource : resourceEnvRefs.values()) {
        context.getNamingResources().addResourceEnvRef(resource);
    }
    for (ContextResource resource : resourceRefs.values()) {
        context.getNamingResources().addResource(resource);
    }
    for (SecurityConstraint constraint : securityConstraints) {
        context.addConstraint(constraint);
    }
    for (String role : securityRoles) {
        context.addSecurityRole(role);
    }
    for (ContextService service : serviceRefs.values()) {
        context.getNamingResources().addService(service);
    }
    // 遍历所有的servlet,创建wrapper
    for (ServletDef servlet : servlets.values()) {
        Wrapper wrapper = context.createWrapper();
        // Description is ignored
        // Display name is ignored
        // Icons are ignored

        // jsp-file gets passed to the JSP Servlet as an init-param

        if (servlet.getLoadOnStartup() != null) {
            wrapper.setLoadOnStartup(servlet.getLoadOnStartup().intValue());
        }
        if (servlet.getEnabled() != null) {
            wrapper.setEnabled(servlet.getEnabled().booleanValue());
        }
        wrapper.setName(servlet.getServletName());
        Map<String,String> params = servlet.getParameterMap();
        for (Entry<String, String> entry : params.entrySet()) {
            wrapper.addInitParameter(entry.getKey(), entry.getValue());
        }
        wrapper.setRunAs(servlet.getRunAs());
        Set<SecurityRoleRef> roleRefs = servlet.getSecurityRoleRefs();
        for (SecurityRoleRef roleRef : roleRefs) {
            wrapper.addSecurityReference(
                    roleRef.getName(), roleRef.getLink());
        }
        wrapper.setServletClass(servlet.getServletClass());
        MultipartDef multipartdef = servlet.getMultipartDef();
        if (multipartdef != null) {
            if (multipartdef.getMaxFileSize() != null &&
                    multipartdef.getMaxRequestSize()!= null &&
                    multipartdef.getFileSizeThreshold() != null) {
                wrapper.setMultipartConfigElement(new MultipartConfigElement(
                        multipartdef.getLocation(),
                        Long.parseLong(multipartdef.getMaxFileSize()),
                        Long.parseLong(multipartdef.getMaxRequestSize()),
                        Integer.parseInt(
                                multipartdef.getFileSizeThreshold())));
            } else {
                wrapper.setMultipartConfigElement(new MultipartConfigElement(
                        multipartdef.getLocation()));
            }
        }
        if (servlet.getAsyncSupported() != null) {
            wrapper.setAsyncSupported(
                    servlet.getAsyncSupported().booleanValue());
        }
        wrapper.setOverridable(servlet.isOverridable());
        // 把wrapper添加到context中去
        context.addChild(wrapper);
    }
    // 把mapping关系添加到context中去
    for (Entry<String, String> entry : servletMappings.entrySet()) {
        context.addServletMapping(entry.getKey(), entry.getValue());
    }

    // 如果WebXML中配置了session-config
    if (sessionConfig != null) {
        if (sessionConfig.getSessionTimeout() != null) {
            context.setSessionTimeout(
                    sessionConfig.getSessionTimeout().intValue());
        }
        SessionCookieConfig scc =
            context.getServletContext().getSessionCookieConfig();
        scc.setName(sessionConfig.getCookieName());
        scc.setDomain(sessionConfig.getCookieDomain());
        scc.setPath(sessionConfig.getCookiePath());
        scc.setComment(sessionConfig.getCookieComment());
        if (sessionConfig.getCookieHttpOnly() != null) {
            scc.setHttpOnly(sessionConfig.getCookieHttpOnly().booleanValue());
        }
        if (sessionConfig.getCookieSecure() != null) {
            scc.setSecure(sessionConfig.getCookieSecure().booleanValue());
        }
        if (sessionConfig.getCookieMaxAge() != null) {
            scc.setMaxAge(sessionConfig.getCookieMaxAge().intValue());
        }
        if (sessionConfig.getSessionTrackingModes().size() > 0) {
            context.getServletContext().setSessionTrackingModes(
                    sessionConfig.getSessionTrackingModes());
        }
    }
    for (Entry<String, String> entry : taglibs.entrySet()) {
        TaglibDescriptor descriptor = new ApplicationTaglibDescriptor(
                entry.getValue(), entry.getKey());
        context.getJspConfigDescriptor().getTaglibs().add(descriptor);
    }

    // Context doesn't use version directly

    for (String welcomeFile : welcomeFiles) {
        /*
         * The following will result in a welcome file of "" so don't add
         * that to the context
         * <welcome-file-list>
         *   <welcome-file/>
         * </welcome-file-list>
         */
        if (welcomeFile != null && welcomeFile.length() > 0) {
            context.addWelcomeFile(welcomeFile);
        }
    }

    // Do this last as it depends on servlets
    for (JspPropertyGroup jspPropertyGroup : jspPropertyGroups) {
        String jspServletName = context.findServletMapping("*.jsp");
        if (jspServletName == null) {
            jspServletName = "jsp";
        }
        if (context.findChild(jspServletName) != null) {
            for (String urlPattern : jspPropertyGroup.getUrlPatterns()) {
                context.addServletMapping(urlPattern, jspServletName, true);
            }
        } else {
            if(log.isDebugEnabled()) {
                for (String urlPattern : jspPropertyGroup.getUrlPatterns()) {
                    log.debug("Skiping " + urlPattern + " , no servlet " +
                            jspServletName);
                }
            }
        }
    }

    for (Entry<String, String> entry : postConstructMethods.entrySet()) {
        context.addPostConstructMethod(entry.getKey(), entry.getValue());
    }

    for (Entry<String, String> entry : preDestroyMethods.entrySet()) {
        context.addPreDestroyMethod(entry.getKey(), entry.getValue());
    }
}
这个方法看是去很多,但原理还是很简单的,将得到的WebXml中的配置信息保存到StandardContext中,但有些还是需要注意,像ServletDef此时被翻译成StandardWrapper(默认情况下), 而一个uri请求,最终是通过Wrapper来处理,StandardWrapper和Servlet类似,但StandardWrapper是Servlet的一层包装,只有通过StandardWrapper各种参数较验后,最终请求才会到过servlet处理,因此这一块特别重要,在下一篇博客分析Tomcat请求时,再来分析各个参数的作用了,其他的也类似,相当于所有注解的配置,xml中的配置,此时全部设置到StandardContext的属性及子节点的属性中,过滤器中,等等,所以这个方法起到承上启下的作用,前面所有的努力只为将值设置到容器的属性中。
接下来看processResourceJARs()方法实现。
protected void processResourceJARs(Set<WebXml> fragments) {
    for (WebXml fragment : fragments) {
        URL url = fragment.getURL();
        Jar jar = null;
        try {
            // Note: Ignore file URLs for now since only jar URLs will be accepted
            if ("jar".equals(url.getProtocol())) {
                jar = JarFactory.newInstance(url);
                jar.nextEntry();
                String entryName = jar.getEntryName();
                while (entryName != null) {
                    if (entryName.startsWith("META-INF/resources/")) {
                        context.addResourceJarUrl(url);
                        break;
                    }
                    jar.nextEntry();
                    entryName = jar.getEntryName();
                }
            } else if ("file".equals(url.getProtocol())) {
                FileDirContext fileDirContext = new FileDirContext();
                fileDirContext.setDocBase(new File(url.toURI()).getAbsolutePath());
                try {
                    fileDirContext.lookup("META-INF/resources/");
                    //lookup succeeded
                    if(context instanceof StandardContext){
                        ((StandardContext)context).addResourcesDirContext(fileDirContext);
                    }
                } catch (NamingException e) {
                    //not found, ignore
                }
            }
        } catch (IOException ioe) {
            log.error(sm.getString("contextConfig.resourceJarFail", url,
                    context.getName()));
        } catch (URISyntaxException e) {
            log.error(sm.getString("contextConfig.resourceJarFail", url,
                context.getName()));
        } finally {
            if (jar != null) {
                jar.close();
            }
        }
    }
}
将jar包或file的META-INF/resources/目录下的内容添加到JNDI中,方便访问,当然啦,还是看一个例子。
- 创建一个项目 ,在其/Users/quyixiao/git/test-resource/src/main/resources/META-INF/resources目录下放一个my-test.js文件 。
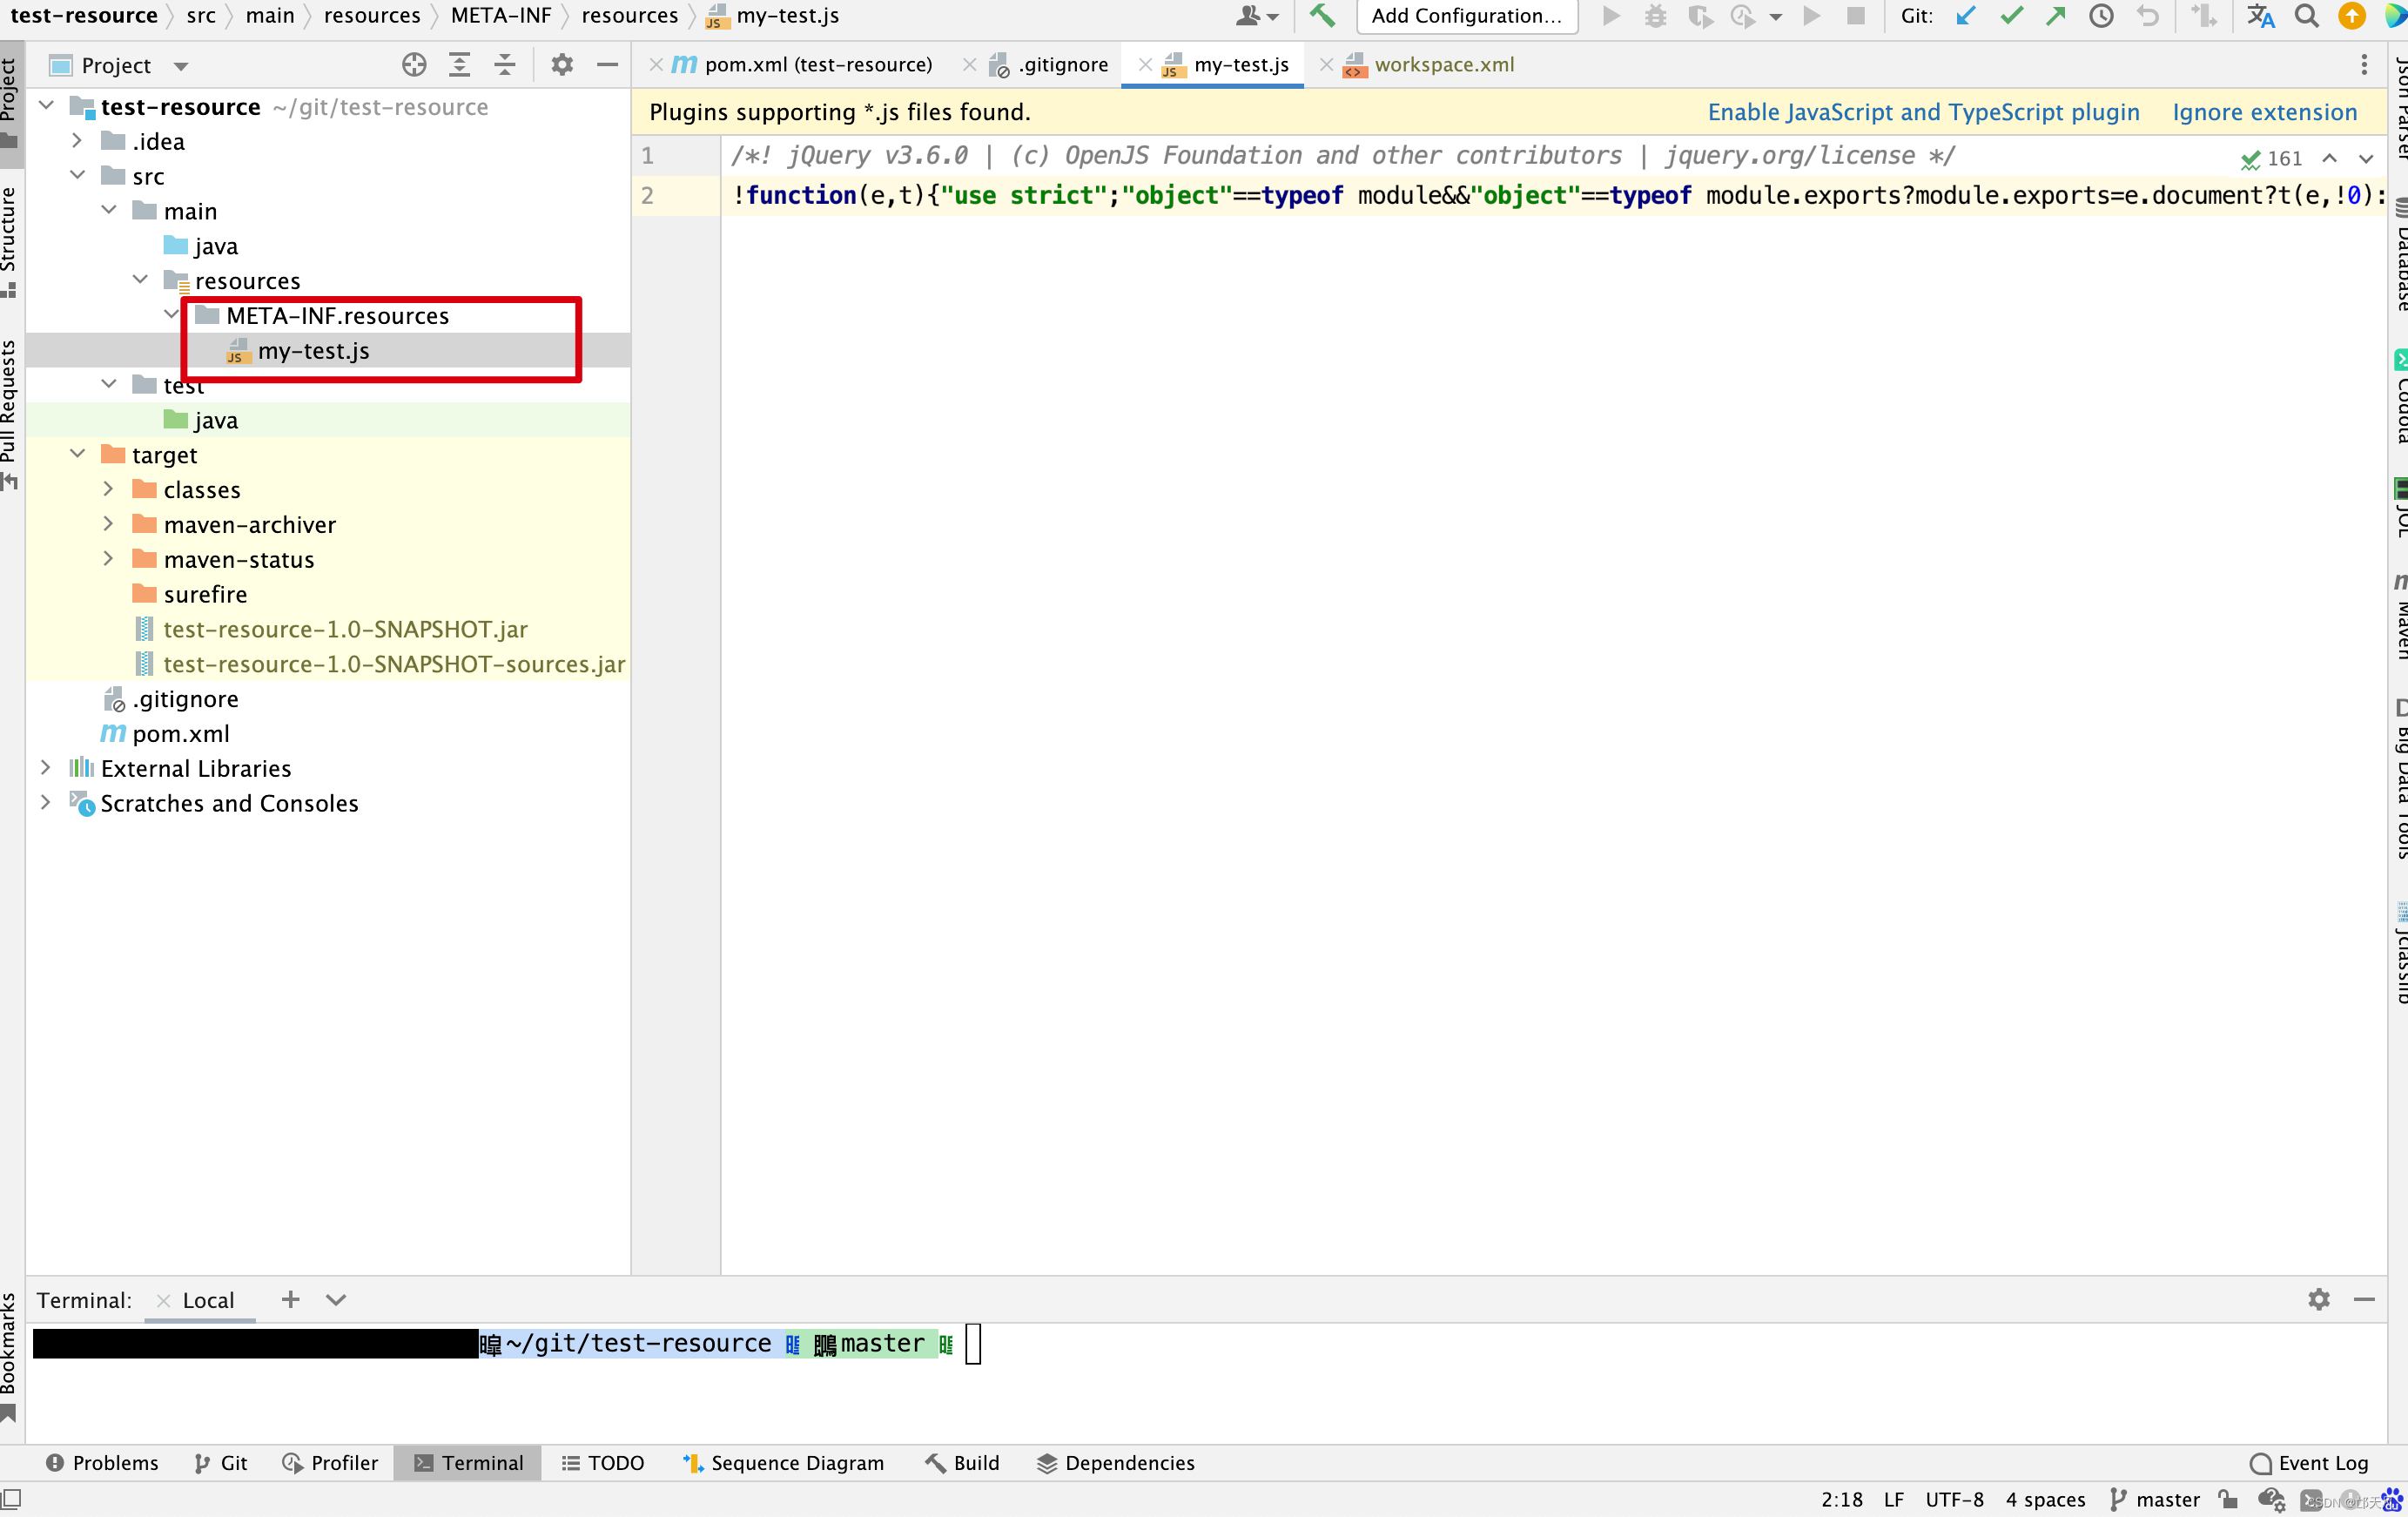
2. 引入servelet-test项目中,在这里注意,本文所有的例子中servlet-test就是servelet-test-1.0项目的。
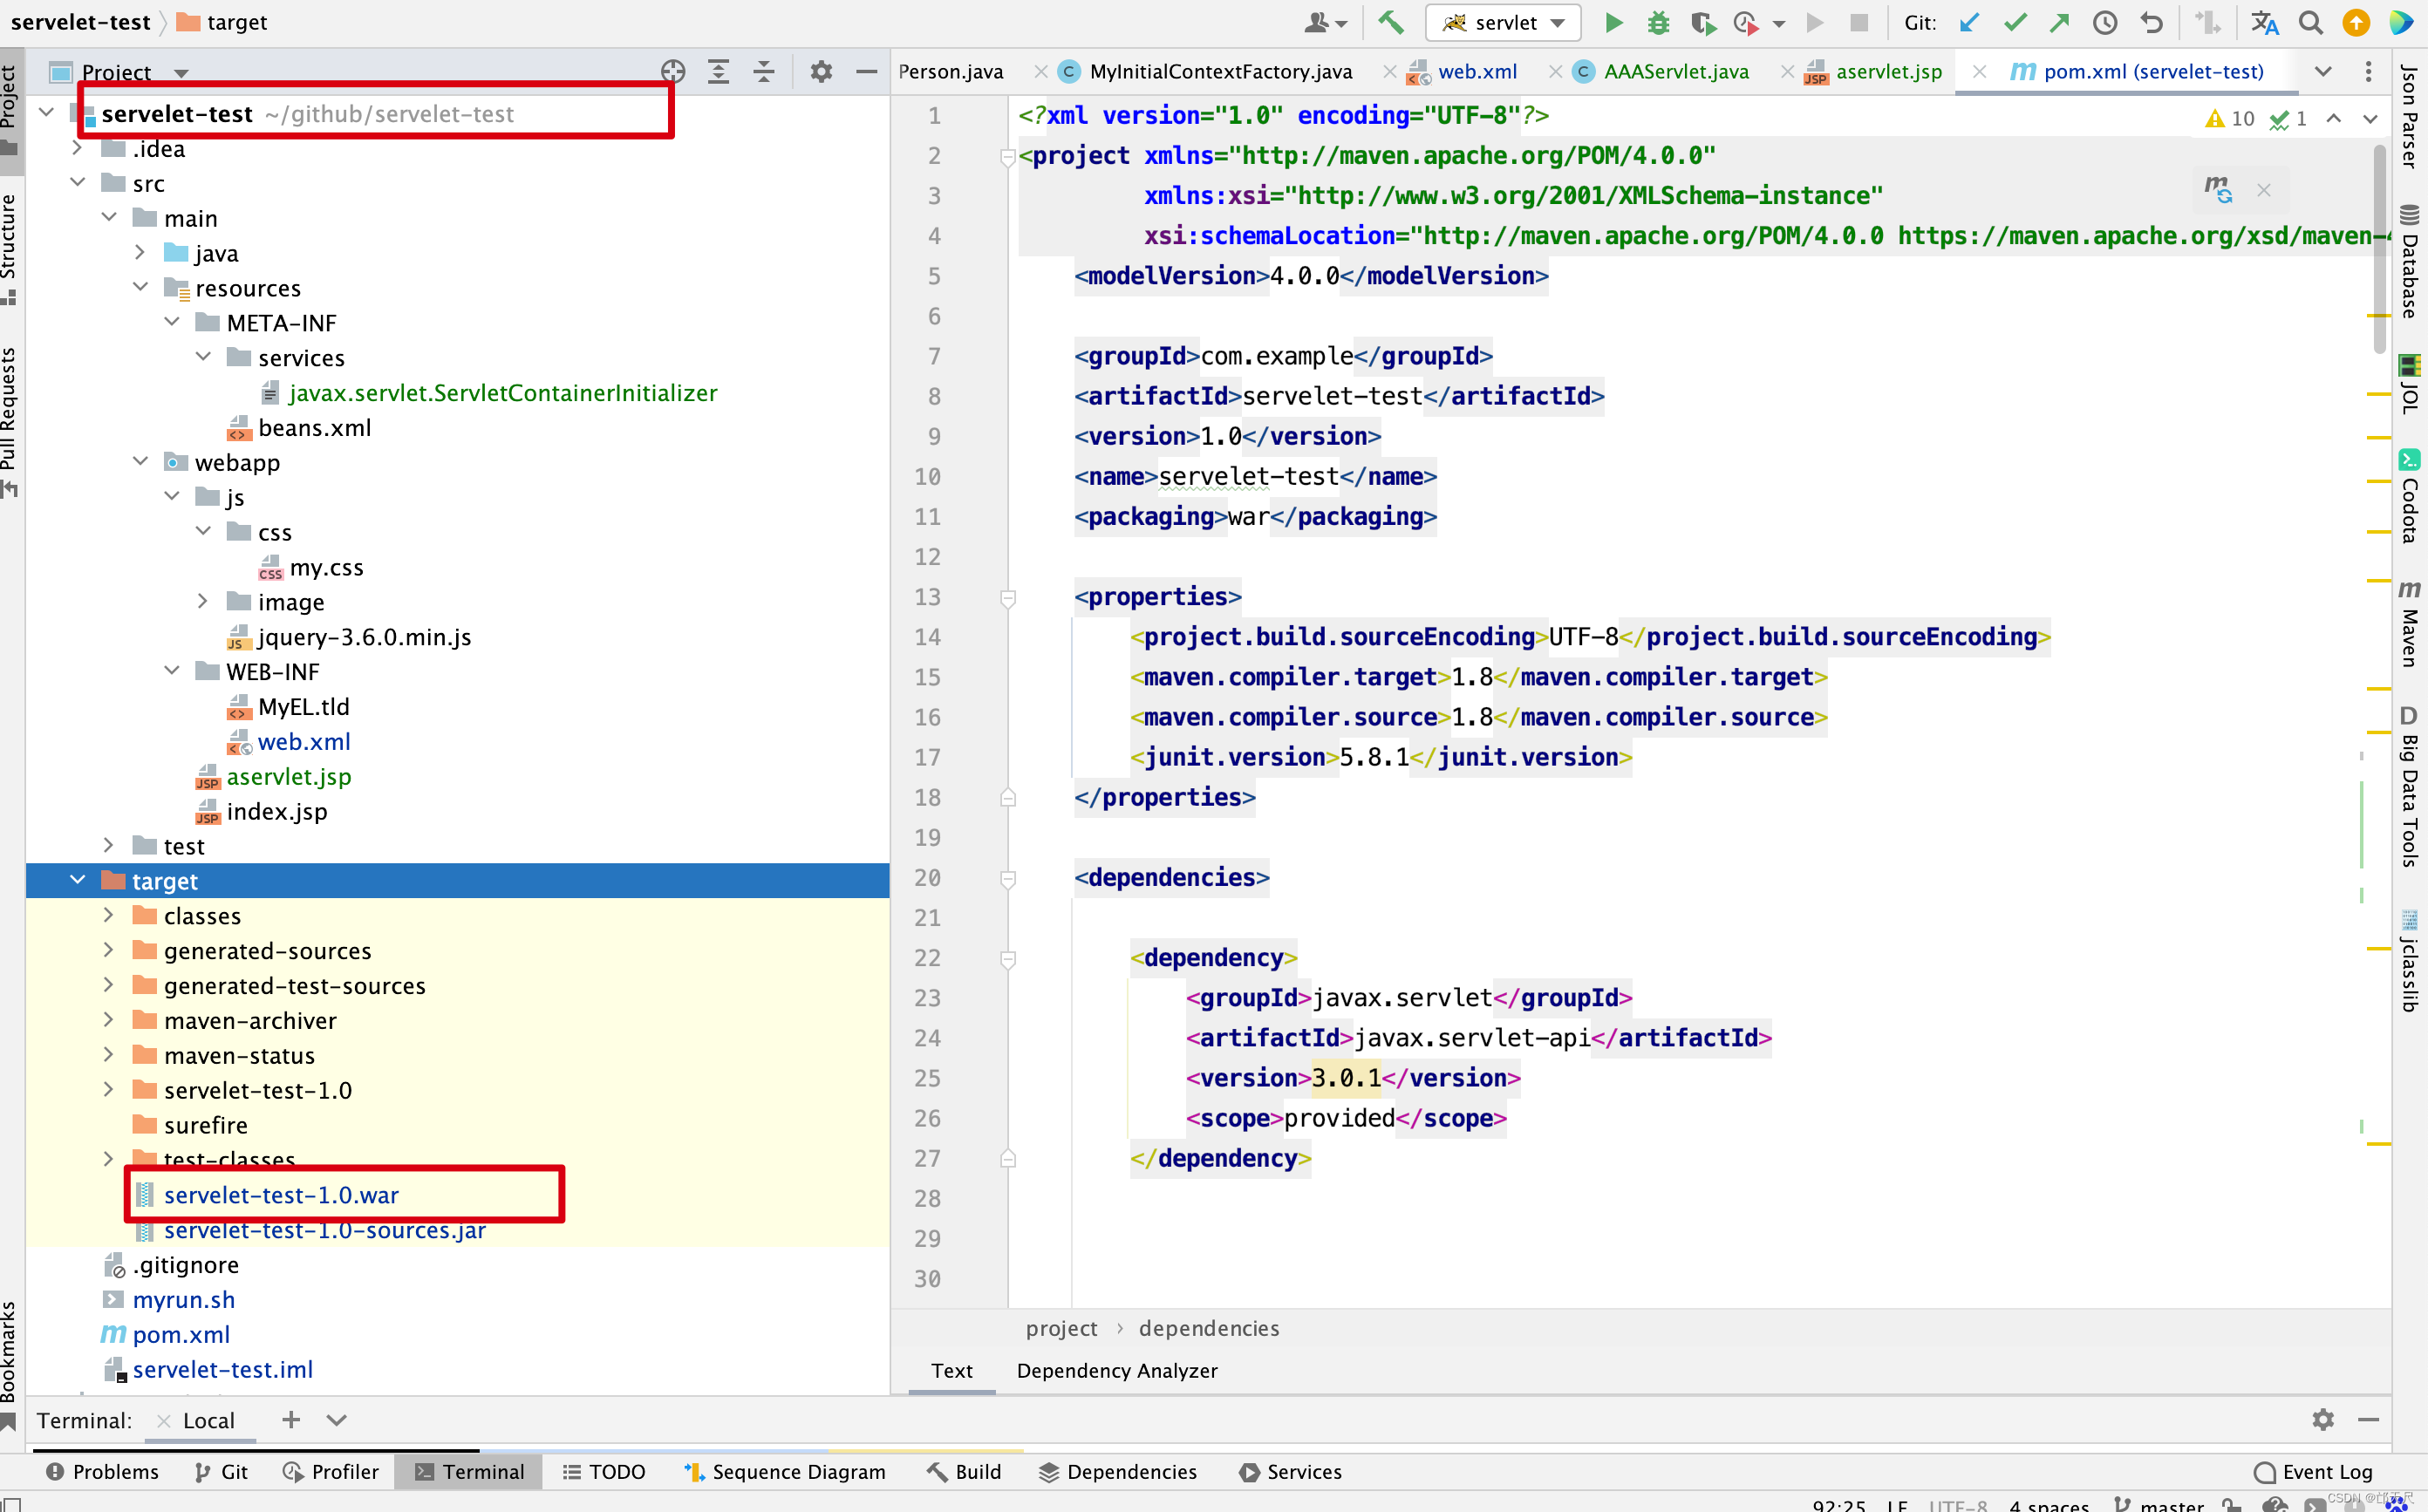
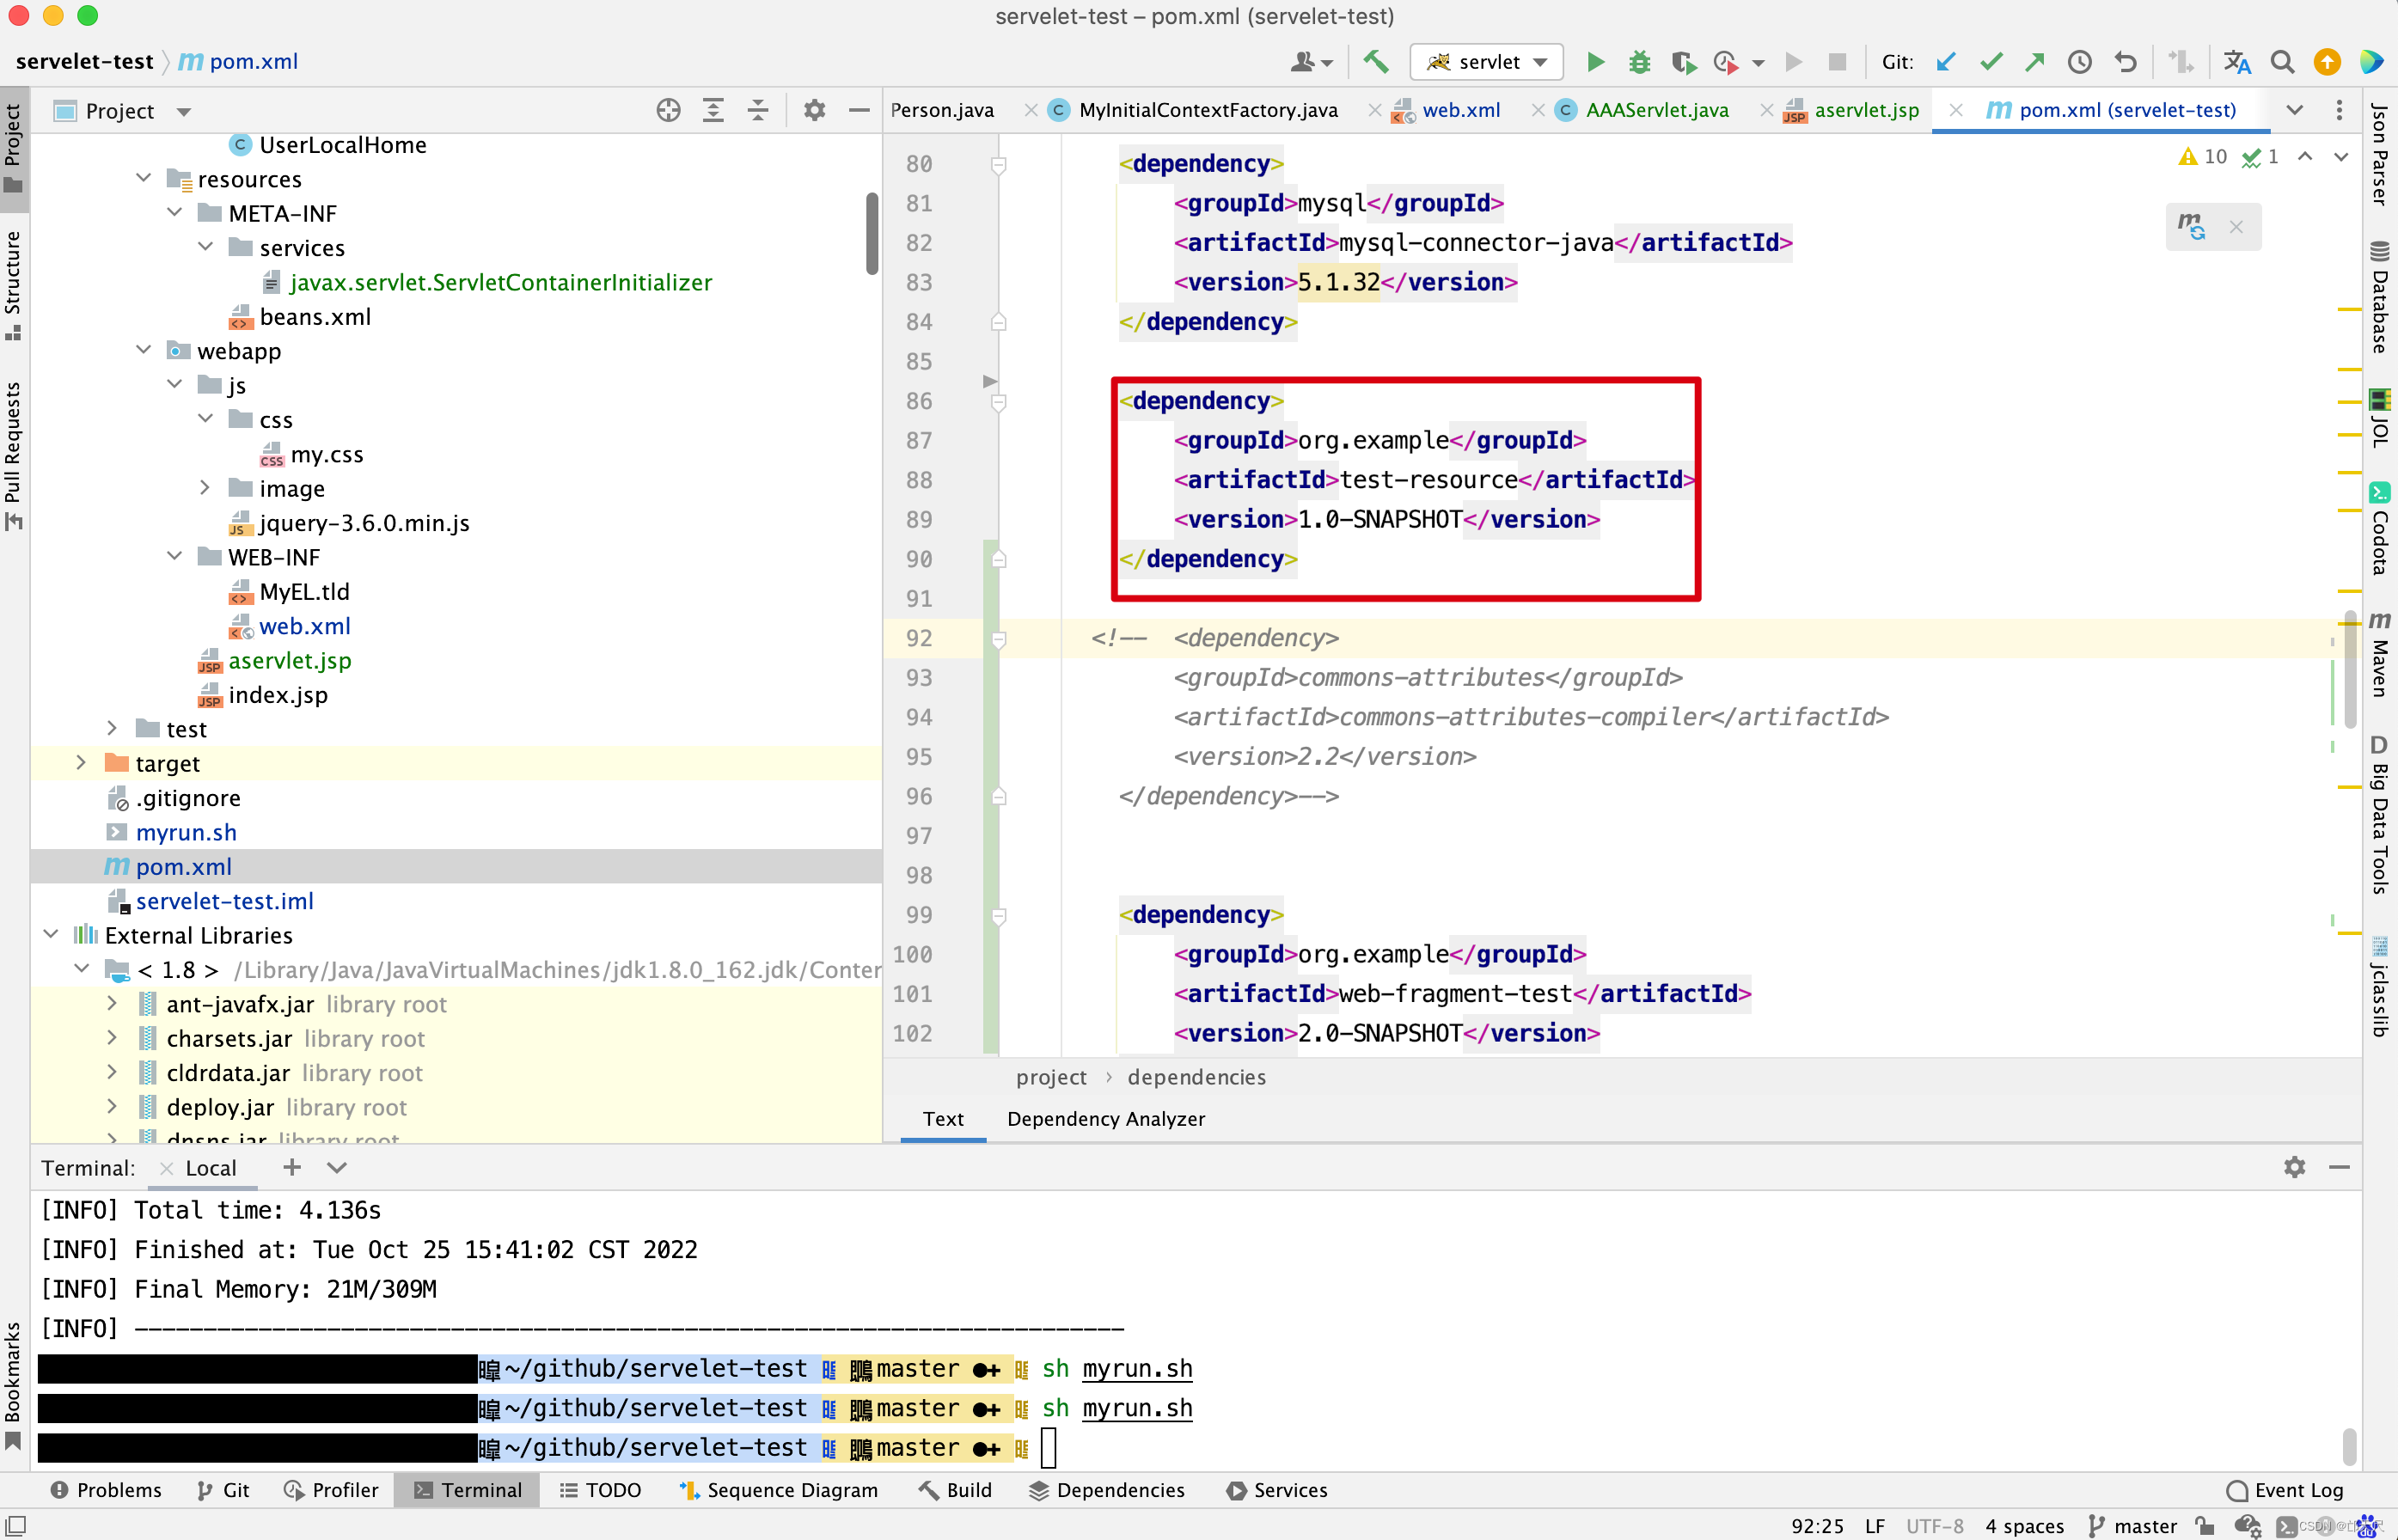
- 在processResourceJARs()方法中打断点
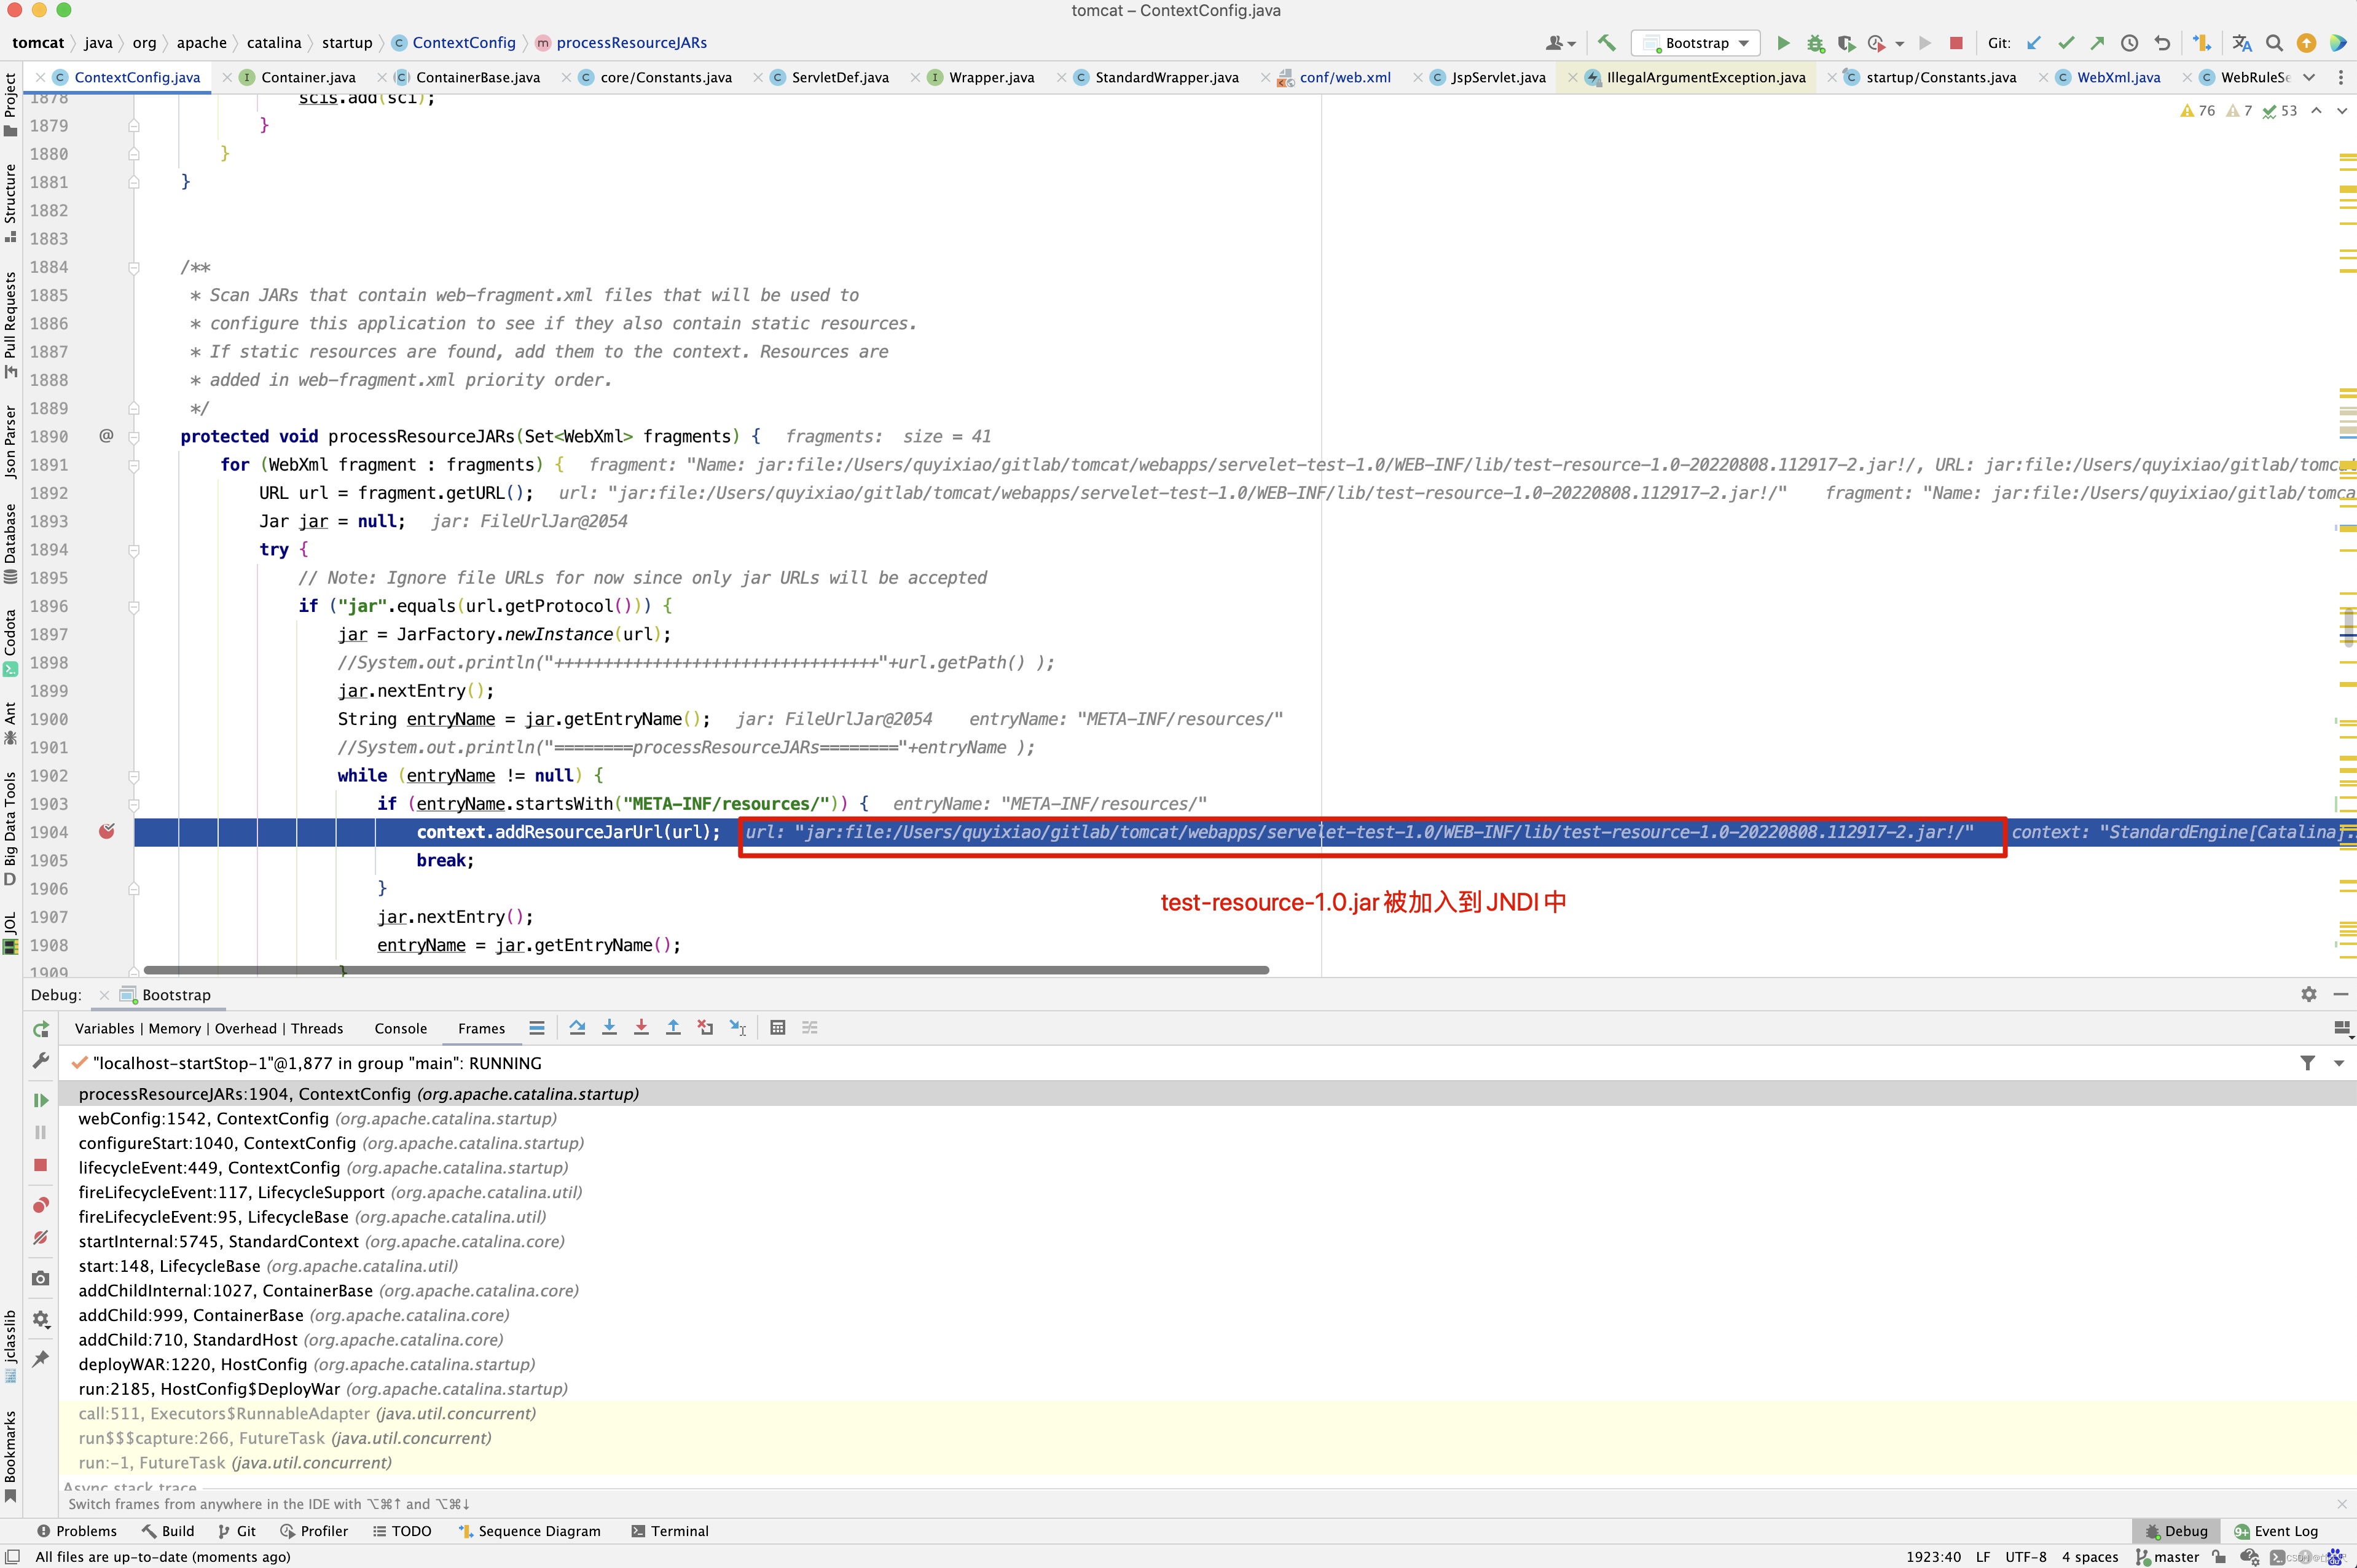
- 启动tomcat后,访问my-test.js资源
listener-listener-class
接下来分析configureStart()中的applicationAnnotationsConfig()方法。
protected void applicationAnnotationsConfig() {

    long t1=System.currentTimeMillis();

    WebAnnotationSet.loadApplicationAnnotations(context);

    long t2=System.currentTimeMillis();
    // 存储StandardContext的启动时间
    if (context instanceof StandardContext) {
        ((StandardContext) context).setStartupTime(t2-t1+
                ((StandardContext) context).getStartupTime());
    }
}
接着进入loadApplicationAnnotations()方法 。
public static void loadApplicationAnnotations(Context context) {
    loadApplicationListenerAnnotations(context);
    loadApplicationFilterAnnotations(context);
    loadApplicationServletAnnotations(context);
}
因为loadApplicationListenerAnnotations(),loadApplicationFilterAnnotations() , loadApplicationServletAnnotations()三个方法的源码实现大同小异,因此只选 loadApplicationListenerAnnotations()方法进行分析 。
protected static void loadApplicationListenerAnnotations(Context context) {
    String[] applicationListeners = context.findApplicationListeners();
    for (String className : applicationListeners) {
        Class<?> clazz = Introspection.loadClass(context, className);
        if (clazz == null) {
            continue;
        }
        loadClassAnnotation(context, clazz);
        loadFieldsAnnotation(context, clazz);
        loadMethodsAnnotation(context, clazz);
    }
}

public String[] findApplicationListeners() {
    ArrayList<String> list =
            new ArrayList<String>(applicationListeners.length);
    for (ApplicationListener applicationListener: applicationListeners) {
        list.add(applicationListener.getClassName());
    }
    return list.toArray(new String[list.size()]);
}
如果要分析loadClassAnnotation(),loadFieldsAnnotation(),loadMethodsAnnotation()三个方法之前,先要找到applicationListeners是从哪里赋值的。 当然又在代码中寻寻觅觅,最终找到了在addApplicationListener()方法中添加Listener。在addApplicationListener()方法中打断点 。
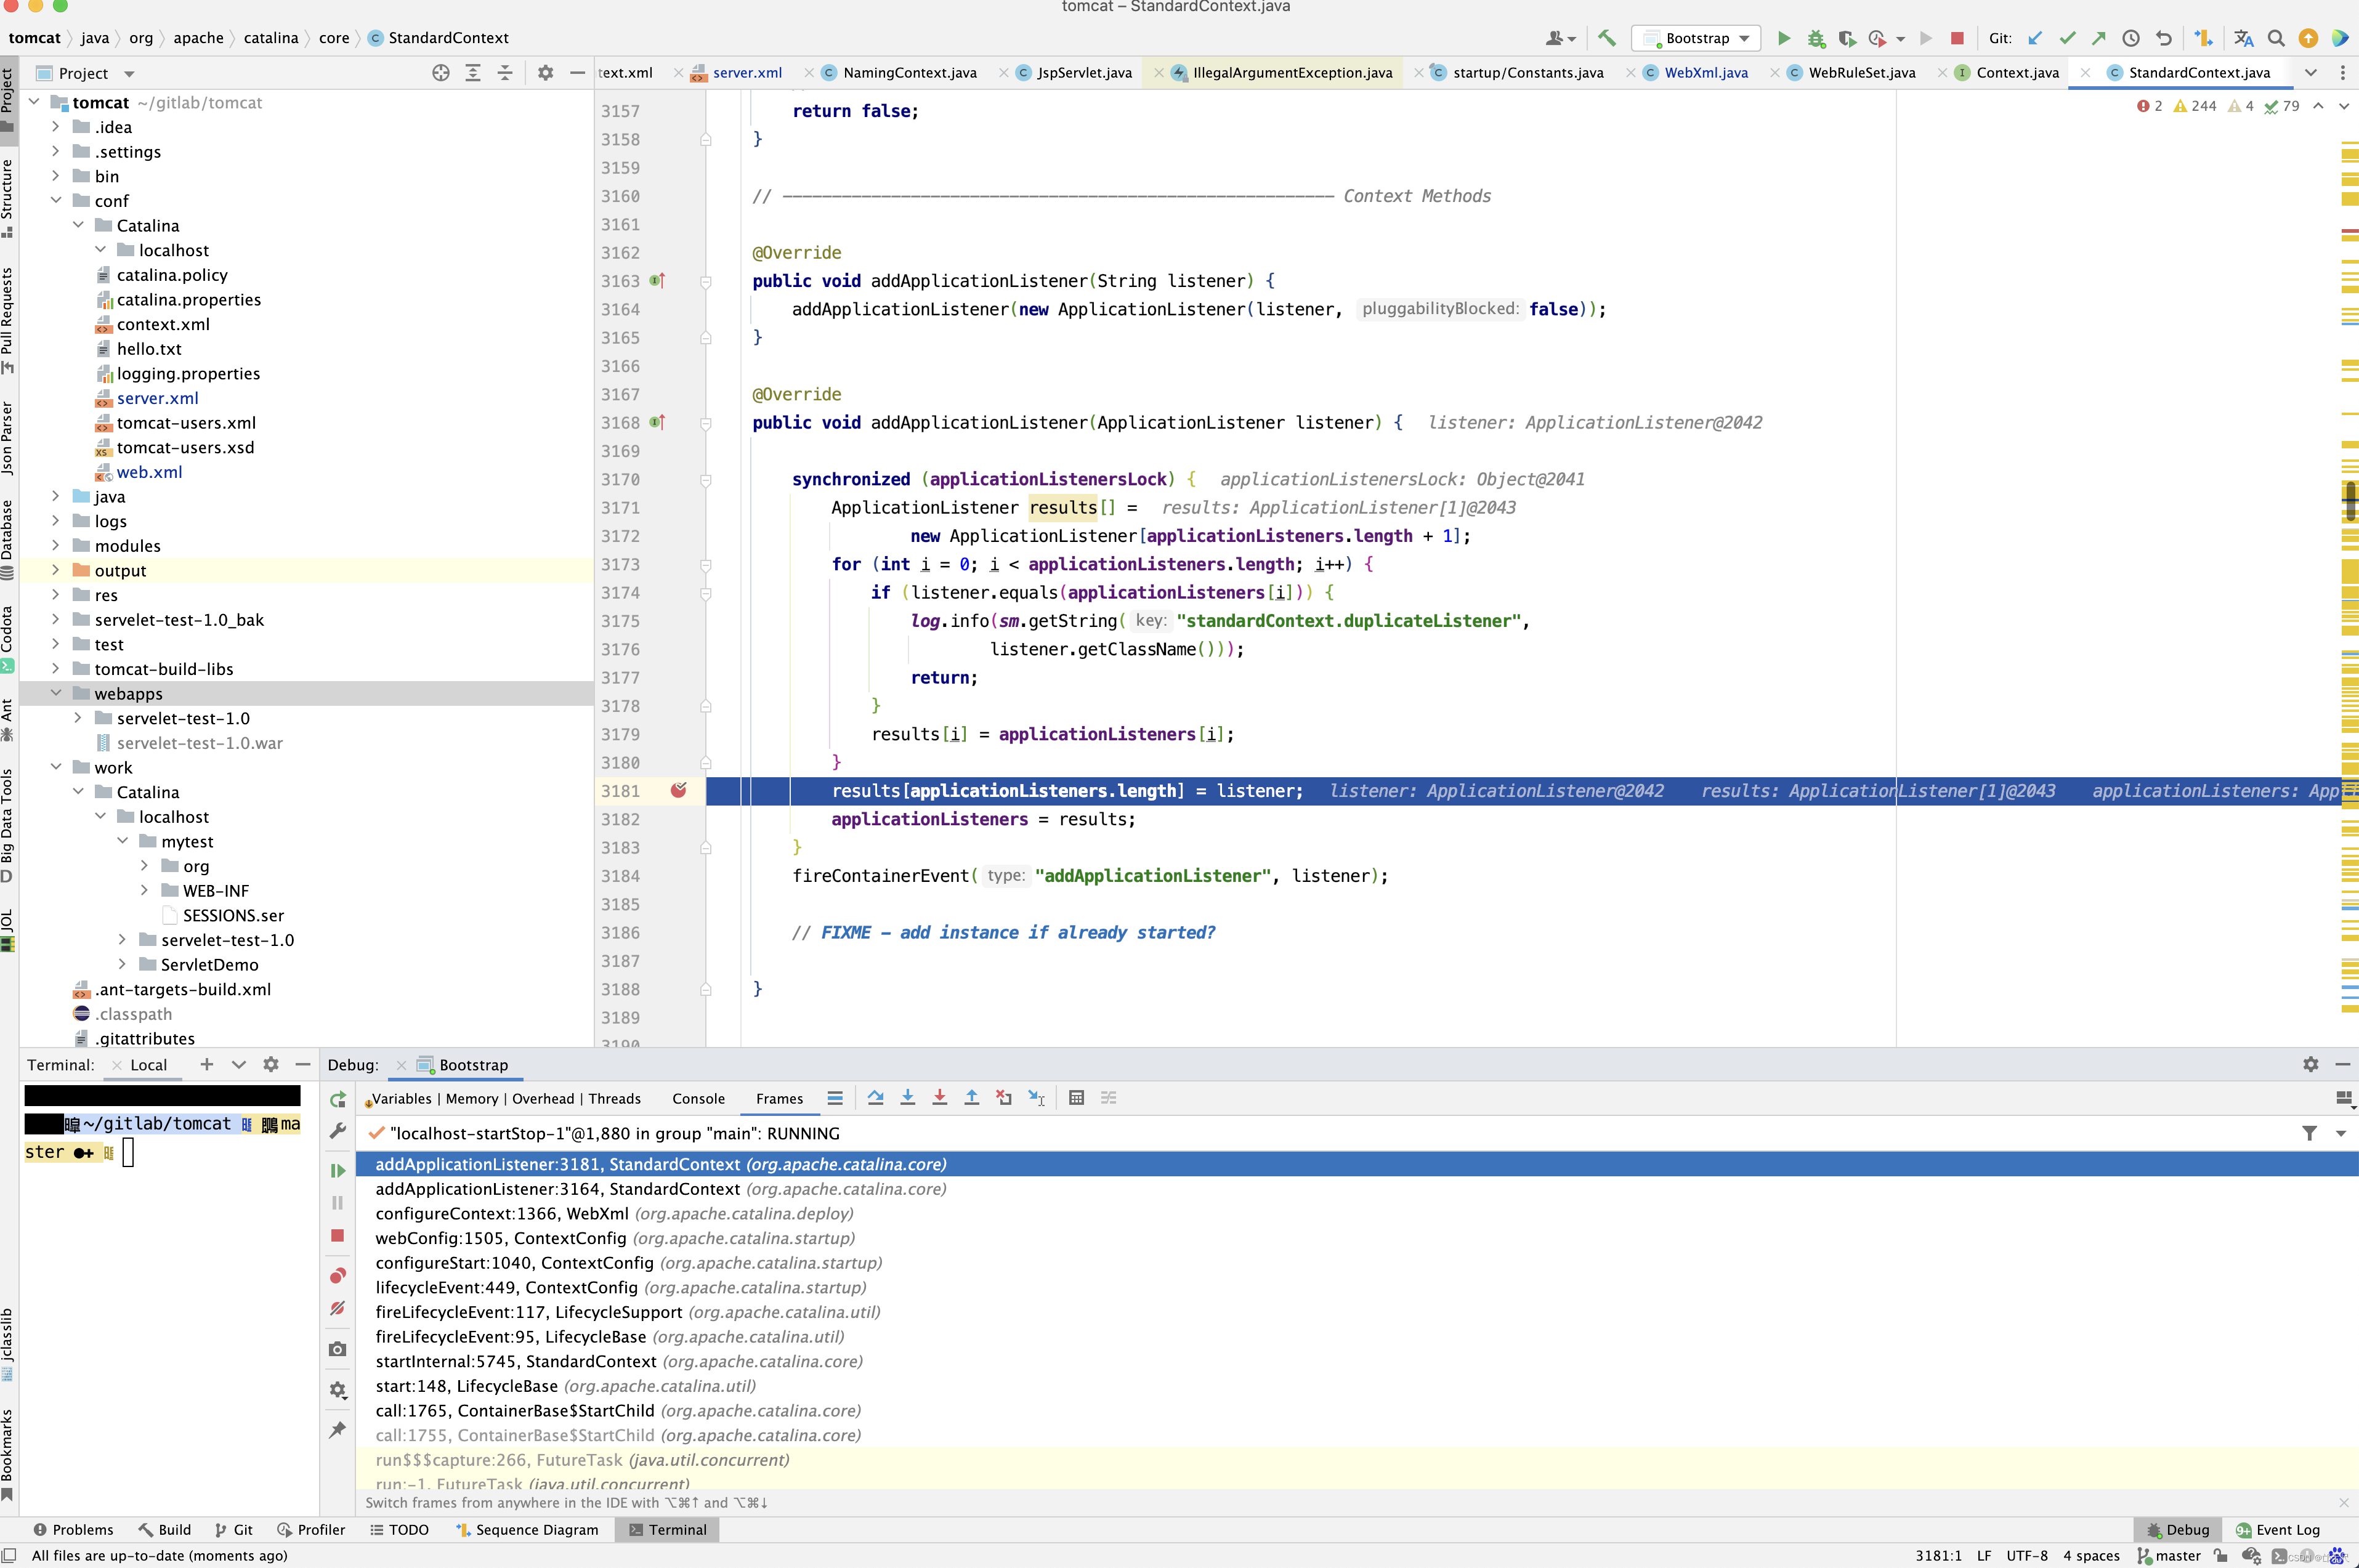
发现来源于WebXml的listeners的值,而WebXml又是从web.xml或web-fragment.xml中解析得到。
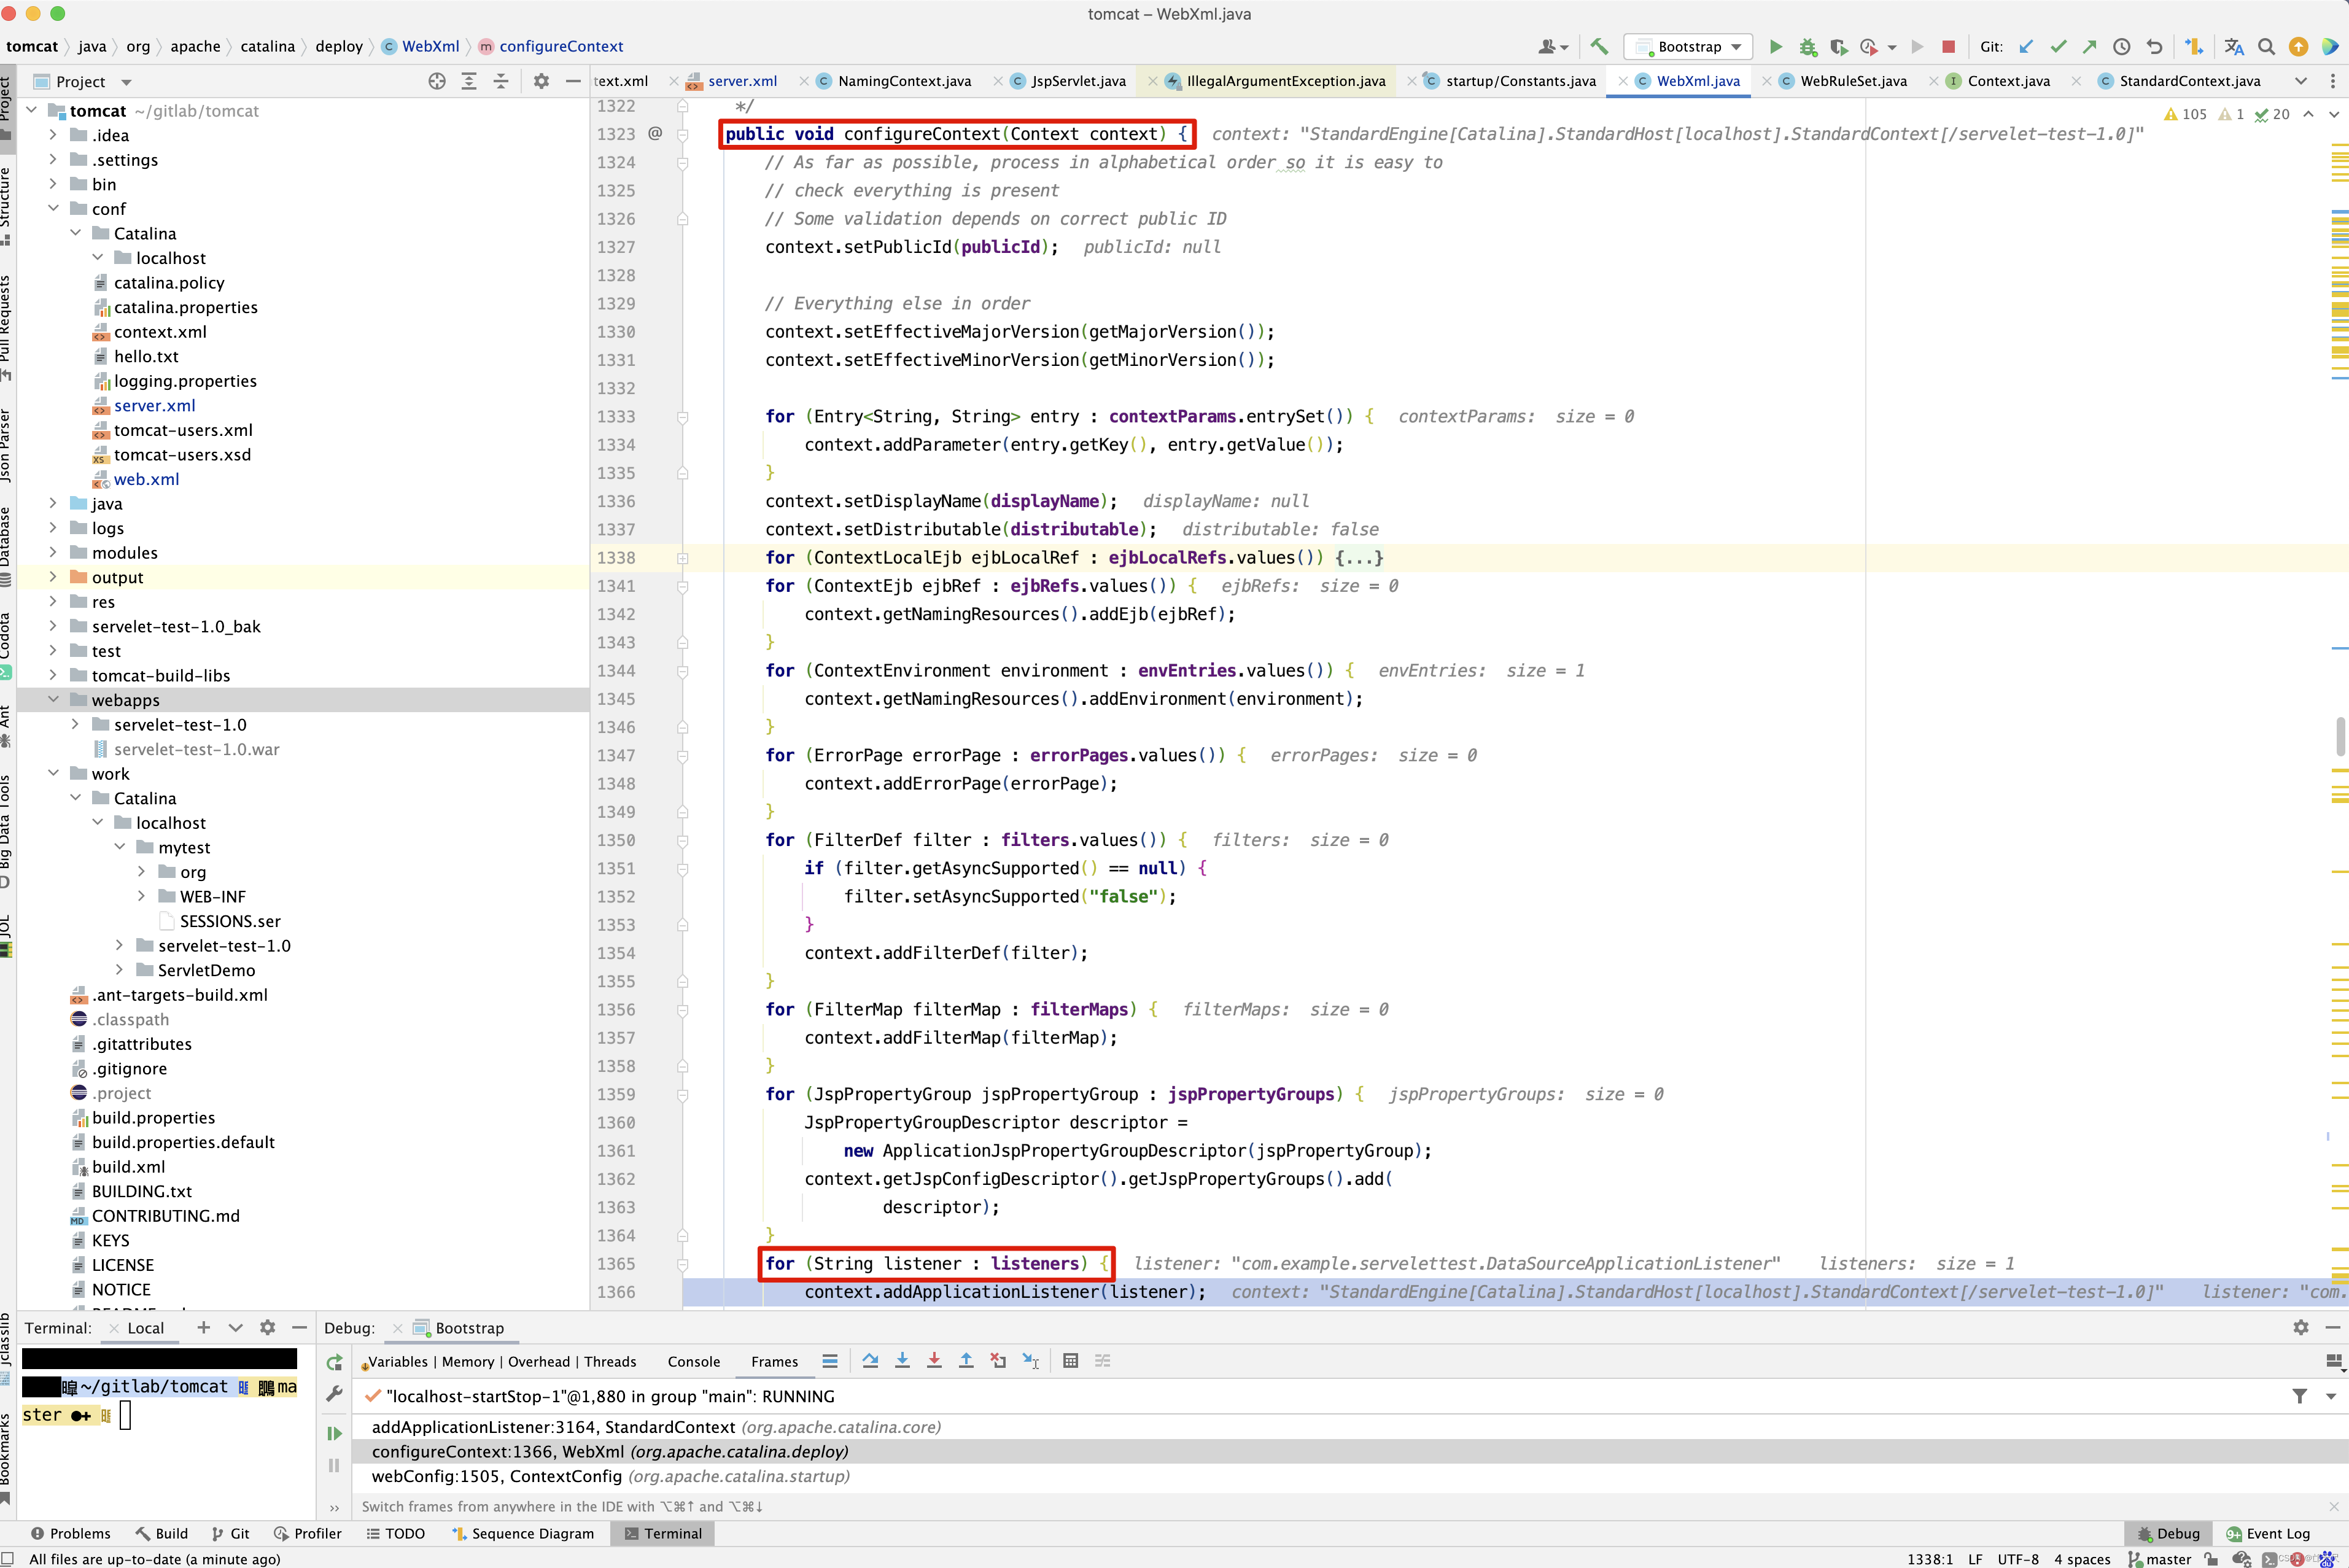
而listeners又是通过addListener()方法添加的。
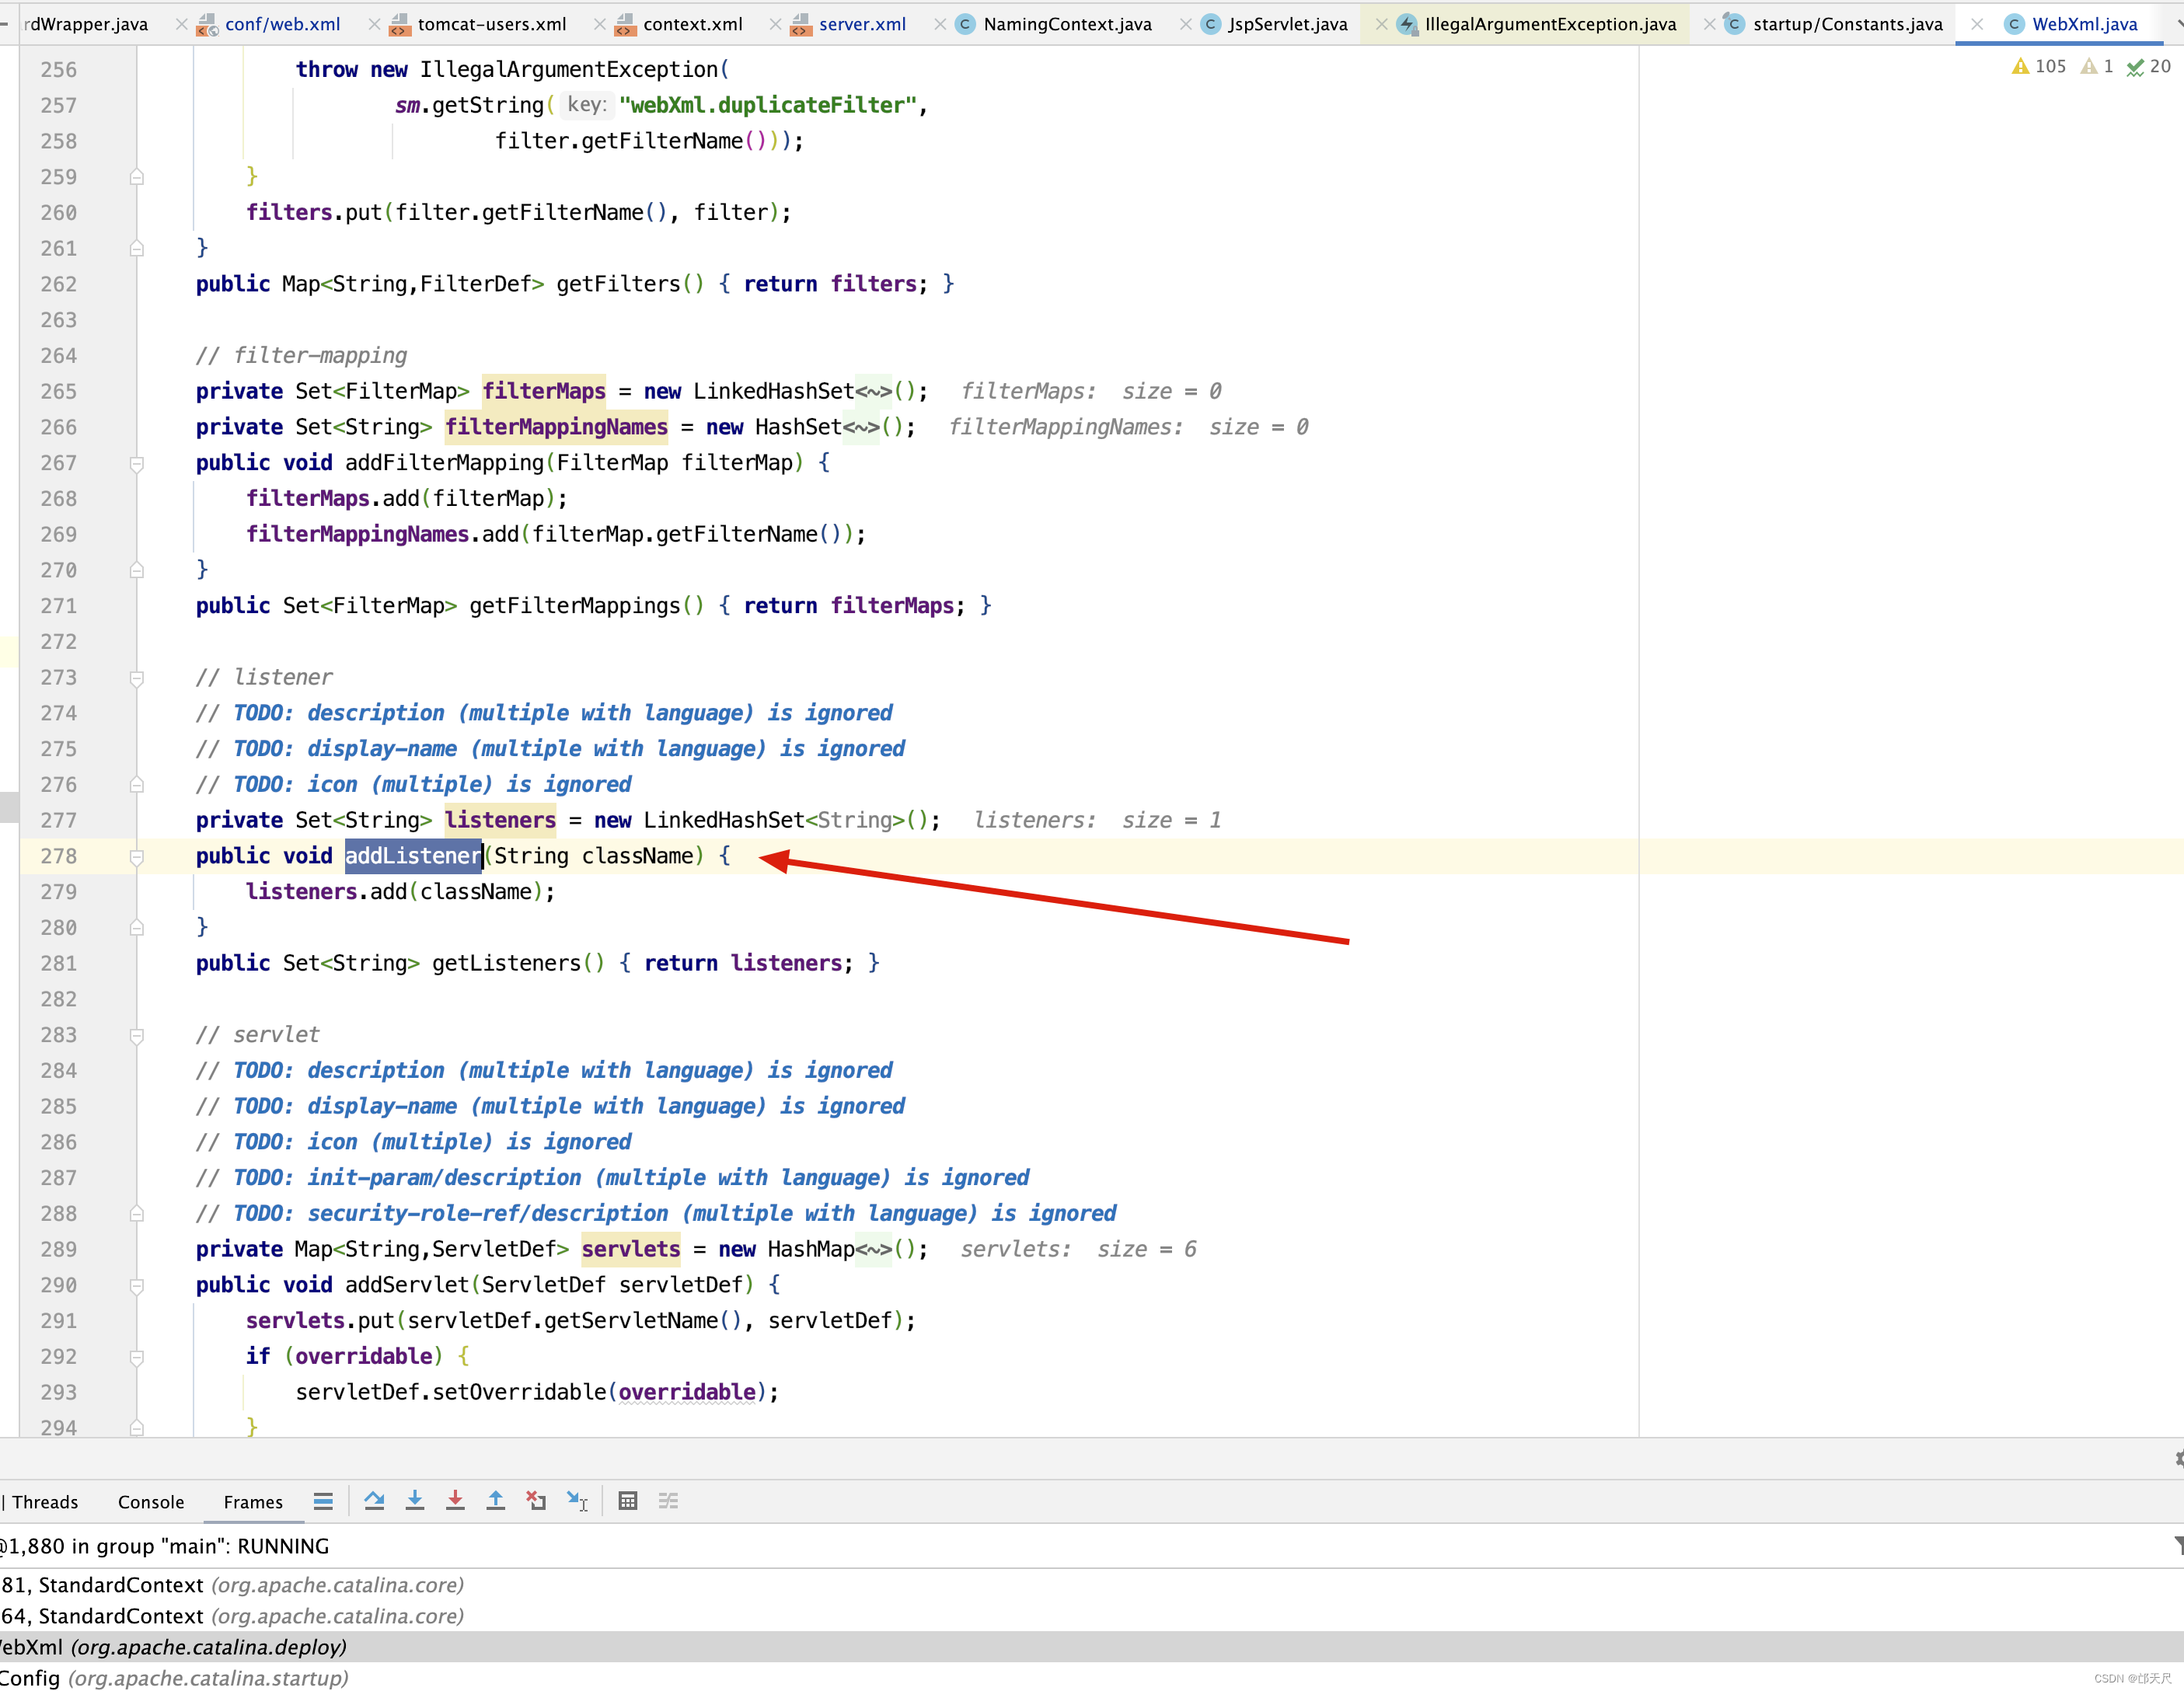
全局搜索addListener"方法,最终从WebRuleSet中得知
listener/listener-class标签。
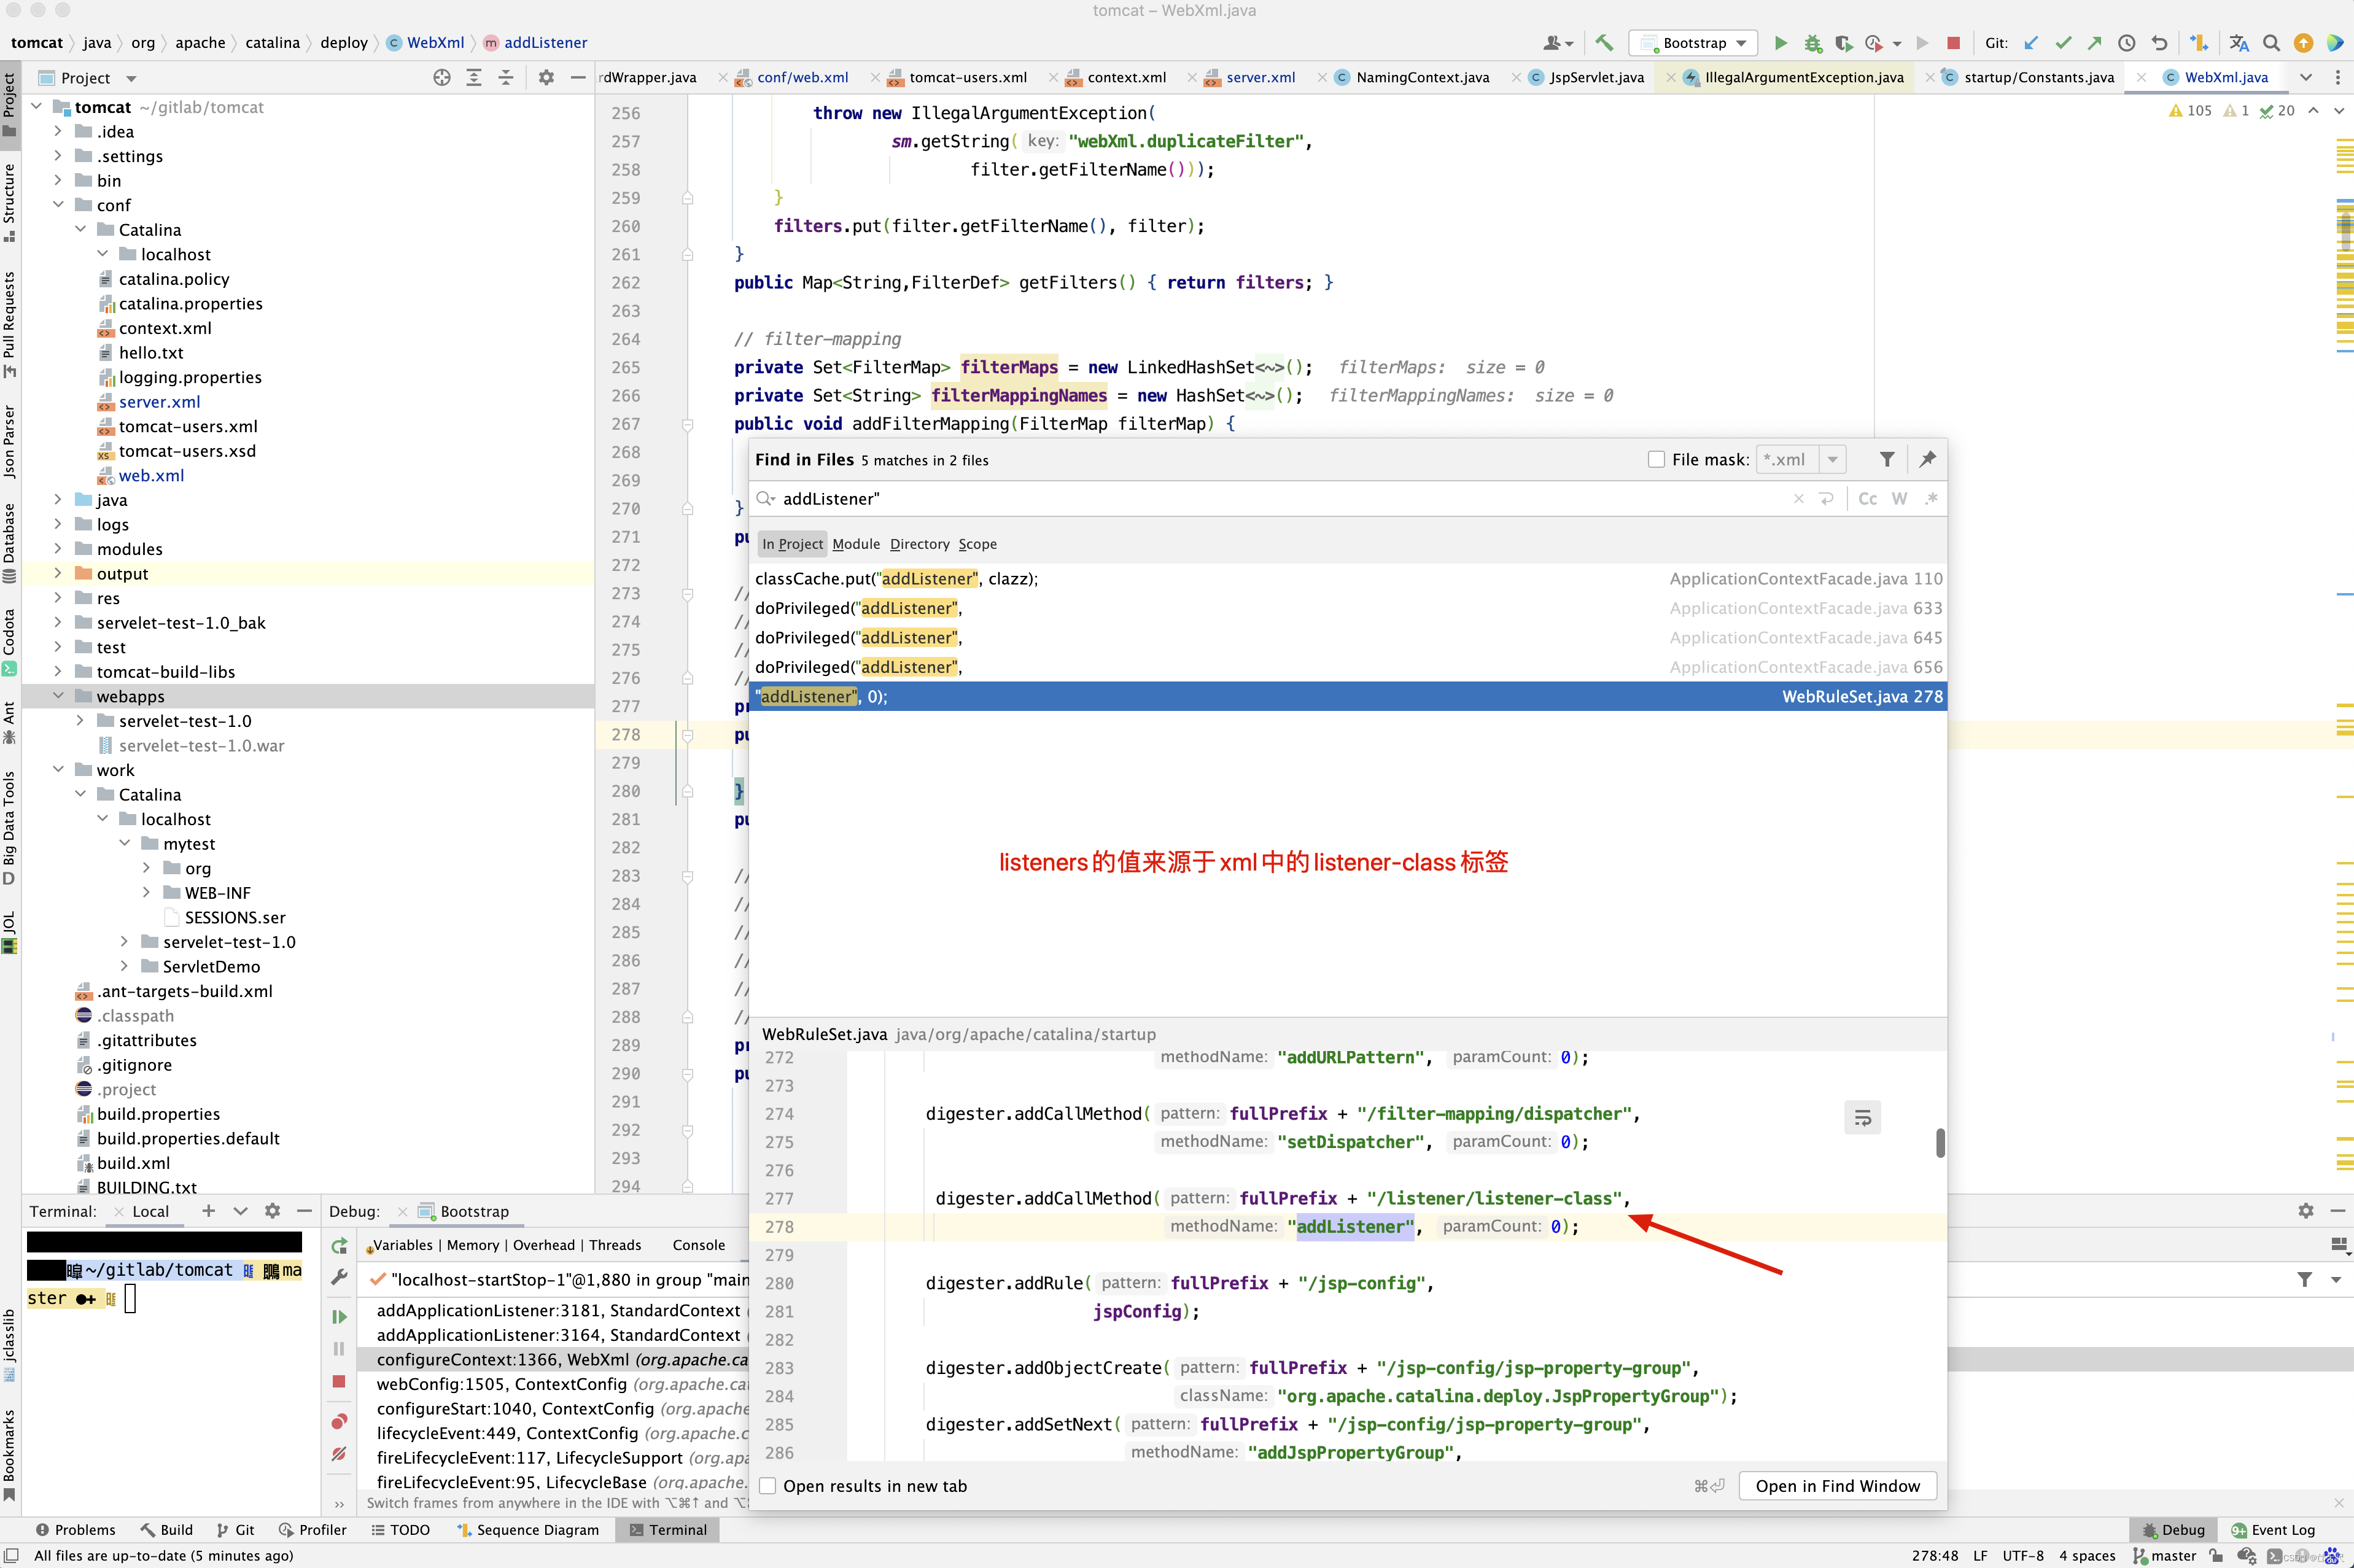
先来看loadClassAnnotation()方法。
protected static void loadClassAnnotation(Context context,
        Class<?> clazz) {
    /* Process Resource annotation.
     * Ref JSR 250
     */
    Resource resourceAnnotation = clazz.getAnnotation(Resource.class);
    if (resourceAnnotation != null) {
        addResource(context, resourceAnnotation);
    }
    /* Process Resources annotation.
     * Ref JSR 250
     */
    Resources resourcesAnnotation = clazz.getAnnotation(Resources.class);
    if (resourcesAnnotation != null && resourcesAnnotation.value() != null) {
        for (Resource resource : resourcesAnnotation.value()) {
            addResource(context, resource);
        }
    }

    DeclareRoles declareRolesAnnotation = clazz.getAnnotation(DeclareRoles.class);
    if (declareRolesAnnotation != null && declareRolesAnnotation.value() != null) {
        for (String role : declareRolesAnnotation.value()) {
            context.addSecurityRole(role);
        }
    }
}
protected static void addResource(Context context, Resource annotation) {
    addResource(context, annotation, null, null);
}
对于类上可以配置Resource和Resources注解。如果配置的是Resources注解,则取出其中的Resource注解调用addResource()方法添加到 context.getNamingResources()中。 接下来看loadFieldsAnnotation()和loadMethodsAnnotation()方法的实现。
protected static void loadFieldsAnnotation(Context context, Class<?> clazz) {
    // Initialize the annotations
    Field[] fields = Introspection.getDeclaredFields(clazz);
    if (fields != null && fields.length > 0) {
        for (Field field : fields) {
            Resource annotation = field.getAnnotation(Resource.class);
            if (annotation != null) {
                String defaultName = clazz.getName() + SEPARATOR + field.getName();
                // type 取属性的类型
                Class<?> defaultType = field.getType();
                addResource(context, annotation, defaultName, defaultType);
            }
        }
    }
}


protected static void loadMethodsAnnotation(Context context, Class<?> clazz) {
    // Initialize the annotations
    Method[] methods = Introspection.getDeclaredMethods(clazz);
    if (methods != null && methods.length > 0) {
        for (Method method : methods) {
            Resource annotation = method.getAnnotation(Resource.class);
            if (annotation != null) {
                if (!Introspection.isValidSetter(method)) {
                    throw new IllegalArgumentException(sm.getString(
                            "webAnnotationSet.invalidInjection"));
                }

                String defaultName = clazz.getName() + SEPARATOR +
                        Introspection.getPropertyName(method);
				// type 取方法的第0个参数的类型
                Class<?> defaultType = (method.getParameterTypes()[0]);
                addResource(context, annotation, defaultName, defaultType);
            }
        }
    }
}
无论是类,方法,还是属性都指向了addResource()方法,进入addResource()方法 。
protected static void addResource(Context context, Resource annotation, String defaultName,
        Class<?> defaultType) {
    String name = getName(annotation, defaultName);
    String type = getType(annotation, defaultType);

    if (type.equals("java.lang.String") ||
            type.equals("java.lang.Character") ||
            type.equals("java.lang.Integer") ||
            type.equals("java.lang.Boolean") ||
            type.equals("java.lang.Double") ||
            type.equals("java.lang.Byte") ||
            type.equals("java.lang.Short") ||
            type.equals("java.lang.Long") ||
            type.equals("java.lang.Float")) {

        // env-entry element
        ContextEnvironment resource = new ContextEnvironment();

        resource.setName(name);
        resource.setType(type);
        resource.setDescription(annotation.description());
        resource.setProperty(MAPPED_NAME_PROPERTY, annotation.mappedName());
        if (JreCompat.getInstance().isCommonsAnnotations1_1Available()) {
            resource.setLookupName(annotation.lookup());
        }

        context.getNamingResources().addEnvironment(resource);

    } else if (type.equals("javax.xml.rpc.Service")) {

        // service-ref element
        ContextService service = new ContextService();

        service.setName(name);
        service.setWsdlfile(annotation.mappedName());
        service.setType(type);
        service.setDescription(annotation.description());
        if (JreCompat.getInstance().isCommonsAnnotations1_1Available()) {
            service.setLookupName(annotation.lookup());
        }

        context.getNamingResources().addService(service);

    } else if (type.equals("javax.sql.DataSource") ||
            type.equals("javax.jms.ConnectionFactory") ||
            type.equals("javax.jms.QueueConnectionFactory") ||
            type.equals("javax.jms.TopicConnectionFactory") ||
            type.equals("javax.mail.Session") ||
            type.equals("java.net.URL") ||
            type.equals("javax.resource.cci.ConnectionFactory") ||
            type.equals("org.omg.CORBA_2_3.ORB") ||
            type.endsWith("ConnectionFactory")) {

        // resource-ref element
        ContextResource resource = new ContextResource();

        resource.setName(name);
        resource.setType(type);

        if (annotation.authenticationType() == Resource.AuthenticationType.CONTAINER) {
            resource.setAuth("Container");
        } else if (annotation.authenticationType() == Resource.AuthenticationType.APPLICATION) {
            resource.setAuth("Application");
        }

        resource.setScope(annotation.shareable() ? "Shareable" : "Unshareable");
        resource.setProperty(MAPPED_NAME_PROPERTY, annotation.mappedName());
        resource.setDescription(annotation.description());
        if (JreCompat.getInstance().isCommonsAnnotations1_1Available()) {
            resource.setLookupName(annotation.lookup());
        }

        context.getNamingResources().addResource(resource);

    } else if (type.equals("javax.jms.Queue") ||
            type.equals("javax.jms.Topic")) {

        // message-destination-ref
        MessageDestinationRef resource = new MessageDestinationRef();

        resource.setName(name);
        resource.setType(type);
        resource.setUsage(annotation.mappedName());
        resource.setDescription(annotation.description());
        if (JreCompat.getInstance().isCommonsAnnotations1_1Available()) {
            resource.setLookupName(annotation.lookup());
        }
        context.getNamingResources().addMessageDestinationRef(resource);
    } else {
        /*
         * General case. Also used for:
         * - javax.resource.cci.InteractionSpec
         * - javax.transaction.UserTransaction
         */

        // resource-env-ref
        ContextResourceEnvRef resource = new ContextResourceEnvRef();

        resource.setName(name);
        resource.setType(type);
        resource.setProperty(MAPPED_NAME_PROPERTY, annotation.mappedName());
        resource.setDescription(annotation.description());
        if (JreCompat.getInstance().isCommonsAnnotations1_1Available()) {
            resource.setLookupName(annotation.lookup());
        }
        context.getNamingResources().addResourceEnvRef(resource);
    }
}
大家看到这里,肯定弄晕了,不知道这个方法用来做什么?那来看两个例子吧。
- 在catalina.base/conf/server.xml 中添加如下加粗代码
<?xml version='1.0' encoding='utf-8'?>
<Server port="8005" shutdown="SHUTDOWN">
      <Resource
              name="jdbc/mysql"
              auth="Container"
              type="javax.sql.DataSource"
              driverClassName="com.mysql.jdbc.Driver"
              url="jdbc:mysql://172.16.157.238:3306/lz_test"
              username="ldd_biz"
              password="Hello1234"
              maxActive="5"
              maxIdle="2"
              maxWait="10000"/>


  </GlobalNamingResources>
  <Service name="Catalina">

    <Connector port="8009" protocol="AJP/1.3" redirectPort="8443" />
    <Engine name="Catalina" defaultHost="localhost" >

      <Host name="localhost"  appBase="webapps"
            unpackWARs="true" autoDeploy="true" copyXML="true" deployIgnore="[1][3-9][0-9]{9}">

        <Context path="/servelet-test-1.0"  docBase="servelet-test-1.0" >
          <ResourceLink global="jdbc/mysql" name="jdbc/mysql" type="javax.sql.DataSource" />
        </Context>

        <Valve className="org.apache.catalina.valves.ErrorReportValve" showServerInfo ="false" />


        <Valve className="org.apache.catalina.valves.AccessLogValve" directory="logs"
               prefix="localhost_access_log." suffix=".txt"
               pattern="%h %l %u %t "%r" %s %b" />

      </Host>
    </Engine>
  </Service>
</Server>
- 在servlet-test项目目录下web.xml中添加listener-class
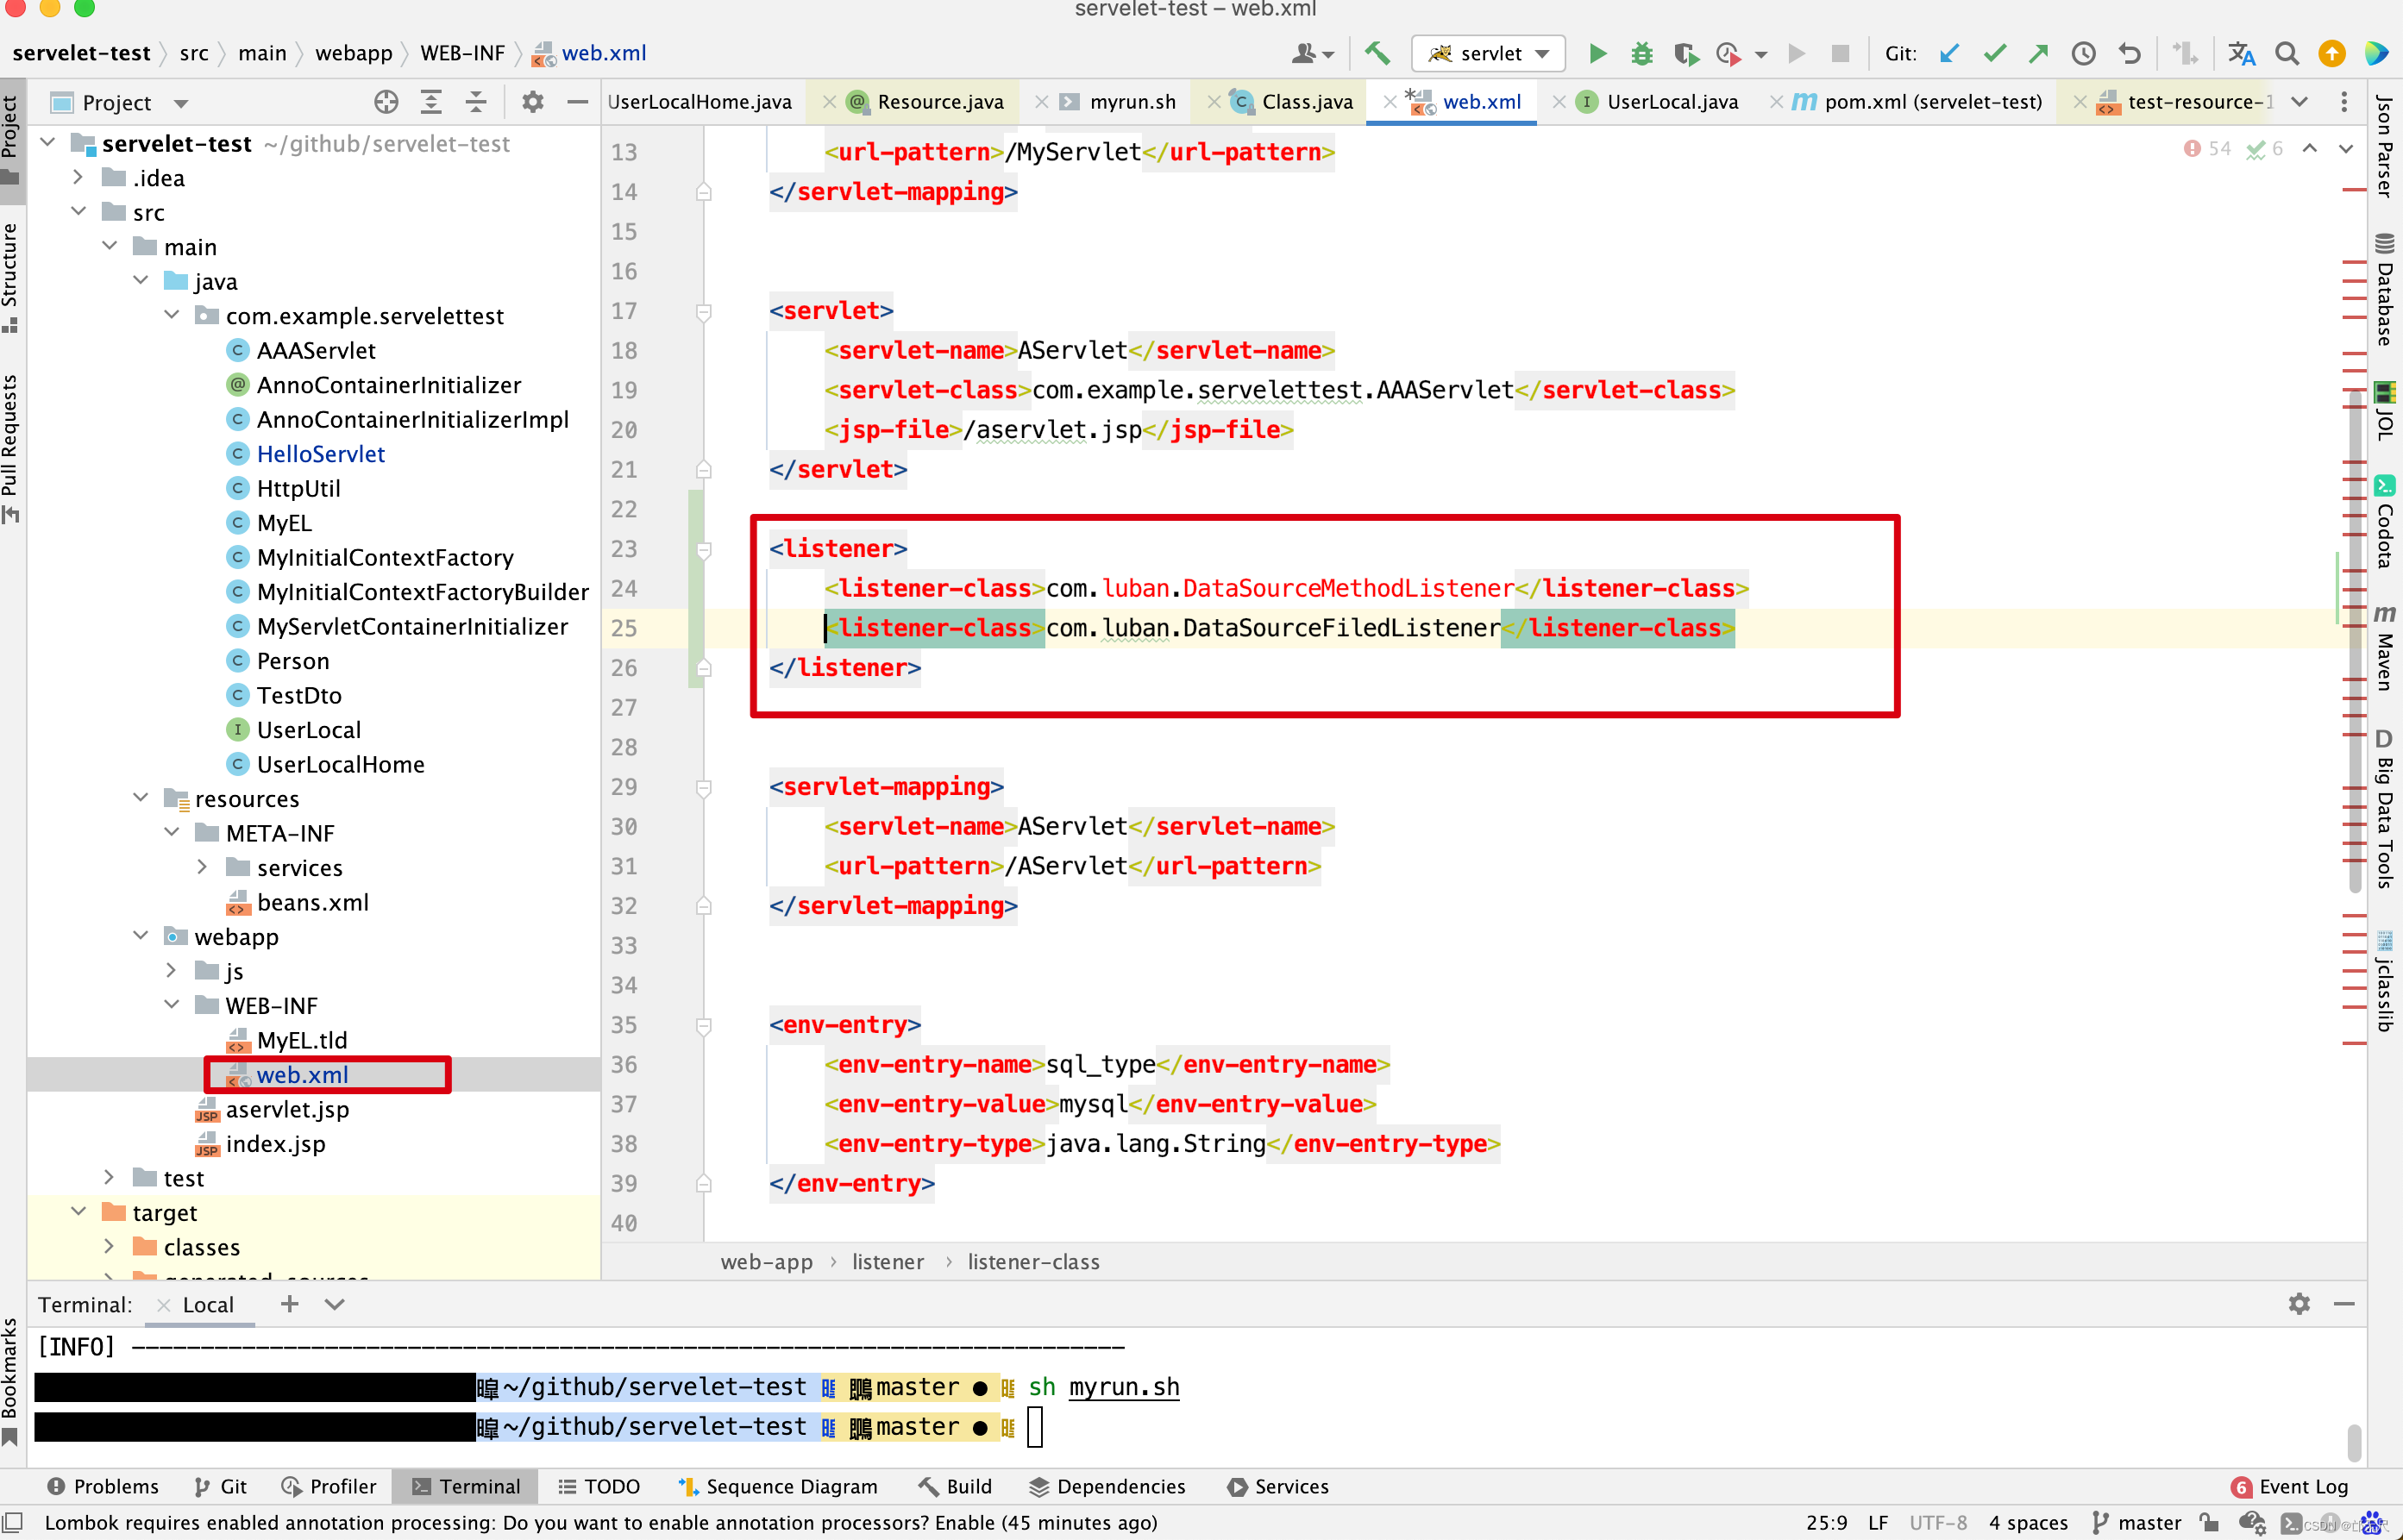
<?xml version="1.0" encoding="UTF-8"?>
<web-app xmlns:xsi="http://www.w3.org/2001/XMLSchema-instance"
         xsi:schemaLocation="http://xmlns.jcp.org/xml/ns/javaee"
         version="3.1" xmlns="http://xmlns.jcp.org/xml/ns/javaee">

    <servlet>
        <servlet-name>my</servlet-name>
        <servlet-class>com.example.servelettest.HelloServlet</servlet-class>
    </servlet>

    <servlet-mapping>
        <servlet-name>my</servlet-name>
        <url-pattern>/MyServlet</url-pattern>
    </servlet-mapping>


    <servlet>
        <servlet-name>AServlet</servlet-name>
        <servlet-class>com.example.servelettest.AAAServlet</servlet-class>
        <jsp-file>/aservlet.jsp</jsp-file>
    </servlet>

    <listener>
        <listener-class>com.luban.DataSourceMethodListener</listener-class>
        <listener-class>com.luban.DataSourceFiledListener</listener-class>
    </listener>


    <servlet-mapping>
        <servlet-name>AServlet</servlet-name>
        <url-pattern>/AServlet</url-pattern>
    </servlet-mapping>


    <env-entry>
        <env-entry-name>sql_type</env-entry-name>
        <env-entry-value>mysql</env-entry-value>
        <env-entry-type>java.lang.String</env-entry-type>
    </env-entry>


    <ejb-local-ref>
        <ejb-ref-name>LocalUserBean</ejb-ref-name>
        <ejb-ref-type>Session</ejb-ref-type>
        <local-home>com.example.servelettest.UserLocalHome</local-home>
        <local>com.example.servelettest.UserLocal</local>
    </ejb-local-ref>

</web-app>
- 创建DataSourceFiledListener和DataSourceMethodListener类,值得注意,将DataSourceFiledListener和DataSourceMethodListener两个类放到tomcat的代码中,而不放在项目servelet-test下,主要是方便打断点调试。而这两个类的目的就是从NamingContext中取出java:comp/env/jdbc/mysql,将值注入到dataSource属性中,有了dataSource,当然可以查询数据库了。
public class DataSourceFiledListener implements ServletContextListener {

    @Resource(lookup = "java:comp/env/jdbc/mysql")
    private DataSource dataSource;


    @Override
    public void contextInitialized(ServletContextEvent sce) {
        System.out.println("……监听开始111……");
        Context ctx = null;
        Connection con = null;
        Statement stmt = null;
        ResultSet rs = null;

        try {
            System.out.println(dataSource);
            System.out.println("bbb============================" + dataSource);
            con = dataSource.getConnection();
            System.out.println("==con=====" + con);
            stmt = con.createStatement();
            System.out.println("==stmt=====" + stmt);
            rs = stmt.executeQuery("select * from lt_company ");
            while(rs.next()) {
                System.out.println( rs.getInt("id") + " " + rs.getInt("is_delete") + " " + rs.getString("company_name") + " ");
            }
        } catch (SQLException e) {
            e.printStackTrace();
        }

    }

    @Override
    public void contextDestroyed(ServletContextEvent sce) {

    }
}

public class DataSourceMethodListener implements ServletContextListener {
    private DataSource dataSource;

    @Resource(lookup = "java:comp/env/jdbc/mysql")
    public void setDataSource( DataSource dataSource){
        this.dataSource =  dataSource;
    }

    @Override
    public void contextInitialized(ServletContextEvent sce) {
        System.out.println("……监听开始222222……");
        Context ctx = null;
        Connection con = null;
        Statement stmt = null;
        ResultSet rs = null;
        try {
            System.out.println(dataSource);
            System.out.println("bbb============================" + dataSource);
            con = dataSource.getConnection();
            System.out.println("==con=====" + con);
            stmt = con.createStatement();
            System.out.println("==stmt=====" + stmt);
            rs = stmt.executeQuery("select * from lt_company ");
            while(rs.next()) {
                System.out.println( rs.getInt("id") + " " + rs.getInt("is_delete") + " " + rs.getString("company_name") + " ");
            }
        } catch (SQLException e) {
            e.printStackTrace();
        }
    }

    @Override
    public void contextDestroyed(ServletContextEvent sce) {

    }
}
- 结果输出
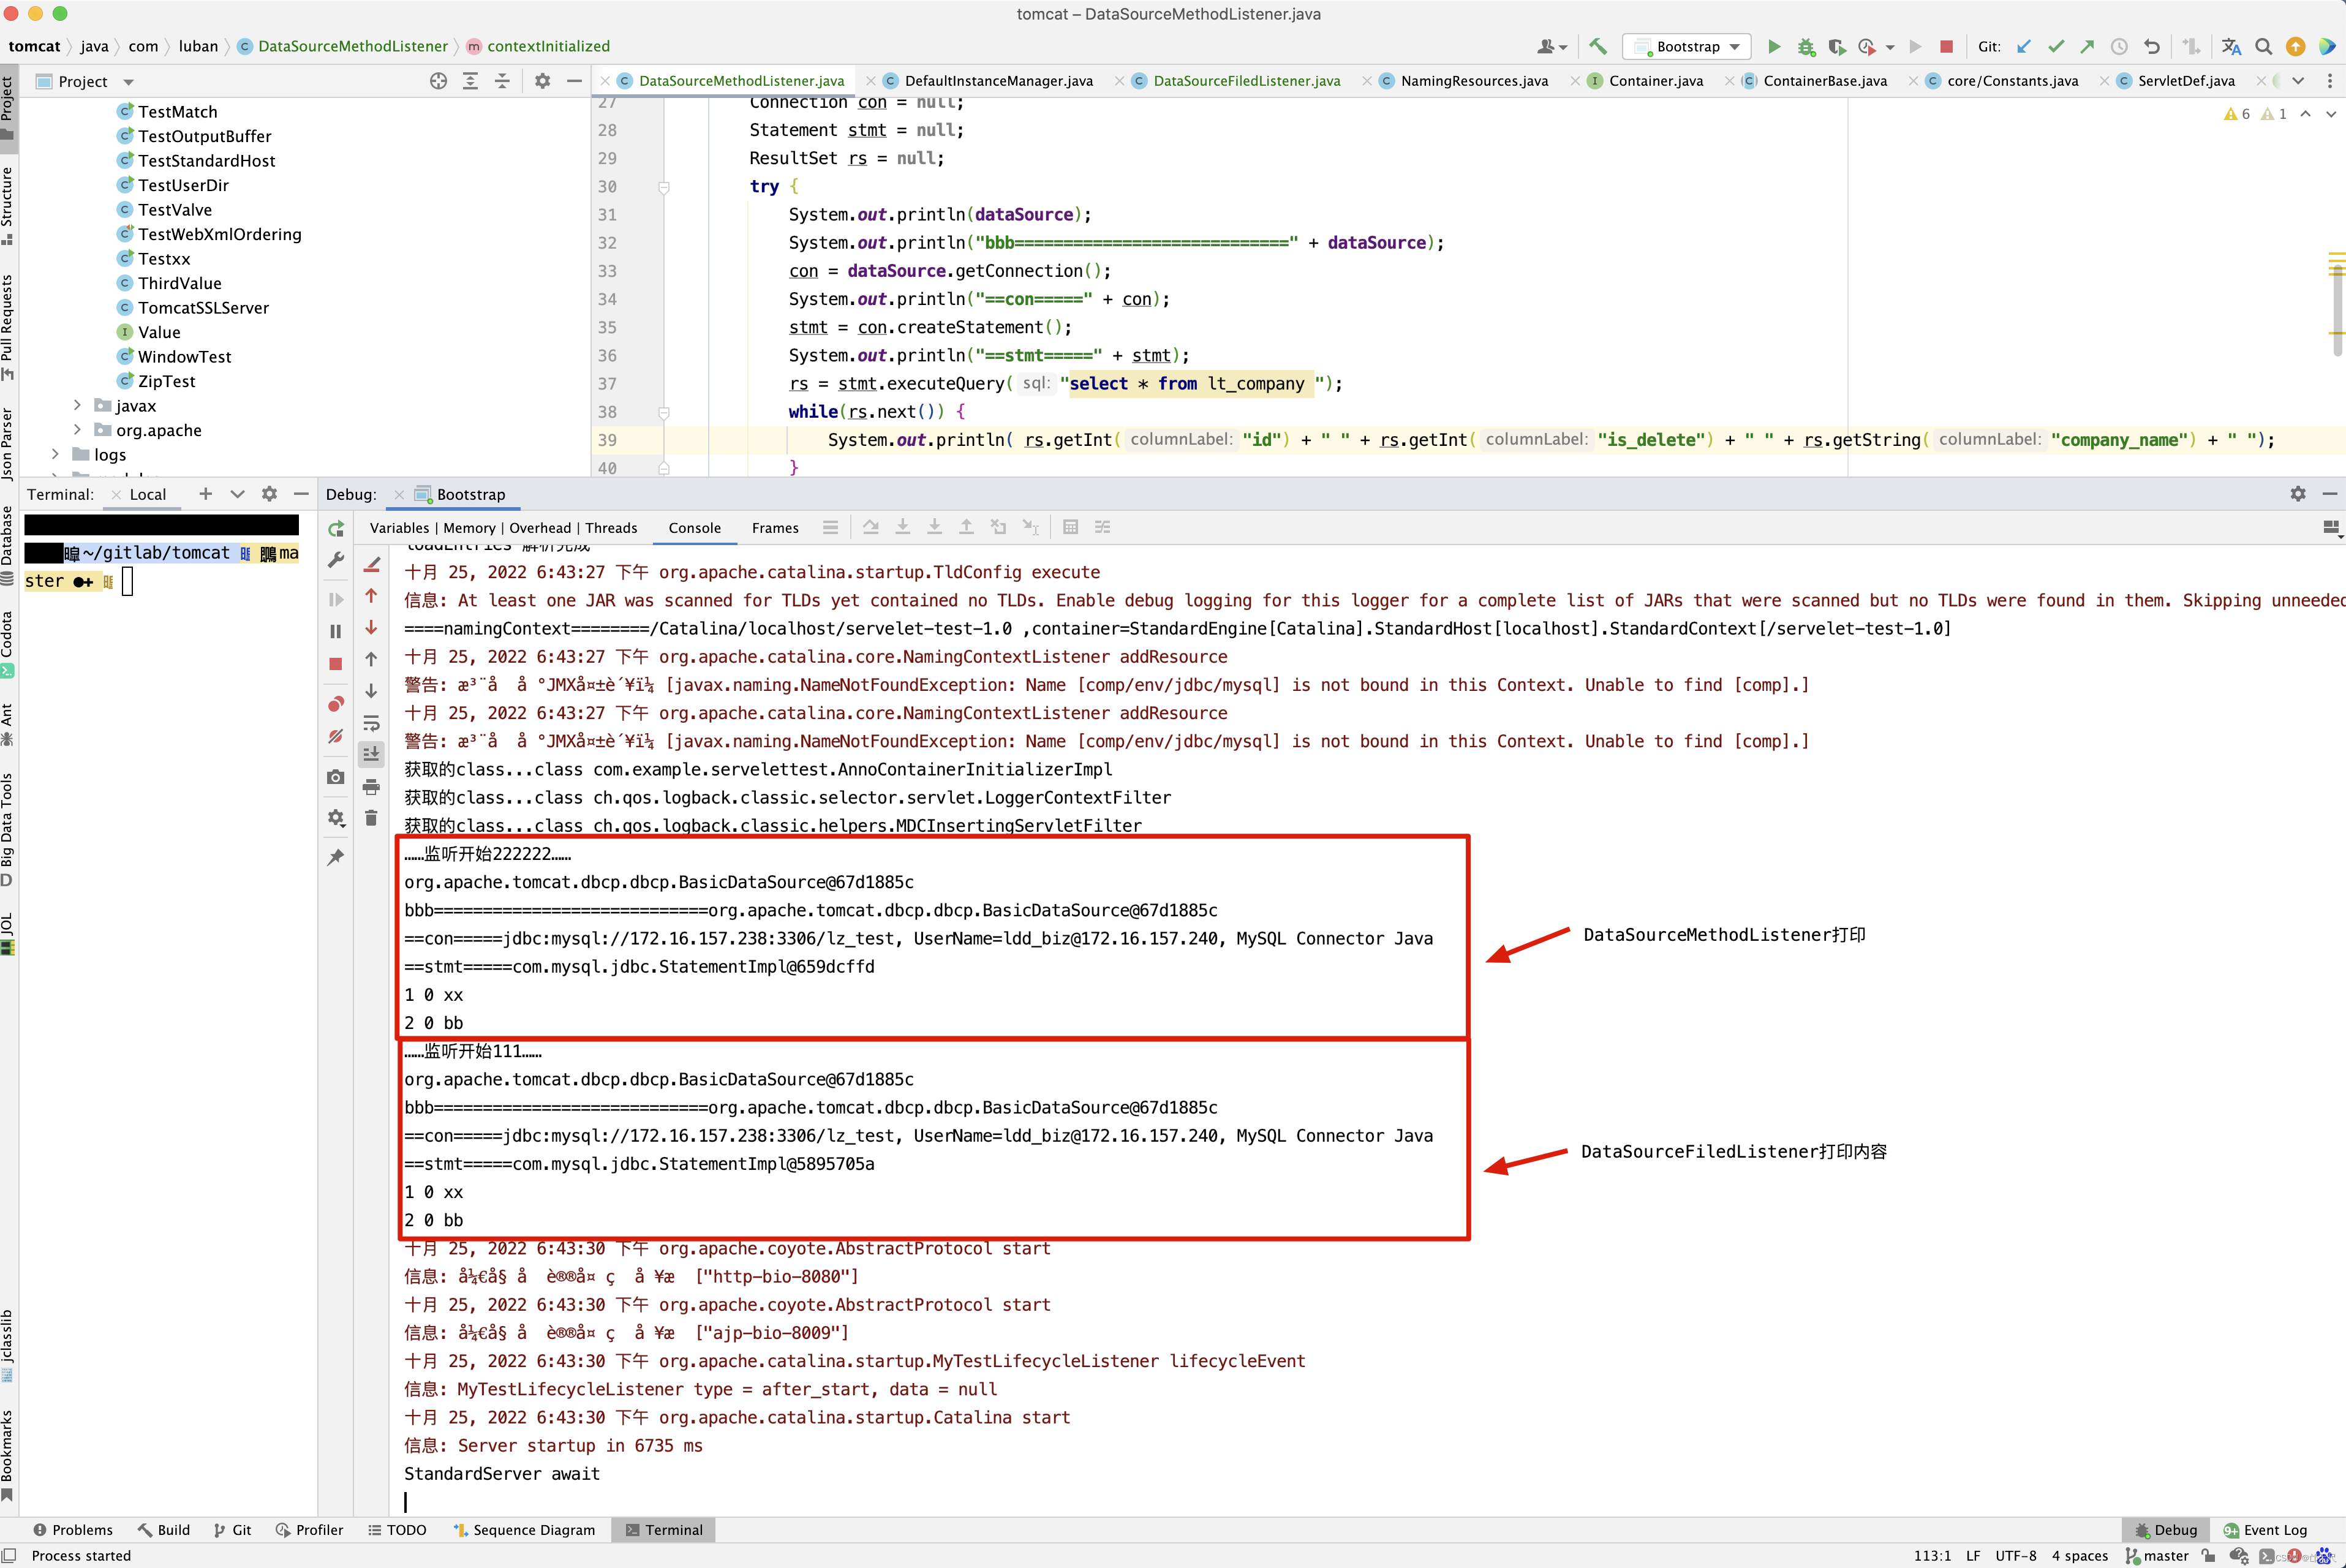
关于ServletContextListener的实现原理,在分析listenerStart()方法时再来分析了。 当然关于@Resource注解配置在类上的作用,目前我也还没有想明白,如果有知道的小伙伴给我留言哈。
关于configureStart()用户授权,验证这一块不做分析,如果以后有时间再来分析了吧。到这里configureStart()方法的分析也告一段落。
因为篇幅问题,请接着看 Tomcat 源码解析一容器加载-大寂灭指(下)


 5092
5092


 被折叠的 条评论
为什么被折叠?
被折叠的 条评论
为什么被折叠?
 到【灌水乐园】发言


