


在使用springboot starter时简直不要太爽,只需要简单引入pom包,写一下配置文件就ok了,不仅如此在写配置时还有默认值或者注释的文字提示,怎么做到的?实际开发中,如果我们使用自己定义starter,代码逼格瞬间飙升。
Swagger是我们后端开发的一大利器,下面就通过实际代码演示一下如何自定义Swagger2 starter
1. 引入maven依赖
<dependencies>
    <dependency>
        <groupId>org.springframework.boot</groupId>
        <artifactId>spring-boot-starter</artifactId>
        <optional>true</optional>
    </dependency>

    <dependency>
        <groupId>org.springframework.boot</groupId>
        <artifactId>spring-boot-configuration-processor</artifactId>
        <optional>true</optional>
    </dependency>

    <dependency>
        <groupId>io.springfox</groupId>
        <artifactId>springfox-swagger2</artifactId>
        <version>2.9.2</version>
    </dependency>
    <dependency>
        <groupId>io.springfox</groupId>
        <artifactId>springfox-swagger-ui</artifactId>
        <version>2.9.2</version>
    </dependency>
</dependencies>
只给出了Swagger2版本号,自己也可以使用最新版本号,springboot版本自己随意
2. 定义Configuration Properties文件
@ConfigurationProperties(prefix = "swagger2")
@Data
public class Swagger2Properties {
    /**
     * API标题
     */
    private String title;
    /**
     * API描述
     */
    private String description;
    /**
     * API版本
     */
    private String version = "1.0";
    /**
     * controller所在的包
     */
    private String basePackage;
    /**
     * 联系人信息
     */
    private Contact contact;

    @Data
    public static class Contact {
        /**
         * 姓名
         */
        private String name;
        /**
         * 博客地址
         */
        private String url;
        /**
         * 邮箱
         */
        private String email;
    }
}
定义了常用属性,其他属性可以根据需要自定添加
3. Swagger2配置类
@EnableConfigurationProperties(Swagger2Properties.class)
@Slf4j
public class Swagger2Configuration {
    private final Environment environment;

    public Swagger2Configuration(Environment environment) {
        this.environment = environment;
    }

    @Bean
    public Docket createRestApi(Swagger2Properties properties) {
        log.info("Swagger config properties:{}", properties);
        String serverPort = environment.getProperty("server.port");
        serverPort = null == serverPort ? "8080" : serverPort;
        log.info("Swagger api address:http://{}:{}/swagger-ui.html", this.getIpAddress(), serverPort);
        return new Docket(DocumentationType.SWAGGER_2)
                .pathMapping("/")
                .select()
                .apis(RequestHandlerSelectors.basePackage(properties.getBasePackage()))
                .paths(PathSelectors.any())
                .build().apiInfo(new ApiInfoBuilder()
                        .title(properties.getTitle())
                        .description(properties.getDescription())
                        .version(properties.getVersion())
                        .contact(new Contact(properties.getContact().getName(), properties.getContact().getUrl(), properties.getContact().getEmail()))
                        .build());
    }

    /**
     * 获取开发机器IP
     */
    public  String getIpAddress() {
        try {
            Enumeration<NetworkInterface> allNetInterfaces = NetworkInterface.getNetworkInterfaces();
            while (allNetInterfaces.hasMoreElements()) {
                NetworkInterface netInterface = allNetInterfaces.nextElement();
                //if (netInterface.isLoopback() || netInterface.isVirtual() || !netInterface.isUp())
                if (!netInterface.isLoopback() && !netInterface.isVirtual() && netInterface.isUp()) {
                    Enumeration<InetAddress> addresses = netInterface.getInetAddresses();
                    while (addresses.hasMoreElements()) {
                        InetAddress ip = addresses.nextElement();
                        if (ip instanceof Inet4Address) {
                            return ip.getHostAddress();
                        }
                    }
                }
            }
        } catch (Exception e) {
            System.err.println("IP地址获取失败" + e.toString());
        }
        return "";
    }
}
注解“@EnableConfigurationProperties”的作用是引入Swagger的属性配置
4. 添加spring.factories配置
在资源文件夹resources下创建META-INF文件夹,在该文件夹下创建spring.factories文件

在该文件中添加自动装配类
org.springframework.boot.autoconfigure.EnableAutoConfiguration=\
  com.cle.Swagger2Configuration,\
  springfox.documentation.swagger2.configuration.Swagger2DocumentationConfiguration
注意:springfox.documentation.swagger2.configuration.Swagger2DocumentationConfiguration该类一定要添加进来,否则会启动报错
4. 安装
starter组件已经开发完成了,用maven install到本地maven仓库就可以其它模块中引用了
5. 使用
-
在项目中引入开发好的starter pom
<dependency> <artifactId>swagger2-spring-boot-starter</artifactId> <groupId>per.cyl</groupId> <version>0.0.1-SNAPSHOT</version> </dependency> -
修改配置文件
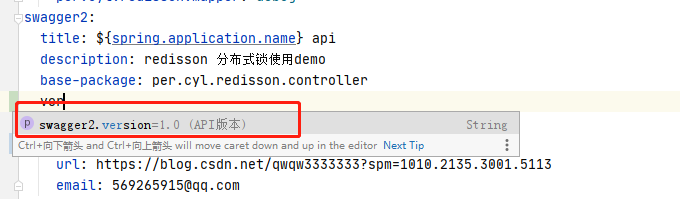
写配置时已经有了注释和默认值的提示,下面是完整的配置
swagger2:
  title: ${spring.application.name} api
  description: redisson 分布式锁使用demo
  base-package: per.cyl.redisson.controller
  version: 1.0.0
  contact:
    name: chenyl
    url: https://blog.csdn.net/qwqw3333333?spm=1010.2135.3001.5113
    email: 569265915@qq.com
项目跑起来后的效果:

总结
springboot 会扫描所有spring.factories中配置的类,将它们加载到IOC容器中,使用者只需要引入依赖,配置必不可少或者自己需要的参数就可以达到开箱即用的效果,避免了手动创建配置类,注入对象等操作。


 6228
6228


 被折叠的 条评论
为什么被折叠?
被折叠的 条评论
为什么被折叠?
 到【灌水乐园】发言


