


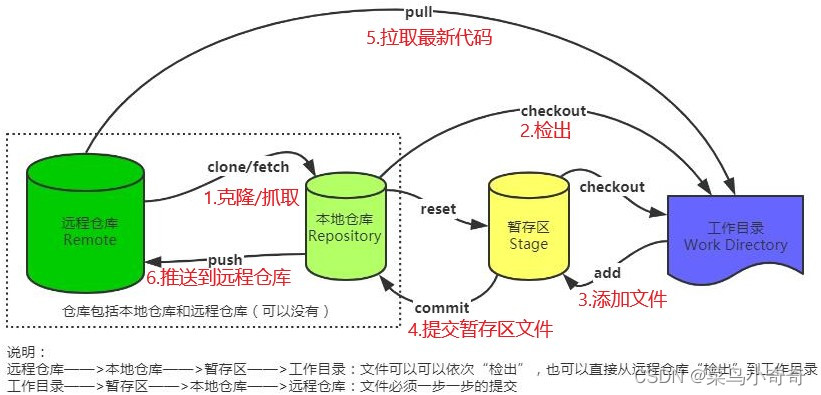
git 初始化及复制远程代码到本地
$ git init # 初始化一个git仓库
$ git clone '仓库路径' # clone远程分支到本地 (git clone git://git.kernel.org/pub/scm/git/git.git)
git 分支操作
$ git branch branch_name # 创建新分支
$ git branch -a # 查看所有分支
$ git merge dev # 合并dev分支
$ git branch -d dev # 删除dev分支
$ git switch -c dev # 创建并切换至dev分支 (等同于 git checkout -b dev)
$ git switch master # 切换至master分支
$ git checkout new_branch # 切换到新分支
$ git checkout -b new_branch # 创建并切换至新分支(相当于:git branch new_branch && git checkout new_branch)
git 合并分支,取消合并
# develop分支合并到master分支
$ git checkout master # 1.先切换到master分支
$ git merge develop  # 2.合并develop分支到master
$ git merge --abort # 取消合并
git 暂存,删除,拉取,提交代码
$ git add [file1] [file2] # 添加修改到暂存区
$ git rm [file1] [file2] # 删除本地分支文件
$ git rm --cached filename # 只删除暂存区文件而不会删除本地文件
$ git status # 查看当前分支的修改情况
$ git stash # 暂存(每次提交前,先暂存本地修改,然后在拉去最新代码,避免冲突)
$ git reset HEAD # 暂存区的目录树会被重写,被 master 分支指向的目录树所替换,但是工作区不受影响
$ git stash pop # 取出暂存区代码(git pull 之后在pop 出本地暂存区代码,然后提交,避免冲突)
$ git pull # 拉取远程最新代码
$ git commit -m 'comment' # 将暂存区内容添加到本地仓库中
$ git commit -am "comment" # (等价于git add file1 && git commit file1)
$ git push # 推送commit到远程分支
$ git push origin HEAD:master # 基于本地分支推送commit到远程分支
$ git push -u origin master # 将本地的master分支推送到origin主机,并指定 origin 为默认远程分支
查看git 版本,远程,分支版本
$ git version # 查看git版本
$ git remote -v # 查看仓库信息
$ git branch -v # 查看各个分支最后一个提交信息
$ git branch -r # 查看远程分支
git cherry-pick
$ git cherry-pick hashId # 将其他分支的提交同步到当前分支
$ git cherry-pick hash_a_id^..hash_a_id # 将其他分支的提交同步到其他分支
$ git cherry-pick hash_a_id..hash_a_id # 将其他分支的提交同步到其他分支
git 本地分支关联(主机)上游分支
# 设置localBranch和主机(origin/master)的关联
$ git branch --set-upstream-to=origin/master your_local_branch
以上命令其实可以解决我们日常开发中的大部分工作需要,但是,作为专业程序员的我们,难道就仅仅满足于这点需求?
git 命令之强大令人叹服!
git 基础配置(方便和简化在命令行操作)
# 配置全局用户
$ git config --global user.name "用户名"
$ git config --global user.email zhansan@qq.com # 如果去掉 --global 参数只对当前仓库有效

# 配置别名alias,方便命令行快速操作,提高工作效率
$ git config --global alias.ck checkout
$ git config --global alias.st status
$ git config --global alias.com commit
$ git config --global alias.br branch
$ git config --global alias.ref reflog

# 定制log的输出形式,实际使用时可以在git lg后面加命令参数,如:git lg -10 显示最近10条提交记录,方便查看,提高效率
$ git config --global alias.lg "log --color --graph --pretty=format:'%Cred%h%Creset -%C(yellow)%d%Creset %s %Cgreen(%cr) %C(bold blue)%Creset'"

# 删除全局配置
$ git config --global --unset alias.xxx
查看git 配置信息
# 查看系统配置
$ git config --list
# 查看用户配置
$ cat ~/.gitconfig
# 查看当前项目的git配置
$ cat .git/config
# 查看暂存区的文件
$ git ls-files
# 查看本地分支所有操作记录
$ git reflog
# 查看所有git命令
$ git --help -a
# 查看当前HEAD指向
$ cat .git/HEAD
git 查看提交日志操作
$ git log --oneline  # oneline -> 一行一行的显示
          --grep="关键字" # grep="关键字" -> 通过关键字查找日志记录中(commit提交时的注释)
          --before= 1 day/1 week/1 "2019-06-06" # before -> 查找规定的时间(如:1天/1周)之前的记录
          --after="2019-06-06"
          --stat # stat -> 显示每次更新的文件修改统计信息,会列出具体文件列表
          --graph # graph -> 记录以图形化显示
          --all   # all -> 将所有记录都详细的显示出来
          --author "username"  # git log --author 'admin' -> 通过提交者查询
          --reverse # reverse -> commit 通过倒序查询
          -num # num -> git log -10 显示最近10次的提交记录
          --abbrev-commit # 缩略式的现实记录
          --pretty=format:"xxx" # pretty=format:"xxx" ->  可以定制要显示的记录格式

$ git log --pretty=oneline
$ git log --graph --pretty=oneline --abbrev-commit
$ git log --author 'username'
$ git log --grep="修改" # 查找提交记录中含有'修改'关键字的记录
$ git blame <file>  # 以列表形式查看指定文件的历史修改记录
$ git log --reverse # --reverse 参数来逆向显示所有日志
$ git log --reverse --oneline # 逆序一行一行的显示
查看git 安装目录
$ where git # Windows: 打开cmd,输入 where git,查看git的安装路径
git查看所有分支操作
$ git reflog # 查看所有分支的操作记录,包括已删除的分支
git 版本回退
$ git reset--hard HEAD^
# 回退到指定版本
$ git reset--hard 9a194ffa
$ git reset HEAD readme.txt #可以把暂存区的修改撤销
git 每次提交输入密码和用户名
$ git config --system --unset credential.helper # 每次拉去代码需要重新输入用户名和密码
$ git config --global credential.helper store # 首次提示输入用户名和密码,后续就不需要再次输入了
参考:https://www.runoob.com/git/git-tutorial.html


 473
473


 被折叠的 条评论
为什么被折叠?
被折叠的 条评论
为什么被折叠?
 到【灌水乐园】发言


