


本教程使用到的IDE:
JDK1.8、MySQL5.7
一、通过maven创建项目
1.1、在eclipse中创建Maven项目
打开eclipse,File-->Maven Project,如图将两个复选框都选中

填写相关信息:
- Group Id:项目的包名(后期可以改)
- Artifact Id:项目名称(后期可以改)
打包类型选择war,如图:

1.2、目录结构
新建项目完成后的目录结构,可能会爆红,没关系暂时先不处理,如图:
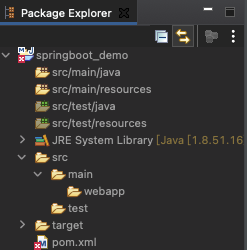
目录结构:
- src/main/java:存放Java的源文件(源代码)
- src/main/resources: 存放配置文件
- src/main/webapp:存放web相关的文件,比如html、js、jsp等
- pom.xml:构建项目所需要的所有jar包(更新maven之后,所有jar包会自动下载无需我们关心,很方便)
1.3、将以下内容替换到pom.xml中
<project xmlns="http://maven.apache.org/POM/4.0.0" xmlns:xsi="http://www.w3.org/2001/XMLSchema-instance"
xsi:schemaLocation="http://maven.apache.org/POM/4.0.0 http://maven.apache.org/xsd/maven-4.0.0.xsd">
<modelVersion>4.0.0</modelVersion>
<!-- Begin##01、添加SpringBoot的parent支持##Begin -->
<parent>
<groupId>org.springframework.boot</groupId>
<artifactId>spring-boot-starter-parent</artifactId>
<version>1.5.2.RELEASE</version>
</parent>
<!-- End##01、添加SpringBoot的parent支持##End -->
<groupId>cn.personal.qin.demos</groupId>
<artifactId>springboot_demo</artifactId>
<version>0.0.1-SNAPSHOT</version>
<packaging>war</packaging>
<dependencies>
<dependency>
<groupId>org.springframework</groupId>
<artifactId>spring-webmvc</artifactId>
</dependency>
<!-- 连接池 -->
<dependency>
<groupId>com.jolbox</groupId>
<artifactId>bonecp-spring</artifactId>
<version>0.8.0.RELEASE</version>
</dependency>
<!-- Begin##02、添加SpringBoot的Web支持##Begin -->
<dependency>
<groupId>org.springframework.boot</groupId>
<artifactId>spring-boot-starter-web</artifactId>
</dependency>
<!-- End##02、添加SpringBoot的Web支持##End -->
<!-- Begin##添加JSP支持##Begin -->
<dependency>
<groupId>org.apache.tomcat.embed</groupId>
<artifactId>tomcat-embed-jasper</artifactId>
<scope>provided</scope>
</dependency>
<!-- End##添加JSP支持##Begin -->
</dependencies>
<build>
<finalName>${project.artifactId}</finalName>
<plugins>
<!-- 资源文件拷贝插件 -->
<plugin>
<groupId>org.apache.maven.plugins</groupId>
<artifactId>maven-resources-plugin</artifactId>
<configuration>
<encoding>UTF-8</encoding>
</configuration>
</plugin>
<!-- java编译插件 -->
<plugin>
<groupId>org.apache.maven.plugins</groupId>
<artifactId>maven-compiler-plugin</artifactId>
<configuration>
<source>1.7</source>
<target>1.7</target>
<encoding>UTF-8</encoding>
</configuration>
</plugin>
<!-- Begin##03、添加SpringBoot的插件支持##Begin -->
<plugin>
<groupId>org.springframework.boot</groupId>
<artifactId>spring-boot-maven-plugin</artifactId>
</plugin>
<!-- End##03、添加SpringBoot的插件支持##End -->
</plugins>
<pluginManagement>
<plugins>
<!-- 配置Tomcat插件 -->
<plugin>
<groupId>org.apache.tomcat.maven</groupId>
<artifactId>tomcat7-maven-plugin</artifactId>
<version>2.2</version>
</plugin>
</plugins>
</pluginManagement>
</build>
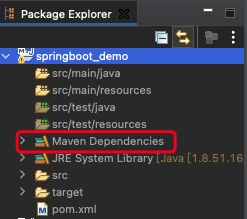
</project>1.4、更新Maven
项目鼠标右键-->Maven-->Update Project...
此时会发现,项目之前爆红的异常解决了,并且在MavenDependencies中添加了所有的jar包
二、项目开发
2.1、创建包,并创建java类
代码如下:
package org.personal.qin.demo;

import org.springframework.boot.SpringApplication;
import org.springframework.boot.autoconfigure.SpringBootApplication;
import org.springframework.context.annotation.Configuration;
import org.springframework.stereotype.Controller;
import org.springframework.web.bind.annotation.RequestMapping;
import org.springframework.web.bind.annotation.ResponseBody;

@Controller //springmvc的controller控制器
@SpringBootApplication //springboot核心注解,目的是开启自动配置,scan会自动扫描该类所在的包或者子包
@Configuration
public class MainApplication {

	@RequestMapping("hello")
	@ResponseBody
	public String hello() {
		return "hello world!";
	}

	public static void main(String[] args) {
		SpringApplication.run(MainApplication.class, args);
    }
}
通过代码可以发现,hello方法是一个controller方法,我们通过浏览器访问hello就可以访问该controller。由于SpringBoot内置了Tomcat所以Web项目不需要部署,直接运行即可:鼠标右键-->run as-->Java Application

浏览器中访问网址:http://127.0.0.1:8080/hello
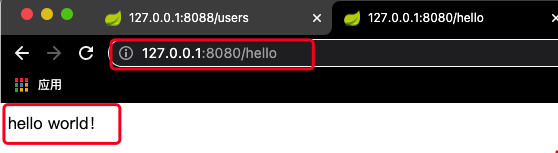
浏览器中成功访问到了controller,并且将字符串hello world!输出到了网页上


 830
830


 被折叠的 条评论
为什么被折叠?
被折叠的 条评论
为什么被折叠?
 到【灌水乐园】发言


