


文章目录
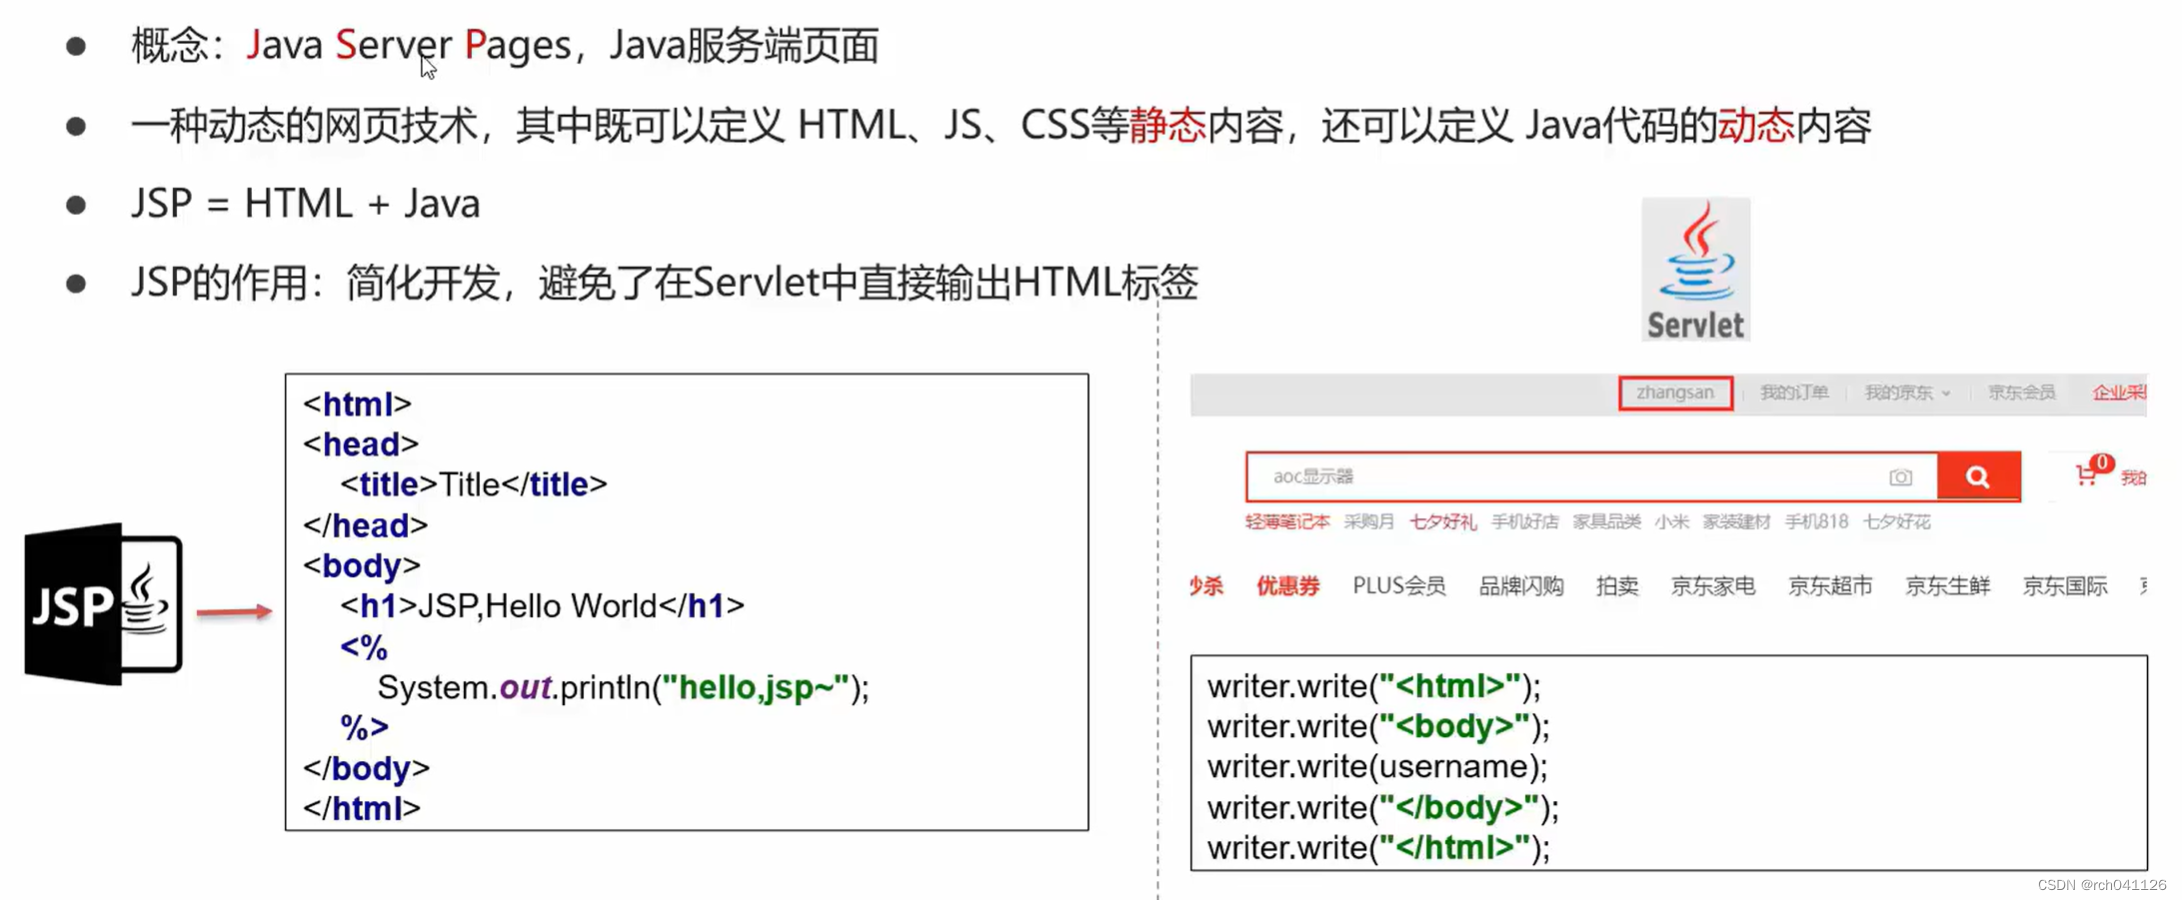
一、JSP概述
二、JSP快熟入门
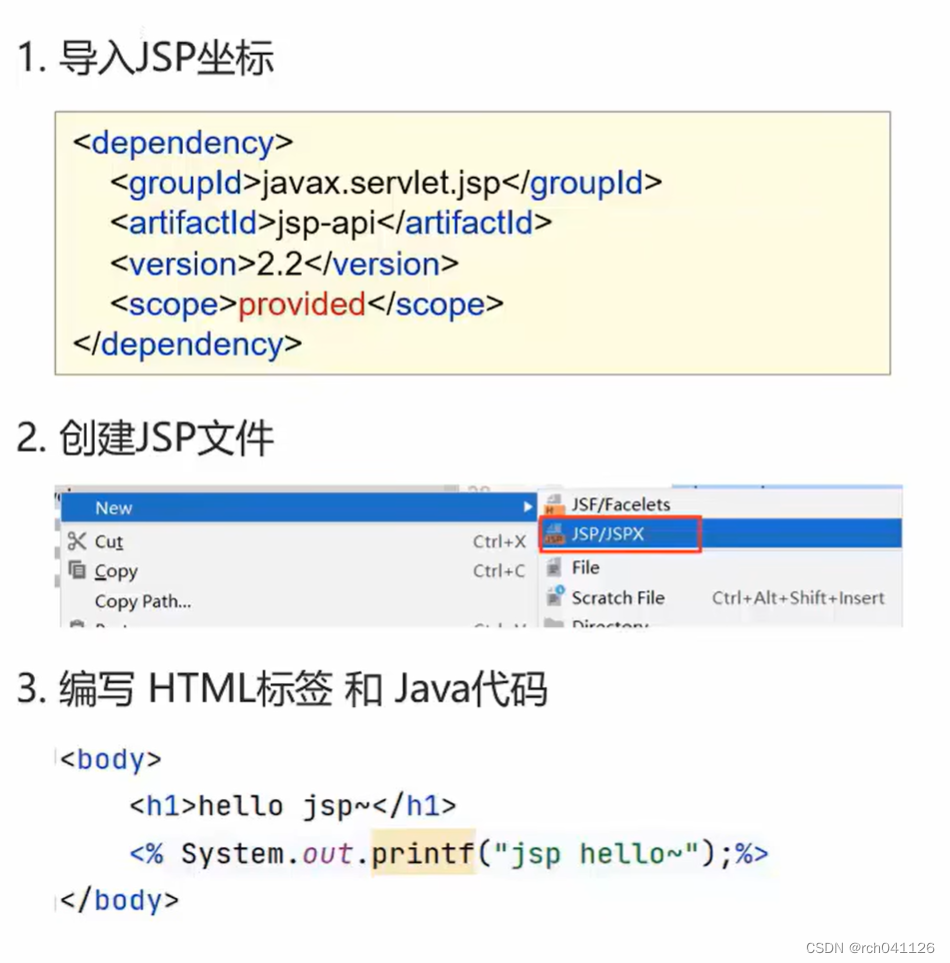
导入JSP坐标
        <dependency>
            <groupId>javax.servlet.jsp</groupId>
            <artifactId>jsp-api</artifactId>
            <version>2.2</version>
            <scope>provided</scope>
        </dependency>
编写HTML文件和Java代码
<%@ page contentType="text/html;charset=UTF-8" language="java" %>
<html>
<head>
    <title>Title</title>
</head>
<body>

<h1>hello jsp</h1>

<%
    System.out.println("hello,jsp~");
%>

</body>
</html>
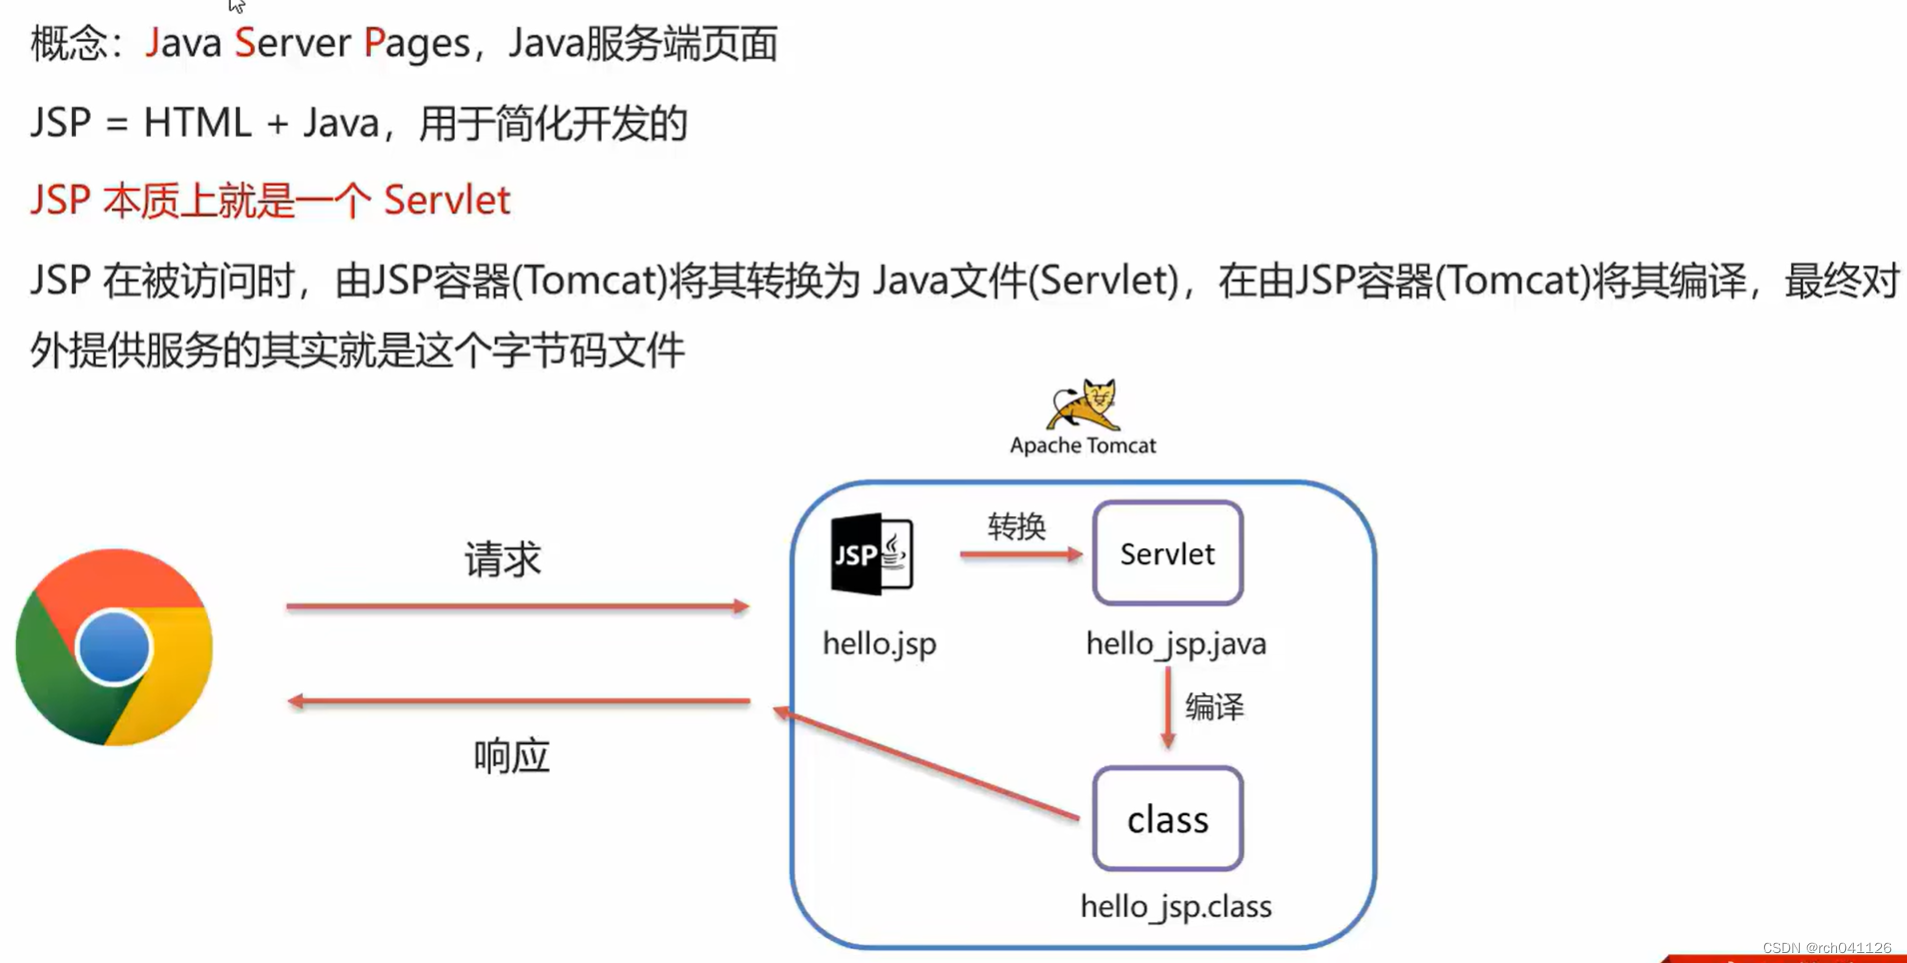
三、JSP原理
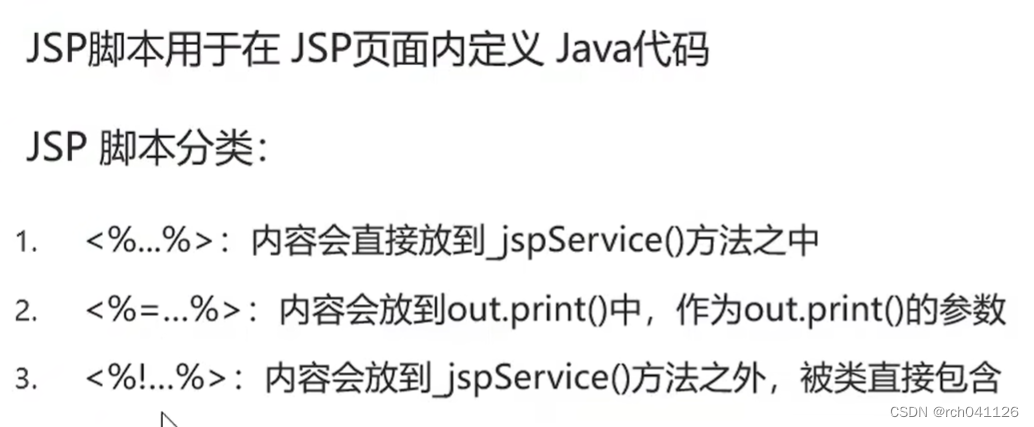
四、JSP脚本
<%@ page contentType="text/html;charset=UTF-8" language="java" %>
<html>
<head>
    <title>Title</title>
</head>
<body>

<h1>hello jsp</h1>

<%
    System.out.println("hello,jsp~");
    int i = 3;
%>

<%="hello"%>
<%=i%>

<%!
    void show(){}
    String name = "zhangsan";
%>
</body>
</html>
JSP脚本案例

品牌实体类
package com.itheima.pojo;

/**
 * 品牌实体类
 */

public class Brand {
    // id 主键
    private Integer id;
    // 品牌名称
    private String brandName;
    // 企业名称
    private String companyName;
    // 排序字段
    private Integer ordered;
    // 描述信息
    private String description;
    // 状态:0:禁用  1:启用
    private Integer status;


    public Brand() {
    }

    public Brand(Integer id, String brandName, String companyName, String description) {
        this.id = id;
        this.brandName = brandName;
        this.companyName = companyName;
        this.description = description;
    }

    public Brand(Integer id, String brandName, String companyName, Integer ordered, String description, Integer status) {
        this.id = id;
        this.brandName = brandName;
        this.companyName = companyName;
        this.ordered = ordered;
        this.description = description;
        this.status = status;
    }
    // getId  ${brand.id}   Id   getId
    public Integer getId() {
        System.out.println("getId方法被调用了...");
        return id;
    }

    public void setId(Integer id) {
        this.id = id;
    }

    public String getBrandName() {
        return brandName;
    }

    public void setBrandName(String brandName) {
        this.brandName = brandName;
    }

    public String getCompanyName() {
        return companyName;
    }

    public void setCompanyName(String companyName) {
        this.companyName = companyName;
    }

    public Integer getOrdered() {
        return ordered;
    }

    public void setOrdered(Integer ordered) {
        this.ordered = ordered;
    }

    public String getDescription() {
        return description;
    }

    public void setDescription(String description) {
        this.description = description;
    }

    public Integer getStatus() {
        return status;
    }

    public void setStatus(Integer status) {
        this.status = status;
    }

    @Override
    public String toString() {
        return "Brand{" +
                "id=" + id +
                ", brandName='" + brandName + '\'' +
                ", companyName='" + companyName + '\'' +
                ", ordered=" + ordered +
                ", description='" + description + '\'' +
                ", status=" + status +
                '}';
    }
}
JSP页面
<%@ page import="com.itheima.pojo.Brand" %>
<%@ page import="java.util.List" %>
<%@ page import="java.util.ArrayList" %>
<%@ page contentType="text/html;charset=UTF-8" language="java" %>

<%
    // 查询数据库
    List<Brand> brands = new ArrayList<Brand>();
    brands.add(new Brand(1,"三只松鼠","三只松鼠",100,"三只松鼠,好吃不上火",1));
    brands.add(new Brand(2,"优衣库","优衣库",200,"优衣库,服适人生",0));
    brands.add(new Brand(3,"小米","小米科技有限公司",1000,"为发烧而生",1));

%>


<!DOCTYPE html>
<html lang="en">
<head>
    <meta charset="UTF-8">
    <title>Title</title>
</head>
<body>
<input type="button" value="新增"><br>
<hr>
<table border="1" cellspacing="0" width="800">
    <tr>
        <th>序号</th>
        <th>品牌名称</th>
        <th>企业名称</th>
        <th>排序</th>
        <th>品牌介绍</th>
        <th>状态</th>
        <th>操作</th>

    </tr>


    <%
        for (int i = 0; i < brands.size(); i++) {
            Brand brand = brands.get(i);
    %>

    <tr align="center">
        <td><%=brand.getId()%></td>
        <td><%=brand.getBrandName()%></td>
        <td><%=brand.getCompanyName()%></td>
        <td><%=brand.getOrdered()%></td>
        <td><%=brand.getDescription()%></td>

        <%
            if(brand.getStatus() == 1){
                //显示启用
        %>
            <td><%="启用"%></td>
        <%
            }else {
                // 显示禁用
        %>
            <td><%="禁用"%></td>
        <%
            }
        %>

        <td><a href="#">修改</a> <a href="#">删除</a></td>
    </tr>

    <%
        }
    %>


</table>

</body>
</html>
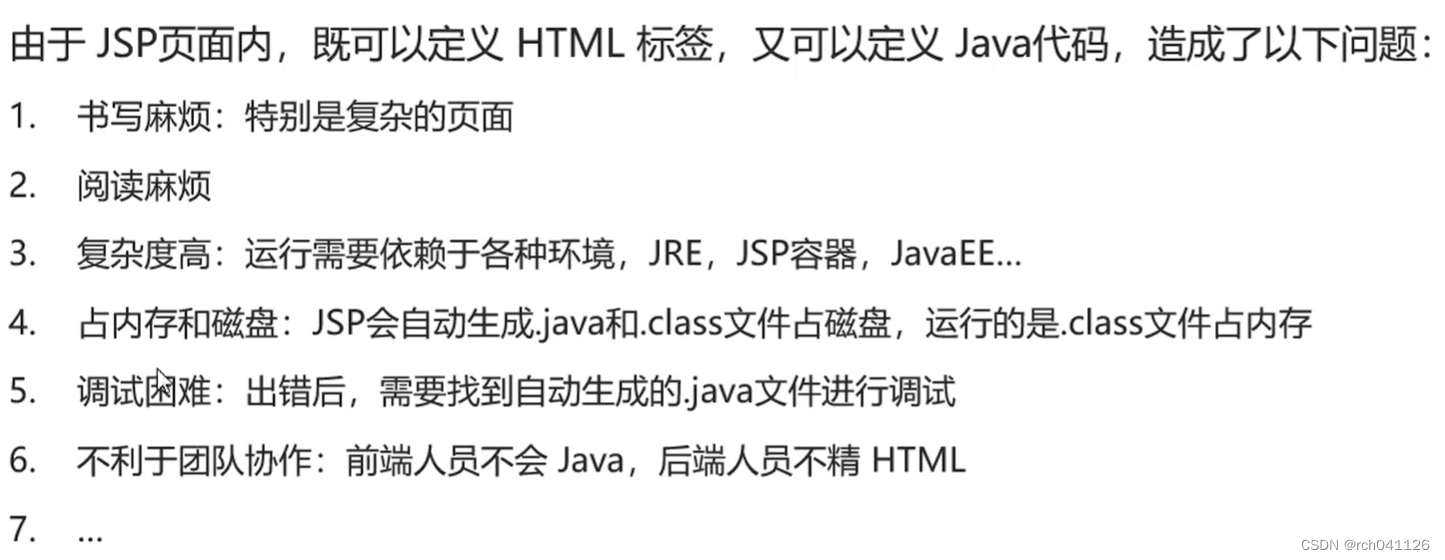
五、JSP缺点

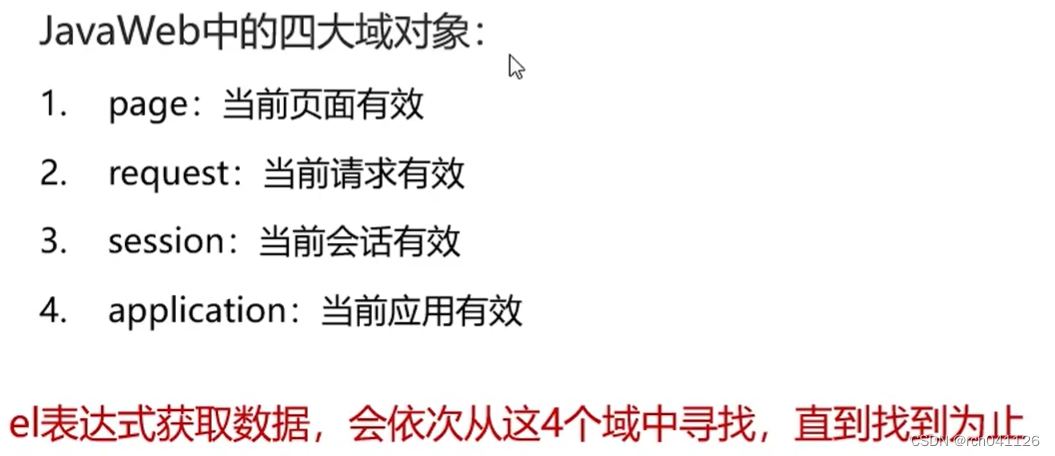
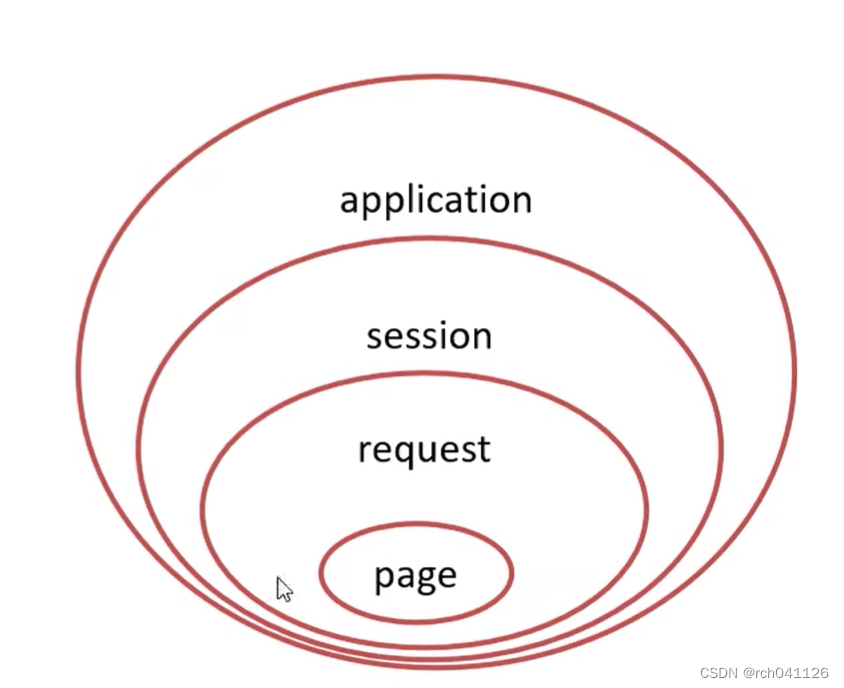
六、EL表达式
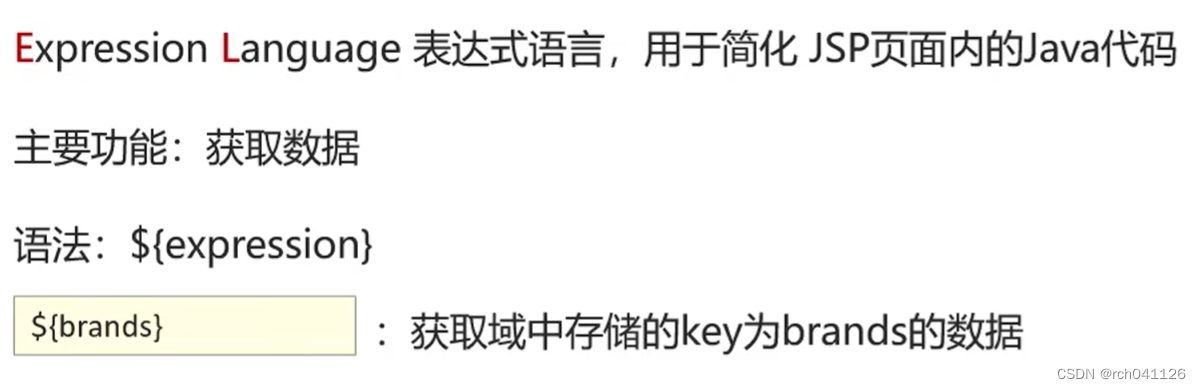
EL代码
<%@ page contentType="text/html;charset=UTF-8" language="java" %>
<html>
<head>
    <title>Title</title>
</head>
<body>

    ${brands}


</body>
</html>
Servlet代码
package com.itheima.web;

import com.itheima.pojo.Brand;

import javax.servlet.*;
import javax.servlet.http.*;
import javax.servlet.annotation.*;
import java.io.IOException;
import java.util.ArrayList;
import java.util.List;

@WebServlet("/demo1")
public class ServletDemo1 extends HttpServlet {
    @Override
    protected void doGet(HttpServletRequest request, HttpServletResponse response) throws ServletException, IOException {
        //1. 准备数据
        List<Brand> brands = new ArrayList<Brand>();
        brands.add(new Brand(1,"三只松鼠","三只松鼠",100,"三只松鼠,好吃不上火",1));
        brands.add(new Brand(2,"优衣库","优衣库",200,"优衣库,服适人生",0));
        brands.add(new Brand(3,"小米","小米科技有限公司",1000,"为发烧而生",1));


        //2. 存储到request域中
        request.setAttribute("brands",brands);
        request.setAttribute("status",1);

        //3. 转发到 el-demo.jsp
        //request.getRequestDispatcher("/el-demo.jsp").forward(request,response);
        //request.getRequestDispatcher("/jstl-if.jsp").forward(request,response);
        request.getRequestDispatcher("/jstl-foreach.jsp").forward(request,response);
    }

    @Override
    protected void doPost(HttpServletRequest request, HttpServletResponse response) throws ServletException, IOException {
        this.doGet(request, response);
    }
}
七、JSTL标签
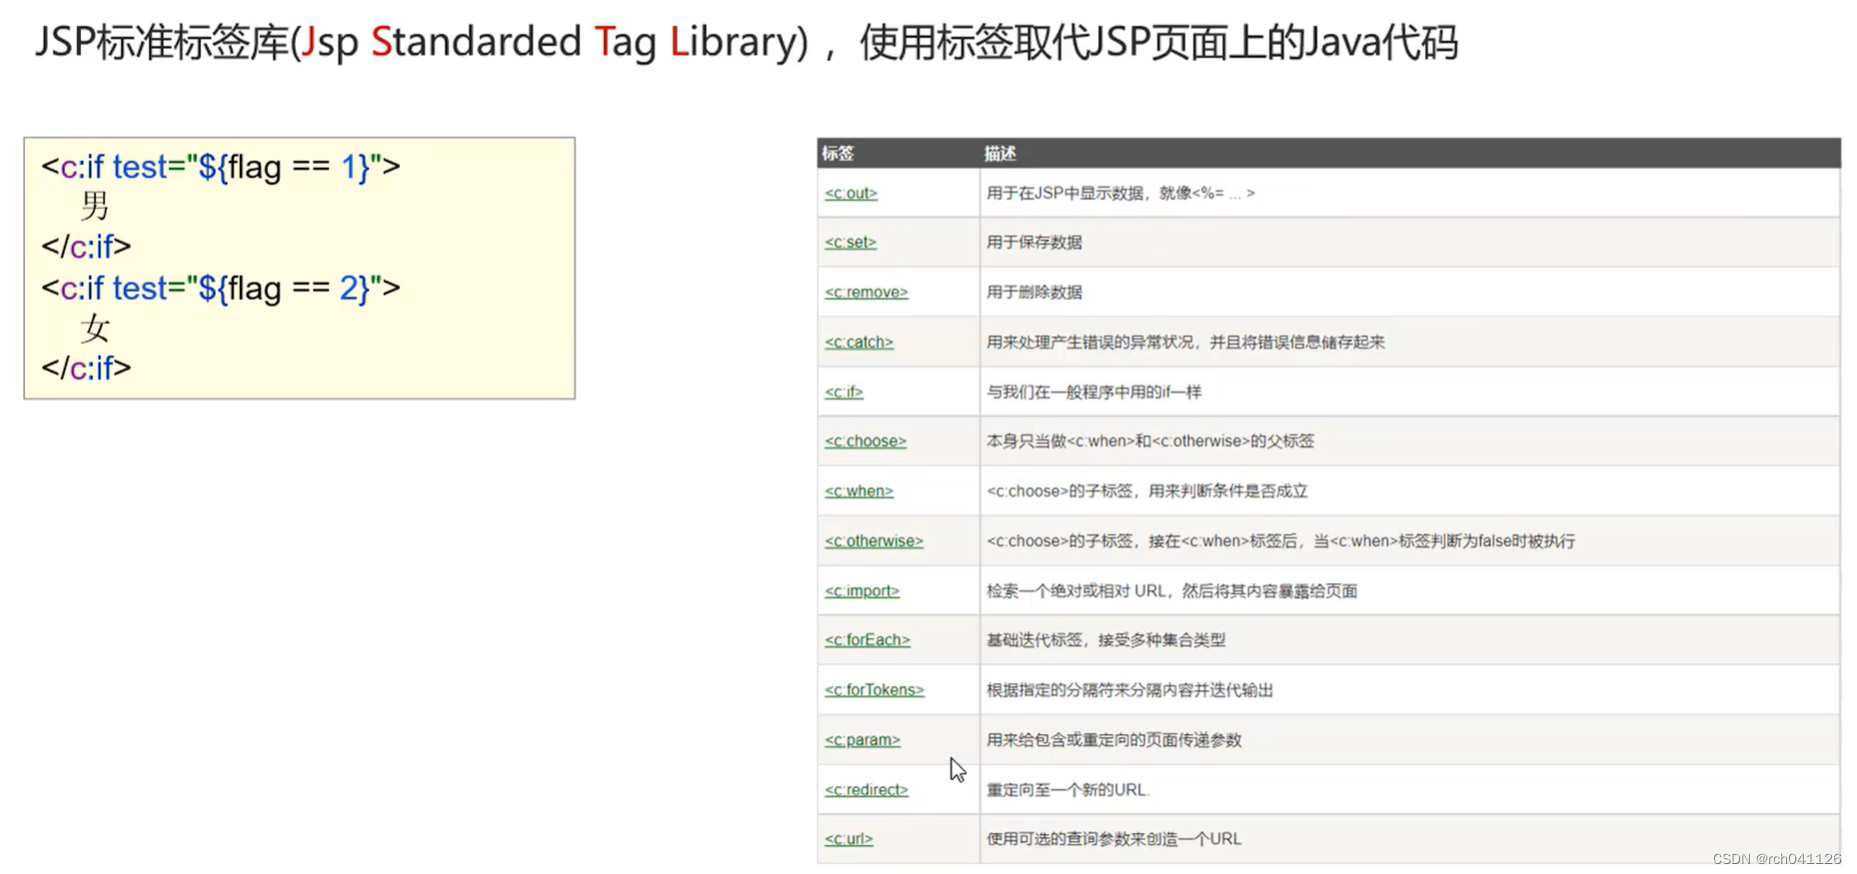
1、<c:if>标签
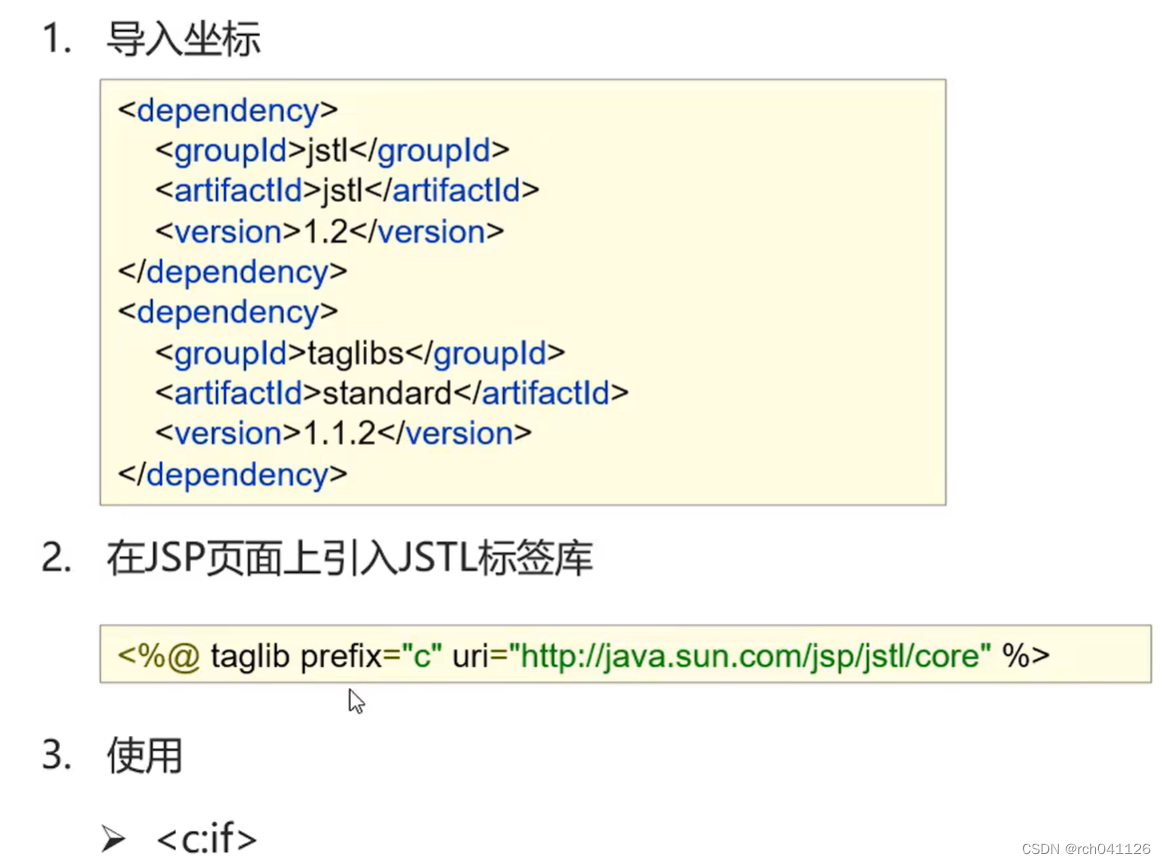
导入jstl坐标
        <!--jstl-->
        <dependency>
            <groupId>jstl</groupId>
            <artifactId>jstl</artifactId>
            <version>1.2</version>
        </dependency>

        <dependency>
            <groupId>taglibs</groupId>
            <artifactId>standard</artifactId>
            <version>1.1.2</version>
        </dependency>
<c:if>演示
<%@ page contentType="text/html;charset=UTF-8" language="java" %>
<%@ taglib prefix="c" uri="http://java.sun.com/jsp/jstl/core" %>

<html>
<head>
    <title>Title</title>
</head>
<body>

    <%--
        c:if:来完成逻辑判断,替换java  if else
    --%>
<%--

    <c:if test="true">
        <h1> true</h1>
    </c:if>

    <c:if test="false">
        <h1> false</h1>
    </c:if>
--%>
    <c:if test="${status ==1}">
        启用
    </c:if>

    <c:if test="${status ==0}">
        禁用
    </c:if>

</body>
</html>
2、<c:foerEach>标签
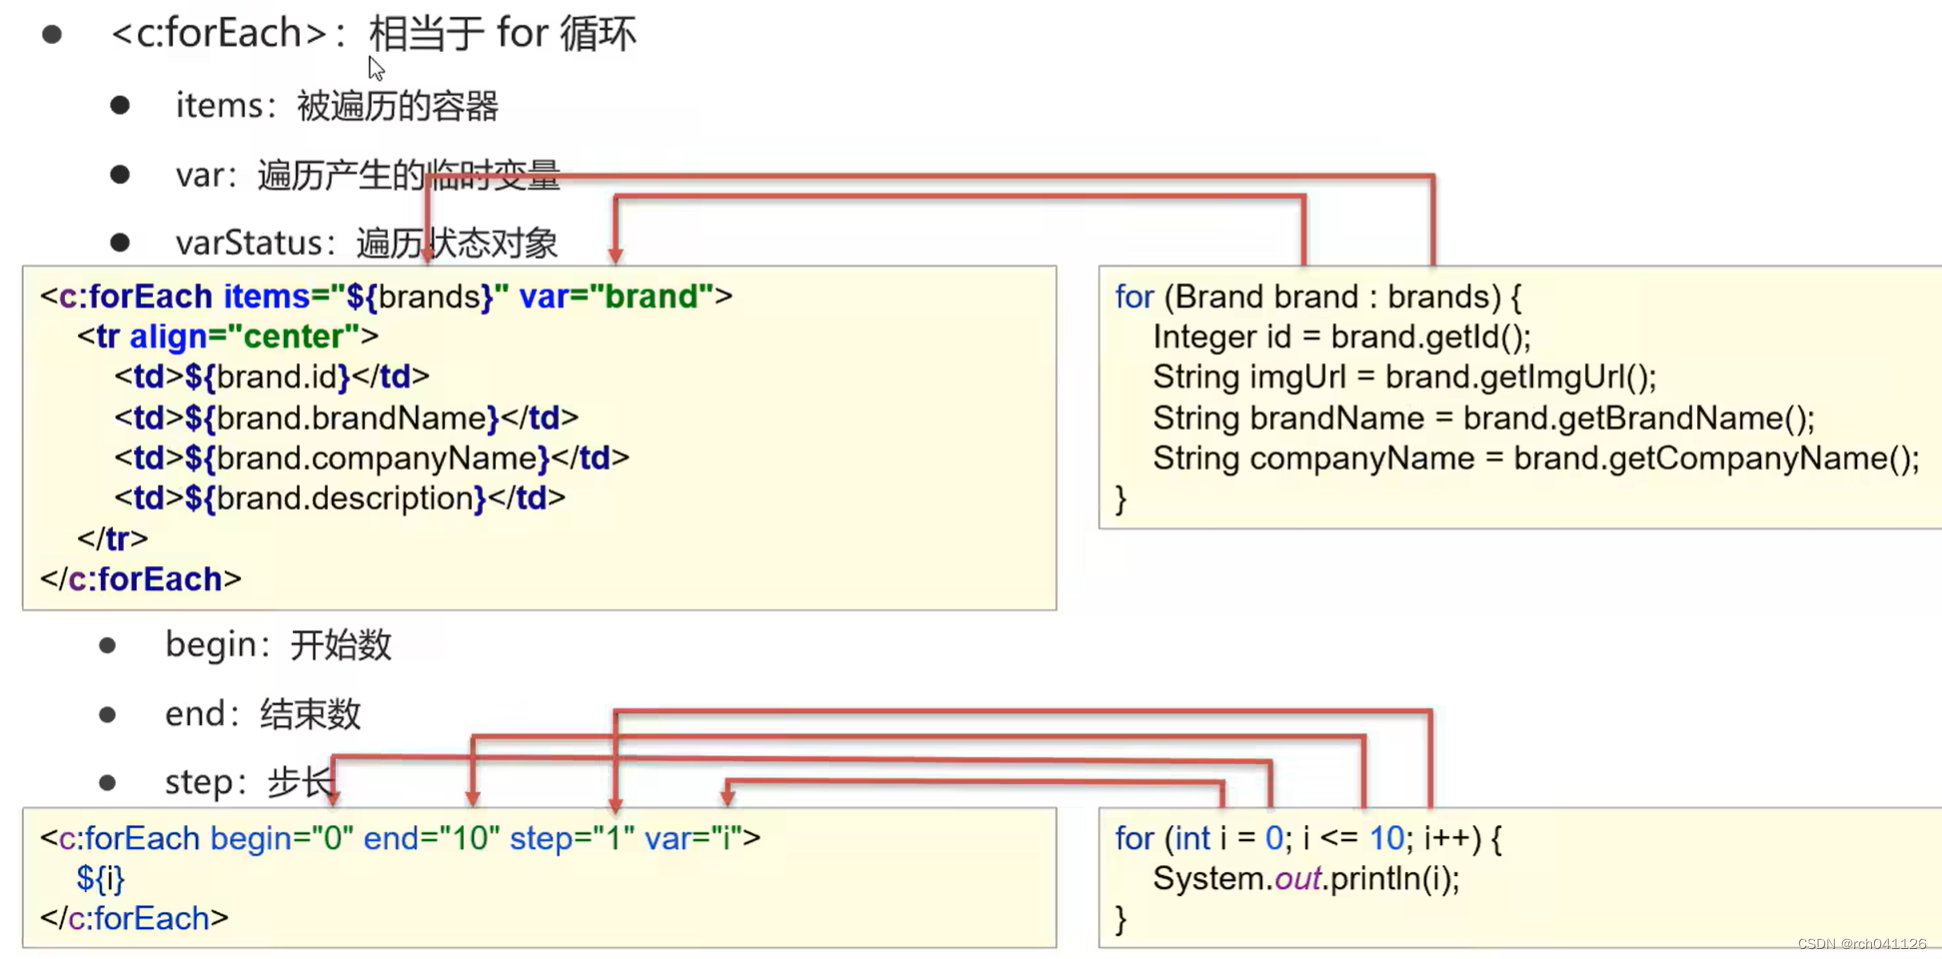
<c:foerEach>演示
<%@ page contentType="text/html;charset=UTF-8" language="java" %>
<%@ taglib prefix="c" uri="http://java.sun.com/jsp/jstl/core" %>

<!DOCTYPE html>
<html lang="en">
<head>
    <meta charset="UTF-8">
    <title>Title</title>
</head>
<body>
<input type="button" value="新增"><br>
<hr>
<table border="1" cellspacing="0" width="800">
    <tr>
        <th>序号</th>
        <th>品牌名称</th>
        <th>企业名称</th>
        <th>排序</th>
        <th>品牌介绍</th>
        <th>状态</th>
        <th>操作</th>

    </tr>


    <c:forEach items="${brands}" var="brand" varStatus="status">
        <tr align="center">
            <%--<td>${brand.id}</td>--%>
            <td>${status.count}</td>
            <td>${brand.brandName}</td>
            <td>${brand.companyName}</td>
            <td>${brand.ordered}</td>
            <td>${brand.description}</td>
            <c:if test="${brand.status == 1}">
                <td>启用</td>
            </c:if>
            <c:if test="${brand.status != 1}">
                <td>禁用</td>
            </c:if>

            <td><a href="#">修改</a> <a href="#">删除</a></td>
        </tr>

    </c:forEach>


</table>


<hr>

<c:forEach begin="1" end="10" step="1" var="i">
    <a href="#">${i}</a>
</c:forEach>


</body>
</html>
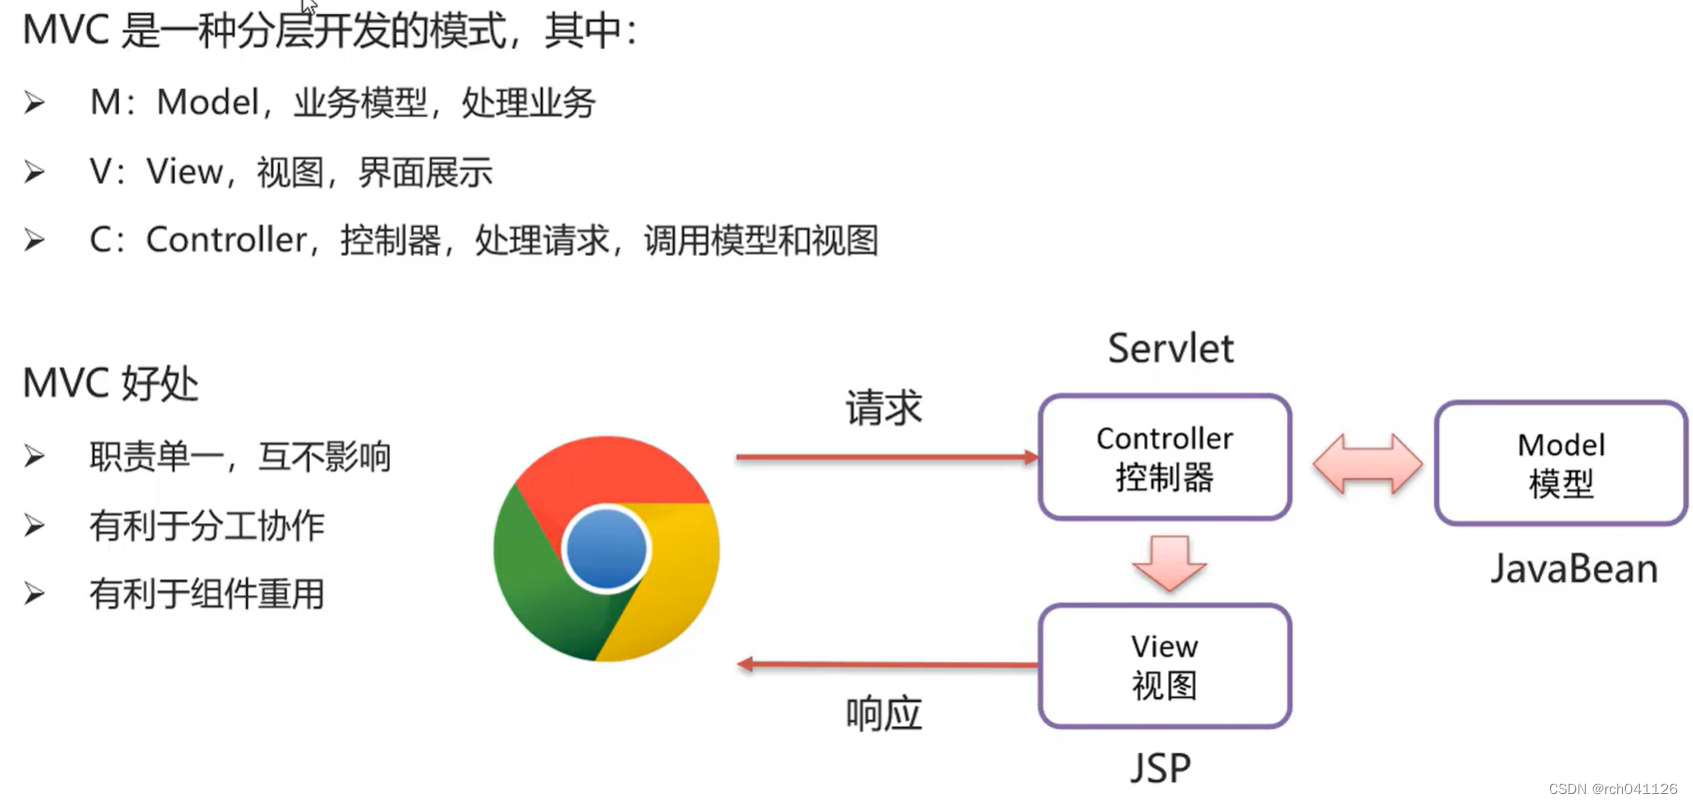
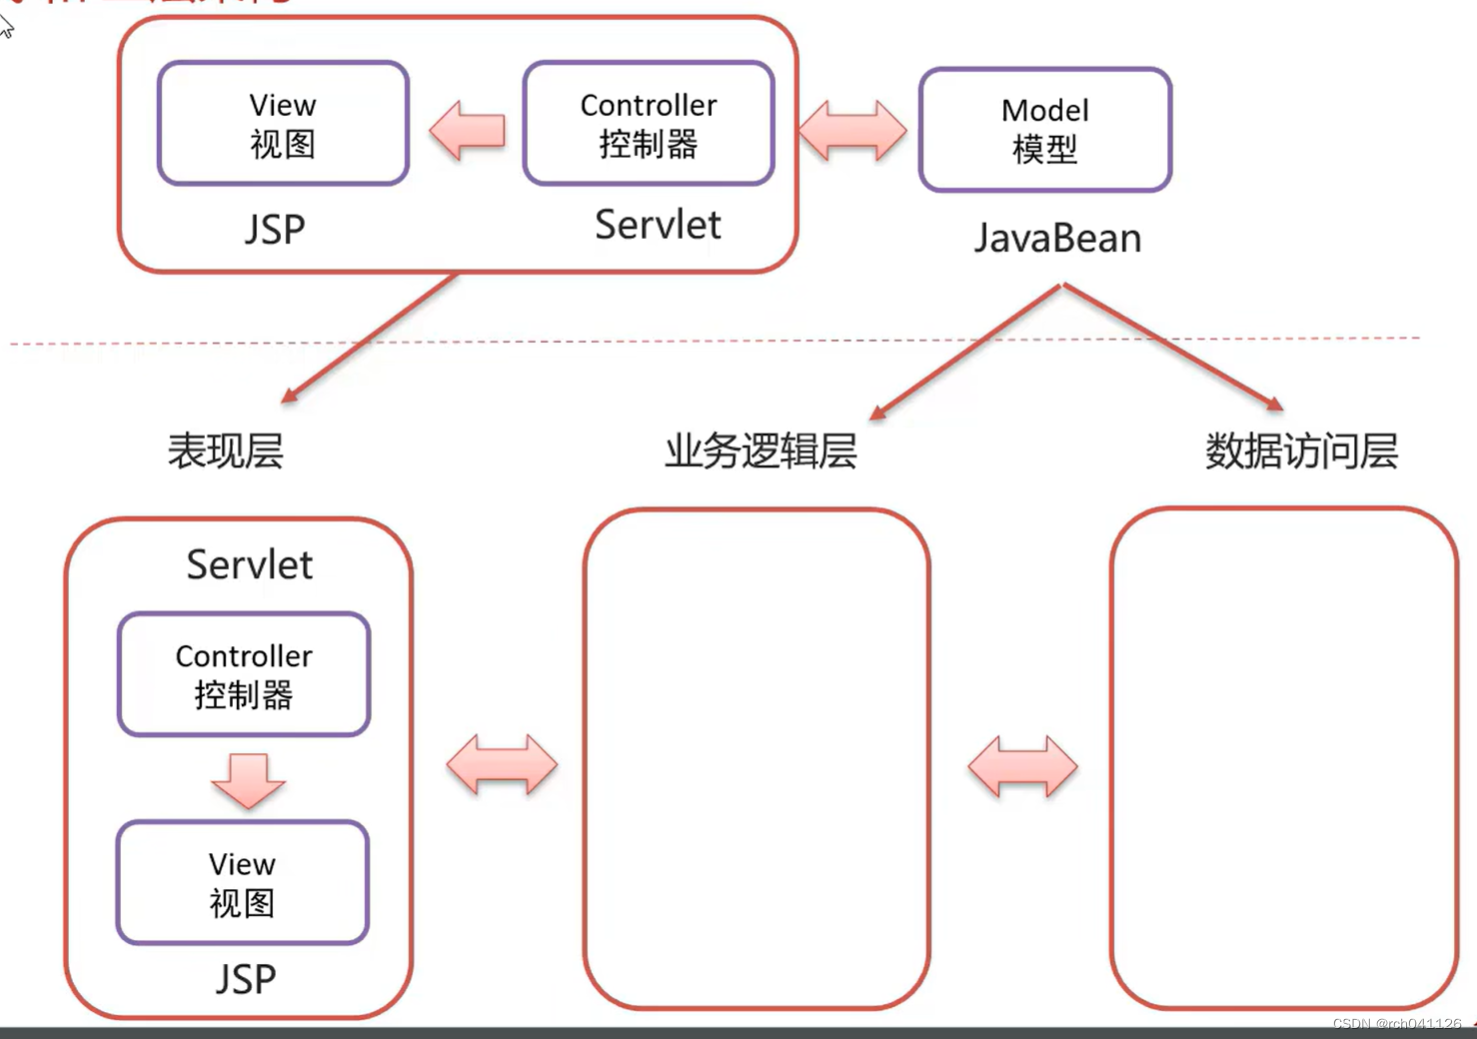
八、MVC 模式和三层架构
1、MVC 模式
2、三层架构

3、MVC 模式和三层架构的区别


 2821
2821


 被折叠的 条评论
为什么被折叠?
被折叠的 条评论
为什么被折叠?
 到【灌水乐园】发言


