


Dagger2使用
(Dagger1就不谈了,直接开始说Dagger2)
带点夸张描述Dagger2的作用:定义一个变量,不需要实例化直接就可以使用。
Dagger2依赖注入的基本实现
其实并不是不需要实例化,只是改变了传统实例化的过程,不需要再在使用的地方进行实例化。
我们平时对一个变量实例化和使用的过程是怎样的呢?
    class A{
        B b;
        C c;

        public void test(){
            b = new B(...);
            c = new C(...);

            b.xxx();
            c.yyy();
        }
    }
而使用Dagger2依赖注入是怎么样的呢?
    class A{
        @Inject
        B b;
        @Inject
        C c;

        public void test(){
//            b = new B(...);
//            c = new C(...);

            b.xxx();
            c.yyy();
        }
    }
这里只是为了直观感受,实际还有其他代码。毕竟,不可能定义一个变量,凭空就实例化了。
Dagger2提供实例的方式有两种:
- 一种是通过
Module类@Provide标注的方法直接提供实例,Module类需要用@Module注解标注
@Module
public class MainModule {
    private MainView mMainView;

    public MainModule(MainView mainView) {
        mMainView = mainView;
    }

    @Provides
    public MainView provideMainView() {
        return mMainView;
    }

}
- 另一种是Dagger2生成的代码里会调用通过
@Inject标注的构造方法,然后生成实例。一个类不能有多个带@Inject标识的构造方法。否则Dagger2就无法判断使用哪一个,会抛出异常。
public class MainPresenter {

    MainView mMainView;

    @Inject
    public MainPresenter(MainView mainView) {
        mMainView = mainView;
    }

    public void loadUserInfo() {
        //假装获取了数据- -
        UserInfo userInfo = new UserInfo("灰来灰去");

        mMainView.showName(userInfo.getName());//显示名称
    }
}看到“这里Dagger2生成的代码”这里,就不得不说Dagger2的机制了,Dagger1使用了反射,而到了Dagger2就完全抛弃了反射,使用预编译的方式。Rebuild Project后,在build/generated/source/apt/debug下对应的包里,会生成需要的类,Dagger2就是通过这些类,来进行实例的注入。
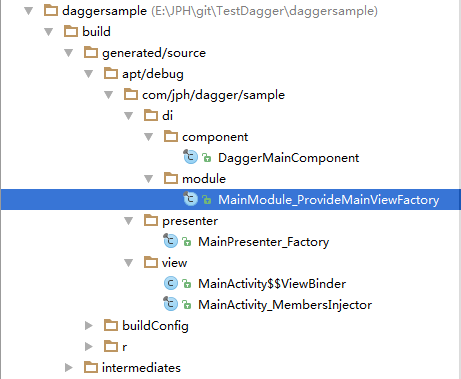
而这些关系是通过Component来建立的,Component需要@Component注解标注,可设置关联的Module(可的意思就是也可不设置),MainComponent会生成一个对应的DaggerMainComponent类。
public class MainActivity extends AppCompatActivity implements MainView {

    @Inject
    MainPresenter mMainPresenter;

    @Bind(R.id.main_txt_name)
    TextView mNameTxt;

    @Override
    protected void onCreate(Bundle savedInstanceState) {
        super.onCreate(savedInstanceState);
        setContentView(R.layout.activity_main);
        ButterKnife.bind(this);

        DaggerMainComponent.builder()
                .mainModule(new MainModule(this))
                .build()
                .inject(this);
    }

    @OnClick(R.id.main_btn_show_name)
    public void onClickShowName(View v) {
        mMainPresenter.loadUserInfo();
    }

    @Override
    public void showName(String name) {
        mNameTxt.setText(name);
    }
}
获取实例的逻辑是:
优先判断对应Module里面有没有直接提供,若没有则通过@Inject标注的构造方法生成。若构造方法里有参数则递归重复此流程。
@Inject
在定义变量处标注,代表此属性使用依赖注入,不需要通过new 来实例化。
在构造方法处标注,代表此构造方法可直接注入到目标属性。
一个类不能有多个带@Inject标识的构造方法。
@Module
相当于工厂模式的Factory,内部是@Provides标注的方法,负责提供生成类实例的方法。
@Provides
在Module里,标注负责提供生成类实例的方法。
@Qualifier
当一个类在Module中有多个@Provides标识的方法可创建实例时。Dagger2无法潘达判断使用哪一个方法来生成实例。此时就需要通过@Qualifier来区分使用哪一个方法创建实例。
@Qualifier不是用来直接标注的,他是需要新建注解,用@Qualifier来标注这个新建的注解。以下都用@MyQualifier表示
- 一种是每一次区分都新建一个
@MyQualifier标识的注解,分别标识在@Provides的位置,和@Inject需要注入的位置 - 另一种则是新建一个
@MyQualifier标识的注解,通过value的值来区分,Dagger2本身也提供了一个@Named。
    @Provides
    @Named(value = "jph")
    public UserInfo provideJPHUserInfo() {
        return new UserInfo("jph");
    }

    @Provides
    @Named(value = "hui")
    public UserInfo provideHuiUserInfo() {
        return new UserInfo("灰来灰去");
    }
@Inject
@Named(value = "hui")
UserInfo userInfo;若是构造方法的参数:
    @Inject
    public MainPresenter(MainView mainView, @Named(value = "jph") UserInfo userInfo) {
        mMainView = mainView;
        mUserInfo = userInfo;
    }
@Scope
和@Qualifier一样,@Scope也是用来标识新建注解的,以下用@MyScope表示。
- 用
@MyScope标注的 Component,如果 Moudle 中的@Provides也被@MyScope标注,那么在这个Component的生命周期内 ,这个 provide提供的对象是单例的。具体是通过DoubleCheck这个类实现的。 - 通过构造方法标注
@Inject进行注入的,@MyScope标注在类名处。 - 若
Provides处标记了@MyScope,则对应的Component也必须标注,但是标注了@MyScope的Component对应Module中的Provides不是必须标注@MyScope。 - 会判断依赖的
Component之间是否都使用了@MyScope标识,未标注@Scope的Component不能依赖标注了@Scope的Component。
不同的@MyScope之间功能没有任何差别,只是定义不同的名字,方便理解。比如比较常见的定义@PerActivity,一般就是代表和Activity的生命周期对应。
Dagger2提供了一个默认的@SingeInstance,用来标注AppModule中的@Provides。因此它标注提供的对象生命周期就跟Application一致,就间接实现了单例。
@Component
通过上文基本实现可以看出Component是负责连接Inject和Module的桥梁。通过@Component标注的XXXComponent来执行注入。
Component的dependencies
在Scope小节有讲到,通过在AppComponent中用@Scope(一般用@SingeInstance)标注Provides方法实现单例。但是当你想在一个MainActivity中使用这个单例对象的时候,直接对他的变量标注@Inject是没用的。因为Dagger2找不到MainActivity和AppComponet之间的关系。此时就需要用到Component的dependencies了。
因为MainActivity是通过MainComponent来进行依赖注入的,此时我们只需要让MainComponent去依赖AppComponent即可。
@PerActivity
@Component(dependencies = AppComponent.class, modules = MainModule.class)
public interface MainComponent {
    ///***
}
仅这样写,只是规定了,MainComponent对象能依赖AppComponent对象,Dagger2是并不知道MainComponent依赖的是哪个AppComponent对象的。就需要在App里面生成一个AppComponent的对象。然后Activity通过getApplication得到这个AppComponent的对象。
public class App extends Application {

    private AppComponent mAppComponent;

    @Override
    public void onCreate() {
        super.onCreate();
        mAppComponent = DaggerAppComponent.builder().appModule(new AppModule(this)).build();
    }

    public AppComponent getAppComponent() {
        return mAppComponent;
    }
}
public class MainActivity extends AppCompatActivity implements MainView {
@Override
protected void onCreate(Bundle savedInstanceState) {
super.onCreate(savedInstanceState);
///***
DaggerMainComponent.builder()
.appComponent(((App) getApplication()).getAppComponent())
.mainModule(new MainModule(this))
.build()
.inject(this);
}
}
这样就建立了MainActivity和AppComponent之间的一个关系。但是如果你要使用AppModule中提供的对象。还需要在AppComponent中定义一个返回值类型与想注入的对象对应的方法。因为自动生成的代码中,DaggerAppComponent就是通过复写这个方法把需要的对象暴露给DaggerMainComponent的。
@Module
public class AppModule {
    Context mContext;

    public AppModule(Context context) {
        mContext = context;
    }

    @Provides
    @Singleton
    public Toaster provideToaster() {
        return new Toaster(mContext);
    }
}
@Singleton
@Component(modules = AppModule.class)
public interface AppComponent {
Toaster getToaster();
}SubComponent
Subcomponent其功能效果优点类似component的dependencies。但是使用@Subcomponent不需要在父component中显式添加子component需要用到的对象,只需要添加返回子Component的方法即可,子Component能自动在父Component中查找缺失的依赖。若子Component有对应的Module,需要在方法中加入Module参数。
@Singleton
@Component(modules = AppModule.class)
public interface AppComponent {
    MainComponent getMainComponent(MainModule mainModule);
}
@PerActivity
@Subcomponent(modules = MainModule.class)
public interface MainComponent {
void inject(MainActivity mainActivity);
}public class MainActivity extends AppCompatActivity implements MainView {
@Override
protected void onCreate(Bundle savedInstanceState) {
super.onCreate(savedInstanceState);
setContentView(R.layout.activity_main);
((App) getApplication()).getAppComponent().getMainComponent(new MainModule(this))
.inject(this);
}
}


 1469
1469

 被折叠的 条评论
为什么被折叠?
被折叠的 条评论
为什么被折叠?
 到【灌水乐园】发言


