


消息机制在Android中很重要,网上也有很多优质的分析文章,但很多人看了以后可能还是一头雾水,看着眼花缭乱的源码懵圈。
本文不会介绍Looper、Handler、MessageQueue是什么,请读者自行了解相关基础知识。
在这里笔者试图通过尽可能少的源码,分析Handler发出的消息经历了怎样的流程,Looper、Handler、MessageQueue又是如何紧密合作实现这一流程,以便大家快速抓住重点。
开始分析源码之前,请大家先思考以下两点疑问:
1.一个Handler发出的消息要放入哪一个MessageQueue,又被哪一个Looper所取出?
2. Looper取出的消息给哪一个Handler处理?
解决了这两个疑问,也就明白了Handler发出的消息经历了怎样的流程。
带Looper的线程
在Looper源码的注释中有这么一个示例:
  *  class LooperThread extends Thread {
  *      public Handler mHandler;
  *
  *      public void run() {
  *          Looper.prepare();
  *
  *          mHandler = new Handler() {
  *              public void handleMessage(Message msg) {
  *                  // process incoming messages here
  *              }
  *          };
  *
  *          Looper.loop();
  *      }
* }这个示例展示了在一个线程中使用Looper的正确姿势:
1. 调用Looper.prepare();
2. 创建mHandler
3. 调用Looper.loop();
4. 使用mHandler
下面我们来逐步看一下整个流程:
Looper.prepare()
Looper类中相关代码如下:
    static final ThreadLocal<Looper> sThreadLocal = new ThreadLocal<Looper>();
    final MessageQueue mQueue;

      /** Initialize the current thread as a looper.
      * This gives you a chance to create handlers that then reference
      * this looper, before actually starting the loop. Be sure to call
      * {@link #loop()} after calling this method, and end it by calling
      * {@link #quit()}.
      */
    public static void prepare() {
        prepare(true);
    }

    private static void prepare(boolean quitAllowed) {
        if (sThreadLocal.get() != null) {
            throw new RuntimeException("Only one Looper may be created per thread");
        }
        sThreadLocal.set(new Looper(quitAllowed));
    }

    private Looper(boolean quitAllowed) {
        mQueue = new MessageQueue(quitAllowed);
        mThread = Thread.currentThread();
}第15-17行的判断,决定了一个线程只能有一个Looper和一个MessageQueue。
第22行给成员变量mQueue赋值。
第18行将新生成的Looper对象保存到静态ThreadLocal对象sThreadLocal中。
简单地说,调用Looper.prepare()后,为一个线程生成了一个Looper对象和一个MessageQueue对象,并将它们保存了起来以便日后使用。
创建mHandler
创建mHandler的相关代码如下:
    public Handler() {
        this(null, false);
    }

    public Handler(Callback callback, boolean async) {
        if (FIND_POTENTIAL_LEAKS) {
            final Class<? extends Handler> klass = getClass();
            if ((klass.isAnonymousClass() || klass.isMemberClass() || klass.isLocalClass()) &&
                    (klass.getModifiers() & Modifier.STATIC) == 0) {
                Log.w(TAG, "The following Handler class should be static or leaks might occur: " +
                    klass.getCanonicalName());
            }
        }

        mLooper = Looper.myLooper();
        if (mLooper == null) {
            throw new RuntimeException(
                "Can't create handler inside thread that has not called Looper.prepare()");
        }
        mQueue = mLooper.mQueue;
        mCallback = callback;
        mAsynchronous = async;
    }

    类Looper:
    public static @Nullable Looper myLooper() {
        return sThreadLocal.get();
    }
第15行获取了之前sThreadLocal中保存的Looper对象。
第18行的错误如果你看到过,说明你曾经在没有调用Looper.prepare()的线程中创建Handler,结果只能是失败。
第20行将之前Looper对象中保存的成员变量mQueue保存到正在创建的Handler中。
看到这里,我们就明白了为什么一定要先调用Looper.prepare()才能创建Handler,在创建Handler时又使用了之前调用Looper.prepare()时保存的哪些变量。
使用mHandler
一般使用Handler有两种方式:
1. post一个Runnable
2. send一条Message
每种方式又可以设置延迟时间,各有几种实现方法。
我们看一下入参最少的post方法,相关方法如下:
    public final boolean post(Runnable r){
        return sendMessageDelayed(getPostMessage(r), 0);
    }

    private static Message getPostMessage(Runnable r) {
        Message m = Message.obtain();
        m.callback = r;
        return m;
    }

    public final boolean sendMessageDelayed(Message msg, long delayMillis){
        if (delayMillis < 0) {
            delayMillis = 0;
        }
        return sendMessageAtTime(msg, SystemClock.uptimeMillis() + delayMillis);
    }

    public boolean sendMessageAtTime(Message msg, long uptimeMillis) {
        MessageQueue queue = mQueue;
         if (queue == null) {
             RuntimeException e = new RuntimeException(
                     this + " sendMessageAtTime() called with no mQueue");
             Log.w("Looper", e.getMessage(), e);
             return false;
         }
         return enqueueMessage(queue, msg, uptimeMillis);
    }

    private boolean enqueueMessage(MessageQueue queue, Message msg, long uptimeMillis) {
         msg.target = this;
         if (mAsynchronous) {
             msg.setAsynchronous(true);
         }
         return queue.enqueueMessage(msg, uptimeMillis);
}第5-9行,方法getPostMessage()将Runnable转换成了Message,其中Runnable保存在Message的成员变量callback中。
第19行将之前创建mHandler时赋值的成员变量mQueue传给enqueueMessage()方法。
第30行将mHandler自身保存在Message的成员变量target中。
第34行调用MessageQueue的enqueueMessage()方法,将这条msg插入到消息队列中,至于enqueueMessage()方法是如何插入的,不在本文讨论范围之内。
可见post一个Runnable也会转为send一条Message,所有的post和send相关方法最终都会进入到Handler的enqueueMessage中,在这个方法中调用MessageQueue的enqueueMessage()方法,插入一条消息到消息队列。
Message的处理
我们都知道,Looper会开启无限循环,取出MessageQueue中的Message进行处理,具体的方法为Looper的loop():
    public static void loop() {
        final Looper me = myLooper();
        if (me == null) {
            throw new RuntimeException("No Looper; Looper.prepare() wasn't called on this thread.");
        }
        final MessageQueue queue = me.mQueue;

        // Make sure the identity of this thread is that of the local process,
        // and keep track of what that identity token actually is.
        Binder.clearCallingIdentity();
        final long ident = Binder.clearCallingIdentity();

        for (;;) {
            Message msg = queue.next(); // might block
            if (msg == null) {
                // No message indicates that the message queue is quitting.
                return;
            }

            // This must be in a local variable, in case a UI event sets the logger
            final Printer logging = me.mLogging;
            if (logging != null) {
                logging.println(">>>>> Dispatching to " + msg.target + " " +
                        msg.callback + ": " + msg.what);
            }

            final long traceTag = me.mTraceTag;
            if (traceTag != 0 && Trace.isTagEnabled(traceTag)) {
                Trace.traceBegin(traceTag, msg.target.getTraceName(msg));
            }
            try {
                msg.target.dispatchMessage(msg);
            } finally {
                if (traceTag != 0) {
                    Trace.traceEnd(traceTag);
                }
            }

            if (logging != null) {
                logging.println("<<<<< Finished to " + msg.target + " " + msg.callback);
            }

            // Make sure that during the course of dispatching the
            // identity of the thread wasn't corrupted.
            final long newIdent = Binder.clearCallingIdentity();
            if (ident != newIdent) {
                Log.wtf(TAG, "Thread identity changed from 0x"
                        + Long.toHexString(ident) + " to 0x"
                        + Long.toHexString(newIdent) + " while dispatching to "
                        + msg.target.getClass().getName() + " "
                        + msg.callback + " what=" + msg.what);
            }

            msg.recycleUnchecked();
        }
    }
第14行为循环开始的位置,此处将阻塞直至取出下一条消息。
第32行就是处理消息的位置,根据之前的分析,msg的成员变量target就是一个Handler,这个Handler对象是消息插入队列时赋值的,说明消息交给了Handler的dispatchMessage()方法,我们看一下这个方法:
    public void dispatchMessage(Message msg) {
        if (msg.callback != null) {
            handleCallback(msg);
        } else {
            if (mCallback != null) {
                if (mCallback.handleMessage(msg)) {
                    return;
                }
            }
            handleMessage(msg);
        }
    }

    private static void handleCallback(Message message) {
        message.callback.run();
    }

    public interface Callback {
        public boolean handleMessage(Message msg);
    }

    /**
     * Subclasses must implement this to receive messages.
     */
    public void handleMessage(Message msg) {
    }
第2行的msg.callback就是之前post()方法传入的Runnable对象,也就是说如果是用post一个Runnable的形式发出的消息,最终将按第15行所示,进入Runnable对象的run()方法。
第5行的mCallback是Handler时一种构造方法传入的,它是个接口对象,如果不为null的话,Message将被第19行的handleMessage()方法所处理。
如果msg.callback和mCallback都为null或者mCallback.handleMessage返回了false,则Message将被第25行——Handler的handleMessage()方法所处理,所以Handler的子类需要重写该方法以处理Message。
总结
现在再回头看最初的两个疑问:
1.一个Handler发出的消息要放入哪一个MessageQueue,又被哪一个Looper所取出?
2. Looper取出的消息给哪一个Handler处理?
经过之前的分析,答案已经很清楚了:
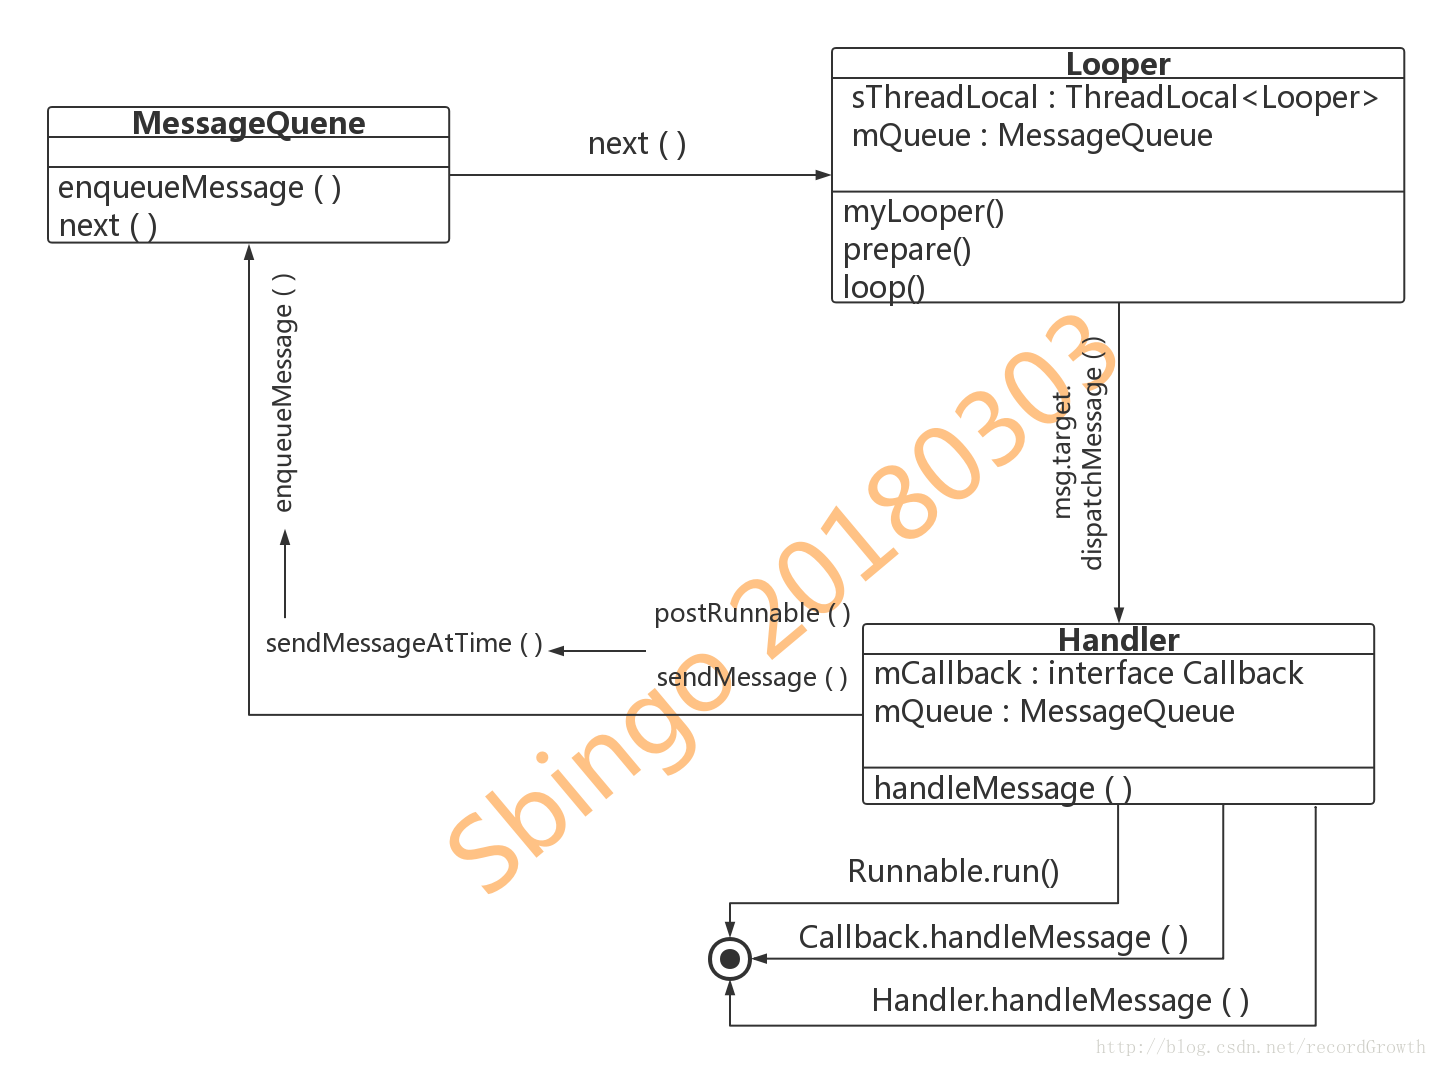
1. Handler在创建时会获取Looper.prepare()所准备好的Looper和MessageQueue,于是该Handler的消息会存入该MessageQueue中,然后被该Looper取出。
2. Handler在存入消息时,会将自身赋值给Message的成员变量target,于是Looper就可以将消息交给这个target处理。
根据以上分析,可以画出这样的流程图:
主线程的Looper问题
可能有人会问:为什么我没在主线程中调用Looper.prepare()和Looper.loop()
,却可以随手创建一个Handler使用,这不是不符合刚才的分析吗?
其实主线程也是一样的,只是系统已经帮我们调用了Looper.prepare()和Looper.loop()。
app启动后会进入ActivityThread的main()方法,该方法如下:
public static void main(String[] args) {
     Trace.traceBegin(Trace.TRACE_TAG_ACTIVITY_MANAGER, "ActivityThreadMain");
     SamplingProfilerIntegration.start();

     // CloseGuard defaults to true and can be quite spammy.  We
     // disable it here, but selectively enable it later (via
     // StrictMode) on debug builds, but using DropBox, not logs.
     CloseGuard.setEnabled(false);

     Environment.initForCurrentUser();

     // Set the reporter for event logging in libcore
     EventLogger.setReporter(new EventLoggingReporter());

     // Make sure TrustedCertificateStore looks in the right place for CA certificates
     final File configDir = Environment.getUserConfigDirectory(UserHandle.myUserId());
     TrustedCertificateStore.setDefaultUserDirectory(configDir);

     Process.setArgV0("<pre-initialized>");

     Looper.prepareMainLooper();

     ActivityThread thread = new ActivityThread();
     thread.attach(false);

     if (sMainThreadHandler == null) {
         sMainThreadHandler = thread.getHandler();
     }

     if (false) {
         Looper.myLooper().setMessageLogging(new
                 LogPrinter(Log.DEBUG, "ActivityThread"));
     }

     // End of event ActivityThreadMain.
     Trace.traceEnd(Trace.TRACE_TAG_ACTIVITY_MANAGER);
     Looper.loop();

     throw new RuntimeException("Main thread loop unexpectedly exited");
}第21行和第37行就是相关调用的地方,所以我们才可以在主线程中随手创建一个Handler使用。


 665
665

 被折叠的 条评论
为什么被折叠?
被折叠的 条评论
为什么被折叠?
 到【灌水乐园】发言


