


概要
本次主要研究一下各种消息发送的过程。包括并行消息、串行消息、广播消息和延迟消息。
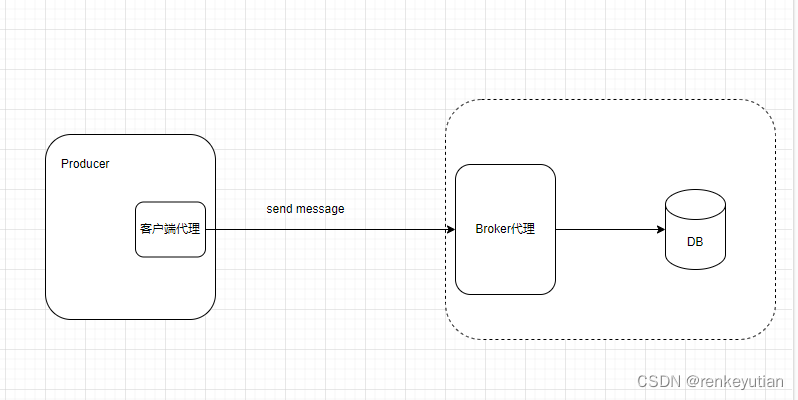
整体架构流程
 技术细节
技术细节
从作者提供的一个demo开始分析: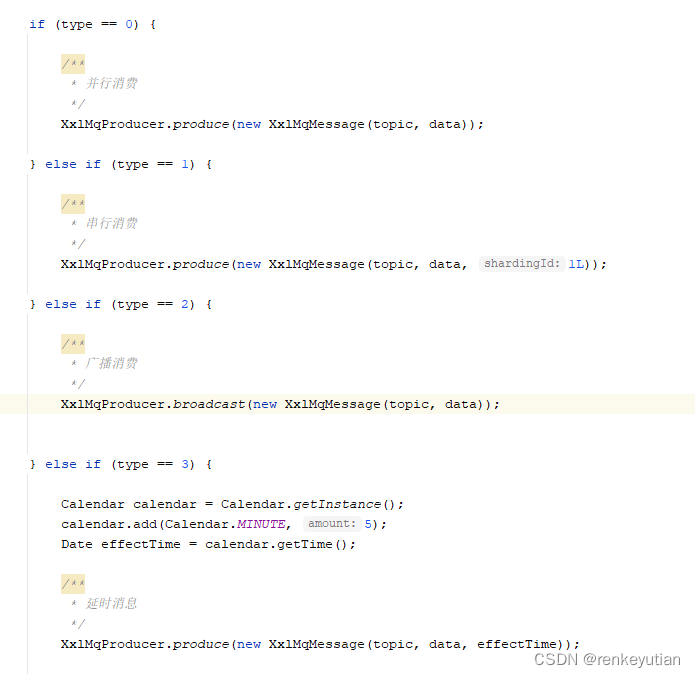
可以看到,发消息主要有两种方式,produce和broadcast。先看一下produce: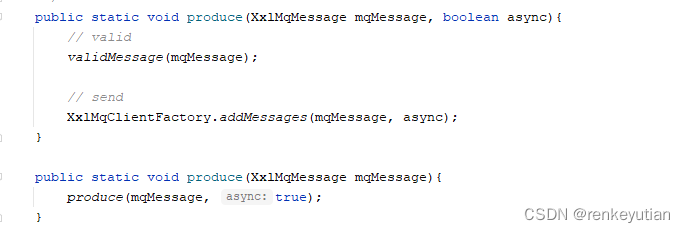 首先会对消息体进行必要的验证:
消息体构造好之后,会将消息发送出去,默认是异步发送: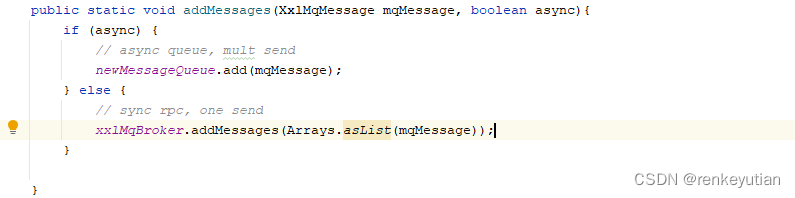
异步时,是直接丢到一个队列中,会有线程去取数据,然后通过代理存储到服务端的消息表中。同步时,直接通过代理存储到消息表中。最终都是通过代理来进行处理的。
上一篇《XXL-MQ之Consumer启动流程分析》分析了怎么构建客户端代理,这里的xxlMqBroker就是客户端代理。消费newMessageQueue中数据的线程也是在构建客户端代理的时候开启的。相当于生产者-消费者模型中,有3个消费者在消费消息。可以看到,最终还是通过代理将消息进行存储的(xxlMqBroker.addMessages(messageList)):
public void startBrokerService() {

        // init IXxlMqBroker
        .
        .
        .
        // async + mult, addMessages
        for (int i = 0; i < 3; i++) {
            clientFactoryThreadPool.execute(new Runnable() {
                @Override
                public void run() {

                    while (!XxlMqClientFactory.clientFactoryPoolStoped) {
                        try {
                            XxlMqMessage message = newMessageQueue.take();
                            if (message != null) {
                                // load
                                List<XxlMqMessage> messageList = new ArrayList<>();
                                messageList.add(message);

                                List<XxlMqMessage> otherMessageList = new ArrayList<>();
                                int drainToNum = newMessageQueue.drainTo(otherMessageList, 100);
                                if (drainToNum > 0) {
                                    messageList.addAll(otherMessageList);
                                }

                                // save
                                xxlMqBroker.addMessages(messageList);
                            }
                        } catch (Exception e) {
                            if (!XxlMqClientFactory.clientFactoryPoolStoped) {
                                logger.error(e.getMessage(), e);
                            }
                        }
                    }

                    // finally total
                    List<XxlMqMessage> otherMessageList = new ArrayList<>();
                    int drainToNum = newMessageQueue.drainTo(otherMessageList);
                    if (drainToNum> 0) {
                        xxlMqBroker.addMessages(otherMessageList);
                    }

                }
            });
        }
 }
代理调用的任何方法,都会走到下面的逻辑:
public Object getObject() {
		return Proxy.newProxyInstance(Thread.currentThread()
				.getContextClassLoader(), new Class[] { iface },
				new InvocationHandler() {
					@Override
					public Object invoke(Object proxy, Method method, Object[] args) throws Throwable {

						// method param
						String className = method.getDeclaringClass().getName();	// iface.getName()
						String varsion_ = version;
						String methodName = method.getName();
						Class<?>[] parameterTypes = method.getParameterTypes();
						Object[] parameters = args;

						// address
						String finalAddress = address;
						if (finalAddress==null || finalAddress.trim().length()==0) {
							if (invokerFactory!=null && invokerFactory.getServiceRegistry()!=null) {
								// discovery
								String serviceKey = XxlRpcProviderFactory.makeServiceKey(className, varsion_);
								TreeSet<String> addressSet = invokerFactory.getServiceRegistry().discovery(serviceKey);
								// load balance
								if (addressSet==null || addressSet.size()==0) {
									// pass
								} else if (addressSet.size()==1) {
									finalAddress = addressSet.first();
								} else {
									finalAddress = loadBalance.xxlRpcInvokerRouter.route(serviceKey, addressSet);
								}

							}
						}
						if (finalAddress==null || finalAddress.trim().length()==0) {
							throw new XxlRpcException("xxl-rpc reference bean["+ className +"] address empty");
						}

						// request
						XxlRpcRequest xxlRpcRequest = new XxlRpcRequest();
	                    xxlRpcRequest.setRequestId(UUID.randomUUID().toString());
	                    xxlRpcRequest.setCreateMillisTime(System.currentTimeMillis());
	                    xxlRpcRequest.setAccessToken(accessToken);
	                    xxlRpcRequest.setClassName(className);
	                    xxlRpcRequest.setMethodName(methodName);
	                    xxlRpcRequest.setParameterTypes(parameterTypes);
	                    xxlRpcRequest.setParameters(parameters);

	                    // send
						if (CallType.SYNC == callType) {
							// future-response set
							XxlRpcFutureResponse futureResponse = new XxlRpcFutureResponse(invokerFactory, xxlRpcRequest, null);
							try {
								// do invoke
								client.asyncSend(finalAddress, xxlRpcRequest);

								// future get
								XxlRpcResponse xxlRpcResponse = futureResponse.get(timeout, TimeUnit.MILLISECONDS);
								if (xxlRpcResponse.getErrorMsg() != null) {
									throw new XxlRpcException(xxlRpcResponse.getErrorMsg());
								}
								return xxlRpcResponse.getResult();
							} catch (Exception e) {
								logger.info(">>>>>>>>>>> xxl-rpc, invoke error, address:{}, XxlRpcRequest{}", finalAddress, xxlRpcRequest);

								throw (e instanceof XxlRpcException)?e:new XxlRpcException(e);
							} finally{
								// future-response remove
								futureResponse.removeInvokerFuture();
							}
						} else if (CallType.FUTURE == callType) {
							// future-response set
							XxlRpcFutureResponse futureResponse = new XxlRpcFutureResponse(invokerFactory, xxlRpcRequest, null);
                            try {
								// invoke future set
								XxlRpcInvokeFuture invokeFuture = new XxlRpcInvokeFuture(futureResponse);
								XxlRpcInvokeFuture.setFuture(invokeFuture);

                                // do invoke
                                client.asyncSend(finalAddress, xxlRpcRequest);

                                return null;
                            } catch (Exception e) {
								logger.info(">>>>>>>>>>> xxl-rpc, invoke error, address:{}, XxlRpcRequest{}", finalAddress, xxlRpcRequest);

								// future-response remove
								futureResponse.removeInvokerFuture();

								throw (e instanceof XxlRpcException)?e:new XxlRpcException(e);
                            }

						} else if (CallType.CALLBACK == callType) {

							// get callback
							XxlRpcInvokeCallback finalInvokeCallback = invokeCallback;
							XxlRpcInvokeCallback threadInvokeCallback = XxlRpcInvokeCallback.getCallback();
							if (threadInvokeCallback != null) {
								finalInvokeCallback = threadInvokeCallback;
							}
							if (finalInvokeCallback == null) {
								throw new XxlRpcException("xxl-rpc XxlRpcInvokeCallback(CallType="+ CallType.CALLBACK.name() +") cannot be null.");
							}

							// future-response set
							XxlRpcFutureResponse futureResponse = new XxlRpcFutureResponse(invokerFactory, xxlRpcRequest, finalInvokeCallback);
							try {
								client.asyncSend(finalAddress, xxlRpcRequest);
							} catch (Exception e) {
								logger.info(">>>>>>>>>>> xxl-rpc, invoke error, address:{}, XxlRpcRequest{}", finalAddress, xxlRpcRequest);

								// future-response remove
								futureResponse.removeInvokerFuture();

								throw (e instanceof XxlRpcException)?e:new XxlRpcException(e);
							}

							return null;
						} else if (CallType.ONEWAY == callType) {
                            client.asyncSend(finalAddress, xxlRpcRequest);
                            return null;
                        } else {
							throw new XxlRpcException("xxl-rpc callType["+ callType +"] invalid");
						}

					}
				});
	}
封装好XxlRpcRequest对象,对象中指定了需要调用Broker的哪个方法、方法的参数类型和参数值,这样Broker就可以知道通过反射调用哪个方法了。至于怎么找到Broker,之前也分析过,这里传进来的address是null,所以,会通过http的方式查询到目前正常活跃的Broker的地址集,通过路由策略指定一个地址,然后调用client.asyncSend(finalAddress, xxlRpcRequest)将消息发送出去。分析到这里,好像没有看到netty客户端连接的代码,它们是什么时候建立连接的呢?因为只有先建立了连接,两个端才能正常通信,客户端才能调用服务端的方法。进入client.asyncSend看看: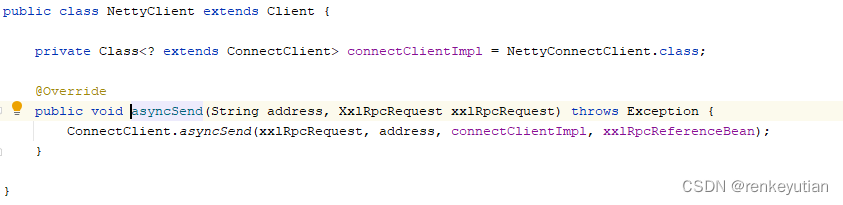
通过前面的分析,不难判断是client 就是NettyClient。接着进入: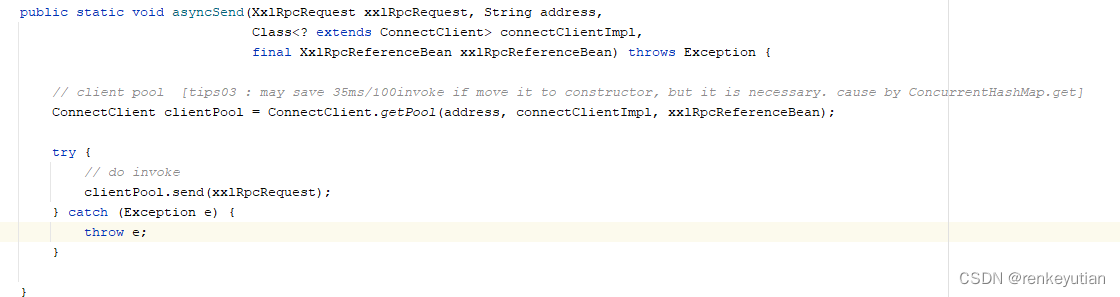
private static ConnectClient getPool(String address, Class<? extends ConnectClient> connectClientImpl,
                                         final XxlRpcReferenceBean xxlRpcReferenceBean) throws Exception {

        // init base compont, avoid repeat init
        if (connectClientMap == null) {
            synchronized (ConnectClient.class) {
                if (connectClientMap == null) {
                    // init
                    connectClientMap = new ConcurrentHashMap<String, ConnectClient>();
                    // stop callback
                    xxlRpcReferenceBean.getInvokerFactory().addStopCallBack(new BaseCallback() {
                        @Override
                        public void run() throws Exception {
                            if (connectClientMap.size() > 0) {
                                for (String key: connectClientMap.keySet()) {
                                    ConnectClient clientPool = connectClientMap.get(key);
                                    clientPool.close();
                                }
                                connectClientMap.clear();
                            }
                        }
                    });
                }
            }
        }

        // get-valid client
        ConnectClient connectClient = connectClientMap.get(address);
        if (connectClient!=null && connectClient.isValidate()) {
            return connectClient;
        }

        // lock
        Object clientLock = connectClientLockMap.get(address);
        if (clientLock == null) {
            connectClientLockMap.putIfAbsent(address, new Object());
            clientLock = connectClientLockMap.get(address);
        }

        // remove-create new client
        synchronized (clientLock) {

            // get-valid client, avlid repeat
            connectClient = connectClientMap.get(address);
            if (connectClient!=null && connectClient.isValidate()) {
                return connectClient;
            }

            // remove old
            if (connectClient != null) {
                connectClient.close();
                connectClientMap.remove(address);
            }

            // set pool
            ConnectClient connectClient_new = connectClientImpl.newInstance();
            connectClient_new.init(address, xxlRpcReferenceBean.getSerializer(), xxlRpcReferenceBean.getInvokerFactory());
            connectClientMap.put(address, connectClient_new);

            return connectClient_new;
        }

    }
可以看到,这里对新建的连接进行了缓存。第一次会新建和服务端的连接,后面如果这个连接一直正常,就直接从缓存里面取了。先分析一下这段代码,很值得分析,里面有几个点值得我们一起学习一下,可以运用到自己的代码中。
- connectClientMap使用双重检查加锁方式,保证了并发情况下,只会有一个线程初始化成功。
- 在新建连接的时候,也使用了锁,而且是一个地址对应一个锁,这样的锁力度限制在地址,同样可以提高并发。
- 在缓存中获取连接之后,还检查了连接是否活跃。不活跃,就关闭连接,并且移除之后,新建一个放到缓存。
下面看一下建立连接的代码,在ConnectClient#init方法中:
public void init(String address, final Serializer serializer, final XxlRpcInvokerFactory xxlRpcInvokerFactory) throws Exception {

        Object[] array = IpUtil.parseIpPort(address);
        String host = (String) array[0];
        int port = (int) array[1];


        this.group = new NioEventLoopGroup();
        Bootstrap bootstrap = new Bootstrap();
        bootstrap.group(group)
                .channel(NioSocketChannel.class)
                .handler(new ChannelInitializer<SocketChannel>() {
                    @Override
                    public void initChannel(SocketChannel channel) throws Exception {
                        channel.pipeline()
                                .addLast(new NettyEncoder(XxlRpcRequest.class, serializer))
                                .addLast(new NettyDecoder(XxlRpcResponse.class, serializer))
                                .addLast(new NettyClientHandler(xxlRpcInvokerFactory));
                    }
                })
                .option(ChannelOption.TCP_NODELAY, true)
                .option(ChannelOption.SO_KEEPALIVE, true)
                .option(ChannelOption.CONNECT_TIMEOUT_MILLIS, 10000);
        this.channel = bootstrap.connect(host, port).sync().channel();

        // valid
        if (!isValidate()) {
            close();
            return;
        }

        logger.debug(">>>>>>>>>>> xxl-rpc netty client proxy, connect to server success at host:{}, port:{}", host, port);
    }

    @Override
    public void send(XxlRpcRequest xxlRpcRequest) throws Exception {
        this.channel.writeAndFlush(xxlRpcRequest).sync();
    }
连接建立之后,缓存起来。然后调用send方法将消息发送出去。这样就实现了服务端-客户端的双向通信。
- 再看一下broadcast的逻辑:
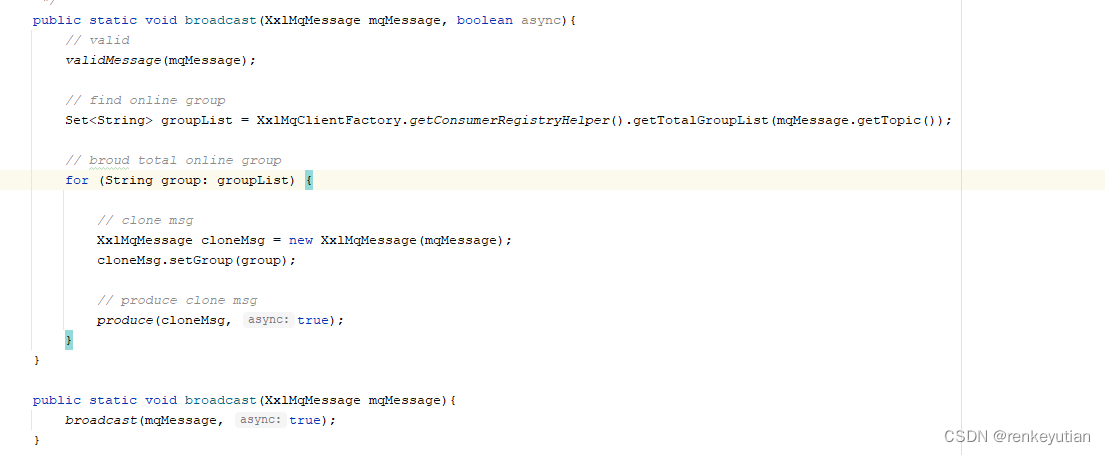
先找到这个topic下面所有的分组,然后向这个topic下面的每个分组里面都发一条消息。最后还是produce的那套逻辑。
延迟消息、并行、串行消息,都是通过produce发送的。但是在consumer消费的时候,会根据情况,进行不同的处理。下一篇会进行分析。
小结
1、里面有很多小细节,比如为什么要做代理,创建连接时的双重检查,加锁的粒度等等,都是可以运用到自己的代码中的。主要是体会别人的思想,为啥要这么做,什么场景下要这么做。
2、本质上,各种消息的发送,其实就是一套逻辑。重点应该是consumer端的消费代码的处理。


 131
131


 被折叠的 条评论
为什么被折叠?
被折叠的 条评论
为什么被折叠?
 到【灌水乐园】发言


