


由于fixture重要&&功能强大,因此本章节再着重介绍一下。
上一篇中已经介绍了setup, teardown在pytest中的使用,但是pytest中一般不使用setup,当然没有觉得,pytest作为一个开源的测试框架,使用日常使用的就是最好的。
1 fixture和setup/teardown对比
setup是针对整个测试脚本.py的,上文中已展示了对.py中的每个case,都会执行setup方法做数据准备工作。二者直接的区别在于以下几点:
- setup/teardown是针对测试脚本全局来设置的,没办法只针对某个方法来设置,假如遇到一些用例1需要提前登陆,用例3不需要提前登陆,到了用例5又要登陆,这种场景的用setup就显得很无助了,这时就可用fixture的方式替换setup/teardown了
- fixture的命名方式很灵活,不像setup/teardown,只能用如setup、teardown、setup_method等;
- 使用fixture的conftest方式可以跨模块(py文件)来共享前置、后置数据,而且在调用时不需要导入fixture修饰的方法,即:scope="module"方式
- fixture还可以实现多个模块-py文件共用一个session的情况,即:scope=session方式
import pytest


def setup_module():
    print("\n 这里是setup_module")

def teardown_module():
    print("这里是teardown_module")

def setup_function():
    print("这里是setup_function")

def teardown_function():
    print("这里是teardown_function")

def test_case1():
    print("这里是test_case1")

def test_case2():
    print("这里是test_case2")

class Testclass():
    def setup_class(self):  # 类似于unittest里的@classmethod
        print("这里是setup_class")

    def teardown_class(self):
        print("这里是teardown_class")

    def setup(self):
        print("这里是setup")

    def teardown(self):
        print("这里是teardown")

    def setup_method(self):  # 这里同setup方法作用其实一样
        print("这里是setup_method")

    def teardown_method(self):
        print("这里是teardown_method")

    def test_ClassCase1(self):
        print("这里是test_testClassCase1")

    def test_ClassCase2(self):
        print("这里是test_testClassCase1")
2 fixture 参数使用
fixture函数定义如下:
def fixture(
    fixture_function: Optional[FixtureFunction] = None,
    *,
    scope: "Union[_ScopeName, Callable[[str, Config], _ScopeName]]" = "function",
    params: Optional[Iterable[object]] = None,
    autouse: bool = False,
    ids: Optional[
        Union[Sequence[Optional[object]], Callable[[Any], Optional[object]]]
    ] = None,
    name: Optional[str] = None,
) -> Union[FixtureFunctionMarker, FixtureFunction]:```

在程序中使用的是,在被装饰的函数前面加上如下语句即可,比如定义了一个func函数,需要加上fixture装饰器

```python
@pytest.fixture(scope,params,autouse,ids,name)
def func():
   ...
这里给出一个示例:
import pytest
@pytest.fixture(scope="function",
                params=([{"id":10,"name":"mike"},
                        {"id":20,"name":"bill"}]))
def funGlobal(request):
    '''被装饰方法'''
    id=request.param['id']
    name=request.param['name']
#     print("这里是funGlobal()")
    return id,name
def test_case1(funGlobal):
    '''测试方法,入参直接调用即可,如果测试方法和被装饰方法不再一个py文件,
    则无需导入被修饰方法'''
    print("这里是测试用例1")
执行命令如下:
pytest test_007.py --html=./testreport.html
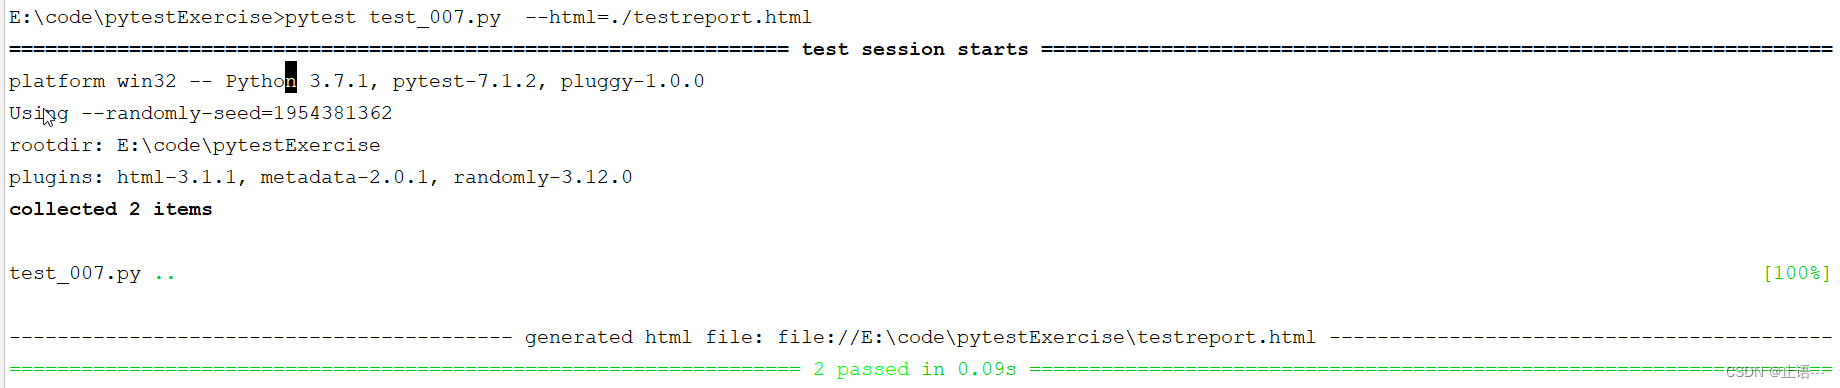
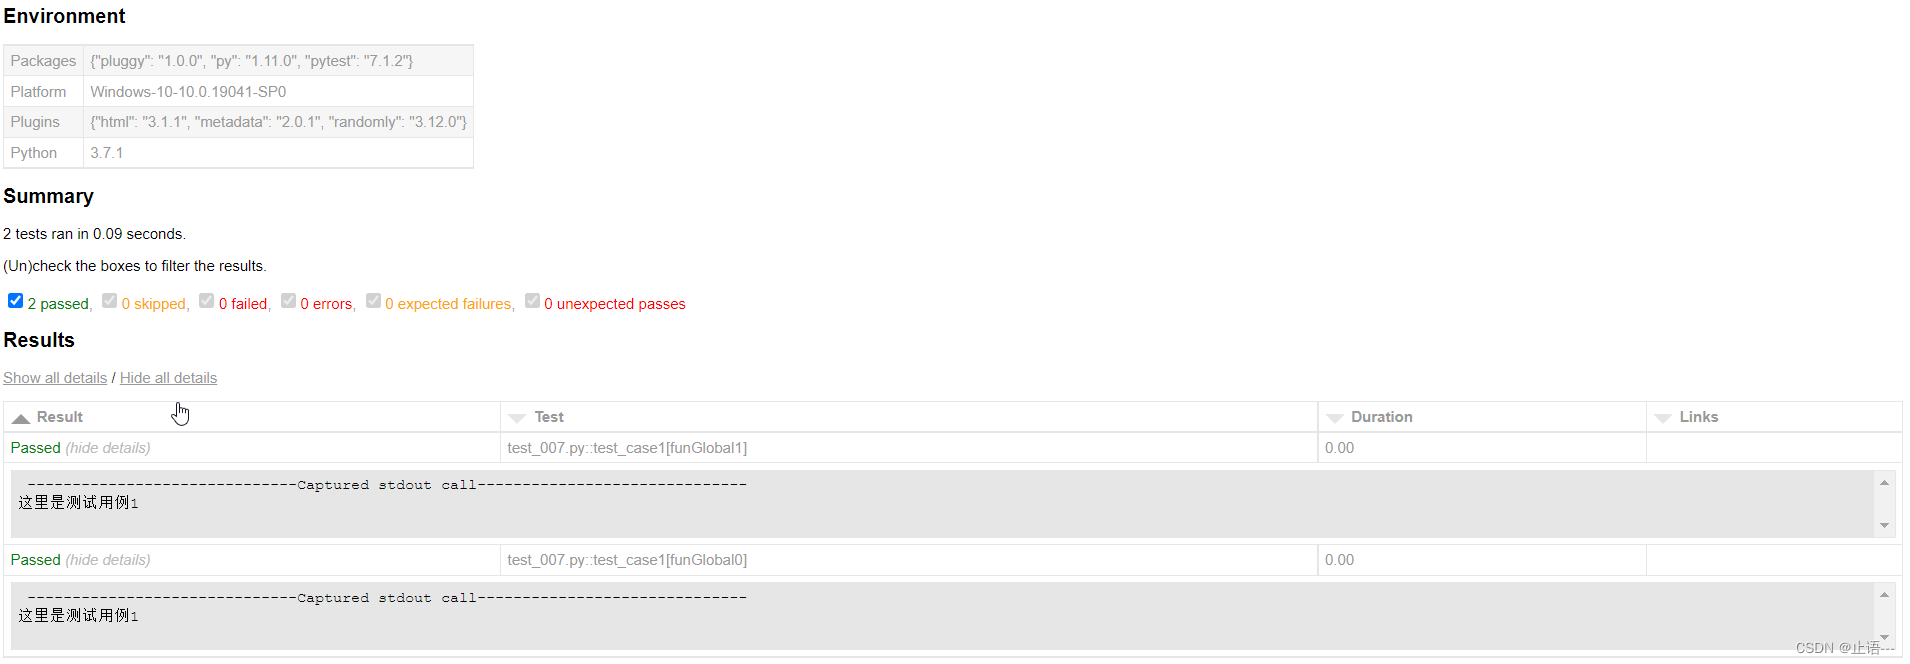
输出结果如下:
这里就fixture中的每个参数再详细介绍下
scope:scope的取值范围有4个,分别是’function’,‘module’,‘class’,‘session’,默认为function
- function:每个test都会运行,且为默认参数,且所有文件中的测试用例执行前都会执行一次fixture装饰器的方法。py文件(即模块)内依次执行所有测试方法(包括类内和类外)
- class:每个class的所有test只运行一次,---->每个测试文件里的测试类执行前执行1次fixture装饰器修饰的方法,类外测试方法不考虑。py文件(即模块)内依次执行所有测试方法(包括类内和类外),若多个测试方法调用同1个装饰器方法,则执行时合并到一轮装饰器传参内,即案例中case3、case4
- module:每个module的所有test只运行一次,可以实现多个.py跨文件共享, 每一个.py文件调用一次,---->每个测试py文件执行前执行1次conftest文件中的fixture。py文件(即模块)内优先依次执行带fixture装饰的测试方法(包括类内和类外),再依次执行不带fixture的方法。,若多个测试方法调用同1个装饰器方法,则执行时合并到一轮装饰器传参内,即案例中case1、case3、case4
- session:每个session只运行一次,可以实现多个.py跨文件使用1个session来完成多个用例,session作用域是最大的,常配合conftest.py方式使用---->所有测试文件执行前执行1次conftest文件中的fixture
这里以一个具体的示例来解释上面的论点:
import pytest


@pytest.fixture(scope="module",
                params=([{"id": 1, "name": "mike"},
                         {"id": 2, "name": "bill"}]), name="testfun")
def funGlobal(request):
    '''fixture方法,request是固定参数'''
    id = request.param['id']  # request.param可以拿到装饰器的params的值
    name = request.param['name']
    print("funGlobal()--别名testfun")
    return id, name

def noCase():
    print("这里不是测试用例方法")

def testcase1(testfun):
    '''1.类外测试方法,调用fixture装饰器方法'''
    print("\n testcase1--{}".format(testfun))

def testcase2():
    '''2.类外测试方法,不调用fixture'''
    print("testcase2()\n")

'''3.放在class类前,相当于类内所有测试方法都带入fixture装饰方法,
就不用每个单独加@pytest.mark.usefixtures("testfun")   '''
class TestClass():
    def testcase11(self):
        '''4.类内测试方法,不调用fixture'''
        print("testcase11")

    @pytest.mark.paramTest  # 打mark标签
    def testcase3(self, testfun):
        '''5.类内测试方法,入参传fixture装饰方法'''
        print("testcase3----id:{}".format(testfun))

    def testcase4(self):
        '''6.类内测试方法,使用pytest.mark.usefixtures
        调用fixture装饰方法(此处不是打mark标签)'''
        print("testcase4")

if __name__ == "__main__":
    pytest.main(["-s", __file__])
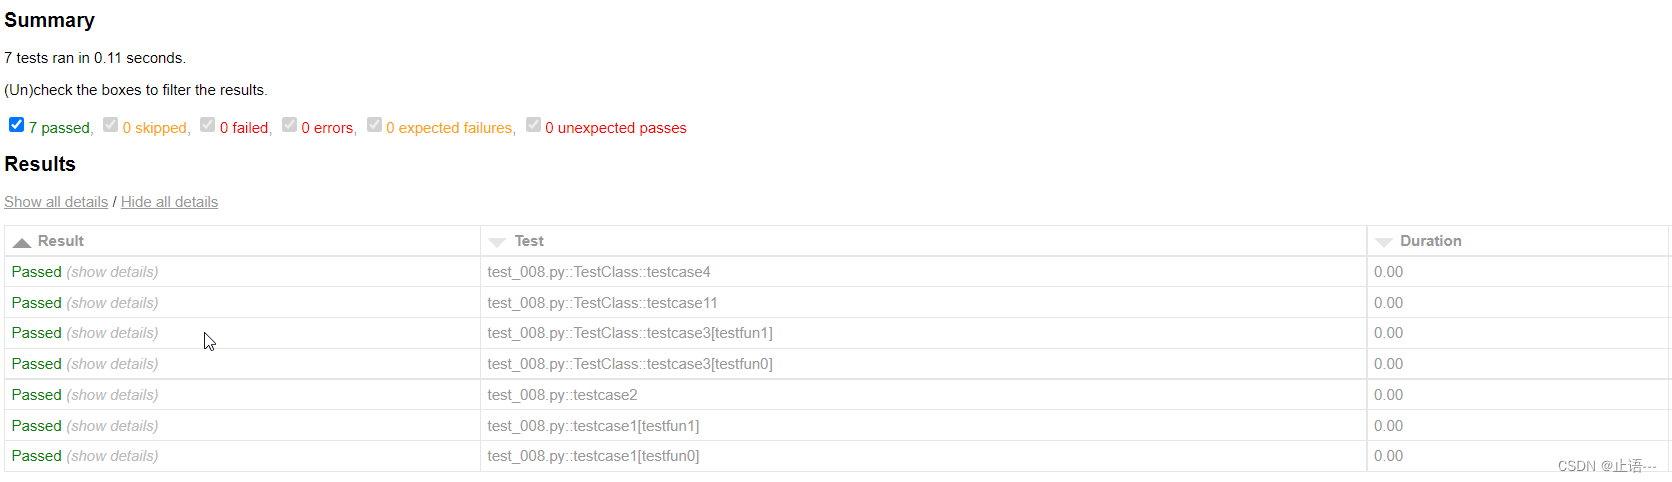
执行命令:pytest test_008.py --html=./testreport.html 输出测试报告:

接着就每个执行输出的case进行分析,因为在pytest中已经写了python调用pytest的main([-s, file]),直接执行该文件.
另外关于pytest中参数传递的问题,除了上面的返回字典的方式,还有比如返回原组的方式
@pytest.fixture(params=[
('redis','6666'),
('elastissearch','9200')
])
def getInfo(request):
login,password = request.param
print(login,password)
2.1scope参数
2.1.1 scope=module
pytest的参数scope=module时
test_008.py funGlobal()--别名testfun
.
 testcase1--(2, 'bill')
.testcase3----id:(2, 'bill')
.testcase2()

funGlobal()--别名testfun
.
 testcase1--(1, 'mike')
.testcase3----id:(1, 'mike')
.testcase11
.testcase4
说明:对比输出报告,先执行类中有装饰器方法的测试用例按从上到下执行,再执行不带装饰器的测试用例
2.1.2 scope=funciton
ccope=funciton时,执行py文件输出如下:
#@pytest.fixture(scope="function",
#                params=([{"id": 1, "name": "mike"},
#                         {"id": 2, "name": "bill"}]), name="testfun")
============================= test session starts =============================
platform win32 -- Python 3.7.1, pytest-7.1.2, pluggy-1.0.0
Using --randomly-seed=1461922867
rootdir: E:\code\pytestExercise
plugins: html-3.1.1, metadata-2.0.1, randomly-3.12.0collected 2 items

test_008.py funGlobal()--别名testfun
.
 testcase1--(2, 'bill')
funGlobal()--别名testfun
.
 testcase1--(1, 'mike')
                                                           [100%]

============================== warnings summary ===============================
说明:py文件内,先执行类中的测试方法,从下到上依次执行测试方法,遇到有装饰器的直接调用装饰器
2.1.3 scope=class
#@pytest.fixture(scope="class",
#                params=([{"id": 1, "name": "mike"},
#                         {"id": 2, "name": "bill"}]), name="testfun")
============================= test session starts =============================
platform win32 -- Python 3.7.1, pytest-7.1.2, pluggy-1.0.0
Using --randomly-seed=43670548
rootdir: E:\code\pytestExercise
plugins: html-3.1.1, metadata-2.0.1, randomly-3.12.0collected 7 items

test_008.py .testcase2()

funGlobal()--别名testfun
.
 testcase1--(2, 'bill')
funGlobal()--别名testfun
.
 testcase1--(1, 'mike')
funGlobal()--别名testfun
.testcase3----id:(1, 'mike')
.testcase4
.testcase11
funGlobal()--别名testfun
.testcase3----id:(2, 'bill')
                                                      [100%]

============================== warnings summary ===============================
输出测试报告:
说明:py文件内,先在类外从上到下执行带装饰器名的测试用例,然后执行不带装饰器名的测试用例;再进入类中从上到下执行测试用例,遇到多个带相同装饰器的测试方法先执行装饰器再执行多个测试方法
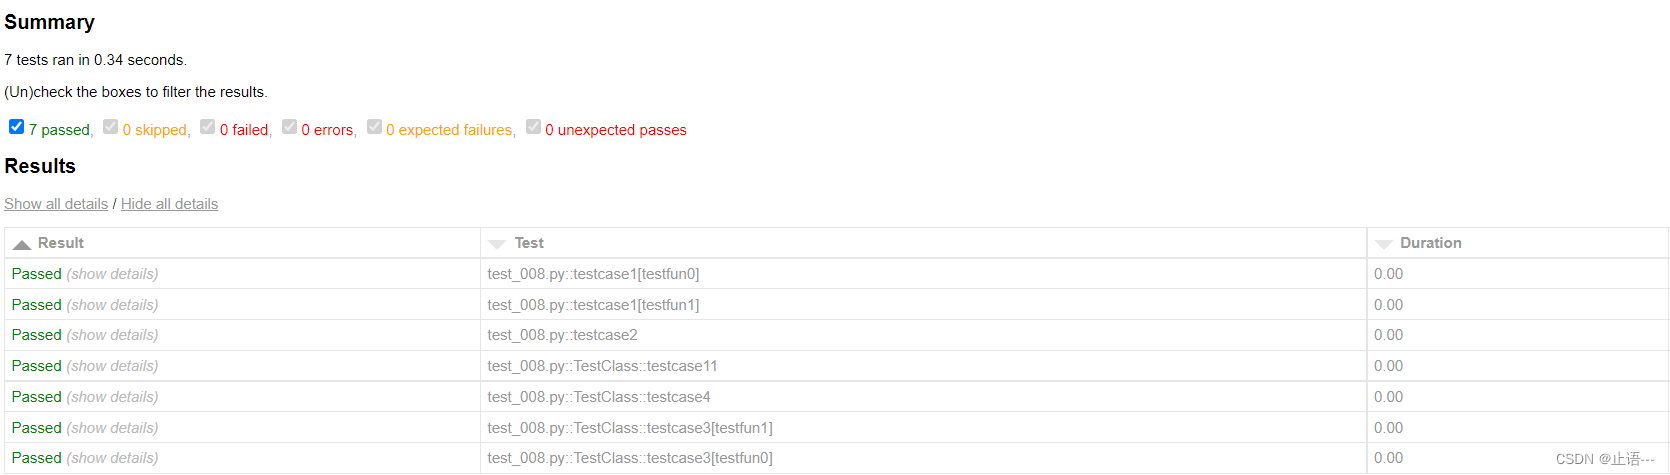
2.1.4 scope=session
#@pytest.fixture(scope="session",
#                params=([{"id": 1, "name": "mike"},
#                         {"id": 2, "name": "bill"}]), name="testfun")
============================= test session starts =============================
platform win32 -- Python 3.7.1, pytest-7.1.2, pluggy-1.0.0
Using --randomly-seed=3534237076
rootdir: E:\code\pytestExercise
plugins: html-3.1.1, metadata-2.0.1, randomly-3.12.0collected 2 items

test_008.py funGlobal()--别名testfun
.
 testcase1--(1, 'mike')
funGlobal()--别名testfun
.
 testcase1--(2, 'bill')
                                                           [100%]

============================== warnings summary ===============================
输出测试报告:

说明:py文件内,scope=session的时候,所有用例在开始会执行1次fixture,然后全部用例结束后再执行1次fixture中的销毁操作。用例按顺序一次执行。因有2组数据 所以执行2次。
scope=session这里提供一个单独的示例,针对常见的登录业务,还比如常见的创建资源使用后完成销毁,如创建云计算ECS资源的测试。
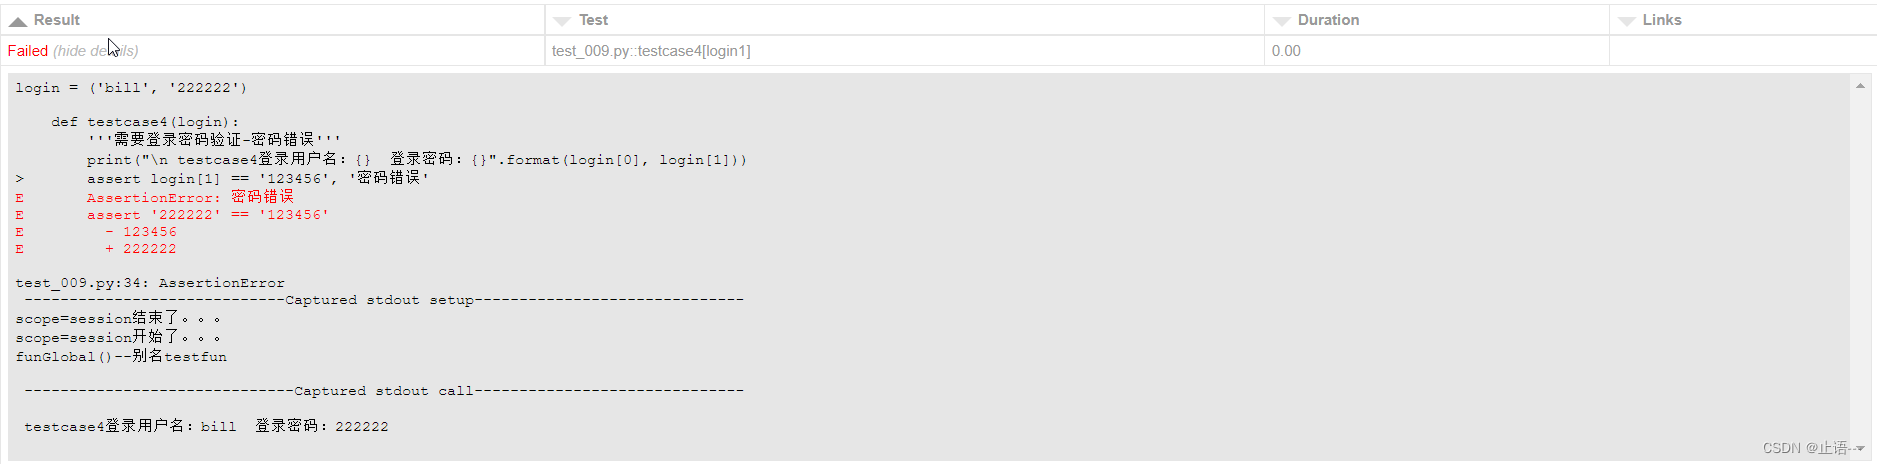
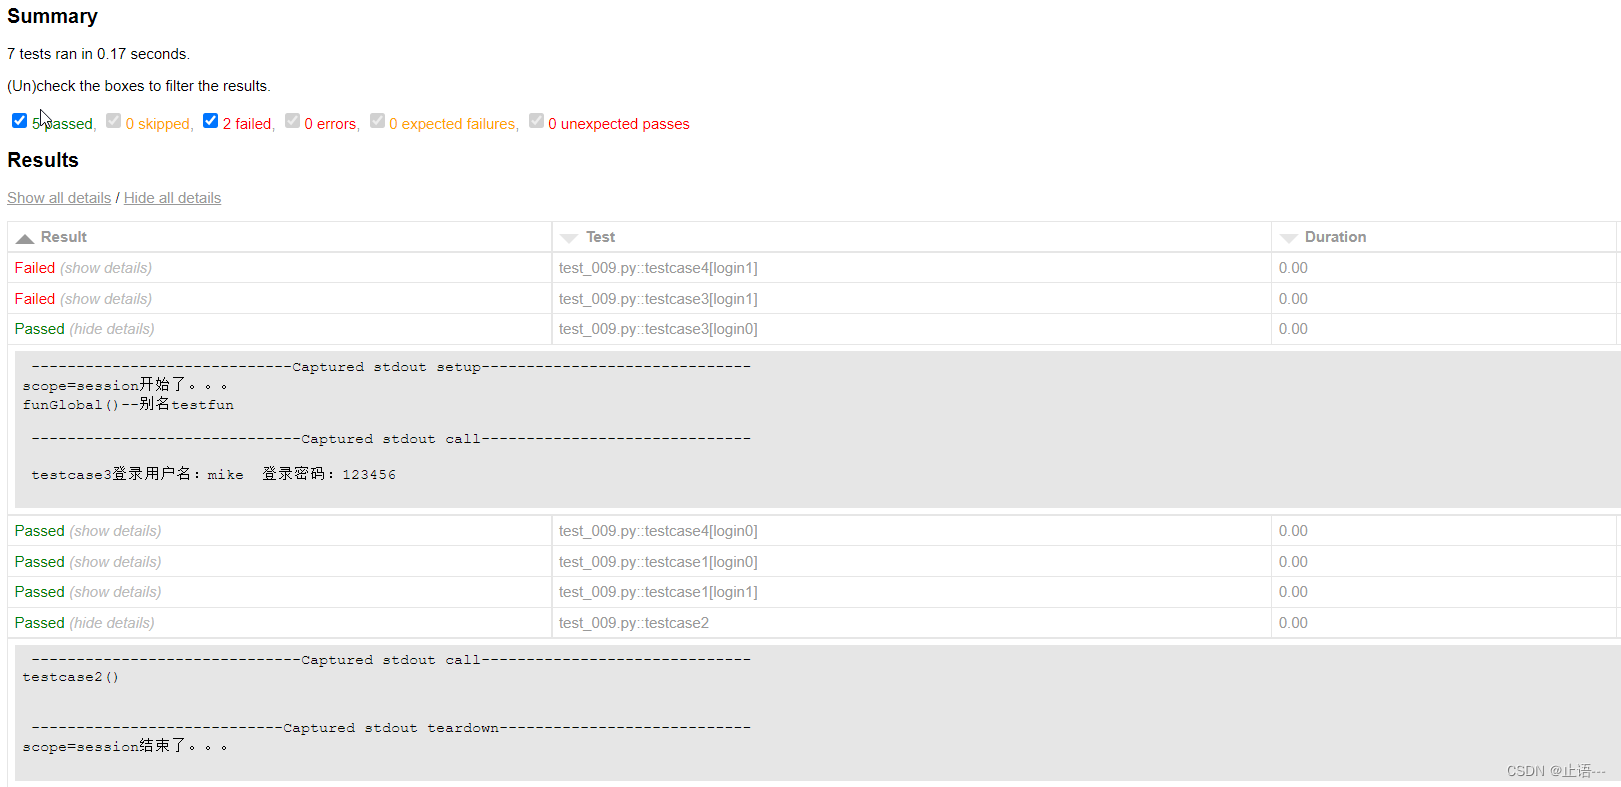
test_009.py testcase2()
.scope=session开始了。。。funGlobal()--别名testfun
 testcase1登录用户名:mike  登录密码:123456
 testcase3登录用户名:mike  登录密码:123456
 testcase4登录用户名:mike  登录密码:123456
.scope=session结束了。。。scope=session开始了。。。funGlobal()--别名testfun
 testcase1登录用户名:bill  登录密码:222222
 testcase3登录用户名:bill  登录密码:222222
Ftestcase4登录用户名:bill  登录密码:222222
Fscope=session结束了。。。后面是断言相关输出信息......
说明:py文件内,scope=session的时候,所有用例在开始会执行1次fixture,然后全部用例结束后再执行1次fixture中的销毁操作。用例按顺序一次执行。因有2组数据 所以执行2次。
2.2 params参数
默认None,可传入多个参数来多次调用fixture装饰的方法,在用例中分别循环使用这些不同参数
2.3 autouse参数
为True,则为所有测试激活fixture,对于测试方法可以看到它;为False(默认值)则显示需要参考来激活fixture
注意:若为True,则在测试方法中调用装饰器方法时,测试方法不需要在参数中指定对应的被装饰函数名也会被调用;若为False即默认值,则在测试方法的参数中需要传入被装饰的方法名或装饰器别名。可见autouse=True会影响所有测试方法,使用时要慎重。
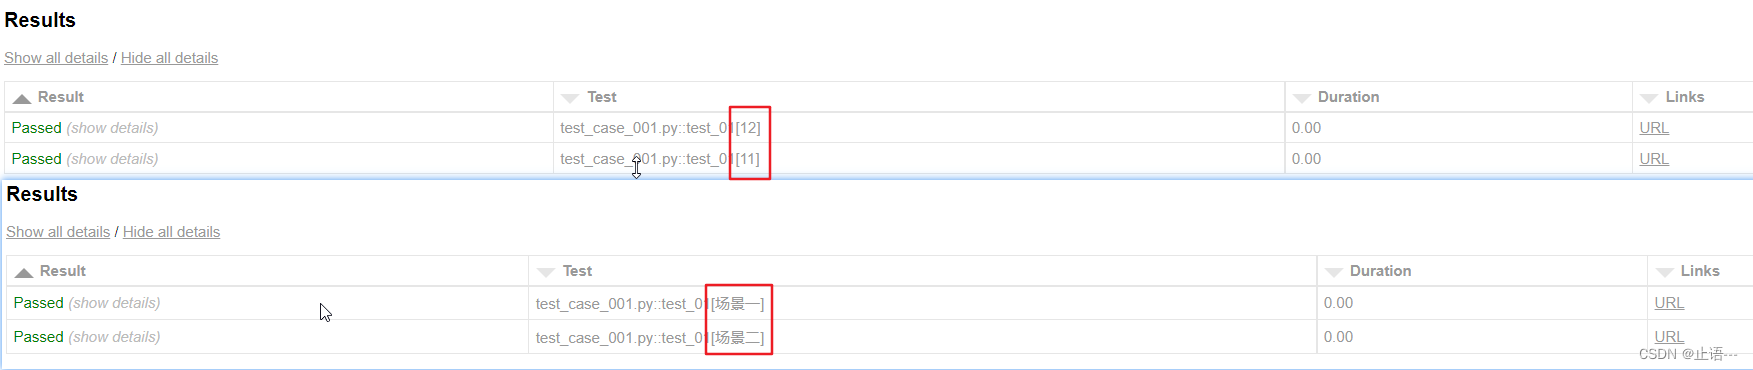
2.4 ids参数
每个字符串id的列表,每个字符串对应于params,这样他们就是测试ID的一部分。如果没有提供ID,将从params自动生成.如何理解呢
@pytest.mark.parametrize('a',[11,12],)
def test_01(a):
    print(a)
@pytest.mark.parametrize('a',[11,12],ids=["场景一","场景二"])
def test_01(a):
    print(a)
输出测试报告对比如下
比较常见的场景是组合情形
@pytest.mark.parametrize('a',[11,12],ids=["流程A","流程B"])
@pytest.mark.parametrize('b,c',[(11,12),(22,23)],ids=["场景一","场景二"])
def test_01(a,b,c):
    print(a,b,c)

2.5 name参数
fixture的名称。默认为装饰函数的名称。如果fixture在它的同一模块中使用,则功能名称将被请求的功能arg遮蔽; 解决这个问题的一种方法是将装饰函数命名为“fixture_ ”然后使用”@ pytest.fixture(name =‘’)
3 fixture 常用方法
3.1 在测试方法的参数中传入fixture装饰函数名
import pytest
@pytest.fixture(scope="function",
                params=([{"id":10,"name":"Demo8-mike"},
                        {"id":20,"name":"Demo8-bill"}]),name="testfun")
def funGlobal(request):
    '''fixture方法1-作用域为:function'''
    id=request.param['id']
    name=request.param['name']
    print("这里是装饰器funGlobal()别名testfun")
    return id,name
def testcase1(testfun):#将装饰函数fixture以别名testfun传入测试用例方法的参数中
    print("\n这里是类外部方法testcase1,调用了funGlobal()====={}".format(testfun))


 370
370


 被折叠的 条评论
为什么被折叠?
被折叠的 条评论
为什么被折叠?
 到【灌水乐园】发言


