


一、前言
上一篇文章讲了一个服务如何去配置中心读取文件,配置中心如何去远端 git 读取配置文件,构建了是单节点的 Config Server。当服务实例很多时,都从配置中心读取文件,这时可以考虑配置中心集群,从而达到高可用。
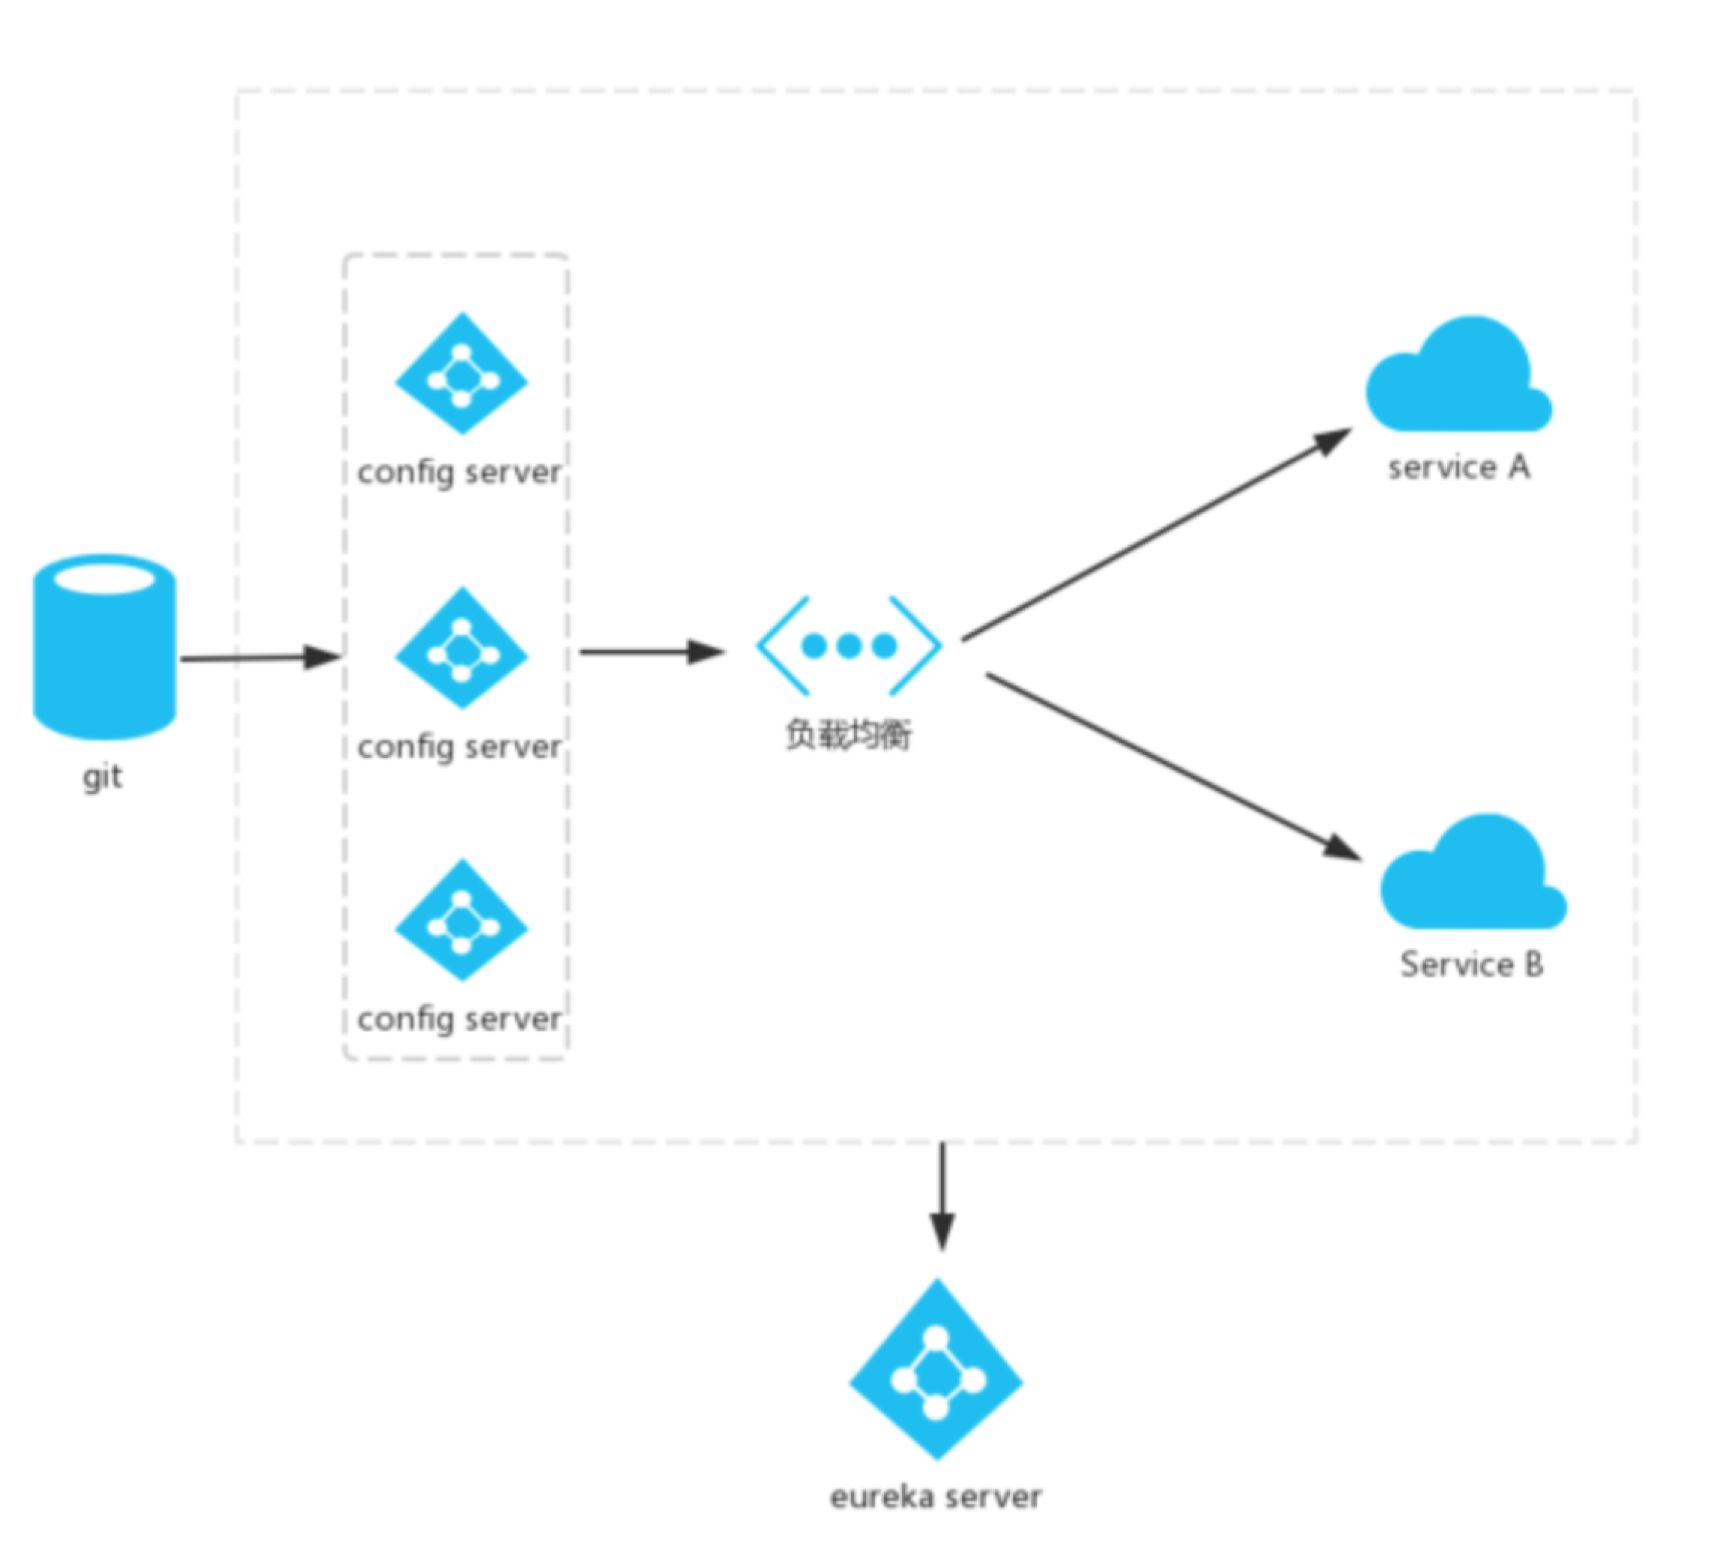
Spring Cloud Config 高可用的架构图如下:
二、准备工作
1、将上一篇的代码复制一份修改一下,创建一个 microservice-eureka-server 工程,用作服务注册中心。
在其pom.xml文件引入Eureka的起步依赖spring-cloud-starter-netflix- eureka-server,代码如下:
<?xml version="1.0" encoding="UTF-8"?>
<project xmlns="http://maven.apache.org/POM/4.0.0" xmlns:xsi="http://www.w3.org/2001/XMLSchema-instance"
         xsi:schemaLocation="http://maven.apache.org/POM/4.0.0 https://maven.apache.org/xsd/maven-4.0.0.xsd">
    <modelVersion>4.0.0</modelVersion>

    <parent>
        <groupId>com.riemann</groupId>
        <artifactId>microservice-eureka-ha-config</artifactId>
        <version>0.0.1-SNAPSHOT</version>
    </parent>

    <groupId>com.riemann</groupId>
    <artifactId>microservice-eureka-server</artifactId>
    <version>0.0.1-SNAPSHOT</version>
    <packaging>jar</packaging>

    <name>microservice-eureka-server</name>
    <description>Eureka Server</description>

    <dependencies>
        <dependency>
            <groupId>org.springframework.cloud</groupId>
            <artifactId>spring-cloud-starter-netflix-eureka-server</artifactId>
        </dependency>
        <dependency>
            <groupId>org.springframework.boot</groupId>
            <artifactId>spring-boot-starter-web</artifactId>
        </dependency>
    </dependencies>

</project>
2、在配置文件application.yml上,指定服务端口为8761,加上作为服务注册中心的基本配置,代码如下:
server:
  port: 8761

eureka:
  instance:
    hostname: localhost
  client:
    registerWithEureka: false
    fetchRegistry: false
    serviceUrl:
      defaultZone: http://${eureka.instance.hostname}:${server.port}/eureka/
3、入口 Application 类:
package com.riemann.microserviceeurekaserver;

import org.springframework.boot.SpringApplication;
import org.springframework.boot.autoconfigure.SpringBootApplication;
import org.springframework.cloud.netflix.eureka.server.EnableEurekaServer;

@SpringBootApplication
@EnableEurekaServer
public class MicroserviceEurekaServerApplication {
    public static void main(String[] args) {
        SpringApplication.run(MicroserviceEurekaServerApplication.class, args);
    }
}
三、改造 microservice-eureka-server-config
1、在其pom.xml文件加上EurekaClient的起步依赖spring-cloud-starter-netflix-eureka-client,代码如下:
<?xml version="1.0" encoding="UTF-8"?>
<project xmlns="http://maven.apache.org/POM/4.0.0" xmlns:xsi="http://www.w3.org/2001/XMLSchema-instance"
         xsi:schemaLocation="http://maven.apache.org/POM/4.0.0 https://maven.apache.org/xsd/maven-4.0.0.xsd">
    <modelVersion>4.0.0</modelVersion>

    <parent>
        <groupId>com.riemann</groupId>
        <artifactId>microservice-eureka-ha-config</artifactId>
        <version>0.0.1-SNAPSHOT</version>
    </parent>

    <groupId>com.riemann</groupId>
    <artifactId>microservice-eureka-server-config</artifactId>
    <version>0.0.1-SNAPSHOT</version>
    <packaging>jar</packaging>

    <name>microservice-eureka-server-config</name>
    <description>Eureka Config Server</description>

    <dependencies>
        <dependency>
            <groupId>org.springframework.cloud</groupId>
            <artifactId>spring-cloud-starter-netflix-eureka-client</artifactId>
        </dependency>
        <dependency>
            <groupId>org.springframework.boot</groupId>
            <artifactId>spring-boot-starter-web</artifactId>
        </dependency>
		<dependency>
			<groupId>org.springframework.cloud</groupId>
			<artifactId>spring-cloud-config-server</artifactId>
		</dependency>
    </dependencies>

</project>
2、配置文件application.yml,指定服务注册地址为http://localhost:8761/eureka/,其他配置同上一篇文章,完整的配置如下:
server:
  port: 8888

spring:
  application:
    name: microservice-eureka-server-config
  cloud:
    config:
      server:
        git:
          uri: https://github.com/riemannChow/SpringCloudConfig
          username:
          password:
          searchPaths: repo
      label: master
eureka:
  client:
    serviceUrl:
      defaultZone: http://localhost:8761/eureka/
3、最后需要在程序的启动类Application加上EnableEurekaClient 和 @EnableDiscoveryClient的注解。
package com.riemann.microserviceeurekaserver;

import org.springframework.boot.SpringApplication;
import org.springframework.boot.autoconfigure.SpringBootApplication;
import org.springframework.cloud.client.discovery.EnableDiscoveryClient;
import org.springframework.cloud.config.server.EnableConfigServer;
import org.springframework.cloud.netflix.eureka.EnableEurekaClient;

@SpringBootApplication
@EnableConfigServer
@EnableDiscoveryClient
@EnableEurekaClient
public class MicroserviceEurekaServerConfigApplication {
    public static void main(String[] args) {
        SpringApplication.run(MicroserviceEurekaServerConfigApplication.class, args);
    }
}
四、改造 microservice-provider-service-config
1、将其注册微到服务注册中心,作为Eureka客户端,需要pom文件加上起步依赖spring-cloud-starter-netflix-eureka-client,代码如下:
<?xml version="1.0" encoding="UTF-8"?>
<project xmlns="http://maven.apache.org/POM/4.0.0" xmlns:xsi="http://www.w3.org/2001/XMLSchema-instance"
		 xsi:schemaLocation="http://maven.apache.org/POM/4.0.0 https://maven.apache.org/xsd/maven-4.0.0.xsd">
	<modelVersion>4.0.0</modelVersion>

	<parent>
		<groupId>com.riemann</groupId>
		<artifactId>microservice-eureka-ha-config</artifactId>
		<version>0.0.1-SNAPSHOT</version>
	</parent>

	<groupId>com.riemann</groupId>
	<artifactId>microservice-provider-service-config</artifactId>
	<version>0.0.1-SNAPSHOT</version>
	<packaging>jar</packaging>

	<name>microservice-provider-service-config</name>
	<description>Eureka Config Client</description>

	<dependencies>
		<dependency>
			<groupId>org.springframework.boot</groupId>
			<artifactId>spring-boot-starter-web</artifactId>
		</dependency>
		<dependency>
			<groupId>org.springframework.cloud</groupId>
			<artifactId>spring-cloud-starter-config</artifactId>
		</dependency>
		<dependency>
			<groupId>org.springframework.cloud</groupId>
			<artifactId>spring-cloud-starter-netflix-eureka-client</artifactId>
		</dependency>
	</dependencies>

</project>
2、配置文件bootstrap.yml,注意是bootstrap。加上服务注册地址为http://localhost:8761/eureka/
server:
  port: 8889

spring:
  application:
    name: microservice-provider-service-config
  cloud:
    config:
      profile: dev
      label: master
      discovery:
        enabled: true
        service-id: microservice-eureka-server-config
eureka:
  client:
    serviceUrl:
      defaultZone: http://localhost:8761/eureka/
- spring.cloud.config.discovery.enabled 是从配置中心读取文件。
- spring.cloud.config.discovery.serviceId 配置中心的servieId,即服务名。
这时发现,在读取配置文件不再写ip地址,而是服务名,这时如果配置服务部署多份,通过负载均衡,从而高可用。
依次启动 microservice-eureka-server、microservice-eureka-server-config、microservice-provider-service-config
访问网址:http://localhost:8761/
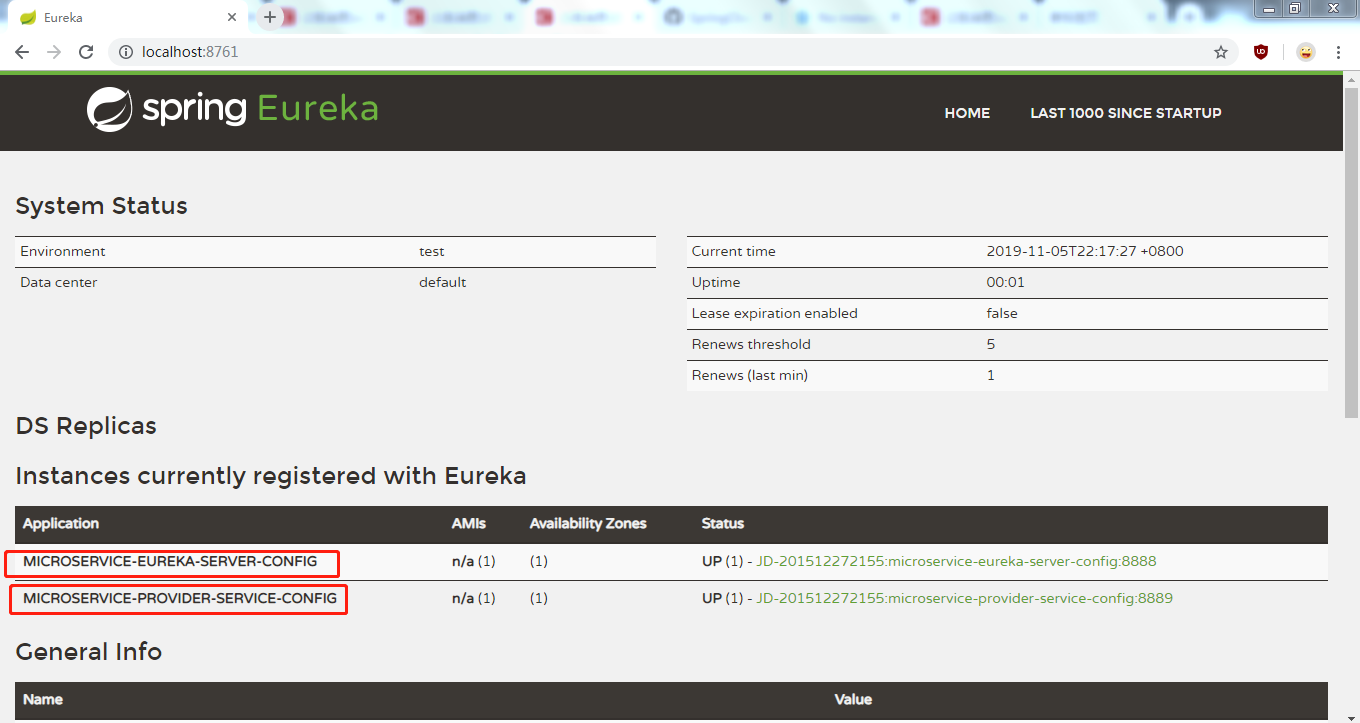
访问 http://localhost:8889/hi,浏览器显示:
foo dev version 27


 3万+
3万+


 被折叠的 条评论
为什么被折叠?
被折叠的 条评论
为什么被折叠?
 到【灌水乐园】发言


