


ddddocr和孪生神经网络是什么
ddddocr:大佬开源的一个已经训练好的模型,功能非常强大,可以识别滑块、点选验证码等,功能非常强大,带动了行业内卷。
pip install ddddocr
https://github.com/sml2h3/ddddocr
孪生神经网络:官方介绍非常专业复杂,我也没看懂,只知道比较两个图片相似度用它就行了
https://github.com/bubbliiiing/Siamese-pytorch
dddocr直接pip安装就行,Siamese要安装还要先配置环境conda、pytorch等非常复杂,建议专门找教程看。
安装好后Siamese还需要安装requirements.txt中的模块。
一切准备就绪后就开始了,大体思路是先用dddocr识别图片上的 图标位置,把识别出来的图标裁剪下来,把裁剪下来的图片手动进行分类,分类好后再使用Siamese进行训练。
图标识别并分割代码
import ddddocr
import cv2
import os
from PIL import Image
import time

det = ddddocr.DdddOcr(det=True)


def ico_slicing(name, coord_list):
    dd = {0: 'A', 1: 'B', 2: 'C', 3: 'D', 4:'E'}
    # 打开图片文件
    img = Image.open(f'E:/shenduxuexi/ddddocr/tubiao2/{name}')

    # 定义要裁剪的区域坐标 (left, upper, right, lower)
    # 请根据实际情况替换为你想要的坐标值
    for i, n in enumerate(coord_list):
        coordinates = n
        print(i, n)
        # 裁剪图片
        cropped_img = img.crop(tuple(coordinates))
        name_dir = name.split('.')[0]
        if not os.path.exists(f'tubiao_set2/{name_dir}'):
            os.makedirs(f'tubiao_set2/{name_dir}')
        # 保存裁剪后的图片
        cropped_img.save(f'tubiao_set2/{name_dir}/{dd.get(i)}_{name}')


def ico_coord():
    for img_data in os.listdir('E:/shenduxuexi/ddddocr/tubiao2'):
        with open(f'E:/shenduxuexi/ddddocr/tubiao2/{img_data}', 'rb') as f:
            image = f.read()

        bboxes = det.detection(image)
        ico_slicing(img_data, bboxes)


ico_coord()
把识别出来的图片手动进行分类,存储到对应类别文件夹。

存储文件名要改成类别_hash值的格式,方便后续操作。
分类后要使用数据增强代码对图片集进行增强,如何有足够数据集就不用增强,三千张左右图片就不用吧,我增强完也只有一千多张。
#数据增强代码
# -*- coding: utf-8 -*-

import cv2
import numpy as np
import os.path
import copy
from PIL import Image, ImageEnhance
import os
import random
import shutil


# 椒盐噪声
def SaltAndPepper(src, percetage):
    SP_NoiseImg = src.copy()
    SP_NoiseNum = int(percetage * src.shape[0] * src.shape[1])
    for i in range(SP_NoiseNum):
        randR = np.random.randint(0, src.shape[0] - 1)
        randG = np.random.randint(0, src.shape[1] - 1)
        randB = np.random.randint(0, 3)
        if np.random.randint(0, 1) == 0:
            SP_NoiseImg[randR, randG, randB] = 0
        else:
            SP_NoiseImg[randR, randG, randB] = 255
    return SP_NoiseImg


# 高斯噪声
def addGaussianNoise(image, percetage):
    G_Noiseimg = image.copy()
    w = image.shape[1]
    h = image.shape[0]
    G_NoiseNum = int(percetage * image.shape[0] * image.shape[1])
    for i in range(G_NoiseNum):
        temp_x = np.random.randint(0, h)
        temp_y = np.random.randint(0, w)
        G_Noiseimg[temp_x][temp_y][np.random.randint(3)] = np.random.randn(1)[0]
    return G_Noiseimg


# 昏暗
def darker(image, percetage=0.9):
    image_copy = image.copy()
    w = image.shape[1]
    h = image.shape[0]
    # get darker
    for xi in range(0, w):
        for xj in range(0, h):
            image_copy[xj, xi, 0] = int(image[xj, xi, 0] * percetage)
            image_copy[xj, xi, 1] = int(image[xj, xi, 1] * percetage)
            image_copy[xj, xi, 2] = int(image[xj, xi, 2] * percetage)
    return image_copy


# 亮度
def brighter(image, percetage=1.5):
    image_copy = image.copy()
    w = image.shape[1]
    h = image.shape[0]
    # get brighter
    for xi in range(0, w):
        for xj in range(0, h):
            image_copy[xj, xi, 0] = np.clip(int(image[xj, xi, 0] * percetage), a_max=255, a_min=0)
            image_copy[xj, xi, 1] = np.clip(int(image[xj, xi, 1] * percetage), a_max=255, a_min=0)
            image_copy[xj, xi, 2] = np.clip(int(image[xj, xi, 2] * percetage), a_max=255, a_min=0)
    return image_copy


# 旋转
def rotate(image, angle, center=None, scale=1.0):
    (h, w) = image.shape[:2]
    # If no rotation center is specified, the center of the image is set as the rotation center
    if center is None:
        center = (w / 2, h / 2)
    m = cv2.getRotationMatrix2D(center, angle, scale)
    rotated = cv2.warpAffine(image, m, (w, h))
    return rotated


# 翻转
def flip(image):
    flipped_image = np.fliplr(image)
    return flipped_image


def augment_image(image_path, save_path):
    try:
        img = cv2.imread(image_path)
        image_name = os.path.basename(image_path)  # 获取图片名称
        split_result = image_name.split('.')
        name = split_result[:-1]
        extension = split_result[-1]
        # cv2.imshow("1",img)
        # cv2.waitKey(5000)
        # 旋转
        rotated_90 = rotate(img, 90)

        cv2.imwrite(save_path + "".join(name) + 'r90.' + extension, rotated_90)
        rotated_180 = rotate(img, 180)
        cv2.imwrite(save_path + "".join(name) + 'r180.' + extension, rotated_180)
        flipped_img = flip(img)
        cv2.imwrite(save_path + "".join(name) + 'fli.' + extension, flipped_img)

        # 增加噪声
        # img_salt = SaltAndPepper(img, 0.3)
        # cv2.imwrite(save_path + img_name[0:7] + '_salt.jpg', img_salt)
        img_gauss = addGaussianNoise(img, 0.3)
        cv2.imwrite(save_path + "".join(name) + 'noise.' + extension, img_gauss)

        # 变亮、变暗
        img_darker = darker(img)
        cv2.imwrite(save_path + "".join(name) + 'darker.' + extension, img_darker)
        img_brighter = brighter(img)
        cv2.imwrite(save_path + "".join(name) + 'brighter.' + extension, img_brighter)

        blur = cv2.GaussianBlur(img, (7, 7), 1.5)
        #      cv2.GaussianBlur(图像,卷积核,标准差)
        cv2.imwrite(save_path + "".join(name) + 'blur.' + extension, blur)
    except Exception as e:
        print(f'{e}错误')


def dir_file():
    path = r'E:\shenduxuexi\Siamese-pytorch-master\datasets\images_background'
    for g, m, s in os.walk(path):
        for gg in s:
            # file = os.path.join(g, gg).split('\\')
            if 'png' in gg:
                # print(os.path.join(g, gg))
                # sunzi = file[-2] + '_' + file[-1].replace('_', '').replace(file[-2],'')
                #     print(os.path.join(g, gg), g)
                augment_image(os.path.join(g, gg), g + '\\')


if __name__ == '__main__':
    dir_file()

    # target_num = 5  # 目标增强图片数量
    # image_folder = 'E:/shenduxuexi/dddd/data_set/tubiao/huidu/anniu_Bb67da83a05894a7d895d925b9eaf36d5.jpg'  # 图片文件夹路径
    # save_folder = 'E:/shenduxuexi/dddd/data_set/tubiao/huidu3/'  # 保存增强后的图片的文件夹路径
    # path = r'E:\shenduxuexi\dddd\data_set\tubiao\huidu2'
    # for g, m, s in os.walk(path):
    #     for gg in s:
    #         lujing = os.path.join(path, gg)
    #         print(lujing)
    #         # augment_image(lujing, save_folder)
    #         print(lujing)

# # 获取所有类别的文件夹路径
# class_folders = os.listdir(image_folder)
数据集准备好就可以训练了,把数据文件放在datasets\images_background文件下,把train文件中的train_own_data 改为True直接运行train文件就可以愉快的训练了。

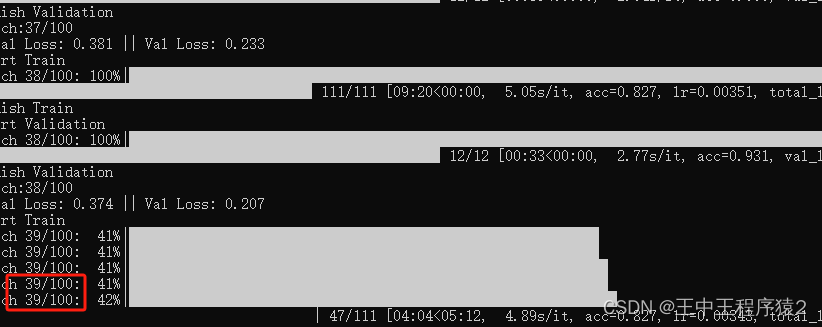
一般要训练一百轮才行,训练的很慢。不过Siamese跟别的模型不同的地方在于,在训练过程中就可以直接使用。
在logs文件夹下会生成pth文件,这个就是训练出来的权重,第一个是最好的,最后一个是最后训练出来的,直接用最后一个就行。

修改siamese的路径为自己想要的权重,运行predict.py文件就可以使用了,也可以把pth文件转化为onnx使用。
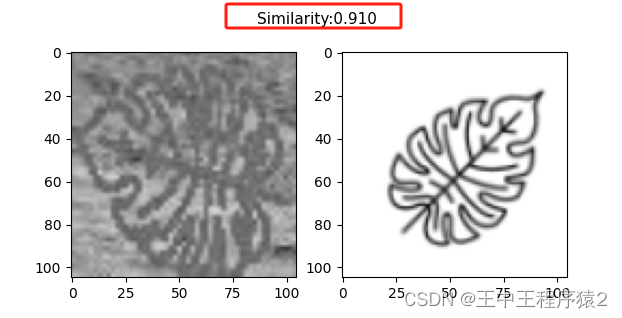
测试了几个准确度还蛮高的,把彩图转为灰度图争取率好像更高一点。

完整代码:
import os
import ddddocr
import cv2
import os
from PIL import Image
import time
import numpy as np
from PIL import Image

from siamese import Siamese
import re

det = ddddocr.DdddOcr(det=True)


def siamese(hash_jpg, hash_png):
    model = Siamese()

    image_1 = Image.open(hash_jpg)
    image_2 = Image.open(hash_png)

    probability = model.detect_image(image_1, image_2)
    if float(re.findall('\[(.*?)\]', str(probability))[0]) > 0.9:
        return True
    return False


def chunwenjian():
    item = {}
    path = r'E:\shenduxuexi\Siamese-pytorch-master\0b4d897cb20b411f8326630684dbb94c'
    for g, m, s in os.walk(path):
        jpg = []
        png = []

        for gg in s:

            if 'jpg' in gg:
                jpg.append(gg)
            else:
                png.append(gg)

        for hash_jpg in jpg:
            for hash_png in png:
                file_jpg = os.path.join(g, hash_jpg)
                file_png = os.path.join(g, hash_png)
                print(file_jpg, file_png)
                if siamese(file_jpg, file_png):
                    item[hash_png] = file_jpg.split('\\')[-1]
                    break

        print(item)


def ico_slicing(name, coord_list):
    # dd = {0: 'A', 1: 'B', 2: 'C', 3: 'D', 4: 'E'}
    dd = {'A': 0, 'B': 1, 'C': 2, 'D': 3, 'E': 4}
    # 打开图片文件
    img = Image.open(f'E:/shenduxuexi/Siamese-pytorch-master/0b4d897cb20b411f8326630684dbb94c/{name}')

    # 定义要裁剪的区域坐标 (left, upper, right, lower)
    # 请根据实际情况替换为你想要的坐标值
    for i, n in enumerate(coord_list):
        coordinates = n
        print(i, n)
        # 裁剪图片
        cropped_img = img.crop(tuple(coordinates))
        name_dir = name.split('.')[0]
        if not os.path.exists(f'{name_dir}'):
            os.makedirs(f'{name_dir}')
        # 保存裁剪后的图片
        coordinates = [str(i) for i in coordinates]
        name_coord = '_'.join(coordinates) + '.jpg'
        print(f'{name_dir}/{i}_{name_coord}')
        cropped_img.save(f'{name_dir}/{i}_{name_coord}')


def ico_coord():
    img_data = '0b4d897cb20b411f8326630684dbb94c.jpg'
    # for img_data in os.listdir('E:/shenduxuexi/ddddocr/tubiao2'):
    with open(
            f'E:/shenduxuexi/Siamese-pytorch-master/0b4d897cb20b411f8326630684dbb94c/0b4d897cb20b411f8326630684dbb94c.jpg',
            'rb') as f:
        image = f.read()

    bboxes = det.detection(image)
    if len(bboxes) == 3:
        ico_slicing(img_data, bboxes)


def white(path):
    for g, m, s in os.walk(path):
        for gg in s:
            imagePath = os.path.join(g, gg)
            if not 'png' in imagePath:
                continue

            img = Image.open(imagePath)

            # Convert to RGBA if not already in RGBA mode
            if img.mode != 'RGBA':
                img = img.convert('RGBA')

            width, height = img.size

            # Create a new RGB image filled with white
            img2 = Image.new('RGB', size=(width, height), color=(255, 255, 255))

            # Paste the RGBA image onto the RGB image, using the alpha channel as mask
            img2.paste(img, (0, 0), mask=img)

            # Save the resulting image to a file
            img2.save(imagePath)

            print(f"Processed image saved at {imagePath}")


# ico_coord()
# chunwenjian()
# siamese('E:/shenduxuexi/Siamese-pytorch-master/0b4d897cb20b411f8326630684dbb94c/2_132_120_183_170.jpg',
#         'E:/shenduxuexi/Siamese-pytorch-master/0b4d897cb20b411f8326630684dbb94c/processed_image.png')
# white('E:/shenduxuexi/Siamese-pytorch-master/0b4d897cb20b411f8326630684dbb94c')
chunwenjian()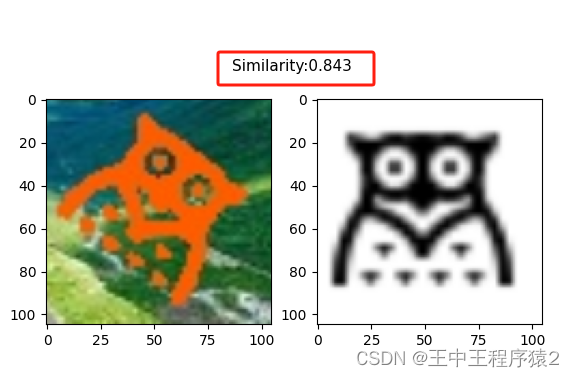


 7581
7581

 被折叠的 条评论
为什么被折叠?
被折叠的 条评论
为什么被折叠?
 到【灌水乐园】发言


