


Logical Volume Management (LVM) makes it easier to manage disk space. If a file system needs more space, it can be added to its logical volumes from the free spaces in its volume group and the file system can be re-sized as we wish. If a disk starts to fail, replacement disk can be registered as a physical volume with the volume group and the logical volumes extents can be migrated to the new disk without data loss.
Create LVM Storage in Linux
In a modern world every Server needs more space day by day for that we need to expand depending on our needs. Logical volumes can be use in RAID, SAN. A Physical Disk will be grouped to create a volume Group. Inside volume group we need to slice the space to create Logical volumes. While using logical volumes we can extend across multiple disks, logical volumes or reduce logical volumes in size with some commands without reformatting and re-partitioning the current disk. Volumes can stripes data across multiple disks this can increase the I/O stats.
LVM Features
- It is flexible to expand the space at any time.
- Any file systems can be installed and handle.
- Migration can be used to recover faulty disk.
- Restore the file system using Snapshot features to earlier stage. etc…
My Server Setup – Requirements
- Operating System – CentOS 6.5 with LVM Installation
- Server IP – 192.168.0.200
This series will be titled Preparation for the setting up LVM (Logical Volume Management) through Parts 1-6 and covers the following topics.
Creating LVM Disk Storage in Linux
1. We’ve used CentOS 6.5 Operating system using LVM in a Virtual Disk (VDA). Here we can see the Physical Volume (PV), Volume Group (VG), Logical Volume (LV) by using following command.

Check Physical Volumes
Here, is the description of each parameters shown in above screenshot.
- Physical Disk Size (PV Size)
- Disk which used was Virtual Disk vda.
- Volume Group Size (VG Size)
- Volume Group name (vg_tecmint)
- Logical Volume name (LogVol00, LogVol01)
- LogVol00 Assigned for sawp with 1GB Size
- LogVol01 Assigned for / with 16.5GB
So, from here we come to know that there is not enough free space in VDA disk.
2. For Creating a New Volume Group, we need to add Additional 3 hard disks in this server. It is not Compulsory to use 3 Drives just 1 is Enough to create a new VG and LV inside that vg, I am adding more here for demonstration purpose and for more feature command explanations.
Following are the disks I have added additionally.

Verify Added Disks
- Default Disk using for Operating system (Centos6.5).
- Partitions defined in default Disk (vda1 = swap), (vda2 = /).
- Additionally added Disks are mentioned as Disk1, Disk2, Disk3.
Each and every Disks are 20 GB in Size. Default PE Size of a Volume Group is 4 MB, Volume group what we are using in this server is configured using default PE.

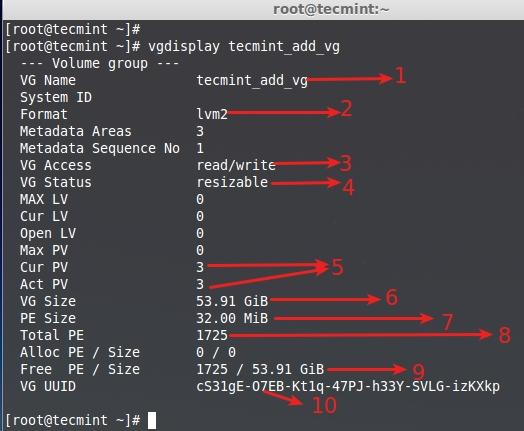
Volume Group Display
- VG Name – A Volume Group name.
- Format – LVM Architecture Used LVM2.
- VG Access – Volume Group is in Read and Write and ready to use.
- VG Status – Volume Group can be re-sized, We can Expand more if we need to add more space.
- Cur LV – Currently there was 2 Logical volumes in this Volume Group.
- CurPV and Act PV – Currently Using Physical Disk was 1 (vda), And its active, so what we can use this volume group.
- PE Size – Physical Extends, Size for a disk can be defined using PE or GB size, 4MB is the Default PE size of LVM. For example, if we need to create 5 GB size of logical volume we can use sum of 1280 PE, Don’t you understand what I’m saying ?.
Here the Explanation –> 1024MB = 1GB, if so 1024MB x 5 = 5120PE = 5GB, Now Divide the 5120/4 = 1280, 4 is the Default PE Size.
- Total PE – This Volume Group have.
- Alloc PE – Total PE Used, full PE already Used, 4482 x 4PE = 17928.
- Free PE – Here it’s already used so there was no free PE.
3. Only vda used, Currently Centos Installed /boot, /, swap, in vda physical disk using lvm there were no space remaining in this disk.
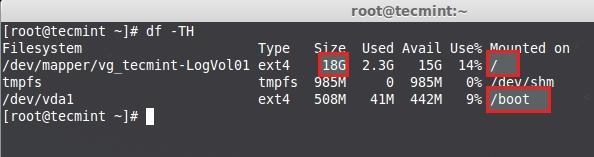
Check the Disk Space
Above image shows the mount Point we are using 18GB fully used for root, so there is no free space available.
4. So let’s, create new physical volume (pv), Volume Group (vg) in the name of tecmint_add_vg and create Logical Volumes (lv) in it, Here we can create 4 Logical Volumes in the name of tecmint_documents,tecmint_manager and tecmint_public.
We can extend the Volume Group of currently using VG to get more space. But here, what we are going to do is to Create new Volume Group and play around it, later we can see how to extend the file systems Volume group which is currently in use.
Before using a new Disk we need to partition the disk using fdisk.
- c – Switch off DOS-compatible mode it is Recommend to include this Option.
- u – While listing the partition tables it will give us in sector instead of cylinder.

Create New Physical Partitions
Next, follow the below steps to create new partition.
- Choose n to create new.
- Choose p to create a primary partition.
- Choose which number of partition we need to create.
- Press Enter twice to use the full space of the Disk.
- We need to change the type of newly created partition type t.
- Which number of partition need to change, choose the number which we created its 1.
- Here we need to change the type, we need to create LVM so we going to use the type code of LVM as 8e, if we do not know the type code Press L to list all type codes.
- Print the Partition what we created to just confirm.
- Here we can see the ID as 8e LINUX LVM.
- Write the changes and exit fdisk.
Do the above steps for other 2 disks sdb and sdc to create new partitions. Then Restart the machine to verify the partition table using fdisk command.

Verify Partition Table
Creating Physical Volumes
5. Now, it’s time to create Physical Volumes using all 3 disks. Here, I have listed the physical disk using pvscommand, only one default pvs is now listed.
Then create the new physical disks using command.
Once again list the disk to see the newly created Physical disks.

Create Physical Volumes
Creating Volume Groups
6. Create Volume Group in the name of tecmint_add_vg using available free PV Create using PE size 32. To Display the current volume groups, we can see there is one volume group with 1 PV using.
This will create the volume group using 32MB PE size in the name of tecmint_add_vg using 3 Physical volumes we created in last steps.
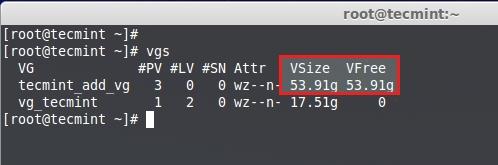
Next, verify the volume group by running vgs command again.

Create Volume Groups

Verify Volume Groups
Understanding vgs command output:
- Volume Group name.
- Physical Volumes used in this Volume Group.
- Shows free space available in this volume group.
- Total Size of the Volume Group.
- Logical Volumes inside this volume group, Here we have not yet created so there is 0.
- SN = Number of Snapshots the volume group contains. (Later we can create a snapshot).
- Status of the Volume group as Writeable, readable, resizeable, exported, partial and clustered, Here it is wz–n- that means w = Writable, z = resizeable..
- Number of Physical Volume (PV) used in this Volume Group.
7. To Display more information about volume group use command.

Check Volume Group Information
8. To get more information about newly created volume groups, run the following command.
List New Volume Groups
- Volume group name
- LVM Architecture used.
- It can be read and write state, ready to use.
- This volume group can be resizeable.
- No of Physical disk used and they are active.
- Volume Group total size.
- A Single PE size was 32 here.
- Total number of PE available in this volume group.
- Currently we have not created any LV inside this VG so its totally free.
- UUID of this volume group.
Creating Logical Volumes
9. Now, ceate 3 Logical Volumes in the name of tecmint_documents, tecmint_manager and tecmint_public. Here, we can see how to Create Logical Volumes Using PE size and Using GB Size. First, list the Current Logical Volumes using following command.

List Current Volume Groups
10. These Logical Volumes are in vg_tecmint Volume Group. List and see how much free spaces are there to create logical volumes using pvs command.
Check Free Space
11. Volume group size is 54GB and its unused, So we can Create LV in it. Let us divide volume group to equal size to create 3 Logical Volumes. That means 54GB/3 = 18GB, A single Logical Volume will be 18GB in Size after Creation.
Method 1: Creating Logical Volumes using PE Size’s
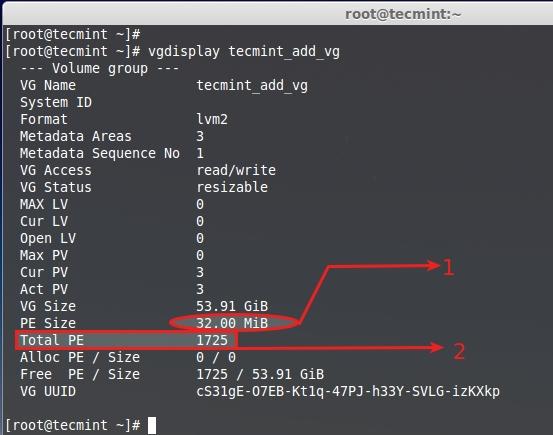
First let us create Logical Volumes Using Physical Extends (PE) size. We need to know Default PE size assigned for this Volume Group and Total PE available to create new Logical Volumes, Run the command to get the info using.
Create New Logical Volume
- Default PE Assigned for this VG is 32MB, Here Single PE size will be 32MB.
- Total Available PE is 1725.
Just do and see a little Calculation using bc command.
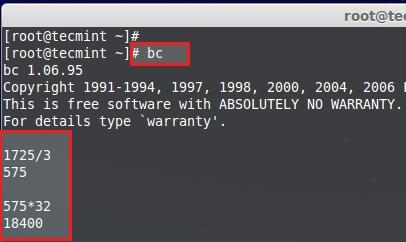
Calculate Disk Space
Press CRTL+D to Exit from bc. Let us now Create 3 Logical Volumes using 575 PE’s.
- -l – Creating using Extent Size
- -n – Give a Logical Volume name.
List the Created Logical Volumes using lvs command.

List Created Logical Volumes
Method 2: Creating Logical Volumes using GB Size’s
While Creating Logical Volume using GB size we cannot get the exact size. So, the better way is to create using extend.
List the Created logical Volumes using lvs command.

Verify Created Logical Volumes
Here, we can see while creating 3rd LV we can’t Round-up to 18GB, It is because of small changes in size, But this issue will be ignored while creating LV using Extend size.
Creating File System
12. For using the logical volumes we need to format. Here I am using ext4 file-system to create the volumes and going to mount under /mnt/.

Create Ext4 File System
13. Let us Create Directories in /mnt and Mount the Logical volumes what we have created file-system.
List and confirm the Mount point using.

Mount Logical Volumes
Permanent Mounting
It’s now temporarily mounted, for permanent mount we need to add the entry in fstab, for that let us get the mount entry from mtab using
We need to make slight changes in fstab entry while entering the mount entry contents copies from mtab, we need to change the rw to defaults
Our fstab Entry want to be similar to below sample. Save and exit from fstab using wq!.

Get mtab Mount Entry
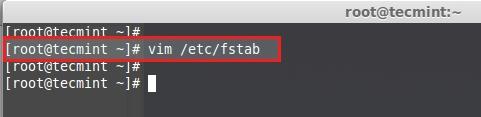
Open fstab File

Add Auto Mount Entry
Execute the command mount -a to check for the fstab entry before restart.

Verify fstab Entry
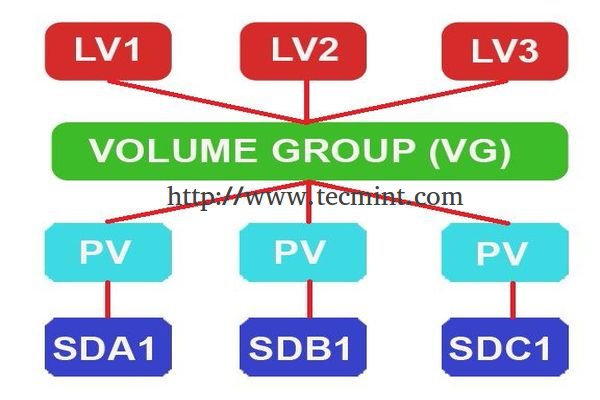
Here we have seen how to setup flexible storage with logical volumes by using physical disk to physical volume, physical volume to volume group, volume group to logical volumes.
In my upcoming future articles, I will see how to extend the volume group, logical volumes, reducing logical volume, taking snapshot and restore from snapshot. Till then stay updated to TecMint for more such awesome articles.
Reference: http://www.tecmint.com/create-lvm-storage-in-linux/


 9万+
9万+


 被折叠的 条评论
为什么被折叠?
被折叠的 条评论
为什么被折叠?
 到【灌水乐园】发言


