


package com.example.intentservicedemo;
import android.app.IntentService;
import android.content.Intent;
import android.util.Log;
public class MyIntentService extends IntentService
{
	private static final String TAG = "MyIntentService";
	public MyIntentService()//注意提供无参构造器
	{
		super("MyIntentService");
	}
	@Override
	protected void onHandleIntent(Intent intent)
	{
		int data = intent.getIntExtra("TEST",-1);
		Log.i(TAG,"data = "+data);

		switch (data)
		{
		case 1:
			Log.i(TAG,"service run task 1...");
			try
			{
				Thread.sleep(3000);
			} catch (InterruptedException e)
			{
				e.printStackTrace();
			}
			break;
		case 2:
			Log.i(TAG,"service run task 2...");
			break;
		}
	}

	@Override
	public void onCreate()
	{
		super.onCreate();
		Log.i(TAG,"oncreate...");
	}

	@Override
	public void onStart(Intent intent, int startId)
	{
		super.onStart(intent, startId);
		Log.i(TAG,"onstart...");
	}
	@Override
	public int onStartCommand(Intent intent, int flags, int startId)
	{
		Log.i(TAG,"onstartcommand...");
		return super.onStartCommand(intent, flags, startId);
	}

	@Override
	public void onDestroy()
	{
		super.onDestroy();
		Log.i(TAG, "ondestroy...");
	}
}
在清单文件中配置之:
<service
android:name="com.example.intentservicedemo.MyIntentService"
></service>
创建一个Activity:
package com.example.intentservicedemo;
import android.app.Activity;
import android.content.Intent;
import android.os.Bundle;
public class MainActivity extends Activity
{
@Override
protected void onCreate(Bundle savedInstanceState)
{
super.onCreate(savedInstanceState);
setContentView(R.layout.activity_main);
Intent intent = new Intent(this,MyIntentService.class);
intent.putExtra("TEST",1);
startService(intent);
intent.putExtra("TEST",2);
startService(intent);
}
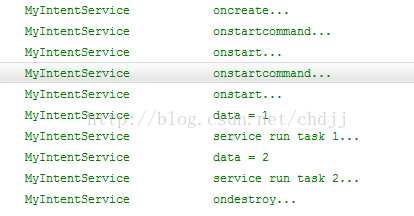
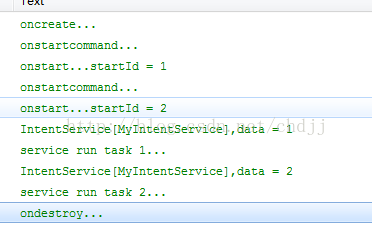
}观察日志:
 private volatile Looper mServiceLooper;//Looper
 private volatile ServiceHandler mServiceHandler;//Handler
 private String mName;//子线程名
 private boolean mRedelivery;
其中ServiceHandler是Handler子类:
  private final class ServiceHandler extends Handler {
        public ServiceHandler(Looper looper) {
            super(looper);
        }
        @Override
        public void handleMessage(Message msg) {
            onHandleIntent((Intent)msg.obj);
            stopSelf(msg.arg1);
        }
} public void onCreate() {
super.onCreate();
HandlerThread thread = new HandlerThread("IntentService[" + mName + "]");
thread.start();
mServiceLooper = thread.getLooper();
mServiceHandler = new ServiceHandler(mServiceLooper);
}public void onStart(Intent intent, int startId) {
Message msg = mServiceHandler.obtainMessage();
msg.arg1 = startId;
msg.obj = intent;
mServiceHandler.sendMessage(msg);
}
@Override
public int onStartCommand(Intent intent, int flags, int startId) {
onStart(intent, startId);
return mRedelivery ? START_REDELIVER_INTENT : START_NOT_STICKY;
}调用destroy方法会销毁消息循环,进而子线程终止:
 @Override
    public void onDestroy() {
        mServiceLooper.quit();
    }
文档解释:
However, if your service handles multiple requests to onStartCommand() concurrently, then you shouldn't stop the service when you're done processing a start request, because you might have since received a new start request (stopping at the end of the first request would terminate the second one). To avoid this problem, you can use stopSelf(int) to ensure that your request to stop the service is always based on the most recent start request. That is, when you call stopSelf(int), you pass the ID of the start request (the startId delivered to onStartCommand()) to which your stop request corresponds. Then if the service received a new start request before you were able to call stopSelf(int), then the ID will not match and the service will not stop.


 1万+
1万+


 被折叠的 条评论
为什么被折叠?
被折叠的 条评论
为什么被折叠?
 到【灌水乐园】发言


