


近期老板让研究一下航拍、遥感影像对比功能,个人认为可行性并不高,没有知识储备,而且真要做好的话得当作产品去砸钱(老板:砸钱是不可能的,这辈子都不可能砸钱)。
经过查询相关资料,OpenCV对图像的处理还是挺不错的,底层是用c,c++写的,文件小,对python、Java等提供接口。
步骤大致如下:
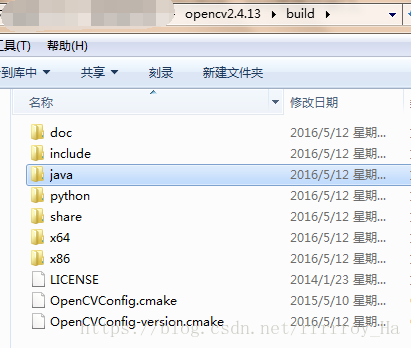
1.按照上方【下载】链接(这里不直接提供红框链接是因为左上角可看到“OpenCV教程”字样,你们懂我意思吧.jpg,是API文档哦)页面找到如下红框处地址,访问后可看到多个版本地址,逐级深入得到对应版本的快速下载器(并不是真实文件),运行exe才能得到目标文件夹,找到下载的opencv文件夹,在builder下找到Java文件夹,这是for Java开发包。


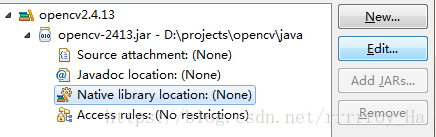
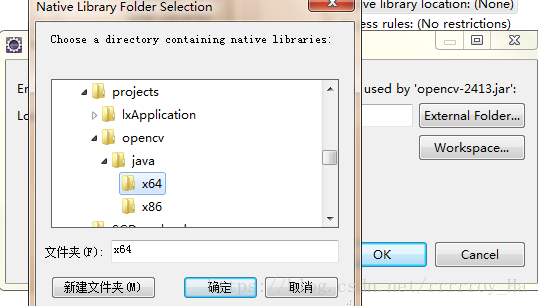
2.打开eclipse,windows——preferences——Java——Build Path——User Libraries,点击New,输入opencv2.4.13,点击Add Jars,选择opencv Java目录下的jar包,展开Libraries,选中Native library location,可以看到值为none,点击Edit,选择Java目录下的x64(32位系统选x86)。
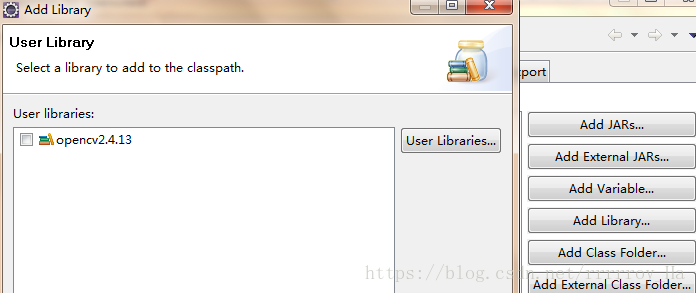
3.创建Java项目,打开Java Build Path,点击右侧的Add Library——User Library,可以看到之前配置的opev2.4.13,勾选即可。
接下来就可以开发了。
图片找茬的思路是先对两图片做差,通过腐蚀、膨胀来强化不同点,弱化相同点,再通过边缘检测算法找出不同点位置画框标识。根据opencv教程,也能帮助了解各个功能。
这是从网上找的找茬图


图像做差:Core.absdiff(Mat src1, Mat src2, Mat dst)
代码如下:
public static void main(String[] args) {
		// TODO Auto-generated method stub
		System.loadLibrary(Core.NATIVE_LIBRARY_NAME );

		Mat img1 = Highgui.imread("D:\\projects\\3.png");
		Mat img2 = Highgui.imread("D:\\projects\\4.png");

		Mat img = new Mat();
		//像素做差
        Core.absdiff(img1, img2, img);
        Highgui.imwrite("D:\\projects\\new_diff7.png", img);
	}
效果:
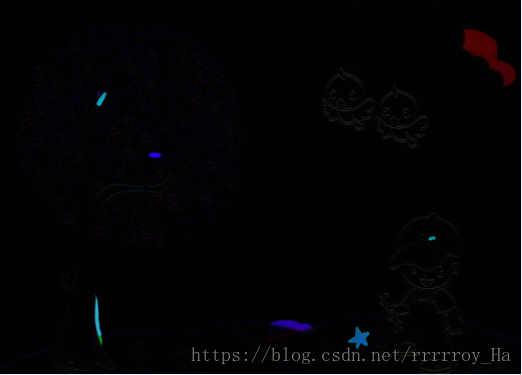
可以看到做差把相同部分除去,剩下的明显的就是不同处。
腐蚀:
Imgproc.erode(Mat src, Mat dst, Mat kernel, Point anchor, int iterations)
//接上步
        Mat erodeImg = new Mat();

        Mat kernel = Imgproc.getStructuringElement(1,new Size(4,6));
        //腐蚀
        Imgproc.erode(img, erodeImg, kernel,new Point(-1,-1),1);
        Highgui.imwrite("D:\\projects\\new_diff7.png", erodeImg);
效果:
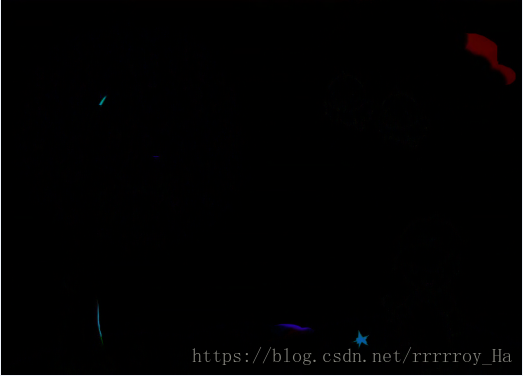
可以看到腐蚀是把暗度增强,达到去除噪声的目的,但弊端是比较细小的点会被当作噪点忽略掉,腐蚀的强度与kernel(腐蚀范围)、iterations(腐蚀次数)有关。
膨胀:Imgproc.dilate(Mat src, Mat dst, Mat kernel, Point anchor, int iterations)
//接上步
        Mat dilateImg = new Mat();
        Mat kernel1 = Imgproc.getStructuringElement(1,new Size(2,3));
        //膨胀
        Imgproc.dilate(erodeImg, dilateImg, kernel1);
        Highgui.imwrite("D:\\projects\\new_diff7.png", dilateImg);
效果:
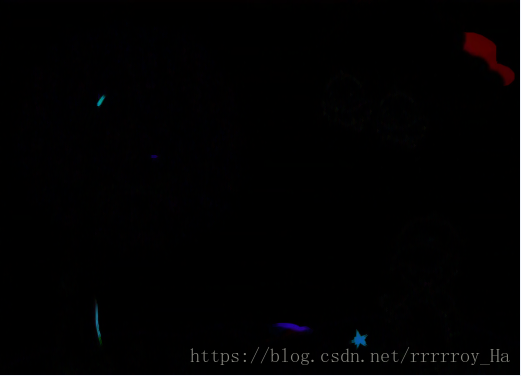
膨胀与腐蚀相反,先腐蚀后膨胀就可以达到将相同点去除,突出不同点的效果。
画框:
//接上步
        Mat threshImg = new Mat();
		List<MatOfPoint> contours = new ArrayList<MatOfPoint>();

		Mat hierarchy = new Mat();
        //检测边缘
        Imgproc.threshold(dilateImg, threshImg, 20, 255, Imgproc.THRESH_BINARY);
        //转化成灰度
        Imgproc.cvtColor(threshImg, threshImg, Imgproc.COLOR_RGB2GRAY);
        //找到轮廓(3:CV_RETR_TREE,2:CV_CHAIN_APPROX_SIMPLE)
        Imgproc.findContours(threshImg, contours, hierarchy, Imgproc.RETR_TREE, Imgproc.CHAIN_APPROX_SIMPLE, new Point(0,0));


		List<Rect> boundRect = new ArrayList<Rect>(contours.size());
        for(int i=0;i<contours.size();i++){
//        	Mat conMat = (Mat)contours.get(i);
//        	Imgproc.approxPolyDP((MatOfPoint2f)conMat,contours_poly.get(i),3,true);
        	//根据轮廓生成外包络矩形
        	Rect rect = Imgproc.boundingRect(contours.get(i));
        	boundRect.add(rect);
        }

        for(int i=0;i<contours.size();i++){
        	Scalar color = new Scalar(0,0,255);
        	//绘制轮廓
//        	Imgproc.drawContours(img1, contours, i, color, 1, Core.LINE_8, hierarchy, 0, new Point());
        	//绘制矩形
        	Core.rectangle(img1, boundRect.get(i).tl(), boundRect.get(i).br(), color, 2, Core.LINE_8, 0);
        }

        Highgui.imwrite("D:\\projects\\new_diff7.png", img1);
效果:
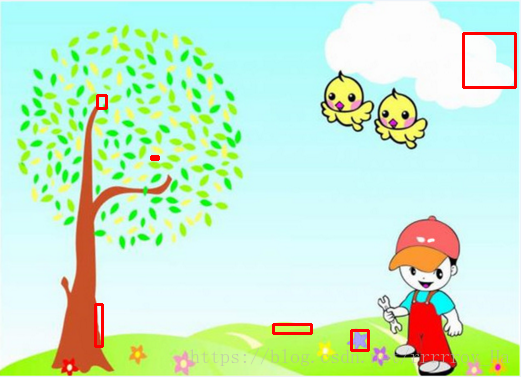
可以看到小孩帽子上的白点因为某种原因在腐蚀阶段被当作噪声忽略掉了,要提高精度还可对腐蚀的参数进行设置。
总代码:
package com.opencv;

import java.util.ArrayList;
import java.util.List;


import org.opencv.core.MatOfPoint;
import org.opencv.core.Rect;
import org.opencv.core.Scalar;
import org.opencv.core.Size;
import org.opencv.core.Point;
import org.opencv.core.Core;
import org.opencv.core.Mat;
import org.opencv.highgui.Highgui;
import org.opencv.imgproc.Imgproc;

public class Hello {

	/**
	 * @param args
	 */
	public static void main(String[] args) {
		// TODO Auto-generated method stub
		System.loadLibrary(Core.NATIVE_LIBRARY_NAME );

		Mat img1 = Highgui.imread("D:\\projects\\3.png");
		Mat img2 = Highgui.imread("D:\\projects\\4.png");

		Mat img = new Mat();
		Mat erodeImg = new Mat();
		Mat dilateImg = new Mat();
		Mat threshImg = new Mat();
		List<MatOfPoint> contours = new ArrayList<MatOfPoint>();

		Mat hierarchy = new Mat();
		//像素做差
        Core.absdiff(img1, img2, img);

        Mat kernel = Imgproc.getStructuringElement(1,new Size(4,6));
        Mat kernel1 = Imgproc.getStructuringElement(1,new Size(2,3));
        //腐蚀
        Imgproc.erode(img, erodeImg, kernel,new Point(-1,-1),1);
        //膨胀
        Imgproc.dilate(erodeImg, dilateImg, kernel1);
        //检测边缘
        Imgproc.threshold(dilateImg, threshImg, 20, 255, Imgproc.THRESH_BINARY);
        //转化成灰度
        Imgproc.cvtColor(threshImg, threshImg, Imgproc.COLOR_RGB2GRAY);
        //找到轮廓(3:CV_RETR_TREE,2:CV_CHAIN_APPROX_SIMPLE)
        Imgproc.findContours(threshImg, contours, hierarchy, Imgproc.RETR_TREE, Imgproc.CHAIN_APPROX_SIMPLE, new Point(0,0));

		List<Rect> boundRect = new ArrayList<Rect>(contours.size());
        for(int i=0;i<contours.size();i++){
//        	Mat conMat = (Mat)contours.get(i);
//        	Imgproc.approxPolyDP((MatOfPoint2f)conMat,contours_poly.get(i),3,true);
        	//根据轮廓生成外包络矩形
        	Rect rect = Imgproc.boundingRect(contours.get(i));
        	boundRect.add(rect);
        }

        for(int i=0;i<contours.size();i++){
        	Scalar color = new Scalar(0,0,255);
        	//绘制轮廓
//        	Imgproc.drawContours(img1, contours, i, color, 1, Core.LINE_8, hierarchy, 0, new Point());
        	//绘制矩形
        	Core.rectangle(img1, boundRect.get(i).tl(), boundRect.get(i).br(), color, 2, Core.LINE_8, 0);
        }

        Highgui.imwrite("D:\\projects\\new_diff7.png", img1);
	}

}
应小伙伴建议,提供OpenCV的API地址


 26万+
26万+


 被折叠的 条评论
为什么被折叠?
被折叠的 条评论
为什么被折叠?
 到【灌水乐园】发言


