


记录下自己学习CocoaPods的心路历程

一、CoaoaPods简介
CocoaPods是专门为iOS工程提供第三方依赖库的管理工具,通过CocoaPods,我们可以更方便地管理每个第三方库的版本,而且不需要我们做太多的配置,就可以直观、集中和自动化地管理我们项目的第三方库。
CocoaPods将所有依赖的库都放在一个名为Pods的项目下,然后让主项目依赖Pods项目。然后,我们编码工作都从主项目转移到Pods项目。Pods项目最终会编译为一个libPod-项目名.a静态库,主项目依赖于这个静态库。
对于资源文件,CocoaPods 提供了一个名为 Pods-resources.sh 的 bash 脚本,该脚本在每次项目编译的时候都会执行,将第三方库的各种资源文件复制到目标目录中。
CocoaPods 通过一个名为 Pods.xcconfig 的文件来在编译时设置所有的依赖和参数。
CocoaPods是用 Ruby 写的,并由若干个 Ruby 包 (gems) 构成的。在解析整合过程中,最重要的几个 gems 分别是: CocoaPods/CocoaPods, CocoaPods/Core, 和 CocoaPods/Xcodeproj。
CocoaPod的核心组件
-
CocoaPods/CocoaPod
这是一个面向用户的组件,每当执行一个 pod 命令时,这个组件都将被激活。该组件包括了所有使用 CocoaPods 涉及到的功能,并且还能通过调用所有其它的 gems 来执行任务。 -
CocoaPods/Core
Core 组件提供支持与 CocoaPods 相关文件的处理,文件主要是 Podfile 和 podspecs。 -
Podfile
Podfile 是一个文件,用于定义项目所需要使用的第三方库。该文件支持高度定制,你可以根据个人喜好对其做出定制。更多相关信息,请查阅 Podfile 指南。 -
Podspec
.podspec 也是一个文件,该文件描述了一个库是怎样被添加到工程中的。它支持的功能有:列出源文件、framework、编译选项和某个库所需要的依赖等。 -
CocoaPods/Xcodeproj
这个 gem 组件负责所有工程文件的整合。它能够创建并修改 .xcodeproj 和 .xcworkspace 文件。它也可以作为单独的一个 gem 包使用。如果你想要写一个脚本来方便地修改工程文件,那么可以使用这个 gem。
二、CocoaPods的常用命令
pod install,最常用的指令; pod update,更新repo并重新解析依赖; pod install --repo-update,类似pod update; pod install --no-repo-update,忽略Pod库更新,直接用本地repo进行install; pod update --no-repo-update,类似pod install; pod update AFNetworking,更新指定库;
以上所有指令都可以添加 --verbose ,查看更详细的信息; xcconfig在新增configuration之后,需要重新pod install,并修改xcconfig。
Pod install 的过程
pod install 这个命令到底做了什么?首先,在 CocoaPods 中,所有的命令都会由 Command 类派发到将对应的类,而真正执行 pod install 的类就是 Install:
module Pod
  class Command
	class Install < Command
	  def run
		verify_podfile_exists!
		installer = installer_for_config
		installer.repo_update = repo_update?(:default => false)
		installer.update = false
		installer.install!
	  end
	end
  end
end
这里面会从配置类的实例 config 中获取一个 Installer 的实例,然后执行 install! 方法,这里的 installer 有一个 update 属性,而这也就是 pod install 和 update 之间最大的区别,其中后者会无视已有的 Podfile.lock 文件,重新对依赖进行分析:
module Pod
  class Command
	class Update < Command
	  def run
		...

		installer = installer_for_config
		installer.repo_update = repo_update?(:default => true)
		installer.update = true
		installer.install!
	  end
	end
  end
end
Podfile 的解析
Podfile 中依赖的解析其实是与我们在手动解析 Podfile 章节所介绍的差不多,整个过程主要都是由 CocoaPods-Core 这个模块来完成的,而这个过程早在 installer_for_config 中就已经开始了:
def installer_for_config
  Installer.new(config.sandbox, config.podfile, config.lockfile)
end
这个方法会从 config.podfile 中取出一个 Podfile 类的实例:
def podfile
  @podfile ||= Podfile.from_file(podfile_path) if podfile_path
end
类方法 Podfile.from_file 就定义在 CocoaPods-Core 这个库中,用于分析 Podfile 中定义的依赖,这个方法会根据 Podfile 不同的类型选择不同的调用路径:
Podfile.from_file
`-- Podfile.from_ruby
	|-- File.open
	`-- eval
from_ruby 类方法就会像我们在前面做的解析 Podfile 的方法一样,从文件中读取数据,然后使用 eval 直接将文件中的内容当做 Ruby 代码来执行。
def self.from_ruby(path, contents = nil)
  contents ||= File.open(path, 'r:utf-8', &:read)

  podfile = Podfile.new(path) do
	begin
	  eval(contents, nil, path.to_s)
	rescue Exception => e
	  message = "Invalid `#{path.basename}` file: #{e.message}"
	  raise DSLError.new(message, path, e, contents)
	end
  end
  podfile
end
在 Podfile 这个类的顶部,我们使用 Ruby 的 Mixin 的语法来混入 Podfile 中代码执行所需要的上下文:
include Pod::Podfile::DSLPodfile 中的所有你见到的方法都是定义在 DSL 这个模块下面的:
module Pod
  class Podfile
	module DSL
	  def pod(name = nil, *requirements) end
	  def target(name, options = nil) end
	  def platform(name, target = nil) end
	  def inhibit_all_warnings! end
	  def use_frameworks!(flag = true) end
	  def source(source) end
	  ...
	end
  end
end
这里定义了很多 Podfile 中使用的方法,当使用 eval 执行文件中的代码时,就会执行这个模块里的方法,在这里简单看一下其中几个方法的实现,比如说 source 方法:
def source(source)
  hash_sources = get_hash_value('sources') || []
  hash_sources << source
  set_hash_value('sources', hash_sources.uniq)
end
该方法会将新的 source 加入已有的源数组中,然后更新原有的 sources 对应的值。
稍微复杂一些的是 target 方法:
def target(name, options = nil)
  if options
	raise Informative, "Unsupported options `#{options}` for " \
	  "target `#{name}`."
  end

  parent = current_target_definition
  definition = TargetDefinition.new(name, parent)
  self.current_target_definition = definition
  yield if block_given?
ensure
  self.current_target_definition = parent
end
这个方法会创建一个 TargetDefinition 类的实例,然后将当前环境系的 target_definition 设置成这个刚刚创建的实例。这样,之后使用 pod 定义的依赖都会填充到当前的 TargetDefinition 中:
def pod(name = nil, *requirements)
  unless name
	raise StandardError, 'A dependency requires a name.'
  end

  current_target_definition.store_pod(name, *requirements)
end
当 pod 方法被调用时,会执行 store_pod 将依赖存储到当前 target 中的 dependencies 数组中:
def store_pod(name, *requirements)
  return if parse_subspecs(name, requirements)
  parse_inhibit_warnings(name, requirements)
  parse_configuration_whitelist(name, requirements)

  if requirements && !requirements.empty?
	pod = { name => requirements }
  else
	pod = name
  end

  get_hash_value('dependencies', []) << pod
  nil
end
总结一下,CocoaPods 对 Podfile 的解析与我们在前面做的手动解析 Podfile 的原理差不多,构建一个包含一些方法的上下文,然后直接执行 eval 方法将文件的内容当做代码来执行,这样只要 Podfile 中的数据是符合规范的,那么解析 Podfile 就是非常简单容易的。
安装依赖的过程
Podfile 被解析后的内容会被转化成一个 Podfile 类的实例,而 Installer 的实例方法 install! 就会使用这些信息安装当前工程的依赖,而整个安装依赖的过程大约有四个部分:
- 解析 Podfile 中的依赖
- 下载依赖
- 创建
Pods.xcodeproj工程 - 集成 workspace
def install!
  resolve_dependencies
  download_dependencies
  generate_pods_project
  integrate_user_project
end
在上面的 install 方法调用的 resolve_dependencies 会创建一个 Analyzer 类的实例,在这个方法中,你会看到一些非常熟悉的字符串:
def resolve_dependencies
  analyzer = create_analyzer

  plugin_sources = run_source_provider_hooks
  analyzer.sources.insert(0, *plugin_sources)

  UI.section 'Updating local specs repositories' do
	analyzer.update_repositories
  end if repo_update?

  UI.section 'Analyzing dependencies' do
	analyze(analyzer)
	validate_build_configurations
	clean_sandbox
  end
end
在使用 CocoaPods 中经常出现的 Updating local specs repositories 以及 Analyzing dependencies 就是从这里输出到终端的,该方法不仅负责对本地所有 PodSpec 文件的更新,还会对当前 Podfile 中的依赖进行分析:
def analyze(analyzer = create_analyzer)
  analyzer.update = update
  @analysis_result = analyzer.analyze
  @aggregate_targets = analyzer.result.targets
end
analyzer.analyze 方法最终会调用 Resolver 的实例方法 resolve:
def resolve
  dependencies = podfile.target_definition_list.flat_map do |target|
	target.dependencies.each do |dep|
	  @platforms_by_dependency[dep].push(target.platform).uniq! if target.platform
	end
  end
  @activated = Molinillo::Resolver.new(self, self).resolve(dependencies, locked_dependencies)
  specs_by_target
rescue Molinillo::ResolverError => e
  handle_resolver_error(e)
end
这里的 Molinillo::Resolver 就是用于解决依赖关系的类。
三、CocoaPods的使用
CocoaPods的使用流程很简单:(假设已经安装CocoaPods)
1、在xcodeproj所在目录下,新建Podfile文件; 2、描述依赖信息,以demo为例,有AFNetworking和SDWebImage两个第三方库:
target 'LearnPod' do
        pod 'AFNetworking'
        pod 'SDWebImage'
end
3、打开命令行,执行pod install ; 4、打开生成xcworkspace,就可以继续开发;
PodFile的写法
1、普通的写法; pod 'AFNetworking' 或者 pod 'AFNetworking', '3.2.1',前者是下载最新版本,后者是下载指定版本。
2、指向本地的代码分支;
pod 'AFNetworking', :path => '/Users/loyinglin/Documents/Learn/AFNetworking'
指向的本地目录要带有podspec文件。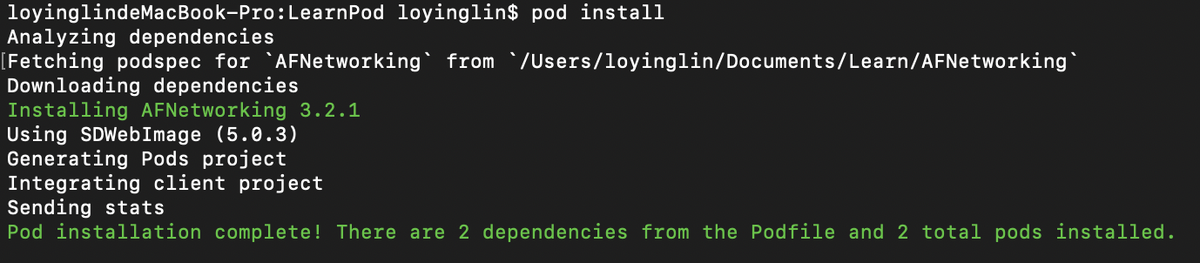
3、指定远端的代码分支;
pod 'AFNetworking', :git => 'https://github.com/AFNetworking/AFNetworking.git', :branch => 'master'
指向的repo仓库要带有podspec文件。

4、针对特定的configurations用不同的依赖库
`pod 'AFNetworking', :configurations => ['Release']`
如上,只有Release的configurations生效;(同理,可以设置Debug)

5、多target的PodFile
platform :ios, '8.0'

def commonPods #通用pods集
    pod 'AFNetworking', '~> 2.0'
    pod 'Masonry'
end

def appOnlyPods #app专用pods集
    pod 'MBProgressHUD'
end

def extensionPods #扩展专用pods集
    pod 'GTSDKExtension'
end

target :TestCocoaPods do
    commonPods
    appOnlyPods

    target :TestCocoaPodsTests do
    inherit! :search_paths
    # Pods for testing
    end

    target :TestCocoaPodsUITests do
        inherit! :search_paths
        # Pods for testing
    end
end

target :SecondTarget do
    commonPods
end
四、Pods工程和主工程的关系
在实际的开发过程,容易知道Pods工程是先编译,编译完再执行主工程的编译;因为主工程的Linked Libraries里面有libPods-LearnPod.a的文件。(LearnPod是target的名字,下面的示例图都是用LearnPod作为target名)
对于资源文件,CocoaPods 提供了一个名为 Pods-resources.sh 的 bash 脚本,该脚本在每次项目编译的时候都会执行,将第三方库的各种资源文件复制到目标目录中。 CocoaPods 通过一个名为 Pods.xcconfig 的文件来在编译时设置所有的依赖和参数。 在编译之前会检查pod的版本是否发生变化(manifest和.lock文件对比),以及执行一些自定义的脚本。 Pod库的子target在指定armv7和arm64两个架构的时候,会分别编译生成armv7和arm64的.a文件;然后再进行一次合并操作,得到一个.a文件。 编译完成后进行链接,在armv7和arm64都指定时,会分别进行链接,最后合并得到可执行文件。 得到可执行文件后,会进行asset、storyboard等资源文件的处理;还会执行pod的脚本,把pod的资源复制过来。 全部准备就绪,就会生成符号表,包括.a文件里面的符号。 最后进行签名、校验,得到.app文件。


 3959
3959


 被折叠的 条评论
为什么被折叠?
被折叠的 条评论
为什么被折叠?
 到【灌水乐园】发言


