


一、RecyclerView
1、RecyclerView的介绍
RecyclerView是support:recyclerview-v7包中提供的一个类。它具有ListView、GridView、Gallery这些类的功能。 那么为什么有了上面这些类后,Google还推出RecyclerView这个类呢?它到底有什么样的优势呢? 相比于ListView、GridView和Gallery这些类,RecyclerView已经将ViewHolder制定了一套标准,所有我们自定义的ViewHolder必须继承RecyclerView.ViewHolder,然后需要在构造方法中初始化Item中要用到的控件。 同时通过设置不同的LayoutManager,以及结合ItemDecoration 、ItemAnimator、ItemTouchHelper,可以实现非常炫酷的效果,这些功能是ListView等控件难以企及的。 说了那么多,那么RecyclerView到底应该怎么用呢?下面举个例子说明如何使用RecyclerView来实现ListView的功能。
2、RecyclerView的使用方法
首先在使用RecyclerView前,必须要在app的gradle中依赖RecyclerView,如下所示:
compile'com.android.support:recyclerview-v7:23.4.0'
然后我们需要在布局文件中引用RecyclerView,如下所示:
<android.support.v7.widget.RecyclerView
        android:id="@+id/recycler_view"
        android:layout_width="match_parent"
        android:layout_height="match_parent"/>
然后,我们需要在Activity中获取到该RecyclerView实例,然后设置LayoutManager和adapter:
//通过findViewById拿到RecyclerView实例
mRecyclerView =   findViewById(R.id.recycler_view);
//设置RecyclerView管理器
mRecyclerView.setLayoutManager(new LinearLayoutManager(this, LinearLayoutManager.VERTICAL,false));
//初始化适配器
mAdapter = new MyRecyclerViewAdapter(list);
//设置适配器
mRecyclerView.setAdapter(mAdapter);
上面自定义了MyRecyclerViewAdapter,我们看它是如何实现的:
public class MyRecyclerViewAdapter extends RecyclerView.Adapter<MyRecyclerViewAdapter.ViewHolder> {
    private List<String> list;

    public MyRecyclerViewAdapter(List<String> list) {
        this.list = list;
    }

    @Override
    public MyRecyclerViewAdapter.ViewHolder onCreateViewHolder(ViewGroup parent, int viewType) {
        View view = LayoutInflater.from(parent.getContext()).inflate(R.layout.item_view_layout, parent,false);
        MyRecyclerViewAdapter.ViewHolder viewHolder = new MyRecyclerViewAdapter.ViewHolder(view);
        return viewHolder;
    }

    @Override
    public void onBindViewHolder(MyAdapter.ViewHolder holder, int position) {
        holder.mText.setText(list.get(position));
    }

    @Override
    public int getItemCount() {
        return list.size();
    }

    class ViewHolder extends RecyclerView.ViewHolder {
        TextView mText;
        ViewHolder(View itemView) {
            super(itemView);
            mText = itemView.findViewById(R.id. item_text_view);
        }
    }
}
自定义的MyRecyclerViewAdapter必须实现RecyclerView.Adapter,它是一个泛型类,其中传入的是一个自定义的ViewHolder,这个ViewHolder必须继承RecyclerView.ViewHolder,构造函数传入的参数是ItemView对象,并在此初始化所需要用到的控件。 最后是item_view_layout布局文件的实现:
<?xml version="1.0" encoding="utf-8"?>
<LinearLayout
    xmlns:android="http://schemas.android.com/apk/res/android"
    android:layout_width="match_content"
    android:layout_height="wrap_content"
    android:orientation="vertical">

    <TextView
        android:id="@+id/item_text_view"
        android:layout_width="match_content"
        android:layout_height="wrap_content"
        android:gravity="center"
        android:text="Item"/>
</LinearLayout>
以上就是RecyclerView实现ListView的全部代码,其实和ListView最大的不同点就是在于Adapter简化了很多,ListView中需要实现的getView方法中的繁重的逻辑全部都内聚到了RecyclerView的内部逻辑中,开发者只需要关注itemView的功能即可。
3、参考文章
二、ConstraintLayout
1、ConstraintLayout的介绍
ConstraintLayout在Android Studio 2.2就已经出现了,在传统的Android界面开发中,都是通过xml来完成的,而且也是可以通过可视化的方式来完成的,但是不太方便。但是自从ConstaintLayout出现后,它和传统编写界面的方式恰恰相反,ConstraintLayout非常适合使用可视化的方式来编写界面,但并不太适合使用XML的方式来进行编写。 然后,ConstraintLayout还有另外一个优点,它可以有效的解决布局嵌套问题。我们平时编写界面,复杂的布局总会伴随着多层的嵌套,而嵌套越多,程序的性能也就越差。ConstraintLayout则是使用约束的方式来指定各个控件的位置和关系的,它有点类似于RelativeLayout,但远比RelativeLayout要更强大。
2、ConstraintLayout的使用方法
说了那么多,我们就来看一下ConstraintLayout是如何使用的。 首先,要使用ConstraintLayout,需要在app的gradle文件中添加ConstraintLayout的依赖,如下所示:
implementation'com.android.support.constraint:constraint-layout:1.0.2'
我们先来看一个布局形式:

<?xml version="1.0" encoding="utf-8"?>
<android.support.constraint.ConstraintLayout
    xmlns:android="http://schemas.android.com/apk/res/android"
    android:layout_width="match_parent"
    android:layout_height="match_parent"
    xmlns:app="http://schemas.android.com/apk/res-auto">

    <ImageView
        android:id="@+id/imgview"
        android:layout_width="120dp"
        android:layout_height="80dp"
        android:layout_marginTop="20dp"
        android:layout_marginLeft="20dp"
        app:layout_constraintLeft_toLeftOf="parent"
        app:layout_constraintTop_toTopOf="parent"
        android:background="@color/colorPrimary"/>
    <TextView
        android:id="@+id/feed_textview"
        android:layout_width="0dp"
        android:layout_height="wrap_content"
        android:text="这是一段TextView这是一段TextView这是一段TextView"
        app:layout_constraintLeft_toRightOf="@+id/imgview"
        app:layout_constraintTop_toTopOf="@+id/imgview"
        app:layout_constraintRight_toRightOf="parent"
        android:layout_marginLeft="20dp"/>

    <TextView
        android:id="@+id/time_textview"
        android:layout_width="wrap_content"
        android:layout_height="wrap_content"
        android:text="1小时前"
        app:layout_constraintRight_toRightOf="parent"
        app:layout_constraintBottom_toBottomOf="@+id/imgview"
        android:layout_marginRight="10dp"/>
</android.support.constraint.ConstraintLayout>
上面的布局文件中,先看左边的ImageView,它有两个属性,分别是app:layout_constraintLeft_toLeftOf和app:layout_constraintTop_toTopOf。
app:layout_constraintLeft_toLeftOf的意思是: 当前控件左边的边需要和哪一个控件左边的边进行对齐。 app:layout_constraintLeft_toLeftOf=“parent"说明: ImageView左边的边和父布局左边的边进行对齐。
同理,app:layout_constraintTop_toTopOf=”parent"说明ImageView的顶部和父布局对齐。 加上这两个约束后,就唯一确定了ImageView的位置。
我们再来看下面一个TextView,它有三个属性,分别是app:layout_constraintLeft_toRightOf、app:layout_constraintTop_toTopOf、app:layout_constraintRight_toRightOf 根据上面的分析,我们很清楚的就知道了该TextView的约束是这样的:
它左边的边和ImageView右边的边对齐。 它上面的边和ImageView上面的边对齐。 它右边的边和父布局右边的边对齐。
类似的属性还有:
- layout_constraintRight_toLeftOf
- layout_constraintRight_toRightOf
- layout_constraintTop_toTopOf
- layout_constraintTop_toBottomOf
- layout_constraintBottom_toTopOf
- layout_constraintBottom_toBottomOf
- layout_constraintBaseline_toBaselineOf
3、另一个例子
<?xml version="1.0" encoding="utf-8"?>
<RelativeLayout
    xmlns:android="http://schemas.android.com/apk/res/android"
    android:layout_width="match_parent"
    android:layout_height="match_parent">

    <Button
        android:id="@+id/btn1"
        android:layout_width="wrap_content"
        android:layout_height="wrap_content"
        android:text="button1"/>

    <Button
        android:id="@+id/btn2"
        android:layout_width="wrap_content"
        android:layout_height="wrap_content"
        android:layout_toRightOf="@+id/btn1"
        android:layout_alignParentRight="true"
        android:text="button2"/>

</RelativeLayout>
如果将上面的RelativeLayout转换为ConstraintLayout,那么代码是这样的:
<?xml version="1.0" encoding="utf-8"?>
<android.support.constraint.ConstraintLayout
    xmlns:android="http://schemas.android.com/apk/res/android"
    android:layout_width="match_parent"
    android:layout_height="match_parent"
    xmlns:app="http://schemas.android.com/apk/res-auto">

    <Button
        android:id="@+id/btn1"
        android:layout_width="wrap_content"
        android:layout_height="wrap_content"
        android:text="button1"/>

    <Button
        android:id="@+id/btn2"
        android:layout_width="wrap_content"
        android:layout_height="wrap_content"
        app:layout_constraintLeft_toRightOf="@+id/btn1"
        app:layout_constraintRight_toRightOf="parent"
        android:text="button2"/>

</android.support.constraint.ConstraintLayout>
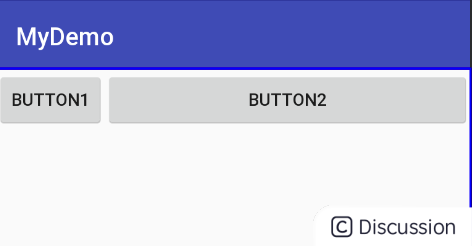
我们将android:layout_toRightOf="@+id/btn1"换成了app:layout_constraintLeft_toRightOf="@+id/btn1",将android:layout_alignParentRight="true"换成了app:layout_constraintRight_toRightOf="parent"。 但是出来的效果却不是很理想:

其实控件有自己设置的宽度时,例如warp_content、固定值,我们为控件添加的都是约束的“Constraint”,这个约束有点像橡皮筋一样会拉这个控件,但是并不会改变控件的尺寸。
在上面的例子中,当btn2的宽度较小时,我们为其左侧设置了一个约束(btn1右侧),右侧设置了一个约束(parent右侧对齐),当两个约束同时生效的时候(你可以认为两边都是相同的一个拉力),这样btn2会居中。
当btn2设置的宽度特别大的时候,依然是这两个力,那么会发生什么?这样就会造成左侧和右侧超出的距离一样大。
那么怎样才能使得btn2实现上面的效果呢? 我们可以将btn2的宽度设置为0dp,因为在ConstraintLayout中0代表:MATCH_CONSTRAINT。顾名思义,这个常量就是和约束保持一样尺寸的意思。 下面是正确的代码:
<?xml version="1.0" encoding="utf-8"?>
<android.support.constraint.ConstraintLayout
    xmlns:android="http://schemas.android.com/apk/res/android"
    android:layout_width="match_parent"
    android:layout_height="match_parent"
    xmlns:app="http://schemas.android.com/apk/res-auto">

    <Button
        android:id="@+id/btn1"
        android:layout_width="wrap_content"
        android:layout_height="wrap_content"
        android:text="button1"/>

    <Button
        android:layout_width="0dp"
        android:layout_height="wrap_content"
        app:layout_constraintLeft_toRightOf="@+id/btn1"
        app:layout_constraintRight_toRightOf="parent"
        android:text="button2"/>

</android.support.constraint.ConstraintLayout>
4、增加一个banner
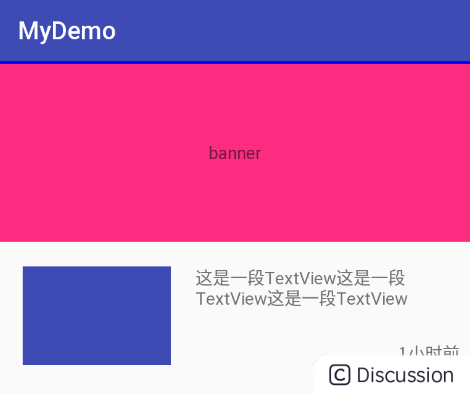
现在我们往第一个布局中的最上面增加一个banner,并且设置其宽高比为16:6。如下图所示:
<?xml version="1.0" encoding="utf-8"?>
<android.support.constraint.ConstraintLayout
    xmlns:android="http://schemas.android.com/apk/res/android"
    android:layout_width="match_parent"
    android:layout_height="match_parent"
    xmlns:app="http://schemas.android.com/apk/res-auto">

    <ImageView
        android:id="@+id/imgview"
        android:layout_width="120dp"
        android:layout_height="80dp"
        android:layout_marginTop="20dp"
        android:layout_marginLeft="20dp"
        app:layout_constraintLeft_toLeftOf="parent"
        app:layout_constraintTop_toBottomOf="@+id/banner"
        android:background="@color/colorPrimary"/>
    <TextView
        android:id="@+id/feed_textview"
        android:layout_width="0dp"
        android:layout_height="wrap_content"
        android:text="这是一段TextView这是一段TextView这是一段TextView"
        app:layout_constraintLeft_toRightOf="@+id/imgview"
        app:layout_constraintTop_toTopOf="@+id/imgview"
        app:layout_constraintRight_toRightOf="parent"
        android:layout_marginLeft="20dp"/>

    <TextView
        android:id="@+id/time_textview"
        android:layout_width="wrap_content"
        android:layout_height="wrap_content"
        android:text="1小时前"
        app:layout_constraintRight_toRightOf="parent"
        app:layout_constraintBottom_toBottomOf="@+id/imgview"
        android:layout_marginRight="10dp"/>

    <TextView
        android:id="@+id/banner"
        android:layout_width="0dp"
        android:layout_height="0dp"
        android:background="@color/colorAccent"
        app:layout_constraintDimensionRatio="16:6"
        android:gravity="center"
        android:text="banner"
        app:layout_constraintLeft_toLeftOf="parent"
        app:layout_constraintRight_toRightOf="parent"
        app:layout_constraintBottom_toTopOf="@+id/imgview"/>
</android.support.constraint.ConstraintLayout>
在这里,我们使用了app:layout_constraintDimensionRatio这个属性,这个属性默认的意思是表示宽高比,我们设置了16:6,也就是说在宽度已经固定为约束的尺寸(屏幕宽度)时,高度会根据这个比例进行调整。 其实app:layout_constraintDimensionRatio这个属性还有另外两种写法:
app:layout_constraintDimensionRatio="W,16:6" app:layout_constraintDimensionRatio="H,16:6"
其中app:layout_constraintDimensionRatio="H,16:6"和默认是一样的,表示宽高比。因为H的意思是使用高(H表示高度)作为后面16:6中的分母。 所以app:layout_constraintDimensionRatio="W,16:6"就很好理解了,其实就是使用宽(W表示宽度)作为分母。
5、增加几个Tab
我们现在需要在底部增加3个tab,并让它们实现均分。这有点像LinearLayout和weight的意思。我们先看一下效果图是怎样的:

<?xml version="1.0" encoding="utf-8"?>
<android.support.constraint.ConstraintLayout
    xmlns:android="http://schemas.android.com/apk/res/android"
    android:layout_width="match_parent"
    android:layout_height="match_parent"
    xmlns:app="http://schemas.android.com/apk/res-auto">

    <ImageView
        android:id="@+id/imgview"
        android:layout_width="120dp"
        android:layout_height="80dp"
        android:layout_marginTop="20dp"
        android:layout_marginLeft="20dp"
        app:layout_constraintLeft_toLeftOf="parent"
        app:layout_constraintTop_toBottomOf="@+id/banner"
        android:background="@color/colorPrimary"/>
    <TextView
        android:id="@+id/feed_textview"
        android:layout_width="0dp"
        android:layout_height="wrap_content"
        android:text="这是一段TextView这是一段TextView这是一段TextView"
        app:layout_constraintLeft_toRightOf="@+id/imgview"
        app:layout_constraintTop_toTopOf="@+id/imgview"
        app:layout_constraintRight_toRightOf="parent"
        android:layout_marginLeft="20dp"/>

    <TextView
        android:id="@+id/time_textview"
        android:layout_width="wrap_content"
        android:layout_height="wrap_content"
        android:text="1小时前"
        app:layout_constraintRight_toRightOf="parent"
        app:layout_constraintBottom_toBottomOf="@+id/imgview"
        android:layout_marginRight="10dp"/>

    <TextView
        android:id="@+id/banner"
        android:layout_width="0dp"
        android:layout_height="0dp"
        android:background="@color/colorAccent"
        app:layout_constraintDimensionRatio="16:6"
        android:gravity="center"
        android:text="banner"
        app:layout_constraintLeft_toLeftOf="parent"
        app:layout_constraintRight_toRightOf="parent"
        app:layout_constraintBottom_toTopOf="@+id/imgview"/>

    <Button
        android:id="@+id/tab1"
        android:layout_width="0dp"
        android:layout_height="wrap_content"
        android:text="tab1"
        app:layout_constraintRight_toLeftOf="@+id/tab2"
        app:layout_constraintLeft_toLeftOf="parent"
        app:layout_constraintBottom_toBottomOf="parent"/>

    <Button
        android:id="@+id/tab2"
        android:layout_width="0dp"
        android:layout_height="wrap_content"
        android:text="tab2"
        app:layout_constraintLeft_toRightOf="@+id/tab1"
        app:layout_constraintRight_toLeftOf="@+id/tab3"
        app:layout_constraintBottom_toBottomOf="parent"/>


    <Button
        android:id="@+id/tab3"
        android:layout_width="0dp"
        android:layout_height="wrap_content"
        android:text="tab3"
        app:layout_constraintLeft_toRightOf="@+id/tab2"
        app:layout_constraintRight_toRightOf="parent"
        app:layout_constraintBottom_toBottomOf="parent"/>

</android.support.constraint.ConstraintLayout>
我们增加了3个tab,并且让它们之间相互依赖,即tab1的左边和parent的左边对齐,右边和tab2的左边对齐。tab2的左边和tab1的右边对齐,右边和tab3的左边对齐。tab3的左边和tab2的右边对齐,右边和parent的右边对齐。 这样就实现了3个tab均分整个屏幕的效果。 那么平分算是实现了,那么可以实现LinearLayout和weight给单独控件实现不同比例配置的效果吗?其实也是可以的。 ConstraintLayout提供了app:layout_constraintHorizontal_weight属性,它可以实现不同的tab占据不同的比例。 如果我们给上面的3个tab分别设置为2:1:1,那么就可以实现下面的效果:

app:layout_constraintHorizontal_weight属性还有更多的值可以设置,具体可以看hongyang大神的这篇文章:
ConstraintLayout 完全解析 快来优化你的布局吧 当然,ConstraintLayout还有很多其他高级的玩法,大家感兴趣的可以上网搜一下,这里就不再详谈了。
6、参考文章
Android新特性介绍,ConstraintLayout完全解析 实战篇ConstraintLayout的崛起之路 ConstraintLayout 完全解析 快来优化你的布局吧


 1155
1155


 被折叠的 条评论
为什么被折叠?
被折叠的 条评论
为什么被折叠?
 到【灌水乐园】发言


