


什么是模型绑定?模型绑定是从HTTP请求获取数据的一个过程并且将他们提供给Action方法的参数,模型包含了构成应用程序业务逻辑的数据,它们包含了数据库或者另外数据源中的数据
在ASP.NET Core处理模型有两个核心的概念
1 Model Binding – 从HTTP请求提取数据的一个过程,并将数据提供给Action方法的参数
2 Model Validation – 处理模型属性验证的一个过程以至于未验证的实体不能进入数据库
模型绑定分为基础和高级分别两篇,在这节中,我们学习关于模型绑定处理的细节
1 ASP.NET Core 模型绑定例子
我们通过一个例子来了解模型绑定的概念,在Visual Studio 2022 中创建一个ASP.NET Core Web App (Model-View-Controller) 项目,名称为AspNetCore.ModelBinding
Models & Repository
在Models文件夹下添加一个新的类叫EmployeeDetails.cs,这定义了2个两个类和一个枚举:
namespace AspNetCore.ModelBinding.Models
{
    public class Employee
    {
        public int Id { get; set; }
        public string Name { get; set; }
        public DateTime DOB { get; set; }
        public Address HomeAddress { get; set; }
        public Role Role { get; set; }
    }
    public class Address
    {
        public string HouseNumber { get; set; }
        public string Street { get; set; }
        public string City { get; set; }
        public string PostalCode { get; set; }
        public string Country { get; set; }
    }
    public enum Role
    {
        Admin,
        Designer,
        Manager
    }
}
在Models文件夹下创建一个新的文件Repository.cs,定义接口并实现该接口:
namespace AspNetCore.ModelBinding.Models
{
    public interface IRepository
    {
        IEnumerable<Employee> Employee { get; }
        Employee this[int id] { get; set; }
    }
    public class EmployeeRepository : IRepository
    {
        private Dictionary<int, Employee> employee = new Dictionary<int, Employee>
        {
            [1] = new Employee
            {
                Id = 1,
                Name = "John",
                DOB = new DateTime(1980, 12, 25),
                Role = Role.Admin
            },
            [2] = new Employee
            {
                Id = 2,
                Name = "Michael",
                DOB = new DateTime(1981, 5, 13),
                Role = Role.Designer
            },
            [3] = new Employee
            {
                Id = 3,
                Name = "Rachael",
                DOB = new DateTime(1982, 11, 25),
                Role = Role.Designer
            },
            [4] = new Employee
            {
                Id = 4,
                Name = "Anna",
                DOB = new DateTime(1983, 1, 20),
                Role = Role.Manager
            }
        };


        public IEnumerable<Employee> Employee => employee.Values;


        public Employee this[int id]
        {
            get
            {
                return employee.ContainsKey(id) ? employee[id] : null;
            }
            set
            {
                employee[id] = value;
            }
        }
    }
}
我们创建repository并且创建4个员工,我们使用4个员工的数据帮助我们理解模型绑定的概念
Controllers & Views
在Controllers文件夹下编辑HomeController.cs文件,通过依赖注入从构造函数中获取EmployeeRepository 仓储类,更新HomeController.cs 文件代码如下:
using AspNetCore.ModelBinding.Models;
using Microsoft.AspNetCore.Mvc;
namespace AspNetCore.ModelBinding.Controllers
{
    public class HomeController : Controller
    {
        private IRepository repository;
        public HomeController(IRepository repo)
        {
            repository = repo;
        }
        public IActionResult Index(int id = 1)
        {
            return View(repository[id]);
        }
    }
}
在Views->Home文件下编辑Index.cshtml 视图文件以至于它能接收到Employee模型并绑定employee属性在HTML表格,Index 代码如下:
@model Employee
@{
    ViewData["Title"] = "Index";
}
<h2>Employee</h2>
<table class="table table-bordered align-middle">
    <tr><th>Id:</th><td>@Model.Id</td></tr>
    <tr><th>Name:</th><td>@Model.Name</td></tr>
    <tr><th>Date of Birth:</th><td>@Model.DOB.ToShortDateString()</td></tr>
    <tr><th>Role:</th><td>@Model.Role</td></tr>
</table>
注册Repository作为服务
在Program.cs类中注册EmployeeRepository 服务,以至于控制器能够通过依赖注入访问这个类,代码如下:
builder.Services.AddSingleton<IRepository, EmployeeRepository>();在应用中更新下面代码:
using ModelBindingValidation.Models;
var builder = WebApplication.CreateBuilder(args);
// Add services to the container.
builder.Services.AddSingleton<IRepository, EmployeeRepository>();
builder.Services.AddControllersWithViews();
var app = builder.Build();
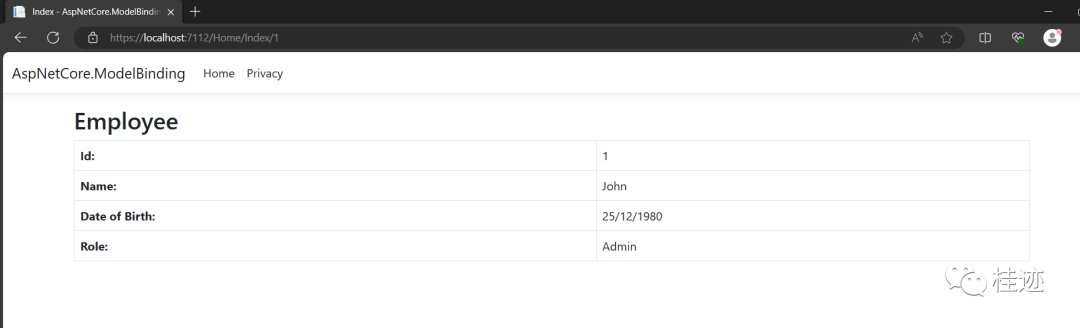
...现在运行项目并且进入URL– /Home/Index/1,将看到employee为1的员工编号显示在浏览器,图片如下:
2 理解模型绑定
ASP.NET Core模型绑定在整个过程发挥什么作用呢?我们请求的URL包含了employee id的值(给与第三段的URL是1) /Home/Index/1
在Program.cs 类中有默认路由,路由指定了3个URL段,Id是变量
app.MapControllerRoute(
    name: "default",
    pattern: "{controller=Home}/{action=Index}/{id?}"
    );
现在,我们看到Index方法有一个Id参数
public IActionResult Index(int id = 1)
{
    return View(repository[id]);
}
ASP.NET Core模型绑定处理过程从URL中获取的Id值,并且将Id值通过参数提供给action方法
模型绑定会从下面3个地方查询值:
1 表单数据值
2 路由变量
3 查询字符串
从表单数据开始检查,然后路由变量,最后是查询字符串,在这种情况下,框架如果没有在表单数据中发现Id的值, 接着会检查路由变量,发现有个路由变量的值叫Id,然后停止搜索, 接下来不会搜索查询字符串
搜索顺序是非常重要,如果我们打开URL– /Home/Index/2?id=1 ,然而我们将会看到Employee Id 为2的记录, 如下图所示:
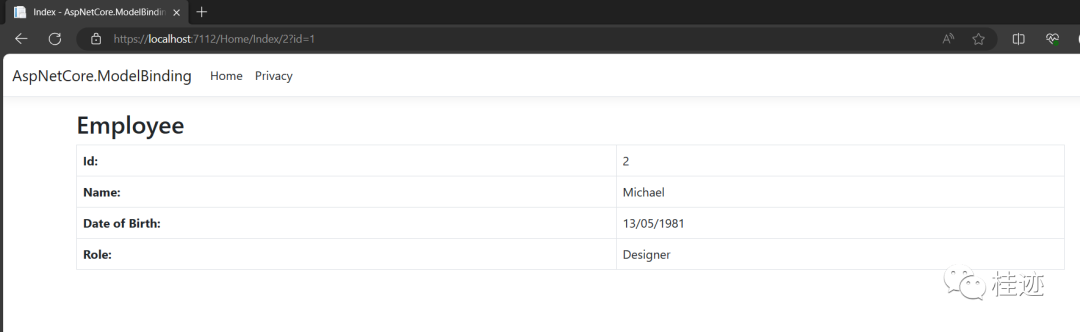
这是为什么Employee 为2的员工被显示,因为在查询字符串Id的值(即1)之前框架在路由变量中发现了Id(即2)值,因此2的值被提供给action方法参数,如果我们打开URL-Home/Index?id=3,然而Employee Id为3的员工将被显示:
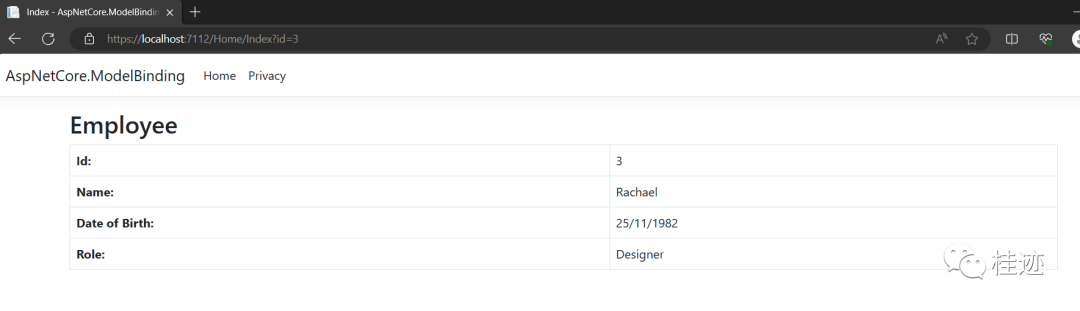
在这种情况下,框架没有发现Id的值在URL段,因此它将搜索查询字符串发现Id为3的值
3 模型绑定默认值
如果ASP.NET Core在这三个地方没有发现绑定的值,会发生什么呢?– 表单数据值,路由变量&查询字符串,在这种情况下,它将根据action方法定义的类型提供默认值,这些默认值是:
1 int类型为0
2 string类型为""
3 时间类型为01-01-0001 00:00:00
4 float类型为0
在Index方法代码中我们测试一下模型绑定默认值:
public IActionResult Index(int id)
{
    if (id == 0)
        id = 1;
    return View(repository[Convert.ToInt32(id)]);
}
我们把参数id默认值移除掉,接下来我们在Index方法中打断点,然后运行应用程序并且进入URL – /Home/Index,注意在这个url中没有给定第三个参数employee id,因此 现在模型绑定将提交默认值,当断点命中时,我们将鼠标移动到id变量上检查一下值,你将看到值0,如下图所示:
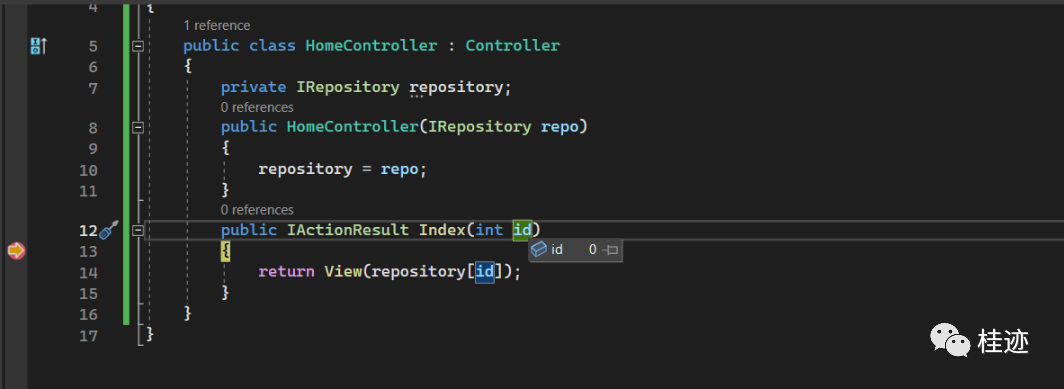
当ASP.NET Core 没有给employee id 值,因此它会为id参数绑定默认值,Id参数是int类型,默认值是0,因此模型绑定提供了默认值为0
你能获取到它 – 如果Id参数类型修改为string,然而模型绑定将给与默认值""
我们数据中没有员工Id为0,因此我们在if代码块中赋值为1,这将帮助我们阻止运行时错误,我们可以通过使用Try-Catch 块处理运行时错误
注意可空类型的默认值为null,现在修改Index方法有一个nullable int类型参数,代码如下:
public IActionResult Index(int? id)
{
    if (id == null)
        id = 1;
    return View(repository[Convert.ToInt32(id)]);
}
运行你的应用程序并且进入URL– /Home/Index,现在通过断点来检查id的值, 这时你将发现它的值为null
4 模型绑定简单类型
当ASP.NET Core 绑定简单类型时,将会把值转换为方法的参数类型,简单类型是– string,int,bool,float,datetime,decimal等
让我们通过一个简单的例子来了解一下:
public IActionResult Index(int? id)
{
    if (id == null)
        id = 1;
    return View(repository[Convert.ToInt32(id)]);
}
Index方法参数是int类型因此ASP.NET Core 框架会自动转换url中id段变量的值到int值
案例 1 : 针对 URL – /Home/Index/1
当强求的URL包含的id值为int,像– /Home/Index/1 框架会成功转换1的值到int,因此方法参数会收到参数为1
案例 2 : 针对 URL – /Home/Index/John
如果你收到要给URL,Id值是字符串 像– /Home/Index/John 在这种情况下,框架将尝试把John转换到int值,这时不能转化,因此action 方法接收到id的参数为null
5 模型绑定复杂类型
当action方法的参数是复杂类型,像类对象,然而模型绑定会指定绑定每个复杂类型的公共属性
模型绑定查找公共属性从下面三个地方:
1 表单数据
2 路由变量
3 查询字符串
这个是非常重要的感念,你将在你的项目中再次使用,面试时也经常问到这个问题,因此我们创建一个例子理解它
在Home Controller中添加Create方法,这两个方法如下:
public IActionResult Create() => View();
[HttpPost]
public IActionResult Create(Employee model) => View("Index", model);
HTTP GET版本的Create方法选择默认View并且没有传递任何模型给它,HTTP POST 版本的Create方法有一个Employee参数的类型(是一个复杂类型)
模型绑定的功能是从Http请求中提取Employee类公共属性,并且将它提供给Create方法的参数,该方法传递Employee模型对象到默认View
接下来在Views->Home 文件夹下创建Create View,它的代码给与如下:
@model Employee
@{
    ViewData["Title"] = "Create Employee";
}
<h2>Create Employee</h2>
<form asp-action="Create" method="post">
    <div class="form-group">
        <label asp-for="Id"></label>
        <input asp-for="Id" class="form-control" />
    </div>
    <div class="form-group">
        <label asp-for="Name"></label>
        <input asp-for="Name" class="form-control" />
    </div>
    <div class="form-group">
        <label asp-for="DOB"></label>
        <input asp-for="DOB" class="form-control" />
    </div>
    <div class="form-group">
        <label asp-for="Role"></label>
        <select asp-for="Role" class="form-control"
                asp-items="@new SelectList(Enum.GetNames(typeof(Role)))"></select>
    </div>
    <button type="submit" class="btn btn-primary">Submit</button>
</form>
这个View包含了一个表单并且绑定了Employee实体一些公共属性,当表单被提交这些值将被提交到HTTP POST版本的Create方法
Create方法需要Employee对象的参数,因此模型绑定过程首先从表单数据中查找Employee对象的每个公共属性的值(Id, Name, DOB, Role)
表单数据包含了这些值,使用asp-for帮助标签作为输入元素,例如-示例–id属性绑定到输入控件,如下所示
<input asp-for="Id" class="form-control" />Name属性被绑定通过下面这种方式
<input asp-for="Name" class="form-control" />模型绑定会把这些值绑定到Employee对象的属性,将Employee对象传递给Create方法的参数,Create方法使用模型绑定技术获取employee类型的参数值
asp-for 是一个帮助标签,你可以获取到更多的关于内置帮助标签在ASP.NET Core
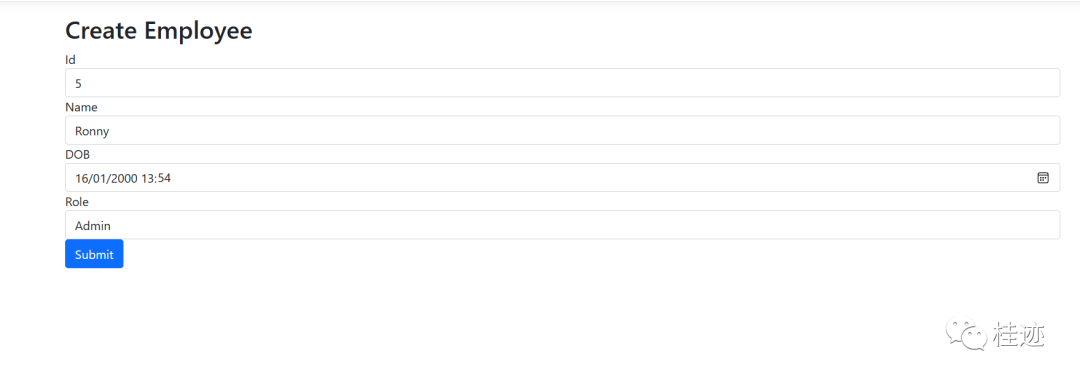
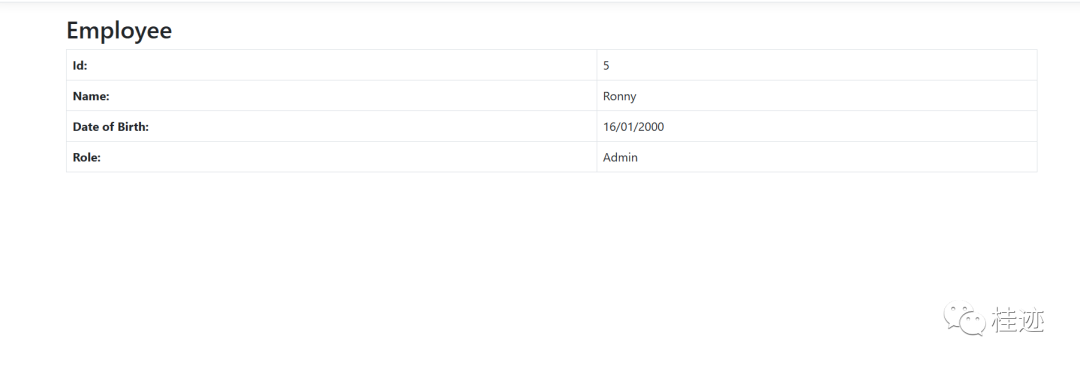
Post版本的Create方法调用Index视图,将Employee对象作为Model传递给View,现在运行应用程序并且进入URL– /Home/Create,在表单中输入所有值并点击提交按钮,我们会看到填充的值显示在浏览器上
下面2张图片显示了填充和提交的表单:
6 复杂对象包含复杂对象
EmployeeDetails.cs类包含了名称为HomeAddress公共属性,这个属性是一个Address类型,因此复杂对象包含另一个复杂对象案例
public class Employee
{
    public int Id { get; set; }
    public string Name { get; set; }
    public DateTime DOB { get; set; }
    public Address HomeAddress { get; set; }
    public Role Role { get; set; }
}
public class Address
{
    public string HouseNumber { get; set; }
    public string Street { get; set; }
    public string City { get; set; }
    public string PostalCode { get; set; }
    public string Country { get; set; }
}
绑定HomeAddress属性时,模型绑定处理过程和前面的相同:
1 查找所有HomeAddress的公共属性(即 HouseNumber, Street, City, PostalCode, Country)
2 在表单数据中搜索这些公共属性的值,注意路由&查询字符串变量不能包含复杂类型
更新Create.cshtml视图文件绑定HomeAddress类型所有属性,代码如下:
@model Employee
@{
    ViewData["Title"] = "Create Employee";
}
<h2>Create Employee</h2>
<form asp-action="Create" method="post">
    <div class="form-group">
        <label asp-for="Id"></label>
        <input asp-for="Id" class="form-control" />
    </div>
    <div class="form-group">
        <label asp-for="Name"></label>
        <input asp-for="Name" class="form-control" />
    </div>
    <div class="form-group">
        <label asp-for="DOB"></label>
        <input asp-for="DOB" class="form-control" />
    </div>
    <div class="form-group">
        <label asp-for="Role"></label>
        <select asp-for="Role" class="form-control"
                asp-items="@new SelectList(Enum.GetNames(typeof(Role)))"></select>
    </div>
    <div class="form-group">
        <label asp-for="HomeAddress.HouseNumber"></label>
        <input asp-for="HomeAddress.HouseNumber" class="form-control" />
    </div>
    <div class="form-group">
        <label asp-for="HomeAddress.City"></label>
        <input asp-for="HomeAddress.City" class="form-control" />
    </div>
    <div class="form-group">
        <label asp-for="HomeAddress.Street"></label>
        <input asp-for="HomeAddress.Street" class="form-control" />
    </div>
    <div class="form-group">
        <label asp-for="HomeAddress.PostalCode"></label>
        <input asp-for="HomeAddress.PostalCode" class="form-control" />
    </div>
    <div class="form-group">
        <label asp-for="HomeAddress.Country"></label>
        <input asp-for="HomeAddress.Country" class="form-control" />
    </div>
    <button type="submit" class="btn btn-primary">Submit</button>
</form>
当绑定HomeAddress属性时候,我们必须包含"HomeAddress",看Helper标签asp-for="HomeAddress.HouseNumber" 绑定HouseNumber属性,我们也为另一些属性使用这种绑定
编辑Index视图显示HomeAddress对象所有属性,代码如下:
@model Employee
@{
ViewData["Title"] = "Index";
}
<h2>Employee</h2>
<table class="table table-sm table-bordered table-striped">
<tr><th>Id:</th><td>@Model.Id</td></tr>
<tr><th>Name:</th><td>@Model.Name</td></tr>
<tr><th>Date of Birth:</th><td>@Model.DOB.ToShortDateString()</td></tr>
<tr><th>Role:</th><td>@Model.Role</td></tr>
<tr><th>House No:</th><td>@Model.HomeAddress?.HouseNumber</td></tr>
<tr><th>Street:</th><td>@Model.HomeAddress?.Street</td></tr>
<tr><th>City:</th><td>@Model.HomeAddress?.City</td></tr>
<tr><th>Postal Code:</th><td>@Model.HomeAddress?.PostalCode</td></tr>
<tr><th>Country:</th><td>@Model.HomeAddress?.Country</td></tr>
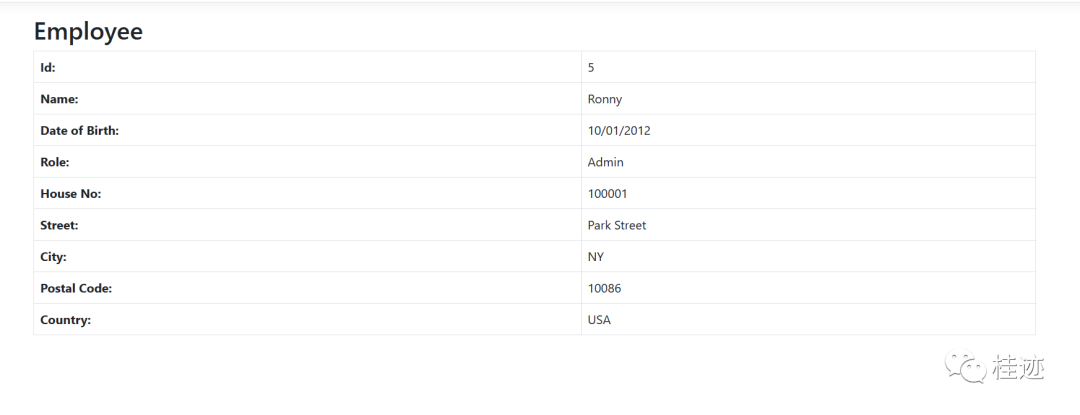
</table>现在,运行应用程序并且进入URL– /Home/Create, 填充并提交表单,我们将发现address类型属性的显示,显示图片如下:
检查源代码
下面是浏览器为html生成的源代码
<div class="form-group">
    <label for="HomeAddress_HouseNumber">HouseNumber</label>
    <input class="form-control" type="text" id="HomeAddress_HouseNumber" name="HomeAddress.HouseNumber" value="" />
</div>
<div class="form-group">
    <label for="HomeAddress_City">City</label>
    <input class="form-control" type="text" id="HomeAddress_City" name="HomeAddress.City" value="" />
</div>
<div class="form-group">
    <label for="HomeAddress_Street">Street</label>
    <input class="form-control" type="text" id="HomeAddress_Street" name="HomeAddress.Street" value="" />
</div>
<div class="form-group">
    <label for="HomeAddress_PostalCode">PostalCode</label>
    <input class="form-control" type="text" id="HomeAddress_PostalCode" name="HomeAddress.PostalCode" value="" />
</div>
<div class="form-group">
    <label for="HomeAddress_Country">Country</label>
    <input class="form-control" type="text" id="HomeAddress_Country" name="HomeAddress.Country" value="" />
</div>
HouseNumber输入控件获取属性名字的值HomeAddress.HouseNumber,然而id属性的值变为HomeAddress_HouseNumber,相同的方式,City输入控件获取name属性的值,然而id的属性的值为 HomeAddress_City
在C#代码中我们也能获取HouseNumber值在action 方法通过使用Request.Form方法,代码如下:
string houseNo = Request.Form["HomeAddress.HouseNumber"];针对另外一些值也是相同的方式
7 使用[Bind(Prefix)]特性绑定复杂类型
[Bind(Prefix)]特性能修改复杂类型模型绑定的默认行为,让我们通过一个例子来理解,创建一个名为PersonAddress.cs的模型类使用下面代码:
namespace AspNetCore.ModelBinding.Models
{
    public class PersonAddress
    {
        public string City { get; set; }
        public string Country { get; set; }
    }
}
接下来,在HomeController类中添加一个新的action方法叫DisplayPerson
[HttpPost]
public IActionResult DisplayPerson(PersonAddress personAddress)
{
    return View(personAddress);
}
下一步,修改Create视图中asp-action标签的值,将该值设置为DisplayPerson,代码如下:
<form asp-action="DisplayPerson" method="post">
    ...
</form>
现在,意味着当我们在表单中输入数据并且提交表单时,数据将被提交到DisplayPerson方法 ,在Views->Home文件夹创建一个DisplayPerson视图,这个视图包含PersonAddress类型,并显示城市和国家在模型对象
DisplayPerson视图代码如下:
@model PersonAddress
@{
    ViewData["Title"] = "Person";
}
<h2>Person</h2>
<table class="table table-sm table-bordered table-striped">
    <tr><th>City:</th><td>@Model.City</td></tr>
    <tr><th>Country:</th><td>@Model.Country</td></tr>
</table>
现在运行你的应用程序,并且进入URL- /Home/Create,填充表单并且点击提交按钮
注意City和Country没有包含任何值,模型绑定失败了,看如下图:
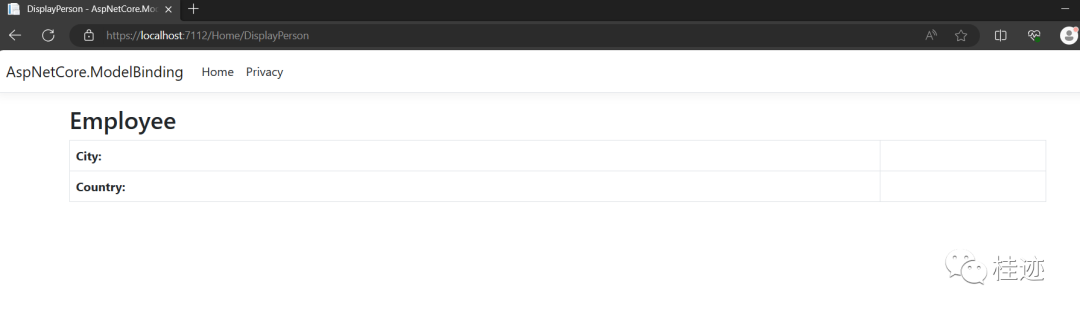
模型绑定失败的原因是因为City和Country输入控件属性Name包含了字符串HomeAddress 前缀,在浏览器中检查输入控件源代码
<input class="form-control" type="text" id="HomeAddress_City" name="HomeAddress.City" value="">
<input class="form-control" type="text" id="HomeAddress_Country" name="HomeAddress.Country" value="">
为了解决这个问题,我们在action方法的参数中应用[Bind(Prefix)],告诉ASP.NET Core 基于HomeAddress前缀完成模型绑定
因此改变DisplayPerson 方法包含[Bind(Prefix = nameof(Employee.HomeAddress))]显示如下:
public IActionResult DisplayPerson
([Bind(Prefix = nameof(Employee.HomeAddress))] PersonAddress personAddress)
{
return View(personAddress);
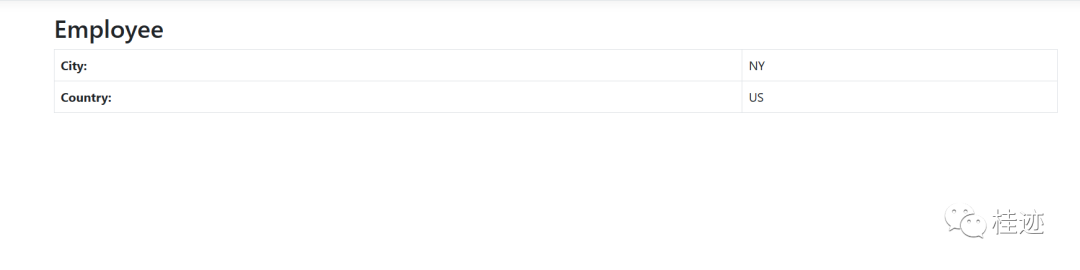
}再次提交表单,这次我们将发现City和Country值并将他们显示在浏览器,看下面图片:
使用[Bind]选择性的绑定属性
我们可以选择性的绑定属性,Bind()方法的第一个参数提供包含模型绑定中的所有属性的名称(用逗号分隔的列表中),那意味着剩下的属性将不被绑定
修改DisplayPerson方法代码,绑定方法包含City属性
public IActionResult DisplayPerson([Bind(nameof(PersonAddress.City), Prefix = nameof(Employee.HomeAddress))] PersonAddress personAddress)
{
   return View(personAddress);
}
测试一下该方法,你将看到仅仅City值显示,如下图所示:

我们可以使用另外一种方法实现相同的功能,在PersonAddress类的Country属性上使用 [BindNever] 特性,BindNever指定的属性模型绑定将被忽略
using Microsoft.AspNetCore.Mvc.ModelBinding;
namespace AspNetCore.ModelBinding.Models
{
    public class PersonAddress
    {
        public string City { get; set; }
        [BindNever]
        public string Country { get; set; }
    }
}
8 模型绑定上传文件
我们通过模型绑定技术完成上传文件功能,这里我们必须做3件事情:
1 在View中添加input type=”file”控件
2 在html表单的标签中添加enctype="multipart/form-data"特性
3 在action方法中添加IFormFile类型参数,使用该参数绑定上传文件
我们创建一个上传文件的特性,添加一个新的Controller并且命名为FileUploadController.cs. 代码给与如下:
using Microsoft.AspNetCore.Mvc;


namespace ModelBindingValidation.Controllers
{
    public class FileUploadController : Controller
    {
        private IWebHostEnvironment hostingEnvironment;
        public FileUploadController(IWebHostEnvironment environment)
        {
            hostingEnvironment = environment;
        }
        public IActionResult Index() => View();
        [HttpPost]
        public async Task<IActionResult> Index(IFormFile file)
        {
            string path = Path.Combine(hostingEnvironment.WebRootPath, "Images/" + file.FileName);
            using (var stream = new FileStream(path, FileMode.Create))
            {
                await file.CopyToAsync(stream);
            }
            return View((object)"Success");
        }
    }
}
添加一个IWebHostEnvironment 的依赖用来获取"wwwroot"文件夹的全部路径, Index方法通过模型绑定技术将上传的文件绑定到IFormFile类型参数
方法内部将文件保存到应用程序wwwroot/Images文件夹内
为了能够正常工作你确保在wwwroot目录下创建Images文件夹,接下来在 Views/FileUpload文件夹内添加Index文件,代码如下:
@model string
@{
    ViewData["Title"] = "Upload File";
}


<h2>Upload File</h2>
<h3>@Model</h3>


<form method="post" enctype="multipart/form-data">
    <div class="form-group">
        <input type="file" name="file" />
    </div>
    <button type="submit" class="btn btn-primary">Submit</button>
</form>
浏览器看上如下:

总结:
在ASP.NET Core中模型绑定是一个重要的感念,开发人员能够非常容易的在Views和Controllers之间传输数据,在这节文章中,我们通过例子来了解模型绑定原理
源代码地址
https://github.com/bingbing-gui/Asp.Net-Core-Skill/tree/master/Fundamentals/AspNetCore.ModelBinding/AspNetCore.ModelBinding
参考文献
https://www.yogihosting.com/aspnet-core-model-binding/


 1212
1212

 被折叠的 条评论
为什么被折叠?
被折叠的 条评论
为什么被折叠?
 到【灌水乐园】发言


