


这节我们通过例子来讲解模型绑定高级概念,我们分别从这几个维度来讲解:
1 模型绑定数组类型
2 模型绑定集合类型
3 模型绑定复杂的集合类型
4 模型绑定源
1 模型绑定数组类型
使用模型绑定我们可以给Action方法绑定数组类型的参数,为了验证这个例子,在HomeController中创建一个Places方法,代码如下:
using AspNetCore.ModelBinding.Advanced.Models;
using Microsoft.AspNetCore.Mvc;
using System.Diagnostics;
namespace AspNetCore.ModelBinding.Advanced.Controllers
{
    public class HomeController : Controller
    {
        private readonly ILogger<HomeController> _logger;
        public HomeController(ILogger<HomeController> logger)
        {
            _logger = logger;
        }
        public IActionResult Palces(string[] places) => View(places);
    }
}
注意这个Action方法有个string类型的参数并且被命名为places,模型绑定机制会搜索form表单数据中名字为places的项, 路由变量和查询字符串,如果发现将会绑定到方法的参数
接下来,创建一个视图文件,名字为Places在Views->Home 文件夹内,添加下面代码:
@model string []
@{
    ViewData["Title"] = "Places";
}
<h2></h2>
@if (@Model.Length == 0)
{
    <form asp-action="Places" method="post">
        @for (int i = 1; i <= 3; i++)
        {
            <div class="form-group">
                <label>Place @i</label>
                <input name="places" class="form-controller" />
            </div>
        }
        <button type="submit" class="btn btn-primary">提交</button>
    </form>
}
else
{
    <table class="table table-sm table-bordered table-striped">
        @foreach (var place in Model)
        {
            <tr>
                <td>Place</td>
                <td>@place</td>
            </tr>
        }
    </table>
    <a asp-action="Places" class="btn btn-primary">返回</a>
}
视图中包含一个数组类型的模型,if-else块语句检查是否为空,它使用了代码– @Model.Length == 0判断,如果不为空使用循环遍历模型并显示,否则,在这种情况下,如果模型为空,表单会添加3个places并显示3个相同的输入框
这3个完全相同的输入元素有他们自己的名字places– <input name="places" class="form-controller" />它们在action方法中有相同的参数名字 –string[] places,因此当表单被提交时,模型绑定会从所有的输入控件中获取值并且创建一个包含这些值的数据,这个数组被绑定到方法的参数上
运行项目并进入url初始化 Places 方法– /Home/Places,现在page页面检查3个html的输入元素, 代码如下:
<div class="form-group">
<label>Place 1</label>
<input name="places" class="form-controller" />
</div>
<div class="form-group">
<label>Place 2</label>
<input name="places" class="form-controller" />
</div>
<div class="form-group">
<label>Place 3</label>
<input name="places" class="form-controller" />
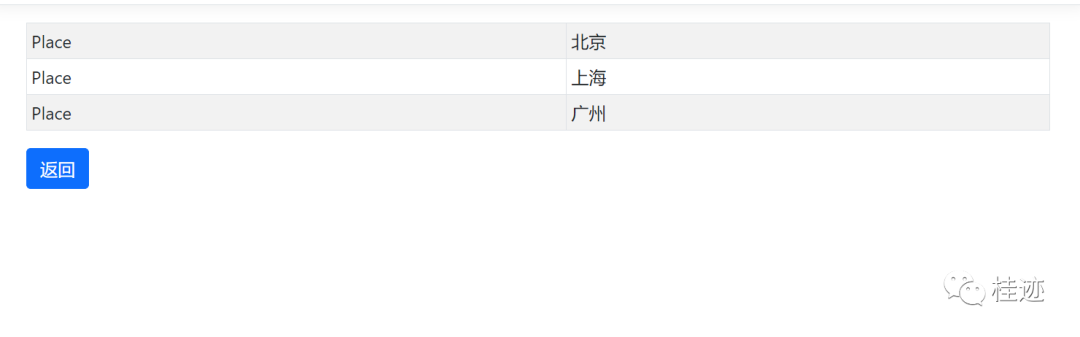
</div>你能看到所有的这3个输入元素有相同的名字places,并且这个名字action方法的参数名称是相同的,因此模型绑定将会应用一个数组的绑定
现在在表单上输入3个places名称并提交, 提交这三个值将会显示在浏览器:

2 模型绑定集合类型
模型绑定也可以绑定集合类型,在C#中集合类型被广泛使用,我们通过一个例子来了解,让我们更新一下前面的例子,将参数从数组类型修改为强类型的集合
因此,改变Places方法的参数类型从 string[] 到 List<string>
public IActionResult Places(List<string> places) => View(places);我们稍微修改一下Places.cshtml视图文件:
1 将模型类型修改为List<string>
2 在if代码块中使用Model.Count
代码如下:
@model List<string>
@{
    ViewData["Title"] = "Places";
}
<h2></h2>
@if (@Model.Count == 0)
{
    <form asp-action="Places" method="post">
        @for (int i = 1; i <= 3; i++)
        {
            <div class="form-group">
                <label>Place @i</label>
                <input name="places" class="form-controller" />
            </div>
        }
        <button type="submit" class="btn btn-primary">提交</button>
    </form>
}
else
{
    <table class="table table-sm table-bordered table-striped">
        @foreach (var place in Model)
        {
            <tr>
                <td>Place</td>
                <td>@place</td>
            </tr>
        }
    </table>
    <a asp-action="Places" class="btn btn-primary">返回</a>
}
你可以像之前一样运行和提交表单,提交时,你添加的3个places文本会显示在浏览器中
3 模型绑定复杂的集合类型
现在我们使用模型绑定来绑定一个复杂类型的集合,因此创建一个PersonAddress类使用两个属性 – City & Country
public class PersonAddress
{
    public string City { get; set; }
    public string Country { get; set; }
}
接下来,进入Home控制器并添加一个新的名字为Address的方法, 具体方法的代码如下:
public IActionResult Address() => View();
[HttpPost]
public IActionResult Address(List<PersonAddress> address) => View(address);
接下来,在Views->Home文件夹内创建一个名字为Address视图,代码如下:
@model List<PersonAddress>
@{
    ViewData["Title"] = "Address";
}
<h2>Address</h2>
@if (Model.Count == null)
{
    <form asp-action="Address" method="post">
        @for (int i = 0; i < 3; i++)
        {
            <fieldset class="form-group">
                <legend>Address @(i + 1)</legend>
                <div class="form-group">
                    <label>City:</label>
                    <input name="[@i].City" class="form-control" />
                </div>
                <div class="form-group">
                    <label>Country:</label>
                    <input name="[@i].Country" class="form-control" />
                </div>
            </fieldset>
        }
        <button type="submit" class="btn btn-primary">Submit</button>
    </form>
}
else
{
    <table class="table table-sm table-bordered table-striped">
        <tr><th>City</th><th>Country</th></tr>
        @foreach (var address in Model)
        {
            <tr><td>@address.City</td><td>@address.Country</td></tr>
        }
    </table>
    <a asp-action="Address" class="btn btn-primary">Back</a>
}
视图中包含一个PersonAddress集合的Model,是一个复杂类型的集合,当在模型中没有数据显示时它呈现一个表单,表单包含了3对City和Country输入框前缀使用了数组索引具体代码如下:
<fieldset class="form-group">
   <legend>Address 1</legend>
       <div class="form-group">
            <label>City:</label>
            <input name="[0].City" class="form-control" />
        </div>
        <div class="form-group">
             <label>Country:</label>
             <input name="[0].Country" class="form-control" />
        </div>
</fieldset>
<fieldset class="form-group">
   <legend>Address 2</legend>
   <div class="form-group">
        <label>City:</label>
        <input name="[1].City" class="form-control" />
    </div>
    <div class="form-group">
         <label>Country:</label>
         <input name="[1].Country" class="form-control" />
    </div>
</fieldset>
<fieldset class="form-group">
    <legend>Address 3</legend>
    <div class="form-group">
         <label>City:</label>
         <input name="[2].City" class="form-control" />
    </div>
    <div class="form-group">
          <label>Country:</label>
          <input name="[2].Country" class="form-control" />
    </div>
</fieldset>
这些输入框被创建通过循环从i->0到i->2,当提交表单时,模型绑定使用name属性的int索引值创建List<PersonAddress>集合的元素,前缀为[0]的name属性的值对应第一个PersonAddress对象,前缀为[1]的name属性的值对应第二个PersonAddress对象, 最后 前缀为[2]的name属性的值对应第三个对象,如果你有更多的对象,可以使用这种模式, 这是一个经典的例子针对模型绑定复杂类型的集合
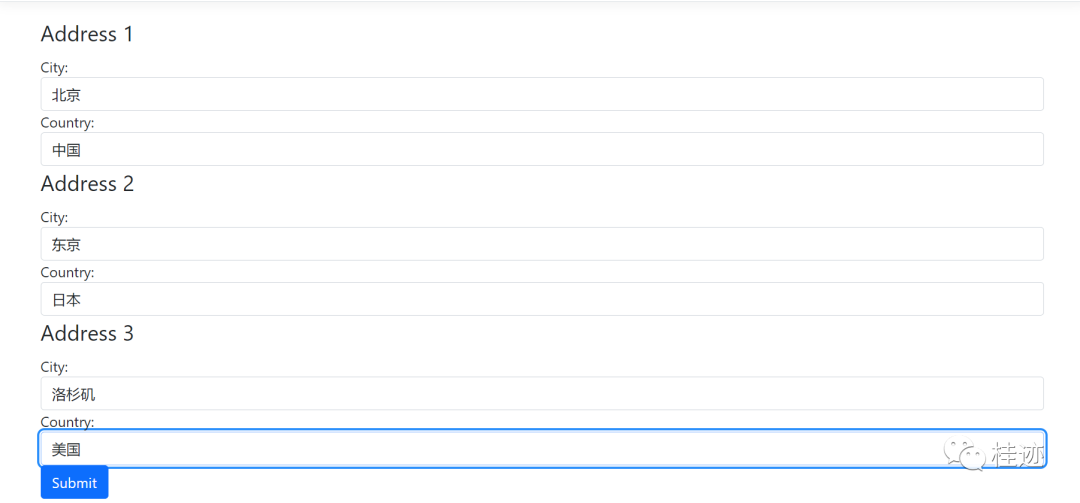
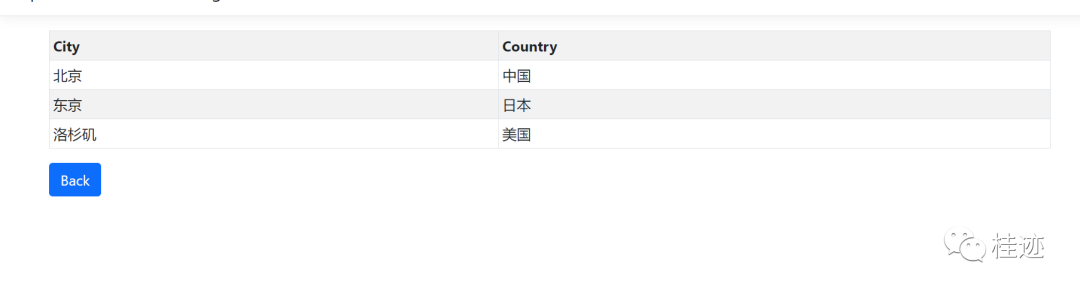
现在运行应用程序进行测试,进入URL– /Home/Address, 针对这3对Citiy和Country 输入值并且按下提交按钮,你将看到这些值显示在浏览器,图片显示如下:
4 模型绑定源
在ASP.NET Core 不同方式的模型绑定:
1 Form data
2 Routing
3 Query string
模型绑定首先从表单数据中搜索、接着路由数据、最后是查询字符串
我们能重写这个搜索行为,强制模型绑定使用特定的数据源中的数据进行绑定,我们可用通过下面表格的特性来完成:
名称 | 描述 |
FromQuery | 使用这个特性指定查询字符串作为模型绑定的数据源 |
FromHeader | 使用这个特性指定请求的header作为模型绑定的数据源 |
FromBody | 使用这个特性指定请求body作为模型绑定的数据源 |
FromForm | 使用这个特性指定表单数据作为模型绑定的数据源 |
FromRoute | 使用这个特性指定路由数据作为模型绑定的数据源 |
为什么使用模型绑定?模型绑定技术是可以将HTTP请求中的数据转换到控制器的方法的一种最简单的方式,数据转换以不同的方式完成像form、body、headers、routes & query strings,模型绑定使得所有的这些工作很平滑,项目也减少了大量开发时间
FromForm特性
[FromForm]特性告诉模型绑定从提交的表单域中获取值,模型绑定首先在表单数据中搜索值,因此大多数情况下我们不需要添加这个特性
让我们通过一个例子来了解,我们有一个类叫Employee
public class Employee
{
    public int Id { get; set; }
    public string Name { get; set; }
}
在Home控制器中创建一个名字为FromFormExample的方法,在Post版本方法的参数中添加一个FromForm特性– [FromForm] Employee model, 这告诉模型从表单域中绑定获取参数的值
public IActionResult FromFormExample() => View();
[HttpPost]
public IActionResult FromFormExample([FromForm] Employee model)
{
    ViewBag.Message = "Employee data received";
    return View();
}
现在在Views->Home文件内创建FromFormExample视图,在这个视图中我们创建一个html表单接受employee id和name
@{
    ViewData["Title"] = "FromFormExample";
}
<h2>From Form</h2>
<h3>@ViewBag.Message</h3>
<form method="post">
    <div class="form-group">
        <label>Id:</label>
        <input name="Id" class="form-control" />
    </div>
    <div class="form-group">
        <label>Name:</label>
        <input name="Name" class="form-control" />
    </div>
    <button class="btn btn-primary">Submit</button>
</form>
访问https://localhost:7145/Home/FromFormExample
输入employee id和name并且按下提交按钮,在action方法的参数中将会收到该表单的值
让我们使用另外一个例子,我们使用JQuery添加数据到表单域,并提交表单
因此改变Post 版本的FromFormExample,返回一个Employee类型,并且在末尾返回参数的值
[HttpPost]
public Employee FromFormExample([FromForm]Employee model) => model;
现在修改 FromFormExample 视图如下:
@{
    ViewData["Title"] = "FromFormExample";
}
<h2>From Form</h2>
@section scripts {
    <script src="https://ajax.aspnetcdn.com/ajax/jQuery/jquery-3.2.1.min.js"></script>
    <script>
        $(document).ready(function () {
            $("button").click(function (e) {
                data = new FormData();
                data.append("id", 5);
                data.append("name", "Donald Trump");
                $.ajax("/Home/FromFormExample", {
                    method: "post",
                    processData: false,
                    contentType: false,
                    data: data,
                    success: function (data) {
                        $("#empId").text(data.id);
                        $("#empName").text(data.name);
                    }
                });
            });
        });
     </script>
}
<table class="table table-sm table-bordered table-striped">
    <tr><th>Id:</th><td id="empId"></td></tr>
    <tr><th>Name:</th><td id="empName"></td></tr>
</table>
<button class="btn btn-primary">Submit</button>
视图代码有一个ajax()方法调用FromFormExample方法,这个方法要求的数据来自于表单域 (因此它使用了[FromForm] 特性),因此我们添加值(employee id=5 和 name=Donald Trump) 在FormData, 看下面代码是如何工作:
data = new FormData();
data.append("Id", 5);
data.append("Name", "Donald Trump");
表单数据的值被添加到ajax方法的data参数,访问 /Home/FromFormExample,并点击按钮,值像显示在HTML表格,图片显示如下:


FromBody 特性
指定FormBody特性来指定模型绑定从Request Body作为数据源的值,为了理解这个特性如何工作,在Home 控制器中添加一个名为Body的方法
public IActionResult Body() => View();
[HttpPost]
public Employee Body([FromBody]Employee model) => model;
我们使用[FromBody]特性修饰Post版本的Body方法的参数,那意味着模型绑定从请求体中搜索Employee模型的值,注意方法返回的类型是Employee类型
在 Views->Home文件夹内部创建Body视图
@{
    ViewData["Title"] = "Body";
}
<h2>Body</h2>
 @section scripts {
    <script src="https://ajax.aspnetcdn.com/ajax/jQuery/jquery-3.2.1.min.js"></script>
    <script>
        $(document).ready(function () {
            $("button").click(function (e) {
                $.ajax("/Home/Body", {
                    method: "post",
                    contentType: "application/json",
                    data: JSON.stringify({
                        id: 5,
                        name: "Donald Trump"
                    }),
                    success: function (data) {
                        $("#empId").text(data.id);
                        $("#empName").text(data.name);
                    }
                });
            });
        });
</script>
}
<table class="table table-sm table-bordered table-striped">
    <tr><th>Id:</th><td id="empId"></td></tr>
    <tr><th>Name:</th><td id="empName"></td></tr>
</table>
<button class="btn btn-primary">Submit</button>
在这个视图中,当点击按钮时,像URL– /Home/Body 发送包含了JSON data的HTTP POST请求
注意使用JavaScript的JSON.stringify方法将Id&name的值转换为JSON字符创并且赋值给JQuery AJAX 方法的data参数
data: JSON.stringify({
  id: 5,
  name: "Donald Trump"
})
Body方法Employee类型的参数接受到这个数据,并且以JSON格式返回给视图
最后,$.ajax()方法在Success调用回调方法,我们将接收到这个数据并将其显示在Table内
我们来做个测试,进入URL- /Home/Body 并点击Button,如下图所示:


FromQuery 特性
FromQuery指定模型绑定从查询字符串中获取值,我们在Home控制器中有Index方法包含如下代码:
public IActionResult Index(int id = 1)
{
return View(repository[id]);
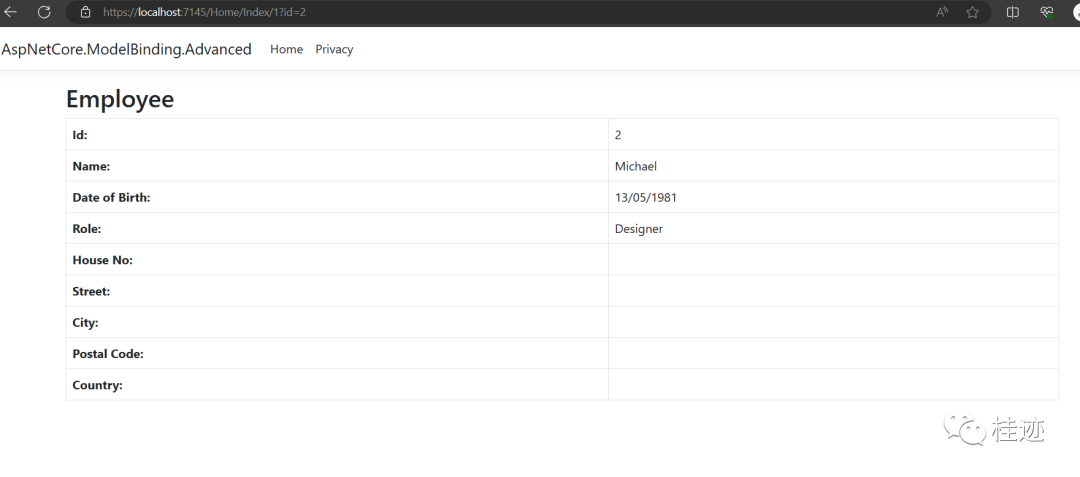
}现在我们进入– /Home/Index/1?id=2, id参数将获取值为1而不是2,因为查询顺序路由值,接下来是查询字符创,模型绑定在搜索查询字符创之前搜索路由的值
在URL数据中有3段 – /Home(1st segment)/Index(2nd segment)/1(3rd segment)包含的id值是1,因此你将看到Employee Id为1的数据
现在,我们能通过使用[FromQuery]特性非常容易的重写搜索行为,它将强迫模型绑定查找查询字符串针对Id参数
因此,更新Index 方法
public IActionResult Index([FromQuery] int id = 1)
{
    return View(repository[id]);
}
使用相同的URL– /Home/Index/1?id=2,这次你将看到第二个员工显示在浏览器,这意味着模型绑定在查询字符串中搜索值,代码如下:
FromHeader 特性
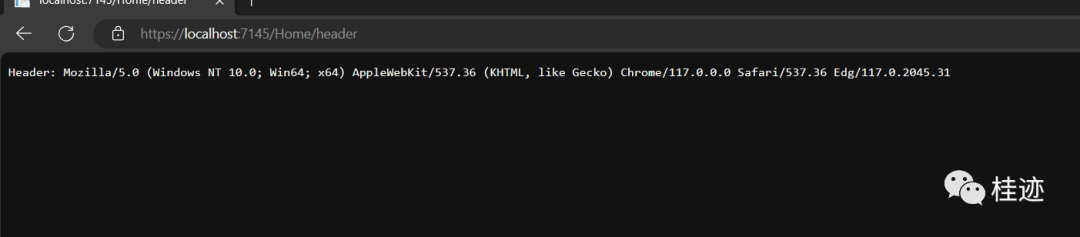
FormHeader特性指定模型绑定从HTTP headers中获取值,在Home控制器中添加一个名为Header的action方法,显示如下代码:
public string Header([FromHeader]string accept) => $"Header: {accept}";这个方法有一个名字为accept的参数,从http请求的header中绑定这个参数
运行你的应用程序,进入– /Home/Header,你将在浏览器中看到accept的值:
Header:
text/html,application/xhtml+xml,application/xml;q=0.9,image/webp,image/apng,*/*;q=0.8,application/signed-exchange;v=b3;q=0.9
现在,我们在浏览器开发工具中检查Request Header的值,请检查下面步骤:
1 按下F12打开浏览器开发工具,或者使用快捷键
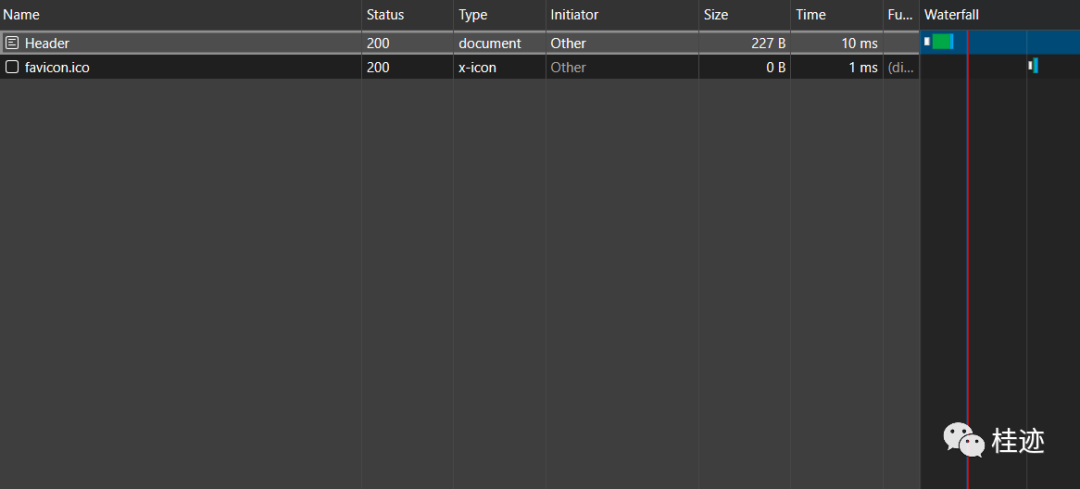
2 点击Network 页,按下F5重新加载值
3 在左侧你将看到Header文本,点击它
看图片如下:
4 你将获取到4选项 – Headers, Preview, Response, Timing. 点击Headers 选项,我们会发现请求的Headers. 看图如下:
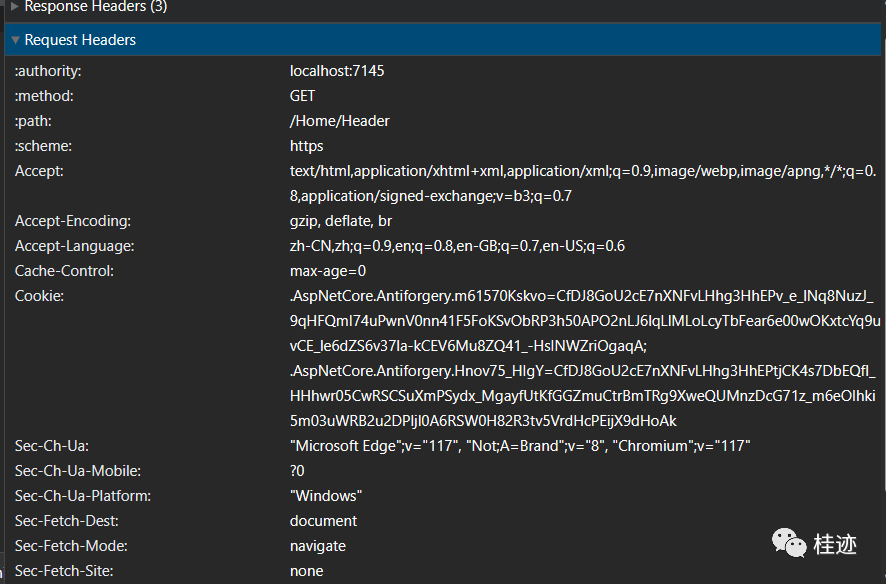
请求的Header有多个属性像
Accept
Accept-Encoding
Accept-Language
Cache-Control
Connection
Host
Upgrade-Insecure-Requests
User-Agent
现在,让我们绑定 User-Agent 值,因此使用Name属性配置FromHeader特性并且指定Header中的名称,在我们这种情况下,我们获取User-Agent
更新Header方法代码:
public string Header([FromHeader(Name = "User-Agent")]string accept) => $"Header: {accept}";现在重新加载应用程序,查看URL–/Home/Header, 这次你将看到User-Agent的值被显示在浏览器上:
绑定请求Headers中的所有值
我们能绑定请求的所有Header的值,通过使用FromHeader在类的属性上,让我们通过一个例子了解该特性
在Models文件夹下创建一个FullHeader.cs类
using Microsoft.AspNetCore.Mvc;
namespace AspNetCore.ModelBinding.Advanced.Models
{
    public class FullHeader
    {
        [FromHeader]
        public string Accept { get; set; }
        [FromHeader(Name = "Accept-Encoding"))]
        public string AcceptEncoding { get; set; }
        [FromHeader(Name = "Accept-Language")]
        public string AcceptLanguage { get; set; }
        [FromHeader(Name = "Cache-Control")]
        public string CacheControl { get; set; }
        [FromHeader(Name = "Connection")]
        public string Connection { get; set; }
        [FromHeader(Name = "Host")]
        public string Host { get; set; }
        [FromHeader(Name = "Upgrade-Insecure-Requests")]
        public string UpgradeInsecureRequests { get; set; }
        [FromHeader(Name = "User-Agent")]
        public string UserAgent { get; set; }
    }
}
接下来,在Home控制器中创建一个FullHeader 方法:
public IActionResult FullHeader(FullHeader model) => View(model);最后在Views->Home 文件夹下 创建一个 FullHeader 视图:
@model FullHeader
@{
    ViewData["Title"] = "Full Header";
}
<h2>Header</h2>
<table class="table table-sm table-bordered table-striped">
    <tr><th>Accept:</th><td>@Model.Accept</td></tr>
    <tr><th>Accept-Encoding:</th><td>@Model.AcceptEncoding</td></tr>
    <tr><th>Accept-Language:</th><td>@Model.AcceptLanguage</td></tr>
    <tr><th>Cache-Control:</th><td>@Model.CacheControl</td></tr>
    <tr><th>Connection:</th><td>@Model.Connection</td></tr>
    <tr><th>Host:</th><td>@Model.Host</td></tr>
    <tr><th>Upgrade-Insecure-Requests:</th><td>@Model.UpgradeInsecureRequests</td></tr>
    <tr><th>UserAgent:</th><td>@Model.UserAgent</td></tr>
</table>
运行应用程序,进入URL– /Home/FullHeader 你会看到所有请求的Header:
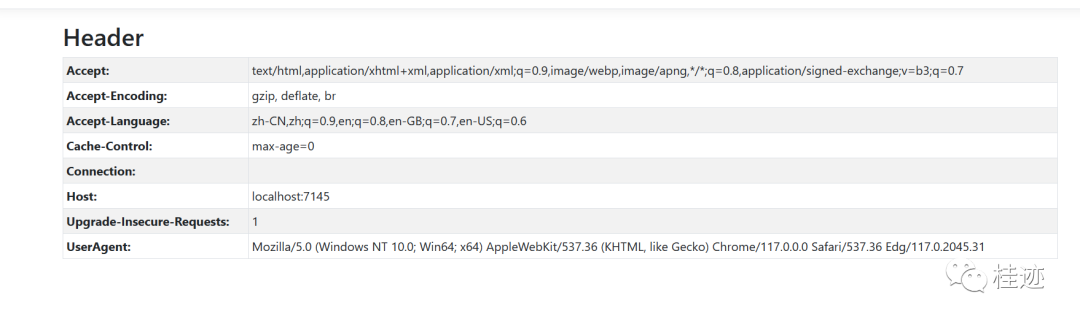
这是一个典型的例子通过模型绑定捕获所有的HTTP Headers的值,将他们展示到表格中,在你的项目中使用这个代码
FromRoute 特性
[FromRoute]特性会指定模型绑定从路由数据中绑定值,让我们创建一个例子理解这个概念,在Home控制器中创建一个新的方法叫FromRouteExample,注意参数有一个[FromRoute]的特性将会绑定路由数据
public IActionResult FromRouteExample() => View();
[HttpPost]
public string FromRouteExample([FromRoute] string id) => id;
创建一个FromRouteExample在Views->Home 文件夹内
@{
ViewData["Title"] = "FromRouteExample";
}
<h2>Body</h2>
@section scripts {
<script src="https://ajax.aspnetcdn.com/ajax/jQuery/jquery-3.2.1.min.js"></script>
<script>
$(document).ready(function () {
$("button").click(function (e) {
$.ajax("/Home/FromRouteExample/5",
{
method: "post",
success: function (data) {
$("#id").text(data);
}
});
});
});
</script>
}
<table class="table table-sm table-bordered table-striped">
<tr><th>Id:</th><td id="id"></td></tr>
</table>
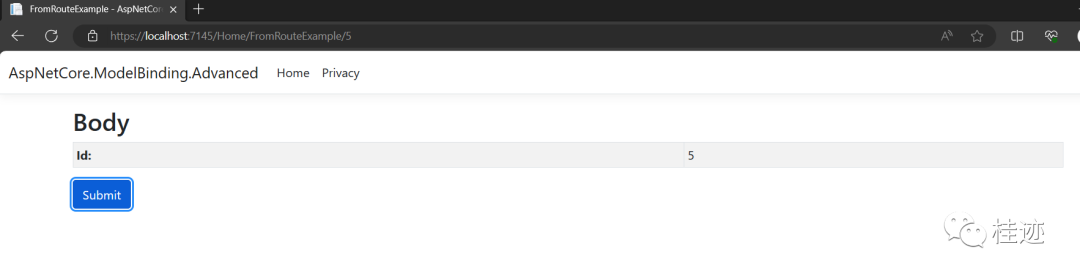
<button class="btn btn-primary">Submit</button>当ajax方法调用这个action时,第三段url 发送的值为5(ajax方法调用/Home/FromRouteExample/5),因为使用了[FromRoute]特性,这个值将绑定到方法的参数,运行项目并且进入–/Home/FromRouteExample,点击提交按钮,你将看到html表格中显示的值为5
总结
这节我们主要讲解ASP.NET Core 中模型绑定高级篇
源代码地址
https://github.com/bingbing-gui/Asp.Net-Core-Skill/tree/master/Fundamentals/AspNetCore.ModelBinding/AspNetCore.ModelBinding.Advanced
参考文献
https://www.yogihosting.com/aspnet-core-model-binding/


 697
697


 被折叠的 条评论
为什么被折叠?
被折叠的 条评论
为什么被折叠?
 到【灌水乐园】发言


