


ASP.NET Core 中的选项模式提供了一种以类型安全方式管理配置的可靠方法。这篇博文探讨了 Options Pattern、其优点以及如何在 ASP.NET Core 应用程序中实现它。
订阅,因为更多即将到来。
如何管理 ASP.NET 核心应用程序中的配置?
每个 ASP.NET 应用程序都需要管理配置。
让我们探讨一下如何在 ASP.NET Core 应用中从appsettings.json进行管理:BlogPostConfiguration
{
  "BlogPostConfiguration": {
    "ScheduleInterval": 10,
    "PublishCount": 5
  }
}
管理配置的朴素方法是在 DI 容器中使用注册为 Singleton 的自定义配置类:
public record BlogPostConfiguration
{
    public int ScheduleInterval { get; init; }

    public int PublishCount { get; init; }
}

var configuration = new BlogPostConfiguration();
builder.Configuration.Bind("BlogPostConfiguration", configuration);

builder.Services.AddSingleton(configuration);
让我们实现一个服务,该服务将使用此配置根据配置每 X 秒触发一次博客文章发布作业。此作业应在每次迭代中获取配置的博客计数。简化的实现如下:BackgroundService
public class BlogBackgroundService : BackgroundService
{
    private readonly IServiceScopeFactory _scopeFactory;
    private readonly BlogPostConfiguration _configuration;
    private readonly ILogger<BlogBackgroundService> _logger;

    public BlogBackgroundService(
        IServiceScopeFactory scopeFactory,
        BlogPostConfiguration configuration,
        ILogger<BlogBackgroundService> logger)
    {
        _scopeFactory = scopeFactory;
        _configuration = configuration;
        _logger = logger;
    }

    protected override async Task ExecuteAsync(CancellationToken stoppingToken)
    {
        while (!stoppingToken.IsCancellationRequested)
        {
            _logger.LogInformation("Trigger blog publishment background job");

            using var scope = _scopeFactory.CreateScope();
            await using var dbContext = scope.ServiceProvider.GetRequiredService<ApplicationDbContext>();

            var blogs = await dbContext.BlogPosts
                .Take(_configuration.PublishCount)
                .ToListAsync(cancellationToken: stoppingToken);

            _logger.LogInformation("Publish {BlogsCount} blogs: {@Blogs}",
                blogs.Count, blogs.Select(x => x.Title));

            var delay = TimeSpan.FromSeconds(_configuration.ScheduleInterval);
            await Task.Delay(delay, stoppingToken);
        }
    }
}
在这里,我们将配置类直接注入到作业的构造函数中,并在方法中使用它。BlogPostConfigurationExecuteAsync
乍一看,这种方法似乎还可以,但它有几个缺点:
配置是手动构建的,没有任何验证
配置注册为单例,如果不重新启动应用程序,则无法更改
配置与服务逻辑紧密耦合。这种方法降低了代码的灵活性和可维护性
测试可能更麻烦,因为配置与服务紧密绑定。模拟单元测试的配置需要更多的设置,并且容易出错。
另一种方法是在每次我们需要读取配置时注入作业的构造函数和调用方法。这种方法要糟糕得多,因为它会创建更多的配置与服务逻辑的耦合。IConfigurationGetSection("").GetValue<T>()
更好的方法是使用选项模式。
ASP.NET Core 中期权模式的基础知识
选项模式是 ASP.NET Core 中的一种约定,它允许开发人员将配置设置映射到强类型类。
此模式具有以下优点:
**类型安全:**配置值映射到强类型对象,减少因配置不正确而导致的错误
**验证:**支持配置值验证
**关注点分离:**配置逻辑与应用程序逻辑分离,使代码库更简洁,更易于维护。
**易于测试:**在测试过程中可以轻松模拟配置,提高可测试性。
有三种方法可以使用 Options Pattern 获取 ASP.NET 核心中的配置:和 。IOptionsIOptionsSnapshotIOptionsMonitor
IOptions
IOptions<T>是一种单一实例服务,在应用程序启动时检索一次配置值,并且在应用程序的生存期内不会更改。当应用程序运行后不需要更改配置值时,最好使用它。IOptions 是三者中性能最高的选项。
IOptionsSnapshot
IOptionsSnapshot<T>是一种作用域内的服务,每次在同一请求中访问配置值时,都会检索这些值。它对于在不重新启动应用程序的情况下处理配置更改非常有用。它具有性能成本,因为它为每个请求提供了 options 类的新实例。
IOptions监视器
IOptionsMonitor<T>是一种单一实例服务,提供对配置值的实时更新。它允许订阅更改通知,并在任何时间点提供选项的当前值。它非常适合需要动态更改配置值而无需重新启动应用程序的场景。
这些类的行为不同。让我们详细了解一下这些选项中的每一个。
如何在 ASP.NET Core 中使用 IOptions
所有三个选项类在 DI 中的配置注册是相同的。
让我们使用选项模式重写。首先,我们需要更新配置注册以使用:BlogPostConfigurationAddOptions
builder.Services.AddOptions\<BlogPostConfiguration>()
    .Bind(builder.Configuration.GetSection(nameof(BlogPostConfiguration)));
现在,我们可以使用接口将此配置注入到后台服务中:IOptions
public BlogBackgroundService(
    IServiceScopeFactory scopeFactory,
    IOptions<BlogPostConfiguration> options,
    ILogger<BlogBackgroundService> logger)
{
    _scopeFactory = scopeFactory;
    _options = options;
    _logger = logger;
}

protected override async Task ExecuteAsync(CancellationToken stoppingToken)
{
    while (!stoppingToken.IsCancellationRequested)
    {
        // ...
        var blogs = await dbContext.BlogPosts
            .Take(_options.Value.PublishCount)
            .ToListAsync(cancellationToken: stoppingToken);
    }
}
要获取配置值,您需要使用 ._options.Value
如何在 ASP.NET Core 中使用 IOptionsSnapshot
为了最好地说明 和 之间的区别,让我们创建两个最小的 API 端点,它们使用以下类返回配置:IOptionsIOptionsSnapshot
app.MapGet("/api/configuration-singleton", (IOptions\<BlogPostConfiguration> options) =>
{
var configuration = options.Value;
return Results.Ok(configuration);
});
app.MapGet("/api/configuration-snapshot", (IOptionsSnapshot\<BlogPostConfiguration> options) =>
{
var configuration = options.Value;
return Results.Ok(configuration);
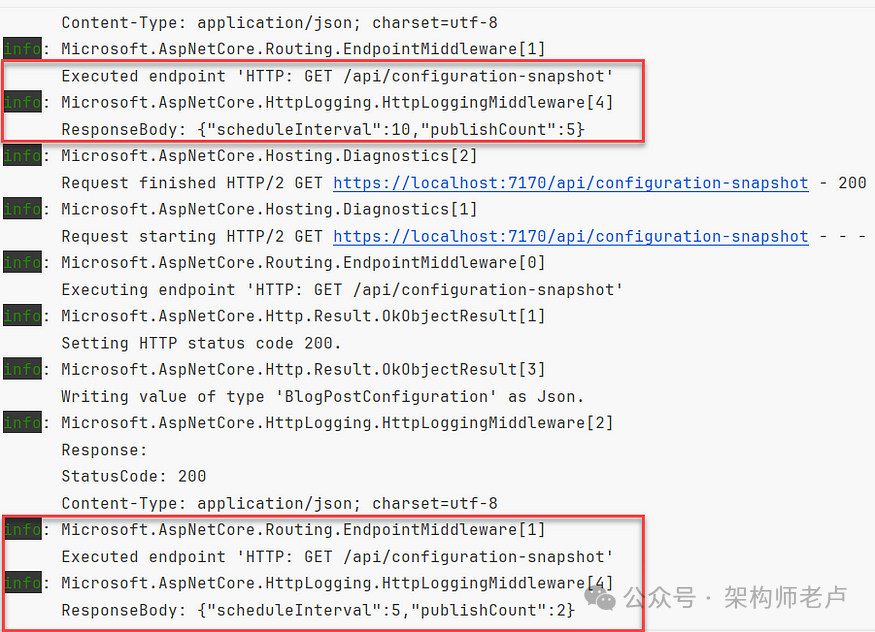
});每次调用“configuration-singleton”终结点时,它始终返回相同的配置。
但是,如果更新appsettings.json文件并保存它,则下一次调用“configuration-snapshot”端点将呈现不同的结果:
如何在 ASP.NET Core 中使用 IOptionsMonitor
为了充分理解工作原理,让我们尝试在后台服务中更改为:IOptionsMonitorIOptionsIOptionsMonitor
public class BlogBackgroundServiceWithIOptionsMonitor : BackgroundService
{
    private readonly IServiceScopeFactory _scopeFactory;
    private readonly IOptionsMonitor<BlogPostConfiguration> _optionsMonitor;
    private readonly ILogger<BlogBackgroundServiceWithIOptionsMonitor> _logger;

    public BlogBackgroundServiceWithIOptionsMonitor(
        IServiceScopeFactory scopeFactory,
        IOptionsMonitor<BlogPostConfiguration> optionsMonitor,
        ILogger<BlogBackgroundServiceWithIOptionsMonitor> logger)
    {
        _scopeFactory = scopeFactory;
        _optionsMonitor = optionsMonitor;
        _logger = logger;
    }

    protected override async Task ExecuteAsync(CancellationToken stoppingToken)
    {
        _optionsMonitor.OnChange(newConfig =>
        {
            _logger.LogInformation("Configuration changed. ScheduleInterval - {ScheduleInterval}, PublishCount - {PublishCount}",
                newConfig.ScheduleInterval, newConfig.PublishCount);
        });

        while (!stoppingToken.IsCancellationRequested)
        {
            // ...

            var blogs = await dbContext.BlogPosts
                .Take(_optionsMonitor.CurrentValue.PublishCount)
                .ToListAsync(cancellationToken: stoppingToken);

            _logger.LogInformation("Publish {BlogsCount} blogs: {@Blogs}",
                blogs.Count, blogs.Select(x => x.Title));

            var delay = TimeSpan.FromSeconds(_optionsMonitor.CurrentValue.ScheduleInterval);
            await Task.Delay(delay, stoppingToken);
        }
    }
}
以下是值得一提的几个要点。尽管是 Singleton 类,但它始终返回最新的配置值 using property。IOptionsMonitor_optionsMonitor.CurrentValue
此类具有一个委托的方法,该委托在保存appsettings.json时触发。此方法可以调用两次:OnChange
info: OptionsPattern.HostedServices.BlogBackgroundServiceWithIOptionsMonitor[0]
      Configuration changed. ScheduleInterval - 2, PublishCount - 2
info: OptionsPattern.HostedServices.BlogBackgroundServiceWithIOptionsMonitor[0]
      Configuration changed. ScheduleInterval - 2, PublishCount - 2
这可能因文件系统而异,文件系统可能会触发更新操作系统中保存的文件和文件关闭事件的配置。IOptionsMonitor
选项模式中的验证
如前所述,ASP.NET Core 中的期权模式支持验证。它支持 2 种类型的验证:数据注释和自定义验证。
数据注释验证基于属性验证,我不喜欢。这种类型的验证通过使用验证逻辑污染配置类来破坏单一责任原则。
我更喜欢使用自定义验证。让我们看一下如何添加验证。BlogPostConfiguration
首先,让我们扩展 DI 容器中的配置注册,并添加 和 方法调用:ValidateDataAnnotationsValidateOnStart
builder.Services.AddOptions<BlogPostConfiguration>()
    .Bind(builder.Configuration.GetSection(nameof(BlogPostConfiguration)))
    .ValidateDataAnnotations()
    .ValidateOnStart();
无论选择哪种验证类型,我们都需要调用该方法。ValidateDataAnnotations
ValidateOnStart方法在 Core 应用启动时触发验证 ASP.NET 并在 appsettings.json 中更新配置时触发验证。这对于在应用程序启动之前及早捕获错误特别有用。
为了进行验证,我们将使用 FluentValidation 库:
public class BlogPostConfigurationValidator : AbstractValidator<BlogPostConfiguration>
{
    public BlogPostConfigurationValidator()
    {
        RuleFor(x => x.ScheduleInterval).GreaterThan(0);
        RuleFor(x => x.PublishCount).GreaterThan(0);
    }
}
现在,让我们通过实现接口来创建自定义选项验证器:IValidateOptions<T>
public class BlogPostConfigurationValidationOptions : IValidateOptions<BlogPostConfiguration>
{
    private readonly IServiceScopeFactory _scopeFactory;

    public BlogPostConfigurationValidationOptions(IServiceScopeFactory scopeFactory)
    {
        _scopeFactory = scopeFactory;
    }

    public ValidateOptionsResult Validate(string? name, BlogPostConfiguration options)
    {
        using var scope = _scopeFactory.CreateScope();
        var validator = scope.ServiceProvider.GetRequiredService<IValidator<BlogPostConfiguration>>();

        var result = validator.Validate(options);
        if (result.IsValid)
        {
            return ValidateOptionsResult.Success;
        }

        var errors = result.Errors.Select(error => $"{error.PropertyName}: {error.ErrorMessage}").ToList();
        return ValidateOptionsResult.Fail(errors);
    }
}
BlogPostConfigurationValidationOptions必须注册一个单一实例,这就是我们从服务范围工厂解析范围的原因。IValidator<BlogPostConfiguration>
最后,您需要在 DI 中注册验证器和验证选项:
builder.Services.AddValidatorsFromAssemblyContaining(typeof(BlogPostConfigurationValidator));

builder.Services.AddSingleton<IValidateOptions<BlogPostConfiguration>, BlogPostConfigurationValidationOptions>();
在以下情况下调用该方法:Validate
应用程序启动
配置已于 appsettings.json 年更新
使用选项模式管理其他文件中的配置
Core 中 Options Pattern 的真正强大之处在于 ASP.NET 您可以使用 Options 类解析来自任何来源的配置。
在上面的所有示例中,我们都在标准appsettings.json中管理配置。同样,您可以管理任何其他 JSON 文件中的配置。
让我们创建一个“custom.settings.json”文件:
{
  "BlogLimitsConfiguration": {
    "MaxBlogsPerDay": 3
  }
}
然后我们可以将这个文件添加到对象中,并为其配置添加选项:Configuration
builder.Configuration.AddJsonFile("custom.settings.json", true, true);

builder.Services.AddOptions<BlogLimitsConfiguration>()
    .Bind(builder.Configuration.GetSection(nameof(BlogLimitsConfiguration)));
现在我们可以与任何 Options 类一起使用,例如:BlogLimitsConfiguration
app.MapGet("/api/configuration-custom", (IOptions\<BlogLimitsConfiguration> options) =>
{
    var configuration = options.Value;
    return Results.Ok(configuration);
});
您甚至可以创建自定义选项配置提供程序,以便从数据库、redis 或任何其他存储中读取配置。外部 Nuget 包中有许多现成的配置提供程序,例如,使用 Options 类从 Azure、AWS 访问配置。
如果你喜欢我的文章,请给我一个赞!谢谢


 291
291

 被折叠的 条评论
为什么被折叠?
被折叠的 条评论
为什么被折叠?
 到【灌水乐园】发言


