容器接口
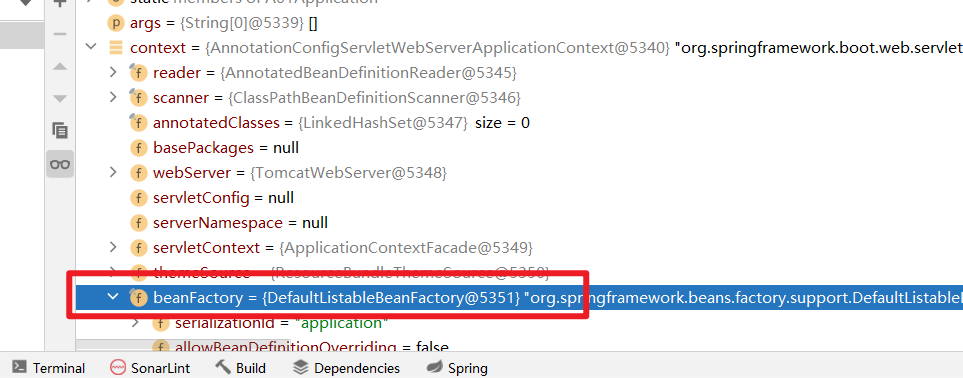
首先了解一下`BeanFactory`和`ApplicationContext`这两个接口的关系。其实在一个 SpringBoot 项目中,这个 SpringBoot 项目的启动类的返回值就是一个 ApplicationContext 接口的实现类。

然后在 IDEA 中选中这个类,按住ctrl+alt+U可以查看类图,观察 ApplicationContext和BeanFactory之间的关系。

这里可以发现:
BeanFactory是ApplicationContext的父类ApplicationContext接口不仅仅继承了BeanFactory接口还继承了其他的接口,所以说ApplicationContext不仅组合BeanFactory的功能,还有其他的功能。
接下来就简单的介绍一下这两个接口
BeanFactory
介绍:
简单说`BeanFactory`就是:- 它是
ApplicationContext的父接口 - 它是
Spring的核心容器,主要的ApplicationContext实现都【**组合/借助】**了它的功能。
所谓的组合/借助是什么意思?
我们可以通过ApplicationContext的getBean()方法进行查看源码:

我们可以发现ApplicationContext的 getBean 方法其实内部组合调用了BeanFactory的 getBean 方法。所以说其实这个方法并不是ApplicationContext接口提供的,而是间接调用BeanFactory接口来实现的(并没有完全重写 getBean 方法,而是内部组合的BeanFactory的方法)。
既然说了组合,而且从上面的源码也可以看出来,其实BeanFactory是ApplicationContext内部的成员变量。

功能:
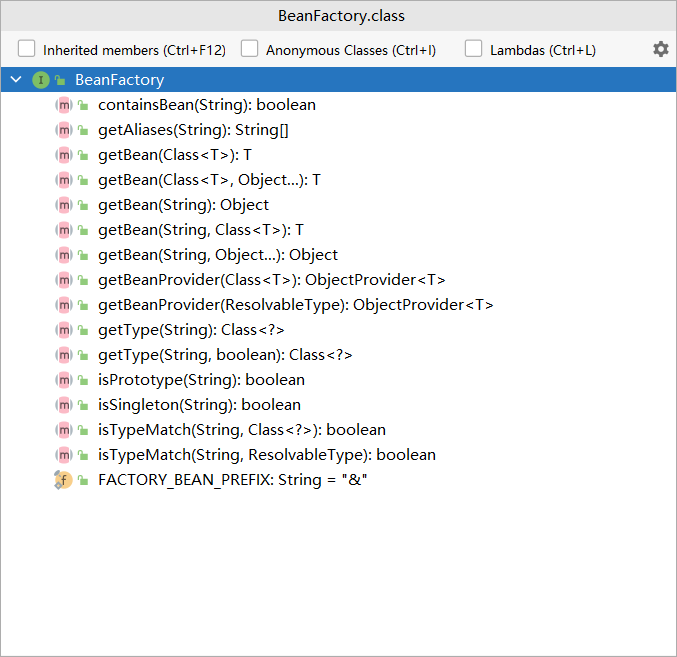
想要知道 `BeanFactory`可以干点什么我们可以查看源码:
通过查看源码,表面上我们看着这个结构只有getBean有用
但是实际上,控制反转,基本的依赖注入,直至 Bean 的生命周期的各个功能,都是由它的实现类实现的。
单例Bean管理
其中它的最主要的实现类是`DefaultListableBeanFactory`,可以简单的看一下类图。我们都知道 Bean 一般都是单例的形式保存的,从类图中就可以发现有一个接口主要是用来实现保存**单例Bean的,**接下来我们就尝试获取到BeanFactory中的单例Bean。
首先我们进入到DefaultSingletonBeanRegistry的源码中。

我们可以发现有一个 HashMap,就是用来专门存储单例 Bean 的。
接下来可以通过反射来获取这个值并且遍历查看。
Field singletonObjects = DefaultSingletonBeanRegistry.class.getDeclaredField("singletonObjects");
singletonObjects.setAccessible(true);
ConfigurableListableBeanFactory beanFactory = context.getBeanFactory();
Map<String, Object> stringObjectMap = (Map<String, Object>) singletonObjects.get(beanFactory);
stringObjectMap.forEach((k,v) -> {
    System.out.println(k + "====>" + v);
});
可以看到有非常多单例bean被管理

这里我们可以自己创建两个 Bean 来查看效果。
@Component
public class Component1 {
}
@Component
public class Component2 {
}
进行过滤
Field singletonObjects = DefaultSingletonBeanRegistry.class.getDeclaredField("singletonObjects");
singletonObjects.setAccessible(true);
ConfigurableListableBeanFactory beanFactory = context.getBeanFactory();
Map<String, Object> stringObjectMap = (Map<String, Object>) singletonObjects.get(beanFactory);
stringObjectMap.entrySet().stream().filter(stringObjectEntry -> stringObjectEntry.getKey().startsWith("component"))
.forEach(e -> {
    System.out.println(e.getKey() + "=====>" + e.getValue());
});
component1=====>com.sahuid.a01.Component1@4642b71d
component2=====>com.sahuid.a01.Component2@1450078a
ApplicationContext
这里我们再观察一下 ApplicationContext 的类图。
这里可以发现,除了BeanFactory的功能以外,还实现了四个接口,这四个接口就相当于是ApplicationContext的拓展能供。
功能:
国际化翻译能力
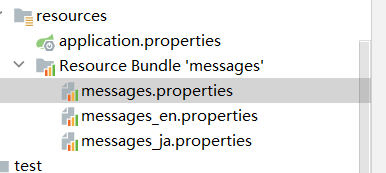
这个具体指的是可以将文字翻译成多种语言的能力,具体的接口是`MessageSource`。这里需要在resource目录下配置配置 message 文件
其中第一个是通用的文件,就是所有语言通用的翻译。
然后第二个是英文。
第三个是日文。

在里面配置相关的翻译


然后通过 ApplicationContext 进行翻译
        System.out.println(context.getMessage("hi", null, Locale.ENGLISH));
        System.out.println(context.getMessage("hi", null, Locale.JAPANESE));

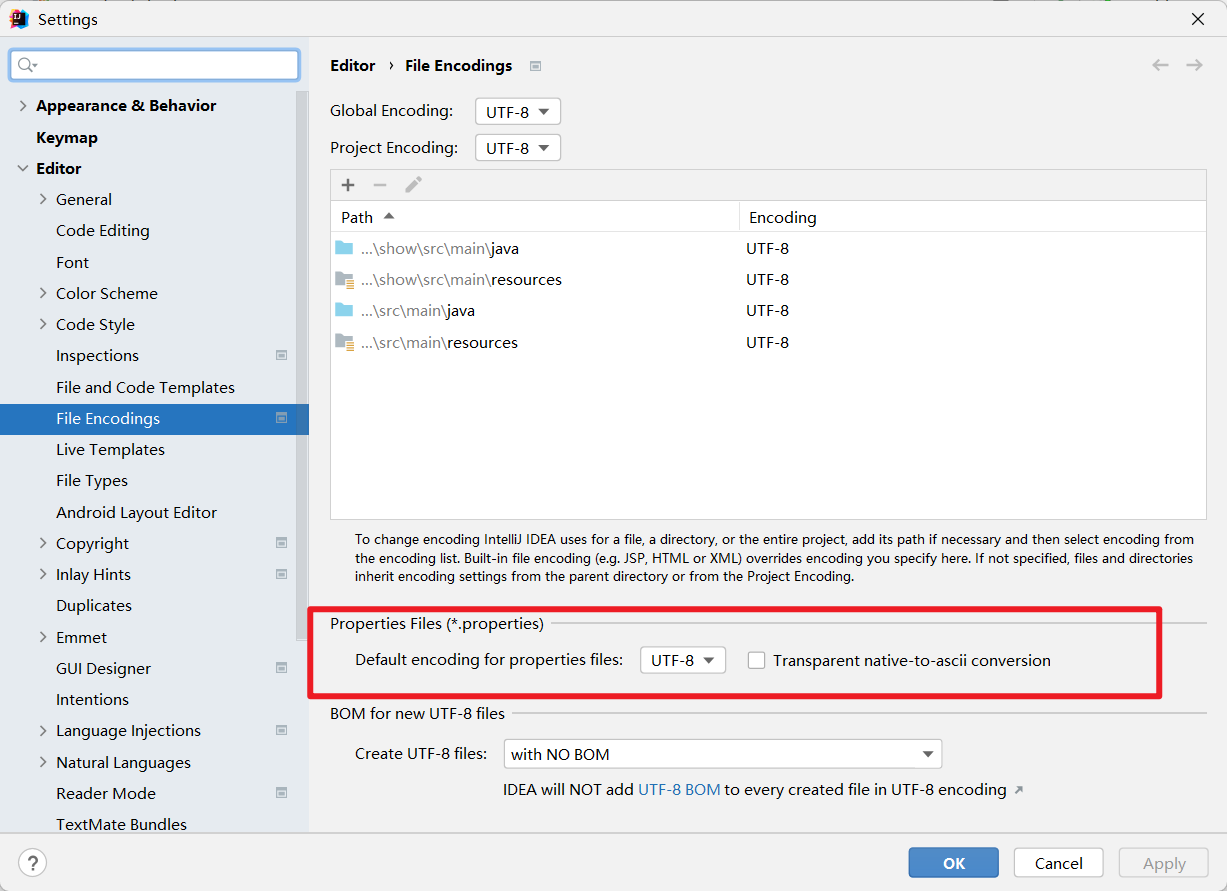
注意:
这里可能会出现乱码的情况,所以我们需要修改一个 properties 文件的编码方式。

获取资源对象
这里可以通过`context`对象的`getResource()`方法来获取路径下的单个资源信息。或者`getResources()`获取多个资源。其中参数里有几种通配符:
classpath:从当前类路径下找文件
classpath*:查找包括jar包里面的文件
file:当前磁盘文件下的文件。
接下来我们就调用一下查到单个和多个文件的方法:
我们这里分别查到当前类下的properties文件,和一个和Spring boot 自动装配相关的文件路径为META-INF/spring.facotories
Resource[] resources = context.getResources("classpath:application.properties");
for (Resource resource : resources) {
    System.out.println(resource);
}
System.out.println("===== 多个文件");
Resource[] contextResources = context.getResources("classpath*:META-INF/spring.factories");
for (Resource contextResource : contextResources) {
    System.out.println(contextResource);
}
class path resource [application.properties]
===== 多个文件
URL [jar:file:/C:/Users/Lenovo/.m2/repository/org/springframework/boot/spring-boot/2.7.6/spring-boot-2.7.6.jar!/META-INF/spring.factories]
URL [jar:file:/C:/Users/Lenovo/.m2/repository/org/springframework/boot/spring-boot-autoconfigure/2.7.6/spring-boot-autoconfigure-2.7.6.jar!/META-INF/spring.factories]
URL [jar:file:/C:/Users/Lenovo/.m2/repository/org/springframework/spring-beans/5.3.24/spring-beans-5.3.24.jar!/META-INF/spring.factories]
获取环境变量
`ApplecationContext`还可以获取环境变量,这里面的环境变量包括系统的环境变量和`properties`中设置的环境变量。下面我们就调用来查看一下java_home和server.port这两个环境变量(这里不用区分大小写)
String java_home = context.getEnvironment().getProperty("java_home");
System.out.println(java_home);
String port = context.getEnvironment().getProperty("server.port");
System.out.println(port);
D:\Java\jdk8
9000
发布事件
其中`context`的`publishEvent`方法就是用来发布的事件的,不过我们在发布事件之前需要一个事件,我们创建一个`UserRegisteredEvent`类用来充当事件,它需要继承`ApplicationEvent`这个类,然后写一个构造方法,里面的参数就是事件的源头,由谁发送事件,就传入谁。public class UserRegisteredEvent extends ApplicationEvent {
public UserRegisteredEvent(Object source) {
super(source);
}
}
然后我们还需要一个事件的监听器,这个监听器可以是容器中的任何一个bean我们只需要添加一个EventListener注解,并在参数中写入需要监听什么样的事件。
这里我们就用Component2来充当监听器
@Component
public class Component2 {
    private static final Logger log = LoggerFactory.getLogger(Component2.class);

    @EventListener
    public void aaa(UserRegisteredEvent event){
        log.info("接受到的事件:{}", event);
    }
}
然后我们就发布事件,发布的源头就是我们的context
context.publishEvent(new UserRegisteredEvent(context));
[INFO ] 07:27:48.428 [main] com.sahuid.a01.Component2 - 接受到的事件:com.sahuid.a01.UserRegisteredEvent[source=org.springframework.boot.web.servlet.context.AnnotationConfigServletWebServerApplicationContext@1649b0e6, started on Sat Sep 14 07:27:46 CST 2024]
这样我们就发现了其实这个事件发布就有一个解耦的作用。
比如我们现在有一个注册的功能,注册之后需要发送短信,在不解耦的情况下,就是写在一起的。并且如果后面有很多种的话,我们就需要在这个方法里面添加很多种方法,并进行判断。
@Component
public class Component1 {
    private static final Logger log = LoggerFactory.getLogger(Component1.class);

    public void register(){
        log.info("用户注册");
        log.info("发送短信");
    }
}
现在我们使用事件发布的话,我们只需要关注用户注册这一件事情就好,当注册完成之后发布一个事件让发送短信的监听器监听到,然后处理相关逻辑即可,这样注册功能里面不会绑定着其他功能的代码,进行了解耦。
我们进行模拟一下:
用户创建好了我们就创建发布一条消息
@Component
public class Component1 {
    private static final Logger log = LoggerFactory.getLogger(Component1.class);
    @Autowired
    private ApplicationEventPublisher context;
    public void register(){
        log.info("用户注册");
        context.publishEvent(new UserRegisteredEvent(this));
    }
}
然后我们监听器那边就可以监听到处理相关逻辑:
@Component
public class Component2 {
    private static final Logger log = LoggerFactory.getLogger(Component2.class);

    @EventListener
    public void aaa(UserRegisteredEvent event){
        log.info("接受到的事件:{}", event);
        log.info("发送短信");
    }
}
进行调用一下
context.getBean(Component1.class).register();
结果:
[INFO ] 07:46:40.872 [main] com.sahuid.a01.Component1           - 用户注册
[INFO ] 07:46:40.872 [main] com.sahuid.a01.Component2           - 接受到的事件:com.sahuid.a01.UserRegisteredEvent[source=com.sahuid.a01.Component1@6dcd5639]
[INFO ] 07:46:40.874 [main] com.sahuid.a01.Component2           - 发送短信


 4606
4606

 被折叠的 条评论
为什么被折叠?


