


我们都知道一个activity的绘制过程是从setContentView方法开始的 那么setContentView背后到底干了些什么不为人知的事情,今天让我们来揭开它神秘的面纱,我们来看看setContentView的源码
public void setContentView(@LayoutRes int layoutResID) {
getWindow().setContentView(layoutResID);//初始化content界面
initWindowDecorActionBar();//初始化ActionBar
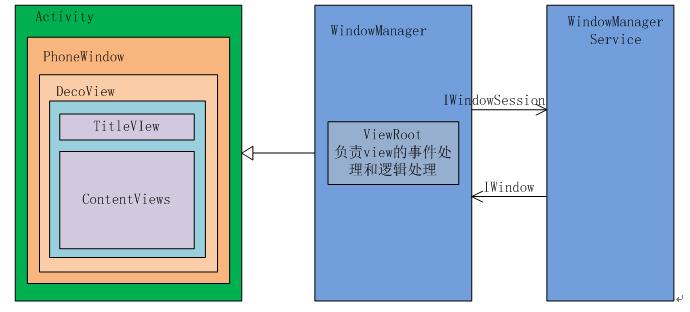
}我们再来看看activity的层次结构
这个方法有两个作用 是初始化content和ActionBar 这就是为什么我们使用java代码设置全屏的时候需要在setContentView前面
requestWindowFeature(Window.FEATURE_NO_TITLE);
比如这样
大概的分布是这样
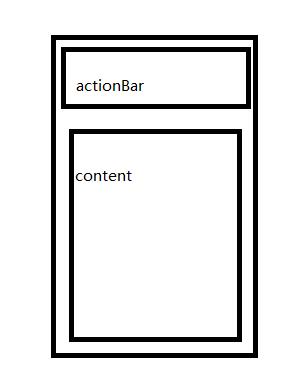
actionBar的初始化我们先不谈 先来看看这个 content
我们点进去发现是一个window类 它的定义是这样 public abstract class Window {。。。}
它的具体对象是一个PhoneWindow类 我们来看看这个PhoneWindow到底干了些什么
public class PhoneWindow extends Window implements MenuBuilder.Callback {
...
 public void setContentView(int layoutResID) {
        // Note: FEATURE_CONTENT_TRANSITIONS may be set in the process of installing the window
        // decor, when theme attributes and the like are crystalized. Do not check the feature
        // before this happens.
        //判断decorView是否存在 不存在的话建一个或者叫安装一个 下面那些if else就是判断java文件中设置的各种属性
        if (mContentParent == null) {
            installDecor();
        } else if (!hasFeature(FEATURE_CONTENT_TRANSITIONS)) {
            mContentParent.removeAllViews();
        }

        if (hasFeature(FEATURE_CONTENT_TRANSITIONS)) {
            final Scene newScene = Scene.getSceneForLayout(mContentParent, layoutResID,
                    getContext());
            transitionTo(newScene);
        } else {
            mLayoutInflater.inflate(layoutResID, mContentParent);//使用inflater加载layout文件
        }
        mContentParent.requestApplyInsets();
        final Callback cb = getCallback();
        if (cb != null && !isDestroyed()) {
            cb.onContentChanged();
        }
    }
    ...
    }
当加载layout文件后 oncreate()方法就算完成了
但是大家会问 只是加载了 那么怎么显示呢 activity启动最终调用了ActiivityThread中的内部类的ApplicationThread中的scheduleLaunchActivity函数。该函数会发一个这个方法中会给UI线程发一个H.LAUNCH_ACTIVITY消息,然后会调用ActivityThread的handleLaunchActivity(ActivityClientRecord r, Intent customIntent)函数,我们来看看这个函数的源码
 private void handleLaunchActivity(ActivityClientRecord r, Intent customIntent) {
     ...
    //创建并加载activity 里面会调用到setcontentView方法
        Activity a = performLaunchActivity(r, customIntent);

        if (a != null) {
            r.createdConfig = new Configuration(mConfiguration);
            Bundle oldState = r.state;
            //使decorView变得可见兵使用viewRootImpl绘制view
            //////重要重要 看这里
            handleResumeActivity(r.token, false, r.isForward,
                    !r.activity.mFinished && !r.startsNotResumed);

            if (!r.activity.mFinished && r.startsNotResumed) {

                try {
                    r.activity.mCalled = false;
                    //回调回Instrumentation的暂停activity方法,有兴趣可以去看看源码 这里不再赘述 这个类还是挺重要的
                    mInstrumentation.callActivityOnPause(r.activity);
                    // We need to keep around the original state, in case
                    // we need to be created again.  But we only do this
                    // for pre-Honeycomb apps, which always save their state
                    // when pausing, so we can not have them save their state
                    // when restarting from a paused state.  For HC and later,
                    // we want to (and can) let the state be saved as the normal
                    // part of stopping the activity.
                    if (r.isPreHoneycomb()) {
                        r.state = oldState;
                    }
                    if (!r.activity.mCalled) {
                        throw new SuperNotCalledException(
                            "Activity " + r.intent.getComponent().toShortString() +
                            " did not call through to super.onPause()");
                    }

                } catch (SuperNotCalledException e) {
                    throw e;

                } catch (Exception e) {
                    if (!mInstrumentation.onException(r.activity, e)) {
                        throw new RuntimeException(
                                "Unable to pause activity "
                                + r.intent.getComponent().toShortString()
                                + ": " + e.toString(), e);
                    }
                }
                r.paused = true;
            }
        } else {
            // If there was an error, for any reason, tell the activity
            // manager to stop us.
            try {
                ActivityManagerNative.getDefault()
                    .finishActivity(r.token, Activity.RESULT_CANCELED, null, false);
            } catch (RemoteException ex) {
                // Ignore
            }
        }
    }
这里面最重要的绘制的方法就是 handleResumeActivity 我们来看看这个方法
final void handleResumeActivity(IBinder token,
            boolean clearHide, boolean isForward, boolean reallyResume) {
        // If we are getting ready to gc after going to the background, well
        // we are back active so skip it.
        unscheduleGcIdler();
        mSomeActivitiesChanged = true;

        // TODO Push resumeArgs into the activity for consideration
        ActivityClientRecord r = performResumeActivity(token, clearHide);

        if (r != null) {
            final Activity a = r.activity;

            if (localLOGV) Slog.v(
                TAG, "Resume " + r + " started activity: " +
                a.mStartedActivity + ", hideForNow: " + r.hideForNow
                + ", finished: " + a.mFinished);

            final int forwardBit = isForward ?
                    WindowManager.LayoutParams.SOFT_INPUT_IS_FORWARD_NAVIGATION : 0;

            // If the window hasn't yet been added to the window manager,
            // and this guy didn't finish itself or start another activity,
            // then go ahead and add the window.
            boolean willBeVisible = !a.mStartedActivity;
            if (!willBeVisible) {
                try {
                    willBeVisible = ActivityManagerNative.getDefault().willActivityBeVisible(
                            a.getActivityToken());
                } catch (RemoteException e) {
                }
            }
            ///重要的看这里
                if (r.window == null && !a.mFinished && willBeVisible) {
                //得到window对象
                r.window = r.activity.getWindow();
                //得到decorview
                View decor = r.window.getDecorView();
                //设置decorview可见
                decor.setVisibility(View.INVISIBLE);
                //拿到wm对象
                ViewManager wm = a.getWindowManager();
                WindowManager.LayoutParams l = r.window.getAttributes();
                a.mDecor = decor;
                l.type = WindowManager.LayoutParams.TYPE_BASE_APPLICATION;
                l.softInputMode |= forwardBit;
                if (a.mVisibleFromClient) {
        把decorview加到window里面
                    wm.addView(decor, l);
                }
我们接下来看看addView的源码
    public void addView(View view, ViewGroup.LayoutParams params,
            Display display, Window parentWindow) {


        ViewRootImpl root;
        View panelParentView = null;

        synchronized (mLock) {
            // Start watching for system property changes.
            if (mSystemPropertyUpdater == null) {
                mSystemPropertyUpdater = new Runnable() {
                    @Override public void run() {
                        synchronized (mLock) {
                            for (int i = mRoots.size() - 1; i >= 0; --i) {
                                mRoots.get(i).loadSystemProperties();
                            }
                        }
                    }
                };
                SystemProperties.addChangeCallback(mSystemPropertyUpdater);
            }

            int index = findViewLocked(view, false);
            if (index >= 0) {
                if (mDyingViews.contains(view)) {
                    // Don't wait for MSG_DIE to make it's way through root's queue.
                    mRoots.get(index).doDie();
                } else {
                    throw new IllegalStateException("View " + view
                            + " has already been added to the window manager.");
                }
                // The previous removeView() had not completed executing. Now it has.
            }

            // If this is a panel window, then find the window it is being
            // attached to for future reference.
            if (wparams.type >= WindowManager.LayoutParams.FIRST_SUB_WINDOW &&
                    wparams.type <= WindowManager.LayoutParams.LAST_SUB_WINDOW) {
                final int count = mViews.size();
                for (int i = 0; i < count; i++) {
                    if (mRoots.get(i).mWindow.asBinder() == wparams.token) {
                        panelParentView = mViews.get(i);
                    }
                }
            }

            root = new ViewRootImpl(view.getContext(), display);

            view.setLayoutParams(wparams);
    //mViews是view的一个arraylist
            mViews.add(view);
            //mroots是ViewRootImpl的一个arraylist
            mRoots.add(root);
            //这个是布局参数的一个arraylist
            mParams.add(wparams);
        }

        // do this last because it fires off messages to start doing things
        try {
        //使用setView把root会知道panelparentView上
            root.setView(view, wparams, panelParentView);
        } catch (RuntimeException e) {
            // BadTokenException or InvalidDisplayException, clean up.
            synchronized (mLock) {
                final int index = findViewLocked(view, false);
                if (index >= 0) {
                    removeViewLocked(index, true);
                }
            }
            throw e;
        }
    }
接下来就是setView方法了 他会调用 requestLayout();
   public void requestLayout() {
        if (!mHandlingLayoutInLayoutRequest) {
            checkThread();
            mLayoutRequested = true;
            scheduleTraversals();
        }
    }
看这个scheduleTraversals();
 void scheduleTraversals() {
        if (!mTraversalScheduled) {
            mTraversalScheduled = true;
            mTraversalBarrier = mHandler.getLooper().getQueue().postSyncBarrier();
            //这里很重要 有一个mTraversalRunnable他是一个runable实现 我们看它的实现
            mChoreographer.postCallback(
                    Choreographer.CALLBACK_TRAVERSAL, mTraversalRunnable, null);
            if (!mUnbufferedInputDispatch) {
                scheduleConsumeBatchedInput();
            }
            notifyRendererOfFramePending();
            pokeDrawLockIfNeeded();
        }
    }
TraversalRunnable的源码
  final class TraversalRunnable implements Runnable {
        @Override
        public void run() {
            doTraversal();
        }
    }
他会调用doTraversal();
 void doTraversal() {
        if (mTraversalScheduled) {
            mTraversalScheduled = false;
            mHandler.getLooper().getQueue().removeSyncBarrier(mTraversalBarrier);

            if (mProfile) {
                Debug.startMethodTracing("ViewAncestor");
            }
//看这个方法
            performTraversals();

            if (mProfile) {
                Debug.stopMethodTracing();
                mProfile = false;
            }
        }
    }
就是这个最终的目的
performTraversals();这个源码实在太长 我就不贴了 它在ViewRootImpl这个类里面最后执行了performMasure(),performLayout(),performDraw();开始绘制 我们下篇博客谈谈怎么绘制一个view


 300
300

 被折叠的 条评论
为什么被折叠?
被折叠的 条评论
为什么被折叠?
 到【灌水乐园】发言


