


SSH2(Struts2,Spring,Hibernate) Struts进行流程控制,Spring进行业务流转,Hibernate进行数据库操作的封装!
先把SSH2的每个框架的版本列一下,因为不同的框架版本,需要的Jar文件都有所区别:
开发环境: Eclipse 3.7 (Indigo) + Win7 + Tomcat 7
SSH2版本:
- struts-2.2.3.1
- Spring3.1.0
- Hibernate4.0.0
- 先配置Strut2的环境
- 将Struts2和Hibernate整合
- 将Struts2和Spring整合
- 将Spring和Hibernate整合
1. 下载Struts 开发包: http://www.apache.org (搜索Struts的Project) -- 不要告诉我你找不到
下载最新的 struts-2.2.3.1
解压缩后会发现lib目录下N多jar文件,下面这几个是必不可少的(一共8个,跟我搜索到的6个或者7个答案不一样,少一个运行Tomcat7的服务都会有问题)
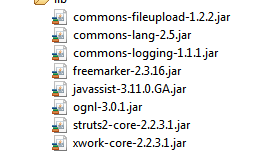
2. 在Ecplise中新建一个Dynamic web Project,将上面的8个Jar文件复制到WebConent/WEB-INF/lib目录下
3. 在WEB-INF下新建一个web.xml文件,这个是启动web服务必须要用滴. 内容如下:
- <?xml version="1.0" encoding="UTF-8"?>
- <web-app
- xmlns:xsi="http://www.w3.org/2001/XMLSchema-instance"
- xmlns="http://java.sun.com/xml/ns/javaee"
- xmlns:web="http://java.sun.com/xml/ns/javaee/web-app_2_5.xsd"
- xsi:schemaLocation="http://java.sun.com/xml/ns/javaee http://java.sun.com/xml/ns/javaee/web-app_2_5.xsd"
- id="WebApp_ID" version="2.5">
- <!-- Struts2 configuration -->
- <filter>
- <filter-name>struts2</filter-name>
- <filter-class>org.apache.struts2.dispatcher.ng.filter.StrutsPrepareAndExecuteFilter</filter-class>
- </filter>
- <filter-mapping>
- <filter-name>struts2</filter-name>
- <url-pattern>/*</url-pattern>
- </filter-mapping>
- </web-app>
注意:上面的Filter是StrutsPrepareAndExecuteFilter,这个是最新的Filter
4. 在src目录下新建一个struts.xml文件,这个是action调用必须要用滴,现在什么都不用写,放个空壳先
- <?xml version="1.0" encoding="UTF-8" ?>
- <!DOCTYPE struts PUBLIC
- "-//Apache Software Foundation//DTD Struts Configuration 2.0//EN"
- "http://struts.apache.org/dtds/struts-2.0.dtd">
- <struts>
- </struts>
- package test;
- import com.opensymphony.xwork2.ActionSupport;
- //action类一般都继承ActionSupport
- public class LoginAction extends ActionSupport {
- public String username;
- public String password;
- public String execute()
- {
- if (!username.equals("admin"))
- {
- super.addFieldError("username", "用户名错误!");
- return ERROR;
- }
- if (!password.equals("admin"))
- {
- super.addFieldError("password", "密码错误!");
- return ERROR;
- }
- return SUCCESS;
- }
- public void validate()
- {
- if ((null == username) || (0==username.length()))
- {
- super.addActionError("用户名不能为空!");
- }
- if ((null == password) || (0 == password.length()))
- {
- super.addActionError("密码不能为空!");
- }
- }
- }
- <?xml version="1.0" encoding="UTF-8" ?>
- <!DOCTYPE struts PUBLIC
- "-//Apache Software Foundation//DTD Struts Configuration 2.0//EN"
- "http://struts.apache.org/dtds/struts-2.0.dtd">
- <struts>
- <package name="struts2" extends="struts-default">
- <action name="login" class="test.LoginAction">
- <result name="success" >index.jsp</result>
- <result name="input">login.jsp</result>
- <result name="error">login.jsp</result>
- </action>
- </package>
- </struts>
注意:
- result节点会根据LoginAction中execute方法的返回值来判断需要转到哪个jsp文件显示
- 如果需要指定执行LoginAction某个Method,可以增加method,例如: <action name="login" class="test.LoginAction"method="xxx">
7. 写个Login.jsp文件测试一下
login.jsp
- <%@ page language="java" contentType="text/html; charset=UTF-8" pageEncoding="UTF-8"%>
- <%@ taglib uri="/struts-tags" prefix="s" %>
- <%
- String path = request.getContextPath();
- String basePath = request.getScheme()+"://"+request.getServerName()+":"+request.getServerPort()+path+"/";
- %>
- <!DOCTYPE html PUBLIC "-//W3C//DTD HTML 4.01 Transitional//EN" "http://www.w3.org/TR/html4/loose.dtd">
- <html>
- <head>
- <base href="<%=basePath%>">
- <title>Struts Test</title>
- <meta http-equiv="Content-Type" content="text/html; charset=UTF-8">
- <meta http-equiv="pragma" content="no-cache">
- <meta http-equiv="cache-control" content="no-cache">
- <meta http-equiv="expires" content="0">
- <meta http-equiv="keywords" content="easyTalk">
- <meta http-equiv="description" content="This is my page">
- </head>
- <body>
- <s:form name="loginFrm" action="login">
- <s:textfield name="username" label="username"></s:textfield>
- <s:textfield name="password" label="password"></s:textfield>
- <s:submit label="submit"></s:submit>
- </s:form>
- <s:actionerror/>
- </body>
- </html>
上面用到了struts2的一些tag,具体使用方法自己百度...
- <%@ page language="java" contentType="text/html; charset=UTF-8" pageEncoding="UTF-8"%>
- <%@ taglib uri="/struts-tags" prefix="s" %>
- <%
- String path = request.getContextPath();
- String basePath = request.getScheme()+"://"+request.getServerName()+":"+request.getServerPort()+path+"/";
- %>
- <!DOCTYPE html PUBLIC "-//W3C//DTD HTML 4.01 Transitional//EN" "http://www.w3.org/TR/html4/loose.dtd">
- <html>
- <head>
- <base href="<%=basePath%>">
- <title>Struts Test Result</title>
- <meta http-equiv="Content-Type" content="text/html; charset=UTF-8">
- <meta http-equiv="pragma" content="no-cache">
- <meta http-equiv="cache-control" content="no-cache">
- <meta http-equiv="expires" content="0">
- <meta http-equiv="keywords" content="easyTalk">
- <meta http-equiv="description" content="This is my page">
- </head>
- <body>
- <p> 用户名:<s:property value="username"/></p>
- <p> 密 码 :<s:property value="password" />
- </body>
- </html>
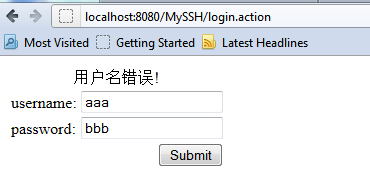
8. 测试结果:
输入错误用户名会有自动提示:
输入正确用户名和密码:

测试通过!!!!!!!!!!!!!!!!!!!!!!!!!!!!!


 1002
1002

 被折叠的 条评论
为什么被折叠?
被折叠的 条评论
为什么被折叠?
 到【灌水乐园】发言


