eclipse创建webservice client, java调用

需求描述 
有一个WSDL地址, 需要把它转化成Java代码调用。 
IDE环境要求 
这里使用Eclipse自动生成。这里的eclipse需要安装有Web开发插件。 
 步骤 
1. 首先新建一个 “Dynamic Web Project”, 比如:   WebServiceClientTest. 
这个的用处是为了存放产生的Java代码。 
2.  右键单击 WebServiceClientTest , New-->Others --->Web Services-->Web Service Client 
3. 在Service definition 输入wsdl的地址 
   滑动条拉到Develop client 上。 
4. 一直下一步就产生Java Code了。 
5. 产生的Code中, 有一个Java 文件以Proxy结尾, 这个就是调用的Class了。 


1.工具:eclipse3.3或者是带有webservice插件的eclipse
2. 首先用浏览器访问webservice的站点,接着保存打开的页面,后缀为.wsdl。
3.把保存好的文件拷入eclipse的工程中。
4.eclipse:file----new---other----webservice----web service client,选择之前拷贝到eclipse中的.wsdl文件,点击finish.
这样eclipse就帮我们自动生成了web service的客户端,接下来只需在程序中调用即可。
在程序中调用eclipse自动生成的web service客户端:
String endpoint = "服务器的webservice地址";
YourWebServiceNameProxy ywsnp = new YourWebServiceNameProxy ();
ywsnp.xxx方法(入参);
 
如:
String enpoint = "http://www.webxml.com.cn/WebServices/TranslatorWebService.asmx?wsdl";  
TranslatorWebServiceSoapProxy translatorWebServiceSoapProxy = new TranslatorWebServiceSoapProxy();
String[] result =translatorWebServiceSoapProxy.getEnCnTwoWayTranslator("猫");


JDK版本:1.7update65

Eclipse版本:Juno Service Release 2(4.2.2)

首先在Eclipse中安装Axis2的插件:

1,下载Axis2插件,最新版本为1.6.2:http://www.apache.org/dyn/mirrors/mirrors.cgi/axis/axis2/java/core/1.6.2/axis2-eclipse-codegen-plugin-1.6.2.zip

2,将zip压缩包中的org.apache.axis2.eclipse.codegen.plugin_1.6.2.jar放置在%ECLIPSE_HOME%\plugins路径下

3,重启Eclipse

安装完成后就可以使用安装好的插件生成WSDL文件了

1,创建一个普通的Java项目,在该项目下创建一个接口,在Navigator视图下,项目结构如下:

[java]  view plain  copy
  1. package com.sean;  
  2.   
  3. public interface Math {  
  4.     public int add(int a, int b);  
  5. }  

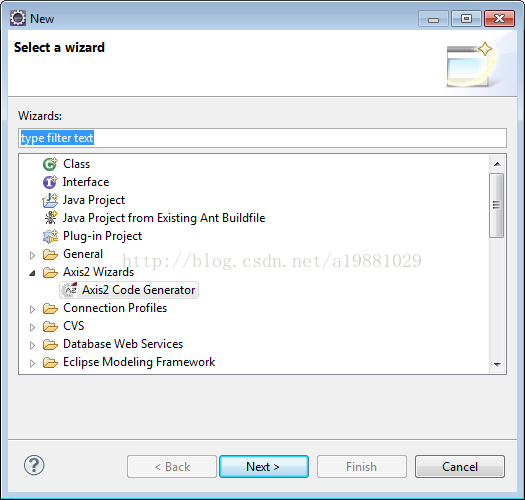
2,选择Eclipse菜单栏中的File -> New -> Other...,在弹出的对话框中选择Axis2 Code Generator,然后选择Next

3,然后选择通过Java源文件生成WSDL

4,Fully Qualified Class name中填写用来生成WSDL的Java类全名称

然后通过Add Folder按钮添加Java类编译后生成的.class文件(Math.class)所在路径

最后点击Test Class Loading...按钮

当测试通过时(按钮右侧显示Class file loaded successfully),才可点击Next按钮

5,WSDL文件属性值,这里使用默认的即可

6,选择将WSDL文件生成在本地文件系统,并且选择好WSDL文件的生成路径及文件名

点击Finish后,将在指定位置生成WSDL文件(Math.wsdl),文件内容如下:

[html]  view plain  copy
  1. <?xml version="1.0" encoding="UTF-8"?>  
  2. <wsdl:definitions xmlns:wsdl="http://schemas.xmlsoap.org/wsdl/"   
  3.     xmlns:ns1="http://org.apache.axis2/xsd"   
  4.     xmlns:wsaw="http://www.w3.org/2006/05/addressing/wsdl"   
  5.     xmlns:http="http://schemas.xmlsoap.org/wsdl/http/"   
  6.     xmlns:xsd="http://sean.com"   
  7.     xmlns:xs="http://www.w3.org/2001/XMLSchema"   
  8.     xmlns:mime="http://schemas.xmlsoap.org/wsdl/mime/"   
  9.     xmlns:soap="http://schemas.xmlsoap.org/wsdl/soap/"   
  10.     xmlns:soap12="http://schemas.xmlsoap.org/wsdl/soap12/"   
  11.     targetNamespace="http://sean.com">  
  12.     <wsdl:types>  
  13.         <xs:schema attributeFormDefault="qualified"   
  14.             elementFormDefault="qualified"   
  15.             targetNamespace="http://sean.com">  
  16.             <xs:element name="add">  
  17.                 <xs:complexType>  
  18.                     <xs:sequence>  
  19.                         <xs:element minOccurs="0" name="args0" type="xs:int"/>  
  20.                         <xs:element minOccurs="0" name="args1" type="xs:int"/>  
  21.                     </xs:sequence>  
  22.                 </xs:complexType>  
  23.             </xs:element>  
  24.             <xs:element name="addResponse">  
  25.                 <xs:complexType>  
  26.                     <xs:sequence>  
  27.                         <xs:element minOccurs="0" name="return" type="xs:int"/>  
  28.                     </xs:sequence>  
  29.                 </xs:complexType>  
  30.             </xs:element>  
  31.         </xs:schema>  
  32.     </wsdl:types>  
  33.     <wsdl:message name="addRequest">  
  34.         <wsdl:part name="parameters" element="xsd:add"/>  
  35.     </wsdl:message>  
  36.     <wsdl:message name="addResponse">  
  37.         <wsdl:part name="parameters" element="xsd:addResponse"/>  
  38.     </wsdl:message>  
  39.     <wsdl:portType name="MathPortType">  
  40.         <wsdl:operation name="add">  
  41.             <wsdl:input message="xsd:addRequest" wsaw:Action="urn:add"/>  
  42.             <wsdl:output message="xsd:addResponse" wsaw:Action="urn:addResponse"/>  
  43.         </wsdl:operation>  
  44.     </wsdl:portType>  
  45.     <wsdl:binding name="MathSoap11Binding" type="xsd:MathPortType">  
  46.         <soap:binding transport="http://schemas.xmlsoap.org/soap/http" style="document"/>  
  47.         <wsdl:operation name="add">  
  48.             <soap:operation soapAction="urn:add" style="document"/>  
  49.             <wsdl:input>  
  50.                 <soap:body use="literal"/>  
  51.             </wsdl:input>  
  52.             <wsdl:output>  
  53.                 <soap:body use="literal"/>  
  54.             </wsdl:output>  
  55.         </wsdl:operation>  
  56.     </wsdl:binding>  
  57.     <wsdl:binding name="MathSoap12Binding" type="xsd:MathPortType">  
  58.         <soap12:binding transport="http://schemas.xmlsoap.org/soap/http" style="document"/>  
  59.         <wsdl:operation name="add">  
  60.             <soap12:operation soapAction="urn:add" style="document"/>  
  61.             <wsdl:input>  
  62.                 <soap12:body use="literal"/>  
  63.             </wsdl:input>  
  64.             <wsdl:output>  
  65.                 <soap12:body use="literal"/>  
  66.             </wsdl:output>  
  67.         </wsdl:operation>  
  68.     </wsdl:binding>  
  69.     <wsdl:binding name="MathHttpBinding" type="xsd:MathPortType">  
  70.         <http:binding verb="POST"/>  
  71.         <wsdl:operation name="add">  
  72.             <http:operation location="add"/>  
  73.             <wsdl:input>  
  74.                 <mime:content type="application/xml" part="parameters"/>  
  75.             </wsdl:input>  
  76.             <wsdl:output>  
  77.                 <mime:content type="application/xml" part="parameters"/>  
  78.             </wsdl:output>  
  79.         </wsdl:operation>  
  80.     </wsdl:binding>  
  81.     <wsdl:service name="Math">  
  82.         <wsdl:port name="MathHttpSoap11Endpoint" binding="xsd:MathSoap11Binding">  
  83.             <soap:address location="http://localhost:8080/axis2/services/Math"/>  
  84.         </wsdl:port>  
  85.         <wsdl:port name="MathHttpSoap12Endpoint" binding="xsd:MathSoap12Binding">  
  86.             <soap12:address location="http://localhost:8080/axis2/services/Math"/>  
  87.         </wsdl:port>  
  88.         <wsdl:port name="MathHttpEndpoint" binding="xsd:MathHttpBinding">  
  89.             <http:address location="http://localhost:8080/axis2/services/Math"/>  
  90.         </wsdl:port>  
  91.     </wsdl:service>  
  92. </wsdl:definitions>  
0


JDK版本:1.7update65

Eclipse版本:Juno Service Release 2(4.2.2)

插件安装过程及WSDL文件生成过程参见:http://blog.csdn.net/a19881029/article/details/40194787

1,下载Axis2的1.6.2版本二进制压缩包,下载路径为:http://axis.apache.org/axis2/java/core/download.cgi,下载完成后解压,以供之后使用

2,创建一个普通的Java工程,用来存放自动生成的Web Service服务端/客户端代码

3,选择Eclipse菜单栏中的File -> New -> Other...,在弹出的对话框中选择Axis2 Code Generator,然后选择Next

4,选择通过WSDL文件生成Java源代码

5,选择生成好的WSDL文件

6,如果Codegen option选择default,则不可修改下面的配置项,默认生成Web Service客户端,如果Codegen option选择custom,则可以手动修改下面的配置项

7,选择将自动生成的Java代码保存在Eclipse当前工作空间中的特定工程中

8,虽然Axis2依赖的jar包加到了工程中,但是并没有添加到工程的Build Path中,需要手动添加一下

9,客户端生成代码如下:

生成的时候选择同时生成同步方法和异步方法,同步方法比较简单,就不多说了,这里看下MathStub类中异步方法是如何处理的

[java]  view plain  copy
  1. ......  
  2. public  void startadd(  
  3.     com.sean.Add add2,  
  4.     final com.sean.MathCallbackHandler callback)  
  5.     throws java.rmi.RemoteException{  
  6. ......  
  7. callback.receiveResultadd(  
  8.     (com.sean.AddResponse)object);                                      
  9. catch (org.apache.axis2.AxisFault e) {  
  10.     cllback.receiveErroradd(e);  
  11. }  
  12. ......  

MathCallbackHandler是个抽象方法

[java]  view plain  copy
  1. ......  
  2. /** 
  3.     * auto generated Axis2 call back method for add method override this method 
  4.     * for handling normal response from add operation 
  5.     */  
  6. public void receiveResultadd(com.sean.AddResponse result) {}  
  7.   
  8. /** 
  9.     * auto generated Axis2 Error handler override this method for handling 
  10.     * error response from add operation 
  11.     */  
  12. public void receiveErroradd(java.lang.Exception e) {}  
  13. ......  

综上,实现了自己的异常处理类

[java]  view plain  copy
  1. package com.sean;  
  2.   
  3. public class MyMathCallbackHandler extends MathCallbackHandler {  
  4.       
  5.     @Override  
  6.     public void receiveResultadd(AddResponse result) {  
  7.         super.clientData = result;  
  8.     }  
  9.   
  10.     @Override  
  11.     public void receiveErroradd(Exception e) {  
  12.         System.out.println(e.getMessage());  
  13.     }  
  14. }  

接口调用方式如下

[java]  view plain  copy
  1. package com.sean;  
  2.   
  3. public class Test {  
  4.     public static void main(String[] args) throws Exception {  
  5.         Math math = new MathStub("http://127.0.0.1:8888/mockMathSoap12Binding");  
  6.         //sync  
  7.         Add add1 = new Add();  
  8.         add1.setArgs0(1);  
  9.         add1.setArgs1(2);  
  10.         AddResponse resp1 = math.add(add1);  
  11.         System.out.println(resp1.get_return());  
  12.           
  13.         //async  
  14.         Add add2 = new Add();  
  15.         add2.setArgs0(5);  
  16.         add2.setArgs1(6);  
  17.         MathCallbackHandler callback = new MyMathCallbackHandler();  
  18.         math.startadd(add2, callback);  
  19.         //As the method is not sync, can't get result immediately.  
  20.         Thread.sleep(1000);  
  21.         AddResponse resp2 = (AddResponse)callback.getClientData();  
  22.         System.out.println(resp2.get_return());  
  23.     }  
  24. }  

10,服务端生成代码如下:

是否选择生成Sleleton的接口类都可以,如果勾选,则会多生成一个MathSkeletonInterface类,MathSkeleton类变为该接口类的实现类,在MathMessageReceiverInOut中,由直接调用MathSkeleton类改为调用MathSkeletonInterface接口类,除此之外没有别的变化

MathSkeleton类中需要添加服务端的处理逻辑

[java]  view plain  copy
  1. /** 
  2.  * MathSkeleton.java 
  3.  * 
  4.  * This file was auto-generated from WSDL 
  5.  * by the Apache Axis2 version: 1.6.2  Built on : Apr 17, 2012 (05:33:49 IST) 
  6.  */  
  7. package com.sean;  
  8.   
  9. public class MathSkeleton implements MathSkeletonInterface {  
  10.     public com.sean.AddResponse add(com.sean.Add add0) {  
  11.         int a = add0.getArgs0();  
  12.         int b = add0.getArgs1();  
  13.         int result = a + b;  
  14.         AddResponse resp = new AddResponse();  
  15.         resp.set_return(result);  
  16.         return resp;  
  17.     }  
  18. }  

  • 0
    点赞
  • 7
    收藏
    觉得还不错? 一键收藏
  • 0
    评论
智慧农业是一种结合了现代信息技术,包括物联网、大数据、云计算等,对农业生产过程进行智能化管理和监控的新模式。它通过各种传感器和设备采集农业生产中的关键数据,如大气、土壤和水质参数,以及生物生长状态等,实现远程诊断和精准调控。智慧农业的核心价值在于提高农业生产效率,保障食品安全,实现资源的可持续利用,并为农业产业的转型升级提供支持。 智慧农业的实现依赖于多个子系统,包括但不限于设施蔬菜精细化种植管理系统、农业技术资料库、数据采集系统、防伪防串货系统、食品安全与质量追溯系统、应急追溯系统、灾情疫情防控系统、农业工作管理系统、远程诊断系统、监控中心、环境监测系统、智能环境控制系统等。这些系统共同构成了一个综合的信息管理和服务平台,使得农业生产者能够基于数据做出更加科学的决策。 数据采集是智慧农业的基础。通过手工录入、传感器自动采集、移动端录入、条码/RFID扫描录入、拍照录入以及GPS和遥感技术等多种方式,智慧农业系统能够全面收集农业生产过程中的各种数据。这些数据不仅包括环境参数,还涵盖了生长状态、加工保存、检验检疫等环节,为农业生产提供了全面的数据支持。 智慧农业的应用前景广阔,它不仅能够提升农业生产的管理水平,还能够通过各种应用系统,如库房管理、无公害监控、物资管理、成本控制等,为农业生产者提供全面的服务。此外,智慧农业还能够支持政府监管,通过发病报告、投入品报告、死亡报告等,加强农业产品的安全管理和质量控制。 面对智慧农业的建设和发展,存在一些挑战,如投资成本高、生产过程标准化难度大、数据采集和监测的技术难题等。为了克服这些挑战,需要政府、企业和相关机构的共同努力,通过政策支持、技术创新和教育培训等手段,推动智慧农业的健康发展。智慧农业的建设需要明确建设目的,选择合适的系统模块,并制定合理的设备布署方案,以实现农业生产的智能化、精准化和高效化。
评论
添加红包

请填写红包祝福语或标题

红包个数最小为10个

红包金额最低5元

当前余额3.43前往充值 >
需支付:10.00
成就一亿技术人!
领取后你会自动成为博主和红包主的粉丝 规则
hope_wisdom
发出的红包
实付
使用余额支付
点击重新获取
扫码支付
钱包余额 0

抵扣说明:

1.余额是钱包充值的虚拟货币,按照1:1的比例进行支付金额的抵扣。
2.余额无法直接购买下载,可以购买VIP、付费专栏及课程。

余额充值