


接触tensorflow小白,网上教程很多,图像分类应该属于比较经典的一个例子啦,特别是google推了slim,但是网上的教程遗漏啦许多细节介绍会导致跑不出来,经过调试终于跑出来啦
结果还算可以,分享一下
我的环境,cuda8.0+cudnn5.1+python2.7
关于tensorflow,cuda+cudnn等安装推荐教程:
http://blog.csdn.net/xierhacker/article/details/53035989
整体思路就是通过训练好的vgg_16模型进行图像分类,
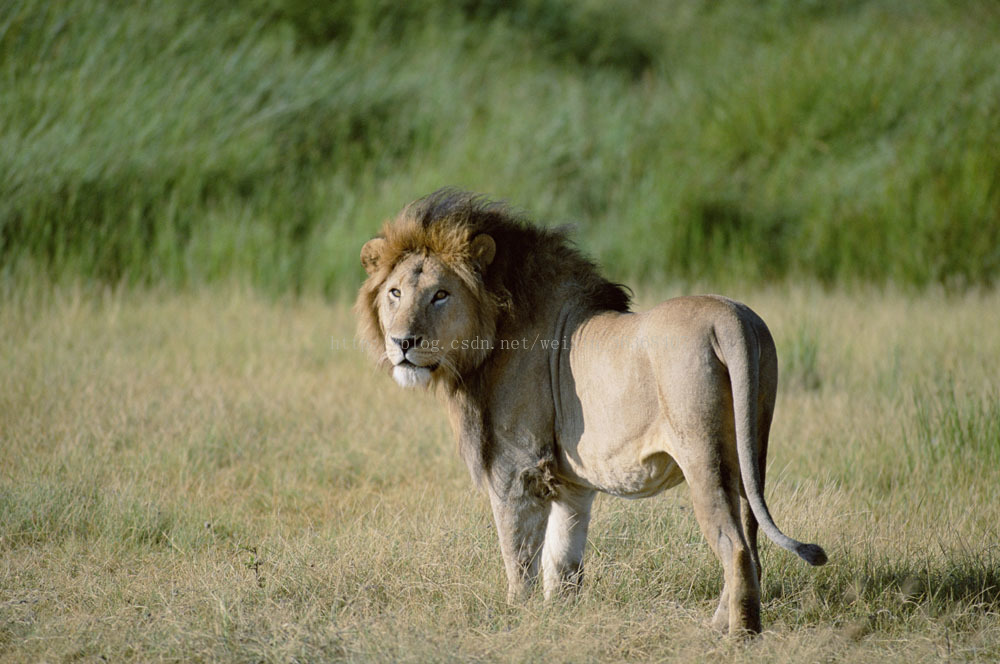
原图:
step01输出结果:
Probability 1.00 => [lion, king of beasts, Panthera leo]
5 things
Probability 0.00 => [collie]
5 things
Probability 0.00 => [ox]
5 things
Probability 0.00 => [baboon]
5 things
Probability 0.00 => [chow, chow chow]
很显然分类的比较正确
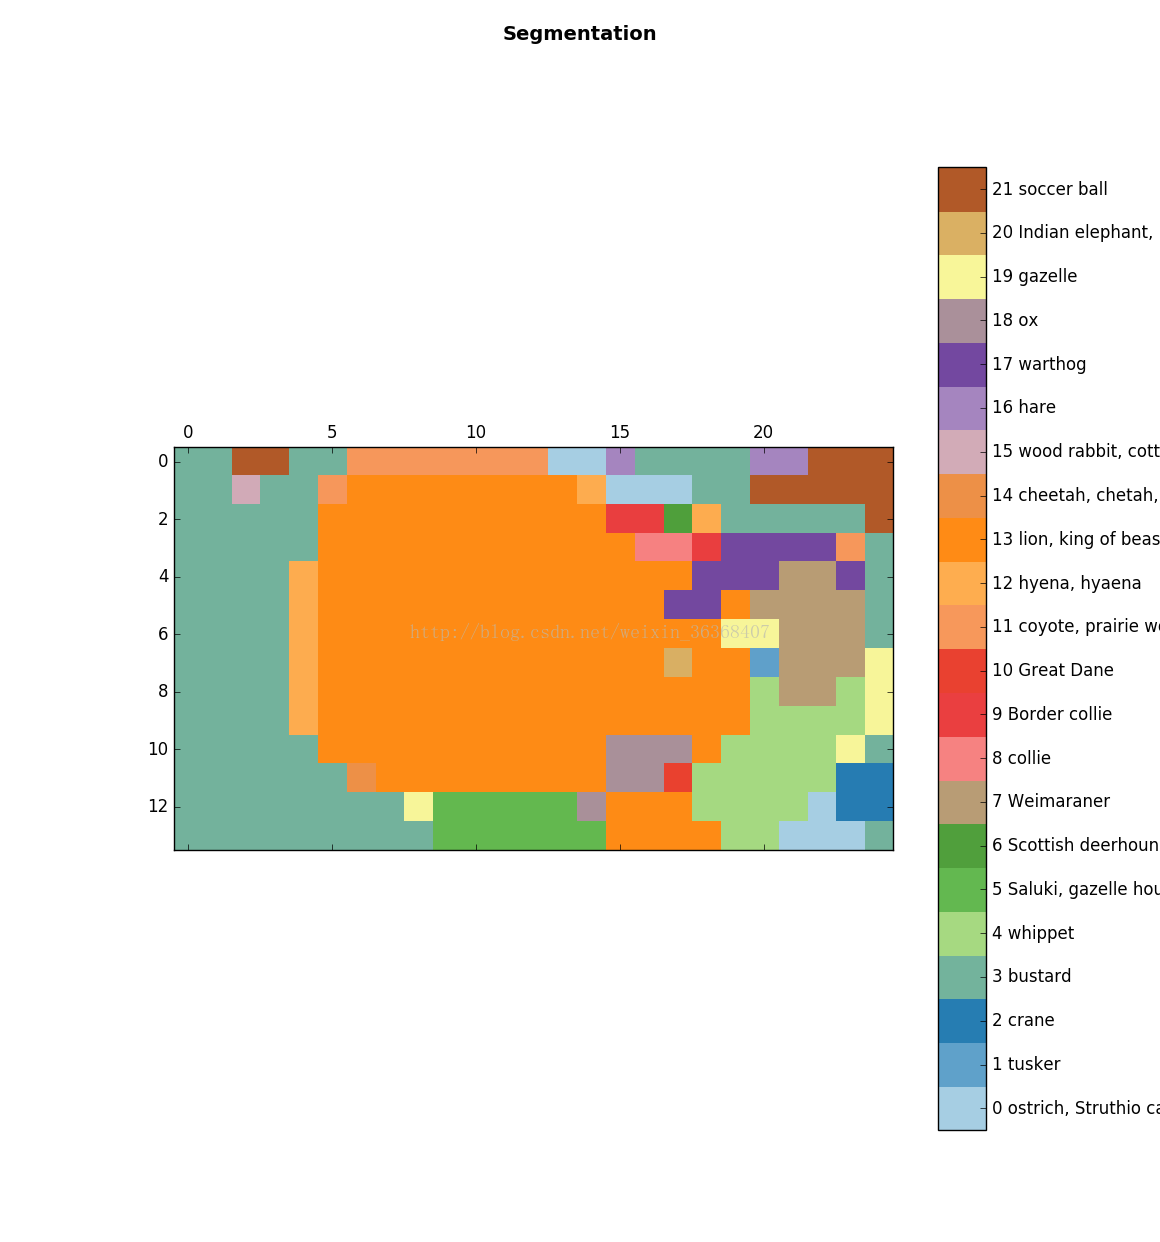
Step02图像分割显示效果:
工具:tensorflow slim opencv numpy
Step01:下载vgg模型,
import sys
import os
os.environ["CUDA_VISIBLE_DEVICES"] = '0'
sys.path.append("/home/yc/models/slim")
from datasets import dataset_utils
import tensorflow as tf
url = "http://download.tensorflow.org/models/vgg_16_2016_08_28.tar.gz"
# 指定保存路径
checkpoints_dir = '/home/yc/models/checkpoints'
if not tf.gfile.Exists(checkpoints_dir):
tf.gfile.MakeDirs(checkpoints_dir)
dataset_utils.download_and_uncompress_tarball(url, checkpoints_dir)
Step02:图像分类 from datasets等属于下载models/slim下的文件夹,可能代码不提示,没有关系,
import sys
import os
os.environ["CUDA_VISIBLE_DEVICES"] = '0'
sys.path.append("/home/yc/models/slim")
from matplotlib import pyplot as plt
import numpy as np
import cv2
import tensorflow as tf
from datasets import imagenet
from nets import vgg
from preprocessing import vgg_preprocessing
checkpoints_dir = '/home/yc/models/checkpoints'
slim=tf.contrib.slim
image_size=vgg.vgg_16.default_image_size
with tf.Graph().as_default():
# Open specified url and load image as a string
# Decode string into matrix with intensity values
image = cv2.imread("/home/yc/1214/tiger.jpg")
image=cv2.cvtColor(image, 4)
plt.imshow(image)
plt.suptitle("The tiger",
fontsize=14, fontweight='bold')
plt.axis('off')
plt.show()
# Resize the input image, preserving the aspect ratio
# and make a central crop of the resulted image.
# The crop will be of the size of the default image size of
# the network.
processed_image = vgg_preprocessing.preprocess_image(image,
image_size,
image_size,
is_training=False)
# Networks accept images in batches.
# The first dimension usually represents the batch size.
# In our case the batch size is one.
processed_images = tf.expand_dims(processed_image, 0)
# Create the model, use the default arg scope to configure
# the batch norm parameters. arg_scope is a very conveniet
# feature of slim library -- you can define default
# parameters for layers -- like stride, padding etc.
with slim.arg_scope(vgg.vgg_arg_scope()):
logits, _ = vgg.vgg_16(processed_images,
num_classes=1000,
is_training=False)
# In order to get probabilities we apply softmax on the output.
probabilities = tf.nn.softmax(logits)
# Create a function that reads the network weights
# from the checkpoint file that you downloaded.
# We will run it in session later.
init_fn = slim.assign_from_checkpoint_fn(
os.path.join(checkpoints_dir, 'vgg_16.ckpt'),
slim.get_model_variables('vgg_16'))
with tf.Session() as sess:
# Load weights
init_fn(sess)
# We want to get predictions, image as numpy matrix
# and resized and cropped piece that is actually
# being fed to the network.
network_input, probabilities = sess.run([processed_image,probabilities])
probabilities = probabilities[0, 0:]
sorted_inds = [i[0] for i in sorted(enumerate(-probabilities),
key=lambda x:x[1])]
# Show the downloaded image
# Show the image that is actually being fed to the network
# The image was resized while preserving aspect ratio and then
# cropped. After that, the mean pixel value was subtracted from
# each pixel of that crop. We normalize the image to be between [-1, 1]
# to show the image.
plt.imshow( network_input / (network_input.max() - network_input.min()) )
plt.suptitle("Resized, Cropped and Mean-Centered input to network",
fontsize=14, fontweight='bold')
plt.axis('off')
plt.show()
names = imagenet.create_readable_names_for_imagenet_labels()
for i in range(5):
print "5 things"
index = sorted_inds[i]
# Now we print the top-5 predictions that the network gives us with
# corresponding probabilities. Pay attention that the index with
# class names is shifted by 1 -- this is because some networks
# were trained on 1000 classes and others on 1001. VGG-16 was trained
# on 1000 classes.
print('Probability %0.2f => [%s]' % (probabilities[index], names[index+1]))
res = slim.get_model_variables()
Step03:图像分割显示(上一步注重的是局部类别,根据概率排名,很清楚等看出分类,在复杂场景下,需要全图的类别情况,需要分割并显示)
import sys
import os
os.environ["CUDA_VISIBLE_DEVICES"] = '0'
sys.path.append("/home/yc/models/slim")
from matplotlib import pyplot as plt
import numpy as np
import cv2
import tensorflow as tf
import urllib2
from datasets import imagenet
from nets import vgg
from preprocessing import vgg_preprocessing
checkpoints_dir = '/home/yc/models/checkpoints'
slim=tf.contrib.slim
image_size=vgg.vgg_16.default_image_size
# Load the mean pixel values and the function
# that performs the subtraction
from preprocessing.vgg_preprocessing import (_mean_image_subtraction,
_R_MEAN, _G_MEAN, _B_MEAN)
# Function to nicely print segmentation results with
# colorbar showing class names
def discrete_matshow(data, labels_names=[], title=""):
print "matshow begin"
#get discrete colormap
cmap = plt.get_cmap('Paired', np.max(data)-np.min(data)+1)
# set limits .5 outside true range
mat = plt.matshow(data,
cmap=cmap,
vmin = np.min(data)-.5,
vmax = np.max(data)+.5)
#tell the colorbar to tick at integers
cax = plt.colorbar(mat,
ticks=np.arange(np.min(data),np.max(data)+1))
# The names to be printed aside the colorbar
if labels_names:
cax.ax.set_yticklabels(labels_names)
if title:
plt.suptitle(title, fontsize=14, fontweight='bold')
plt.show()
with tf.Graph().as_default():
image01 = cv2.imread("/home/yc/1214/tiger.jpg")
image=cv2.cvtColor(image01,4)
# Convert image to float32 before subtracting the
# mean pixel value
image_float = tf.to_float(image, name='ToFloat')
# Subtract the mean pixel value from each pixel
processed_image = _mean_image_subtraction(image_float,
[_R_MEAN, _G_MEAN, _B_MEAN])
input_image = tf.expand_dims(processed_image, 0)
with slim.arg_scope(vgg.vgg_arg_scope()):
# spatial_squeeze option enables to use network in a fully
# convolutional manner
logits, _ = vgg.vgg_16(input_image,
num_classes=1000,
is_training=False,
spatial_squeeze=False)
# For each pixel we get predictions for each class
# out of 1000. We need to pick the one with the highest
# probability. To be more precise, these are not probabilities,
# because we didn't apply softmax. But if we pick a class
# with the highest value it will be equivalent to picking
# the highest value after applying softmax
pred = tf.argmax(logits, dimension=3)
init_fn = slim.assign_from_checkpoint_fn(
os.path.join(checkpoints_dir, 'vgg_16.ckpt'),
slim.get_model_variables('vgg_16'))
with tf.Session() as sess:
init_fn(sess)
segmentation = sess.run([pred])
# Remove the first empty dimension
segmentation = np.squeeze(segmentation)
# Let's get unique predicted classes (from 0 to 1000) and
# relable the original predictions so that classes are
# numerated starting from zero
unique_classes, relabeled_image = np.unique(segmentation,
return_inverse=True)
segmentation_size = segmentation.shape
print unique_classes
relabeled_image = relabeled_image.reshape(segmentation_size)
labels_names = []
names = imagenet.create_readable_names_for_imagenet_labels()
for index, current_class_number in enumerate(unique_classes):
labels_names.append(str(index) + ' ' + names[current_class_number+1])
print labels_names
discrete_matshow(data=relabeled_image, labels_names=labels_names, title="Segmentation")


 5489
5489


 被折叠的 条评论
为什么被折叠?
被折叠的 条评论
为什么被折叠?
 到【灌水乐园】发言


