


DirectX 教程: DirectX Tutorial - Direct3D: Getting Started
基本知识:
1. 图形硬件
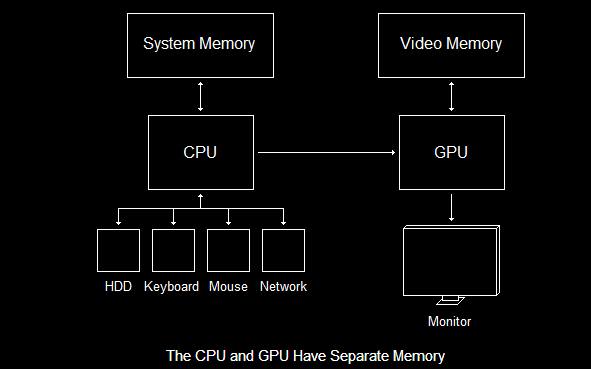
随着显示技术的发展,显示器独立带有显存
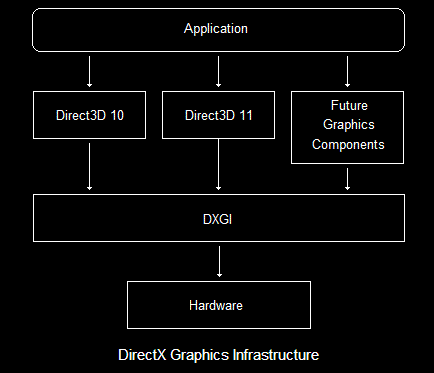
2. DXGI ( DirectX Graphics Infrastructure )
The DirectX Graphics Infrastructure is a component that lies at the base of all the most recent versions of Direct3D.
Its job is to handle fundamental tasks such as displaying images on the screen and finding out what resolutions the monitor and video card can handle.
DXGI is not actually a part of Direct3D.
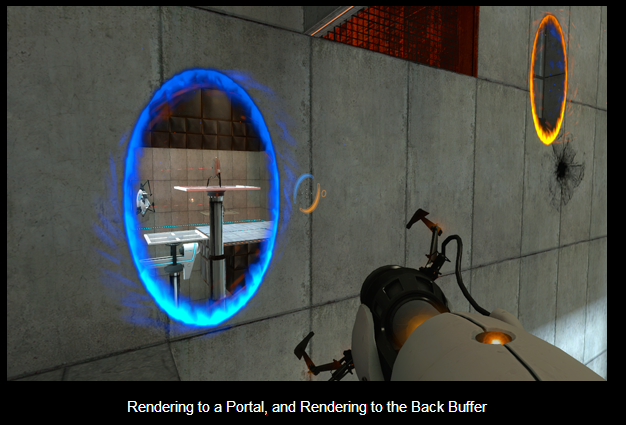
3. The Swap Chain

基本做法: 设立两个buffer,一个读出数据用于显示的同时,另外一个用于存计算机输出的显示数据,再交换。
4. 流水线
此处作者没有详细讲

5. 坐标系统
作者从一维讲到三维,没有必要细讲了。
6. 三维几何
Primitives(基本几何形状)
A primitive is a single element in a 3D environment, be it a triangle, a line, a dot, or whatever. Following is a list of ways primitives can be combined to create 3D objects.
1. Point Lists
2. Line Lists
3. Line Strips

4. Triangle Lists

5. Triangle Strips


7. COM
COM stands for Component Object Model.
Even though COM's job is to hide all the complexity, there are four things you need to know about it.
1. A COM object is a class or set of classes controlled by an interface. An interface is a set of functions that, well, controls a COM object. In the example above, "device" is a COM object, and the functions control it.
2. Each type of COM object has a unique ID.
3. When done using a COM object, you must always call the function Release().
4. COM objects are easy to identify, because they typically start with an 'I', such as 'ID3D10Device'.
程序基本结构:
8. Direct3D Headers
// include the basic windows header files and the Direct3D header files
#include <windows.h>
#include <windowsx.h>
#include <d3d11.h>
#include <d3dx11.h>
#include <d3dx10.h>

// include the Direct3D Library file
#pragma comment (lib, "d3d11.lib")
#pragma comment (lib, "d3dx11.lib")
#pragma comment (lib, "d3dx10.lib")

// global declarations
IDXGISwapChain *swapchain;             // the pointer to the swap chain interface
ID3D11Device *dev;                     // the pointer to our Direct3D device interface
ID3D11DeviceContext *devcon;           // the pointer to our Direct3D device context

// function prototypes
void InitD3D(HWND hWnd);     // sets up and initializes Direct3D
void CleanD3D(void);         // closes Direct3D and releases memory

// the WindowProc function prototype
LRESULT CALLBACK WindowProc(HWND hWnd, UINT message, WPARAM wParam, LPARAM lParam);
这里主要注意的就是global declarations
需要建立两个设备相关的指针,另外还需要一个swap chain 的指针
然后是D3D的初始化和释放,分别对应两个函数。
注意还要导入D3D相关的头文件,详细步骤请看:http://www.directxtutorial.com/lessonarticle.aspx?id=4
9. DirectX3D 初始化
初始化主要就是写上D3D11CreateDeviceAndSwapChain函数
这个函数看着很复杂,其实基本参数都用那几个,不大会变,详细自己看英文教程,不详述。使用这个函数是init的第一步。
// this function initializes and prepares Direct3D for use
void InitD3D(HWND hWnd)
{
    // create a struct to hold information about the swap chain
    DXGI_SWAP_CHAIN_DESC scd;

    // clear out the struct for use
    ZeroMemory(&scd, sizeof(DXGI_SWAP_CHAIN_DESC));

    // fill the swap chain description struct
    scd.BufferCount = 1;                                    // one back buffer
    scd.BufferDesc.Format = DXGI_FORMAT_R8G8B8A8_UNORM;     // use 32-bit color
    scd.BufferUsage = DXGI_USAGE_RENDER_TARGET_OUTPUT;      // how swap chain is to be used
    scd.OutputWindow = hWnd;                                // the window to be used
    scd.SampleDesc.Count = 4;                               // how many multisamples
    scd.Windowed = TRUE;                                    // windowed/full-screen mode

    // create a device, device context and swap chain using the information in the scd struct
    D3D11CreateDeviceAndSwapChain(NULL,
                                  D3D_DRIVER_TYPE_HARDWARE,
                                  NULL,
                                  NULL,
                                  NULL,
                                  NULL,
                                  D3D11_SDK_VERSION,
                                  &scd,
                                  &swapchain,
                                  &dev,
                                  NULL,
                                  &devcon);
}
这里还要补充一点
scd.SampleDesc.Count = 1; 是用来表示是否打开抗锯齿
10. 释放D3D
// this is the function that cleans up Direct3D and COM
void CleanD3D()
{
    // close and release all existing COM objects
    swapchain->Release();
    dev->Release();
    devcon->Release();
}
开始进行渲染:
这里需要两步:
First, we need to tell the GPU where in memory to create the final image (for us, this is the back buffer).
这一步包含11,12两点,注意这一步的时候各个代码段在initD3D中的顺序。
Second, we need to tell the GPU where on the backbuffer it should draw.
这一步是13点,这是一个独立的刷新方法,会在每一个frame显示的时候调用,所以要注意调用这个方法的位置是在while主循环中。
11. Setting the Render Target
ID3D11RenderTargetView *backbuffer;    // global declaration

// this function initializes and prepares Direct3D for use
void InitD3D(HWND hWnd)
{
    // Direct3D initialization
    // ...

    // get the address of the back buffer
    ID3D11Texture2D *pBackBuffer;
    swapchain->GetBuffer(0, __uuidof(ID3D11Texture2D), (LPVOID*)&pBackBuffer);

    // use the back buffer address to create the render target
    dev->CreateRenderTargetView(pBackBuffer, NULL, &backbuffer);
    pBackBuffer->Release();

    // set the render target as the back buffer
    devcon->OMSetRenderTargets(1, &backbuffer, NULL);
}
First, we determine the address of the back buffer.
Second, we create a COM object using that address to represent the render target.
Third, we set that object as the active render target.
12. Setting the Viewport
这里涉及到坐标系归一化的概念

// this function initializes and prepares Direct3D for use
void InitD3D(HWND hWnd)
{
    // Direct3D initialization
    // ...

    // Set the render target
    // ...

    // Set the viewport
    D3D11_VIEWPORT viewport;
    ZeroMemory(&viewport, sizeof(D3D11_VIEWPORT));

    viewport.TopLeftX = 0;
    viewport.TopLeftY = 0;
    viewport.Width = 800;
    viewport.Height = 600;

    devcon->RSSetViewports(1, &viewport);
}
13. Rendering Frames
// this is the function used to render a single frame
void RenderFrame(void)
{
    // clear the back buffer to a deep blue
    devcon->ClearRenderTargetView(backbuffer, D3DXCOLOR(0.0f, 0.2f, 0.4f, 1.0f));

    // do 3D rendering on the back buffer here

    // switch the back buffer and the front buffer
    swapchain->Present(0, 0);
}
14. release修改:
需要加一行:
backbuffer->Release();


 6051
6051

 被折叠的 条评论
为什么被折叠?
被折叠的 条评论
为什么被折叠?
 到【灌水乐园】发言


