林炳文Evankaka原创作品。转载请注明出处http://blog.csdn.net/evankaka
本文要用Servlet+Jsp+MySql实例用户登录,并简要介绍了下MVC的思想,此例子也是按照这个思路来做的。在Eclipse+tomcat7.0上做的。不会很难,对于了解MVC思想很有帮助!
本文工程下载
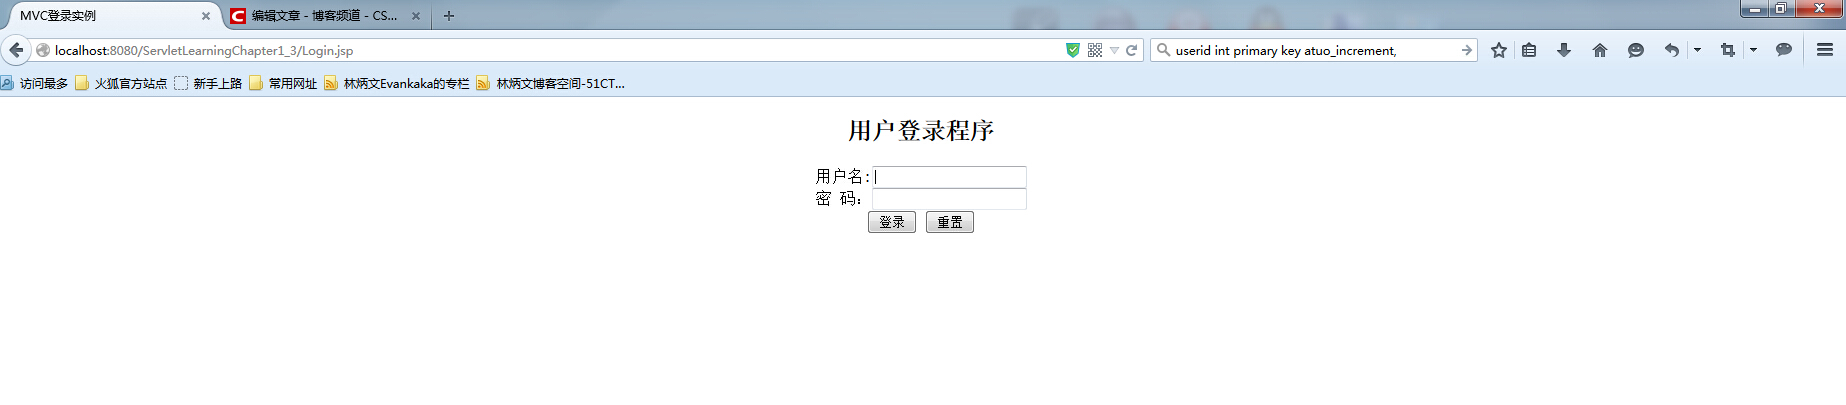
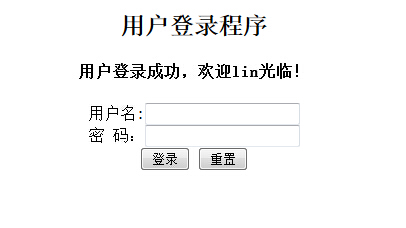
效果:
这是刚开始的界面
这是错误时的信息

这是成功时的信息
一、MVC简介
MVC全名是Model View Controller,是模型(model)-视图(view)-控制器(controller)的缩写,一种软件设计典范,用一种业务逻辑、数据、界面显示分离的方法组织代码,将业务逻辑聚集到一个部件里面,在改进和个性化定制界面及用户交互的同时,不需要重新编写业务逻辑。MVC被独特的发展起来用于映射传统的输入、处理和输出功能在一个逻辑的图形化用户界面的结构中。
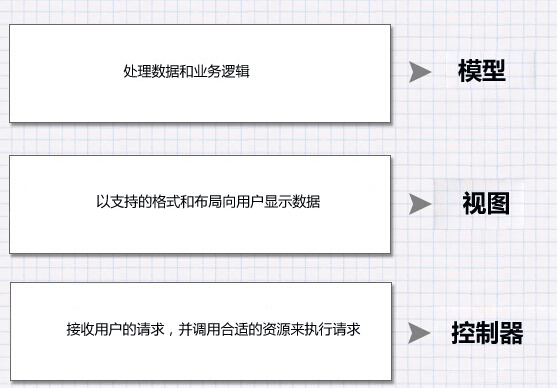
控制器
控制器掌管着用户的请求(当用户点击图形用户界面(GUI)上的元素执行操作时,控制器会收到HTTP GET或者POST请求)。它的主要功能就是调用并协调需要的资源/对象来执行用户请求。通常控制器会为任务调用合适的模型,以及选择合适的视图。
模型
模型是指运用于数据之上的数据规则和数据内容,它一般对应于应用程序所要管理的对象。在软件系统中,任何事物都可以被抽象成可以对其以某种方式进行处理的数据模型。应用程序中的用户,信息以及图书是什么?它们只是一堆必须按照对应规则处理的数据(日期不能是未来的日期,电子邮件有特定的格式,名字的长度不能超过多少字符等等。
视图
视图提供了展示模型数据的不同方式。它可能是数据填充的模板。视图可以有多个,而控制器则决定使用哪个视图。一个网络应用通常由许多控制器,模型和视图组成。控制器可以被看成是一个主控制器,用于接收用户的所有请求,然后在调用特定的控制器来处理不同的情况。
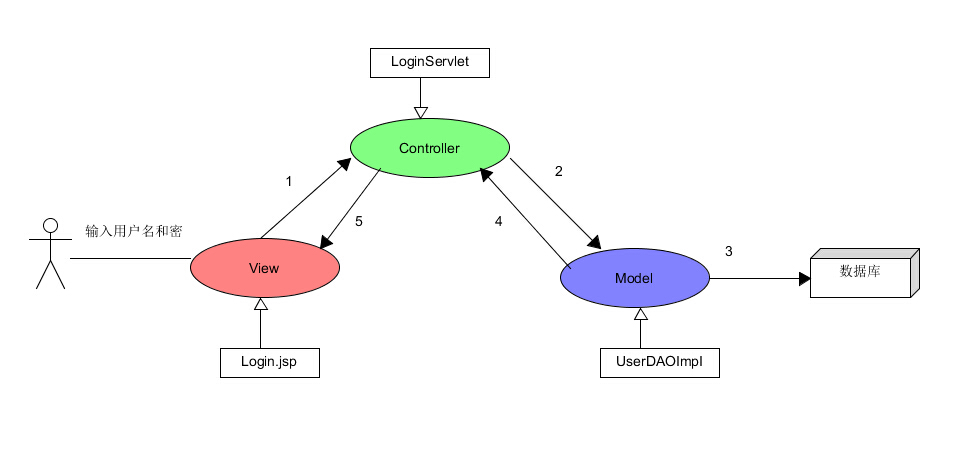
二、本文MVC结构
本文的这个例子,比较简单。看看下面的这个图就懂了
三、程序
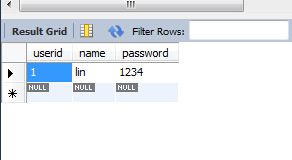
1、创建数据库,这里使用的是MySql5.6,并插入了一个用户
- create database example;
- use example;
- create table user(
- userid int primary key auto_increment,
- name varchar(30) NOT NULL,
- password varchar(30) NOT NULL
- );
- insert into user(userid,name,password) values (null,'lin','1234');
如果example不存在,记得要先create database example
select *from user结果如下:
2、VO类,用来和数据库对应,DAO类中会用到的东西
-
-
-
-
-
- package com.mucfc.vo;
- public class User {
- private int userid;
- private String name;
- private String password;
- public int getUserid() {
- return userid;
- }
- public void setUserid(int userid) {
- this.userid = userid;
- }
- public String getName() {
- return name;
- }
- public void setName(String name) {
- this.name = name;
- }
- public String getPassword() {
- return password;
- }
- public void setPassword(String password) {
- this.password = password;
- }
-
- }
3、定义操作数据库 ,完成数据库的连接,打开等操作,要注意加异常操作!这也是在DAO类中需要用到的东西
-
-
-
-
-
- package com.mucfc.dbc;
-
- import java.sql.Connection;
- import java.sql.DriverManager;
- public class DatabaseConnection {
-
- private static final String DBDRIVER="com.mysql.jdbc.Driver";
-
- private static final String DBURL="jdbc:mysql://localhost:3306/example";//example表示数据库
- private static final String DBUSER="root";
- private static final String DBPASS="christmas258@";
- private Connection connection=null;
- public DatabaseConnection() throws Exception{
- try{
-
- Class.forName(DBDRIVER);
- connection=DriverManager.getConnection(DBURL,DBUSER,DBPASS);
-
- }catch(Exception exception ){
- throw exception;
- } finally {
- }
- }
- public Connection getConnection(){
- return connection;
- }
- public void close() throws Exception{
- if(connection!=null){
- try {
- connection.close();
- } catch (Exception e) {
- throw e;
- }
- }
-
- }
-
- }
4、定义DAO接口
接口类,查询是否存在这个用户的方法是findLogin(User user)
-
-
-
-
-
- package com.mucfc.dao;
- import com.mucfc.vo.User;
- public interface IUserDAO {
-
-
-
-
-
-
- public boolean findLogin(User user) throws Exception;
-
- }
5、DAO的实现类,这里相当是Mode(模型层)
-
-
-
-
-
- package com.mucfc.dao;
- import java.sql.Connection;
- import java.sql.PreparedStatement;
- import java.sql.ResultSet;
- import com.mucfc.vo.User;
- public class UserDAOImpI implements IUserDAO{
- private Connection conn=null;
- private PreparedStatement pstmt=null;
- public UserDAOImpI(Connection conn){
- this.conn=conn;
- }
- @Override
- public boolean findLogin(User user) throws Exception {
- boolean flag=false;
- try {
- String sql="select name from user where name=? and password=?";
- pstmt=conn.prepareStatement(sql);
- pstmt.setString(1,user.getName());
- pstmt.setString(2, user.getPassword());
- ResultSet rSet=pstmt.executeQuery();
- if(rSet.next()){
- user.setName(rSet.getString(1));
- flag=true;
- }
-
- } catch (Exception e) {
- throw e;
- }finally{
-
- if(pstmt!=null){
- try {
- pstmt.close();
- } catch (Exception e) {
- throw e;
- }
- }
-
- }
- return flag;
- }
-
- }
对用户名和密码进行验证,如果验证成功,则通过VO将用户的真实姓名取出并返回。
6、定义一个DAO的代理类
这里这个代理类可以要也可以不要,这里为了方便些,所以定义了一个
-
-
-
-
-
- package com.mucfc.dao.proxy;
- import com.mucfc.dao.IUserDAO;
- import com.mucfc.dao.UserDAOImpI;
- import com.mucfc.dbc.DatabaseConnection;
- import com.mucfc.vo.User;
- public class UserDAOProxy implements IUserDAO{
- private DatabaseConnection dbc=null;
- private IUserDAO dao=null;
- public UserDAOProxy(){
- try {
- dbc=new DatabaseConnection();
- } catch (Exception e) {
- e.printStackTrace();
- }
- dao=new UserDAOImpI(dbc.getConnection());
-
- }
- @Override
- public boolean findLogin(User user) throws Exception {
- boolean flag=false;
- try {
- flag=dao.findLogin(user);
- } catch (Exception e) {
- throw e;
- }finally{
- dbc.close();
- }
- return flag;
- }
-
- }
7、新建一个Servlet类,取名为LoginServlet.java ,这里相当是Controller(控制层)代码如下:
- package com.mucfc.servlet;
- import java.io.IOException;
- import java.util.ArrayList;
- import java.util.List;
- import javax.servlet.ServletException;
- import javax.servlet.annotation.WebServlet;
- import javax.servlet.http.HttpServlet;
- import javax.servlet.http.HttpServletRequest;
- import javax.servlet.http.HttpServletResponse;
- import com.mucfc.dao.proxy.UserDAOProxy;
- import com.mucfc.vo.User;
-
-
-
- @WebServlet("/LoginServlet")
- public class LoginServlet extends HttpServlet {
- private static final long serialVersionUID = 1L;
-
-
-
- public LoginServlet() {
- super();
-
- }
-
-
-
-
- protected void doGet(HttpServletRequest request, HttpServletResponse response) throws ServletException, IOException {
- String name=request.getParameter("name");
- String password=request.getParameter("password");
- List<String> info=new ArrayList<String>();
- if(name==null||"".equals(name)){
- info.add("用户名不能为空");
- System.out.println("用户名不能为空");
- }
-
- if(password==null||"".equals(password)){
- info.add("密码不能为空");
- System.out.println("密码不能为空");
- }
- if(info.size()==0){
- User user=new User();
- user.setName(name);
- user.setPassword(password);
- UserDAOProxy userDAOProxy=new UserDAOProxy();
- try {
-
- if(userDAOProxy.findLogin(user)){
- info.add("用户登录成功,欢迎"+user.getName()+"光临!");
- }else {
- info.add("用户登录失败,错误的用户名和密码");
- }
- } catch (Exception e) {
- e.printStackTrace();
- }
- }
- request.setAttribute("info", info);
- request.getRequestDispatcher("Login.jsp").forward(request,response);
-
- }
-
-
-
-
- protected void doPost(HttpServletRequest request, HttpServletResponse response) throws ServletException, IOException {
- doGet(request, response);
- }
-
- }
它主要实现了得到Login.jsp传过来的name和password,然后调用dao类到数据库example中的user表中去进行name和password的验证。最后再将结果返回给login.jsp,接着login,jsp更新显示结果。
8、初始界面Login.jsp,这里相当是View(显示层)
- <%@page import="java.util.Iterator"%>
- <%@page import="java.util.List"%>
- <%@ page language="java" contentType="text/html; charset=GBK"
- pageEncoding="GBK"%>
- <!DOCTYPE html PUBLIC "-//W3C//DTD HTML 4.01 Transitional//EN" "http://www.w3.org/TR/html4/loose.dtd">
- <html>
- <head>
- <meta http-equiv="Content-Type" content="text/html; charset=GBK">
- <center><title>MVC登录实例</title></center>
- </head>
- <body>
- <center><h2>用户登录程序</h2></center>
- <center>
- <%
- request.setCharacterEncoding("GBK");
- %>
- <%
- List<String> info=(List<String>)request.getAttribute("info");
- if(info!=null){
- Iterator<String> iter=info.iterator();
- while(iter.hasNext()){
- %>
- <h4><%=iter.next()%></h4>
- <%
- }
- }
- %>
- </center>
- <center>
- <form action="LoginServlet" method="post" onSubmit="return validate(this)">
- 用户名:<input type="text" name="name"><br>
- 密 码:<input type="password" name="password"><br>
- <input type="submit" value="登录">
- <input type="reset" value="重置">
- </form>
- </center>
- </body>
- </html>
9、web.xml设置:
- <?xml version="1.0" encoding="UTF-8"?>
- <web-app xmlns:xsi="http://www.w3.org/2001/XMLSchema-instance" xmlns="http://java.sun.com/xml/ns/javaee" xsi:schemaLocation="http://java.sun.com/xml/ns/javaee http://java.sun.com/xml/ns/javaee/web-app_3_0.xsd" id="WebApp_ID" version="3.0">
-
- <welcome-file-list>
- <welcome-file>Login.html</welcome-file>
- <welcome-file>Login.htm</welcome-file>
- <welcome-file>Login.jsp</welcome-file>
-
- </welcome-file-list>
-
- <servlet>
- <servlet-name>LoginServlet</servlet-name>
- <servlet-class>com.mucfc.servlet.LoginServlet</servlet-class>
- </servlet>
- <servlet-mapping>
- <servlet-name>LoginServlet</servlet-name>
- <url-pattern>/servlet/LoginServlet</url-pattern>
- </servlet-mapping>
- </web-app>
10.导入必要的包,是一定要的!

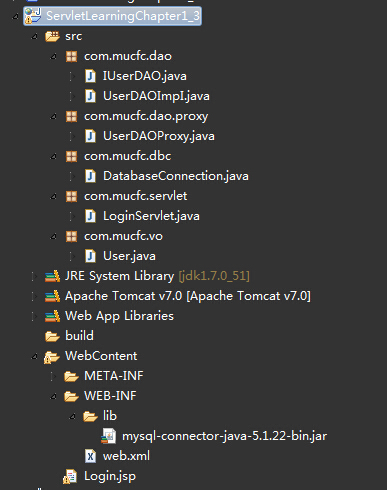
11.整个工程目录如下:
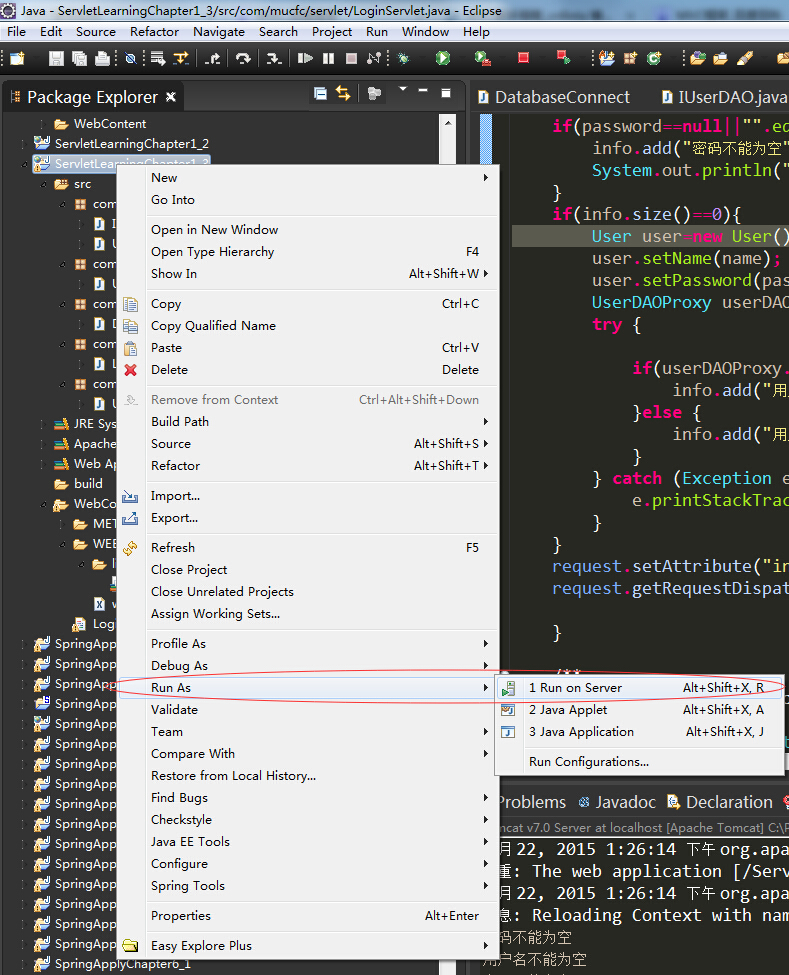
12、运行
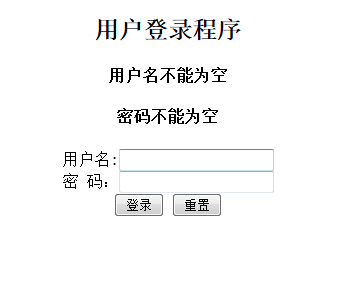
13、结果
浏览器输入:http://localhost:8080/ServletLearningChapter1_3/

好了,是不是很简单呢?
林炳文Evankaka原创作品。转载请注明出处http://blog.csdn.net/evankaka


 1126
1126

 被折叠的 条评论
为什么被折叠?
被折叠的 条评论
为什么被折叠?
 到【灌水乐园】发言


