一、问题
Python模块和C/C++的动态库间相互调用在实际的应用中会有所涉及,在此作一总结。
二、Python调用C/C++
1、Python调用C动态链接库
Python调用C库比较简单,不经过任何封装打包成so,再使用python的ctypes调用即可。
/***gcc -o libpycall.so -shared -fPIC pycall.c*/
#include <stdio.h>
#include <stdlib.h>
int foo(int a, int b) { printf("you input %d and %d\n", a, b); return a+b; }
(2)gcc编译生成动态库libpycall.so:gcc -o libpycall.so -shared -fPIC pycall.c。使用g++编译生成C动态库的代码中的函数或者方法时,需要使用extern "C"来进行编译。
(3)Python调用动态库的文件:pycall.py
import ctypes
ll = ctypes.cdll.LoadLibrary
lib = ll("./libpycall.so") lib.foo(1, 3) print '***finish***'
(4)运行结果:
2、Python调用C++(类)动态链接库
需要extern "C"来辅助,也就是说还是只能调用C函数,不能直接调用方法,但是能解析C++方法。不是用extern “C”,构建后的动态链接库没有这些函数的符号表。
class TestLib
void TestLib::display(int a) {
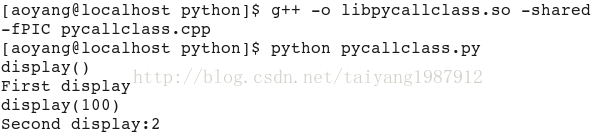
(2)g++编译生成动态库libpycall.so:g++ -o libpycallclass.so -shared -fPIC pycallclass.cpp。
(3)Python调用动态库的文件:pycallclass.py
3、Python调用C/C++可执行程序
(1)C/C++程序:main.cpp
(3)Python调用程序:main.py
import commands
import os
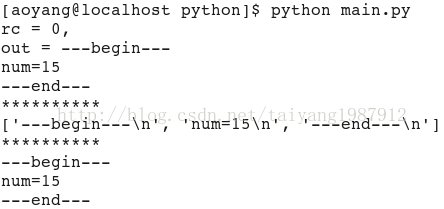
main = "./testmain" if os.path.exists(main): rc, out = commands.getstatusoutput(main) print 'rc = %d, \nout = %s' % (rc, out)
print ‘*’*10
print ‘*’*10
(4)运行结果:
4、扩展Python(C++为Python编写扩展模块) 所有能被整合或导入到其它python脚本的代码,都可以被称为扩展。可以用Python来写扩展,也可以用C和C++之类的编译型的语言来写扩展。Python在设计之初就考虑到要让模块的导入机制足够抽象。抽象到让使用模块的代码无法了解到模块的具体实现细节。Python的可扩展性具有的优点:方便为语言增加新功能、具有可定制性、代码可以实现复用等。
为 Python 创建扩展需要三个主要的步骤:创建应用程序代码、利用样板来包装代码和编译与测试。
(1)创建应用程序代码
#include <stdio.h>
#include <stdlib.h>
#include <string.h>
int fac(int n) 0! == 1! == 1 /fac(n-1); / n! == n*(n-1)! */
char reverse(char s) tmp /p = s, / fwd /q = (s + (strlen(s) - 1)); / bwd /
<span style="color: #0000ff;">while (p < q) <span style="color: #008000;">/*<span style="color: #008000;"> if p < q <span style="color: #008000;">*/<span style="color: #000000;">
{
t = *p; <span style="color: #008000;">/*<span style="color: #008000;"> swap & move ptrs <span style="color: #008000;">*/
*p++ = *<span style="color: #000000;">q;
*q-- =<span style="color: #000000;"> t;
}
<span style="color: #0000ff;">return<span style="color: #000000;">(s);
}
int main()
上述代码中有两个函数,一个是递归求阶乘的函数fac();另一个reverse()函数实现了一个简单的字符串反转算法,其主要目的是修改传入的字符串,使其内容完全反转,但不需要申请内存后反着复制的方法。
(2)用样板来包装代码
接口的代码被称为“样板”代码,它是应用程序代码与Python解释器之间进行交互所必不可少的一部分。样板主要分为4步:a、包含Python的头文件;b、为每个模块的每一个函数增加一个型如PyObject* Module_func()的包装函数;c、为每个模块增加一个型如PyMethodDef ModuleMethods[]的数组;d、增加模块初始化函数void initModule()。
int fac(int n)
char *reverse(char *s)
<span style="color: #0000ff;">while (s && (p <<span style="color: #000000;"> q))
{
t = *<span style="color: #000000;">p;
*p++ = *<span style="color: #000000;">q;
*q-- =<span style="color: #000000;"> t;
}
<span style="color: #0000ff;">return<span style="color: #000000;">(s);
}
int test()
#include “Python.h”
static PyObject *args) )Py_BuildValue(“i”, fac(num));
static PyObject *dupe_str; retval;
<span style="color: #0000ff;">if (!PyArg_ParseTuple(args, <span style="color: #800000;">"<span style="color: #800000;">s<span style="color: #800000;">", &<span style="color: #000000;">orig_str))
<span style="color: #0000ff;">return<span style="color: #000000;"> NULL;
retval = (PyObject*)Py_BuildValue(<span style="color: #800000;">"<span style="color: #800000;">ss<span style="color: #800000;">"<span style="color: #000000;">, orig_str,
dupe_str=<span style="color: #000000;">reverse(strdup(orig_str)));
<span style="color: #0000ff;">free<span style="color: #000000;">(dupe_str); #防止内存泄漏
<span style="color: #0000ff;">return<span style="color: #000000;"> retval;
}
static PyObject *args) )Py_BuildValue("");
static PyMethodDef
void initExtest()
Python.h头文件在大多数类Unix系统中会在/usr/local/include/python2.x或/usr/include/python2.x目录中,系统一般都会知道文件安装的路径。
增加包装函数,所在模块名为Extest,那么创建一个包装函数叫Extest_fac(),在Python脚本中使用是先import Extest,然后调用Extest.fac(),当Extest.fac()被调用时,包装函数Extest_fac()会被调用,包装函数接受一个 Python的整数参数,把它转为C的整数,然后调用C的fac()函数,得到一个整型的返回值,最后把这个返回值转为Python的整型数做为整个函数调用的结果返回回去。其他两个包装函数Extest_doppel()和Extest_test()类似。
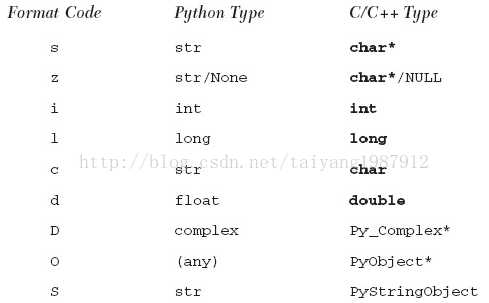
从Python到C的转换用PyArg_Parse*系列函数,int PyArg_ParseTuple():把Python传过来的参数转为C;int PyArg_ParseTupleAndKeywords()与PyArg_ParseTuple()作用相同,但是同时解析关键字参数;它们的用法跟C的sscanf函数很像,都接受一个字符串流,并根据一个指定的格式字符串进行解析,把结果放入到相应的指针所指的变量中去,它们的返回值为1表示解析成功,返回值为0表示失败。从C到Python的转换函数是PyObject*
Py_BuildValue():把C的数据转为Python的一个对象或一组对象,然后返回之;Py_BuildValue的用法跟sprintf很像,把所有的参数按格式字符串所指定的格式转换成一个Python的对象。
若需要使用PyArg_ParseTupleAndKeywords()函数来分析命名参数的话,还需要让这个标志常量与METH_KEYWORDS常量进行逻辑与运算常量
from distutils.core import setup, Extension
MOD = ‘Extest’
Extension()第一个参数是(完整的)扩展的名字,如果模块是包的一部分的话,还要加上用'.'分隔的完整的包的名字。上述的扩展是独立的,所以名字只要写"Extest"就行;sources参数是所有源代码的文件列表,只有一个文件Extest2.c。setup需要两个参数:一个名字参数表示要编译哪个内容;另一个列表参数列出要编译的对象,上述要编译的是一个扩展,故把ext_modules参数的值设为扩展模块的列表。
运行setup.py build命令就可以开始编译我们的扩展了,提示部分信息:
你的扩展会被创建在运行setup.py脚本所在目录下的build/lib.*目录中,可以切换到那个目录中来测试模块,或者也可以用命令把它安装到Python中:python setup.py install,会提示相应信息。
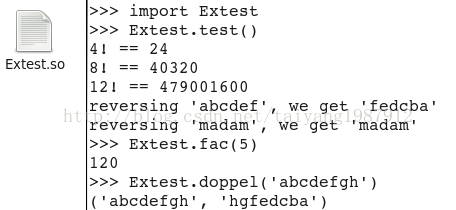
测试模块:
(5)引用计数和线程安全
Python对象引用计数的宏:Py_INCREF(obj)增加对象obj的引用计数,Py_DECREF(obj)减少对象obj的引用计数。Py_INCREF()和Py_DECREF()两个函数也有一个先检查对象是否为空的版本,分别为Py_XINCREF()和Py_XDECREF()。
编译扩展的程序员必须要注意,代码有可能会被运行在一个多线程的Python环境中。这些线程使用了两个C宏Py_BEGIN_ALLOW_THREADS和Py_END_ALLOW_THREADS,通过将代码和线程隔离,保证了运行和非运行时的安全性,由这些宏包裹的代码将会允许其他线程的运行。
三、C/C++调用Python
C++可以调用Python脚本,那么就可以写一些Python的脚本接口供C++调用了,至少可以把Python当成文本形式的动态链接库,
#test function
def add(a,b):
    print "in python function add" print "a = " + str(a) print "b = " + str(b) print "ret = " + str(a+b) return
def foo(a):
<span style="color: #0000ff;">print <span style="color: #800000;">"<span style="color: #800000;">in python function foo<span style="color: #800000;">"
<span style="color: #0000ff;">print <span style="color: #800000;">"<span style="color: #800000;">a = <span style="color: #800000;">" +<span style="color: #000000;"> str(a)
<span style="color: #0000ff;">print <span style="color: #800000;">"<span style="color: #800000;">ret = <span style="color: #800000;">" + str(a *<span style="color: #000000;"> a)
<span style="color: #0000ff;">return
class guestlist:init (self):getitem (self, id):
#update()
(2)C++代码:
/**g++ -o callpy callpy.cpp -I/usr/include/python2.6 -L/usr/lib64/python2.6/config -lpython2.6**/
#include <Python.h>
int main(int argc, char** argv) { // 初始化Python //在使用Python系统前,必须使用Py_Initialize对其 //进行初始化。它会载入Python的内建模块并添加系统路 //径到模块搜索路径中。这个函数没有返回值,检查系统 //是否初始化成功需要使用Py_IsInitialized。  Py_Initialize(); <span style="color: #008000;">//<span style="color: #008000;"> 检查初始化是否成功
<span style="color: #0000ff;">if ( !<span style="color: #000000;">Py_IsInitialized() ) {
    <span style="color: #0000ff;">return -<span style="color: #800080;">1<span style="color: #000000;">;
}
<span style="color: #008000;">//<span style="color: #008000;"> 添加当前路径
<span style="color: #008000;">//<span style="color: #008000;">把输入的字符串作为Python代码直接运行,返回0
<span style="color: #008000;">//<span style="color: #008000;">表示成功,-1表示有错。大多时候错误都是因为字符串
<span style="color: #008000;">//<span style="color: #008000;">中有语法错误。
PyRun_SimpleString(<span style="color: #800000;">"<span style="color: #800000;">import sys<span style="color: #800000;">"<span style="color: #000000;">);
PyRun_SimpleString(<span style="color: #800000;">"<span style="color: #800000;">print '---import sys---'<span style="color: #800000;">"<span style="color: #000000;">);
PyRun_SimpleString(<span style="color: #800000;">"<span style="color: #800000;">sys.path.append('./')<span style="color: #800000;">"<span style="color: #000000;">);
PyObject *pName,*pModule,*pDict,*pFunc,*<span style="color: #000000;">pArgs;

<span style="color: #008000;">//<span style="color: #008000;"> 载入名为pytest的脚本
pName = PyString_FromString(<span style="color: #800000;">"<span style="color: #800000;">pytest<span style="color: #800000;">"<span style="color: #000000;">);
pModule =<span style="color: #000000;"> PyImport_Import(pName);
<span style="color: #0000ff;">if ( !<span style="color: #000000;">pModule ) {
    printf(<span style="color: #800000;">"<span style="color: #800000;">can't find pytest.py<span style="color: #800000;">"<span style="color: #000000;">);
    getchar();
    <span style="color: #0000ff;">return -<span style="color: #800080;">1<span style="color: #000000;">;
}
pDict =<span style="color: #000000;"> PyModule_GetDict(pModule);
<span style="color: #0000ff;">if ( !<span style="color: #000000;">pDict ) {
    <span style="color: #0000ff;">return -<span style="color: #800080;">1<span style="color: #000000;">;
}

<span style="color: #008000;">//<span style="color: #008000;"> 找出函数名为add的函数
printf(<span style="color: #800000;">"<span style="color: #800000;">----------------------\n<span style="color: #800000;">"<span style="color: #000000;">);
pFunc = PyDict_GetItemString(pDict, <span style="color: #800000;">"<span style="color: #800000;">add<span style="color: #800000;">"<span style="color: #000000;">);
<span style="color: #0000ff;">if ( !pFunc || !<span style="color: #000000;">PyCallable_Check(pFunc) ) {
    printf(<span style="color: #800000;">"<span style="color: #800000;">can't find function [add]<span style="color: #800000;">"<span style="color: #000000;">);
    getchar();
    <span style="color: #0000ff;">return -<span style="color: #800080;">1<span style="color: #000000;">;
 }

<span style="color: #008000;">//<span style="color: #008000;"> 参数进栈
*<span style="color: #000000;">pArgs;
pArgs = PyTuple_New(<span style="color: #800080;">2<span style="color: #000000;">);

<span style="color: #008000;">//<span style="color: #008000;">  PyObject* Py_BuildValue(char *format, ...)
<span style="color: #008000;">//<span style="color: #008000;">  把C++的变量转换成一个Python对象。当需要从
<span style="color: #008000;">//<span style="color: #008000;">  C++传递变量到Python时,就会使用这个函数。此函数
<span style="color: #008000;">//<span style="color: #008000;">  有点类似C的printf,但格式不同。常用的格式有
<span style="color: #008000;">//<span style="color: #008000;">  s 表示字符串,
<span style="color: #008000;">//<span style="color: #008000;">  i 表示整型变量,
<span style="color: #008000;">//<span style="color: #008000;">  f 表示浮点数,
<span style="color: #008000;">//<span style="color: #008000;">  O 表示一个Python对象。
PyTuple_SetItem(pArgs, 0, Py_BuildValue("l",3)); PyTuple_SetItem(pArgs, 1, Py_BuildValue("l",4));
<span style="color: #008000;">//<span style="color: #008000;"> 调用Python函数
PyObject_CallObject(pFunc, pArgs);
<span style="color: #008000;">//<span style="color: #008000;">下面这段是查找函数foo 并执行foo
printf(<span style="color: #800000;">"<span style="color: #800000;">----------------------\n<span style="color: #800000;">"<span style="color: #000000;">);
pFunc = PyDict_GetItemString(pDict, <span style="color: #800000;">"<span style="color: #800000;">foo<span style="color: #800000;">"<span style="color: #000000;">);
<span style="color: #0000ff;">if ( !pFunc || !<span style="color: #000000;">PyCallable_Check(pFunc) ) {
    printf(<span style="color: #800000;">"<span style="color: #800000;">can't find function [foo]<span style="color: #800000;">"<span style="color: #000000;">);
    getchar();
    <span style="color: #0000ff;">return -<span style="color: #800080;">1<span style="color: #000000;">;
 }

pArgs = PyTuple_New(<span style="color: #800080;">1<span style="color: #000000;">);
PyTuple_SetItem(pArgs, <span style="color: #800080;">0, Py_BuildValue(<span style="color: #800000;">"<span style="color: #800000;">l<span style="color: #800000;">",<span style="color: #800080;">2<span style="color: #000000;">));

PyObject_CallObject(pFunc, pArgs);

printf(<span style="color: #800000;">"<span style="color: #800000;">----------------------\n<span style="color: #800000;">"<span style="color: #000000;">);
pFunc = PyDict_GetItemString(pDict, <span style="color: #800000;">"<span style="color: #800000;">update<span style="color: #800000;">"<span style="color: #000000;">);
<span style="color: #0000ff;">if ( !pFunc || !<span style="color: #000000;">PyCallable_Check(pFunc) ) {
    printf(<span style="color: #800000;">"<span style="color: #800000;">can't find function [update]<span style="color: #800000;">"<span style="color: #000000;">);
    getchar();
    <span style="color: #0000ff;">return -<span style="color: #800080;">1<span style="color: #000000;">;
 }
pArgs = PyTuple_New(<span style="color: #800080;">0<span style="color: #000000;">);
PyTuple_SetItem(pArgs, <span style="color: #800080;">0, Py_BuildValue(<span style="color: #800000;">""<span style="color: #000000;">));
PyObject_CallObject(pFunc, pArgs);

Py_DECREF(pName);
Py_DECREF(pArgs);
Py_DECREF(pModule);

<span style="color: #008000;">//<span style="color: #008000;"> 关闭Python
Py_Finalize();
(3)C++编译成二进制可执行文件:g++ -o callpy callpy.cpp -I/usr/include/python2.6 -L/usr/lib64/python2.6/config -lpython2.6,编译选项需要手动指定Python的include路径和链接接路径(Python版本号根据具体情况而定)。
(4)运行结果:
四、总结
(1)Python和C/C++的相互调用仅是测试代码,具体的项目开发还得参考Python的API文档。


 1万+
1万+


 被折叠的 条评论
为什么被折叠?
被折叠的 条评论
为什么被折叠?
 到【灌水乐园】发言


