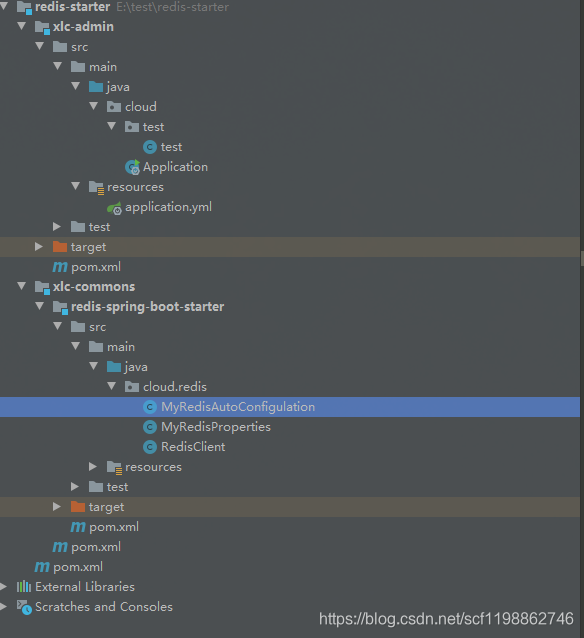
自定义springboot的starter,自动化配置
工程架构

starter为通用的组件
建立一个module 工程 xlc-commns
里面进行自定义starter,这里我就写一个redis-starter 作为例子
package cloud.redis;

import org.springframework.boot.context.properties.ConfigurationProperties;
import org.springframework.boot.context.properties.EnableConfigurationProperties;
import org.springframework.stereotype.Component;

/**
 * @author cunfeng
 * @create 2021-05-06 10:23
 */

@ConfigurationProperties(prefix = "myredis") //自定义yml格式 随便起名
public class MyRedisProperties {
    /**
     * ip地址
     */
    private String host;
    /**
     * 端口号
     */
    private  int  port;

    /**
     * 密码
     */
    private String password;
    /**
     * 接池中总连接的最大数量
     */
    private int   maxActive;
    /**
     *  连接池中空闲连接的最大数量
     */
    private int   maxIdle;
    /**
     * 最大建立连接等待时间
     */
    private  int  maxWait;
    /**
     * 超时时间
     */
    private  int timeout;
    /**
     *    第几个数据库
     */
    private int database;

    public String getPassword() {
        return password;
    }
    public void setPassword(String password) {
        this.password = password;
    }

    public String getHost() {
        return host;
    }
    public void setHost(String host) {
        this.host = host;
    }
    public int getPort() {
        return port;
    }
    public void setPort(int port) {
        this.port = port;
    }
    public int getMaxActive() {
        return maxActive;
    }
    public void setMaxActive(int maxActive) {
        this.maxActive = maxActive;
    }
    public int getMaxIdle() {
        return maxIdle;
    }
    public void setMaxIdle(int maxIdle) {
        this.maxIdle = maxIdle;
    }
    public int getMaxWait() {
        return maxWait;
    }
    public void setMaxWait(int maxWait) {
        this.maxWait = maxWait;
    }

    public int getTimeout() {
        return timeout;
    }

    public void setTimeout(int timeout) {
        this.timeout = timeout;
    }

    public int getDatabase() {
        return database;
    }

    public void setDatabase(int database) {
        this.database = database;
    }
}
package cloud.redis;
import org.apache.commons.lang.StringUtils;
import org.slf4j.Logger;
import org.slf4j.LoggerFactory;
import org.springframework.beans.factory.annotation.Autowired;
import org.springframework.beans.factory.annotation.Qualifier;
import org.springframework.boot.autoconfigure.condition.ConditionalOnClass;
import org.springframework.boot.autoconfigure.condition.ConditionalOnMissingBean;
import org.springframework.boot.context.properties.EnableConfigurationProperties;
import org.springframework.context.annotation.Bean;
import org.springframework.context.annotation.Configuration;

import redis.clients.jedis.JedisPool;
import redis.clients.jedis.JedisPoolConfig;


/**
 * 利用jedis 进行连接redis
 * @author cunfeng
 * @create 2021-05-06 10:33
 */
@Configuration
@EnableConfigurationProperties(MyRedisProperties.class)//开启属性注入,通过@autowired注入
@ConditionalOnClass(RedisClient.class)//判断这个类是否在classpath中存在
public class MyRedisAutoConfigulation {

    private Logger logger = LoggerFactory.getLogger(this.getClass());
    @Autowired
    private MyRedisProperties prop;

    @Bean(name="jedisPool")
    public JedisPool jedisPool() {
        JedisPoolConfig config = new JedisPoolConfig();
        //连接池中空闲连接的最大数量
        config.setMaxIdle(prop.getMaxIdle());
        // 接池中总连接的最大数量
        config.setMaxTotal(prop.getMaxActive());
        //最大建立连接等待时间
        config.setMaxWaitMillis(prop.getMaxWait());
        //第几个数据库
        int database = prop.getDatabase();
        //密码
        String password = prop.getPassword();
        int timeout = prop.getTimeout();
        if(StringUtils.isNotBlank(password)){
            logger.info("初始化redis连接池完毕--------------");
            return new JedisPool(config, prop.getHost(), prop.getPort(),timeout,password,database);
        }else {
            logger.info("初始化redis连接池完毕--------------");
            return new JedisPool(config, prop.getHost(), prop.getPort(),timeout,null,database);
        }

    }

    @Bean
    @ConditionalOnMissingBean(RedisClient.class)//容器中如果没有RedisClient这个类,那么自动配置这个RedisClient
    public RedisClient redisClient(@Qualifier("jedisPool")JedisPool pool) {
        RedisClient redisClient = new RedisClient();
        redisClient.setJedisPool(pool);
        return redisClient;
    }

}
package cloud.redis;

import org.slf4j.Logger;
import org.slf4j.LoggerFactory;
import org.springframework.beans.factory.annotation.Autowired;
import redis.clients.jedis.Client;
import redis.clients.jedis.Jedis;
import redis.clients.jedis.JedisPool;

import java.util.HashMap;
import java.util.Map;
import java.util.Objects;
import java.util.Set;
import java.util.function.Function;

/**
 * 常用的redis方法
 * @author cunfeng
 * @create 2021-05-06 10:53
 */
public class RedisClient {

    private Logger log = LoggerFactory.getLogger(this.getClass());


    @Autowired
    private JedisPool jedisPool;


    /**
     * 处理jedis请求
     * @param f 处理逻辑,通过lambda行为参数化
     * @return 处理结果
     */
    private Object excuteByJedis(Function<Jedis, Object> f) {
        Jedis jedis = null;
        try{
            jedis= jedisPool.getResource();
            return f.apply(jedis);
        } catch (Exception e) {
            e.printStackTrace();
            if(jedis != null ) {
                jedisPool.close();
            }
            log.error("redis资源池发生错误:"+e.getMessage());
            return null;
        }finally {
            if (jedis != null){
                jedis.close();
            }
        }
    }

    public Map<String, Object> getKeysSize() {
        long dbSize = (long) this.excuteByJedis(
                j -> {
                    Client client = j.getClient();
                    client.dbSize();
                    return client.getIntegerReply();
                }
        );
        Map<String, Object> map = new HashMap<>();
        map.put("create_time", System.currentTimeMillis());
        map.put("dbSize", dbSize);
        return map;
    }

    public Map<String, Object> getMemoryInfo() {
        String info = (String) this.excuteByJedis(
                j -> {
                    Client client = j.getClient();
                    client.info();
                    return client.getBulkReply();
                }
        );
        String[] strs = Objects.requireNonNull(info).split("\n");
        Map<String, Object> map = null;
        for (String s : strs) {
            String[] detail = s.split(":");
            if ("used_memory".equals(detail[0])) {
                map = new HashMap<>();
                map.put("used_memory", detail[1].substring(0, detail[1].length() - 1));
                map.put("create_time", System.currentTimeMillis());
                break;
            }
        }
        return map;
    }


    public Set<String> getKeys(String pattern) {
        return (Set<String>) this.excuteByJedis(j -> j.keys(pattern));
    }


    public String get(String key) {
        return (String) this.excuteByJedis(j -> j.get(key));
    }


    public String set(String key, String value) {
        return (String) this.excuteByJedis(j -> j.set(key, value));
    }


    public Long del(String... key) {
        return (Long) this.excuteByJedis(j -> j.del(key));
    }


    public Boolean exists(String key) {
        return (Boolean) this.excuteByJedis(j -> j.exists(key));
    }


    public Long pttl(String key) {
        return (Long) this.excuteByJedis(j -> j.pttl(key));
    }


    public Long pexpire(String key, Long milliseconds) {
        return (Long) this.excuteByJedis(j -> j.pexpire(key, milliseconds));
    }

    public String haSet(String key, Map<String, String> map) {
        return (String) this.excuteByJedis(j -> j.hmset(key, map));
    }

    public Map<String,String> hmGetAll(String key) {
        return  (Map<String, String>) this.excuteByJedis(j -> j.hgetAll(key));
    }

    public JedisPool getJedisPool() {
        return jedisPool;
    }

    public void setJedisPool(JedisPool jedisPool) {
        this.jedisPool = jedisPool;
    }

}
最关键的配置

org.springframework.boot.autoconfigure.EnableAutoConfiguration=\
cloud.redis.MyRedisAutoConfigulation
web工程继承redis-starter
pom文件
<?xml version="1.0" encoding="UTF-8"?>
<project xmlns="http://maven.apache.org/POM/4.0.0"
         xmlns:xsi="http://www.w3.org/2001/XMLSchema-instance"
         xsi:schemaLocation="http://maven.apache.org/POM/4.0.0 http://maven.apache.org/xsd/maven-4.0.0.xsd">
    <parent>
        <artifactId>redis-starter</artifactId>
        <groupId>org.xlc</groupId>
        <version>1.0</version>
    </parent>
    <modelVersion>4.0.0</modelVersion>

    <artifactId>xlc-admin</artifactId>
    <dependencies>
        <!-- https://mvnrepository.com/artifact/org.springframework.boot/spring-boot-starter-web -->
        <dependency>
            <groupId>org.springframework.boot</groupId>
            <artifactId>spring-boot-starter-web</artifactId>
            <version>2.2.1.RELEASE</version>
        </dependency>

        <!--自定义yml提示-->
        <dependency>
            <groupId>org.springframework.boot</groupId>
            <artifactId>spring-boot-configuration-processor</artifactId>
            <version>2.2.6.RELEASE</version>
            <optional>true</optional>
        </dependency>
        <dependency>
            <groupId>org.xlc</groupId>
            <artifactId>redis-spring-boot-starter</artifactId>
            <version>${project.version}</version>
        </dependency>
    </dependencies>
    <build>
        <plugins>
            <plugin>
                <groupId>org.springframework.boot</groupId>
                <artifactId>spring-boot-maven-plugin</artifactId>
                <executions>
                    <execution>
                        <goals>
                            <goal>repackage</goal>
                        </goals>
                    </execution>
                </executions>
            </plugin>
        </plugins>
        <finalName>wangxiao</finalName>
    </build>

</project>
测试demo
package cloud.test;
import cloud.redis.RedisClient;
import org.springframework.beans.factory.annotation.Autowired;
import org.springframework.boot.SpringApplication;
import org.springframework.web.bind.annotation.GetMapping;
import org.springframework.web.bind.annotation.PathVariable;
import org.springframework.web.bind.annotation.RequestMapping;
import org.springframework.web.bind.annotation.RestController;

import java.util.HashMap;

/**
 * @MethodName: 测试类
 * @Author: cunfeng
 * @Date: 2021年05月05日 16:56
 **/
@RestController

public class test {

    @Autowired
    private RedisClient redisClient;


    @RequestMapping("/set")
    public String set(String key, String value) {
        redisClient.set(key, value);
        return "success";
    }

    @RequestMapping("/get")
    public String get(String key){
        return redisClient.get(key);
    }

}
server:
  port: 2222
  servlet:
    context-path: /
myredis:                  #自定义yml
  host: 192.168.2.204
  port: 6379
  password:
  min-idle: 8         #空闲 最小链接数
  max-idle: 500       #空闲 最大链接数
  max-active: 2000    #最大链接数
  max-wait: 10000     #最大建立连接等待时间
  timeout: 30000      #超时时间
  database: 1          #第几个数据库
gitee 项目地址
https://gitee.com/YuXuanPer/redis-starter
测试案列不易,多多支持


 1001
1001


 被折叠的 条评论
为什么被折叠?


