POI操作Word
操作依赖包org.apache.poi,包括poi和poi-ooxml。
创建空白Word文件
    void poiCreateNewWord() {
        String path = "C:\\Users\\wisdom21111\\Desktop\\";
        XWPFDocument document = new XWPFDocument();
        try {
            FileOutputStream out = new FileOutputStream(path + "newFile.docx");
            document.write(out);
            out.close();
        } catch (FileNotFoundException e) {
            e.printStackTrace();
        } catch (IOException e) {
            e.printStackTrace();
        }
    }
复制Word文件
    void poiCopyFile() throws IOException {
        XWPFDocument xwpfDocument1 = new XWPFDocument(new FileInputStream("C:\\Users\\wisdom21111\\Desktop\\oldFile.docx"));
        XWPFDocument xwpfDocument2 = xwpfDocument1;
        FileOutputStream out = new FileOutputStream("C:\\Users\\wisdom21111\\Desktop\\newFile.docx");
        xwpfDocument2.write(out);
        out.close();
    }
合并Word文档
    @Test
    void poiMergeMultiFile(File[] files,String outfile) throws IOException, XmlException {
        XWPFDocument xwpfDocument = new XWPFDocument(new FileInputStream(files[0]));
        CTBody ctBody = xwpfDocument.getDocument().getBody();
        String srcstr = ctBody.xmlText(); //<xml-fragment ...>...</xml-frament> 整体信息
        String prefix = srcstr.substring(0,srcstr.indexOf(">")+1); //<xml-frament ...> 头
        String suffix = srcstr.substring(srcstr.lastIndexOf("<")); //</xml-frament> 尾
        String mainbody = srcstr.substring(srcstr.indexOf(">")+1,srcstr.lastIndexOf("<")); //...主体内容
        List<String> list = new ArrayList<>();
        //使用循环遍历获得后续文件内容
        for(int i=1;i<files.length;i++){
            XWPFDocument xwpfDocument1 = new XWPFDocument(new FileInputStream(files[i]));
            CTBody ctBody1 = xwpfDocument1.getDocument().getBody();
            String appendContent = ctBody1.xmlText().substring(srcstr.indexOf(">")+1,srcstr.lastIndexOf("<")); //后续文件的主体内容
            list.add(appendContent);
        }
        StringBuilder sb = new StringBuilder();
        sb.append(prefix); //xml头
        sb.append(mainbody); //第一个文件主体内容
        for(String str:list){
            sb.append("    <w:p>\n" +
                    "        <w:pPr>\n" +
                    "            <w:pageBreakBefore w:val=\"true\"/>\n" +
                    "        </w:pPr>\n" +
                    "    </w:p>"); // 分页符
            sb.append(str); //后续文件主体
        }
        sb.append(suffix); //xml文件尾
        CTBody ctResult = CTBody.Factory.parse(sb.toString());
        ctBody.set(ctResult); //重新设置第一个文件内容

        FileOutputStream outputStream = new FileOutputStream(outfile);
        xwpfDocument.write(outputStream);
        outputStream.flush();
        xwpfDocument.close();
        outputStream.close();
    }

    @Test
    void poiMergeMultiFileTest() throws IOException, XmlException {
        File one = new File("C:\\Users\\wisdom21111\\Desktop\\File.docx");
        File two = new File("C:\\Users\\wisdom21111\\Desktop\\File.docx");
        File three = new File("C:\\Users\\wisdom21111\\Desktop\\File.docx");
        String out = "C:\\Users\\wisdom21111\\Desktop\\new.docx";
        File[] files = new File[]{one,two,three};
        poiMergeMultiFile(files,out);
    }
合并Word文档简洁方法,使用POI-TL
    //依赖包 com.deepoove.poi
    void nicePoiMergeFile() throws Exception {
    NiceXWPFDocument niceXWPFDocument1 = new NiceXWPFDocument(ne FileInputStream("C:\\Users\\wisdom21111\\Desktop\\output.docx"));
    NiceXWPFDocument niceXWPFDocument2 = new NiceXWPFDocument(ne FileInputStream("C:\\Users\\wisdom21111\\Desktop\\output.docx"));
    niceXWPFDocument1.createParagraph().setPageBreak(true);
    NiceXWPFDocument newDoc = niceXWPFDocument1.merge(niceXWPFDocument2);
    FileOutputStream out = new FileOutputStream("C:\\Users\\wisdom21111\\Desktop\\new_doc.docx");
    newDoc.write(out);
    newDoc.close();
    out.close();
    }
使用POI-TL根据模板生成Word文件
    HashMap<String,Object> hashMap = new HashMap<>();
    hashMap.put("str","我是字符串");
    XWPFTemplate template = XWPFTemplate.compile("C:\\Users\\wisdom21111\\Desktop\\template.docx").render(hashMap);
    template.writeAndClose(new FileOutputStream("C:\\Users\\wisdom21111\\Desktop\\output.docx"));
文本标签 {{str}}
图片标签 {{@image}}
表格标签 {{#table}}
    hashMap.put("str","Hello,World");
    hasnMap.put("image","C:\\Users\\wisdom21111\\Desktop\\xxx.jpeg");
    //创建表格第一种方式
    hashMap.put("table",Tables.of(new String[][]{
        new String[][]{"00","01"},
        new String[][]{"10","11"}
    }).border(BorderStyle.DEFAULT).create());
    //创建表格第二种方式
    RowRenderData row0 = Rows.of("姓名","性别").textColor("FFFFFF").bgColor("4472C4").center().create();
    RowRenderData row1 = Rows.create("张三","男");
    hashMap.put("table",Tables.create(row0,row1));
引用标签
    替换图片,编辑替换文字-替换文字 {{img}}
put("img",Pictures.ofLocal("C:\\Users\\wisdom21111\\Desktop\\newPic.jpg").create());
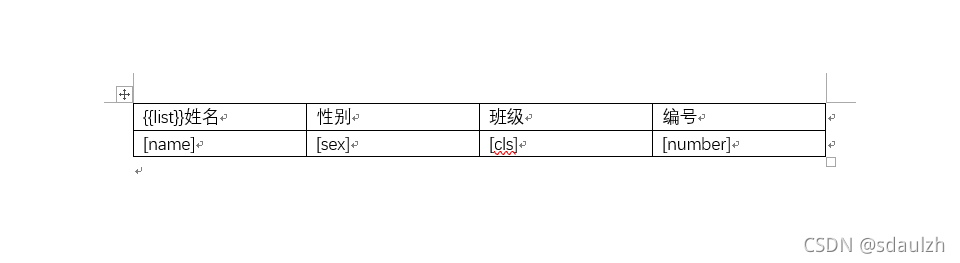
POI-TL表格行循环
    void poitlRowTest() throws IOException {
        Student student1 = new Student("张三","男","一班","001");
        Student student2 = new Student("李四","男","一班","002");
        Student student3 = new Student("王五","男","一班","003");
        List<Student> list = asList(student1,student2,student3);
        LoopRowTableRenderPolicy policy = new LoopRowTableRenderPolicy();
        Configure config = Configure.builder().bind("list",policy).build();

        HashMap<String,Object> hashMap = new HashMap<>();
        hashMap.put("list",list);
        XWPFTemplate template = XWPFTemplate.compile("C:\\Users\\wisdom21111\\Desktop\\template.docx",config).render(hashMap);
        template.writeAndClose(new FileOutputStream("C:\\Users\\wisdom21111\\Desktop\\hello.docx"));
    }
模板template.docx
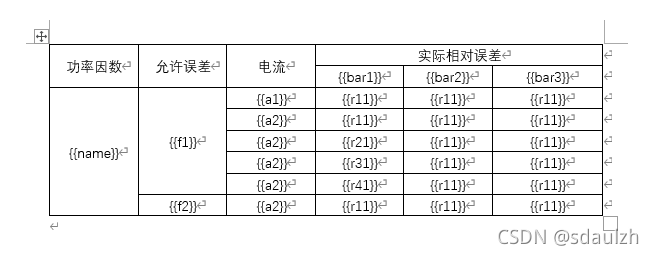
POI-TL创建表格
void poitlCreateTable() throws IOException {
    //表格行,注意每行的单元格数量相同
    RowRenderData row0 =Rows.of("功率因数","允许误差","电流","实际相对误差",null,null).center().crate();
    RowRenderData row1 =Rows.of(null,null,null,"{{bar1}}","{{bar2}}","{{bar3}}").center().create();
    RowRenderData row2 =Rows.of("{{name}}","{{f1}}","{{a1}}","{{r11}}","{{r12}}","{{r13}}").center.create();
    RowRenderData row3 =Rows.of(null,null,"{{a2}}","{{r21}}","{{r22}}","{{r23}}").center().create(;
    RowRenderData row4 =Rows.of(null,null,"{{a3}}","{{r31}}","{{r32}}","{{r33}}").center().create(;
    RowRenderData row5 =Rows.of(null,null,"{{a4}}","{{r41}}","{{r42}}","{{r43}}").center().create(;
    RowRenderData row6 =Rows.of(null,null,"{{a5}}","{{r51}}","{{r52}}","{{r53}}").center().create(;
    RowRenderData row7 =Rows.of(null,"{{f2}}","{{a6}}","{{r61}}","{{r62}}","{{r63}}").center().crete();
    //单元格合并规格
    Map<MergeCellRule.Grid, MergeCellRule.Grid> map = new HashMap<>();
    map.put(MergeCellRule.Grid.of(0,0), MergeCellRule.Grid.of(1,0));
    map.put(MergeCellRule.Grid.of(0,3), MergeCellRule.Grid.of(0,5));
    map.put(MergeCellRule.Grid.of(0,1), MergeCellRule.Grid.of(1,1));
    map.put(MergeCellRule.Grid.of(0,2), MergeCellRule.Grid.of(1,2));
    map.put(MergeCellRule.Grid.of(2,0), MergeCellRule.Grid.of(7,0));
    map.put(MergeCellRule.Grid.of(2,1), MergeCellRule.Grid.of(6,1));
    MergeCellRule.MergeCellRuleBuilder mergeCellRuleBuilder =MergeCellRule.builder();
    for(Map.Entry<MergeCellRule.Grid, MergeCellRule.Grid> e:map.entrySet()){
        mergeCellRuleBuilder.map(e.getKey(),e.getValue());
    }
    //将表格添加到模板中
    Map<String,Object> hashMap = new HashMap<>();
    hashMap.put("table",Tables.of(row0,row1,row2,row3,row4,row5,row6,row7).mereRule(mergeCellRuleBuilder.build()).create());
    XWPFTemplate template =XWPFTemplate.compile("C:\\Users\\wisdom21111\\Desktop\\template.docx").rener(hashMap);
    template.writeAndClose(newFileOutputStream("C:\\Users\\wisdom21111\\Desktop\\hello.docx"));
}
创建效果:
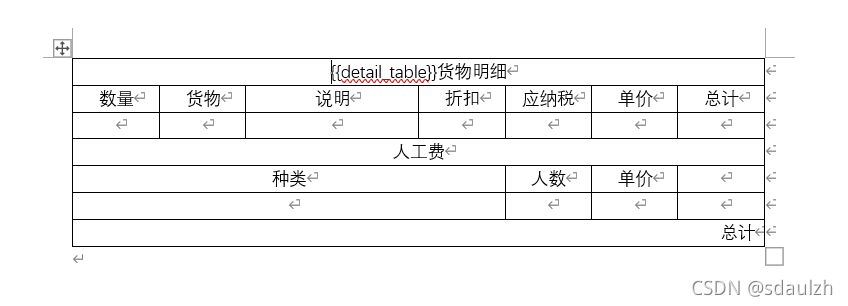
POI动态表格
创建表格数据类
public class DetailData {
    private List<RowRenderData> goods;
    private List<RowRenderData> labors;
    //...省略get/set方法
}
创建自定义渲染类
    public class DetailTablePolicy extends DynamicTableRenderPolicy {
    //表格渲染策略
    int goodStartRow = 2;
    int laborStartRow = 5;
    @Override
    public void render(XWPFTable xwpfTable, Object o) throws Exception {
        if(null==o){
            return;
        }
        DetailData detailData = (DetailData)o;
        List<RowRenderData> labors = detailData.getLabors();
        if(null!=labors){
            xwpfTable.removeRow(laborStartRow);
            //循环插入
            for(int i=0;i<labors.size();i++){
                XWPFTableRow insertRow = xwpfTable.insertNewTableRow(laborStartRow);
                for(int j=0;j<7;j++) insertRow.createCell();
                TableTools.mergeCellsHorizonal(xwpfTable,laborStartRow,0,3);
                TableRenderPolicy.Helper.renderRow(xwpfTable.getRow(laborStartRow),labors.get(i));
            }
        }
        List<RowRenderData> goods = detailData.getGoods();
        if (null != goods) {
            xwpfTable.removeRow(goodStartRow);
            for (int i = 0; i < goods.size(); i++) {
                XWPFTableRow insertNewTableRow = xwpfTable.insertNewTableRow(goodStartRow);
                for (int j = 0; j < 7; j++) insertNewTableRow.createCell();
                TableRenderPolicy.Helper.renderRow(xwpfTable.getRow(goodStartRow), goods.get(i));
            }
        }
    }
}
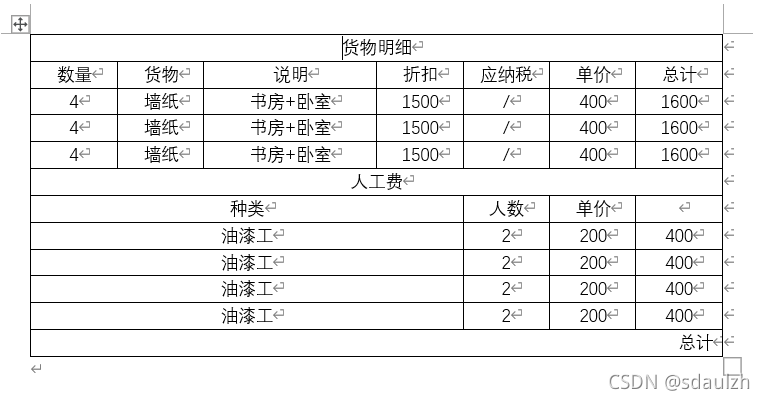
填充数据执行渲染
void dynamicRenderTable() throws IOException {
    //动态表格 从底部向上逐个添加
    //自上向下添加位置不易确定

    DetailData detailData = new DetailData();
    RowRenderData good =Rows.of("4","墙纸","书房+卧室","1500","/","400","1600").center().create();
    List<RowRenderData> goodList = Arrays.asList(good,good,good);
    RowRenderData labor = Rows.of("油漆工","2","200","400").center().create();
    List<RowRenderData> laborList = Arrays.asList(labor,labor,labor,labor);
    detailData.setGoods(goodList);
    detailData.setLabors(laborList);

    Map<String,Object> map = new HashMap<>();
    map.put("detail_table",detailData);
    Configure config = Configure.builder().bind("detail_table",newDetailTablePolicy()).build();
    XWPFTemplate template =XWPFTemplate.compile("C:\\Users\\wisdom21111\\Desktop\\template.docx",confg).render(map);
    template.writeToFile("C:\\Users\\wisdom21111\\Desktop\\hello2.docx");
}
模板预览:
生成预览:


 1101
1101


 被折叠的 条评论
为什么被折叠?
被折叠的 条评论
为什么被折叠?
 到【灌水乐园】发言


