


前言
富文本编辑器功能是很多人都要使用的
市面上有很多的编辑器可以供选择,但是很多编辑器会有点复杂,或者文档看起来难受。
我最近做了一个需求,是需要在html文件上写富文本编辑器。
但是我看了以前用的富文本,没找到如何在html上引入使用。
就感觉不是很方便,所以后面找到了这个wangEditor富文本编辑器
发现这个非常的简单,而且有html的版本文档介绍,对新手比较友好
所以今天就专门写一个帖子记录一下三种使用方法
目录【分三种】
这帖子包含三个部分,编辑器的三个使用场景
1,纯html使用【原始html和js写页面时,要写富文本如何引入和使用】
2,纯vue使用【纯vue的使用方法】
3,html引入vue后使用方法【有时候需要我们html文件,但是里面不用原生的写,还是正常引入vue和elementul写页面,这种时候如何引入富文本】
富文本编辑器的官网,文档可以去上面看
点击这里跳转(如果点击链接失效,自行百度去找)
效果图
html版本

vue版本

纯vue版本代码
首先:下载引入组件
npm install @wangeditor/editor --save
npm install @wangeditor/editor-for-vue --save
然后在main.js内引入css样式
//wangEditor富文本编辑器css样式
import '@wangeditor/editor/dist/css/style.css'
代码
<template>
  <div>
    <p style="text-align: center; font-size: 20px; margin: 10px">
      富文本编辑器模板
    </p>
    <div style="border: 1px solid #ccc">
      <Toolbar
        style="border-bottom: 1px solid #ccc"
        :editor="editor"
        :defaultConfig="toolbarConfig"
        :mode="mode"
      />
      <Editor
        style="height: 500px; overflow-y: hidden"
        v-model="html"
        :defaultConfig="editorConfig"
        :mode="mode"
        @onCreated="onCreated"
      />
    </div>
    <el-button type="primary" @click="look">查看内容</el-button>
  </div>
</template>

<script>
import { Editor, Toolbar } from "@wangeditor/editor-for-vue";
export default {
  components: { Editor, Toolbar },
  data() {
    return {
      //编辑器实例
      editor: null,
      //编辑器内容
      html: "<p>hello</p>",
      //菜单配置
      toolbarConfig: {},
      //编辑器配置
      editorConfig: {
        placeholder: "请输入内容...", //没有内容时默认提示符

        MENU_CONF: {
          // 配置上传图片
          uploadImage: {
            server: "http://xxxxxxx.cn/gzh/uploadFile", //配置图片上传地址

            maxFileSize: 10 * 1024 * 1024, // 10M  图片大小限制

            fieldName: "img", //上传类型

            allowedFileTypes: ["image/*"], // 选择文件时的类型限制,默认为 ['image/*'] 。如不想限制,则设置为 []

            // 自定义上传参数,传递图片时需要带一些参数过去写在这。参数会被添加到 formData 中,一起上传到服务端。
            meta: {
              image_class_id: "2",
              file_type: "1",
            },

            // 自定义设置请求头,比如添加token之类的
            // headers: {
            //     Accept: 'text/x-json',
            //     otherKey: 'xxx'
            // },

            // 上传进度的回调函数,可以用来显示进度条
            onProgress(progress) {
              // progress 是 0-100 的数字
              console.log("progress", progress);
            },

            // // 单个文件上传成功之后
            // onSuccess(file, res) {
            //     console.log(`${file.name} 上传成功`, res)
            // },

            // 单个文件上传失败
            onFailed(file, res) {
              console.log(`${file.name} 上传失败`, res);
            },

            // 上传错误,或者触发 timeout 超时
            onError(file, err, res) {
              console.log(`${file.name} 上传出错`, err, res);
            },

            // 插入图片到富文本编辑器回显
            customInsert(res, insertFn) {
              // res 即服务端的返回结果
              let url = res.data.url;
              let alt = res.data.name;
              let href = res.data.url;
              // 从 res 中找到 url alt href ,然后插入图片
              insertFn(url, alt, href);
            },
          },
          //配置上传视频
          uploadVideo: {
            server: "http://xxxxxxx.cn/gzh/uploadFile", //配置视频上传地址

            maxFileSize: 5 * 1024 * 1024, // 5M  视频大小限制

            fieldName: "your-custom-name", //上传类型

            // 最多可上传几个文件,默认为 5
            maxNumberOfFiles: 3,

            allowedFileTypes: ["video/*"], // 选择文件时的类型限制,默认为 ['video/*'] 。如不想限制,则设置为 []

            // 自定义上传参数,传递图片时需要带一些参数过去写在这。参数会被添加到 formData 中,一起上传到服务端。
            meta: {
              type: 1,
            },

            // 自定义设置请求头,比如添加token之类的
            // headers: {
            //     Accept: 'text/x-json',
            //     otherKey: 'xxx'
            // },

            metaWithUrl: false, // 将 meta 拼接到 url 参数中,默认 false
            withCredentials: true, // 跨域是否传递 cookie ,默认为 false

            //上传之前触发
            onBeforeUpload(file) {
              // file 选中的文件,格式如 { key: file }
              return file;
              // 可以 return
              // 1. return file 或者 new 一个 file ,接下来将上传
              // 2. return false ,不上传这个 file
            },

            // 上传进度的回调函数,可以用来显示进度条
            onProgress(progress) {
              // progress 是 0-100 的数字
              console.log("progress", progress);
            },

            // // 单个文件上传成功之后
            onSuccess(file, res) {
              console.log(`${file.name} 上传成功`, res);
            },

            // 单个文件上传失败
            onFailed(file, res) {
              console.log(`${file.name} 上传失败`, res);
            },

            // 上传错误,或者触发 timeout 超时
            onError(file, err, res) {
              console.log(`${file.name} 上传出错`, err, res);
            },

            // 插入图片到富文本编辑器回显
            customInsert(res, insertFn) {
              console.log(res, "视频插入");
              // res 即服务端的返回结果
              // let url = res.data.url;
              // let poster = res.data.poster;
              // 从 res 中找到 url poster ,然后插入
              //参数url是视频地址,poster是视频封面图片,后端如果不返回,可以考虑写死一个固定的封面图
              insertFn(url, poster);
            },
          },
        },
      },
      mode: "default", // or 'simple'
    };
  },
  methods: {
    onCreated(editor) {
      this.editor = Object.seal(editor); // 一定要用 Object.seal() ,否则会报错
    },
    look() {
      console.log(this.html);
    },
  },
  mounted() {
    // 模拟 ajax 请求,异步渲染编辑器,模仿后台拉数据回显到编辑器
    setTimeout(() => {
      this.html = "<p>模拟 Ajax 异步设置内容 HTML</p>";
    }, 1500);
  },
  beforeDestroy() {
    const editor = this.editor;
    if (editor == null) return;
    editor.destroy(); // 组件销毁时,及时销毁编辑器
  },
};
</script>

<style>
</style>
纯html版本
这里引入方式直接cdn引入了,如果需要本地版本的可以直接官网下载。最下面我会说明如何下载本地文件引入
<!DOCTYPE html>
<html>

<head>
    <meta charset='UTF-8'>
    <!-- 引入富文本js -->
    <script src="https://unpkg.com/@wangeditor/editor@latest/dist/index.js"></script>
    <!-- 引入富文本css -->
    <link href="https://unpkg.com/@wangeditor/editor@latest/dist/css/style.css" rel="stylesheet">
</head>

<body>
    <div id="editor—wrapper">
        <div id="toolbar-container">
            <!-- 工具栏 -->
        </div>
        <div id="editor-container" style="height: 300px;">
            <!-- 编辑器 -->
        </div>
    </div>
</body>
<script>
    const {
        createEditor,
        createToolbar
    } = window.wangEditor

    const editorConfig = {
        MENU_CONF: {},
        placeholder: 'Type here...',
        onChange(editor) {
            // 富文本输入的内容
            const html = editor.getHtml()
            console.log(html, '内容');
        },
    }
    editorConfig.MENU_CONF['uploadImage'] = {
        server: 'http://xxxxxxx.cn/gzh/uploadFile',
        maxFileSize: 10 * 1024 * 1024, // 10M
        fieldName: 'img',
        // 选择文件时的类型限制,默认为 ['image/*'] 。如不想限制,则设置为 []
        allowedFileTypes: ['image/*'],
        // 自定义上传参数,例如传递验证的 token 等。参数会被添加到 formData 中,一起上传到服务端。
        meta: {
            image_class_id: '2',
            file_type: '1'
        },
        // 自定义增加 http  header
        // headers: {
        //     Accept: 'text/x-json',
        //     otherKey: 'xxx'
        // },
        // 上传进度的回调函数
        onProgress(progress) { // JS 语法
            // progress 是 0-100 的数字
            console.log('progress', progress)
        },

        // // 单个文件上传成功之后
        // onSuccess(file, res) { // JS 语法
        //     console.log(`${file.name} 上传成功`, res)
        // },

        // 单个文件上传失败
        onFailed(file, res) { // JS 语法
            console.log(`${file.name} 上传失败`, res)
        },

        // 上传错误,或者触发 timeout 超时
        onError(file, err, res) { // JS 语法
            console.log(`${file.name} 上传出错`, err, res)
        },
        // 自定义插入图片
        customInsert(res, insertFn) { // JS 语法
            // res 即服务端的返回结果
            let url = res.data.url
            let alt = res.data.name
            let href = res.data.url
            // 从 res 中找到 url alt href ,然后插入图片
            insertFn(url, alt, href)
        },
    }

    const editor = createEditor({
        selector: '#editor-container',
        html: '<p><br></p>',
        config: editorConfig,
        mode: 'default', // or 'simple'
    })
    const toolbarConfig = {}
    toolbarConfig.excludeKeys = [
        'codeBlock',
        'group-video' // 排除菜单组,写菜单组 key 的值即可
    ]
    const toolbar = createToolbar({
        editor,
        selector: '#toolbar-container',
        config: toolbarConfig,
        mode: 'default', // or 'simple'
    })
</script>

<style scoped>
    .el-table .cell {
        text-align: center;
        min-height: 40px;
    }

    #editor—wrapper {
        border: 1px solid #ccc;
        z-index: 100;
        /* 按需定义 */
    }

    #toolbar-container {
        border-bottom: 1px solid #ccc;
    }

    #editor-container {
        height: 500px;
    }

</style>

</html>
html引入vue使用方法
这里复制的时候看一下自己的vue和elementul,axios等文件的路径,不然报错了,我这里引入的是本地的。如果没有这些本地文件的,我上传了资源可以直接下载的。
<!DOCTYPE html>
<html>

<head>
    <meta charset='UTF-8'>
    <!-- 先引入 Vue -->
    <script src='vue.js'></script>

    <!-- 引入element-UI组件 -->
    <script src='element.js'></script>
    <link rel='stylesheet' href='element-index.css'>

    <!-- 引入axios -->
    <script src='axios.min.js'></script>
    <script src='tinymce-vue.js'></script>

    <!-- 引入富文本的js和css -->
    <script src="https://unpkg.com/@wangeditor/editor@latest/dist/index.js"></script>
    <link href="https://unpkg.com/@wangeditor/editor@latest/dist/css/style.css" rel="stylesheet">
</head>

<body>
    <div id="app">
        <p style="font-weight:700;text-align:center">图片设置</p>
        <el-form ref="form" label-width="80px">
            <el-form-item label="顶部图片">
                <div id="editor—wrapper">
                    <div id="toolbar-container">
                        <!-- 工具栏 -->
                    </div>
                    <div id="editor-container" style="height: 300px;">
                        <!-- 编辑器 -->
                    </div>
                </div>
            </el-form-item>
        </el-form>
    </div>

</body>
<script>
    new Vue({
        el: '#app',
        data() {
            return {
                topEditor: '', //<p>hello</p>
                form: '',
                box: null
            };
        },
        mounted() {
            this.editorBox()
        },
        methods: {
            editorBox() {
                let that = this
                const {
                    createEditor,
                    createToolbar
                } = window.wangEditor

                const editorConfig = {
                    MENU_CONF: {},
                    placeholder: 'Type here...',
                    onChange(editor) {
                        const html = editor.getHtml()
                        that.topEditor = html
                        // console.log('topEditor', that.topEditor)
                        // 也可以同步到 <textarea>
                    },
                }
                editorConfig.MENU_CONF['uploadImage'] = {
                    server: 'http://xxxxxxx.cn/gzh/uploadFile',
                    maxFileSize: 10 * 1024 * 1024, // 10M
                    fieldName: 'img',
                    // 选择文件时的类型限制,默认为 ['image/*'] 。如不想限制,则设置为 []
                    allowedFileTypes: ['image/*'],
                    // 自定义上传参数,例如传递验证的 token 等。参数会被添加到 formData 中,一起上传到服务端。
                    meta: {
                        image_class_id: '2',
                        file_type: '1'
                    },
                    // 自定义增加 http  header
                    // headers: {
                    //     Accept: 'text/x-json',
                    //     otherKey: 'xxx'
                    // },
                    // 上传进度的回调函数
                    onProgress(progress) { // JS 语法
                        // progress 是 0-100 的数字
                        console.log('progress', progress)
                    },

                    // // 单个文件上传成功之后
                    // onSuccess(file, res) { // JS 语法
                    //     console.log(`${file.name} 上传成功`, res)
                    // },

                    // 单个文件上传失败
                    onFailed(file, res) { // JS 语法
                        console.log(`${file.name} 上传失败`, res)
                    },

                    // 上传错误,或者触发 timeout 超时
                    onError(file, err, res) { // JS 语法
                        console.log(`${file.name} 上传出错`, err, res)
                    },
                    // 自定义插入图片
                    customInsert(res, insertFn) { // JS 语法
                        // res 即服务端的返回结果
                        let url = res.data.url
                        let alt = res.data.name
                        let href = res.data.url
                        // 从 res 中找到 url alt href ,然后插入图片
                        insertFn(url, alt, href)
                    },
                }

                const editor = createEditor({
                    selector: '#editor-container',
                    html: '<p><br></p>',
                    config: editorConfig,
                    mode: 'default', // or 'simple'
                })
                // editor.setHtml(that.topEditor)  //回显
                const toolbarConfig = {}
                toolbarConfig.excludeKeys = [
                    'codeBlock',
                    'group-video' // 排除菜单组,写菜单组 key 的值即可
                ]
                const toolbar = createToolbar({
                    editor,
                    selector: '#toolbar-container',
                    config: toolbarConfig,
                    mode: 'default', // or 'simple'
                })
            },
        },
    })
</script>
<style scoped>
    .el-table .cell {
        text-align: center;
        min-height: 40px;
    }

    #editor—wrapper {
        border: 1px solid #ccc;
        z-index: 100;
        /* 按需定义 */
    }

    #toolbar-container {
        border-bottom: 1px solid #ccc;
    }

    #editor-container {
        height: 500px;
    }
</style>

</html>
这种方式有一个回显的问题,可以这样写
直接先触发回显的请求,拿到后台的数据后,再调用创建富文本的方法就可以了。
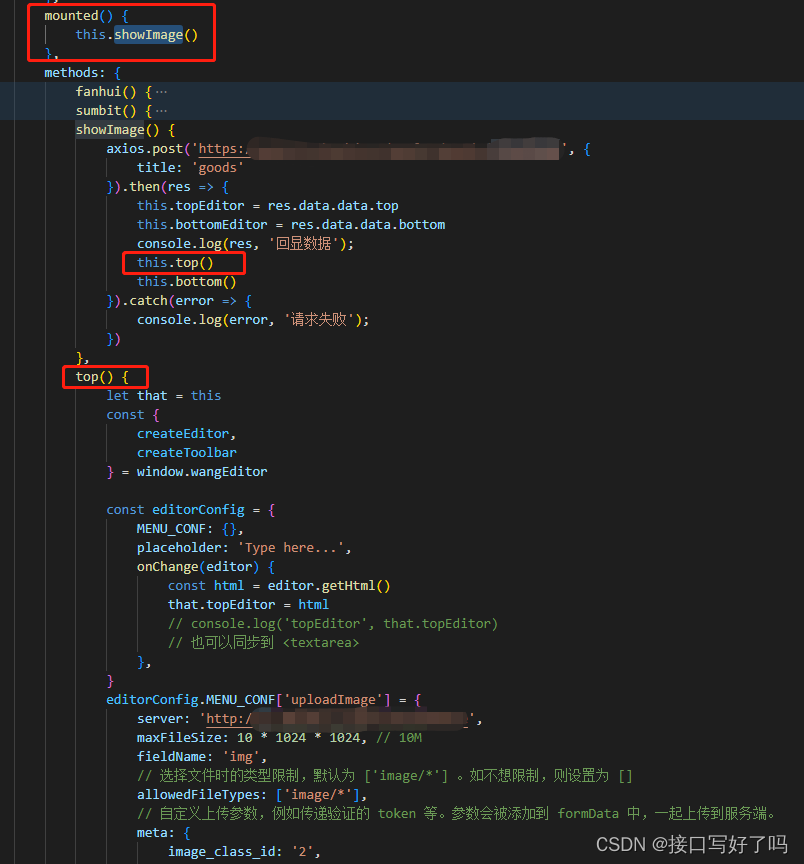
然后这里是用来回显上去的。

本地引入富文本的方式
有时候有的人可能需要的是本地的文件,因为稳定一点,cdn测试是还行,但是上线后怕网站崩了连带这你的项目也出问题。这里讲一下这个富文本如何拿到文件。很简单,其实文档内有写的。
照抄就行,就用我上面的那个vue的npm下载一下,然按步骤把文件拿出来,引入到你的项目
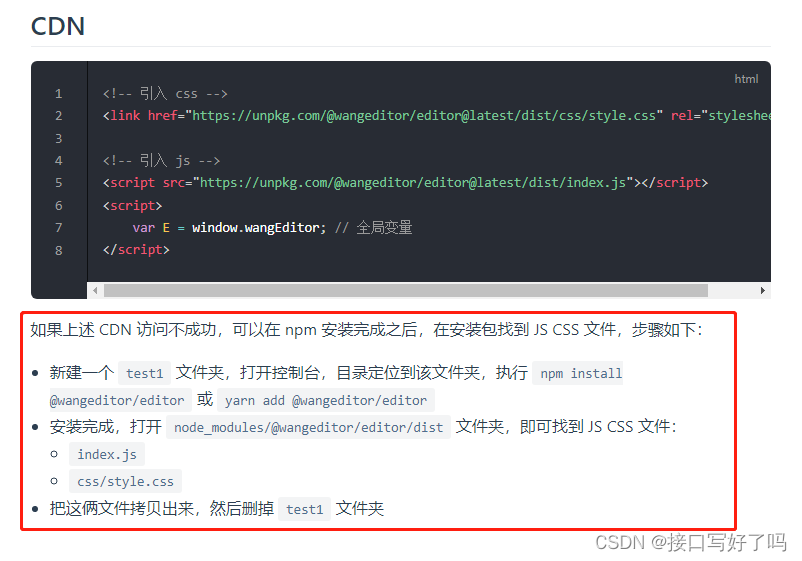
还有一种办法就是直接cdn的那个地址输出网址,然后查看源代码,直接复制出来也可以使用
html套用vue-elementul-axios模板下载
这个模板我也整体上传到csdn资源上了。想要的也可以直接去下一个


 7358
7358

 被折叠的 条评论
为什么被折叠?
被折叠的 条评论
为什么被折叠?
 到【灌水乐园】发言


