


一、前言
今天复习Spring,IOC(控制反转)作为其中的重中之重,自然是复习的重要部分,所以通过手写IOC,来了解Bean注入的全过程,加深理解。当然,在Spring2.5以后,加入了注解方式,作为了现在开发的主流,而xml方式的注入方式在SpringBoot项目中已不太常用,所以这里我们来手动创建注解来复现Bean的注入和依赖注入(DI)的全过程。
二、前期准备
1、 新建两个注解,分别作为创建Bean的注解和依赖注入的注解。
其中@Target注解和@Retention作为元注解分别表示注解作用范围和设置注解的生命周期。
@Target(ElementType.TYPE)
@Retention(RetentionPolicy.RUNTIME)
public @interface BeanOne {

}

@Target(ElementType.FIELD)
@Retention(RetentionPolicy.RUNTIME)
public @interface DiOne {

}
2、准备测试需要的Bean
(1)创建UserDao接口
package com.atguigu.spring6.test.dao;

public interface UserDao {

    public void print();
}
(2)创建UserDaoImpl实现
package com.atguigu.spring6.test.dao.impl;

import com.atguigu.spring.dao.UserDao;

public class UserDaoImpl implements UserDao {

    @Override
    public void print() {
        System.out.println("Dao层执行结束");
    }
}
(3)创建UserService接口
package com.atguigu.spring6.test.service;

public interface UserService {

    public void out();
}
(4)创建UserServiceImpl实现类
package com.atguigu.spring.test.service.impl;

import com.atguigu.spring.core.annotation.Bean;
import com.atguigu.spring.service.UserService;

@BeanOne
public class UserServiceImpl implements UserService {
@DiOne
private UserDao userDao;

    @Override
    public void out() {
        //userDao.print();
        System.out.println("Service层执行结束");
    }
}
3、定义Bean容器接口
public interface ApplicationContext {
    Object getbean(Class cls);
}
4、编写注解bean容器接口实现
/**
 * @author DH
 * @version 1.0
 * @description 手写IOC
 * @date 2023/5/13 14:24
 */
public class FileXMLApplicatiomContext implements ApplicationContext {
    //Bean对象保存在一个Map中
    HashMap<Class,Object> beanFactory = new HashMap<>();
    String rootPath;
    @Override
    public Object getbean(Class cls) {
        return beanFactory.get(cls);
    }
    /**
     * 是如何调用来装载bean的?
     * new FileXMLApplicationCOntext("ctgu.yao.spring") 可知是通过构造器来加载的
     * getbean(Class)
     */
    public  FileXMLApplicatiomContext(String targetPath) throws Exception {
    //具体实现
    }
三、编写注解bean容器接口实现
package ctgu.yao.spring;

import ctgu.yao.spring.anno.BeanOne;
import ctgu.yao.spring.anno.DiOne;
import java.io.File;
import java.io.UnsupportedEncodingException;
import java.lang.reflect.Field;
import java.net.URL;
import java.net.URLDecoder;
import java.util.HashMap;
import java.util.Map;
import java.util.Set;

/**
 * @author DH
 * @version 1.0
 * @description 手写IOC
 * @date 2023/5/13 14:24
 */
public class FileXMLApplicatiomContext implements ApplicationContext {
    //Bean对象保存在一个Map中
    HashMap<Class,Object> beanFactory = new HashMap<>();
    String rootPath;
    @Override
    public Object getbean(Class cls) {
        return beanFactory.get(cls);
    }
    /**
     * 是如何调用来装载bean的?
     * new FileXMLApplicationCOntext("ctgu.yao.spring") 可知是通过构造器来加载的
     * getbean(Class)
     */
    public  FileXMLApplicatiomContext(String targetPath) throws Exception {

        try {
            //1.获得传入的路径,我们需要把路径中的.替换成\
            String replacePath = targetPath.replaceAll("\\.", "\\\\");
            //2、通过线程获得全路径
            URL url = Thread.currentThread().getContextClassLoader().getResource(replacePath);
            //file:/D:/Files/javacod/Spring6/yao_spring/target/classes/ctgu%5cyao%5cspring
            //3.需要转换成成正常路径
            String truePath = URLDecoder.decode(url.getFile(), "utf-8");
            rootPath = truePath.substring(0,truePath.length()-targetPath.length());
            loadBeanOne(new File(rootPath));
            //编写扫描bean逻辑的方法
            loadDiOne();
        } catch (UnsupportedEncodingException e) {
            e.printStackTrace();
        }


    }

    private void loadBeanOne(File file) throws Exception {
        //1.由根文件系统不断向内层查看,为文件就递归
        if (!file.isDirectory()){
            return;
        }
        File[] files = file.listFiles();
        if(files == null || files.length == 0){
            return;
        }
        for (File fileLoad : files) {
            if(fileLoad.isDirectory()){
                loadBeanOne(fileLoad);
            }else{
                String absolutePath = fileLoad.getAbsolutePath();
                //2.不为文件则进行判断是否是类(即是否以.class结尾)
                if(!absolutePath.contains(".class")) {
                    return;
                }
                //3.满足说明是类,替换.class为''
                String classPath = absolutePath.replace(".class", "");
                //4.获得类路径,把\重新换成.
                String trueClassPath = classPath.substring(rootPath.length() - 1).replaceAll("\\\\","\\.");
                //5.判断是否有BeanOne注解
                System.out.println(trueClassPath);
                try {
                    Class<?> aClass = Class.forName(trueClassPath);
                    BeanOne beanOne = aClass.getAnnotation(BeanOne.class);
                    if(beanOne != null){
                    //6.说明有BeanOne注解,再判断是否是接口
                        if(!aClass.isInterface()) {
                            // 7.对类进行装载
                            Object newInstance = aClass.getDeclaredConstructor().newInstance();
                            //8.放到存储的map中,如果有接口实现,key设置为接口名
                            if (aClass.getInterfaces().length > 0) {
                                beanFactory.put(aClass.getInterfaces()[0], newInstance);
                            } else {
                                beanFactory.put(aClass, newInstance);
                            }
                        }
                    }

                } catch (ClassNotFoundException e) {
                    e.printStackTrace();
                }
            }
        }
    }
四、编写扫描bean逻辑
 private void loadDiOne() throws IllegalAccessException {
        //在map中拿到对象,得到class通过反射拿到方法并赋值
        Set<Map.Entry<Class, Object>> entries = beanFactory.entrySet();
        for (Map.Entry<Class, Object> entry : entries){
            Object value = entry.getValue();
            Class<?> aClass = value.getClass();
            Field[] declaredFields = aClass.getDeclaredFields();
            for (Field field : declaredFields) {
                //是否有DiOne注解
                DiOne annotation = field.getAnnotation(DiOne.class);
                if(annotation != null){
                    field.setAccessible(true);
                    Object o = beanFactory.get(field.getType());
                    System.out.println(o.toString());
                    field.set(value,beanFactory.get(field.getType()));
                }
            }
        }

    }
五、测试
创建测试类
package ctgu.yao.spring;

import ctgu.yao.spring.service.UserService;

public class TestAnno {
    public static void main(String[] args) throws Exception {
        FileXMLApplicatiomContext fileXMLApplicatiomContext = new FileXMLApplicatiomContext("ctgu.yao.spring");
        UserService userService = (UserService)fileXMLApplicatiomContext.getbean(UserService.class);
        System.out.println(userService);
        userService.a();
    }
}
测试结果:
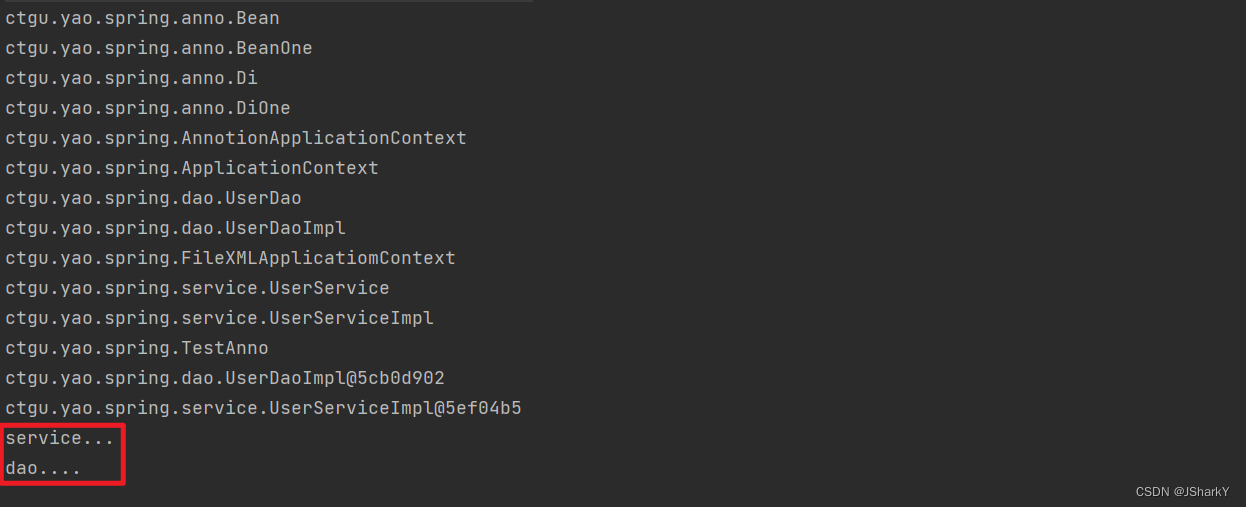
说明Bean的创建和依赖注入都得到了实现。
六、总结
手写IOC的整个过程涉及的内容是Java的反射和String的一些方法,加上一些File的操作,整体过程不算复杂,更重要的是其中包含的控制反转的思想的理解。当然这只是一个简单的实现,但实现的核心原理应该都在其中。最后,手动去复现Bean的注入、管理,对于我们对许多框架的理解十分有益,如果对IOC其中的一些细节时常搞不清楚,手动复写是是一种十分有效的加深理解的方式!


 224
224


 被折叠的 条评论
为什么被折叠?
被折叠的 条评论
为什么被折叠?
 到【灌水乐园】发言


