


前言:
- 一、Linux安装步骤(CentOS 7.0 阿里云);
- 二、Windows安装步骤(Windows 10 专业版);
一、Linux安装安装步骤:
注:卸载在步骤5,卸载在步骤5,卸载在步骤5
1、添加 MariaDB yum 仓库:
1)首先在CentOS操作系统中/etc/yum.repos.d/目录下添加 MariaDB 的YUM配置文件MariaDB.repo文件:
[root@LinuxCentOS /]# touch /etc/yum.repos.d/MariaDB.repo
[root@LinuxCentOS /]# vi /etc/yum.repos.d/MariaDB.repo
2)在该文件中添加以下内容保存:
A、CentOS6.5配置:
[mariadb]
name = MariaDB
baseurl = http://mirrors.ustc.edu.cn/mariadb/yum/10.3/centos6-amd64/
gpgkey = http://mirrors.ustc.edu.cn/mariadb/yum/RPM-GPG-KEY-MariaDB
gpgcheck = 1
B、CentOS7.5配置:
[mariadb]
name = MariaDB
baseurl = http://mirrors.ustc.edu.cn/mariadb/yum/10.3/centos7-amd64/
gpgkey = http://mirrors.ustc.edu.cn/mariadb/yum/RPM-GPG-KEY-MariaDB
gpgcheck=1
注:官网地址特别慢,所以换了一个中国科学技术大学的镜像地址
2、安装 MariaDB:
A、CentOS6.5安装:
1)通过yum命令轻松安装 MariaDB:yum install -y MariaDB-server MariaDB-client
2)MariaDB 安装完毕后,立即启动数据库服务守护进程:service mysql start
3)继续执行步骤3
B、CentOS7.5安装:
1)通过yum命令轻松安装 MariaDB:yum install MariaDB-server MariaDB-client -y
2)MariaDB 安装完毕后,立即启动数据库服务守护进程:systemctl start mariadb
3)设置 MariaDB 在操作系统重启后自动启动服务:systemctl enable mariadb
4)查看 MariaDB 服务当前状态:systemctl status mariadb
5)继续执行步骤3
3、对 MariaDB 进行安全配置:
1)执行命令mysql_secure_installation,根据实际情况用Y/N回复以下问题:设置 MariaDB 的 root 账户密码,删除匿名用户,禁用 root 远程登录,删除测试数据库,重新加载权限表,,效果如下:
[root@LinuxCentOS yum.repos.d]# mysql_secure_installation

NOTE: RUNNING ALL PARTS OF THIS SCRIPT IS RECOMMENDED FOR ALL MariaDB
      SERVERS IN PRODUCTION USE!  PLEASE READ EACH STEP CAREFULLY!

In order to log into MariaDB to secure it, we'll need the current
password for the root user.  If you've just installed MariaDB, and
you haven't set the root password yet, the password will be blank,
so you should just press enter here.
Enter current password for root (enter for none):      <–初次运行直接回车

设置密码
Set root password? [Y/n]                               <– 是否设置root用户密码,输入y并回车或直接回车,Y
New password:                                          <– 设置root用户的密码,比如密码为123456
Re-enter new password:                                 <– 再输入一次你设置的密码

其他配置
Remove anonymous users? [Y/n]                          <– 是否删除匿名用户,回车,Y
Disallow root login remotely? [Y/n]                    <–是否禁止root远程登录,回车,N
Remove test database and access to it? [Y/n]           <– 是否删除test数据库,回车,Y
Reload privilege tables now? [Y/n]                     <– 是否重新加载权限表,回车,Y
 ... Success!
Cleaning up...
All done!  If you've completed all of the above steps, your MariaDB
installation should now be secure.
Thanks for using MariaDB!

[root@LinuxCentOS yum.repos.d]#
2) 在配置完数据库的安全配置后,可以通过以下命令查看版本,确认 MariaDB已安装成功,命令mysql --version:
[root@LinuxCentOS yum.repos.d]# mysql --version

mysql  Ver 15.1 Distrib 10.3.18-MariaDB, for Linux (x86_64) using readline 5.1
3)可以通过 MariaDB 命令行登录,然后对数据库进行sql查询操作,命令mysql -u root -p123456:
[root@LinuxCentOS6 yum.repos.d]# mysql -u root -p123456

Welcome to the MariaDB monitor.  Commands end with ; or \g.
Your MariaDB connection id is 30
Server version: 10.3.18-MariaDB MariaDB Server
Copyright (c) 2000, 2018, Oracle, MariaDB Corporation Ab and others.
Type 'help;' or '\h' for help. Type '\c' to clear the current input statement.

MariaDB [(none)]>
4、为 MariaDB 配置远程访问权限:
在第三步中如果禁用 root 远程登录选择 Y 的话就不能在别的电脑通过navicat等工具连接到数据库,这时就需要给对应的 MariaDB 账户分配权限,允许使用该账户远程连接到MariaDB。可以输入以下命令查看账号信息(配置好的):
MariaDB [mysql]> GRANT ALL PRIVILEGES ON * . * TO 'root'@'%' IDENTIFIED BY '123456' WITH GRANT OPTION;
Query OK, 0 rows affected (0.000 sec)

MariaDB [mysql]> FLUSH PRIVILEGES;
Query OK, 0 rows affected (0.001 sec)

MariaDB [(none)]> select user, host, password from mysql.user\G;
+----------+--------------+-------------------------------------------+
| User     | host         | password                                  |
+----------+--------------+-------------------------------------------+
| root     | localhost    | *6BB4837EB74329105EE4568DDA7DC67ED2CA2AD9 |
| root     | linuxcentos6 | *6BB4837EB74329105EE4568DDA7DC67ED2CA2AD9 |
| root     | 127.0.0.1    | *6BB4837EB74329105EE4568DDA7DC67ED2CA2AD9 |
| root     | ::1          | *6BB4837EB74329105EE4568DDA7DC67ED2CA2AD9 |
| root     | %            | *6BB4837EB74329105EE4568DDA7DC67ED2CA2AD9 |			#root远程登陆用户
| laowang  | %            | *6BB4837EB74329105EE4568DDA7DC67ED2CA2AD9 |			#自定义用户,比如开发者组员"老王"
+----------+--------------+-------------------------------------------+
6 rows in set (0.000 sec)

MariaDB [(none)]>
5、卸载MariaDB数据库:
方法一:
[root@LinuxCentOS6 /]# service mysql stop
Shutting down MariaDB..                                    [  OK  ]

[root@LinuxCentOS6 /]# rpm -aq|grep mysql

[root@LinuxCentOS6 /]# yum -y remove mysql

Loaded plugins: fastestmirror, refresh-packagekit, security
Setting up Remove Process
Resolving Dependencies
--> Running transaction check
---> Package MariaDB-client.x86_64 0:10.3.18-1.el6 will be erased
--> Processing Dependency: MariaDB-client for package: MariaDB-server-10.3.18-1.el6.x86_64
--> Running transaction check
---> Package MariaDB-server.x86_64 0:10.3.18-1.el6 will be erased
--> Finished Dependency Resolution
Dependencies Resolved
===============================================================================================================================================================================================================
 Package                                              Arch                                         Version                                                Repository                                      Size
===============================================================================================================================================================================================================
Removing:
 MariaDB-client                                       x86_64                                       10.3.18-1.el6                                          @mariadb                                       225 M
Removing for dependencies:
 MariaDB-server                                       x86_64                                       10.3.18-1.el6                                          @mariadb                                       516 M
Transaction Summary
===============================================================================================================================================================================================================
Remove        2 Package(s)
Installed size: 741 M
Downloading Packages:
Running rpm_check_debug
Running Transaction Test
Transaction Test Succeeded
Running Transaction
  Erasing    : MariaDB-server-10.3.18-1.el6.x86_64                                                                                                                                                         1/2
  Erasing    : MariaDB-client-10.3.18-1.el6.x86_64                                                                                                                                                         2/2
  Verifying  : MariaDB-client-10.3.18-1.el6.x86_64                                                                                                                                                         1/2
  Verifying  : MariaDB-server-10.3.18-1.el6.x86_64                                                                                                                                                         2/2
Removed:
  MariaDB-client.x86_64 0:10.3.18-1.el6
Dependency Removed:
  MariaDB-server.x86_64 0:10.3.18-1.el6
Complete!
[root@LinuxCentOS6 /]# mysql -version
-bash: /usr/bin/mysql: No such file or directory
方法二:
[root@localhost~]# rpm -aq|grep mariadb
mariadb-libs-5.5.50-1.e17_2.x86_64
mariadb-5.5.50-1.e17_2.x86_64
mariadb-server-5.5.50-1.e17_2.x86_64
[root@localhost~]# yum -y remove mariadb*
二、Windows安装步骤:
文件名称:mariadb-10.0.36-winx64
下载地址:https://pan.baidu.com/s/1aUT-mt5Ib2PmtY7RXDIcew
将压缩包解压到目录(不存在需要创建):D:/Java/mysql/,并将mariadb-10.0.36-winx64文件夹重新命名为:mariadb10.0.36;
删除文件:my-huge.ini,my-innodb-heavy-4G.ini,my-large.ini,my-medium.ini,my-small.ini,4个文件,并创建my.ini配置文件:
1、进入D:/Java/mysql/mariadb10.0.36目录,新建【my.ini】文件,复制以下内容并保存:
[client]
password				= 123456
port					= 3306
socket					= /tmp/mysql.sock
default-character-set	= utf8

[mysqld]
port					= 3306
socket					= /tmp/mysql.sock
basedir					= D:\Java\mysql\mariadb10.0.36
datadir					= D:\Java\mysql\mariadb10.0.36\data
character_set_server	= utf8
default-storage-engine	= MyISAM
key_buffer_size			= 256M
max_allowed_packet		= 1M
table_open_cache		= 256
sort_buffer_size		= 1M
read_buffer_size		= 1M
read_rnd_buffer_size	= 4M
myisam_sort_buffer_size	= 64M
thread_cache_size		= 8
query_cache_size		= 16M
# Try number of CPU's*2 for thread_concurrency
thread_concurrency		= 8
# 当外部锁定(external-locking)起作用时,每个进程若要访问数据表,则必须等待之前的进程完成操作并解除锁定。由于服务器访问数据表时经常需要等待解锁,因此在单服务器环境下external locking会让MySQL性能下降。所以在很多Linux发行版的源中,MySQL配置文件中默认使用了skip-external-locking来避免external locking。
# 当使用了skip-external-locking后,为了使用MyISAMChk检查数据库或者修复、优化表,你必须保证在此过程中MySQL服务器没有使用需要操作的表。如果没有停止服务器,也至少需要先运行
skip-external-locking

[mysqlhotcopy]
interactive-timeout

[WinMySQLAdmin]
Server=D:\Java\mysql\mariadb10.0.36\bin\mysqld.exe
注意:
a、若my.ini文件不生效,将文件复制到C盘的system32目录下即可(如果无效再拷贝至system目录下)。
4、开始添加服务:
在开始菜单输入cmd,右击以管理员身份运行,
运行后将执行目录cd到你的问价解压目录中的bin目录中,
例如我的解压在D:\Java\mysql\mariadb10.0.36
5、添加到Windows服务:
1)输入 D: 回车
2)输入 cd D:\Java\mysql\mariadb10.0.36\bin 回车即可跳转到bin目录。
3)执行完第2步,输入 mysqld.exe --install MariaDB3306
4)执行完第3步,输入 net start MariaDB3306 即可启动服务开始你的MariaDB之旅了。
6、卸载Windows服务:
1)输入 D: 回车
2)输入 cd D:\Java\mysql\mariadb10.0.36\bin
3)顺便提一句,删除的时候也很简单,输入mysqld.exe --remove MariaDB3306即可,或者执行sc delete 服务名称
7、设置MySQL登陆密码:
SET PASSWORD FOR 'root'@'localhost' = PASSWORD('123456');
SET PASSWORD FOR 'root'@'127.0.0.1' = PASSWORD('123456');
COMMIT;
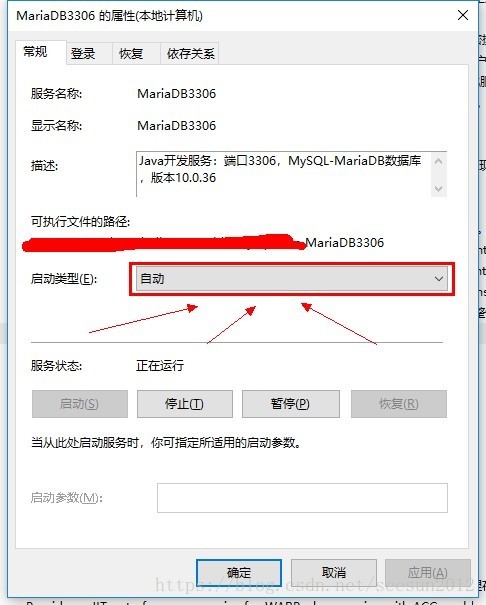
8、跟随Windows系统启动:
控制面板 → 查看方式改成:小图标 → 管理工具 → 服务 → 双击MariaDB3306服务:
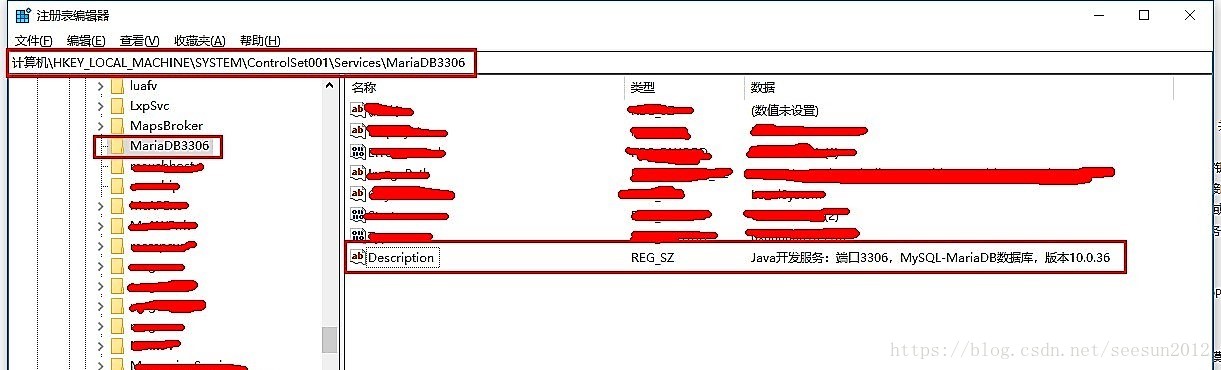
10、设置Windows服务备注:
win键+R 输入:regedit 进入注册表,添加备注:
11、问题:
mysql:1130 is not allowed to connect to this MariaDB server(mysql 1130错误,无法登录远程服务)
地址:https://blog.csdn.net/seesun2012/article/details/83893483?spm=1001.2014.3001.5501
注:以上内容仅提供参考和交流,请勿用于商业用途,如有侵权联系本人删除!
持续更新中…
如有对思路不清晰或有更好的解决思路,欢迎与本人交流,QQ群:273557553
你遇到的问题是小编创作灵感的来源!


 867
867


 被折叠的 条评论
为什么被折叠?
被折叠的 条评论
为什么被折叠?
 到【灌水乐园】发言


