


一、解析注解
在《Mybatis 配置文件解析(二)》已经完成了SQL配置文件的解析,接下来,就是对Mapper接口方法上的注解进行解析了
在解析方法前,会先对Mapper接口上的@CacheNamespace和@CacheNamespaceRef注解进行解析,如果SQL配置文件也配置了缓存,那么Mapper接口上的缓存配置将覆盖掉SQL配置文件中缓存配置
然后获取接口的所有方法,排除桥接方法,遍历其他的所有的方法,如果方法上有注解,就会生成一个MappedStatement对象
parseCache();
parseCacheRef();
// 获取所有方法 看是不是用了注解
Method[] methods = type.getMethods();
for (Method method : methods) {
    try {
        // issue #237
        if (!method.isBridge()) {
            // 是不是用了注解  用了注解会将注解解析成MappedStatement
            parseStatement(method);
        }
    } catch (IncompleteElementException e) {
        configuration.addIncompleteMethod(new MethodResolver(this, method));
    }
}
1.1 生成SqlSource对象
在parseStatement()方法中,首先会调用getParameterType()方法来判断方法入参的类型,然后获得方法上@Lang注解的值作为SQL解析语言驱动,没有配置就用默认,与解析xml配置时一样
最后就是调用getSqlSourceFromAnnotations()方法,通过注解来生成一个SqlSource对象
void parseStatement(Method method) {
    Class<?> parameterTypeClass = getParameterType(method);
    LanguageDriver languageDriver = getLanguageDriver(method);
    SqlSource sqlSource = getSqlSourceFromAnnotations(method, parameterTypeClass, languageDriver);
    ……
}
在判断参数类型时,会过滤掉分页和结果处理器的参数,剩下的参数,如果只有一个,就把该参数的类型作为最终方法的参数类型,如果有多个参数,会把ParamMap.class作为入参类型,这是一样HashMap的实现类,也就是说,当多个参数的时候,Mybatis会自动用一个Map来接收
private Class<?> getParameterType(Method method) {
    Class<?> parameterType = null;
    Class<?>[] parameterTypes = method.getParameterTypes();
    for (Class<?> currentParameterType : parameterTypes) {
        if (!RowBounds.class.isAssignableFrom(currentParameterType) && !ResultHandler.class.isAssignableFrom(currentParameterType)) {
            if (parameterType == null) {
                parameterType = currentParameterType;
            } else {
                parameterType = ParamMap.class;
            }
        }
    }
    return parameterType;
}
首先获取方法上的注解(@Select|@Insert|@Update|@Delete),然后获取注解value()属性的值,这是一个String类型的数组
private SqlSource getSqlSourceFromAnnotations(Method method, Class<?> parameterType, LanguageDriver languageDriver) {
    Class<? extends Annotation> sqlAnnotationType = getSqlAnnotationType(method);
    if (sqlAnnotationType != null) {
        Annotation sqlAnnotation = method.getAnnotation(sqlAnnotationType);
        final String[] strings = (String[]) sqlAnnotation.getClass().getMethod("value").invoke(sqlAnnotation);
        return buildSqlSourceFromStrings(strings, parameterType, languageDriver);
    }
    return null;
}
然后将这些字符串通过一个空格拼接成一个完整的字符串,也就是一个完成的SQL语句,然后调用重载的createSqlSource()来解析这段SQL语句
private SqlSource buildSqlSourceFromStrings(String[] strings, Class<?> parameterTypeClass, LanguageDriver languageDriver) {
    final StringBuilder sql = new StringBuilder();
    for (String fragment : strings) {
        sql.append(fragment);
        sql.append(" ");
    }
    return languageDriver.createSqlSource(configuration, sql.toString().trim(), parameterTypeClass);
}
如果这段SQL是通过<script>标签来定义的,那么它的解析方式同select这些标签一样
如果就是一段普通的SQL语句,会把SQL语句直接封装成一个TextSqlNode实例,判断是否为动态sql,就是判断TextSqlNode的text内容中是否含有"${}",然后把TextSqlNode封装指定的SqlSource
public SqlSource createSqlSource(Configuration configuration, String script, Class<?> parameterType) {
    // issue #3
    if (script.startsWith("<script>")) {
        XPathParser parser = new XPathParser(script, false, configuration.getVariables(), new XMLMapperEntityResolver());
        return createSqlSource(configuration, parser.evalNode("/script"), parameterType);
    } else {
        // issue #127
        script = PropertyParser.parse(script, configuration.getVariables());
        TextSqlNode textSqlNode = new TextSqlNode(script);
        if (textSqlNode.isDynamic()) {
            return new DynamicSqlSource(configuration, textSqlNode);
        } else {
            return new RawSqlSource(configuration, script, parameterType);
        }
    }
}
1.2 解析配置
可以通过方法上添加@Options注解来配置缓存、超时时间这些基础配置,如果没有配置,就使用默认的
if (sqlSource != null) {
    Options options = method.getAnnotation(Options.class);
    final String mappedStatementId = type.getName() + "." + method.getName();
    Integer fetchSize = null;
    Integer timeout = null;
    StatementType statementType = StatementType.PREPARED;
    ResultSetType resultSetType = configuration.getDefaultResultSetType();
    SqlCommandType sqlCommandType = getSqlCommandType(method);
    boolean isSelect = sqlCommandType == SqlCommandType.SELECT;
    boolean flushCache = !isSelect;
    boolean useCache = isSelect;

    if (options != null) {
        if (FlushCachePolicy.TRUE.equals(options.flushCache())) {
            flushCache = true;
        } else if (FlushCachePolicy.FALSE.equals(options.flushCache())) {
            flushCache = false;
        }
        useCache = options.useCache();
        fetchSize = options.fetchSize() > -1 || options.fetchSize() == Integer.MIN_VALUE ? options.fetchSize() : null; //issue #348
        timeout = options.timeout() > -1 ? options.timeout() : null;
        statementType = options.statementType();
        if (options.resultSetType() != ResultSetType.DEFAULT) {
            resultSetType = options.resultSetType();
        }
    }
    ……
}
可以通过@ResultMap来指定SQL配置文件中配置的resultMap节点id属性的值
1.3 生成MappedStatement
参数解析完成之后,就调用addMappedStatement()方法封装成一个MappedStatement,具体的封装过程与SQL配置文件解析时的封装一样,不同的点在于设置resultMaps时,需要把@ResultMap注解的数组值,转换成具体的ResultMap对象
MappedStatement.Builder statementBuilder = new MappedStatement.Builder(configuration, id, sqlSource, sqlCommandType)
    .resource(resource)
    .resultMaps(getStatementResultMaps(resultMap, resultType, id))
    .resultSetType(resultSetType)
    .flushCacheRequired(valueOrDefault(flushCache, !isSelect))
    .useCache(valueOrDefault(useCache, isSelect))
    .cache(currentCache);
调用getStatementResultMaps()方法,遍历@ResultMap中指定的值,去configuration的resultMaps中找到id与之匹配的ResultMap对象;如果没有使用@ResultMap注解,而是使用@ResultType注解,则把@ResultType的value()值封装成一个ResultMap对象进行缓存
private List<ResultMap> getStatementResultMaps(String resultMap,Class<?> resultType,String statementId) {
    resultMap = applyCurrentNamespace(resultMap, true);

    List<ResultMap> resultMaps = new ArrayList<>();
    if (resultMap != null) {
        String[] resultMapNames = resultMap.split(",");
        for (String resultMapName : resultMapNames) {
            resultMaps.add(configuration.getResultMap(resultMapName.trim()));
        }
    } else if (resultType != null) {
        ResultMap inlineResultMap = new ResultMap.Builder(configuration,statementId + "-Inline",resultType,new ArrayList<>(),null).build();
        resultMaps.add(inlineResultMap);
    }
    return resultMaps;
}
二、二级缓存
在Mybatis中提供了一级缓存和二级缓存的概念,一级缓存是SqlSession级别的缓存,只缓存当前会话的结果集,而二级缓存是应用级别的缓存,存在于整个应用中,只要缓存没有被清理就可以一直使用
我们在《Mybatis 配置文件解析(二)》中的解析缓存配置中,只简单了说明了是如何解析缓存然后生成一个Cache对象的,这一节我们重点介绍Mybatis中二级缓存的设计
依然从源码出发,分析源码是如何实现的
/**
 * 解析我们的cache节点
 * <cache ></cache>
    解析到:org.apache.ibatis.session.Configuration#caches
           org.apache.ibatis.builder.MapperBuilderAssistant#currentCache
 */
cacheElement(context.evalNode("cache"));
2.1 二级缓存设计原理
在Mybatis中,Cache分为以下几种:
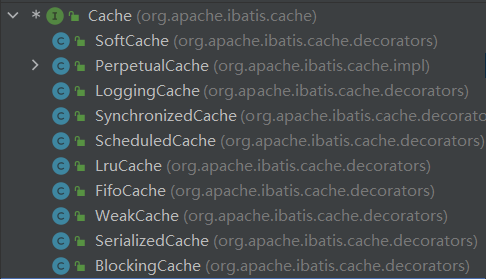
其中SoftCache、LruCache、FifoCache和WeakCache为缓存策略对应的缓存
简单介绍一下这些缓存的用处:
SynchronizedCache:线程同步缓存,对操作缓存的方法都加了Synchronized关键字
LoggingCache:统计缓存命中率以及打印日志
ScheduledCache:过期清理缓存,根据配置的flushInterval参数,定期清理缓存
LruCache、FifoCache四种:缓存淘汰策略,缓存是有大小限制的,当缓存满了之后,有新的缓存数据进来,根据不同的套他策略来清理历史缓存
而这些缓存调用的大概结构如下:
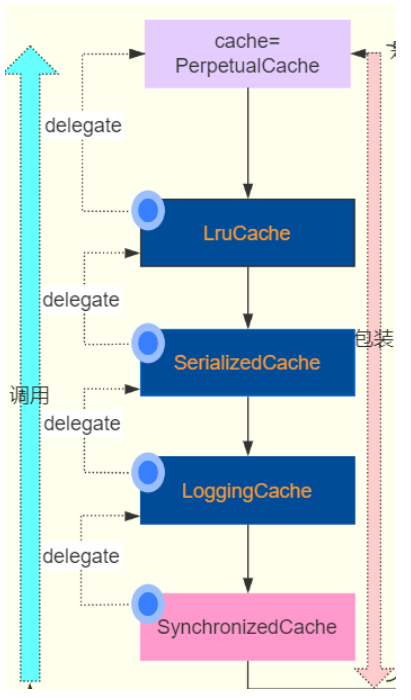
二级缓存采用装饰器和责任链模式,每个缓存提供部分额外功能,PerpetualCache是最基础的缓存实现,所有缓存的方法调用,最后都会转成PerpetualCache的方法调用
在这些缓存中都包含一个delegate熟悉,表示代理缓存。
以LruCache为例,在调用它的getObject()方法的时候,它首先会调用keyMap的get()方法,将KEY的放置到LinkedHashMap的最前面,然后再去调用被包装的缓存对象的getObject()方法,实现了责任链和装饰器的效果
@Override
public Object getObject(Object key) {
    keyMap.get(key); //touch
    return delegate.getObject(key);
}

public void setSize(final int size) {
    // 利用LinkedHashMap可实现LRU缓存
    keyMap = new LinkedHashMap<Object, Object>(size, .75F, true) {
        private static final long serialVersionUID = 4267176411845948333L;

        //当put进新的值方法返回true时,便移除该map中最老的键和值。
        @Override
        protected boolean removeEldestEntry(Map.Entry<Object, Object> eldest) {
            boolean tooBig = size() > size;
            if (tooBig) {
                eldestKey = eldest.getKey();
            }
            return tooBig;
        }
    };
}
2.2 二级缓存源码实现
解析获得二级缓存的配置信息后,就是调用useNewCache()方法创建一个缓存实例,cache节点的type属性只能配置PERPETUAL缓存和自定义的缓存,其他的缓存实现类都没有只有id属性的构造方法,配置成Mybatis提供的其他缓存会报错
private void cacheElement(XNode context) {
    if (context != null) {
        //解析cache节点的type属性
        String type = context.getStringAttribute("type", "PERPETUAL");
        // 根据别名(或完整限定名)  加载为Class
        Class<? extends Cache> typeClass = typeAliasRegistry.resolveAlias(type);
        // 获取缓存过期策略:默认是LRU
        // LRU – 最近最少使用:移除最长时间不被使用的对象。(默认)  FIFO – 先进先出:按对象进入缓存的顺序来移除它们。
   	 	// SOFT – 软引用:基于垃圾回收器状态和软引用规则移除对象。 WEAK – 弱引用:更积极地基于垃圾收集器状态和弱引用规则移除对象。
        String eviction = context.getStringAttribute("eviction", "LRU");
        Class<? extends Cache> evictionClass = typeAliasRegistry.resolveAlias(eviction);
        //flushInterval(刷新间隔)属性可以被设置为任意的正整数,设置的值应该是一个以毫秒为单位的合理时间量。 默认情况是不设置,也就是没有刷新间隔,缓存仅仅会在调用语句时刷新。
        Long flushInterval = context.getLongAttribute("flushInterval");
        //size(引用数目)属性可以被设置为任意正整数,要注意欲缓存对象的大小和运行环境中可用的内存资源。默认值是 1024。
        Integer size = context.getIntAttribute("size");
        //只读)属性可以被设置为 true 或 false。只读的缓存会给所有调用者返回缓存对象的相同实例。 因此这些对象不能被修改。这就提供了可观的性能提升。而可读写的缓存会(通过序列化)返回缓存对象的拷贝。 速度上会慢一些,但是更安全,因此默认值是 false
        boolean readWrite = !context.getBooleanAttribute("readOnly", false);
        boolean blocking = context.getBooleanAttribute("blocking", false);
        Properties props = context.getChildrenAsProperties();
        //把缓存节点加入到Configuration中
        builderAssistant.useNewCache(typeClass, evictionClass, flushInterval, size, readWrite, blocking, props);
    }
}
在useNewCache()方法中会创建一个CacheBuilder实例,然后把缓存相关的属性都添加进去,最后调用build()方法来创建缓存实例,下面我们细看build()方法的源码
public Cache useNewCache(Class<? extends Cache> typeClass,Class<? extends Cache> evictionClass,Long flushInterval,Integer size,boolean readWrite,boolean blocking,
    Properties props) {
  Cache cache = new CacheBuilder(currentNamespace).implementation(valueOrDefault(typeClass, PerpetualCache.class))
      .addDecorator(valueOrDefault(evictionClass, LruCache.class)).clearInterval(flushInterval).size(size).readWrite(readWrite) .blocking(blocking).properties(props)
      .build();
  configuration.addCache(cache);
  currentCache = cache;
  return cache;
}
在build()方法中,如果没有指定缓存类型,就会调用setDefaultImplementations()方法设置默认的缓存类型和淘汰策略
然后通过newBaseCacheInstance()通过反射创建一个设置的缓存类型对应的缓存实例,获取构造方法的时候,取得是只有一个参数且参数类型为String的构造方法,通过构造方法进行实例化
如果配置的是PerpetualCache缓存,那么就会调用newCacheDecoratorInstance()方法,对PerpetualCache进行封装,然后包装成一个淘汰策略对应的缓存实例,默认LruCache
封装成一个淘汰策略对应的缓存之后,会调用setStandardDecorators()方法,根据配置的缓存属性,继续进行包装
public Cache build() {
    setDefaultImplementations();
    Cache cache = newBaseCacheInstance(implementation, id);
    setCacheProperties(cache);
    // issue #352, do not apply decorators to custom caches 不将装饰器应用到自定义缓存
    if (PerpetualCache.class.equals(cache.getClass())) {
        for (Class<? extends Cache> decorator : decorators) {
            cache = newCacheDecoratorInstance(decorator, cache);
            setCacheProperties(cache);
        }
        cache = setStandardDecorators(cache);
    } else if (!LoggingCache.class.isAssignableFrom(cache.getClass())) {
        cache = new LoggingCache(cache);
    }
    return cache;
}

private void setDefaultImplementations() {
    if (implementation == null) {
        implementation = PerpetualCache.class;
        if (decorators.isEmpty()) {
            decorators.add(LruCache.class);
        }
    }
}
如果配置了清理时间,就再包装成一个ScheduledCache实例,如果开启了允许读写,就再包装成一个SerializedCache实例,最后通过LoggingCache和SynchronizedCache包装,就变成了SynchronizedCache实例,最后再根据是否同步,再包装成一个BlockingCache实例,就这样经过层层包装,责任分明的Cache实例
private Cache setStandardDecorators(Cache cache) {
    if (clearInterval != null) {
        cache = new ScheduledCache(cache);//ScheduledCache:调度缓存,负责定时清空缓存
        ((ScheduledCache) cache).setClearInterval(clearInterval);
    }
    if (readWrite) {
        cache = new SerializedCache(cache); //SerializedCache:缓存序列化和反序列化存储
    }
    cache = new LoggingCache(cache);
    cache = new SynchronizedCache(cache);
    if (blocking) {
        cache = new BlockingCache(cache);
    }
    return cache;
}


 546
546

 被折叠的 条评论
为什么被折叠?
被折叠的 条评论
为什么被折叠?
 到【灌水乐园】发言


