


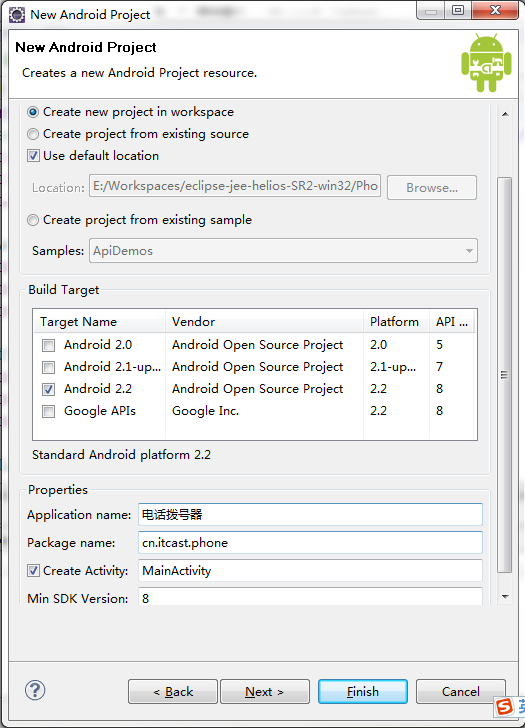
一、创建项目,设置好相应属性后,点击Finish完成创建,如下图所示:
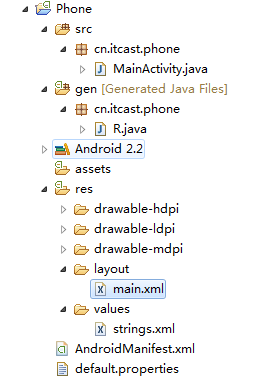
二、设置界面布局,界面如下:
通过修改项目res/layout/main.xml文件可以修改界面,一共需要三个控件,一个文本、一个文本输入框、一个按钮,按照垂直排列
界面中得文本不要直接写在main.xml文件里,最好是写在values下的xml文件里,可以自己新建一个xml文件,也可以写在strings.xml文件中,注意资源的name不能重复,这样做有两个好处:
1、便于国际化
2、节省内存,如果一段文本在很多地方都用到,则不用再每个地方都输入文本内容,只需要使用引用就可以了
string.xml数据文件
- <?xml version="1.0" encoding="utf-8"?>
- <resources>
- <string name="hello">Hello World, MainActivity!</string>
- <string name="app_name">电话拨号器</string>
- <string name="mobile">请输入手机号</string>
- <string name="button">拨打此号码</string>
- </resources>
main.xml布局文件
- <?xml version="1.0" encoding="utf-8"?>
- <LinearLayout xmlns:android="http://schemas.android.com/apk/res/android"
- android:orientation="vertical"
- android:layout_width="fill_parent"
- android:layout_height="fill_parent"
- >
- <TextView
- android:layout_width="fill_parent"
- android:layout_height="wrap_content"
- android:text="@string/mobile"
- />
- <EditText
- android:layout_width="fill_parent"
- android:layout_height="wrap_content"
- android:id="@+id/mobile"
- />
- <Button
- android:layout_width="fill_parent"
- android:layout_height="wrap_content"
- android:text="@string/button"
- android:id="@+id/button"
- />
- </LinearLayout>
- public static final class id {
- public static final int button=0x7f050001;
- public static final int mobile=0x7f050000;
- }
- <?xml version="1.0" encoding="utf-8"?>
- <manifest xmlns:android="http://schemas.android.com/apk/res/android"
- package="cn.itcast.phone"
- android:versionCode="1"
- android:versionName="1.0">
- <application android:icon="@drawable/icon" android:label="@string/app_name">
- <activity android:name=".MainActivity"
- android:label="@string/app_name">
- <intent-filter>
- <action android:name="android.intent.action.MAIN" />
- <category android:name="android.intent.category.LAUNCHER" />
- </intent-filter>
- </activity>
- </application>
- <uses-sdk android:minSdkVersion="8" />
- <span style="white-space:pre"> </span><uses-permission android:name="android.permission.CALL_PHONE"/>
- </manifest>
最后是写MainActivity文件
- package cn.itcast.phone;
- import android.app.Activity;
- import android.content.Intent;
- import android.net.Uri;
- import android.os.Bundle;
- import android.view.View;
- import android.widget.Button;
- import android.widget.EditText;
- public class MainActivity extends Activity {
- /** Called when the activity is first created. */
- @Override
- public void onCreate(Bundle savedInstanceState) {
- super.onCreate(savedInstanceState);
- setContentView(R.layout.main);
- //找到按钮控件
- Button button = (Button)this.findViewById(R.id.button);
- //为按钮添加点击事件
- button.setOnClickListener(new ButtonListener());
- }
- private final class ButtonListener implements View.OnClickListener {
- @Override
- public void onClick(View v) {
- //获取用户输入的电话号码
- EditText mobileText = (EditText)findViewById(R.id.mobile);
- String mobile = mobileText.getText().toString();
- //拨打电话
- //参考android-sdk-windows\platforms\android-8\sources\phone下AndroidManifest.xml
- //文件中<activity android:name="OutgoingCallBroadcaster"开头的那一段
- Intent intent = new Intent();
- intent.setAction("android.intent.action.CALL");
- intent.setData(Uri.parse("tel:"+mobile));
- startActivity(intent);
- }
- }
- }
MainActivity类还有两个可以改进的地方:
一是android.intent.action.CALL可以用一个常量Intent.ACTION_CALL代替
二是将内部类改为匿名内部类,更简洁
- package cn.itcast.phone;
- import android.app.Activity;
- import android.content.Intent;
- import android.net.Uri;
- import android.os.Bundle;
- import android.view.View;
- import android.widget.Button;
- import android.widget.EditText;
- public class MainActivity extends Activity {
- /** Called when the activity is first created. */
- @Override
- public void onCreate(Bundle savedInstanceState) {
- super.onCreate(savedInstanceState);
- setContentView(R.layout.main);
- //找到按钮控件
- Button button = (Button)this.findViewById(R.id.button);
- //为按钮添加点击事件
- button.setOnClickListener(new View.OnClickListener() {
- @Override
- public void onClick(View v) {
- //获取用户输入的电话号码
- EditText mobileText = (EditText)findViewById(R.id.mobile);
- String mobile = mobileText.getText().toString();
- //拨打电话
- //参考android-sdk-windows\platforms\android-8\sources\phone下AndroidManifest.xml
- //文件中<activity android:name="OutgoingCallBroadcaster"开头的那一段
- //android.intent.action.CALL可以用一个常量Intent.ACTION_CALL代替
- Intent intent = new Intent(Intent.ACTION_CALL, Uri.parse("tel:"+mobile));
- startActivity(intent);//内部会添加android.intent.category.DEFAULT
- }
- });
- }
- }
其中ButtonListener中拨打电话部分可以参考android-sdk-windows\platforms\android-8\sources\phone下AndroidManifest.xml中的这一段
- <activity android:name="OutgoingCallBroadcaster"
- android:permission="android.permission.CALL_PHONE"
- android:theme="@android:style/Theme.NoDisplay"
- android:configChanges="orientation|keyboardHidden">
- <!-- CALL action intent filters, for the various ways
- of initiating an outgoing call. -->
- <intent-filter>
- <action android:name="android.intent.action.CALL" />
- <category android:name="android.intent.category.DEFAULT" />
- <data android:scheme="tel" />
- </intent-filter>
- <intent-filter>
- <action android:name="android.intent.action.CALL" />
- <category android:name="android.intent.category.DEFAULT" />
- <data android:scheme="voicemail" />
- </intent-filter>
- <intent-filter>
- <action android:name="android.intent.action.CALL" />
- <category android:name="android.intent.category.DEFAULT" />
- <data android:mimeType="vnd.android.cursor.item/phone" />
- <data android:mimeType="vnd.android.cursor.item/phone_v2" />
- <data android:mimeType="vnd.android.cursor.item/person" />
- </intent-filter>
- </activity>
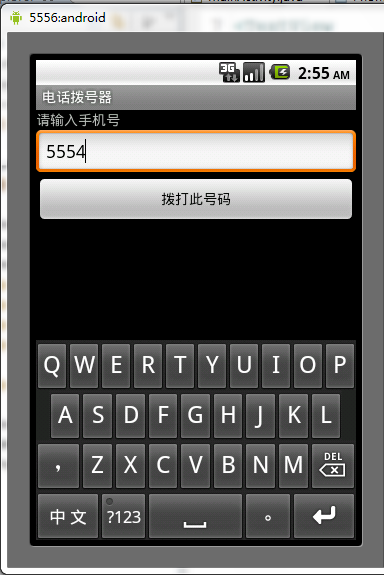
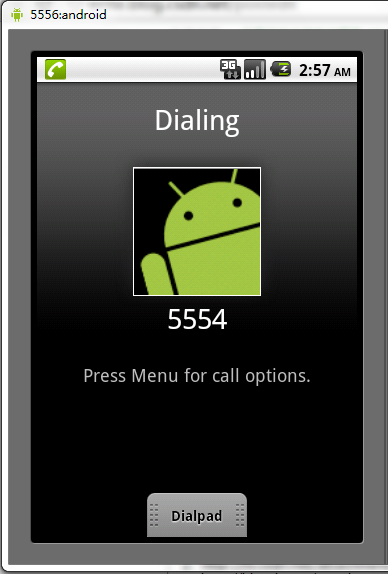
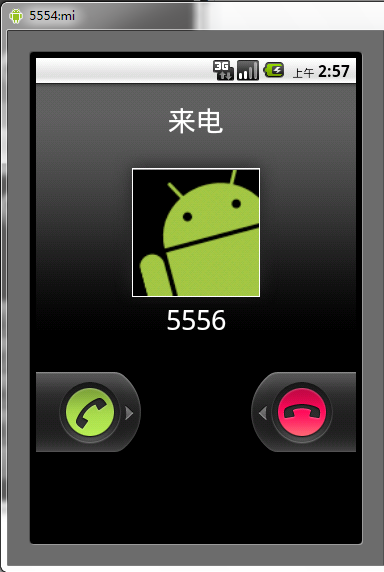
开启两个模拟器,将程序运行在其中一个模拟器上,在电话号码输入框中输入另外一个模拟器的端口号(在模拟器左上角),点击拨打此号码按钮
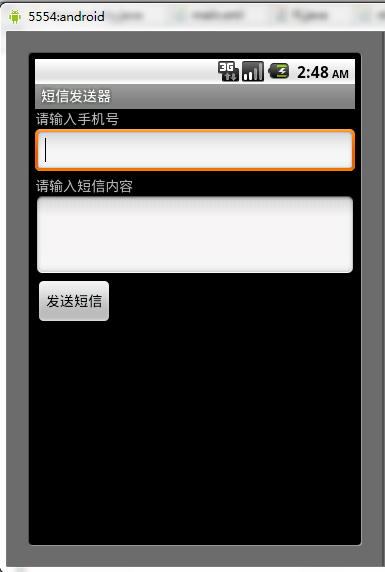
短信发送器
首先创建项目,创建过程同上,这里省略,创建完成后如下图所示:

界面:
然后是设计界面
layout/main.xml
- <?xml version="1.0" encoding="utf-8"?>
- <LinearLayout xmlns:android="http://schemas.android.com/apk/res/android"
- android:orientation="vertical"
- android:layout_width="fill_parent"
- android:layout_height="fill_parent"
- >
- <TextView
- android:layout_width="fill_parent"
- android:layout_height="wrap_content"
- android:text="@string/mobile"
- />
- <EditText
- android:layout_width="fill_parent"
- android:layout_height="wrap_content"
- android:id="@+id/mobile"
- />
- <TextView
- android:layout_width="fill_parent"
- android:layout_height="wrap_content"
- android:text="@string/content"
- />
- <EditText
- android:layout_width="fill_parent"
- android:layout_height="wrap_content"
- android:minLines="3"
- android:id="@+id/content"
- />
- <Button
- android:layout_width="wrap_content"
- android:layout_height="wrap_content"
- android:text="@string/button"
- android:id="@+id/button"
- />
- </LinearLayout>
数据文件
values/strings.xml
- <?xml version="1.0" encoding="utf-8"?>
- <resources>
- <string name="hello">Hello World, SMSActivity!</string>
- <string name="app_name">短信发送器</string>
- <string name="mobile">请输入手机号</string>
- <string name="content">请输入短信内容</string>
- <string name="button">发送短信</string>
- <string name="success">发送短信成功</string>
- </resources>
SMSActivity
- package cn.itcast.sms;
- import java.util.List;
- import android.app.Activity;
- import android.os.Bundle;
- import android.telephony.SmsManager;
- import android.view.View;
- import android.widget.Button;
- import android.widget.EditText;
- import android.widget.Toast;
- public class SMSActivity extends Activity {
- /** Called when the activity is first created. */
- @Override
- public void onCreate(Bundle savedInstanceState) {
- super.onCreate(savedInstanceState);
- setContentView(R.layout.main);
- Button button = (Button)this.findViewById(R.id.button);
- button.setOnClickListener(new View.OnClickListener() {
- @Override
- public void onClick(View v) {
- //获取手机号和内容
- EditText mobileText = (EditText)findViewById(R.id.mobile);
- EditText contentText = (EditText)findViewById(R.id.content);
- String mobile = mobileText.getText().toString();
- String content = contentText.getText().toString();
- //发送短信
- SmsManager smsManager = SmsManager.getDefault();
- List<String> texts = smsManager.divideMessage(content);//如果超过70个汉字,自动拆分短信
- for(String text : texts){
- smsManager.sendTextMessage(mobile, null, text, null, null);
- }
- //使用吐司通知
- Toast.makeText(SMSActivity.this, R.string.success, Toast.LENGTH_LONG).show();
- }
- });
- }
- }
为了是程序能够发送短信,还需要添加权限
在AndroidManifest.xml中添加<uses-permission android:name="android.permission.SEND_SMS"/>
- <?xml version="1.0" encoding="utf-8"?>
- <manifest xmlns:android="http://schemas.android.com/apk/res/android"
- package="cn.itcast.sms"
- android:versionCode="1"
- android:versionName="1.0">
- <application android:icon="@drawable/icon" android:label="@string/app_name">
- <activity android:name=".SMSActivity"
- android:label="@string/app_name">
- <intent-filter>
- <action android:name="android.intent.action.MAIN" />
- <category android:name="android.intent.category.LAUNCHER" />
- </intent-filter>
- </activity>
- </application>
- <uses-sdk android:minSdkVersion="8" />
- <uses-permission android:name="android.permission.SEND_SMS"/>
- </manifest>
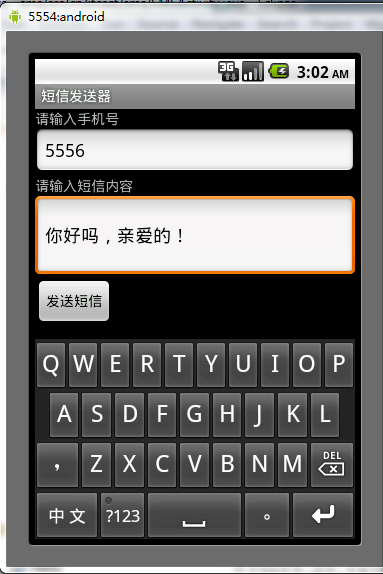
程序完成,启动两台模拟器,运行界面如下:
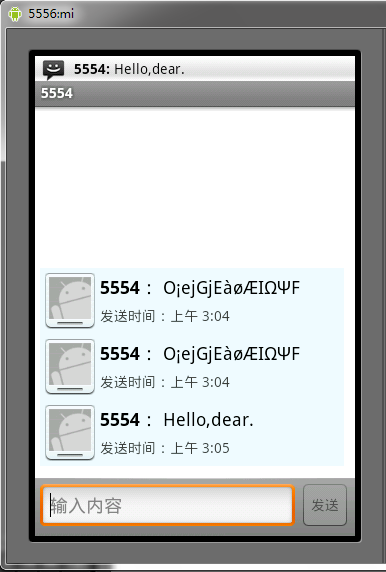
在模拟器上运行时,发送中文会出现乱码,在真实手机上面运行时不会出现这种情况,有兴趣的可以安装到自己手机上面试试~
短信发送器界面还可以采用另一种布局方式:RelativeLayout,效果如下:

修改main.xml
- <?xml version="1.0" encoding="utf-8"?>
- <RelativeLayout xmlns:android="http://schemas.android.com/apk/res/android"
- android:layout_width="fill_parent"
- android:layout_height="fill_parent"
- >
- <LinearLayout
- android:orientation="horizontal"
- android:layout_width="fill_parent"
- android:layout_height="wrap_content"
- android:id="@+id/lineLayout"
- >
- <TextView
- android:layout_width="100dip"
- android:layout_height="wrap_content"
- android:text="@string/mobile"
- android:textSize="16sp"
- />
- <EditText
- android:layout_width="fill_parent"
- android:layout_height="wrap_content"
- android:phoneNumber="true"
- android:id="@+id/mobile"
- />
- </LinearLayout>
- <TextView
- android:layout_width="fill_parent"
- android:layout_height="wrap_content"
- android:text="@string/content"
- android:layout_below="@id/lineLayout"
- android:id="@+id/contentLabel"
- android:textSize="16sp"
- />
- <EditText
- android:layout_width="fill_parent"
- android:layout_height="wrap_content"
- android:minLines="3"
- android:layout_below="@id/contentLabel"
- android:id="@+id/content"
- />
- <Button
- android:layout_width="wrap_content"
- android:layout_height="wrap_content"
- android:text="@string/button"
- android:layout_below="@id/content"
- android:layout_alignParentRight="true"
- android:id="@+id/button"
- />
- </RelativeLayout>


 1355
1355

 被折叠的 条评论
为什么被折叠?
被折叠的 条评论
为什么被折叠?
 到【灌水乐园】发言


